
AORUS 16X - Laptop GIGABYTE - Free user manual and instructions
Find the device manual for free AORUS 16X GIGABYTE in PDF.

| Product type | Gaming laptop |
| Brand | Gigabyte |
| Model | AORUS 16X |
| Screen | 16 inches |
| Processor | 13th Gen Intel Core or AMD Ryzen 7000 series (depending on configuration) |
| RAM Memory | Up to 32 GB DDR5 |
| Storage | NVMe SSD up to 1 TB |
| Graphics card | NVIDIA GeForce RTX 40 series |
| Wireless connectivity | WiFi 6E, Bluetooth 5.2 |
| Ports | 1x HDMI 2.1, 1x Thunderbolt 4, 2x USB 3.2 Type-A, 1x USB 3.2 Type-C, MicroSD UHS-II card reader, combo audio jack, RJ-45 Ethernet port |
| Power supply | 20V 12A (240W) AC adapter |
| Battery | Built-in lithium-ion (do not remove) |
| Weight | Approximately 2.2 kg |
| Dimensions (W x D x H) | Approximately 356 x 242 x 20 mm |
| Operating system | Windows 11 pre-installed |
| Keyboard | Backlit with multimedia function keys |
| Audio | Stereo speakers, built-in microphone |
| Webcam | HD webcam with microphone |
| Touchpad | Yes |
| Maintenance and cleaning | Do not block the vents; avoid direct sunlight and temperatures above 45°C |
| Security | Screen lock (Fn+F6), Windows password |
| Repairability | Battery not user-replaceable; contact GIGABYTE repair center |
Frequently Asked Questions - AORUS 16X GIGABYTE
User questions about AORUS 16X GIGABYTE
0 question about this device. Answer the ones you know or ask your own.
Ask a new question about this device
Download the instructions for your Laptop in PDF format for free! Find your manual AORUS 16X - GIGABYTE and take your electronic device back in hand. On this page are published all the documents necessary for the use of your device. AORUS 16X by GIGABYTE.
USER MANUAL AORUS 16X GIGABYTE
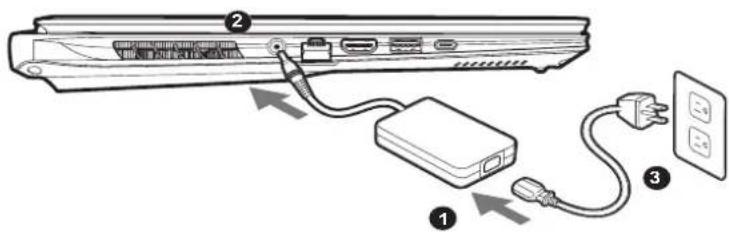
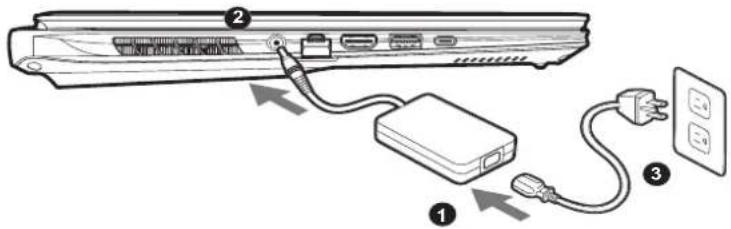
1 Connect the power cord to the AC adapter.
2 Connect the AC adapter to the DC-in jack of the notebook.
3 Connect the power cord to the power outlet.
1-2. Switching on the Power
After you turn on the notebook for the very first time, do not turn it off until the operating system has been configured. Please note that the volume for the audio will not function until Windows® Setup has completed.
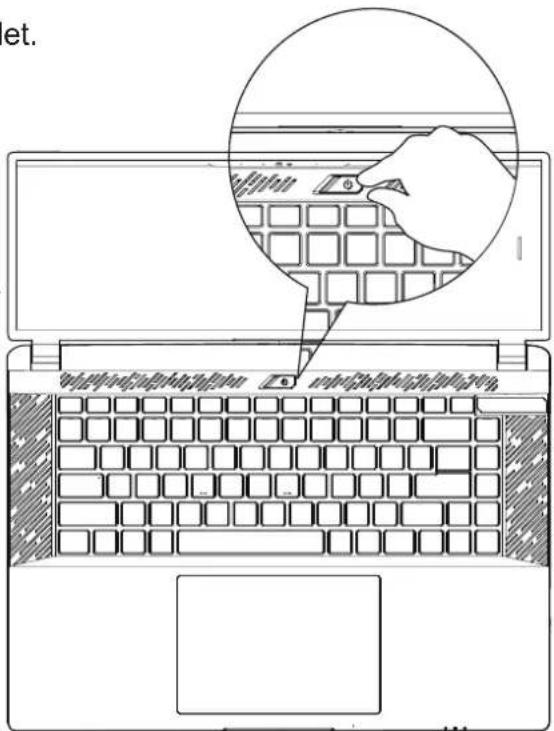

IMPORTANT:
- Ensure that your Notebook PC is connected to a grounded power adapter before turning it on for the first time.
- When using your Notebook PC on power adapter mode, the socket outlet must be near to the unit and easily accessible.
- Locate the input/output mark on your Notebook PC and ensure that it matches the input/output rating information on your power adapter. Some Notebook PC models may have multiple rating output currents based on the available SKU.
• Power adapter information: - Input voltage: 100-240Vac
- Input frequency: 50-60Hz
- Rating output voltage 20V, 12A
1-3. Full User Manual
For more user guide and software instruction, please refer to the below link: https://www.gigabyte.com/Support
* Product specifications and product appearance may differ from country to country.
We recommend that you check with your local dealers for the specifications and appearance of the products available in your country.
* Although we endeavor to present the most accurate and comprehensive information at the time of publication, we reserve the right to make changes without prior notice.
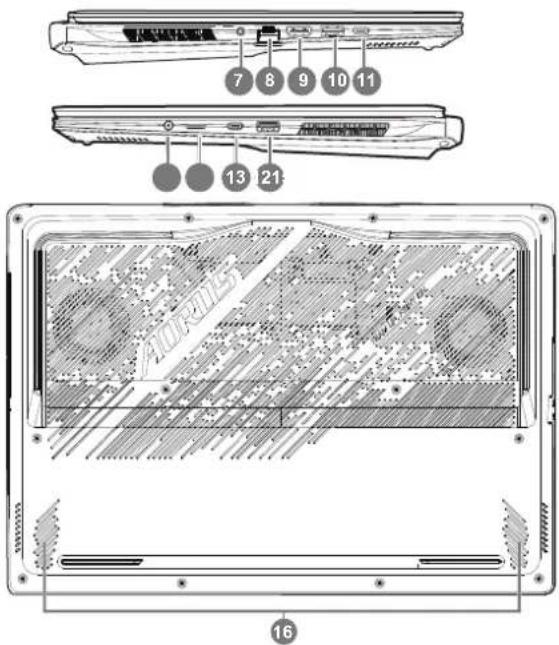
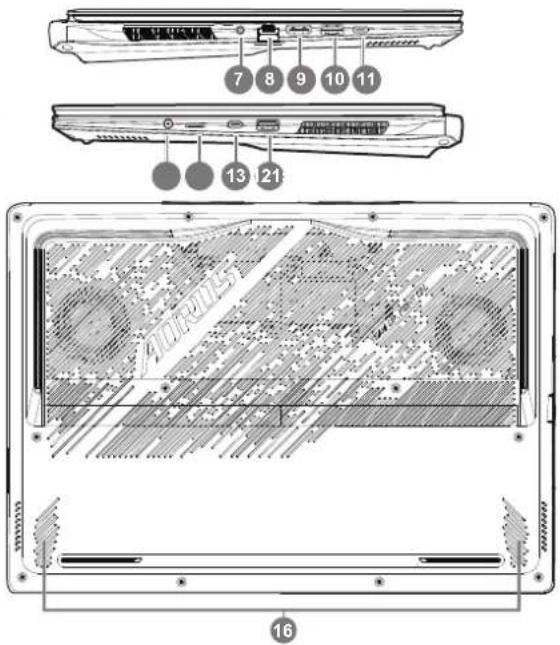
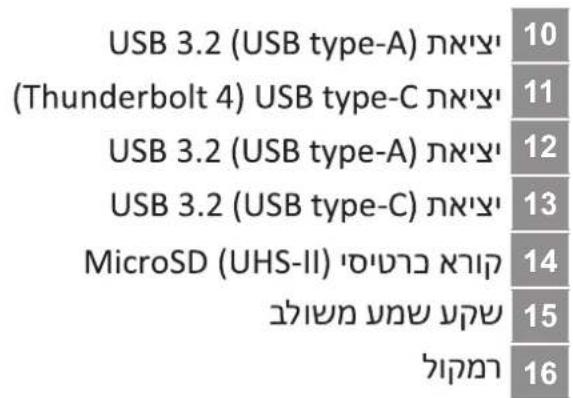
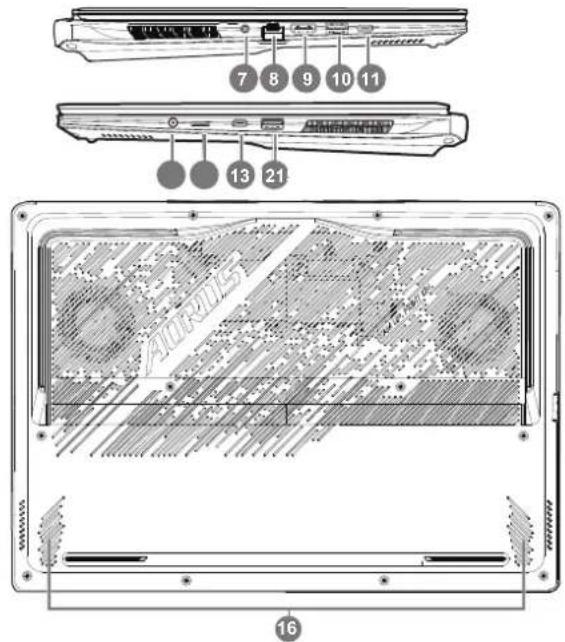
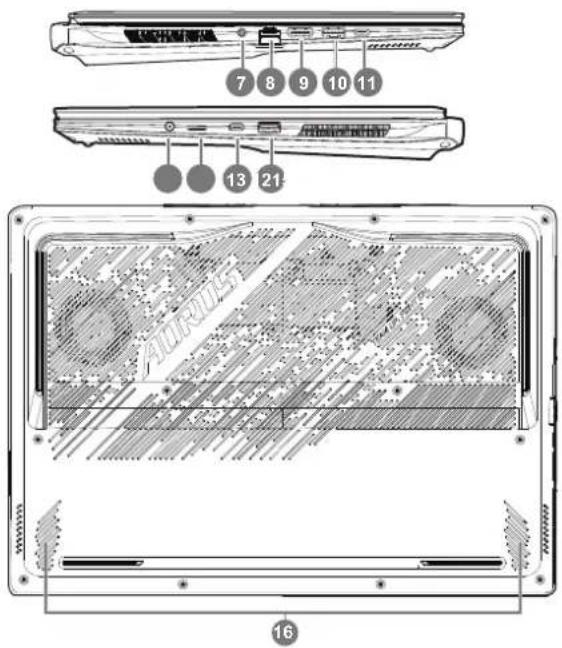
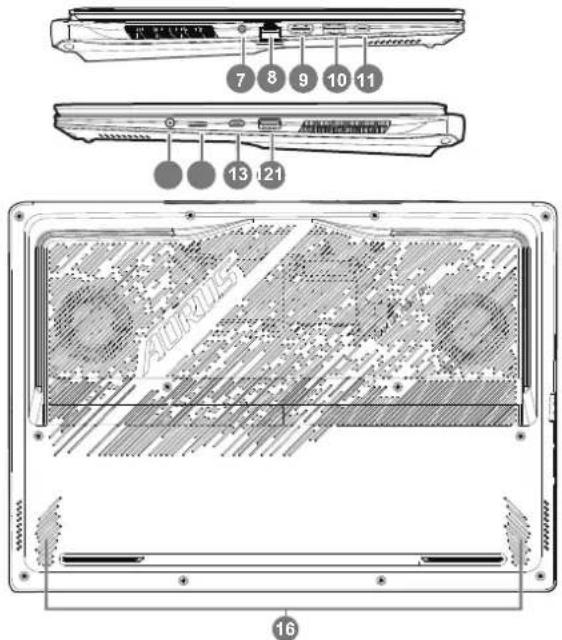
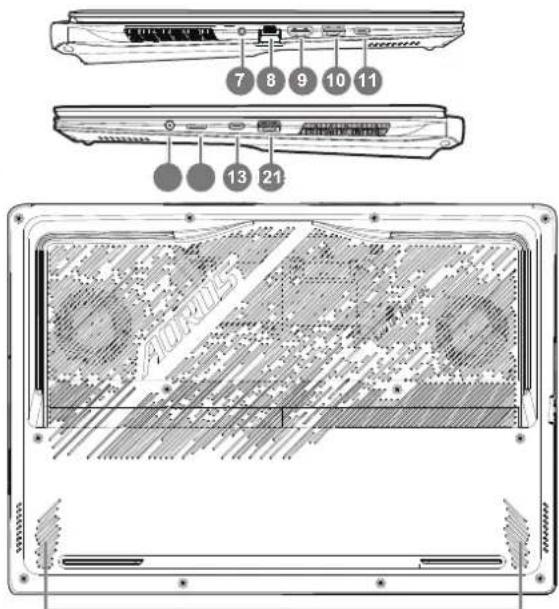
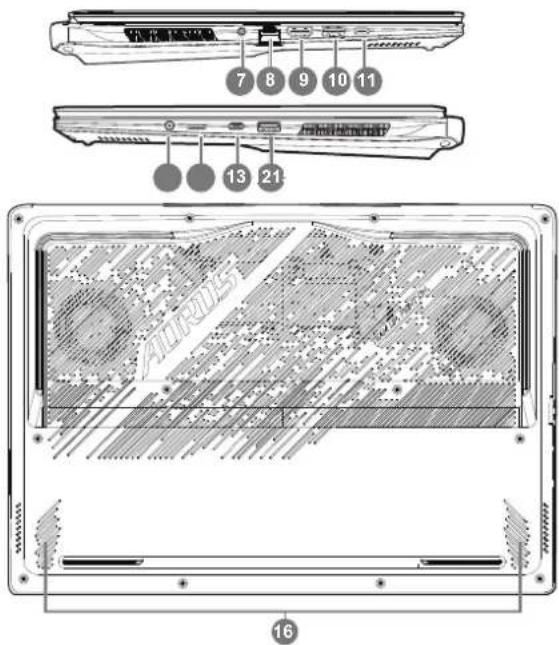
2. AORUS Notebook Tour
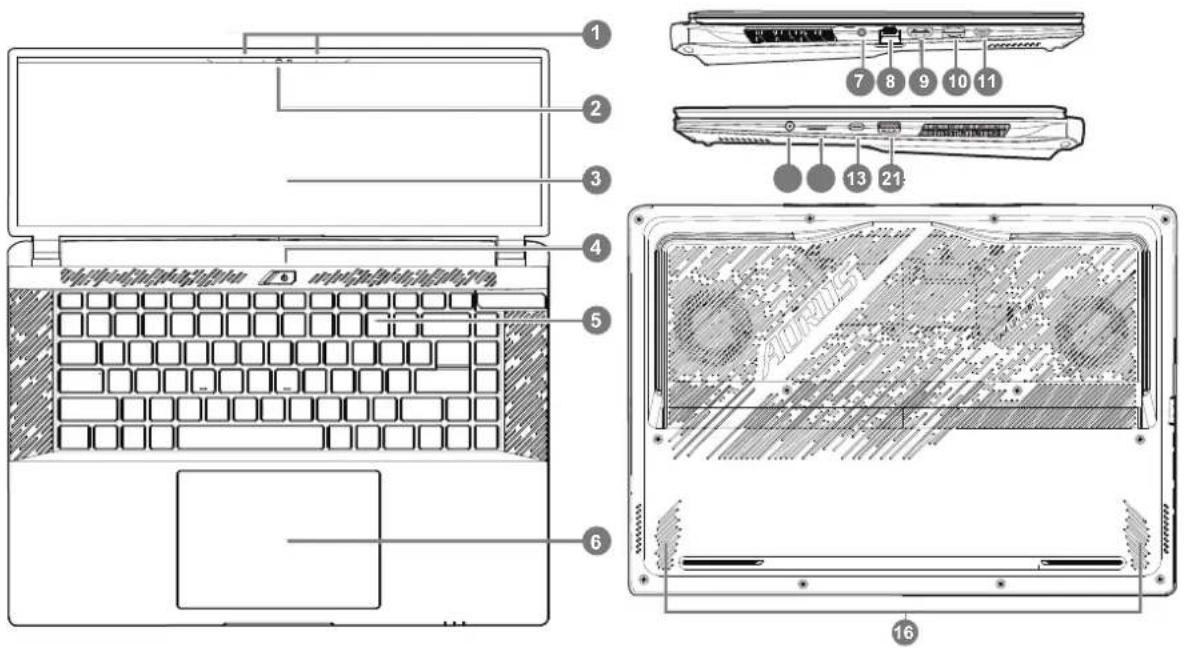
1 Microphone
2 Webcam
3 Display Panel
4 Power Button
5 Keyboard
6 Touchpad
7 Power Input Port (DC)
8 Ethernet Port (LAN)
9 HDMI 2.1 Port HDMI™
10 USB 3.2 Port (USB type-A)
11 Thunderbolt 4 Port (USB type-C)
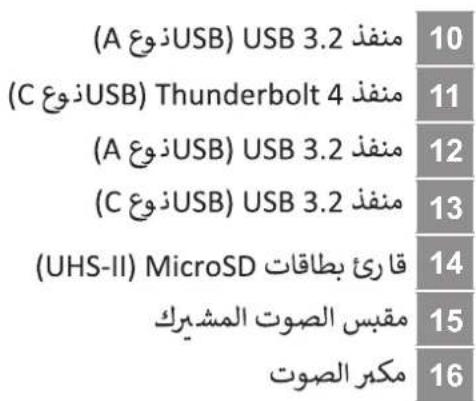
12 USB 3.2 Port (USB type-A)
13 USB 3.2 Port (USB type C)
14 MicroSD Card Reader (UHS-II)
15 Audio Combo Jack
16 Speaker

The Adopted Trademarks HDMI, HDMI High-Definition Multimedia Interface, HDMI trade dress and the HDMI Logos are trademarks or registered trademarks of HDMI Licensing Administrator, Inc. in the United States and other countries.

IMPORTANT:
- Do not remove the built-in lithium battery.
For any service needs, please contact your local GIGABYTE Authorized Service Center. - Do not install the Notebook PC on a slant or a place prone to vibrations, or avoid using the Notebook PC in that location for a long time. This increases the risk that a malfunction or damage to the product will occur.
- Do not store Notebook PC in direct sunlight or the location where temperatures exceed 112°F (45°C) such as inside a vehicle. There is a danger of Lithium-ion battery expansion and aging.
- Do not use the Notebook PC in a badly ventilated location such as on bedding, on a pillow or cushion, etc, and do not use it in a location such as room with floor heating as it may cause the computer to overheat. Take care that the Notebook PC vents (on the side or the bottom) are not blocked especially in these environments. If the vents are blocked, it may be dangerous and cause the Notebook PC to overheat.
Hotkeys
The computer employs hotkeys or key combinations to access most of the computer's controls like screen brightness and volume output. To activate hotkeys, press and hold the
| Hotkey | noitpircseDnoit | ||
| Fn+ESC |  | Maximize Fan Speed | To increase the fan speed to 100%. |
| Fn+F1 |  | Sleep | Put the computer in Sleep mode. |
| Fn+F2 |  | Wireless LAN | Enables / disable the Wireless LAN function. |
| Fn+F3 |  | Brightness Down | Decrease the screen brightness. |
| Fn+F4 |  | Brightness Up | Increase the screen brightness. |
| Fn+F5 |  | Display Toggle | Switch display output between the display screen, external monitor (if connected) and both. |
| Fn+F6 |  | Screen Display Lock | Lock your PC or switch accounts. |
| Fn+F7 |  | Speaker Toggle | Turn the speaker on and off. |
| Fn+F8 |  | Volume Down | Decrease the sound volume. |
| Fn+F9 |  | Volume Up | Increase the sound volume. |
| Fn+F10 |  | Touchpad Toggle Turn the internal touchpad on and off. | |
| Fn+F11 |  | Airplane Mode | Enable/disable the Airplane Mode function. |
| Fn+F12 |  | AI Mode AI Mode Switch. | |
| Fn+Space | [WASY] | Keyboard Backlight Toggle | Turn the keyboard backlight on and off. |
Recovery Guide
System recovery (Restore your laptop operating system)
When something is going wrong with the laptop operating system, the storage of the laptop has a hidden partition containing a full back up image of the operating system that can be used to restore the system to factory default settings.

Note
- If the storage has been switched or the partition deleted, the recovery option will no longer be available and a recovery service will be needed.
- The recovery function is only available on devices with O/S preinstalled. Devices with EFI SHELL do not have the recovery function.
Launch system recovery
The system recovery feature is preinstalled before the laptop is shipped from the factory. The option menu allows you to launch the Windows recovery tool to reinstall the operating system to factory default.
The brief introduction below will show you how to start the recovery tool and restore your system.

All ready to go
Make sure your PC is plugged in. This will take a few minutes.
Recovery Guide
1 Turn off and restart the laptop.
2
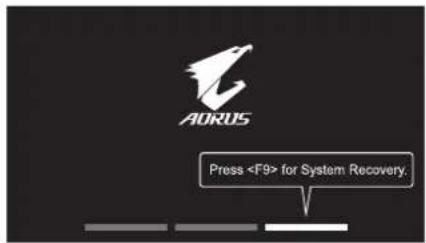
During the laptop turn on process, press and hold F9 key to launch the tool.
3

Choose "Troubleshoot" to enter the recovery settings.
( Also you can choose "Continue" to exit recovery system and continue to System for files or data backup. )

There are two options for system recovery
- Reset this PC -
- Smart Recovery -
Your PC settings will be restored to factory default settings.
Caution: All personal data and files will be lost.
You can choose to keep or remove your files and then reinstalls Windows without losing your files.
4

Smart Recovery
The recovery will be activated and you will see the option buttons on the window. Click on "Yes" to start it.

Caution
- Once the "Recovery" is selected, your personal data and files will be deleted after the laptop starts restoring, and the operating system will be reset to factory default settings
- A progress indicator bar will show on the window when the recovery process is running. Please make sure the AC-adapter is plugged in and do not turn off the laptop.
After the system recovery is completed, you will see the option button on the window, please click on "Shutdown".
5

Advanced options

System Restore
Use a restore point recorded on your PC to restore Windows.

System Image Recovery
Recover Windows using a specific system image file.

Startup Repair
Fix problems that keep Windows from loading.

Command Prompt
Use the Command Prompt for advanced trobleshooting.

UEFI Firmware Settings
Change settings in your PC's UEFI firmware.

Startup Settings
Change Windows Startup behavior.
Appendix
■ Warranty & Service:
Warranty and service and related information please refer to the warranty card or GIGABYTE service website as the below link: https://www.gigabyte.com/Support/Laptop
■ FAQ:
FAQ (Frequent Asked Questions) please refer to the below link:
https://www.gigabyte.com/Support/Faq
For the model which adopts Flicker-Free technology which clears the eye visible monitor flicker and prevents users from suffering eye strain and fatigue.
The following are some tips for comfortable viewing of your monitor:
- Optimal viewing distances for laptop range from approximately 510 mm to 760 mm (20" to 30").
- A general guideline is to position the monitor such that the top of the screen is at or slightly below your eye-height when you are comfortably seated.
- Use adequate lighting for the type of work you are performing.
• Take regular and frequent breaks (at least for 10 minutes) every half-hour.
- Be sure to periodically look away from your monitor screen and focus on a far object for at least 20 seconds during the breaks.
- Eye exercise can help reduce eye strain. Repeat these exercises frequently:
(1) look up and down (2) slowly roll your eye (3) move your eyes diagonally.
For the model which has passed Flicker Free/Flicker Reduce and Low Blue Light verification by TÜV Rheinland.
To learn more:
https://www.gigabyte.com/tw/Support/FAQ/4309
Dolby, Dolby Vision, Dolby Atmos, and the double-D symbol are registered trademarks of Dolby Laboratories Licensing Corporation. Manufactured under license from Dolby Laboratories. Confidential unpublished works. Copyright © 2012–2021 Dolby Laboratories. All rights reserved.
natural_image
Line drawing of a laptop keyboard with a hand inserting a component (no text or symbols)1-2. تشغيل الطاقة
https://www.gigabyte.com/Support
2
https://www.gigabyte.com/Support/Laptop
الأستلة الشائعة:
https://www.gigabyte.com/Support/Faq

ВАЖНО:

https://www.gigabyte.com/Support/Laptop
https://www.gigabyte.com/Support/Faq
natural_image
Line drawing of a laptop keyboard with a hand inserting a key (no text or symbols present)
DŮLEŽITÉ:

https://www.gigabyte.com/Support/Laptop
■ FAQ:
https://www.gigabyte.com/Support/Faq
natural_image
Line drawing of a laptop keyboard with a hand interacting with the screen (no text or symbols)
WICHTIG:


https://www.gigabyte.com/Support/Laptop
https://www.gigabyte.com/Support/Faq
natural_image
Line drawing of a laptop keyboard with a hand inserting a component (no text or symbols)
TÄHTIS:
https://www.gigabyte.com/Support
1 Mikrofon
2 Veebikaamera
3 Kuvaripaneel
4 Toitenupp
5 Klaviatuur
6 Puuteplaat
7 Toite sisendpesa (DC)
8 Etherneti Port (LAN)
9 HDMI 2.1 Port HDMI™
10 USB 3.2 Port (USB type-A)
11 Thunderbolt 4 Port (USB type-C)
12 USB 3.2 Port (USB type-A)
13 USB 3.2 Port (USB type-C)
14 MicroSD-kaardi luger (UHS-II)
15 Audio ühendpesa
16 Kölar

TÄHTIS:
https://www.gigabyte.com/Support/Laptop
■ KKK:
https://www.gigabyte.com/Support/Faq
natural_image
Line drawing of a laptop keyboard with a hand inserting a key into the screen (no text or symbols)
IMPORTANT:
■ Foire Aux Questions:
https://www.gigabyte.com/Support/Faq
natural_image
Line drawing of a laptop keyboard with a hand inserting a key (no text or symbols present)https://www.gigabyte.com/Support

:בְרַע

2
https://www.gigabyte.com/Support/Laptop
תְאָהִיָה בְּרַעֶן
https://www.gigabyte.com/Support/Faq
https://www.gigabyte.com/Support

https://www.gigabyte.com/jp/Support
https://www.gigabyte.com/jp/Support/Laptop
■よくある質問
https://www.gigabyte.com/kr/Support

https://www.gigabyte.com/Support

natural_image
Line drawing of a laptop keyboard with a hand inserting a key into the screen (no text or symbols present)
SVARİGI:
https://www.gigabyte.com/Support/Laptop
BUJ:

BELANGRIJKE INFORMATIE:
https://www.gigabyte.com/Support
https://www.gigabyte.com/Support/Laptop
https://www.gigabyte.com/Support/Faq
16
https://www.gigabyte.com/Support/Laptop
16
1 Microfon
2 Cameră web
3 Panou de afişare
4 Buton de pornire
5 Tastatură
6 Touchpad
7 Port intrare alimentare (c.c.)
8 Port Ethernet (LAN)
9 Port HDMI 2.1 HDMI™
10 Port USB 3.2 (USB tip A)
11 Port Thunderbolt 4 (USB tip-C)
12 Port USB 3.2 (USB tip A)
13 Port USB 3.2 (USB tip C)
14 Cititor de card MicroSD (UHS-II)
15 Mufă combinată audio
16 Difuzor

IMPORTANT:
https://www.gigabyte.com/Support/Laptop
■ ÎNTREBĂRI FRECVENTE:
https://www.gigabyte.com/Support/Faq
natural_image
Line drawing of a laptop keyboard with a hand inserting a key (no text or symbols present)
ВНИМАНИЕ:
https://www.gigabyte.com/Support
1 Povežite kabl za napajanje sa adapterom naizmenične struje.
2 Povežite adapter naizmenične struje za ulazni priključak jednosmerne struje (DC-in) na laptopu.
3 Povežite kabl za napajanje sa strujnom utičnicom.
1 Mikrofon
2 Veb-kamera
3 Ekran
4 Dugme za napajanje
5 Tastatura
6 Tačped
7 Ulazni priključak za napajanje jednosmernom strujom (DC)
8 Mrežni port (LAN)
9 HDMI 2.1 Port HDMI™
10 USB 3.2 port (USB tip A)
11 Thunderbolt 4 port (USB tip C)
12 USB 3.2 port (USB tip A)
13 USB 3.2 port (USB tip C)
14 Čitač MicroSD kartica (UHS-II)
15 Kombinovani audio priključak
16 Zvučnik

VAŽNO:
- Ne uklanjajte ugrađenu litijumsku bateriju. Za sve potrebe servisiranja obratite se svom lokalnom GIGABYTE ovlašćenom servisnom centru.
- Ne postavljajte notebook računar na nagnutu površinu ili na mesto gde dolazi do vibracija ili izbegavajte da koristite notebook računar na takvim mestima tokom dužeg vremenskog perioda. To povećava rizik od kvara ili nastanka oštećenja na proizvodu.
- Ne skladištite i ne koristite laptop računar na direktnom sunčevom svetlu ili lokacijama sa temperaturom većom od 45°C (112°F), na primer, unutar vozila. Postoji rizik od širenja litijum-jonske baterije i smanjenja njenog radnog veka.
- Ne koristite notebook računar na slabo provetrenim mestima, npr. na posteljini ili na jastuku itd. i ne koristite ga na mestima kao što je soba sa podnim grejanjem, jer to može dovesti do pregrevanja računara. Pazite da otvori za ventilaciju na notebook računaru (sa strane ili s donje strane) ne budu blokirani, posebno u takvim okruženjima. Ako su otvori blokirani, to može da bude opasno i dovede do pregrevanja notebook računara.
Prečice
Računar koristi prečice ili kombinacije tastera za pristup većini kontrola računara, kao što su osvetljenost ekrana i jačina zvuka. Da biste aktivirali prečice, pritisnite i držite taster
| Prečica | Funkcija | Opis | |
| Fn+ESC |  | Maksimalna brzina ventilatora | Za povećanje brzine ventilatora na 100%. |
| Fn+F1 | [TGB4] | Spavanje | Prebacivanje računara u režim spavanja. |
| Fn+F2 | [HBXA] | Bežična mreža | Omogućava/onemogućava funkciju bežične LAN mreže. |
| Fn+F3 |  | Smanjenje osvetljenosti | Smanjuje se osvetljenost ekrana. |
| Fn+F4 | [SHWD] | Povećanje osvetljenosti | Povećava se osvetljenost ekrana. |
| Fn+F5 | [0356] | Prebacivanje ekrana | Prebacivanje izlaza ekrana između ekrana i spoljnjeg monitora (ako je povezan) ili oboje. |
| Fn+F6 |  | Zaključavanje ekrana | Zaključajte svoj računar ili promenite nalog. |
| Fn+F7 |  | Prebacivanje zvučnika | Uključivanje i isključivanje zvučnika. |
| Fn+F8 | [DSW2] | Smanjenje jačine zvuka | Smanjuje se jačina zvuka. |
| Fn+F9 |  | Povećanje jačine zvuka | Povećava se jačina zvuka. |
| Fn+F10 |  | Uključivanje/isključivanje tačpeda | Uključivanje i isključivanje tačpeda. |
| Fn+F11 |  | Režim rada u avionu | Omogućavanje/onemogućavanje funkcije režima rada u avionu. |
| Fn+F12 |  | АИ Моде | Прекидач АИ режима. |
| Fn+Space |  | Uključivanje/isključivanje pozadinskog osvetljenja tastature | Uključivanje i isključivanje pozadinskog osvetljenja tastature. |
Vodič za oporavak
Oporavak sistema (oporavak operativnog sistema vašeg laptopa)
U slučaju problema sa operativnim sistemom laptopa, skladište laptopa ima skrivenu particiju koja sadrži potpunu rezervnu sliku operativnog sistema koja se može iskoristiti za vraćanje sistema na fabrički podrazumevane postavke.

Napomena
Tokom procesa uključivanja laptopa, pritisnite i držite taster F9 da biste pokrenuli alatku.
3

Izaberite "Rešavanje problema" da biste ušli u postavke oporavka.
https://www.gigabyte.com/Support/Laptop
■ FAQ :
FAQ (Najčešća pitanja) – pogledajte vezu ispod:
https://www.gigabyte.com/Support/Faq
natural_image
Line drawing of a laptop keyboard with a hand interacting with the screen (no text or symbols)
重要:

ÖNEMLİ:
https://www.gigabyte.com/Support/Laptop
■ SSS:
https://www.gigabyte.com/Support/Laptop
■ ЧаПи:
https://www.gigabyte.com/Support/Faq