
Montreal - Chair Vermeiren - Free user manual and instructions
Find the device manual for free Montreal Vermeiren in PDF.

| Product type | Riser recliner chair |
| Brand | Vermeiren |
| Model | Montreal |
| Use | Indoor, for elderly or people with reduced mobility |
| Maximum occupant weight | 150 kg |
| Dimensions (seated position) | Length 830 mm, width 850 mm, height 1140 mm |
| Dimensions (reclined position) | Length 1520 mm, height 1060 mm |
| Total weight | 53.98 kg |
| Weight of removable parts | Backrest: 6.98 kg |
| Power supply | 220/230 V, AC/DC adapter (input 100-240 V, output 29 V DC) |
| Main functions | Lifting (raising), reclining (lying down), gradual adjustments |
| Noise level | < 53 dB |
| Operating temperature | +5 °C to +41 °C |
| Storage and operating humidity | 30% to 70% |
| Maintenance and cleaning | Clean with a damp cloth and mild detergent; do not use steam cleaner |
| Expected lifespan | 5 years (depending on frequency of use and maintenance) |
| Disposal | In accordance with local environmental legislation; disassembly recommended |
| Warranty | Based on normal use and maintenance; damage due to improper use not covered |
| Included accessories | Control device, headrest protection, 4 wheels (or 2 wheels + 2 leveling feet), manual |
| Repairability | Repairs and replacements by trained personnel with original Vermeiren parts |
Frequently Asked Questions - Montreal Vermeiren
User questions about Montreal Vermeiren
0 question about this device. Answer the ones you know or ask your own.
Ask a new question about this device
Download the instructions for your Chair in PDF format for free! Find your manual Montreal - Vermeiren and take your electronic device back in hand. On this page are published all the documents necessary for the use of your device. Montreal by Vermeiren.
USER MANUAL Montreal Vermeiren
Instructions for specialist dealer
This instruction manual is part and parcel of the product and must accompany every product sold.
Version: H, 2020-06
FR
All rights reserved, including translation.
No part of this manual may be reproduced in any form what so ever (print, photocopy, microfilm or any other process) without written permission of the publisher, or processed, duplicated or distributed by using electronic systems.
This page is intentionally left blank
Content
Content....1
1 Preface....2
2 Your product....3
2.1 Accessories....3
3 Before use ....4
3.1 Intended use 4
3.2 General safety instructions....4
3.3 Symbols on the lift chair 4
3.4 Transport and storage....5
4 Using the lift chair....6
4.1 Transfer into and out of the chair 6
4.2 Comfort adjustments....6
5 Installation and adjustments....8
5.1 Tools....8
5.2 Manner of delivery....8
5.3 Assembling the lift chair 8
6 Maintenance....9
6.1 Instructions for maintenance 9
6.2 Reuse....9
6.3 Expected lifespan....9
6.4 End of use 9
7 Technical specifications....10
1 Preface
Congratulations! You are now owner of a Vermeiren lift chair!
This lift chair is made by qualified and committed personnel. It is designed and produced according to high quality standards guarded by Vermeiren.
Thanks for your trust in the products of Vermeiren. To support you on the use of this lift chair and its operating options, this manual is offered. Please read it carefully; it will help you to get familiar with the operation, capabilities and limitations of your chair.
If you still have questions after reading this manual, do not hesitate to contact your specialist dealer. He/she will be glad to help you on this subject.
Important note
To ensure your safety, and to prolong the lifetime of your product, please take good care of it and have it checked and serviced on a regular basis.
This manual reflects the latest product developments. Vermeiren has the right to implement changes to this type of product without being imposed to any obligation to adapt or replace similar products previously delivered.
Pictures are used to clarify the instructions in this manual. Details of the depicted product may deviate from your product.
Information available
On our website http://www.vermeiren.com/ you will always find the most recent version of following information. Please consult this website regularly for possible updates.
Visually impaired people can download the electronic version of this manual and have it read out by means of a text-to-speech software application.

This user manual For user and specialist dealer

Service manual for lift chairs For user and specialist dealer

EC declaration of conformity
2 Your product
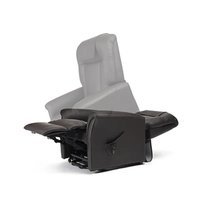
The Montreal lift chairs provide first class seating comfort and make it easier for the user to stand up again.
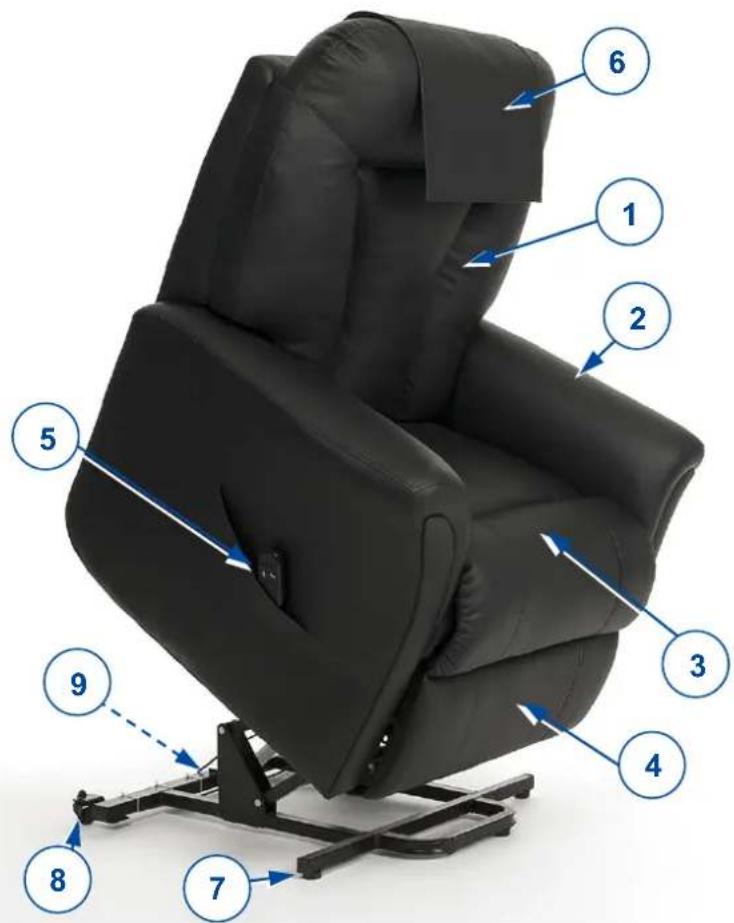
- Backrest
- Armrests
- Seat
- Leg rest
- Controller
- Headrest cover
- Leg leveler
- Wheel
- Identification plate
2.1 Accessories
- 2 big leg levelers for the rear side of the lower frame
3 Before use
3.1 Intended use
In this paragraph a brief description of the intended use of your lift chair is given. Additionally, relevant warnings are added to the instructions in the other paragraphs. In this way we would like to make you aware of the possible misuse that may appear.
• This lift chair is suitable for indoor use.
- This lift chair is designed and produced solely to seat one (1) person with a maximum weight of 150 kg. It is not designed for any use other than previously described.
- This lift chair is meant to be operated by the user. The chair is suitable for use by elderly people and persons with weakened leg function.
• Only use accessories and spare parts approved by Vermeiren.
- Please read all technical details and limits of your lift chair in chapter 7.
- The warranty on this product is based on normal use and maintenance as described in this manual. Damage to your product caused by improper use or lack of maintenance will cause the warranty to lapse.
3.2 General safety instructions
CAUTION
Risk of injuries and/or damage
Please read and follow the instructions in this manual. Otherwise you may get injured or your lift chair may get damaged.
Keep the following general warnings in mind during use:
• Make sure that the lift chair is placed on even ground.
- Surfaces can assume the environment temperatures.
- Make sure that cables do not become entrapped.
- Do not allow children to use or play with the chair as the folding leg rest may cause injuries.
- Do not sit on the backrest, armrest or leg rest. Do not lean heavily on the leg rest when getting into/out of the chair.
- When inclining the backrest and/or leg rest, make sure that there is enough space between the chair and the wall or other object.
- Do not move the lift chair
- when the lift chair is in lying down position.
- when the lift chair is connected to the power outlet or when it is in service.
- Your lift chair has been tested for electromagnetic compatibility and complies with the standard. Nevertheless, sources of electromagnetic fields may be influenced by your chair.
Should any unintended movement occur, unplug the power cord from the mains.
3.3 Symbols on the lift chair
The symbols in following list are applicable to your lift chair. Symbols can be found in the relevant ISO standard (ISO 7000, ISO 7001 and IEC 417).


Maximum weight of the user in kg
Indoor use only

Type designation
Risk of entrapment
3.4 Transport and storage
3.4.1 Transport
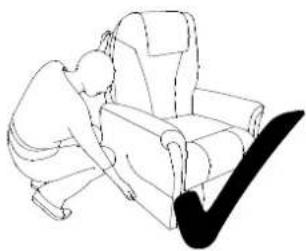
Do not pull the backrest or armrest cushions to move your lift chair, even for a small distance, as this may cause the upholstery or stitching to tear.

natural_image
Line drawing of a person sitting in an armchair with a checkmark overlay (no text or symbols)Grasp the lower frame of the lift chair (side and bottom of the chair) to move it. If the chair has to be lifted off the ground, for example to transport it in a vehicle, lift the chair with at least 2 people.
To make transportation in a vehicle easier, the backrest can be dismounted (see §5.3.2). Store the separate parts in a separate luggage compartment or behind the passenger seat.
The lift chair should only be moved when it is in the upright sitting position. When the chair is in the lift position, the wheels will be blocked and the chair can not be moved.
3.4.2 Storage
CAUTION
Risk of damage
Make sure that your lift chair is stored dry to prevent mould from growing and the upholstery from being damaged, see also technical details in §7.
4 Using the lift chair

Risk of injuries
- First read previous chapters and inform yourself about the intended use. Do NOT use your chair unless you have read and fully understood all instructions.
- In case of doubts or questions, do not hesitate to contact your local specialist dealer, your care provider or technical adviser to help you.

Risk of injuries and/or damage
- Make sure that your fingers, clothes, belts, buckles or jewellery won't get caught by moving parts, during assembly, use or adjustment.
4.1 Transfer into and out of the chair

Risk of injuries or damage
- In case you cannot perform the transfer in a safe manner, ask someone to assist you.
- Do not sit on the leg rest during the transfer.
- Do not pull on the armrests to lift yourself out the chair; use the stand-up function.
To get into the chair:
- Place the chair in its most upright sitting position and fully lower the leg rest (see §4.2).
- Transfer to the chair.
- Sit down on the seat with the lower back against the backrest.
- Adjust the chair to a comfortable sitting position.
To get out of the chair:
- Place the chair in its most upright sitting position and fully lower the leg rest (see §4.2).
- Use the stand-up function (see §4.2). The chair is now lifted slightly forward to help you stand up with ease.
4.2 Comfort adjustments
To adjust your sitting position in the chair, keep pressing the button on the controller until the desired position is reached.
Lift function
Stepless adjustment
• from sitting position to stand-up position;
• from stretched position to sitting position.
Laying down function
Stepless adjustment
• from sitting position to stretched position;
• from stand-up position to sitting position.
When the lift chair is not being used, leave it in the upright sitting position and not in the elevated position.
4.2.1 Entrapment zones
The picture below shows the possible entrapment zones of the lift chair. Take extra care not to get your clothes, fingers or other objects pinched between these moving parts.

natural_image
Two grayscale exercise chair designs: a beige armchair with internal mechanism and a black leather seat with blue adjustment arrows (no text or symbols)5 Installation and adjustments

WARNING
Risk of injuries or damage
- Only use the settings described in this manual.
- Make sure that your fingers, clothes, belts, buckles or jewellery won't get caught by moving parts, during assembly, use or adjustment.
5.1 Tools
No tools are needed to set up the lift chair.
5.2 Manner of delivery
Unpack your product and verify if the delivery is complete. The following items should be included:
• Frame with seat, armrests, leg rest and lower frame
- Backrest
- Headrest cover
- Controller
• 4 wheels (Optional: 2 wheels + 2 leg levelers)
- Manual
Verify your product for transport damage. If you find any damages after delivery, contact the transporter.
5.3 Assembling the lift chair
The lift chair is delivered fully assembled with the exception of the backrest and the wheels.
5.3.1 Mounting the backrest
- Place the backrest with the two sleeves (1) on the plates (2) mounted on the seat.
- Push on the upper side of the backrest until it clicks into place.
- Make sure that the backrest is firmly fixated by pulling it slightly up again. If the backrest comes loose, repeat the steps above.
- Attach the loose backrest upholstery to the lower frame with the Velcro strips.
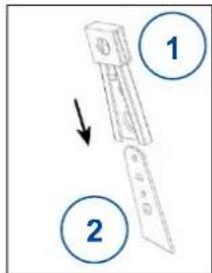
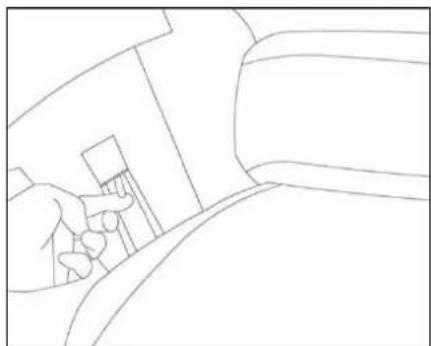
5.3.2 Removing the backrest
- Loosen the backrest upholstery by pulling the Velcro strips off the lower frame.
- Use a flat head screwdriver or other tool to pull the locking clip upwards. At the same time, pull the backrest upwards until the two connection plates are released.
- Lift the backrest out of the lower frame.
natural_image
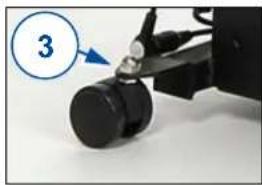
Line drawing of a hand pressing down on a mechanical component (no text or symbols)5.3.3 Mounting the wheels
The lift chair is delivered with a number of wheels according to your chosen version and option. To fasten the wheels into place, use the nuts (3) that are included with the delivery.
natural_image
Close-up of a mechanical device with a blue circle highlighting the number 3, showing a black cylindrical component and a black handle (no text or symbols on the device itself)6 Maintenance
i Regular care ensures that your lift chair is preserved in a perfectly functional condition. For the maintenance manual, refer to the Vermeiren website: www.vermeiren.com.

CAUTION
Risk of injuries and damage
Repairs and replacements may only be undertaken by trained persons and only genuine replacement parts of Vermeiren should be used.
i The last page of this manual contains a registration form for the specialist dealer to record each service.
The service frequency depends on the frequency and intensity of use. Contact your dealer to agree to a common timetable for inspection/maintenance/repair.
Before each use
Inspect the following points:
- All parts: Clean, present and undamaged or unworn.
- Wheels, backrest: Well secured.
- General condition: No deformation, instability, weakness or loose connections.
Contact your specialist dealer for possible repairs or part replacements.
6.1 Instructions for maintenance
6.1.1 Cleaning
CAUTION
Risk of damage
- Never use a steam cleaner to clean the chair.
- Do not soak the upholstery.
The upholstery can be cleaned using a cloth moistened with warm water. Use a mild commercial detergent to remove stubborn dirt. Do not use abrasive cleaning agents, sponge, or hard brush to clean.
6.2 Reuse
Before each reuse, have the lift chair disinfected, inspected and serviced according to the instructions in the maintenance manual.
6.3 Expected lifespan
The average lifespan of your lift chair is 5 years. Depending on the frequency of use and maintenance, the lifespan of your chair will increase or decrease.
6.4 End of use
At end of life, you need to dispose your chair according to the local environmental legislation. The best way to do so, is to disassemble the chair to facilitate the transport of recyclable parts.
7 Technical specifications
The technical details below are only valid for this chair, at standard settings and optimal ambient conditions. Take these details into account during use. The values are no longer applicable if your chair has been modified, damaged, or is severely worn.
| Make | Vermeiren |
| Type | Lift chair |
| Model | Montreal |
| Maximum occupant mass | 150 kg |
| Description | Dimensions |
| Overall length (Sit position) | 830 mm |
| Overall length (Reclined position) | 1520 mm |
| Dismantled length (without backrest) | 820 mm |
| Overall width | 850 mm |
| Total mass | 53.98 kg |
| Mass of heaviest part | 47.00 kg |
| Mass of removable parts | Backrest: 6.98 kg |
| Effective seat depth | 510 mm |
| Effective seat width | 485 mm |
| Seat plane angle (Sit / Recline / Lift) | +9° / +16° / -18° |
| Seat surface height at front edge (Sit / Lift) | 500 / 550 m |
| Total height (Sit / Recline / Lift) | 1140 / 1060 / 1400 mm |
| Dismantled height (without backrest) | 640 mm |
| Backrest height | 700 mm |
| Backrest angle (sit / Recline / Lift) | 8° / 35° / -19° |
| Leg rest angle (Sit / Recline / Lift) | -90° / -6° / -27° |
| Armrest to seat distance | 150 mm |
| Distance from wall | 100 mm |
| Noise level | <53 Db |
| Power | 220/230 V |
| AC/DC Adapter | Input: AC 100-240 V, 50/60 Hz Output: DC29V Max. 10%, max 2 min |
| Degree of protection actuator | IP42 |
| Power rating, Duty cycle actuator | DC24V, Max. 10%, max 2 min/18 min |
| Degree of protection manual control | IP42 |
| EMC compliance | EN 61000-6-3: 2007, EN 61000-6-1: 2007 |
| Storage and use temperature | +5 °C to +41 °C |
| Operating temperature of the electronics | -10°C to +40°C |
| Storage and use humidity | 30% to 70% |
| We reserve the right to introduce technical changes. Measurement tolerance ± 15 mm / 1,5 kg / 1,5°. | |
Table des matières
natural_image
Line drawing of a person sitting in an armchair, viewed through a checkmark (no text or symbols present)natural_image
Two different types of personal mobility furniture: a beige armchair with internal mechanism and a black leather seat with blue frame (no text or symbols visible)natural_image
Line drawing of a hand pressing down on a device (no text or symbols)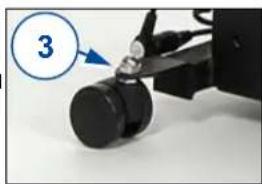
natural_image
Close-up of a mechanical device with a black cylindrical component and a blue arrow pointing to it, labeled with number 3 (no text or symbols on the device itself)6 Entretien
natural_image
Line drawing of a person sitting in an armchair, viewed through a curved black line (no text or symbols)natural_image
Two views of a beige massage chair: one with internal mechanical components, the other showing a black massage seat with blue outline (no text or symbols)natural_image
Line drawing of a hand holding a tool near a vehicle (no text or symbols)natural_image
Close-up of a black mechanical device with a blue circle highlighting the number 3, no visible text or symbols on the device itself.6 Onderhoud
natural_image
Line drawing of a person sitting in a chair with arms crossed, no text or symbols presentnatural_image
Two different types of personal mobility furniture: a beige armchair with internal mechanism and a black leather seat with blue frame (no text or symbols visible)
DE
natural_image
Line drawing of a hand using a tool to interact with a device (no text or symbols)natural_image
Close-up of a mechanical device with a numbered circle highlighting the number 3 (no text or symbols on the device itself)natural_image
Line drawing of a person sitting in an armchair, viewed from the side (no text or symbols)natural_image
Two types of personal mobility furniture: a beige armchair with internal mechanism and a black leather seat with blue frame (no text or symbols visible)
natural_image
Line drawing of a hand using a tool to interact with a device (no text or symbols)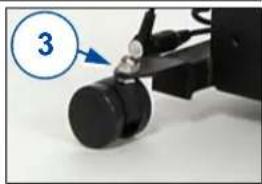
natural_image
Close-up of a mechanical device with a numbered callout (3) pointing to a black cylindrical component, no visible text or symbols on the device itself.6 Manutenzione
natural_image
Line drawing of a person sitting in an armchair with a checkmark overlay (no text or symbols)natural_image
Two types of personal mobility furniture: a beige armchair with internal mechanism and a black leather seat with blue frame (no text or symbols visible)
natural_image
Line drawing of a hand inserting a small object into a device (no text or symbols)natural_image
Close-up of a mechanical device with a numbered circle highlighting the number 3 (no text or symbols on the device itself)6 Mantenimiento
natural_image
Line drawing of a person sitting in a chair with arms crossed, no text or symbols presentnatural_image
Two views of a beige massage chair: one with internal mechanical components, the other with a black interior seat (no text or symbols visible)
natural_image
Line drawing of a hand holding a tool near a table, no text or symbols present5.3.3 Montaż kółek
natural_image
Close-up of a mechanical device with a black cylindrical component and a blue arrow pointing to it, labeled '3' (no text or symbols on the device itself)6 Konserwacja

natural_image
Line drawing of a person kneeling beside an armchair, no text or symbols presentnatural_image
Two views of a beige massage chair: one open showing internal mechanical components, the other closed showing a black massage seat with blue measurement lines (no text or symbols visible)
natural_image
Line drawing of a hand pressing down a small object into a bed (no text or symbols)
natural_image
Close-up of a mechanical device with a blue circle highlighting the number 3, showing a cylindrical component being adjusted (no text or symbols on the device itself)6 Údržba
Service registration form
This product (name): ....
was inspected (I), serviced (S), repaired (R) or disinfected (D):
| By (stamp):Kind of work: I / S / R / DDate: | By (stamp):Kind of work: I / S / R / DDate: | By (stamp):Kind of work: I / S / R / DDate: |
| By (stamp):Kind of work: I / S / R / DDate: | By (stamp):Kind of work: I / S / R / DDate: | By (stamp):Kind of work: I / S / R / DDate: |
| By (stamp):Kind of work: I / S / R / DDate: | By (stamp):Kind of work: I / S / R / DDate: | By (stamp):Kind of world: I / S / R / DDate: |
| By (stamp):Kind of work: I / S / R / DDate: | By (stamp):Kind of work: I / S / R / DDate: | By (stamp):Kind of work: I / S / R / DDate: |
| By (stamp):Kind of work: I / S / R / DDate: | By (stamp):Kind of work: I / S /R / DDate: | By (stamp):Kind of work: I / S / R / DDate: |
| By (stamp):Kind of work: I / S / R / DDate: | By (stamp):Kind of work: I / S / R / DDate: | By (stamp):Kind of work: I / S / R / DDate: |

Vermeiren GROUP NV
Vermeirenplein 1 / 15
2920 Kalmthout
BE
website: www.vermeiren.com
- Instructions for specialist dealer
- FR
- All rights reserved, including translation.
- Content
- Content....1
- Preface
- Important note
- Information available
- Your product
- Accessories
- Before use
- Intended use
- General safety instructions
- CAUTION
- Symbols on the lift chair
- Transport and storage
- Transport
- Storage
- Using the lift chair
- Risk of injuries
- Risk of injuries and/or damage
- Transfer into and out of the chair
- Risk of injuries or damage
- To get into the chair:
- To get out of the chair:
- Comfort adjustments
- Lift function
- Stepless adjustment
- Laying down function
- Entrapment zones
- Installation and adjustments
- WARNING
- Tools
- Manner of delivery
- Assembling the lift chair
- Mounting the backrest
- Removing the backrest
- Mounting the wheels
- Maintenance
- Before each use
- Instructions for maintenance
- Cleaning
- Reuse
- Expected lifespan
- End of use
- Technical specifications
- Table des matières
- Entretien
- Onderhoud
- DE
- Manutenzione
- Mantenimiento
- Montaż kółek
- Konserwacja
- Údržba
- Service registration form
Brand : Vermeiren
Model : Montreal
Category : Chair