
BPI1621UB - Cooker BRANDT - Free user manual and instructions
Find the device manual for free BPI1621UB BRANDT in PDF.

| Product type | Induction hob |
| Brand | Brandt |
| Model | BPI1621UB |
| Number of cooking zones | 4 |
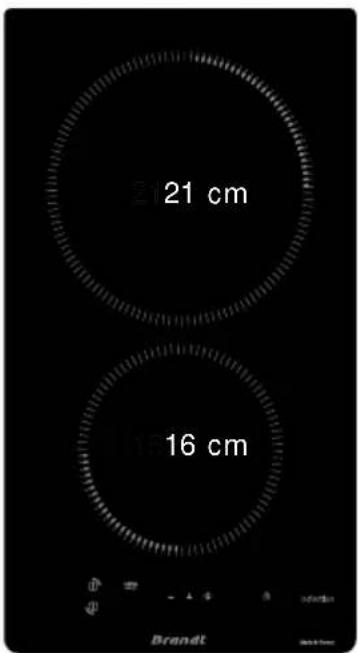
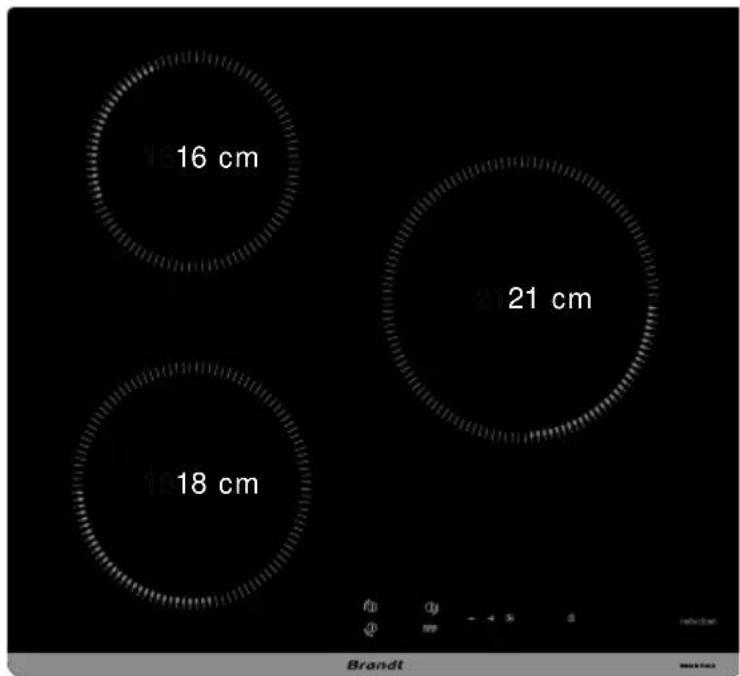
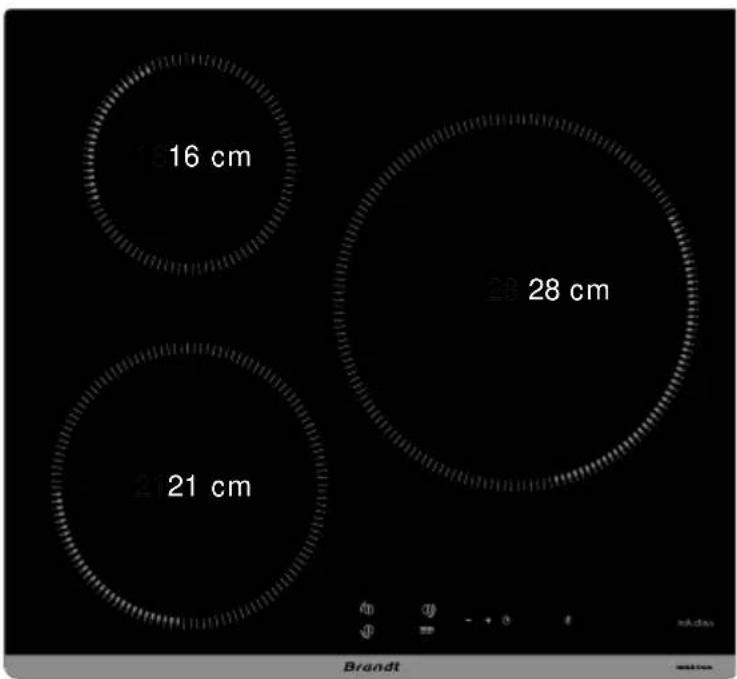
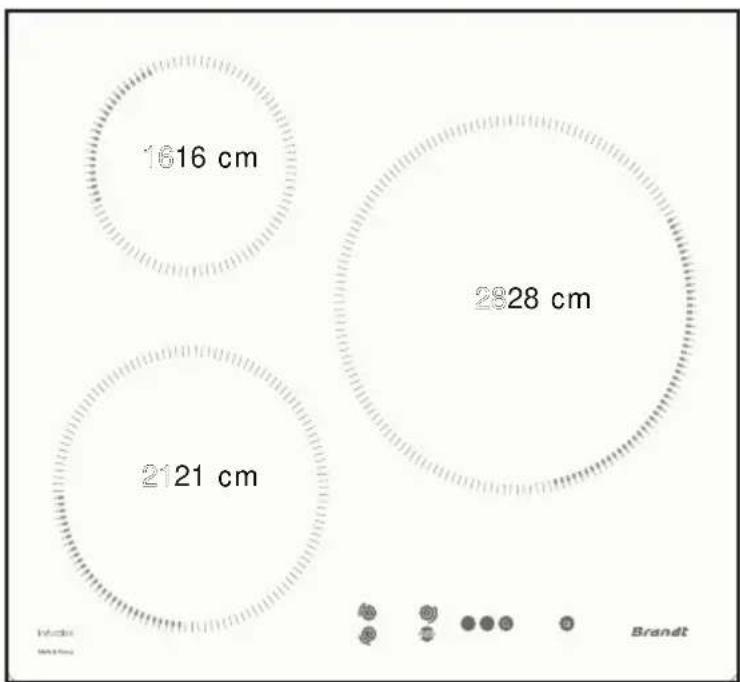
| Cooking zone diameters | 16 cm, 18 cm, 21 cm, 28 cm |
| Maximum power per zone | 2500 W (16 cm), 3600 W (18 cm and 21 cm), 4000 W (28 cm) |
| Ultra Boost function | Yes, access to maximum power |
| Timer | Yes, up to 99 minutes per zone |
| Child lock | Yes, lock controls when off or during cooking |
| Overheating protection | Yes, automatic power reduction if pan is empty |
| Overflow protection | Yes, hob shuts off and alarm sounds |
| Auto-Stop | Yes, automatic shutdown after 1 to 10 hours depending on power |
| Residual heat indicator | Yes, "H" symbol |
| Power supply | 220-240 V ~ or 400 V 3~ (depending on model) |
| Maintenance and cleaning | Sanitary sponge, special glass scraper, white vinegar, special ceramic hob cleaner |
| Compatible cookware | Ferromagnetic base (stainless steel, cast iron, etc.); avoid glass, copper, aluminum without special base |
| Energy consumption | Compliant with EU standards |
| Original spare parts | Available from after-sales service |
Frequently Asked Questions - BPI1621UB BRANDT
User questions about BPI1621UB BRANDT
0 question about this device. Answer the ones you know or ask your own.
Ask a new question about this device
Download the instructions for your Cooker in PDF format for free! Find your manual BPI1621UB - BRANDT and take your electronic device back in hand. On this page are published all the documents necessary for the use of your device. BPI1621UB by BRANDT.
USER MANUAL BPI1621UB BRANDT
natural_image
Black-and-white photo of a bowl with leaf garnish, surrounded by other bowls (no text or symbols visible)MANUEL D'INSTRUCTION FR
Table de cuisson
Chère Cliente, Cher Client,

Important :
natural_image
Diagram of a server rack with ventilation grilles and a circular component, no text or symbols present
B

C
D

natural_image
Illustration of hands using a tool to cut or mark a curved component on a flat surface (no text or symbols)
natural_image
Illustration of hands holding a four-circular induction cooktop on a kitchen (no text or symbols)
Important

natural_image
Illustration of a cooking process showing a pan on a stove with a lid and a pan on a stovetop, no text or symbols present.Auto-Stop :
natural_image
Black-and-white photo of a bowl with leaf garnish, surrounded by other bowls (no text or symbols visible)INSTRUCTION MANUAL EN
Cooking Hob
Dear Customer,
You have just acquired a BRANDT product and we would like to thank you.
We have designed and made this product with you, your lifestyle and your requirements in mind so that it meets your expectations. We have devoted our know-how, our innovative spirit and the passion that has been guiding us for over 60 years.
In an effort to ensure that our products meet your requirements in the best possible way, our Customer Relations department is at your disposal, to answer all your questions and to listen to all your suggestions.
Visit our website www.brandt.com where you will find our latest innovations, as well as useful and complementary information.
BRANDT is delighted to assist you every day and hopes you get the most out of your purchase.

SAFETY ADVICE....4

ENVIRONMENT AND ENERGY SAVING....6

IDENTIFICATION....7

INSTALLATION....9
Unpacking....9
Enclosure 9
Electrical connection ....11

USING....12
Choice of cookware....12
Burner selection....12
① Switching on / Stopping 13
+ / - Setting the power 13
Setting the timer....13
Child safety....14
Safety precautions and recommendations....15

MAINTENANCE....16

SPECIAL MESSAGES, INCIDENTS....17

ENERGY EFFICIENCY....18

AFTER-SALES SERVICE....19
IMPORTANT SAFETY INSTRUCTIONS TO BE READ CAREFULLY AND KEPT FOR FUTURE USE.
This guide can be downloaded from the brand web site.
This appliance can be used by children over 8 years old and persons with reduced physical, sensory or mental capabilities or without experience and knowledge if they have been correctly informed or trained in the use of the appliance in a safe way and understand the hazards involved.
Children must not play with the appliance.
Children must not clean and maintain the appliance without supervision.
Children under 8 years old must be kept away from the hob unless they are supervised at all times.
The appliance and its accessible parts become hot during use.
Precautions must be taken to avoid touching the heating elements.
Metal objects such as knives, forks, spoons and lids must not be placed on the cooking surface as they may heat up.
Your hob is equipped with a child safety device that locks its operation after use or during cooking (See "Child Safety use" section).
Your appliance complies with applicable European Directives and regulations.
In order to avoid interference between your cooking hob and a pacemaker, the pacemaker must be designed and programmed in compliance with the regulations that apply to it. Ask the pacemaker manufacturer or your GP.
Leaving oil or fat to heat unattended on a hob may be dangerous and lead to fire. NEVER attempt to extinguish a fire with water. Instead, switch off the appliance, then cover the flame with a lid or a fire blanket.
CAUTION: cooking must be monitored. Quick heating must be monitored at all times.
Danger of fire: do not store objects on the cooking areas.
If the surface is cracked, disconnect the appliance to avoid the risk of electric shock.
Do not use your hob until you have replaced the glass worktop.
Avoid hard shocks from cookware: although the vitroceramic glass worktop is very sturdy, it is not unbreakable.
Do not place any hot lids flat on your cooking hob. A suction effect may damage the vitroceramic surface. Avoid dragging cookware across the surface, which may in the long-term result in the degradation of the decorative finish of the vitroceramic top. Never use a sheet of aluminium for cooking. Never place items wrapped in aluminium foil or packaged in aluminium dishes on your cooking hob. The aluminium will melt and permanently damage your appliance.
Do not store cleaning products or flammable products in the cabinet underneath your cooking hob.
These hobs must be connected to the power grid via an all-pole cut-off device that complies with installation regulations in effect. A disconnection device must be incorporated into the fixed wiring.
If the power cable is damaged, it should be replaced by the manufacturer, its after-sales service department or a similarly qualified person to avoid danger. Ensure that the power cables of any electrical appliances plugged in close to the hob are not in contact with the cooking zones.
Never use a steam cleaner to
clean your cooking hob.
The appliance is not designed to be switched on using an external timer or a separate remote control system.
WARNING: Only use hob protectors designed by the manufacturer of the cooking appliance or listed as suitable in the user guide, or included with the appliance. Use of unsuitable protectors could cause accidents.

Protecting the environment
This symbol indicates that this product should not be treated as household waste.
Your appliance also contains a great amount of recyclable material. It is
marked with this symbol to indicate that used appliances must be disposed of in certified collection points.
Contact your town hall or your retailer for the used appliance collection points closest to your home. This way, the appliance recycling organised by your manufacturer will be done under the best possible conditions, in compliance with European Directive on Waste Electrical and Electronic Equipment.
This appliance's packing materials are also recyclable. Help recycle it and protect the environment by dropping it off in the municipal receptacles provided for this purpose.
We thank you for your help in protecting the environment.
Advice on how to save energy
Cooking with the correctly sized lid saves energy. If you use a glass lid, you can control your cooking perfectly.


bubble
| Bubble Size | Label | |-------------|-----------| | 1616 cm | | | 2928 cm | | | 2121 cm | |
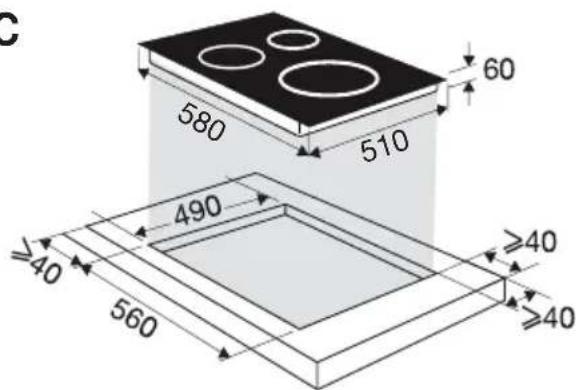
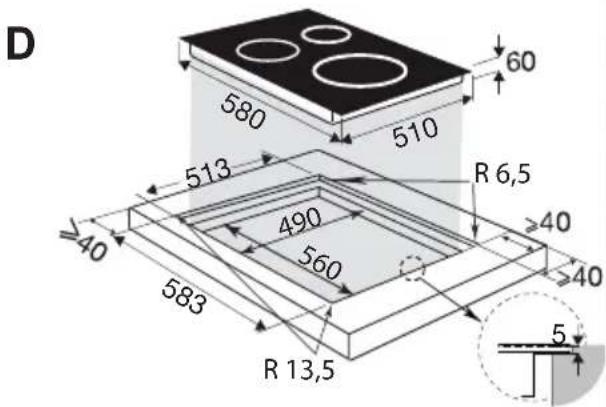
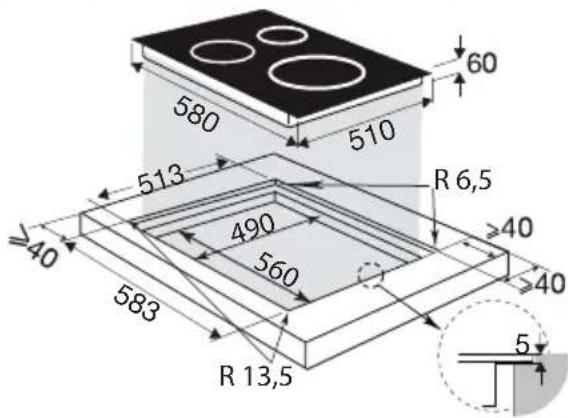
INSTALLATION
EN
UNPACKING
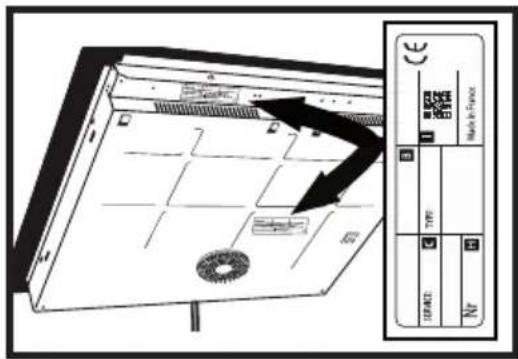
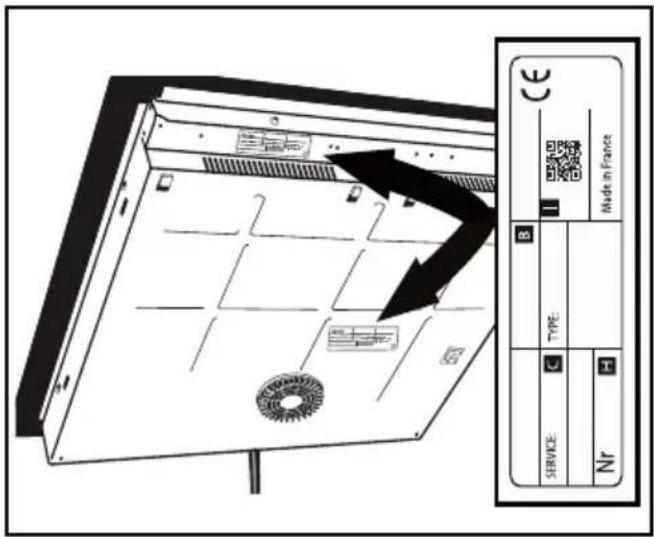
For future use, remove all protective elements. Check and respect the appliance's characteristics that appear on the nameplate.
Note in the boxes below the service and standard references shown on this plate.
Service : ....
Type :
ENCLOSURE
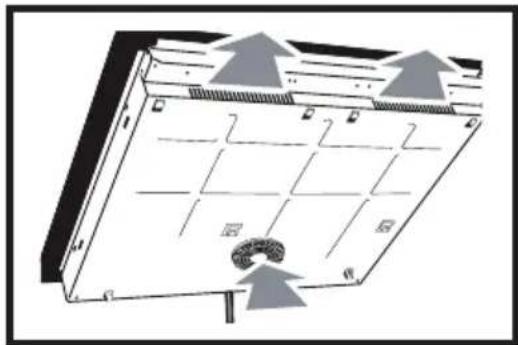
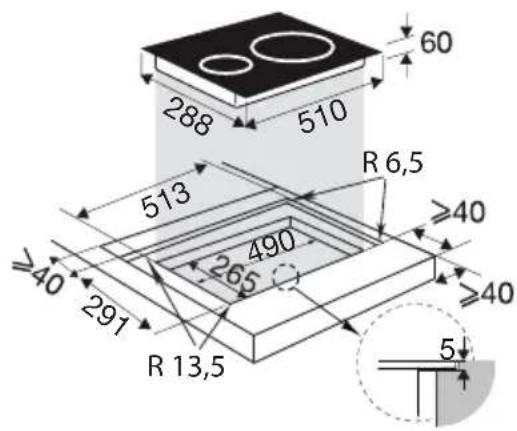
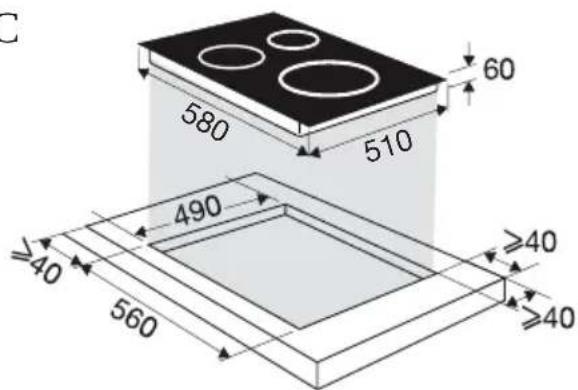
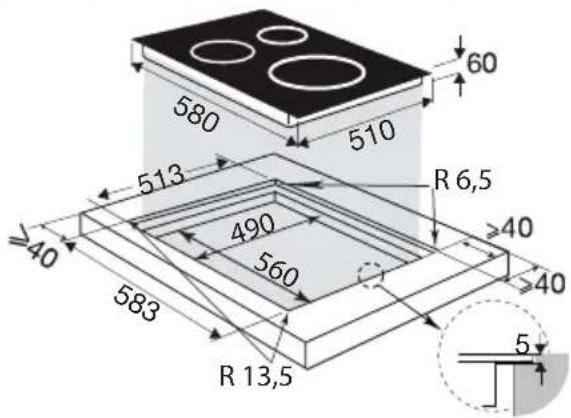
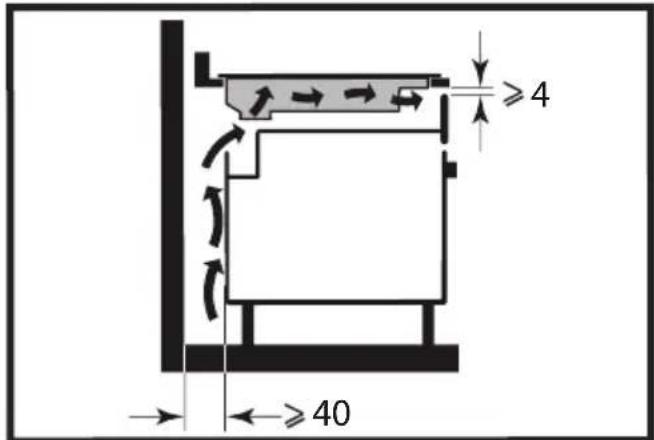
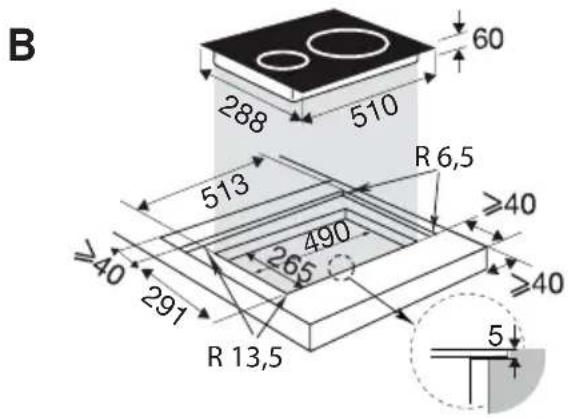
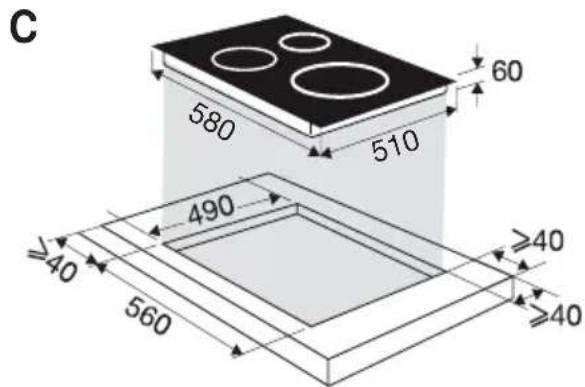
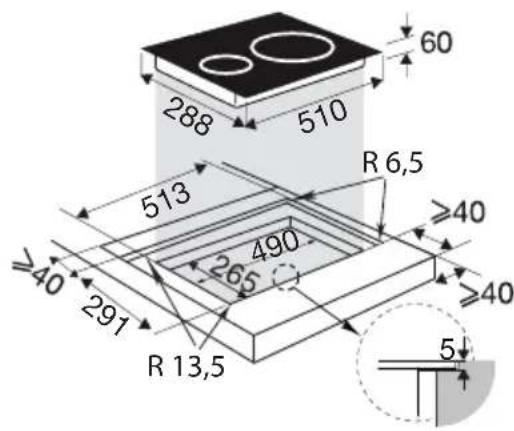
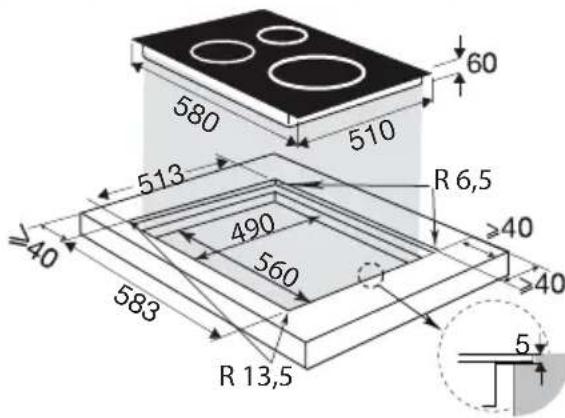
Check that the air intake and outlet are free of obstruction Comply with the information concerning the fitting dimensions (in millimetres) of the work top destined to receive the hob. Check that air circulates correctly between the front and the back of your hob
natural_image
Diagram of a server rack with ventilation grilles and a circular component, no text or symbols present
B
C
D
If you are installing the hob above a drawer,
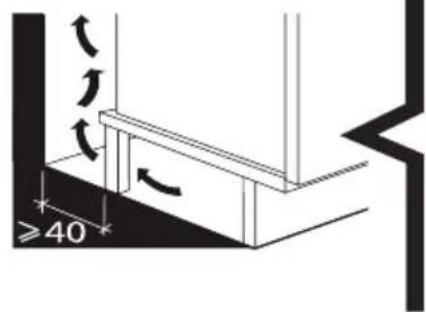
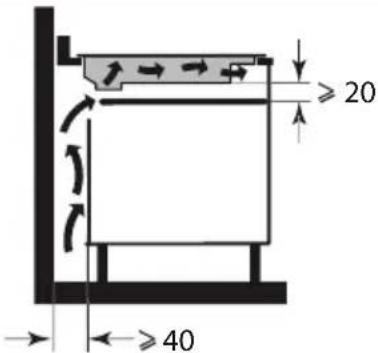
or above a built-in oven, comply with the dimensions provided on the illustrations to ensure a sufficient air outlet at the front.
Carefully glue the sealing joint to the entire surround of the glass hob
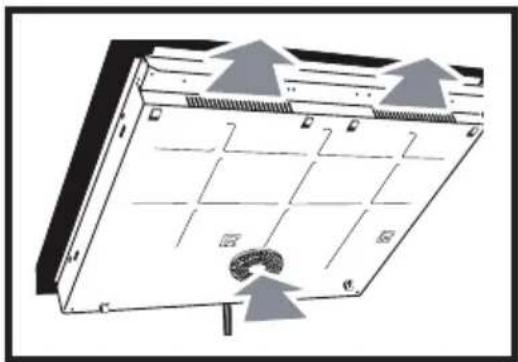
insert the table into the cabinet

natural_image
Illustration of hands using a tool to cut or mark a curved object on a surface (no text or symbols visible)
natural_image
Illustration of hands installing a four-circuit board on a heating appliance (no text or symbols)
Important
If your hob is located above your oven, the hob's thermal safety devices can impede the simultaneous use of the hob and the oven's pyrolysis programme, display code "F7" in the control zones. In such circumstances we recommend that you increase the hob's ventilation by creating an opening in the side of the cabinet (8 x 5 cm).
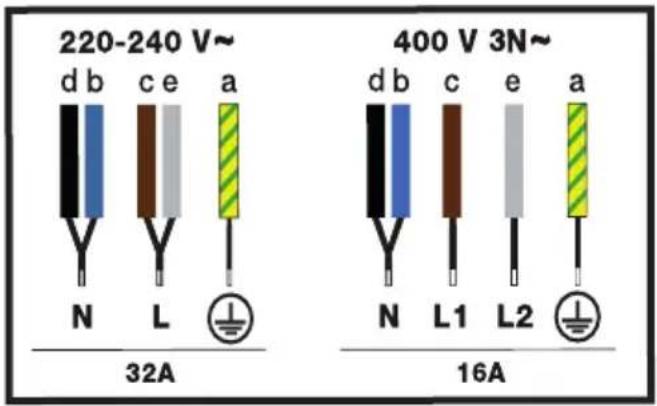
Electric connections
These hobs must be connected to the power grid via an all-pole cut-off device that complies with installation regulations in effect. A disconnection device must be incorporated into the fixed wiring.
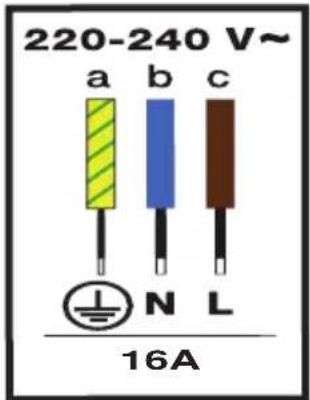
Identify the type of cable of your hob according to the number of wires and colours.
When switching your hob on or after a lengthy power cut, a code is shown on the control pad (this display is reserved for your after-sales service, where applicable. The user of the hob does not need to take notice of it).
This information disappears after around 30 seconds.
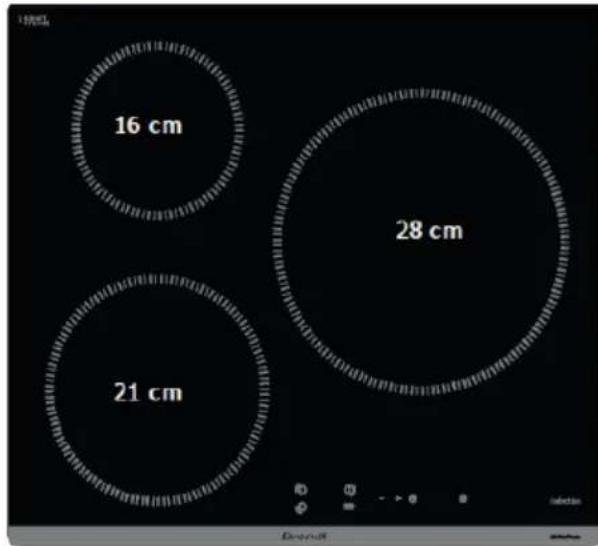
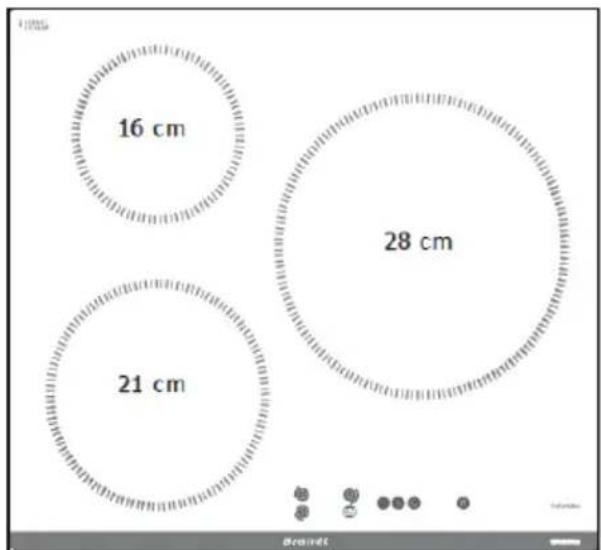
CHOICE OF COOKWARE
Most cookware is compatible with induction. Only glass, earthenware, aluminium without a special bottom, copper and some non-magnetic stainless steel do not work with induction cooking.

Tips
We suggest that you choose cookware with a thick and flat bottom. The heat will be distributed better and cooking will be more uniform.
Advice on how to save energy
Cooking with the correctly sized lid saves energy. If you use a glass lid, you can control
BURNER SELECTION
Select the burner which is the right size for the bottom of your cookware (see table). If the base or the cookware is too small, the power indicator will start to flash and the burner will not work, even if the cookware's material is recommended for induction.
Do not use containers with a smaller diameter than that of the fireplace (see table).

Tips
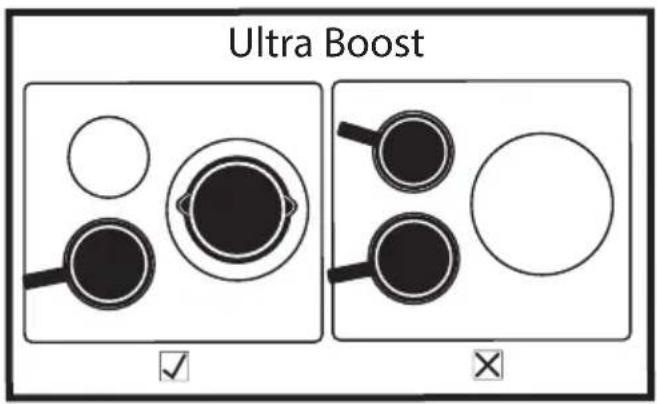
When using the two hobs simultaneously, the hob manages the power distribution so as not to exceed the total power of the hob.
When using the maximum power (Ultra Boost) on several hobs at the same time, make sure that you use the best position for your containers according to the model of your hob as shown in the illustrations.
This will avoid automatic power limitation on one of the hobs if the positioning is not optimal:
☑ = Recommended positioning
☒ = positioning to be avoided
| Diameter of burner (cm) | Maximum power of burner (Watts) | Diameter of bottom of cookware |
| 16 2500 | 10 - 18 | |
| 18 3600 | 11 - 22 | |
| 21 3600 | 12 - 24 | |
| 28 4000 | 15 - 32 |
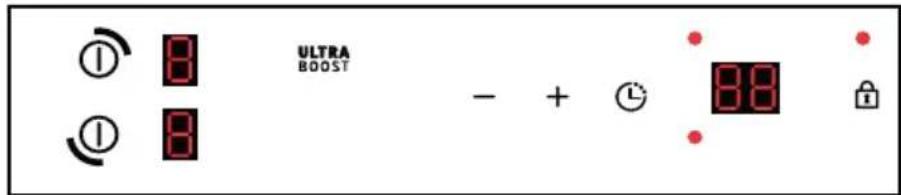
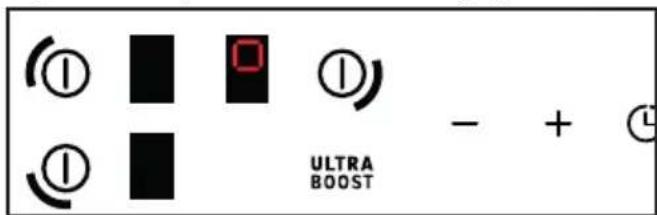
SWITCHING ON - STOPPING
Switching on:
Press the key corresponding to the required burner. A 0 and a beep indicate that the cooking zone is on. You can adjust the required power of the burner selected. If you do not set the power level, the cooking zone will be switched off automatically.
Stopping a zone:
Keep the key corresponding to the required burner pressed down.
A long beep sounds and the display switches off or the "H" symbol (residual heat) appears.
+ / - Power setting
When switching on, you can switch directly to power level 9 by pressing the - button.
Press the + or - button to set the power level from 1 to 9.
With a power < 5, a quick double press on the + button allows direct access to power 5.
X2
With a power level > 5, a quick double press on the + button allows you to switch directly to power level 9.
X2
UPress to access the maximum power.
SETTING THE POWER
\* According to model
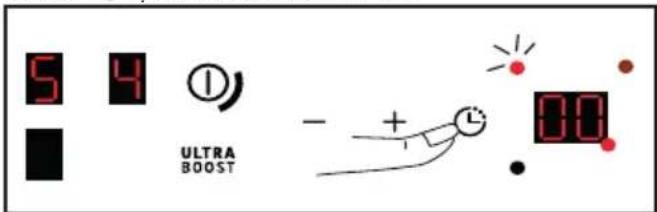
Each cooking zone has a dedicated timer that can be set for up to 99 minutes. The timer is incremented from 1 to 15 and then from 5 to 99 and can be started as soon as the relevant cooking zone is in operation.
1 cooking zone in operation :
Press , to select the cooking zone to which you want to assign the timer. The timer of the active cooking zone has its LED highlighted
The timer zeros are flashing with the timer units LED and the active focus LED.
* Depending on the model
a: led (outside the display) of the fire place indicator being set, it flashes and is more intense than the others.
b: LED (at the edge of the display) indicating that the timer is being set. The + and - buttons are active for setting the timer. When the timer disappears, the + and - buttons are active for the power setting of the selected heater.
a
b
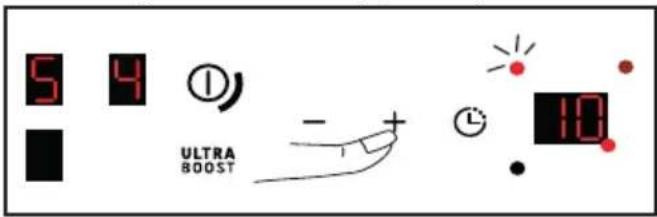
The setting is then made by pressing + or -. 99 minutes can be accessed directly by pressing the key at the start.
If the +/- keys are not pressed for 20 seconds, the cooking time is validated (LED b is no longer lit) and the +/- keys switch back to the power setting of the active hotplate (LED a is lit)
At the end of the cooking time, the display indicates 0 and a beep sounds for about 20 seconds. To deactivate it, press any key.
To stop the timer manually, press and hold the + and - keys simultaneously or return to 0 with the - key.
Multiple fireplaces in operation:
Press ⏻, to select the heater.
The setting is then made by pressing + or -.
CHI LD SAFETY
Your hob has a child safety device which locks the controls when the hob is not in use or when it is being used for cooking. Due to safety reasons, the ① keys remain active and authorise the heating zones to be switched off even when locked.
Locking
Press 🔒. The LED above the lock lights up and a beep confirms your operation.

The display of cooking zones in operation alternately indicates power and the locking symbol ☐.
Unlocking
Press 🔒 until the locking symbol 📄 disappears and a beep confirms your operation.
CLEAN LOCK function:
The Clean Lock function permits the temporary locking of your hob while it is being cleaned.
To activate the Clean Lock function, press briefly on 🔒. The LED above the lock flashes and a beep confirms your operation. After around 1 minute, locking is automatically deactivated. Two beeps will sound and the light will switch off. You can stop the Clean Lock function at any time by holding down the 🔒 button.
SAFETY PRECAUTIONS AND RECOMMENDATIONS
Residual heat:
After intensive use, the cooking zone that you have just used can remain hot for several minutes.
The symbol H is displayed during this period.
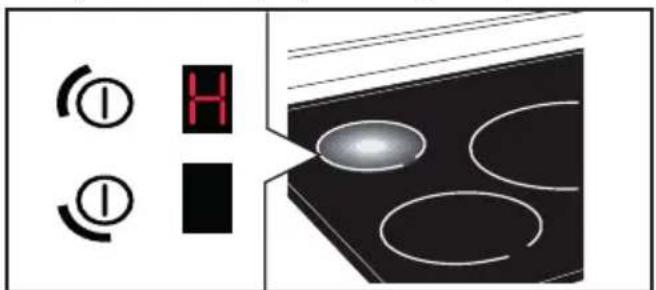
Avoid touching the areas concerned during this time.
Anti-overheat protection:
Each cooking zone has a safety sensor that constantly monitors the temperature of the bottom of the cookware. In the event that empty cookware is left on a cooking zone that is switched on, the hob automatically lowers the power output and thus limits any risk of damage.
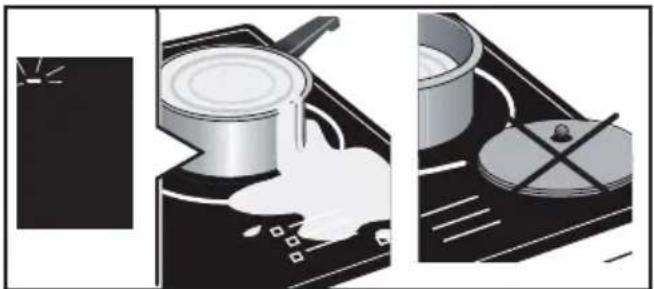
Protection against overflows
A special display (symbol —), a sound signal, followed with the hob swit-
ching off, may be triggered in the following cases:
- Overflow that spills onto the buttons
- Damp towel placed over the buttons.
- Metallic object placed on the buttons
Remove the object or clean and dry the touch controls, then restart cooking.
natural_image
Illustration of a cooking pan with steam rising, showing the lid and pan (no text or symbols)Auto-Stop :
Your hob has an auto-stop device, which automatically stops any cooking zone which remains switched on for an excessive length of time (between 1 and 10 hours depending on the power used).
If this safety system is triggered, the cut-off to the cooking zone is shown with the "A" display on the control panel and a beep sounds for about 2 minutes. Simply press any of the buttons to stop this.

Tips
Sounds which are similar to those of a clock mechanism may be given off.
These noises occur when the hob is working. They disappear or reduce depending on the heating configuration. There may also be whistling sounds depending on the model and quality of your cookware. The noises described are normal. They are related to induction technology and do not indicate a problem.

Tips
We do not recommend a protective device.
For light dirt, use a disinfectant sponge. Thoroughly moisten the zone to be cleaned with hot water, then wipe off (5).
For a build-up of baked-on dirt or sweet overflows, use a disinfectant sponge and/or a special glass scraper. Thoroughly moisten the zone to be cleaned with hot water. Use a scraper for glass to remove the large bits, finish off with a disinfectant sponge, and then wipe off.
For rings and hard water residue, apply warm white vinegar to the stain, leave on, then wipe with a soft cloth.
For shiny metal streaks or weekly maintenance, use a special vitroceramic glass product.
Important note: do not use any powders or abrasive sponges. Use creams and special delicate glassware sponges.
?
SPECIAL MESSAGES, INCIDENTS
EN
DURING INITIAL USE:
- An indicator light appears. This is normal. It will go away after 30 seconds.
- Your installation blows a fuse or one side only of the hob works. The electrical connection of your hob is incorrect. Check its compliance.
- The hob smells the first few times it is used for cooking. The appliance is new. Heat up each ring for half an hour with a saucepan full of water.
6.2 WHEN POWERING ON:
The hob does not work and the indicator lights on the control panel are not on.
The appliance is not receiving electricity. The electrical supply is defective or the connection is incorrect. Inspect the electrical circuit breaker and fuses.

- The hob does not work and another message is displayed. The electronic board is functioning poorly. Call the After-Sales Service Department.
- The hob does not work, the symbol displayed. Unlock the child safety device.
- Error code F9: voltage less than 170 V
- Error code F0: voltage less than 5°C
6.3 DURING USE:
- The hob has stopped working. The symbol — is displayed and there is a sound signal.
There was an overflow or an object is in contact with the control panel. Clean or remove the object, then begin cooking again.
- Code F7 is displayed.
The electronic circuits have overheated. Check the hob's ventilation.
- During operation of a heating zone, the keypad display continues to flash.
The cookware used is not compatible with induction or its size is not suitable for the burner.
- The cookware makes noise and your hob clicks during cooking (see chapter on Safety precautions and recommendations 4.5).
This is normal with some types of cookware. This is caused by the transfer of energy from the hob
to the cookware.
- The fan continues to function after your hob is turned off.
This is normal. It cools the electronic parts.
- In the event of persistent malfunction.
Switch off your hob for 1 minute. If the problem persists, contact the after-sales service.
| IT | Informazioni relative ai piani cottura elettrici per uso domestico - UE n° 66/2014 |
| NL | Informatic met betrekking tot huishoudelijke elektrische kookplaten - UE n° 66/2014 |
Any work on your appliance must be carried out by a qualified professional who is a brand owner. When you call, in order to make it easier to deal with your request, please have the complete references of your appliance (commercial reference, service reference, serial number). This information can be found on the nameplate attached to the bottom of the appliance.
ORIGINAL PARTS
When servicing, only use certified original spare parts.

natural_image
Black-and-white photo of a bowl with leaf garnish, blurred bowls in background (no text or symbols)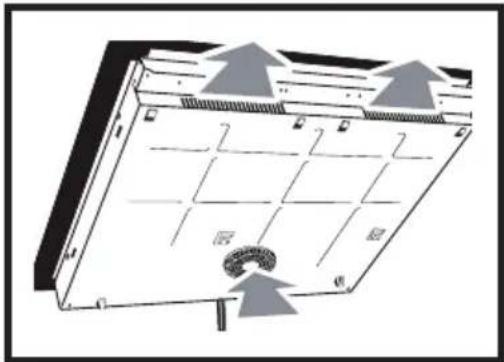
natural_image
Diagram of a server rack with ventilation grilles and a circular component, showing airflow direction (no text or symbols)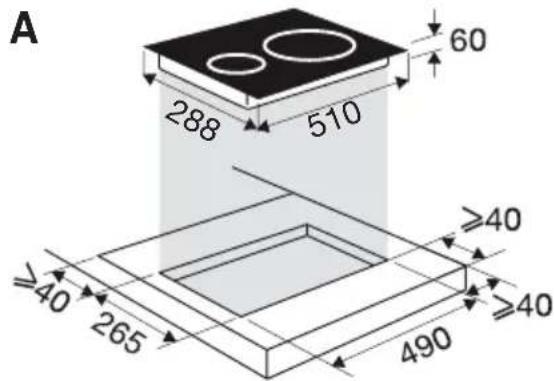
natural_image
Illustration of hands using a tool to cut or mark a curved object on a surface (no text or symbols visible)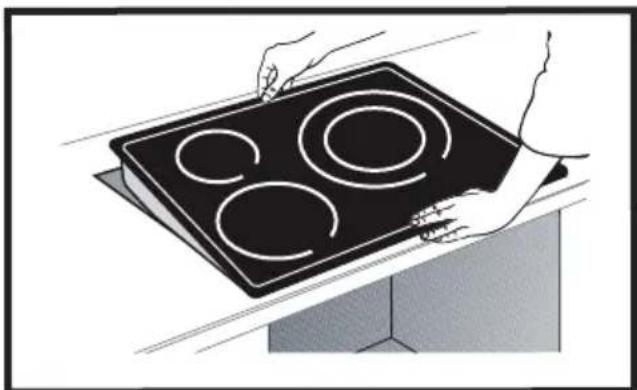
natural_image
Illustration of hands installing a four-circular induction cooktop on a kitchen (no text or symbols)
Importante
natural_image
Illustration of cooking process: pan on stovetop with steam rising, no text or symbols presentAuto-Stop:
| Symbol Unit | Value | ||||||||||||||||||||||||||||||||||||||||||||||||||||||||||||||||||||||||||||||||||||||||||||||||||||||||||||||||||||
| LKGXXID | LKGPEXID | LKGXXID | LKGXXID | ||||||||||||||||||||||||||||||||||||||||||||||||||||||||||||||||||||||||||||||||||||||||||||||||||||||||||||||||||
| Model identification | LKGXXID | LKGPEXID | LKGXXID | LKGXXID | |||||||||||||||||||||||||||||||||||||||||||||||||||||||||||||||||||||||||||||||||||||||||||||||||||||||||||||||||
| Rating plate | LKGXXID | LKGPEXID | LKGXXID | LKGXXID | |||||||||||||||||||||||||||||||||||||||||||||||||||||||||||||||||||||||||||||||||||||||||||||||||||||||||||||||||
| Type of hob | Induction ** | ||||||||||||||||||||||||||||||||||||||||||||||||||||||||||||||||||||||||||||||||||||||||||||||||||||||||||||||||||||
| Total power | 30187400 7400 | 7400 W | **FR: Induction CS: Induction DA: Induction DE: Induction EL: Empyrev, EN: Induction ES: Induction IT: Induction IT: Induction NL: Inductia PL: Indukljji PT: Induplae SK: Indukola SV: Induction. | ||||||||||||||||||||||||||||||||||||||||||||||||||||||||||||||||||||||||||||||||||||||||||||||||||||||||||||||||||
| Number of cooking zones and/or areas | 2 | 3 | 3 | 4 | |||||||||||||||||||||||||||||||||||||||||||||||||||||||||||||||||||||||||||||||||||||||||||||||||||||||||||||||||
| Heating technology (Induction cooking zones and cooking areas, radiant cooking zones, solid plates) | Induction ** | ||||||||||||||||||||||||||||||||||||||||||||||||||||||||||||||||||||||||||||||||||||||||||||||||||||||||||||||||||||
| For circular cooking zones or area: diameter of useful surface area per electric heated cooking zone, rounded to the nearest 5 mm | 1 | ∅ | 16 18 | 21 18 cm | |||||||||||||||||||||||||||||||||||||||||||||||||||||||||||||||||||||||||||||||||||||||||||||||||||||||||||||||||
Intervenciones
natural_image
Black-and-white photo of a bowl with leaf garnish, surrounded by other bowls (no text or symbols visible)BEDIENUNGSHANDBUCH DE
Kochfeld
natural_image
Diagram of a server rack with ventilation grilles and a coiled cable (no text or symbols)
B

C

D
natural_image
Illustration of hands using a tool to cut or mark a curved object on a surface (no text or symbols visible)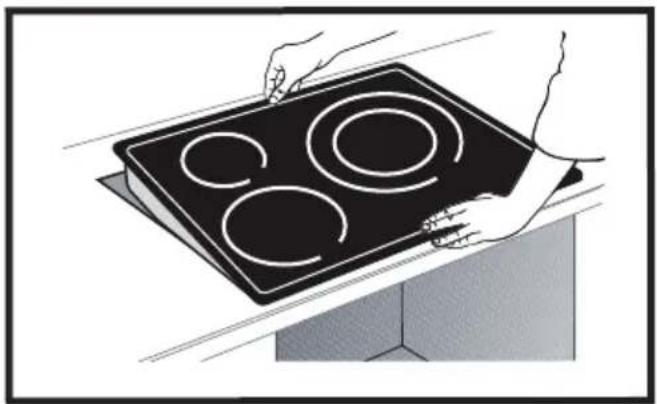
natural_image
Illustration of hands holding a black electric stove with four circular cutouts (no text or symbols)
Wichtig

natural_image
Illustration of a cooking pan with steam rising, showing the lid and pan (no text or symbols)Auto-Stopp:
B: Verkaufsreferenz
C: Service-Referenz
H: Seriennummer
I: QR-Code
Brandt
natural_image
Black-and-white photo of a bowl with leaf garnish, surrounded by other bowls (no text or symbols visible)natural_image
Diagram of a server rack with ventilation grilles and a circular component, no text or symbols present
B
C

D
natural_image
Illustration of hands using a tool to cut or mark a curved object on a surface (no text or symbols visible)
natural_image
Illustration of hands holding a black electric stove with four circular cutouts (no text or symbols)
Σημαντικό

natural_image
Illustration of a cooking pan with steam rising, showing the lid and pan with a crossed-out pan (no text or symbols)Auto-Stop :
natural_image
Black-and-white photo of a bowl with leaf garnish, surrounded by other bowls (no text or symbols visible)NÁVOD K POUŽITÍ CS
Varná deska
ENERGETICKÁ ÚČINNOST....18

POPRODEJNÍ SERVIS ....19
DŮLEŽITÉ BEZPEČNOSTNÍ POKYNY SI PŘED POUŽITÍM POZORNĚ PŘEČTĚTE A USCHOVEJTE PRO BUDOUCÍ POUŽITÍ.
natural_image
Diagram of a server rack with ventilation grilles and a coiled cable (no text or symbols)
natural_image
Illustration of hands using a tool to cut or mark a curved object on a surface (no text or symbols visible)
natural_image
Illustration of hands holding a black electric stove with four circular cutouts (no text or symbols)
Důležité
| Diameter openhaard(cm) | Maximaalvermogen(Watt) | Diameter van debodem van decontainer (cm) |
| 162500 | 10 - 18 | |
| 18 3600 | 11 - 22 | |
| 213600 | 12 - 24 | |
| 28 4000 | 15 - 32 |

SPUŠTĚNÍ - VYPNUTÍ
Mise en Marche :
Zapínání:
Odblokování:
natural_image
Illustration of a cooking process showing a pan on a stove with steam rising, alongside a pan on a stovetop with a crossed-out pan (no text or symbols)Auto-Stop:
natural_image
Black-and-white photo of a bowl with leaf garnish, surrounded by other bowls (no text or symbols visible)BEDIENINGSHANDLEIDING NL
natural_image
Diagram of a solar panel with cooling fins and heat exchangers, showing airflow direction (no text or symbols)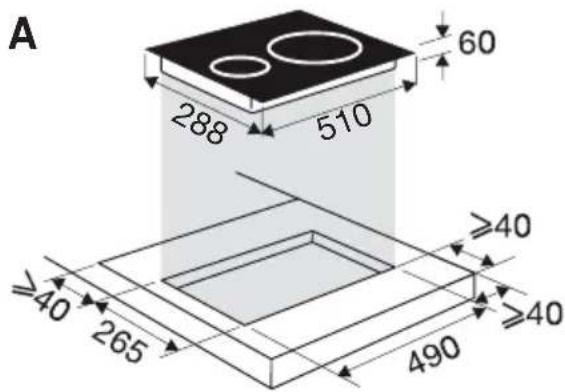
natural_image
Illustration of hands using a tool to cut or mark a curved component on a flat surface (no text or symbols)
natural_image
Illustration of hands holding a four-circular induction cooktop on a kitchen (no text or symbols)
Belangrijk

In-/uitschakelen
Opstarten :
natural_image
Illustration of cooking process: pan on stove with steam rising, and pan on stove with crossed-out pan (no text or symbols)Auto-Stop :
natural_image
Black-and-white photo of a bowl with leaf garnish, blurred bowls in background (no text or symbols)INSTRUKCJA OBSŁUGI PL
Stół do gotowania
Szanowni Klienci!
WIADOMOŚCI SPECJALNE, INCYDENTY ......17

EFEKTYWNOŚĆ ENERGETYCZNA 18

OBSŁUGA POSPRZEDAŻNA 19
WAŻNE ZALECENIA DOTYCZĄCE BEZPIECZEŃSTWA — UWAŻNIE PRZECZYTAĆ I ZACHOWAĆ DO WGLĄDU.
natural_image
Diagram of a solar panel with heat exchangers and cooling fins, showing airflow direction (no text or symbols)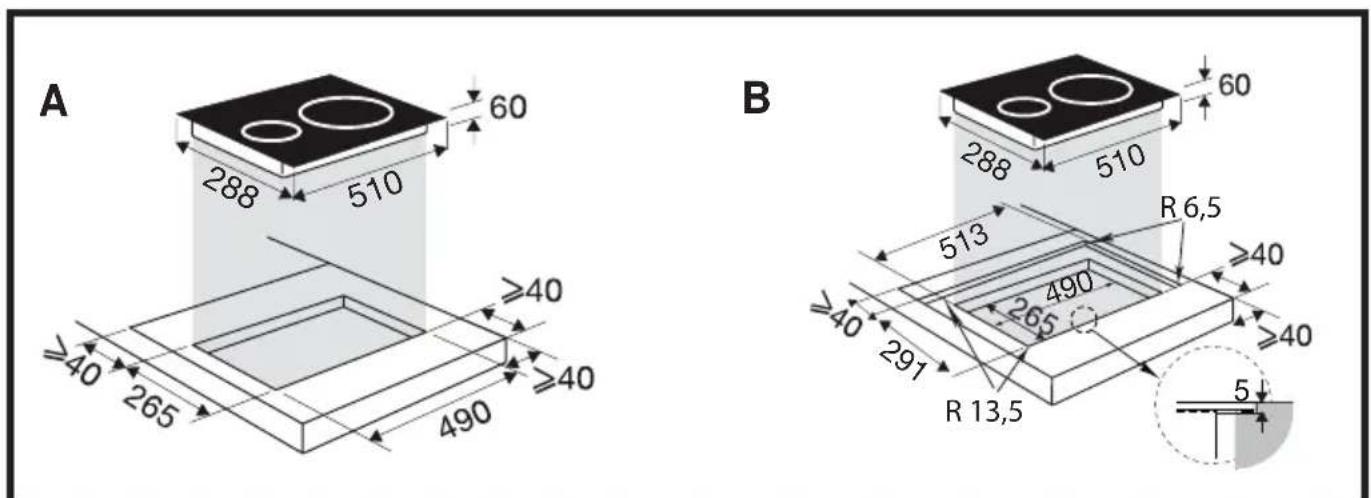
natural_image
Illustration of hands using a tool to cut or mark a curved object on a surface (no text or symbols visible)
natural_image
Illustration of hands holding a black electric stove with four circular cutouts (no text or symbols)
Ważne

natural_image
Illustration of cooking process with a pan on an induction stove and a pan on a stovetop (no text or symbols)Auto-Stop :
natural_image
Black-and-white photo of a bowl with leaf garnish, surrounded by other bowls (no text or symbols visible)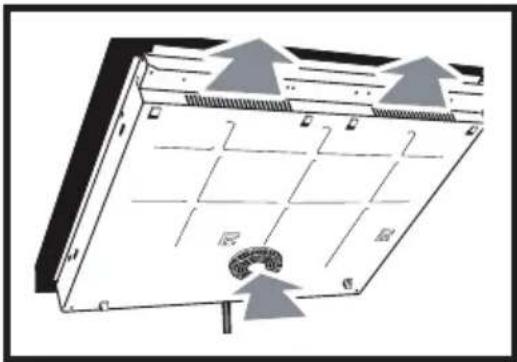
natural_image
Diagram of a solar panel with heat exchangers and cooling fins, showing airflow direction (no text or symbols)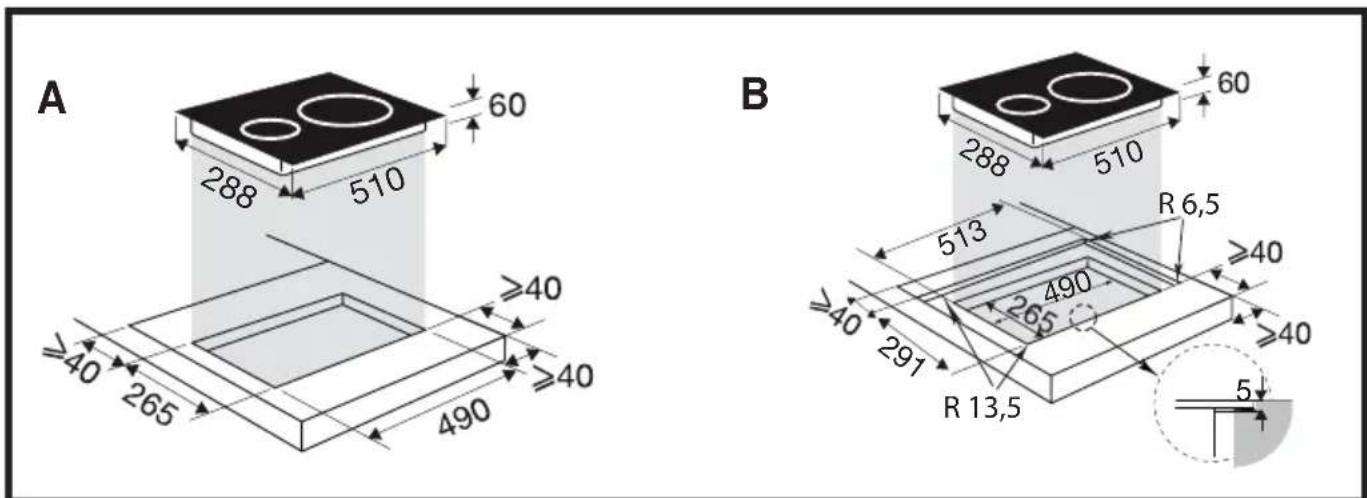

natural_image
Illustration of hands using a tool to cut or mark a curved component on a flat surface (no text or symbols visible)
natural_image
Illustration of hands holding a black electric stove with four circular cutouts (no text or symbols)
Importante

natural_image
Illustration of a cooking pan with steam rising, showing the lid and pan with a cross mark (no text or symbols)Auto-Stop :
natural_image
Black-and-white photo of a bowl with leaf garnish, blurred bowls in background (no text or symbols)MANUAL DE INSTRUÇÕES PT
Placa de cozinha
Caro(a) cliente,
pie
| Segment | Diameter (cm) | |---|---| | Top Left | 16 | | Top Right | 21 | | Bottom Left | 18 | The chart contains three circular segments with their respective diameters. The bottom segment is labeled '18 cm', while the top two segments are labeled '16 cm' and '21 cm'.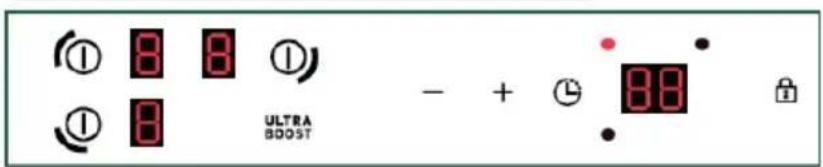
bubble
| Bubble Size (cm) | | :--- | | 16 | | 21 | | 28 |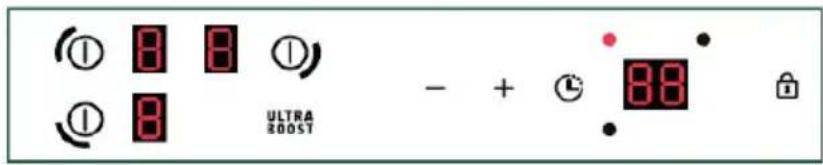
bubble
| Dimension | Value (cm) | |---|---| | Left Circle | 16 | | Middle Circle | 21 | | Right Circle | 28 |
INSTALAÇÃO
Desembalar

Encastre
natural_image
Diagram of a grid-like structure with arrows indicating direction, no text or symbols present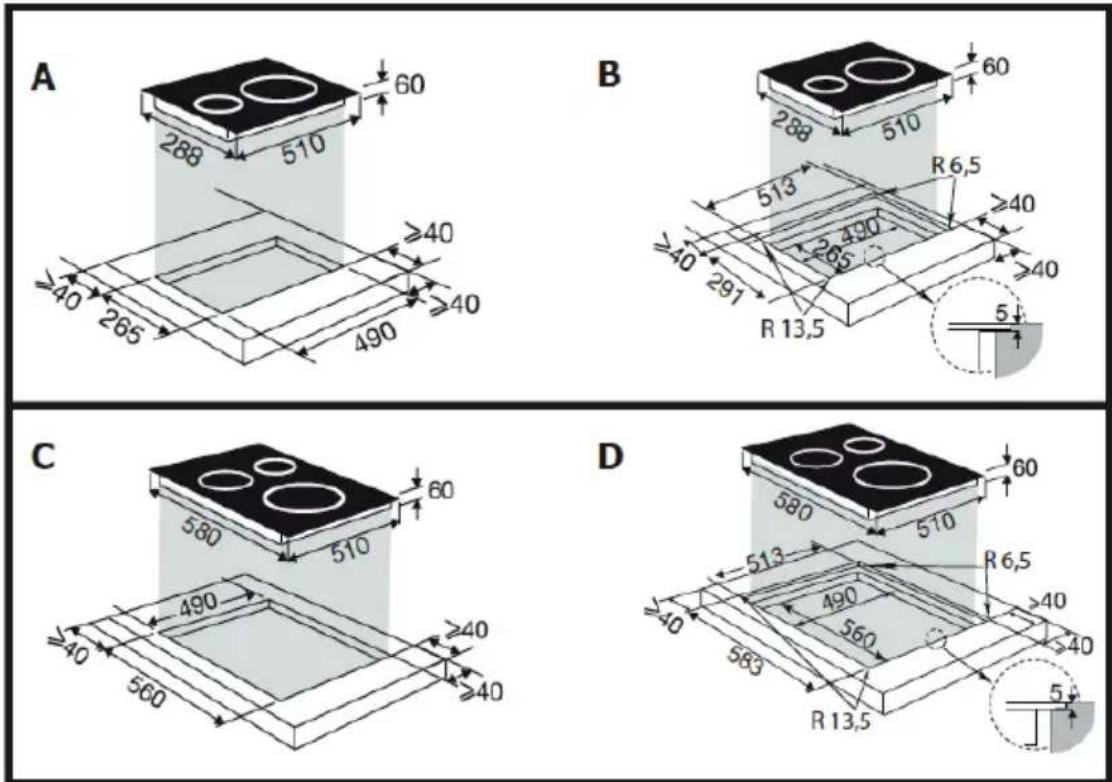
natural_image
Illustration of hands using a tool to cut or repair a component on a grid-patterned surface (no text or symbols)natural_image
Illustration of hands holding a black electric stove with four circular cutouts (no text or symbols)

natural_image
Illustration of a cooking pan with a lid and a pan on a stove, showing steam rising (no text or symbols)| Symbol Unit | Value | ||||||||||||||||||||||||||||||||||||||||||||||||||||||||||||||||||||||||||||||||||||||||||||||||||||||||||||||||
| Model identification | |||||||||||||||||||||||||||||||||||||||||||||||||||||||||||||||||||||||||||||||||||||||||||||||||||||||||||||||||
| Rasing place | |||||||||||||||||||||||||||||||||||||||||||||||||||||||||||||||||||||||||||||||||||||||||||||||||||||||||||||||||
| Type of hole | |||||||||||||||||||||||||||||||||||||||||||||||||||||||||||||||||||||||||||||||||||||||||||||||||||||||||||||||||
| Total power | 700V 700V 7400V 7400W | ||||||||||||||||||||||||||||||||||||||||||||||||||||||||||||||||||||||||||||||||||||||||||||||||||||||||||||||||
| Number of cooking zones under areas | 2 | 3 | 3 | 4 | |||||||||||||||||||||||||||||||||||||||||||||||||||||||||||||||||||||||||||||||||||||||||||||||||||||||||||||
| Heating technology (induction cooking zones and cooking areas, radiation cooking zones, solid plants) | Induction ** | ||||||||||||||||||||||||||||||||||||||||||||||||||||||||||||||||||||||||||||||||||||||||||||||||||||||||||||||||
| For circular cooking zones or areas: diameter of useful surface area per electric heated cooking zone, rounded in the nearest 5 mm | 1 | ∅ | 16.18 | 21.18 cm | |||||||||||||||||||||||||||||||||||||||||||||||||||||||||||||||||||||||||||||||||||||||||||||||||||||||||||||
| 2 | ∅ | 21.16 | 16.18 cm | ||||||||||||||||||||||||||||||||||||||||||||||||||||||||||||||||||||||||||||||||||||||||||||||||||||||||||||||
| 3 | ∅ | 21.28 | 16 cm | ||||||||||||||||||||||||||||||||||||||||||||||||||||||||||||||||||||||||||||||||||||||||||||||||||||||||||||||
| 4 | ∅ | 21 cm | |||||||||||||||||||||||||||||||||||||||||||||||||||||||||||||||||||||||||||||||||||||||||||||||||||||||||||||||
| 5 | ∅ | ||||||||||||||||||||||||||||||||||||||||||||||||||||||||||||||||||||||||||||||||||||||||||||||||||||||||||||||||
| For non-circular cooking zones or areas: length and width of useful surface area per electric heated cooking zone or area, rounded in the nearest 5 mm | 6 | LaW cm | |||||||||||||||||||||||||||||||||||||||||||||||||||||||||||||||||||||||||||||||||||||||||||||||||||||||||||||||
| 7 | LaW cm | ||||||||||||||||||||||||||||||||||||||||||||||||||||||||||||||||||||||||||||||||||||||||||||||||||||||||||||||||
| Energy consumption for cooking zone or area calculated per kg | 1 | ECOMS 2001 | 177,2 | 198,2 | 175,2 | 188,2 | Whkg | ||||||||||||||||||||||||||||||||||||||||||||||||||||||||||||||||||||||||||||||||||||||||||||||||||||||||||
| 2 | ECOMS 2001 | 170,2 | 177,2 | 177,2 | 188,5 | Whkg | Whkg | ||||||||||||||||||||||||||||||||||||||||||||||||||||||||||||||||||||||||||||||||||||||||||||||||||||||||||
| 3 | ECOMS 2001 | 170,2 | 172,6 | 175,1 | 175,1 | 170,2 | 170,2 | 170,2 | 170,2 | Whkg | Whkg | Whkg | Whkg | Whkg | Whkg | Whkg | Whkg | Whkg | Whkg | Whkg | Whkg | Whkg | Whkg | Whkg | Whkg | Whkg | Whkg | Whkg | Whkg | Whkg | Whkg | Whkg | Whkg | Whkg | Whkg | Whkg | Whkg | Whkg | Whkg | Whkg | Whkg | Whkg | Whkg | ||||||||||||||||||||||||||||||||||||||||||||||||||||||||||||||||||||||
| 4 | ECOMS 2001 | 170,2 | 170,2 | 170,2 | 170,2 | 170,2 | 170,2 | 170,2 | 170,2 | Whkg | Whkg | Whkg | Whkg | Whkg | Whkg | Whkg | Whkg | Whkg | Whkg | Whkg | Whkg | Whkg | Whkg | Whkg | Whkg | Whkg | Whkg | Whkg | Whkg | Whkg | Whkg | Whkg | Whkg | Whkg | |||||||||||||||||||||||||||||||||||||||||||||||||||||||||||||||||||||||||||||||
| 5 | ECOMS 2001 | 170,2 | 170,2 | 170,2 | 170,2 | 170,2 | 170,2 | 170,2 | 170,2 | Whkg | Whkg | Whkg | Whkg | Whkg | Whkg | Whkg | Whkg | Whkg | Whkg | Whkg | Whkg | Whkg | Whkg | ||||||||||||||||||||||||||||||||||||||||||||||||||||||||||||||||||||||||||||||||||||||||||
| 6 | ECOMS 2001 | 170,2 | 170,2 | 170,2 | 170,2 | 170,2 | 170,2 | 170,2 | 170,2 | Whkg | Whkg | Whkg | Whkg | Whkg | Whkg | Whkg | Whkg | Whkg | Whkg | Whkg | Whkg | Whkg | Whkg | ||||||||||||||||||||||||||||||||||||||||||||||||||||||||||||||||||||||||||||||||||||||||||