
TISLIM - Cooker BRANDT - Free user manual and instructions
Find the device manual for free TISLIM BRANDT in PDF.


| Product type | Built-in or freestanding cooker |
| Brand | Brandt |
| Model | TISLIM |
| Number of hobs | 4 (mixed gas/electric or all induction depending on version) |
| Oven type | Traditional or multifunction oven |
| Oven capacity | Approximately 70 litres |
| Dimensions (WxHxD) | Approximately 90 x 60 x 60 cm (depending on version) |
| Net weight | Approximately 45 kg |
| Power supply | Natural gas / butane or electric 230V (depending on version) |
| Total power | Up to 10 kW (gas) or 7 kW (electric) |
| Main functions | Cooking by gas burners or induction hobs, oven with natural or assisted convection, grill |
| Controls | Rotary knobs with temperature display |
| Oven lighting | Built-in |
| Timer | With auto shut-off |
| Cleaning | Manual cleaning of enamel surfaces, removable oven glass |
| Maintenance | Regular cleaning of burners or hobs, degreasing the oven |
| Safety | Electronic ignition, gas safety (automatic shut-off if flame goes out), cool door |
| Spare parts | Available from Brandt after-sales service (grids, bulbs, heating elements) |
| Repairability | Repairability index according to official scale (check in the manual) |
| Oven energy class | A+ (depending on model) |
Frequently Asked Questions - TISLIM BRANDT
User questions about TISLIM BRANDT
0 question about this device. Answer the ones you know or ask your own.
Ask a new question about this device
Download the instructions for your Cooker in PDF format for free! Find your manual TISLIM - BRANDT and take your electronic device back in hand. On this page are published all the documents necessary for the use of your device. TISLIM by BRANDT.
USER MANUAL TISLIM BRANDT
FR MANUEL D'INSTRUCTION
EN INSTRUCTION MANUAL
natural_image
Black-and-white photo of a cooking pan on an induction cooktop with shrimp being cooked, accompanied by a plate of stir-fried vegetables (no text or symbols visible)Brandt
Chère Cliente, Cher Client
natural_image
Silhouette of a cooking pot with a lid and handle (no text or symbols)Casserole en émail

Plaque de cuisson
You have just purchased a BRANDT induction cooker and we would like to thank you.
We have placed in this appliance all our passion and know-how in order to meet at best your need. Innovative and efficient: we designed it to be always easy to use.
In the BRANDT products line, you will also find a wide range of small domestic appliances that can be coordinated to your new BRANDT induction cooker.
Of course, in a permanent wish to satisfy as best as possible your expectations toward our products, our after-sales service department is at your disposal and at your listening to answer to all your questions and suggestions.
You can also visit our website www.brandt.com where you will find all our products, as well as additional and useful information.
BRANDT
As part of our commitment to constantly improve our products, we reserve the right to make technical, functional or esthetical properties modifications linked to their technological development

Be careful : Before installing and using your appliance, please carefully read this Guide to Installation and Use, which will allow you to quickly familiarise yourself with its operation
www.brandt.com

TABLE OF CONTENTS
1) INFORMATION FOR THE USER....19
a) Safety recommendations 19
b) Technical data 22
c) Protecting the environment 23
2) APPLIANCE PRESENTATION 23
a) Induction cooker description 23
b) Before the first use 24
c) Suitable and unsuitable pots and containers....24
d) Safety pack 24
3) USING YOUR APPLIANCE 25
a) Use of the control panel 25
b) Starting your appliance.... 25
c) Using the different functions....26
d) Switch off the appliance....27
4) CLEANING AND MAINTENANCE 27
a) Cleaning the induction cooker....27
b) Troubleshooting 28
5) WARRANTY AND CUSTOMER RELATIONS 29
a) Warranty....29
b) Customer relations....29
1) INFORMATION FOR THE USER

Keep this guide with your appliance. If the appliance is ever sold or transferred to another person, ensure that the new owner receives this user guide. Please familiarise yourself with these recommendations before installing and using your appliance. They have been written for your own safety as well as the safety of others.
a) Safety recommendations
IMPORTANT SAFETY INSTRUCTIONS READ CAREFULLY AND KEEP FOR FUTURE USE
GENERAL INFORMATION
Your appliance is designed for standard household use for cooking, reheating foods and liquids. Use this appliance only for its intended uses as described in manual. It shall be used in covered, closed and warmed environment such as a kitchen or a room with the same specifications. The manufacturer declines any responsibility in the case of inappropriate use.
- After removing the packaging, check that the appliance is in good condition and especially that the power cord is not damage. In doubt, contact the nearest After Sales Service.
- Children less than 8 years of age shall be kept away unless continuously supervised.
- Children shall not play with the appliance.
- Keep the appliance and its cord out of reach of children less than 8 years.
Safety tips when installing the appliance

Install or locate this hob only in accordance with the installation instructions provided. See the section 'APPLIANCE PRESENTATION'.
- This appliance must not be placed in a cabinet.
- Do not obstruct any of the vents of your appliance.
- If this equipment is covered or touching flammable material, including curtains, drapes items with a similar nature there is a risk of fire during the use.
- Keep cord away from heated surface.
- The appliance is not intended to be operated by means of an external timer or separate remote-control system.
Safety tips when using the appliance

The appliance and its accessible parts become hot during use. Young children should be kept away.
- This appliance can be used by children aged from 8 years and above and persons with reduced physical, sensory or mental capabilities or lack of experience and knowledge if they have been given supervision or instruction concerning use of the appliance in a safe way and understand the hazards involved.
- The temperature of accessible surfaces may be high when the appliance is operating.
- Ensure that the cookware is suitable for use with an induction hotplate.
- Precautions must be taken when handling the cookware to avoid burns.
- Metallic objects such as knives, forks, spoons and lids should not be place on the hotplate since they can get hot.
- After being used for a long time, the corresponding heating zone of the induction hotplate is till hot. Never touch the ceramic surface to avoid burning.

If the surface is cracked, switch off the appliance to avoid the possibility of electric shock.
Safety tips when cleaning the appliance

Turn the hob off and remove the power plug from the wall socket before cleaning.

Failure to maintain the hob in a clean condition could lead to deterioration of the surface that could adversely affect the life of the appliance and possibly result in a hazardous.
- Cleaning and user maintenance shall not be made by children unless they are supervised.
- This appliance should be cleaned regularly and any food deposits removed.
- Do not use harsh abrasive cleaners or sharp metal scrapers to clean the ceramic glass since they can scratch the surface, which may result in shattering of the glass.
-
For your safety, steam cleaner is not to be used.
-
When unplugging the power cord, do not pull on the cord itself but pull on the plug.
- The supply cord cannot be replaced. If the supply cord is damaged, the appliance should be scrapped. This product is covered by your distributor. For more details, please refer to the warranty conditions supplied.
IMPROPER USE
The manufacturer assumes no liability for improper use. Use this appliances only for the uses described in this manual. Observe general and safety instructions listed in this chapter.
- This induction hob is not intended to be used outdoor.
- This induction hob is intended for home use in private homes. Its use in common areas such as local professionals or pause office or workshop, local camping, hotel, ect... does not respond to an intended use as defined by the manufacturer.
b) Technical data
| Model | Applied voltage/Frequency | Rated power | Net weight | Dimensions mm (HxLxW) |
| TISLIM | 220-240V—50Hz | 2000W | 2.6 Kg | 43x320x395mm |
c) Protecting the environment

At the end of its working life, the product must not be disposed with household waste. It must be taken to a special local authority waste collection centre or to a company providing this service. Disposing household appliances separately avoids possible negative effects on the environment and health and enables the constituent materials to be recycled which saves energy and resources.
To remind you that you must dispose of this appliance correctly the symbol shown above appears on the product warning you not to dispose of it with household waste. For further information, contact your local authority or the shop where you bought the product.

Tips for energy saving
Cooking with a well adjusted lid can save energy. If you use a glass lid, you can perfectly check the cooking.
2) APPLIANCE PRESENTATION
a) Induction cooker description
Control panel :
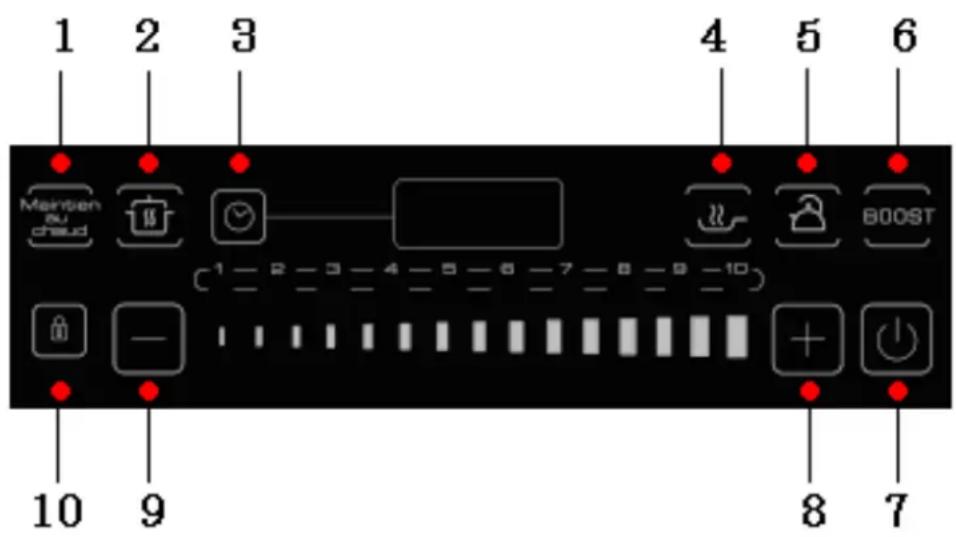
- Keep warm mode
- Simmer mode
- Timer
- Fry mode
-
Boil mode
-
Boost mode
- On/Standby
- Increase power/ time
- Decrease power/time
- Keyboard lock
b) Before the first use
- When unpacking your unit, make sure that you carefully remove all of the packaging materials.
- Before using the appliance for the first time, be sure that it is placed horizontally at least 10 cm away from all sides of the wall, curtains, etc.
- Use an individual socket with more than 10A capacity. Never use a universal socket or share a socket with other appliances. If the use of a multiple socket is indispensable assure that those elements respect the limit power. The appliance must be place on a flat, firm and dry surface. Never move the appliance when it is in process.
- When using the appliance you can hear a slight noise due to a very light vibrating motion of the high frequency container. This is normal and non dangerous.
c) Suitable and unsuitable pots and containers
It's necessary to use suitable pots and containers. Pan test with a magnet: if the magnet "sticks" to the base of the pan, then it is suitable for use with induction cooking. You can also refer to the following description:

Iron oil frying pan

Stainless steal pot

Iron pan

Iron kettle

Enamel stainless steal kettle

Enamel cooking ustensil Iron plate

Requirement for pot materials: containing magnetic induction materials. All the test and authentication of thus product is based on the 430 cookware (bottom diameter 180+/-10mm). The other cookware can not guarantee the best results and performance.
Shape requirement: you can use pots with a diameter (on the higher part) from 12 to 26 cm.
d) Safety pack
- Caution on the heating state of the product surface: if the screen shows an "L" sign surface is cold, if it shows "H" it is hot.
- Over-temperature protection. If the temperature inside the induction cooker body is too high, the appliance will stop heating.
- Over current or voltage abnormality protection. When voltage is abnormal or current changes abruptly, the induction cooker will stop. Once the issues are solved, the induction cooker will work again normally.
- Container detection system. If a pot is moved during process, the unit will stop heating immediately. The appliance will emit a sound and after 1 minute it will automatically return to standby mode.
- Automatic shutdown protection. When the time selected is reached, the induction cooker will shut off automatically until the user triggers the timer again.
- Control Lock (10). This pad allows locking all the control panel to simplify the cleaning but also to preserve and safe children from all risks.
3) USING YOUR APPLIANCE
a) Use of the control panel
- The sensitive pads work with a sense of touch. It is not necessary to put pressure on.
- Use the base of your finger and not the tip as indicated on the images below


- Slide your finger on the slider to increase or decrease the power.
- You will hear a beep each time an action will be registered.
- The control panel must be clean, dry and not be covered by an object or a cloth; even a thin layer of water can create dysfunction.
b) Starting your appliance
After the power supplier is connected, the buzzer sounds and the screen show "L"(cold) or "H"(hot), indicating that the the temperature of the cooking zone is less or higher than 60 degrees. Press on On/standby (7), screen show ----" indicating that the hotplate is in a state of standby and ready to be programmed. You can now use the induction cooker.
You just need to press the + or - buttons of the appliance to select the desired power level or directly use the slider by sliding your finger from left to right or the contrary.
Never put an empty container when the device is on.
Note:
When the device is ready to be used, if no function button is pressed in the following seconds, the induction cooker will switch off automatically after 60 seconds for safety reasons. Screen will show "L", noticing that the temperature is less than 60 degree and that the appliance is OFF.
If you place an incompatible container on the ceramic plates, the LED display will show "E1" and the induction cooker will beep and switch off automatically after 30 seconds.
c) Using the different functions
- Simmer mode

To use this mode, press on the Simmer button (2). A lamp lights up. The simmer cooker entering the simmer state, the default power level shall be level 2. Under this mode, the power cannot be adjusted. Pressing +/- buttons disable simmer mode.
- Fry mode

To use this mode, press on the Fry button (4). A lamp lights up. The default power level shall be level 6. Pressing +/- buttons disable fry mode.
- Boil mode

Boil mode is for boiling water. To use it, press on the Boil button (5). A lamp lights up. The default power level shall be level 10. After about 7 minutes, it will turn to 8 level powers. In this mode, the default working time is 15 minutes. Pressing +/- buttons disable boil mode.
Note: It is recommended to put water that occupies 30% to 80% of the pot capacity when boiling water.
- Boost mode

The boost button (6) allows you to go directly to the highest power level: 10 and then maintain the maximum power without creating overheating of the device or cooking utensils. A lamp lights up. Pressing +/- buttons disable boost mode.
- Keep warm mode

When the appliance is in operation, press on the Keep warm button (1) if you want to keep warm your preparation. A lamp lights up. The appliance will set automatically on the lowest power 1 and will stop after 120 minutes. To set again the power, press directly on the +/- buttons.
- Timer

To use the timer, you just need to select a cooking mode and then press the timer button (3). A lamp lights up. The digital screen will indicate « 00:00 ». During the following 4 seconds, press on the +/- buttons to adjust the cooking time. Each pressure increases or decreases the time by 1 minute. If you maintain the button longer, the time will increase or decrease by increments of 10 minutes. The timer can be set from 1 minute to 180 minutes. When time is over, digital screen will show "H" and you will hear a sight noise. System will switch off automatically. To change time when using device, press timer button (3) then +/- buttons. To cancel the timer function, press again on the timer button (3) during few seconds. Timer light will switch off.
- Child lock mode

To lock the control pads during the cooking, press on Child lock button (10). The indicator<
d) Switch off the appliance
After use, the electric hob is hot, the buzzer rings and the indicator « H » flashes on the screen. To switch off the appliance, press on the On/Standby button (7), then unplug the socket.
Please, refer below table for wattage:
| Level | 1 | 2 | 3 | 4 | 5 | 6 | 7 | 8 | 9 | 10 |
| Wattage(W) | 120 | 300 | 500 | 800 | 1000 | 1200 | 1400 | 1600 | 1800 | 2000 |
4) CLEANING AND MAINTENANCE
a) Cleaning the induction cooker
Switch off and unplug the appliance.

Let it cool down before cleaning.
Regarding the glass-ceramic and the control panel :
• Light dirt: clean with a soft wet cloth.
- Oily dirt: clean with a soft wet cloth dipped with little toothpaste or neutral detergent until the removal of residuals.
- Do not use any flammable, acidic or alkaline materials or substances near the induction cooker, as this may reduce the service life of the induction cooker and pose a fire risk when the induction cooker is turned on.

Note: during the cleaning, never clean the surface of the induction cooker with a rigid brush.
Regarding the air entry and the air vent
After a long time of use, some dust or other dirt may be accumulated at the air entry or air vent. Use a flexible brush or a detergent to clean it. The body of the appliance can be cleaned with caution with a dry cloth.

Note: never immerse the induction cooker in the water and do not maintain it with a steam cleaner.
b) Troubleshooting
Here are the recommended inspections of common failures:
| Problems Points to check | ||
| After the plug in the socket, the indicator (1) and the screen do not light up. | - Make sure that the plug is inserted tightly. - Make sure that the switch, socket, fuse and power line are in good condition. | |
| The button (1) lights up but heating does not start. | - Make sure that the containers are suitable for induction cooker.- Sent it to service facility to repair | |
| Heating stops suddenly during operation. | - Let the appliance cool down- Let air entry and air vent free - Set again the timing- Refer to failure codes | |
| Failure codes | E0 | - Inner circuit error |
| E1 | - No pan or the pan is not suitable | |
| E2 - IGBT is overheat | ||
| E3 | - Input volt is too high | |
| E4 | - Input volt is too low | |
| E5 | - Heat sensor 1 open or short circuit | |
| E6 | - Heat sensor 2 open or short circuit | |
| E1-E3-E4 | Please inspect by self before sending to repair | |
| E0-E2-E5-E6 | Please contact the customer care service (see your warranty card for Toll Free number) | |
5) WARRANTY AND CUSTOMER RELATIONS
a) Warranty
This product is covered by your retailer. For more details, please refer to the warranty conditions supplied.
- Service calls
Any repairs that are made to your appliance must be handled by a qualified professional authorised to work on the brand.
When you call, mention your appliance's "Service" reference, as well as its serial number "Nr".
This information appears on the manufacturer's nameplate which can be found stuck behind the machine.
b) Customer relations
To find out more about all the brand's products you can visit our website: www.brandt.com
To communicate:
You may visit our website www.brandt.com and go to the "CONTACT" section
You may e-mail us: relations.consommateurs@groupebrandt.com
You may write us at the following address:
Or phone us from Monday to Friday from 8:30 am to 6:00 pm :




- Brandt
- TABLE OF CONTENTS
- 1) INFORMATION FOR THE USER....19
- 2) APPLIANCE PRESENTATION 23
- 3) USING YOUR APPLIANCE 25
- 4) CLEANING AND MAINTENANCE 27
- 5) WARRANTY AND CUSTOMER RELATIONS 29
- 1) INFORMATION FOR THE USER
- a) Safety recommendations
- IMPORTANT SAFETY INSTRUCTIONS READ CAREFULLY AND KEEP FOR FUTURE USE
- GENERAL INFORMATION
- Safety tips when installing the appliance
- Safety tips when using the appliance
- Safety tips when cleaning the appliance
- IMPROPER USE
- c) Protecting the environment
- Tips for energy saving
- 2) APPLIANCE PRESENTATION
- b) Before the first use
- c) Suitable and unsuitable pots and containers
- d) Safety pack
- 3) USING YOUR APPLIANCE
- a) Use of the control panel
- b) Starting your appliance
- Never put an empty container when the device is on.
- Note:
- c) Using the different functions
- - Simmer mode
- - Fry mode
- - Boil mode
- - Boost mode
- - Keep warm mode
- - Timer
- - Child lock mode
- d) Switch off the appliance
- 4) CLEANING AND MAINTENANCE
- a) Cleaning the induction cooker
- Let it cool down before cleaning.
- Regarding the glass-ceramic and the control panel :
- Regarding the air entry and the air vent
- b) Troubleshooting
- 5) WARRANTY AND CUSTOMER RELATIONS
- a) Warranty
- b) Customer relations
- To communicate:
Brand : BRANDT
Model : TISLIM
Category : Cooker