E-297 - Basket Pando - Free user manual and instructions
Find the device manual for free E-297 Pando in PDF.

User questions about E-297 Pando
0 question about this device. Answer the ones you know or ask your own.
Ask a new question about this device
Download the instructions for your Basket in PDF format for free! Find your manual E-297 - Pando and take your electronic device back in hand. On this page are published all the documents necessary for the use of your device. E-297 by Pando.
USER MANUAL E-297 Pando
natural_image
Exterior view of a modern office building (no signage)Pando
integralcooking
E-297
MOTOR INT.


Quality Management System
UNE-EN ISO 9001:2015
SGS
EN- The manufacturer will not be held liable for any possible inaccuracies due to printing or transcription errors in this manual. The manufacturer reserves the right to incorporate modifications considered useful or necessary into the products, which will not alter their essential functional and safety characteristics.

text_image
RECOGIDA DE LOS ELECTRODOMÉSTICOSThe symbol on the product or its packaging indicates that this product cannot be disposed of like normal domestic waste. The product must be handed over at a collection point for recycling electrical and electronic equipment. If you ensure that this product is correctly disposed of, you will help to avoid the possible negative environmental and public health effects that could arise from incorrect disposal. For more detailed information about recycling this product, please contact your city authorities, the domestic waste service or the establishment where you purchased it. This electrical appliance is marked in compliance with European Directive 2002/96/EC on electrical and electronic appliance waste (WEEE).

ENVIRONMENTAL PROTECTION AND WASTE TREATMENT
DISPOSAL OF THE PACKAGING. The packaging is marked with in Green Dot.
In its commitment to the protection of the environment and in compliance with the provisions of the European Directive 94/62 / EC on packaging and packaging waste and the derived Law 22/2011 on Contaminated Residues and Soils, Pando entrusts entities of social economy an Integrated Management System, responsible for the periodic collection at the consumer's home or in its vicinity of used packaging and packaging waste for subsequent treatment.
To remove all packaging materials such as cardboard, expanded polyurethane, and film, use the appropriate containers.
This ensures the correct treatment and reuse of packaging materials.
EN - INTRODUCTION
Firstly, we would like to thank you for your confidence in our firm when you chose a Pando extractor hood.
EN - SAFETY INSTRUCTIONS
Read carefully the safety instructions indicated in the use and installation manual enclosed in the accessories and product documentation bag.
Installation should only be carried out by qualified professionals, professional installers or the official technical service.
VERY IMPORTANT!
When opening the packaging, check that all the components are in perfect state and all the accessories are present. If this is not the case, contact the dealer and do not install. Once installed, any damage to the exterior such as scratches, dents, stains, etc. will not be covered by the guarantee.
DO NOT REMOVE THE PROTECTIVE PLASTIC FROM THE HOOD UNTIL IT IS COMPLETELY INSTALLED, IF THIS PLASTIC IS NOT PRESENT IN AREAS THAT COULD HAVE A RISK OF DAMAGE DURING INSTALLATION, IT IS RECOMMENDED TO APPLY PROTECTIVE MATERIALS AGAINST IMPACT, SCRATCHES AND CONTACT WITH CORROSIVE AGENTS.
TAKE ESPECIAL CARE DURING THE INSTALLATION IF OTHER WORK IS ALSO IN PROGRESS, BECAUSE PAINT, SILICON, PLASTER AND OTHER MATERIALS COULD CONTAIN CORROSIVE CHEMICALS THAT MAY DAMAGE THE PRODUCT, IN THESE CASES IT IS RECOMMENDED TO ADEQUATELY PROTECT THE HOOD, BY FOR EXAMPLE, HERMETICALLY COVERING AREAS THAT COULD BE AFFECTED WITH PLASTIC.
THIS WILL AVOID DAMAGE TO THE OUTSIDE OF THE APPLIANCE, SOMETHING THAT WILL NOT BE COVERED BY THE GUARANTEE.
EN - Features and recommendations for ceiling-mounted hoods.
FORM OF THE CEILING:
The “ideal” ceiling to install these hood units must be completely unobstructed and flat over all of its surface. If for design reasons you choose to have different heights or steps in the ceiling, it must be ensured that the suction losses (you must send us a plan to determine whether the surrounding ceiling is suitable).
CEILING HEIGHT:
For optimum operation of the hood, the distance between the hob or cooking area and the base of the hood should be between 140 and 170cm. For other distances outside this range consult our Pando Technical Division.
POSITION OF THE HOOD:
The hood must be centred over the cooking area.
AIR INTAKE GRILLE:
To ensure optimum suction by the hood it is essential that the kitchen has a constant inward flow of air; a ventilation grille at floor level is the perfect solution for this.
INSTALLING THE FLUE PIPE:
We strongly recommend that you use S.E.C. System® fume extractor flue pipes from Pando, as these considerably improve convenience in use and the soundproofing of the unit.
It must be taken into account and provide that the hood and peripherals must have easy and safe access for possible maintenance or repair tasks of the official Pando technical service (SAT).
The guarantee will NOT cover the costs and means necessary for access to a product that does not meet these conditions. In the event that the product is not easily accessible or safe, a criterion that will be issued by SAT in its initial inspection, it will be the responsibility of the client to place the means and assume the necessary costs so that the SAT can perform the intervention adequately.
CONTENIDO / CONTEÚDO / CONTENU / CONTENT

text_image
(x1) Plantilla
text_image
A (x2)B (x4)

C (x1)


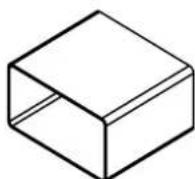
natural_image
Simple line drawing of a rectangular object with a dashed internal line and a small circle on the top (no text or symbols)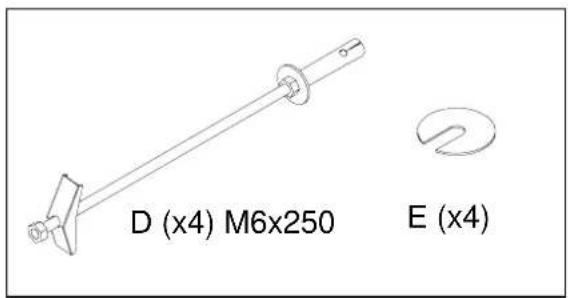
text_image
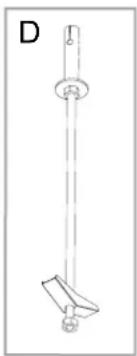
D (x4) M6x250 E (x4)220×90
F (x4)

G (x4) H (x4)
∅150


(x1) 2000mm
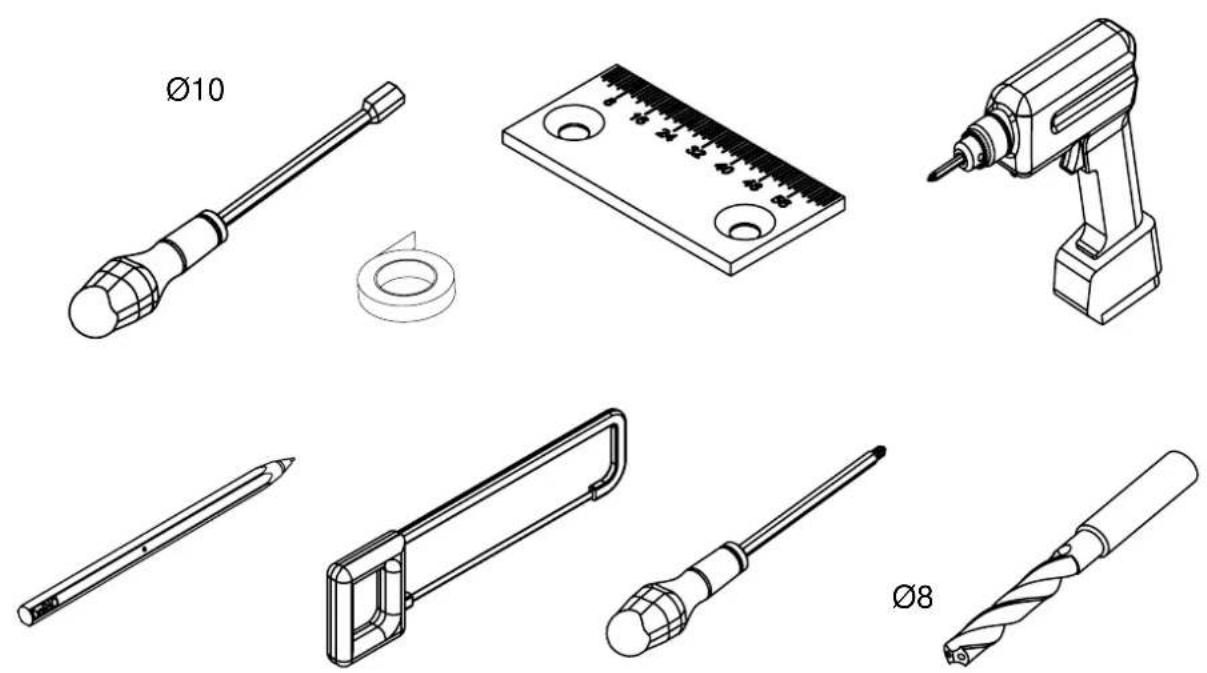
HERRAMIENTAS NECESARIAS / FERRAMENTAS NECESSÁRIAS / LES OUTILS NÉCESSAIRES / TOOLS REQUIERED
COTAS / DIMENSÕES / COTES / DIMENSIONS

text_image
437 102 46 36 510 560 671 900 / 1150 950 / 1200
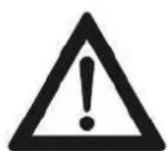
¡PELIGRO! PERIGO! DANGER!
natural_image
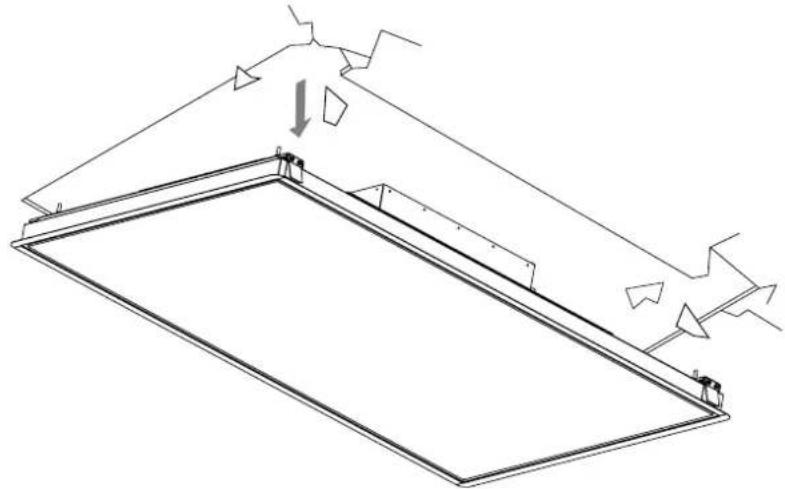
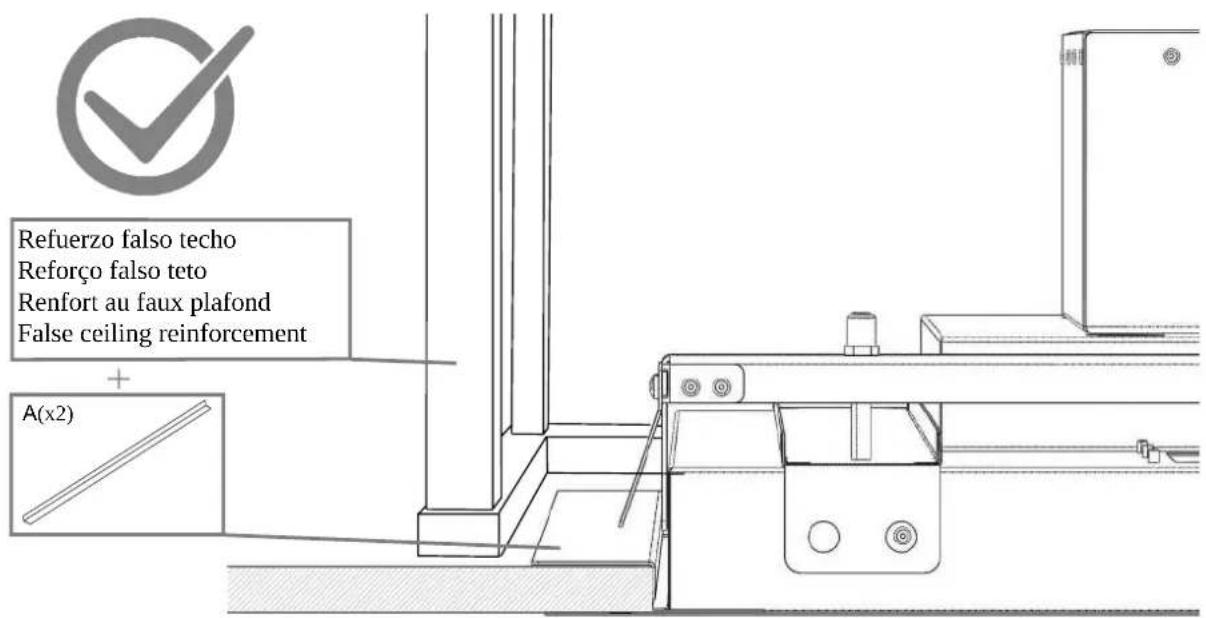
Technical line drawing of a rectangular frame with internal supports and a downward arrow indicating force or movement (no text or symbols)Do not install the hood directly into drywall or any other non-resistant surface.
Use the accessories (Dx2) supplied with the hood and install a reinforcement into false ceiling.
text_image
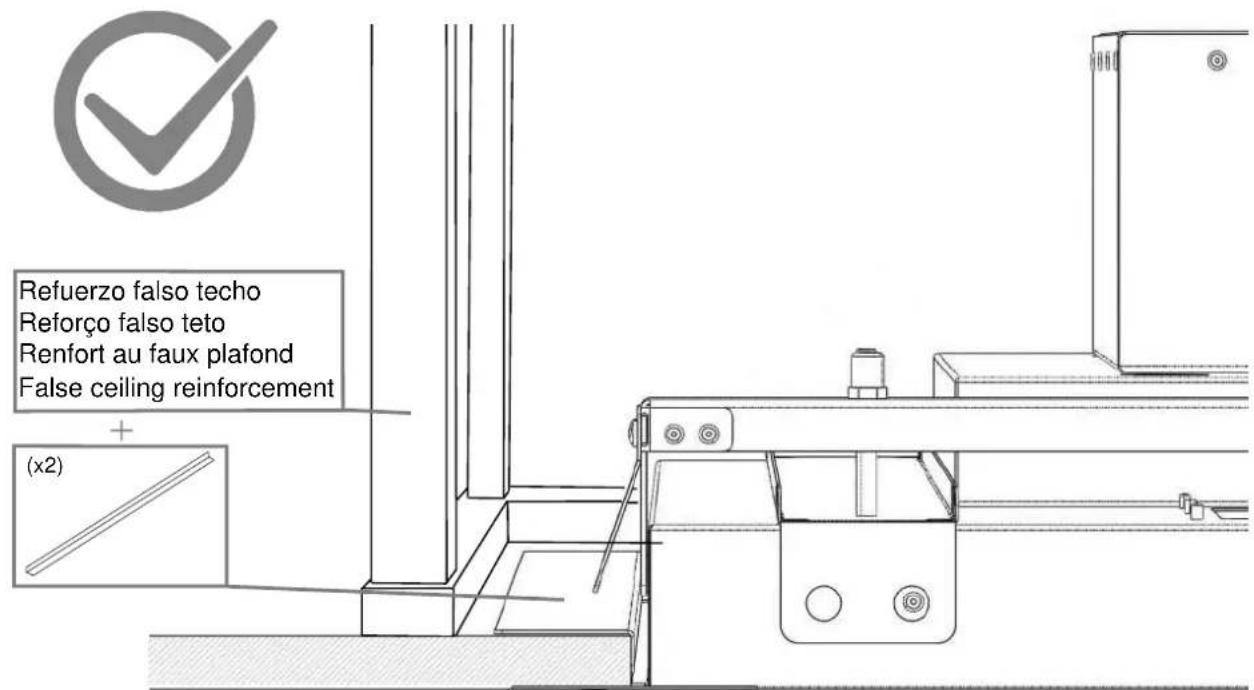
Refuerzo falso techo Reforço falso teto Renfort au faux plafond False ceiling reinforcement (x2)OPCIONAL/ OPCIONAL/ EN OPTION/ OPTIONAL
ESCOJER SALIDA / ESCOLHA A SAÍDA / CHOISISSEZ LA SORTIE / CHOOSE OUTPUT

natural_image
Three technical line drawings of a mechanical assembly with mounting brackets and control panels (no text or symbols)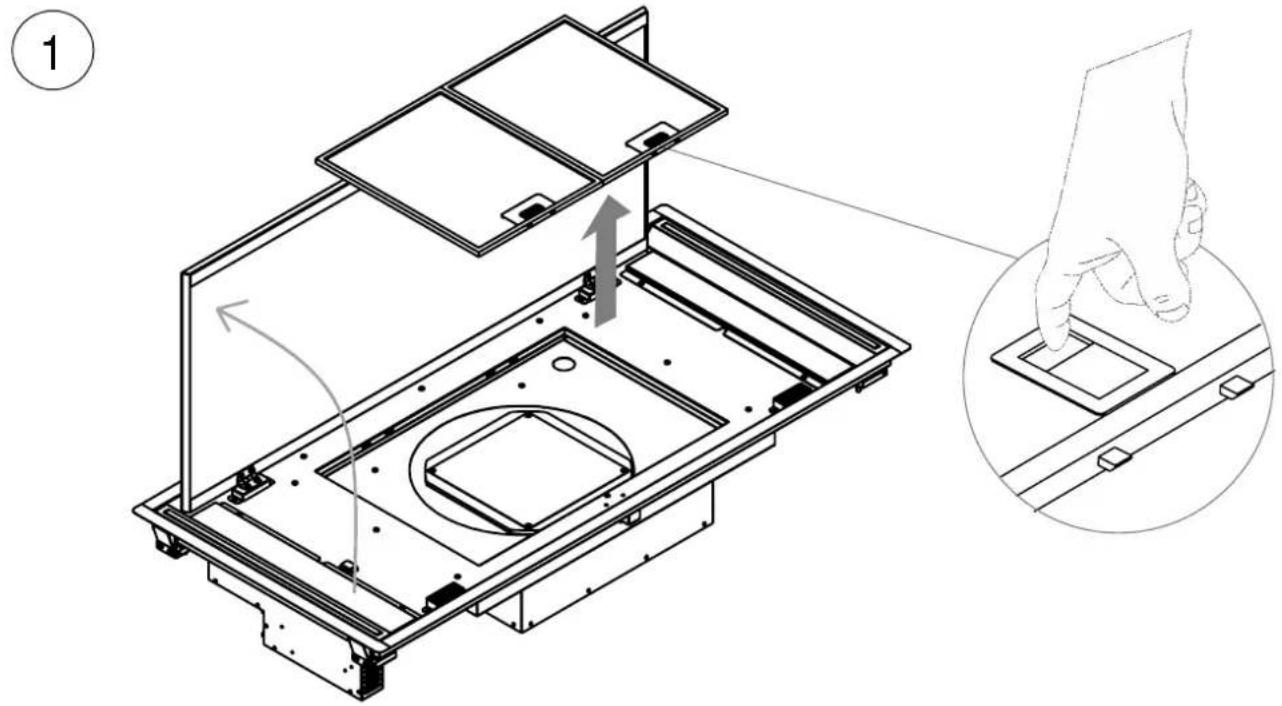
text_image
Technical diagram showing a device assembly with labeled components and a magnified view of the component being placed.
text_image
(2) (X4)OPCIONAL/ OPCIONAL/ EN OPTION/ OPTIONAL
ESCOJER SALIDA / ESCOLHA A SAÍDA / CHOISISSEZ LA SORTIE / CHOOSE OUTPUT
3

text_image
Technical diagram showing a mechanical assembly with angular annotations and directional arrows indicating motion or assembly.
text_image
(4) (X4)
natural_image
Technical line drawing of a mechanical assembly with internal components and directional arrows (no text or symbols)OPCIONAL/ OPCIONAL/ EN OPTION/ OPTIONAL
GIRO PUERTA / ROTAÇÃO A PORTA / TOURNER PORTE / DOOR ROTATION
1
natural_image
Diagram of a device's internal structure showing a panel with red arrows indicating upward movement, and an inset close-up of the component (no text or symbols)2

text_image
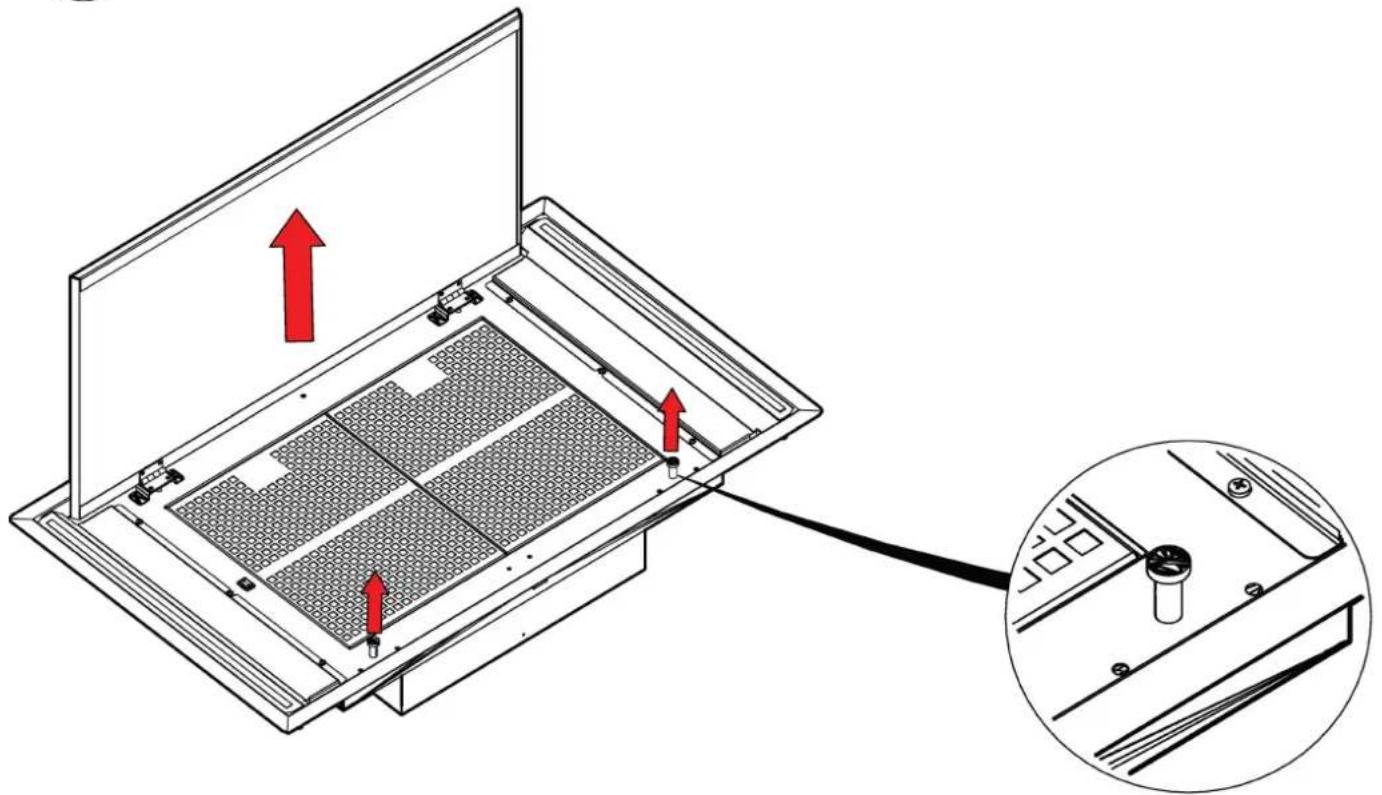
Diagram showing a device with red arrows indicating downward force or reduction, pointing to a panel structure.INSTALACIÓN / INSTALAÇÃO / INSTALLATION / INSTALLATION
OPCIÓNA A / OPÇÃO A / OPTION A / OPTION A p.20


natural_image
Technical line drawing of a mechanical assembly or enclosure with no visible text or symbols
natural_image
Technical line drawing of a mechanical device with a cylindrical component and mounting bracket (no text or symbols)EN- Fixing to false ceiling with clamps
INSTALACIÓN / INSTALAÇÃO / INSTALLATION / INSTALLATION
OPCIÓNA B / OPÇÃO B / OPTION B / OPTION B p.31

natural_image
Simple line drawing of a vertical pole with a circular base and a small bracket at the base (no text or symbols)EN- Fixing to the forge with threaded rods

natural_image
Technical line drawing of a mechanical assembly or enclosure with no visible text or symbolsINSTALACIÓN / INSTALAÇÃO / INSTALLATION / INSTALLATION

natural_image
Technical line drawing of a mechanical assembly or enclosure with supports and mounting points (no text or symbols)
natural_image
Technical line drawing of a mechanical device with a cylindrical component and a rectangular base (no text or symbols)
text_image
OPCIÓN OPÇÃO OPTION OPTION$$ A $$
ES- ANCLAJE A FALSO TECHO CON GRAPAS PT- ANCORAGEM AO TETO FALSO COM GRAMPOS FR- ANCRAGE AU FAUX PLAFOND AVEC DES AGRAFES EN- ANCHORAGE TO FALSE CEILING WITH STAPLES
ES
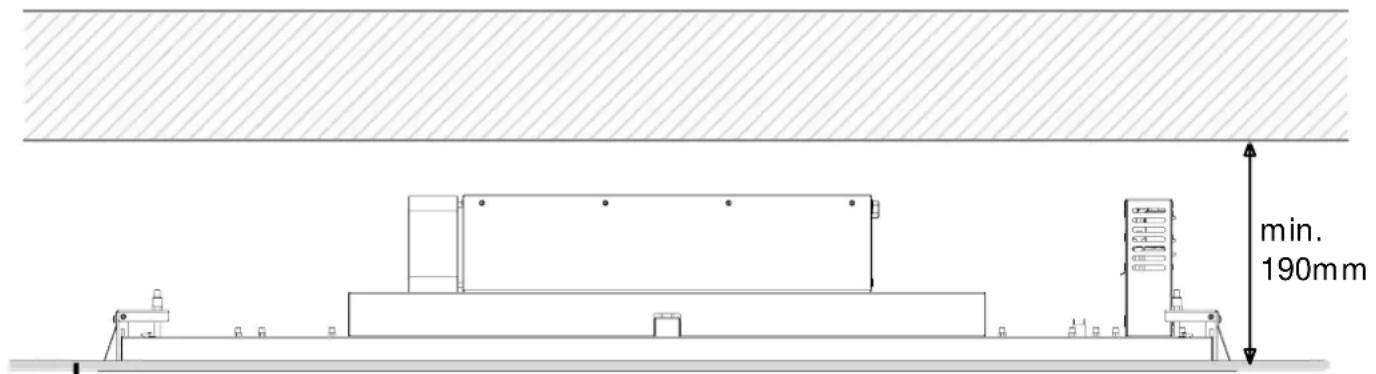
Install to false ceiling once reinforced, prepared to support a minimum weight 60 Kg. Do not install the hood directly into drywall or any other non-resistant surface.
text_image
min. 190mmRegulación grapas, máximo 25mm.
Clamps regulation, maximum 25mm.
ENCASTRE / INSIRA / ENCASTREMENT / INSERT

text_image
910 / 1160 515INSTALACIÓN / INSTALAÇÃO / INSTALLATION / INSTALLATION
OPCIÓNA A / OPÇÃO A / OPTION A / OPTION A

1

natural_image
Simple line drawing of a diamond shape with a pencil inside, no text or symbols present2
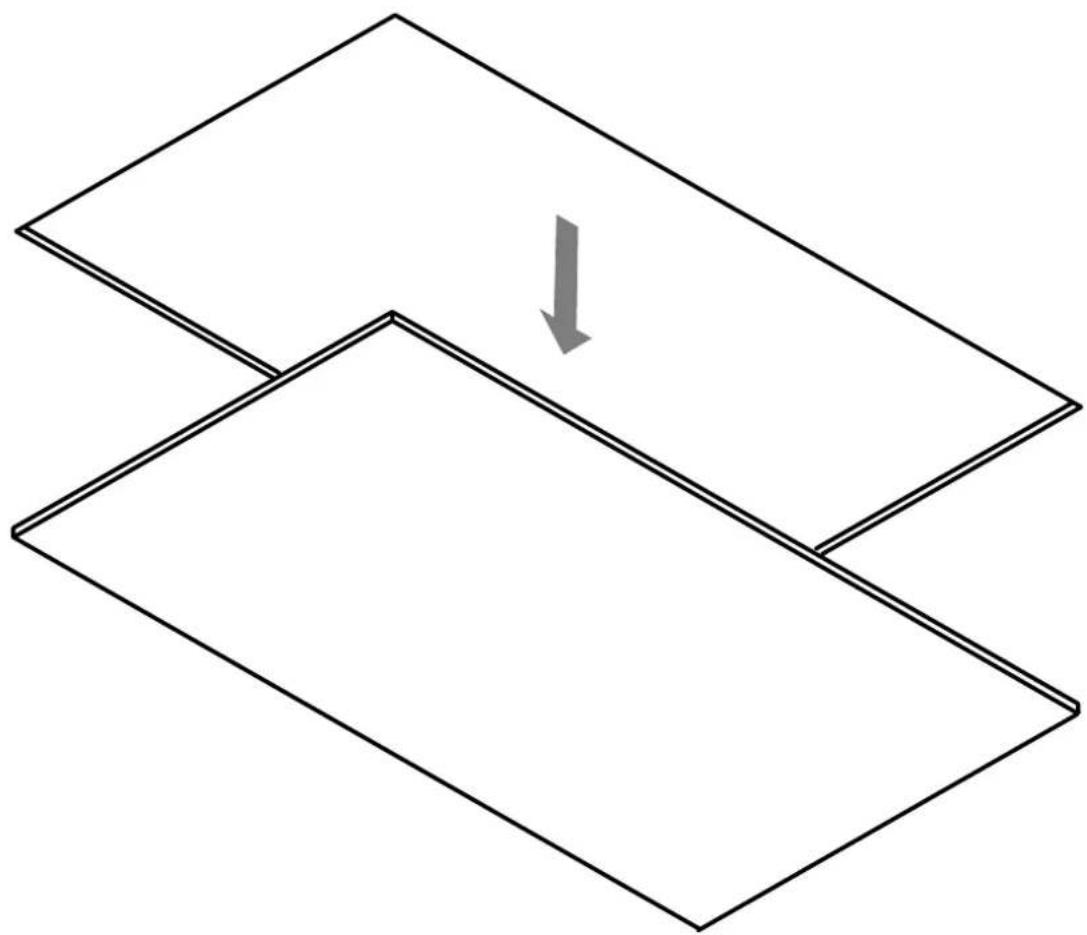
natural_image
Abstract geometric diagram with two overlapping parallelograms and a downward arrow, no text or symbols presentINSTALACIÓN / INSTALAÇÃO / INSTALLATION / INSTALLATION
OPCIÓNA A / OPÇÃO A / OPTION A / OPTION A


text_image
A(x2) 3 4ES-Instalar un soporte adecuado, preparado para soportar mínimo 60 Kg de peso.
No instale la campana directo a paneles de cartón yeso u otra superficie no resistente.
PT-Instale um suporte adequado, preparado para suportar um peso mínimo 60 Kg.
Não instale o exaustor diretamente ao placa de reboco ou outra superfície não resistente.
FR-Installer un support adapté, il doit supporter un poids minimum 60 Kg.
N'installer la hotte directement sur aux cloisons sèches ou à toute autre surface non résistante.
EN-Install a proper support, prepared to stand a minimum weight 60 Kg. Do not install the hood directly in the drywall or any other non-resistant surface.
text_image
Refuerzo falso techo Reforço falso teto Renfort au faux plafond False ceiling reinforcement A(x2)INSTALACIÓN / INSTALAÇÃO / INSTALLATION / INSTALLATION
OPCIÓNA A / OPÇÃO A / OPTION A / OPTION A

5

natural_image
Technical line drawing of a mechanical assembly with no visible text or symbols6

text_image
(X4)
natural_image
Diagram showing two cable termination setups with arrows indicating motion (no text or symbols)INSTALACIÓN / INSTALAÇÃO / INSTALLATION / INSTALLATION
OPCIÓNA A / OPÇÃO A / OPTION A / OPTION A

7

natural_image
Technical line drawing of a mechanical assembly with an inset showing hand pressing a component (no text or symbols present)8
text_image
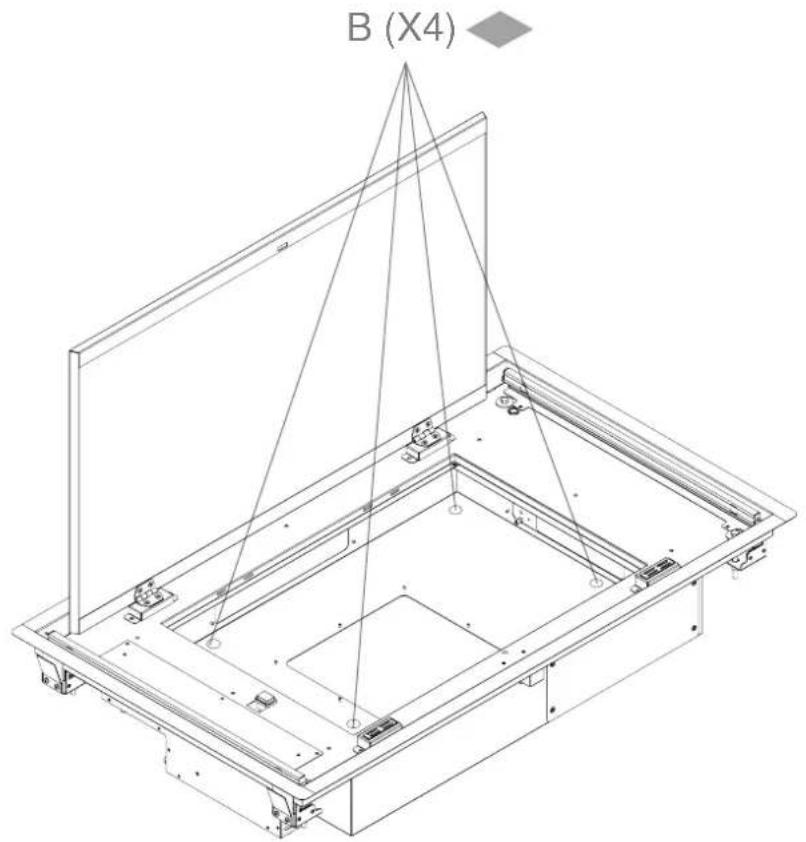
B (X4)INSTALACIÓN / INSTALAÇÃO / INSTALLATION / INSTALLATION
OPCIÓNA A / OPÇÃO A / OPTION A / OPTION A

9

text_image
H → F → G
text_image
10
text_image
C(x1)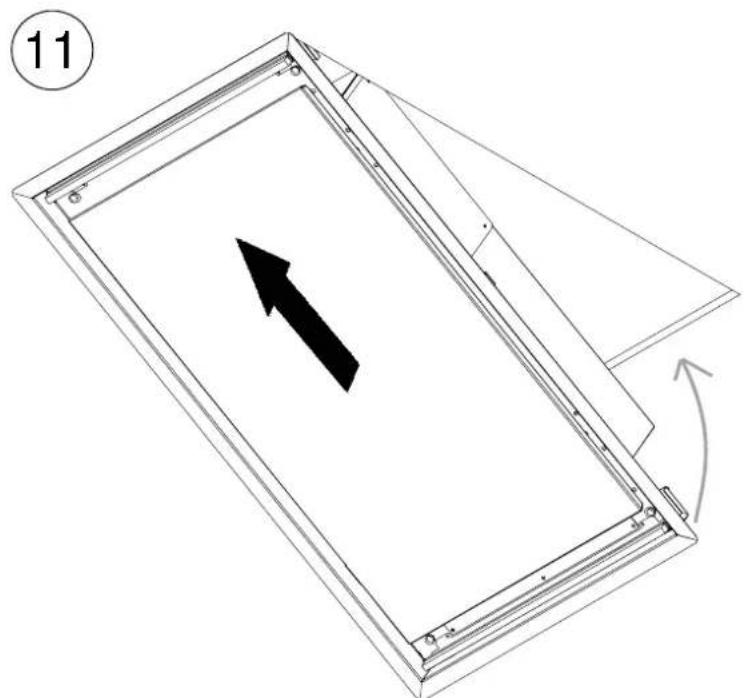
natural_image
Technical line drawing of a rectangular frame with an arrow indicating direction, no text or symbols presentEN- IMPORTANT: Remember that the hood should not be installed directly in the drywall or any other non-resistant surface.
INSTALACIÓN / INSTALAÇÃO / INSTALLATION / INSTALLATION
OPCIÓNA A / OPÇÃO A / OPTION A / OPTION A


text_image
(12) (X4) (X4) Ajustar hasta falso techo Ajustar ao teto falso Ajuster au faux plafond Fix to false ceiling max. 0.5 Newtons /m²(X4)
14
16
natural_image
Isometric line drawing of a rectangular frame with no text or symbols
natural_image
Architectural line drawing of a building structure with ground level and wall (no text or symbols)
natural_image
Technical line drawing of a vertical mechanical component with a circular base and cylindrical shaft (no text or symbols)
text_image
OPCIÓN OPÇÃO OPTION OPTION BES- ANCLAJE A FORJADO CON VARILLAS ROSCADAS PT- ANCORA DE TETO FORJADA COM HASTES ROSCADAS FR- ANCRAGE AU PLANCHER AVEC TIGES FILETEES EN-FIXING TO THE FORGE USING THREADED RODS

natural_image
Diagram showing a screwdriver with a rotating switch and red X-shaped lines intersecting, no text or symbols present.
text_image
A(x2)INSTALACIÓN / INSTALAÇÃO / INSTALLATION / INSTALLATION
OPCIÓNA B / OPÇÃO B / OPTION B / OPTION B

ENCASTRE / INSIRA / ENCASTREMENT / INSERT

text_image
910 / 1160 515
text_image
X 190-265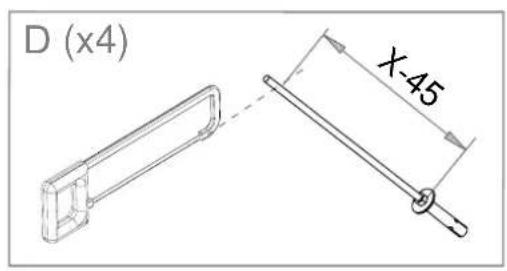
text_image
D (x4) X-45INSTALACIÓN / INSTALAÇÃO / INSTALLATION / INSTALLATION
OPCIÓNA B / OPÇÃO B / OPTION B / OPTION B
B
1
2
3

text_image
510 320
text_image
PLANTILLA TEMPLATE4

text_image
PLANTILLA TEMPLATE5
∅10
6
D (x4)
80mm
INSTALACIÓN / INSTALAÇÃO / INSTALLATION / INSTALLATION
OPCIÓNA B / OPÇÃO B / OPTION B / OPTION B


natural_image
Technical line drawing of a mechanical assembly with mounting brackets and a central panel (no text or symbols)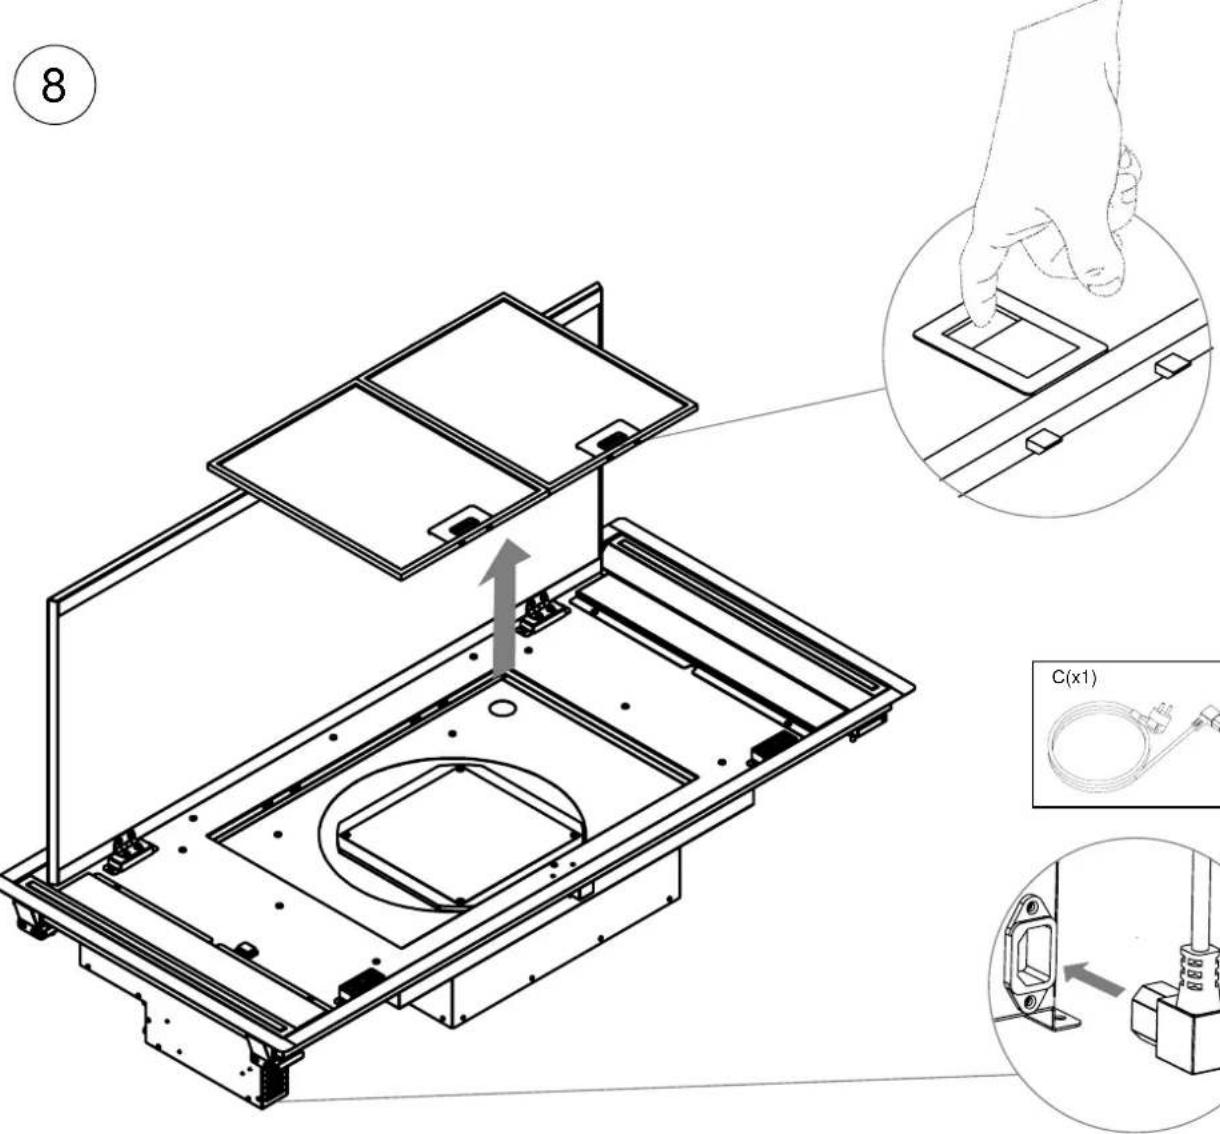
text_image
8 C(x1)INSTALACIÓN / INSTALAÇÃO / INSTALLATION / INSTALLATION
OPCIÓNA B / OPÇÃO B / OPTION B / OPTION B

9

text_image
H → F → G10

natural_image
Technical line drawing of a mechanical assembly with mounting brackets and a central circular component (no text or symbols)INSTALACIÓN / INSTALAÇÃO / INSTALLATION / INSTALLATION
OPCIÓNA B / OPÇÃO B / OPTION B / OPTION B

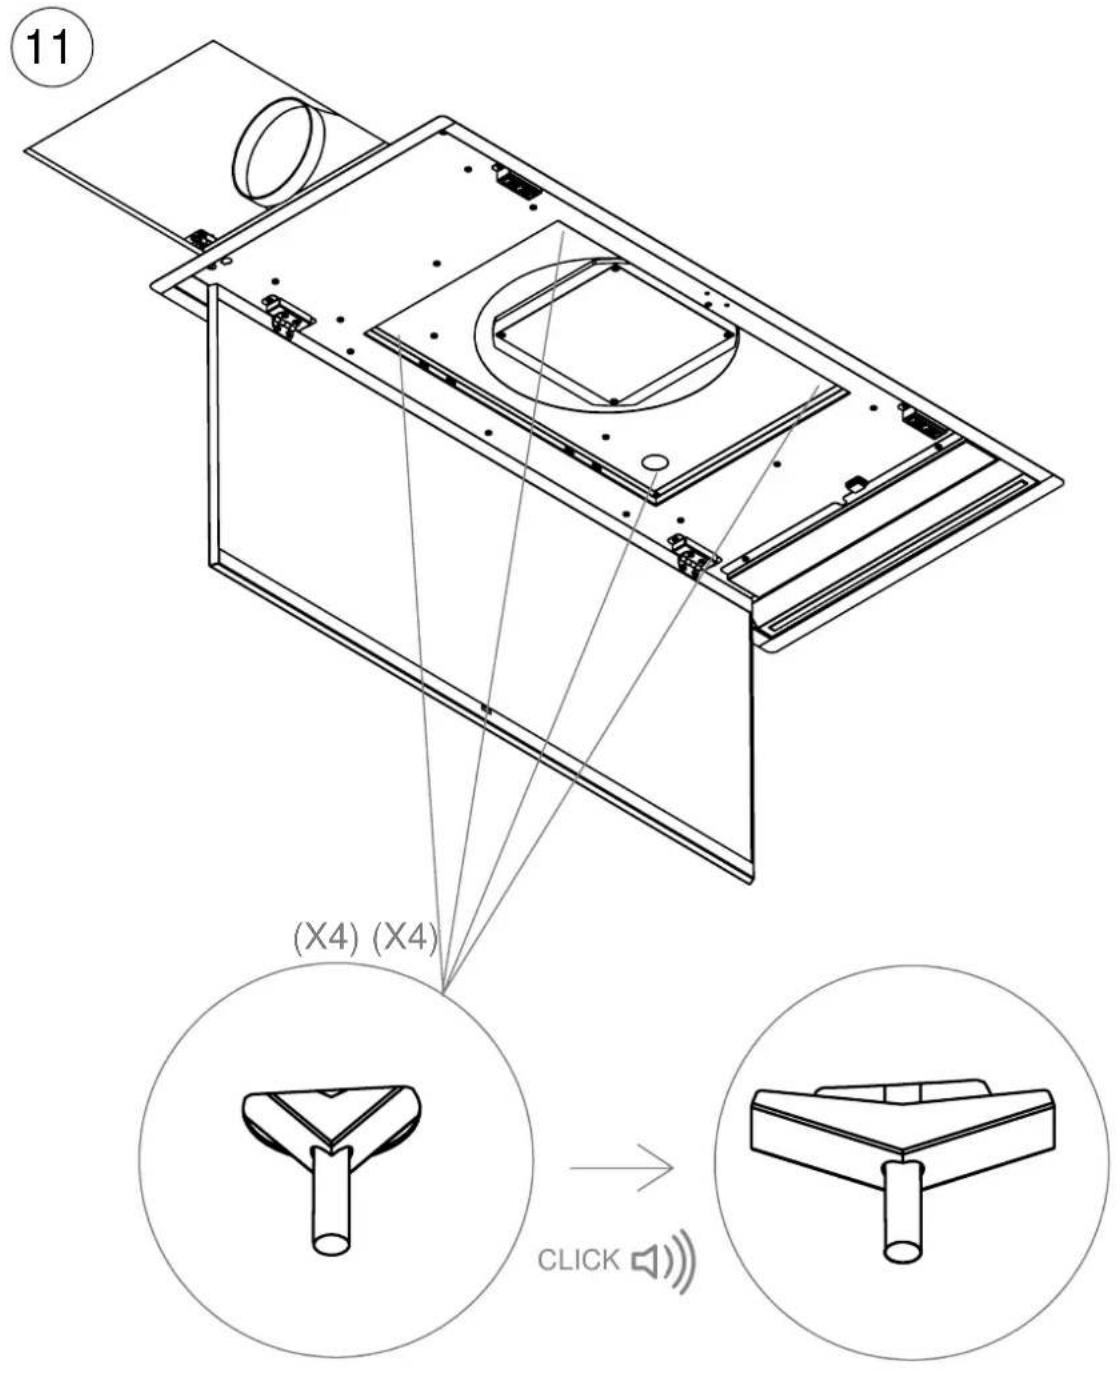
text_image
(11) (X4) (X4) CLICK
text_image
12 E (x4)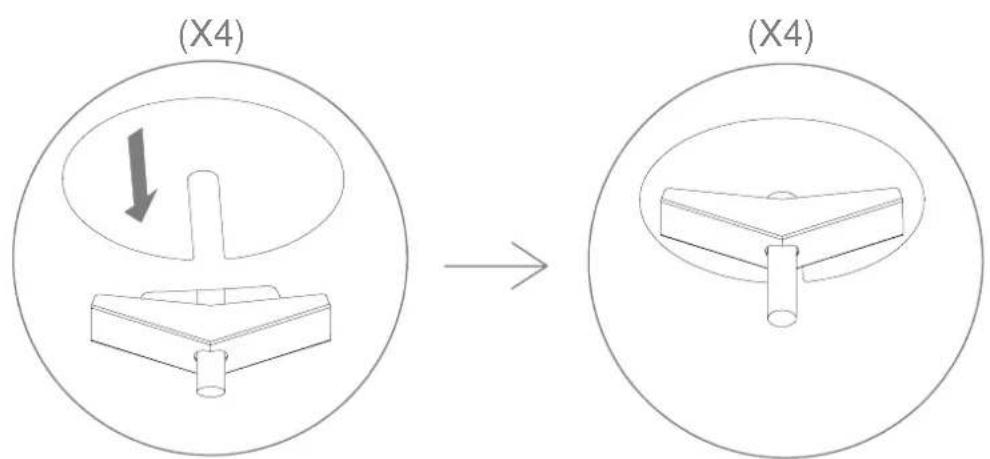
text_image
(X4) (X4)INSTALACIÓN / INSTALAÇÃO / INSTALLATION / INSTALLATION
OPCIÓNA B / OPÇÃO B / OPTION B / OPTION B

13

natural_image
Technical diagram showing a mechanical assembly with a circular component and an arrow indicating direction (no text or symbols)14

natural_image
Diagram showing a cable connector with an arrow pointing to a square component, enclosed in a circle (no text or symbols)15
natural_image
Technical line drawing of an open electronic device casing with internal components and mounting brackets (no text or symbols)
natural_image
Line drawing of a device casing with internal compartments and a magnified inset showing a hand pressing a button on a keyboard (no text or symbols)17
 | ON/OFF,Press this symbol to turn on the motor,press again to turn off. |
 | Press this symbol to reduce the motor speed. |
 | Press this symbol to increase motor speed,Note: If you have a motor version that exceeds 650m^3/h , 3rd or 4th speed will be be time limited.(*see Ecodesign Timer section). |
 | LAST TIME: When the motor is on at any speed, pressing this button will start a 5 -minute timer, at the end of which time the motor and lights will switch off. When on, it is possible to adjust the speed to the desired level. This function is indicated on the display by flashing dots.This function offers a visual indicator by flashing the pilot lamp. |
 | Blue LED that will light up whenever a function is pressed. |
 | MAIN OR WORKING LIGHT: Press to switch on main lights and press again to switch off.COURTESY OR AMBIENT LIGHT: (Optionally, depending on model and version) Keeping the key pressed for 2 seconds will switch on the courtesy light, and continuing pressing will switch it off again. |
A - SYNCHRONIZATING THE REMOTE CONTROL (* only if necessary, it is already synchronized):
- Connect the hood to the mains or turn on the hood switch, optional under filters or panel.
- AT TENTION!: once step 2 is completed, when connecting the hood to the electricity :
DO NOT TOUCH ANY COMMAND KEY
UNTIL AFTER 5 SECONDS

- After the first 5 seconds , in the interval time between 5 and 20 seconds, with the remote control facing the hood, press or hold the LIGHT button on the remote control , and the lights on the hood will light up, confirming that the process has been successfully performed.

text_image
OFF ON <5" 5" ~ 20"If it takes more than 20 seconds to synchronize the control, the hood switchboard closes the reception and does not record any code, you must repeat the process, making sure to press the key between 5 "and 20".
MANTENIMIENTO / MANUTENÇÃO / MAINTENANCE / MAINTENANCE
FILTRO ALUMINIO / FILTRO ALUMÍNIO / FILTRE D'ALUMINIUM / ALUMINIUM FILTER
1
natural_image
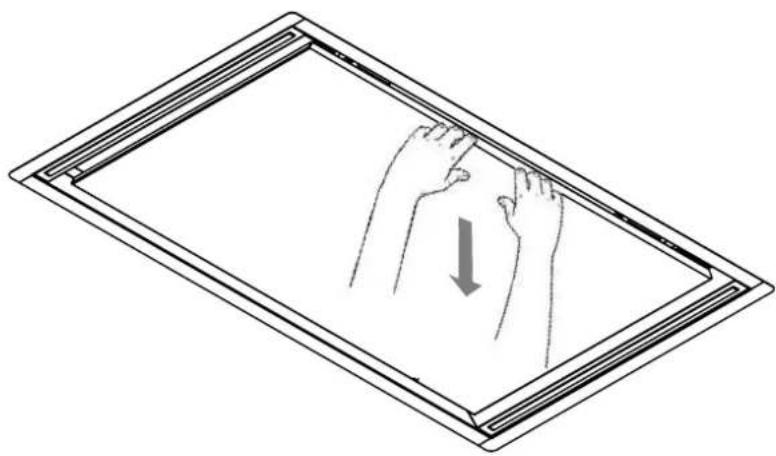
Illustration of two hands holding a tool inside a rectangular frame, with a downward arrow indicating motion (no text or symbols)2

natural_image
Technical line drawing of a mechanical assembly with an inset showing a bracket attachment mechanism (no text or symbols)3

natural_image
Diagram showing a device assembly with a magnified inset of a hand holding a small component (no text or symbols present)MANTENIMIENTO / MANUTENÇÃO / MAINTENANCE / MAINTENANCE FILTRO DE CARBON ACTIVADO (FCLR-AE), LAVABLE Y REACTIBABLE DE ALTA EFICIENCIA (OPCIONAL) FILTRO DE CARVAO ATIVADO (FCLR-AE), LAVÁVEL E REACTIBABLE ALTA EFICIÊNCIA. (OPCIONAL) FILTRE AU CHARBON ACTIVÉ (FCLR), LAVABLE ET RETRIGGERABLE HAUTE EFFICACITE. (EN OPTION) ACTIVATED CARBON FILTER (FCLR), WASHABLE AND REACTIVATABLE HIGH EFFICIENCY. (OPTIONAL)
1
2
3
MANTENIMIENTO / MANUTENÇÃO / MAINTENANCE / MAINTENANCE
ILUMINACION Y CARACTERISTICAS LED / ILUMINAÇÃO E CARATERISTICA LED ÉCLAIRAGE ET CARACTÉRISTIQUES LED / LED LIGHTING AND FEATURES
ATENCIÓN!
LED type lights involve a complex manipulation in addition to an air connection involving an internal connector risk of electric shock, therefore this type of handling must be done by the Pando official technical service or a qualified and authorized professional. The manufacturer will not be liable for any damage caused by mishandling of the LED lights by unauthorized personnel.
1

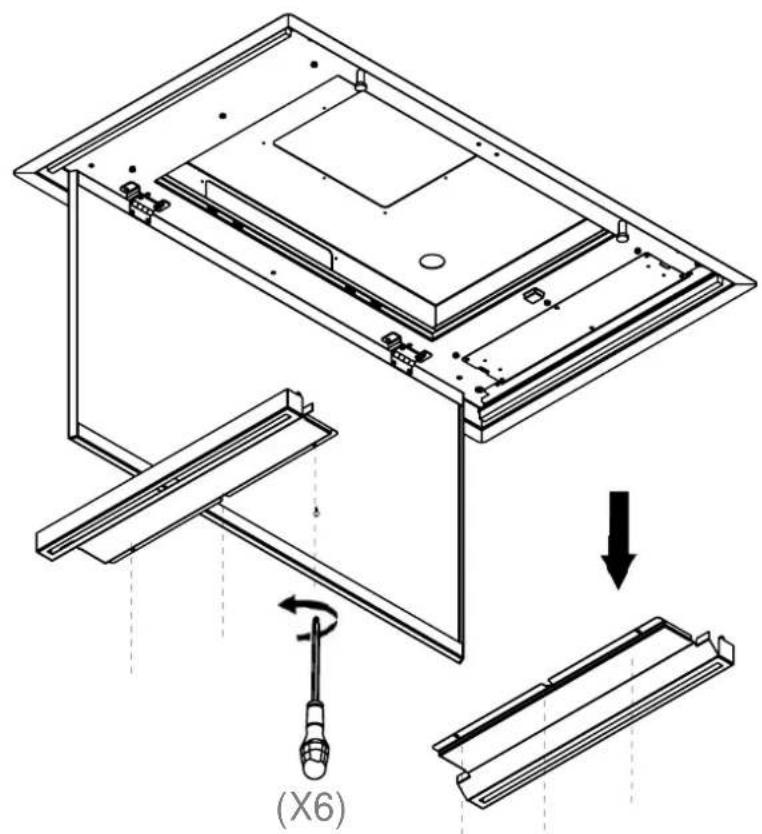
text_image
(X6)
natural_image
Illustration of hands connecting wires to a device, showing two different cable configurations (no text or symbols present)Long= 480mm
P=4.32W
A=24VDC
DESMONTAR / DESMONTAR DÉSINSTALLER / UNINSTALL
1
text_image
(X6)2
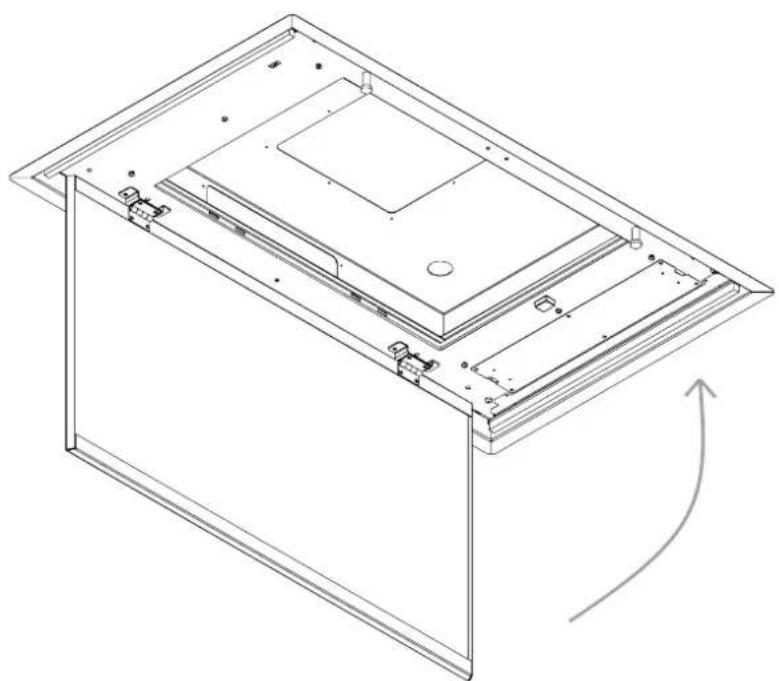
natural_image
Technical line drawing of a rectangular electronic device with internal components and an arrow indicating rotation (no text or symbols)DESMONTAR / DESMONTAR DÉSINSTALLER / UNINSTALL
3
(X2)
4
NOTAS/NOTAS/REMARQUES/NOTES:

text_image
INOX CLEAN LIMPIADOR, ABRILLANTADOR Y PROTECTOR DE ACERO INOXIDABLE PandoES
ESPRODUCTO EXCLUSIVO
LIMPIADOR,
ABRILLANTADOR Y
PROTECTOR DE ACERO INOXIDABLE
INOX PANDO, Referencia 1059.
PROPIEDADES:
EXCLUSIVE PRODUCT CLEANER, POLISH AND STAINLESS PROTECTOR
INOX PANDO, Reference 1059.
PROPERTIES:
Degreaser especially recommended for polishing stainless steel surfaces, with its complex formula based on paraffin it leaves an invisible film that acts as a protector and makes it shine.
APPLICATIONS:
Cleans, polishes and evens out stainless steel surfaces of extractor hoods and stainless steel kitchen furniture.
INOXPAN S.L.
Pol. Ind. El Cros
text_image
QR code with a central hammer and sickle symbol in the centerSERVICIO POST VENTA España, Portugal y Andorra
text_image
QR code with a central logo featuring crossed hammer and screwdriver symbolsEnvironmental Management System Certification
UNE-EN ISO 14001:2015
ES20/208675


Quality Management System
UNE-EN ISO 9001:2015
ES19/86566