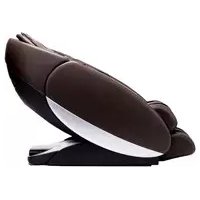
Perfect Chair PC-610 - Massage device Human Touch - Free user manual and instructions
Find the device manual for free Perfect Chair PC-610 Human Touch in PDF.

| Product Type | Reclining Massage Chair |
| Brand | Human Touch |
| Model | Perfect Chair PC-610 |
| Category | Massage Device |
| Dimensions (reclined) | 162.5 cm (L) x 81.3 cm (W) x 78.7 cm (H) |
| Product Weight | 40.8 kg |
| Power Supply | 110-120 V AC, 60 Hz, 150 W |
| Maximum User Weight | 181.4 kg |
| Required Recline Clearance | 30.48 cm |
| Main Functions | Electric zero-gravity recline, independent leg rest, adjustable headrest, adjustable lumbar support (air), Jade Heat heating system (far infrared), backup battery for power outage |
| Upholstery Material | Soft-Hyde synthetic leather or natural leather depending on finish |
| Care and Cleaning | Unplug before cleaning; use a dry cloth for controls; for upholstery, vacuum or clean with mild furniture shampoo; natural leather requires conditioning every 3 months |
| Batteries | 4 AA alkaline batteries for the control panel; 1 9V battery for backup (not included) |
| Safety | Sensors under armrests preventing recline if an obstacle is present; automatic heating shutoff after 2 hours; polarized plug; double insulation |
| Spare Parts and Repairability | Repairs by authorized representative only; no user-serviceable parts; replacement parts available through manufacturer |
| Warranty | Standard warranty included; product registration required at humantouch.com |
| General Information | Ergonomic chair designed to relieve spinal pressure in zero-gravity position; multiple trim options: Comfort, Performance, Supreme |
Frequently Asked Questions - Perfect Chair PC-610 Human Touch
User questions about Perfect Chair PC-610 Human Touch
0 question about this device. Answer the ones you know or ask your own.
Ask a new question about this device
Download the instructions for your Massage device in PDF format for free! Find your manual Perfect Chair PC-610 - Human Touch and take your electronic device back in hand. On this page are published all the documents necessary for the use of your device. Perfect Chair PC-610 by Human Touch.
USER MANUAL Perfect Chair PC-610 Human Touch
©2020 Human Tauney, LLC. Patents pending and intellectual property rights entered.
No medical claims are warranted, or implied by the use of the product.
H100-76.25 is a 1%Gr=4% of H100-130.25%.
C-5007810CPS-XA-BE
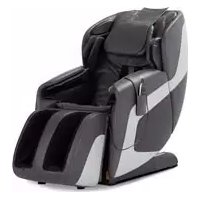
Human Touch® Perfect Chair®
PC-600 / PC-610


human touch
be your best. feel your best."
use & care manual
ENG FRC ESN
Register your product ONLINE today
www.humantouch.com/register
Register your product ONLINE today
www.humantouch.com/register

human touch
be your best. feel your best."
For more than four decades, Human Touch has established itself as an industry leader that is changing the lives of its customers with products and services that help them feel, perform, and live their best. Developed in cooperation with the medical community and industry experts, we deliver products that blend patented technology, craftsmanship and intelligent ergonomics with superior design to enable therapeutic relief for everyone.
Our industry-leading message chairs, Perfect Chair® retailers and evolving set of innovative solutions share attributes in the case-of-use, attention to performance and quality, and design to adapt to most any lifestyle. These attributes are highly valued by our customers and garner broad industry award and recognition. As a result, Human Touch empowers people to enjoy greater health and vitality in their professions, pursuits and everyday lives. And with a population increasingly aware of the benefits of wellness, Human Touch extends its brand leadership and available solutions for the benefit of everyone.
humantouch.com
Register your product at www.humantouch.com to ensure your product is in our system to simplify the warranty process should you ever need it.
Human Touch® Perfect Chair®
PC-600 / PC-610
WITH
Human Touch® Perfect Chair®
Comfort, Performance,
or Supreme Upholstery Packages
*Comfort upholstery package not available for PC-600.
welcome to human touch®
You have just purchased one of the finest pieces of ergonomic furniture available. The Human Touch® Perfect Chair® artfully blends the best of aesthetics, technology and wellness in a sealing experience that transcends the highest standards of comfort. Our vision was to create a zero gravity chair so extraordinary it deserves to be called the Perfect Chair.
With the power to independently position your recline angle and leg elevation, the intuitive five-way omni-control allows for simple transition in our most adjustable Perfect Chair ever. The power recline system passes the body into a virtually weightless position, as it elevates the legs above the heart and reduces weight on the spine. This remarkable chair relieves the soreness, tension and fatigue caused by the earth's constant pulling, while its fixed form seating position ensures maximum ergonomic posture at all recline angles.
To ensure that you don't overlook any of your chair's features, and that you use it safely, read this manual carefully. Then sit back, relax, and enjoy the many benefits of the Perfect Chair!
keep it safe
IMPORTANT SAFETY INSTRUCTIONS
When using an electrical appliance, basic precautions should always be followed, including the following:
READ ALL INSTRUCTIONS BEFORE USING THIS APPLIANCE.

DANGER: TO REDUCE THE RISK OF ELECTRICAL SHOCK
ALWAYS UNPLUG THIS PRODUCT FROM THE ELECTRICAL OUTLET IMMEDIATELY AFTER USING AND BEFORE CLEANING OR SERVICING.

WARNING: RISK OF ELECTRIC SHOCK, FIRE, AND INJURY, THIS PRODUCT MUST BE USED IN ACCORDANCE WITH THE FOLLOWING INSTRUCTIONS:
- DO NOT PUT HANDS OR FINGERS NEAR THE FOOTREST MECHANISM ON THE UNDERSIDE OF THE CHAIR WHILE THIS PRODUCT IS RUNNING. TOUCHING THE MECHANISM CAN RESULT IN INJURY.
- IF THE SUPPLY CORD IS DAMAGED, IT MUST BE REPLACED BY THE MANUFACTURER OR ITS SERVICE AGENT OR A SIMILARLY QUALIFIED PERSON IN ORDER TO AVOID A HAZARD.
- AN APPLIANCE SHOULD NEVER BE LEFT UNATTENDED WHEN PLUGGED IN, UNPLUG FROM OUTLET WHEN NOT IN USE, AND BEFORE PUTTING ON OR TAKING OFF PARTS.
- CLOSE SUPERVISION IS NECESSARY WHEN THIS PRODUCT IS USED BY, ON, OR NEAR CHILDREN, INVALIDS, OR DISABLED PERSONS. KEEP CHILDREN AWAY FROM EXTENDED FOOT SUPPORT (OR OTHER SIMILAR PARTS).
- USE THIS PRODUCT ONLY FOR ITS INTENDED USE AS DESCRIBED IN THIS MANUAL. DO NOT USE ATTACHMENTS NOT RECOMMENDED BY THE MANUFACTURER.
- NEVER OPERATE THIS PRODUCT IF IT HAS A DAMAGED CORD OR PLUG, IF IT IS NOT WORKING PROPERLY, IF IT HAS BEEN DROPPED OR DAMAGED, OR DROPPED INTO WATER. RETURN THIS PRODUCT TO A SERVICE CENTER FOR EXAMINATION AND REPAIR.
• DO NOT CARRY THIS APPLIANCE BY SUPPLY CORD OR USE CORD AS A HANDLE. - ALWAYS KEEP THE POWER CORD AWAY FROM HEATED SURFACES.
- NEVER OPERATE THIS PRODUCT WITH THE AIR OPENINGS BLOCKED. KEEP THE AIR OPENINGS FREE OF LINT, HAIR, AND THE LIKE.
- NEVER DROP OR INSERT ANY OBJECT INTO ANY OPENING.
• DO NOT USE OUTDOORS. - DO NOT OPERATE WHERE AEROSOL (SPRAY) PRODUCTS ARE BEING USED OR WHERE OXYGEN IS BEING ADMINISTERED.
- TO DISCONNECT, TURN ALL CONTROLS TO THE OFF POSITION, THEN REMOVE PLUG FROM OUTLET.
- DO NOT USE THIS PRODUCT WHEN STANDING ON A DAMP FLOOR, OR WHEN ANY PART OF THE BODY IS IN CONTACT WITH PLUMBING OR ANY SIMILAR GROUND.
- DO NOT USE THIS PRODUCT IF NOISE ABOVE NORMAL SOUND IS HEARD.
• DO NOT STAND ON OR IN APPLIANCE. USE ONLY WHILE SEATED. -
THIS APPLIANCE IS NOT INTENDED FOR USE BY PERSONS (INCLUDING CHILDREN) WITH REDUCED PHYSICAL, SENSORY OR MENTAL CAPABILITIES, OR LACK OF EXPERIENCE AND KNOWLEDGE, UNLESS THEY HAVE BEEN GIVEN SUPERVISION OR INSTRUCTION CONCERNING USE OF THE APPLIANCE BY A PERSON RESPONSIBLE FOR THEIR SAFETY. CHILDREN SHOULD BE SUPERVISED TO ENSURE THAT THEY DO NOT PLAY WITH THE APPLIANCE.
-
DO NOT USE WHILE SLEEPING.
• DO NOT USE ON AN INFANT. - THIS PAD IS NOT TO BE USED BY OR ON AN INVALID, SLEEPING OR UNCONSCIOUS PERSON, OR A PERSON WITH POOR BLOOD CIRCULATION UNLESS CAREFULLY ATTENDED.
• DO NOT USE ON AREAS OF INSENSITIVE SKIN. - BURNS CAN OCCUR REGARDLESS OF CONTROL SETTING; CHECK SKIN UNDER PAD FREQUENTLY.
■ NEVER USE PAD WITHOUT COVER IN PLACE. - DO NOT USE PINS OR OTHER METALLIC MEANS TO FASTEN THIS PAD IN PLACE.
- DO NOT SIT ON OR CRUSH PAD - AVOID SHARP FOLDS.
• NEVER PULL THIS PAD BY THE SUPPLY CORD.
• DO NOT USE THE CORD AS A HANDLE - IT IS NOT NECESSARY TO OPEN THE COVER TO EXAMINE THE PAD BEFORE EACH USE.
- LOOP CORD LOOSELY WHEN STORING, TIGHT WRAPPING MAY DAMAGE CORD AND INTERNAL PARTS
- READ AND FOLLOW ALL INSTRUCTIONS ON BOX OR PACKED WITH PAD BEFORE USING.
- THE HEATING PAD MUST NOT BE LAUNDERED.
- REVIEW THE ASSEMBLY INSTRUCTIONS TO CONFIRM THAT THE APPROPRIATE CRITICAL COMPONENTS AND ACCESSORIES ARE BEING USED WITH THE FURNISHING.
- THE PRODUCT SHOULD BE INSTALLED FLATLY AND FIRMLY ON THE FLOOR.
SAFETY PRECAUTIONS
• COMFORTABLE CLOTHING IS RECOMMENDED WHILE USING THIS PRODUCT.
- IF YOU FEEL ANY ABNORMAL DISCOMFORT DURING THE OPERATION OF THIS PRODUCT, TURN OFF THE POWER IMMEDIATELY AND DO NOT USE THE PRODUCT. CONSULT YOUR PHYSICIAN.
• DO NOT PULL ON THE AC GORD.
- WHEN USING THIS PRODUCT AFTER IT HAS BEEN IN STORAGE. CHECK TO SEE THAT THE PRODUCT IS OPERATING PROPERLY PRIOR TO USE.
- ALWAYS CONFIRM THAT THERE ARE NO OBSTACLES BEHIND THE PRODUCT AND THAT THERE IS SUFFICIENT SPACE TO RECLINE.
• TO AVOID INJURY, KEEP PETS AWAY FROM THE CHAIR WHEN IN USE
DO NOT ATTEMPT TO REPAIR THIS PRODUCT YOURSELF.
- THIS PRODUCT IS DESIGNED FOR PERSONAL IN-HOME USE. COMMERCIAL USE WILL VOID WARRANTY.
- THIS HEATING PAD HAS A POLARIZED PLUG (ONE BLADE IS WIDER THAN THE OTHER) AS A SAFETY FEATURE. THIS PLUG WILL FIT INTO A POLARIZED OUTLET ONLY ONE WAY. IF THE PLUG DOES NOT FIT FULLY INTO THE OUTLET, REVERSE THE PLUG. IF IT STILL DOES NOT FIT, CONTACT A QUALIFIED ELECTRICIAN. DO NOT ATTEMPT TO DFEAT THIS SAFETY FEATURE
SAVE THESE INSTRUCTIONS
SERVICING OF DOUBLE INSULATED PRODUCTS
In a double-insulated product, two systems of insulation are provided instead of grounding. No grounding means is provided on a double-insulated product, nor is a means for grounding to be added to the product. Servicing a double-insulated product requires extreme care and knowledge of the system, and is to be done only by qualified service personnel. Replacement parts for a double-insulated product must be identical to the parts they replace. A double-insulated product is marked with the words "DOUBLE INSULATION" or "DOUBLE INSULATED."

The symbol (square within a square) is also able to be marked on the product.

This device complies with Part 15 of the FCC Rules. Operation is subject to the following two conditions: (1) This device may not cause harmful interference, and (2) this device must accept any interference received, including interference that may cause undesired operation.
get ready

SUPREME

PERFORMANCE

COMFORT
Unpack the boxes

3/16-inch Allen wrench
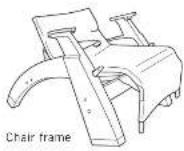
Backrest frame

Head sock

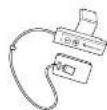
Arm core / Screw (4) (PC-610 Only)

Recline controller housing

Human Touch® Perfect Chair ^2
SUPREME UPHOLSTERY PACKAGE
Body pad
Headrest pad with full back cover

Control panel with connector box
Power hub

4 AA alkaline batteries

Arm caps (2)

Neck pillow

Phillips-head screwdriver

Screws (6) (taped to underside of arm caps)

Transformer
Your Human Touch® Perfect Chair® requires some simple assembly. First, install the backrest frame and, if you've purchased a PC-610, the right-hand armrest core. If you've purchased the COMFORT UPHOLSTERY PACKAGE, just install the recline controller housing and arm caps, then the rest of the pads and you're done! If you've purchased the PERFORMANCE UPHOLSTERY PACKAGE, you'll need to install a control panel as you install the arm caps and body pad. And, if you've purchased the SUPREME UPHOLSTERY PACKAGE you'll need to install a control panel as well as a power hub and transformer underneath the chair. It may sound like a lot, but it's easy, we promise! And, more importantly, it's worth it!

Human Touch® Perfect Chair®
PERFORMANCE UPHOLSTERY PACKAGE
Body pad

Headrest pad
Control panel with connector box

4 AA alkaline batteries

Arm caps (2)

Neck pillow

Phillips-head screwdriver

Screws (6)
(taped to underside of
arm caps)

Human Touch® Perfect Chair®
COMFORT UPHOLSTERY PACKAGE (PC-610 ONLY)
Body pad

Headrest pad

Neck pillow

Screws (6)
(taped to underside
of arm caps)

Arm caps (2)

Phillips-head screwdriver
put it together
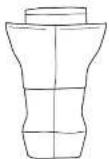
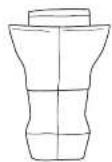
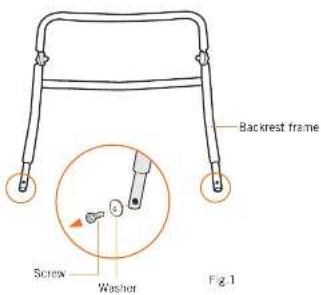
Attach the backrest frame
1. Remove the backrest frame screws.
Using the provided Phillips-head screwdriver, remove the two screws/washers from the two lower ends of the backrest frame. Save these screws/washers as they will be used later in the assembly process (Fig.1).
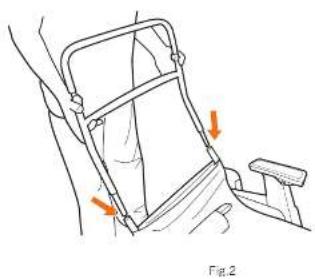
2. Insert the backrest frame into the chair base.
With the backrest frame positioned so that the headrest can tilt forward, slide the two ends of the backrest frame into the open tube ends of the chair base (Fig.2).
natural_image
Illustration of a person using a medical device to interact with another person (no text or symbols present)3. Install the canvas backrest support.
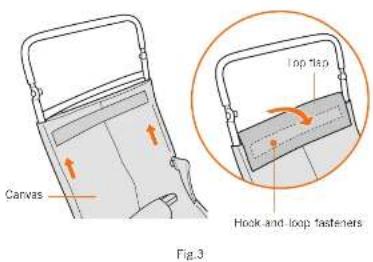
Pull the chair canvas firmly upward as far as it will go, wrap the top flap around the backrest frame and secure it using the hook-and-loop fasteners. It is important that the canvas be stretched tight to provide proper back support (Fig.3).
4. Replace the backrest frame screws.
Using the Phillips head screwdriver, install the two screws with washers (previously removed from the backrest frame) to secure the backrest frame and glide rail safety tip(Fig.4).
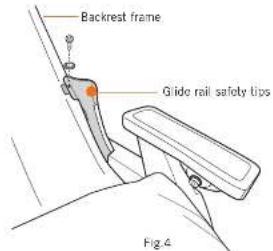
WARNING: You must install these two screws before using the chair; failure to do so may cause severe injury.
PC-610 Only:
Install the right-hand armrest core
- Remove the four screws taped to the top of the right-hand arm (Fig.5).
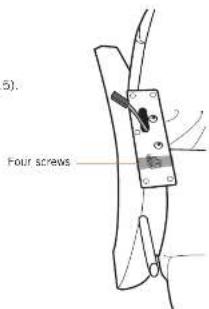
Fig.5
- Push the connectors and cable into the armrest core (Fig.7).

Fig.7
- Connect the armrest core connector to the armrest connector (Fig.6).
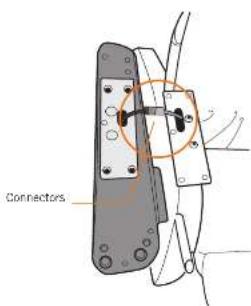
Fig.6
- Secure the armrest core using the four screws and Allen wrench (provided) (Fig.8).
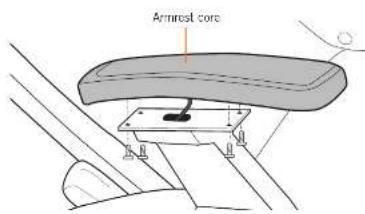
Fig.8

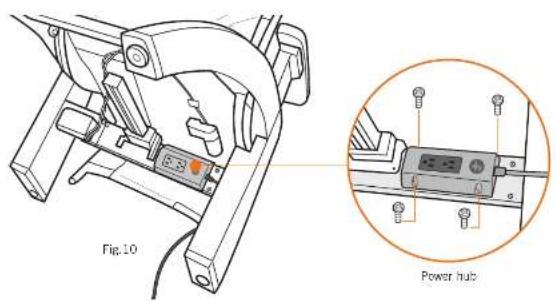
Install the power hub
- Gently tip the chair forward onto the footrest (Fig.9).
- Locate the four screw holes on the rear of the front cross bar.
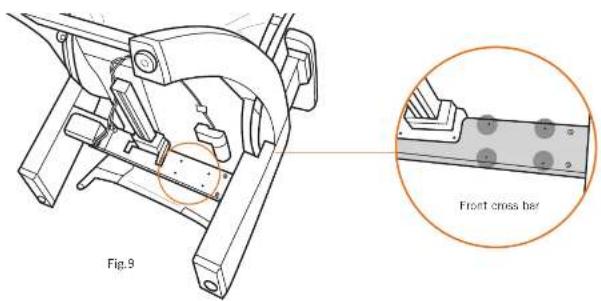
- Using the provided Phillips-head screwdriver and screws, secure the power hub to the chair with the power cord facing to the right (Fig.10).
- Open the canvas pocket on the bottom of the chair, remove the coiled cable, remove the cable tie, then return the cable to the pocket with the plug positioned at the top (Fig.11).
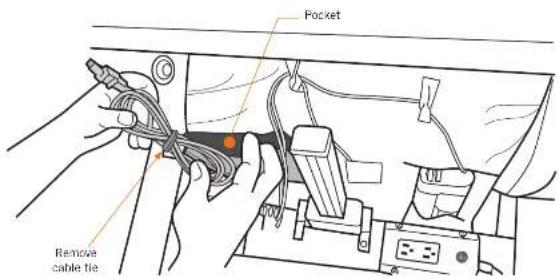
Fig.11
- Pull the plug gently out of the pocket, guide the cable through the two cable guides on the chair canvas, plug it into the left-hand power hub receptacle, then close the canvas pocket using the hook-and-loop fasteners (Fig.12).
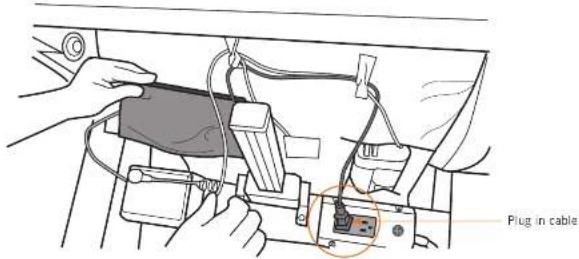
Fig.12
- Plug the transformer into the right-hand power hub receptacle (Fig.13).
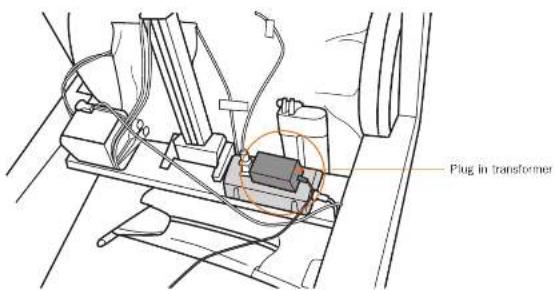
Fig.13
- Feed the transformer cable up through the cable guide then up through the hole in the chair canvas (Fig.14).
- Gently return the chair to the upright position.
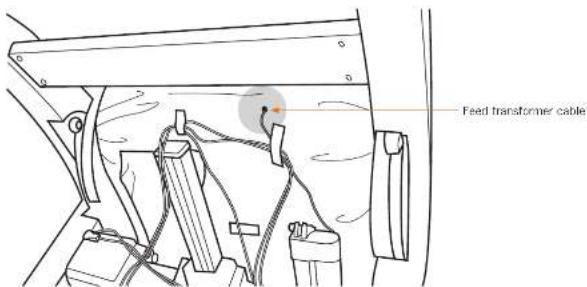
Fig.14
S P C
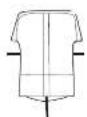
Install the control panel and arm caps
NOTE: Comfort Upholstery Package does not have a control panel; follow steps 1 - 4, 6, 7, 10 and 11 to install the arm caps and lower body pad.
- Remove the six screws taped to the underside of the left-hand armrest cap.
- Note the shape of the top of the recline controller panel and the matching shape of the recline controller housing (Fig.15).
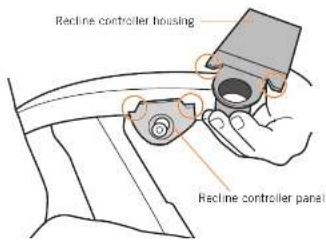
Fig.15
- Place the housing into position on the left-hand armrest as shown (Fig.16).
- Make sure the matching shapes are tightly aligned to ensure that the knob is centered in the housing.
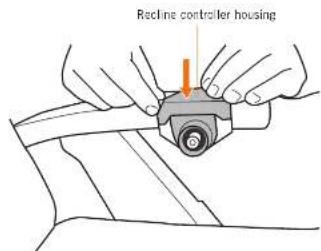
Fig.16
- Place the control panel into position on the armrest, above the chair arm as shown (Fig.17).
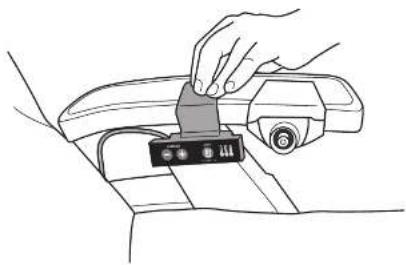
natural_image
Line drawing of hands inserting a component into a car's seat (no text or symbols)Fig.17
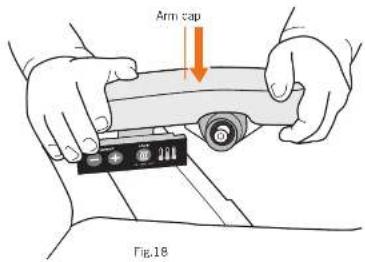
- While holding the housing firmly in place, place the arm cap into position and press down firmly (Fig.18).
- While pressing down on the armrest cap, secure it using the provided Phillips-head screwdriver and three screws (Fig.19).
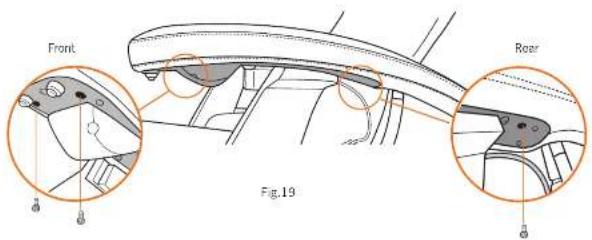
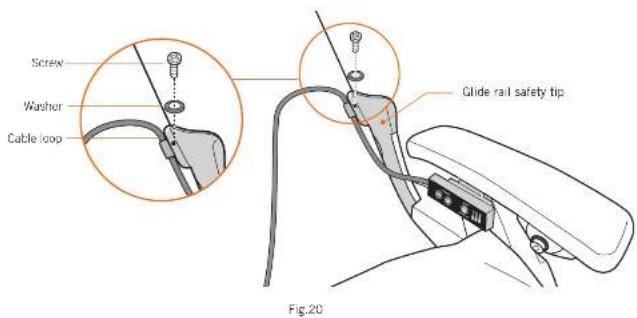
- Using a Phillips-head screwdriver, remove the screw and washer that secure the left-hand glide rail safety tip (Fig.20).
- Place the control panel cable loop into position over the screw hole, then replace the screw and washer to secure it. (Fig.20).
- Place the cap into position on the right-hand armrest core, then secure it using three screws.
- Plug in the chair, use the recline controller to recline it, then unplug it.
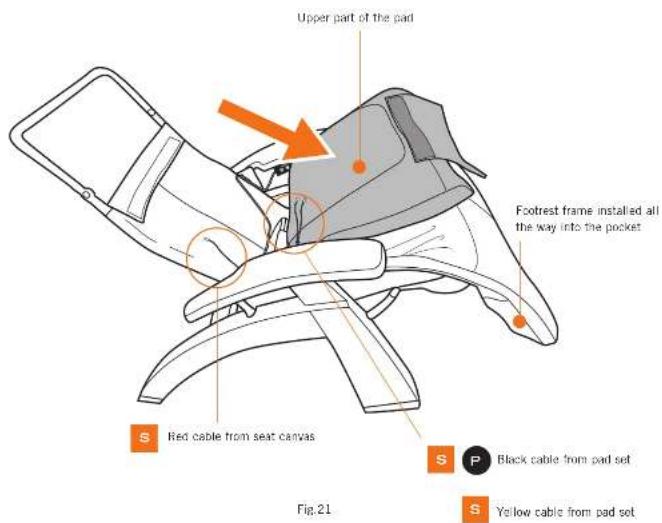
- Slide the body pad onto the footrest frame, making sure the frame slides into the pockets on the bottom corners of the pad (Fig.21).
- Fold the upper part of the pad forward onto the seat (Fig.21).
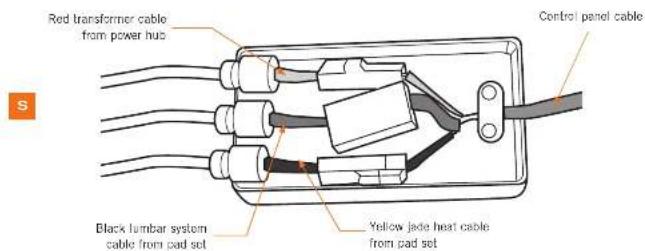
- Locate the following cables:
- Cable coming through the seat canvas (from the transformer plugged into the power hub) with red wiring.
- Two cables coming from the pad set with black and yellow wiring.
- Do one of the following:
Matching the wire colors, connect the three connectors to the corresponding connectors in the connector box attached to the control panel cable. (yellow/yellow, red/red, black/black) (Fig.22).
Pnect the black cable coming from the pad set to the control panel cable (Fig.22).
- Install the cable strain reliefs into the connector box slots, push them all the way down, then snap the connector box cover into place to secure it (Fig.22).
- Tuck the connector box into the seat canvas.
P
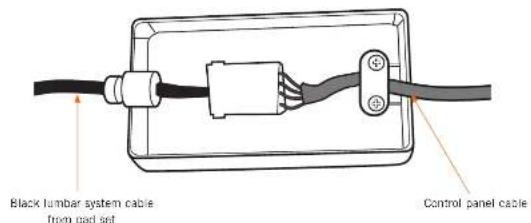
Fig.22

Install batteries in the lumbar system
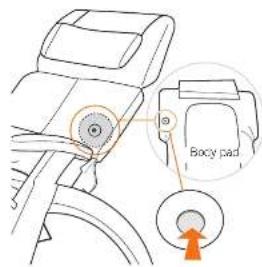
- Locate the zippered pocket on the back of the body pad in the left shoulder area (Fig.23).
- Unzip the pocket and remove the foam square (Fig.24).
- Lift the edge of the black battery compartment that is closest to the edge of the pad upward (do not pull up on the edge of the box from which the wiring is visible). (Fig.25).
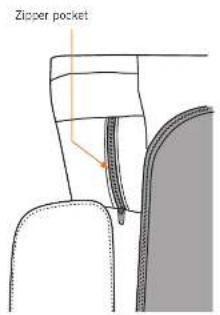
Fig.23 Fig.24
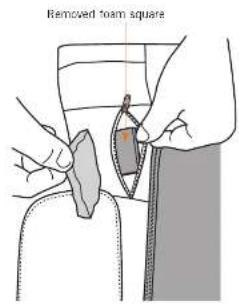
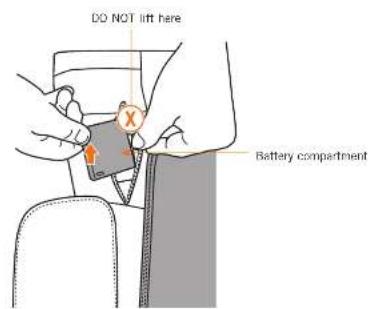
Fig.25
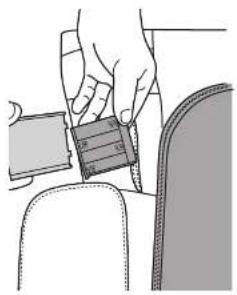
- Use your fingers to remove the battery compartment cover, then install four AA alkaline batteries (Fig.26).
- Replace the battery compartment cover.
- Tuck the battery compartment back into the foam cavity.
- Replace the foam square to cover the battery compartment.
- Close the zippered pocket.
natural_image
Illustration of a hand adjusting a seatbelt on a chair (no text or symbols)Fig.26


S P C
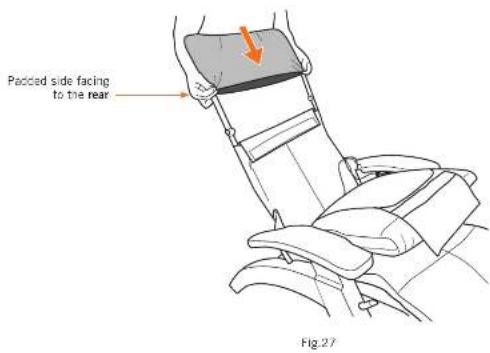
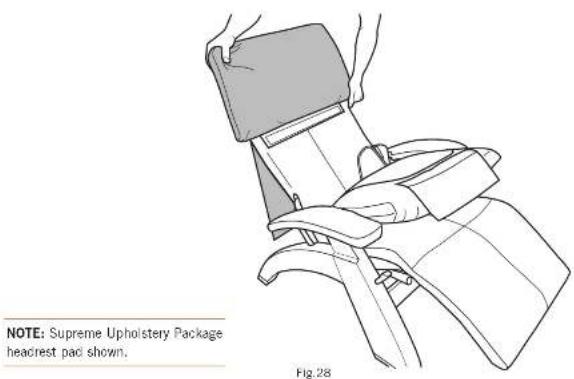
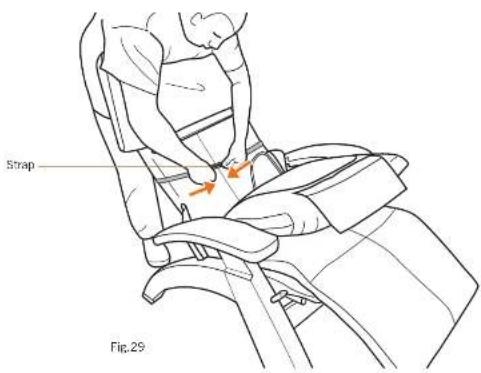
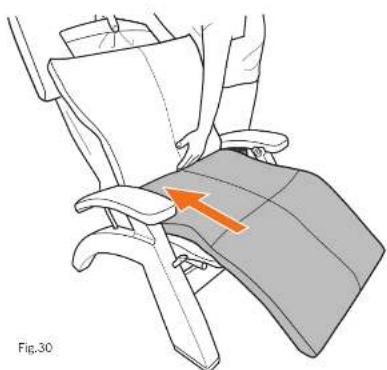
Install the pads
- Slide the head sock over the headrest frame, with the padded side facing the to the rear (Fig.27).
- Slide the headrest pad over the head rest frame (Fig.28).
- Wrap the side straps around the front of the chair canvas, pull them laut, then secure them using the hook-and-loop fasteners (Fig.29). NOTE: If the straps are too tight it causes back pad wrinkles.
- Lift up on the body pad to detach the seat hook and loop fasteners, pull it firmly up toward the seat, then press firmly down on the seat and leg area to secure it (Fig.30).
natural_image
Diagram of a person seated in a chair with an orange arrow indicating a specific area (no text or symbols present)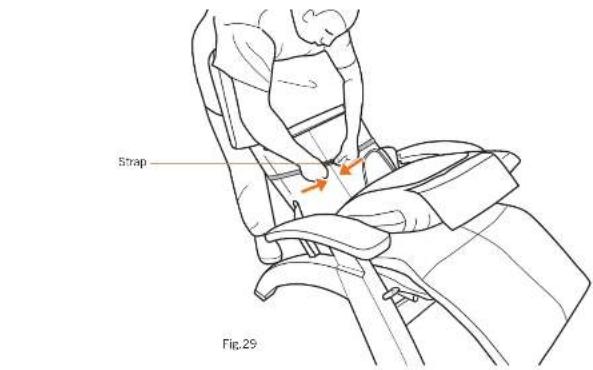
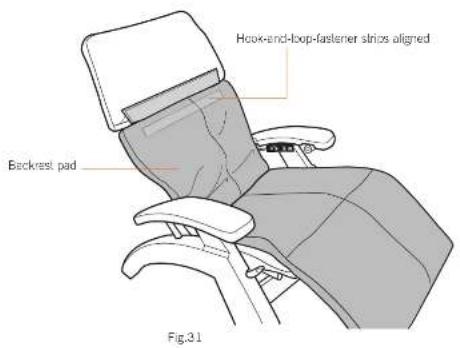
- Pull up on the backrest pad until the hook-and-loop fastener strip on the back of the pad aligns with the hook-and-loop fastener strip on the chair canvas, then press the two strips firmly together (Fig.31).
- Tuck the flap on the top of the body pad up into the headrest pad and smooth the lower part of the headrest pad firmly flat to secure the hook and loop fasteners inside (Fig.32).

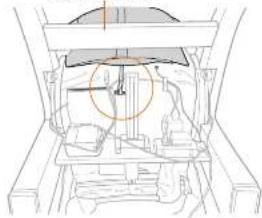
- Plug in the chair, then return it to the upright position.
- Tip the chair gently forward until it is resting on its headrest.
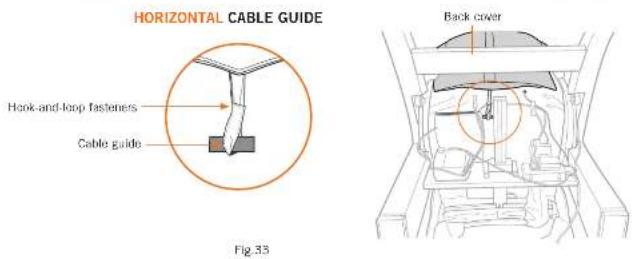
- Locate the canvas cable guide just to the right of the canvas pocket, then do one of the following: • If the cable guide is vertical, loop the strap on the bottom of the backrest cover through the left-hand cable guide, twist it so the hook-and-loop fasteners are aligned, then secure it using the hook-and-loop fasteners (Fig.33).
- If the cable guide is horizontal, insert the end of the strap through the cable guide from the top, pull it back upward, then attach it to the strap using the hook-and-loop fasteners.

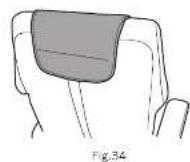
- Place the neck pillow at the desired height; a magnet holds it in position (Fig.34).
take a seat
Adjust the recline angle
Before adjusting the recline angle, be sure there is nothing located directly behind or beneath the chair. Gently push the controller backward to recline the backrest, forward to incline the backrest, up to raise the footrest, and down to lower the footrest. To automatically place the chair in zero-gravity position, press the controller inward and hold it until the chair stops moving (Fig.35).
NOTE: Lean back against the backrest before reclining the chair. Do not put any extra pressure on the footrest while reclining, as this may prevent the footrest from properly deploying and locking.

When adjusting the footrest up and down, you may notice a slight bumping sensation. This is caused by the footrest locking mechanism, and is perfectly normal.
Sensors located underneath each armrest stop the chair from reclining should anything become wedged between the pad set and the armrest; this is a safety feature.
Using your Human Touch Perfect Chair is easy. Just take a seat and adjust the chair to the desired position. The Perfect Chair cradles you in zero-gravity comfort, with your feet above your heart—the ultimate neutral-posture position for stress relief.
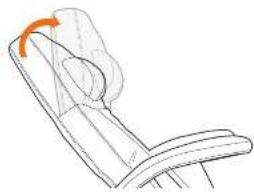
Adjust the headrest
While seated, reach up with both hands and grasp both sides of the headrest. You will feel the rigid frame beneath the soft head pad. Grasping the rigid frame, tilt the headrest forward or backward for maximum comfort. The headrest remains in this position until you adjust it again (Fig.36).
natural_image
Line drawing of a chair with an orange arrow indicating rotation (no text or symbols)Fig.36

Adjusting lumbar support
-
To decrease lumbar support, sit in the chair, lean against the backrest, then push the ball valve on the back of the body pad. When the lumbar support reaches the desired thickness, release the valve.
-
To increase lumbar support, lean forward to remove pressure from the pad, then push the ball valve inward. When the lumbar support reaches the desired thickness, release the valve. It takes approximately ten seconds for the lumbar support to fully inflate.
Lumbar support performance notes
- You must remove all body weight from the pad when increasing lumbar support.
- If the lumbar support has been compressed for a long period of time, it may take up to one minute to restore it to its full thickness.
- The colder the pad is, the longer it takes to react to lumbar support changes.
- Should the ball valve leak during use, push the black ball in and, with a cotton swab, apply a small amount of Vaseline inside the valve. NOTE: It is normal for the lumbar support to return to a fully expanded state over time.
- Keep sharp objects away from the pad. The pad contains a precision air-tight bladder which that will not function properly if punctured.
take control

Using the Jade Heat system
Press the heat button to toggle through low, medium, high, and off. The Jade Stones radiate far-infrared rays that deliver warmth into muscle tissue. Once the deep penetrating heat reaches the optimal temperature, the desired level of warmth is maintained (Fig.37).
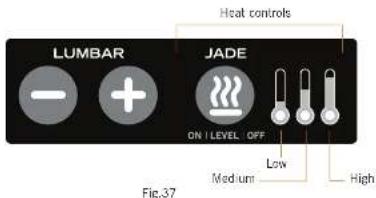
NOTE: The Jade Heat system automatically powers off after two hours of no use.


Using the adjustable lumbar system
Press and hold the plus button to inflate the lumbar area; press and hold the minus button to deflete it. The adjustable lumbar system requires four AA alkaline batteries (see page 18 for installation instructions). Battery life depends on adjustment frequency, however with average use the batteries should last many months (Fig.38).
Adjustable lumbar controls
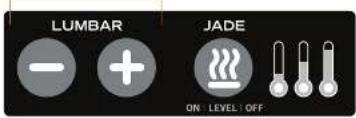
Fig.38
NOTE: Supreme Upholstery Package control panel shown.
smarttouch.com
Human Touch Safety Feature: Battery Backup
Your Perfect Chair has a built-in battery backup system, to ensure that you can incline and exit the chair if a power failure occurs. The battery backup system uses two common 9V batteries (not included). Be sure to note the date you installed the batteries and the battery expiration date. Replace the batteries before the expiration date, or at least annually, to ensure that the battery backup system is functional (Fig.39).
DATE:

IMPORTANT: To use the built-in battery backup system to incline and exit the chair during a power failure, push the controller forward to automatically restore the chair to the upright position.
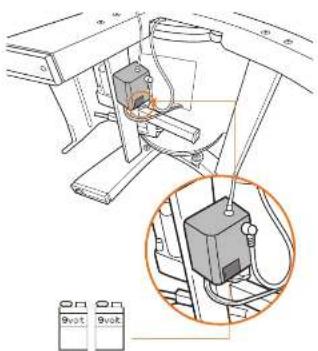
Fig.39

CAUTION: The batteries can only be used ONCE; after using the battery backup system, replace the batteries immediately.
having trouble?
Should your Perfect Chair exhibit any abnormal recline behavior, please do the following to fully reset the chair; this simple reset sequence will resolve many issues:
- Unplug the chair from the power source.
- Wait 30 seconds.
- Plug the chair back into the power source.
If your chair has no power:
-
Check the power cord - Make sure the power cord is not damaged.
-
Check the wall outlet - Plug a known working device into the outlet to ensure the outlet is working.
Having trouble with your Jade Heat or adjustable lumbar system?
My control panel is not working at all (no LEDs light), but the chair backrest reclines/inclines and the footrest raises/lowers:
- Make sure the transformer is plugged securely into the power hub on the underside of the chair.
- Detach the top of the body pad and fold it forward, open the black connector box cover, confirm there are no damaged wires, and then unplug/replug the red cable connector.
My Jade Heat system is working but my adjustable lumbar system is not working:
- Make sure the battery compartment ON/OFF switch is set to ON.
- Detach the top of the body pad and fold it forward, open the black connector box cover, confirm there are no damaged wires, and then unplug/replug the black cable connector.
- Replace the batteries.
My Jade Heat system has no heat (but the LEDs light on the control panel and the adjustable lumbar system is working):
- Detach the top of the body pad and fold it forward, open the black connector box cover, confirm there are no damaged wires, and then unplug/replug the yellow cable connector.
Questions about the pads?
Before calling customer service, consider the following:
- Small scratches, slight color changes, and minor stretching are a normal part of leather wear over time.
- Perfect Chair pads are "soft cushion" upholstery, therefore some wrinkles are an intended part of their appearance.
- As with any soft upholstery, sitting habits may cause sharp folds to occur over time. These can generally be smoothed out if caught early, or remove and reinstall the pad for maximum improvement.
- It is normal for upholstery foam, whether standard foam or memory foam, to settle and compress to some degree over time, somewhat altering its appearance.
- If the pads are crooked, sagging, making noise, or uncomfortable, remove and reinstall the pad set carefully following the instructions in this manual.
If the issue remains, please do the following before contacting our customer experience team (this will help us help you much more quickly):
- Locate the serial number on label on the back of your chair and write it down.
- Locate your proof of purchase, as we will need it to process any warranty claim.
- Now you're ready to contact us!
Contact our Customer Experience team at 800-355-2762,
Monday – Thursday 7 AM to 4:30 PM PST, Friday 7 AM to 3:30 PM
or csadmin@humantouch.com
care and maintenance
To keep your product working and looking its best, please follow these simple care guidelines.

WARNING:
- Be sure to disconnect the power cord from the electrical outlet before cleaning.
- When cleaning the remote control or power switch, use a dry cloth only. Never use a damp cloth to clean any electrical component.

CAUTION:
- Be sure to test any cleaning solution on a small, inconspicuous part of the product to ensure that the color does not fade prior to using the solution on the entire product surface.
- Do not use benzene, thinner or any other solvents on your product.
Cleaning Code Standard for SofHyde or Cloth: W
To maintain your Human Touch product in optimum condition, dust it frequently and/or vacuum it with a soft brush vacuum extension. If your product becomes dirty, use a water-based upholstery cleaner only. To treat stains, spot clean with an upholstery shampoo or a mild detergent foam.
Caring for Leather Upholstery
Natural leather is a breathing, porous material similar to human skin, and is susceptible to staining due to absorbing dirt, sweat, moisture, oil and grease (e.g., hair products and skin lotions). Do not allow these elements to come into direct contact with the upholstery. To help prevent normal leather cracking and drying, and help prevent staining, apply a high-quality leather cleaner and conditioner at least every three months; this will revitalize and reseal the leather surfaces. Follow the product label instructions carefully; Human Touch is not responsible for third-party products.
Maintenance and Repair:
- The mechanics of this product are specially designed and constructed to be maintenance free. No periodic lubrication or servicing is required.
- Your chair should only be serviced by a Human Touch-authorized service representative.
Use and Storage Environment:
- Do not place the chair in direct or reflected sunlight, as ultraviolet rays will quickly fade the upholstery color and cause SofHyde upholstery to rapidly deteriorate.
- Operate your chair in a room temperature between 41 and 104 degrees Fahrenheit (5 to 40 degrees Celsius) with humidity levels of 10% to 70% (non-condensing) to avoid damage.
- To prevent damage to the upholstery, before sitting in your chair make sure there are no sharp objects in your pockets and no metal buttons or zippers that can come in contact with the chair.
- Do not place the chair where excessive dust and pet hair can migrate into the chair's electrical and mechanical components; this can cause malfunction over time.
- When not in use for a long period of time, we recommend that the chair be covered, the power cord be coiled, and that the unit be placed in an environment free of dust and moisture.
- Store your chair in a room temperature between 5 and 122 degrees Fahrenheit (-15 to 50 degrees Celsius) with humidity levels of 10% to 70% (non-condensing) to avoid damage; product stored in cold temperatures may require 48 hours at room temperature to function properly.
- Do not store near open heat or flame.
Specifications* PC-600 PC-610
| Operating Voltage: AC110-120V 60 Hz | AC110-120V 60 Hz |
| Power Consumption: 150 Watts | 150 Watts |
| Chair Size (reclined): 63" L x 31" W x 31" H | 64" L x 32" W x 31" H |
| Product Weight: 86 Lbs. | 90 Lbs. |
| Required Recline Clearance: 12" | 12" |
| Maximum Load Weight: 400 Lbs. | 400 Lbs. |
^a Specifications are subject to change without prior notice.

human touch
humantouch.com
800.355.2762
Human Touch® Perfect Chair®
PC-600 / PC-610

www.humantouch.com/register
www.humantouch.com/register

human touch
natural_image
Line drawing of a person's seatbelt with arrows indicating movement or force (no text or symbols)Fig.2
Compartiments dos piles
Fig.25
natural_image
Illustration of a hand inserting a small object into a seatbelt (no text or symbols)Fig.26
S P C
natural_image
Illustration of a person seated in a chair with an orange arrow indicating movement or force (no text or symbols present)natural_image
Technical line drawing of a mechanical assembly with no visible text or symbolsGUIDE DE CÂBLE HORIZONTAL
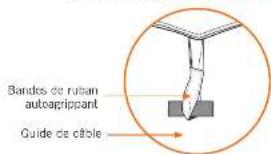
Fig.33
Revêtement arrière
natural_image
Technical line drawing of a mechanical assembly with no visible text or symbolsnatural_image
Line drawing of a chair with an orange arrow indicating rotation (no text or symbols)Fig.36


Fig.39

www.humantouch.com/register
www.humantouch.com/register

human touch
natural_image
Line drawing of a person's seatbelt with arrows indicating movement or force (no text or symbols)Fig.2
natural_image
Line drawing of hands inserting a USB into a device (no text or symbols visible)Fig.17
natural_image
Close-up of a sewing machine stitching fabric with a pointed seam (no text or symbols visible)Fig.23 Fig.24
natural_image
Illustration of hands using a tool to adjust or install a garment (no text or symbols visible)natural_image
Illustration of a sewing machine needle stitching a fabric (no text or symbols)natural_image
Illustration of a hand adjusting a seatbelt on a car seat (no text or symbols visible)Fig.26
S P C
natural_image
Illustration of a person's seatbelt with a hand holding the seatbelt and a blue arrow pointing to the seat (no text or symbols)Fig.27
natural_image
Line drawing of a person's seatbelt device with hands adjusting the seat (no text or symbols)Fig.28