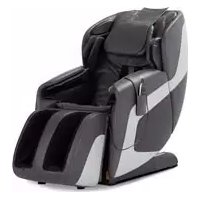
Novo XT2 - Massage device Human Touch - Free user manual and instructions
Find the device manual for free Novo XT2 Human Touch in PDF.

| Product Type | Massage Chair |
| Brand | Human Touch |
| Model | Novo XT2 |
| Dimensions (Upright) | 160 cm (L) x 78.7 cm (W) x 109.2 cm (H) |
| Dimensions (Reclined) | 180.3 cm (L) x 78.7 cm (W) x 96.5 cm (H) |
| Product Weight | 123.8 kg |
| Maximum User Weight | 129.27 kg |
| Required Recline Clearance | 12.7 cm |
| Power Supply | 110-120 V AC, 60 Hz, 1.3 A |
| Automatic Programs | 34 programs including Awake, Energize, Performance, Recovery, Upper Back, Lower Back, Shiatsu, Swedish, Sports, Thai, Demo |
| Manual Massage Modes | Kneading, Tap Touch, Percussion, Shiatsu, Kneading+Percussion, Sync Audio, Focus (Full/Zone/Spot), Deep Tissue |
| Cloud Touch Air Massage | Yes, with zone and intensity adjustment |
| Heat Function | Yes, backrest can be activated |
| Built-in Bluetooth | Yes, built-in speakers |
| Remote Control | Yes, with status display and settings |
| Upholstery Material | Synthetic Leather |
| Stretch Function | Yes, with adjustable direction (up/down) |
| Adjustable Massage Duration | 10, 20, or 30 minutes |
| Cleaning | Dry cloth for controls; mild leather cleaner on surface |
| Warranty | Online registration required; customer service at 800-355-2762 |
| Maintenance | No lubrication needed; repair by authorized center only |
Frequently Asked Questions - Novo XT2 Human Touch
User questions about Novo XT2 Human Touch
0 question about this device. Answer the ones you know or ask your own.
Ask a new question about this device
Download the instructions for your Massage device in PDF format for free! Find your manual Novo XT2 - Human Touch and take your electronic device back in hand. On this page are published all the documents necessary for the use of your device. Novo XT2 by Human Touch.
USER MANUAL Novo XT2 Human Touch
2016 Hua 10. Patent and intedical prnents right afoed
No medical dle are aarantb or phe be the cct of the product.
Human Touch: a tradition of Human Touch, 1C
()
Human Touch®
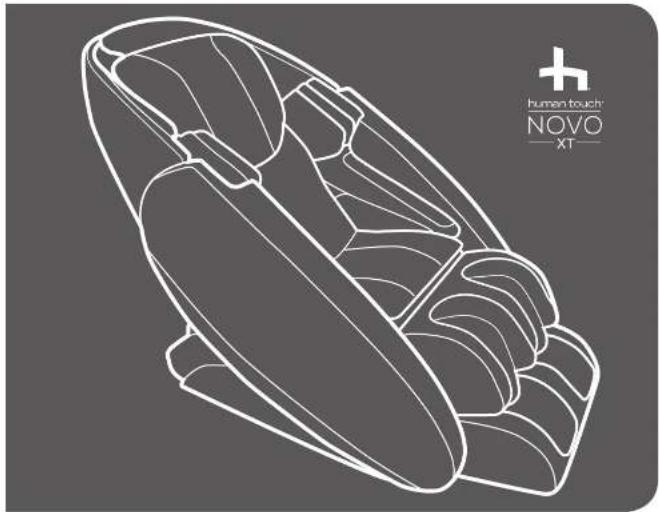
NovoXT

human touch
be your best. feel your best."
Human Touch® Massage Chair
use & care manual
Register your product ONLINE Today
Register your product ONLINE Today
www.humantouch.com/register www.humantouch.com/register

human touch
be your best. feel your best."
For more than 35 years, Human Touch has established itself as an industry leader that is changing the lives of its customers with products and services that help them feel, perform, and live their best. Develop in cooperation with the medical community and industry experts, we deliver products that blend patented technology, craftsmanship and intelligent ergonomics with superior design to enable therapeutic relief for everyone.
Our industry-leading message chairs, Perfect Chair® restinners and evolving set of innovative solutions share attributes in their ease-of-use, attention to performance and quality, and design to adapt to most any lifestyle. These attributes are highly valued by our customers and garner broad industry award and recognition. As a result, Human Touch empowers people to enjoy greater health and vitality in their professions, pursuits and everyday lives. And with a population increasingly aware of the benefits of wellness, Human Touch extends its brand leadership and available solutions for the benefit of everyone.
humantouch.com
Proudly endorsed by

WORLD FEDERATION OF
CHIROPRACTIC
Register your product at www.humantouch.com to ensure your product is in our system to simplify the warranty process should you ever need it.
Human Touch® Novo XT Massage Chair
This is not a dream.
This is you reaching your peak.
Your mind at its sharpest.
Your body rejuvenated
Your soul energized.
This is the Human Touch Ascent Series.
You work hard. You understand how important it is to revitalize physically and mentally to perform at your peak and be your best. Your success is determined by how you start and end your day. Super-charge your daily ritual with a Human Touch Ascent Series massage chair and gain your high-performance edge. Your body rejuvenated, you will experience a heightened level of confidence, motivation, and clarity.
You are fit. Whether winding down from that 50 mile bike ride or the completion of another 10K, your body is craving rejuvenation. You also understand that massage is a critical element of your fitness routine as sore muscles cannot function properly. The Human Touch Novo XT massage chair helps athletes of any level prepare for, and recover from, strenuous workouts by increasing oxygen-rich blood to tired, sore muscles, helping to restore natural well-being more quickly.

human touch
ASCENT SERIES
MORNING AND NIGHT, BOOKEND YOUR DAY WITH A HUMAN TOUCH ASCENT SERIES MASSAGE CHAIR AND UNLOCK YOUR FULL POTENTIAL.
keep it safe
IMPORTANT SAFETY INSTRUCTIONS
When using an electrical appliance, basic precautions should always be followed, including the following:
READ ALL INSTRUCTIONS BEFORE USING THIS APPLIANCE.
DANGER: To reduce the risk of electrical shock
Aabyrmpg fo prnnt from the ntralnl rneimmediately afer using and before cleing.
WARNING: To reduce the risk of burns, fire, electric shock or injury to persons.
- Do not put hands or fingers near the massage mechanism or colors while this product is running. Touching the mechanism can result in injury from the rolles causing togethe.
If the supply cord is damaged, it must be replaced by the manufacturer or its service agent or a similarly qualified person in order to avoid a hazard.
An appliance should never be left unattended when plugged in. Unplug from outlet when not in use, and basters cutting or caking off parts. - Not to operate under blanket or pillow. Excessive hearing can occur and cause (i.e., electro shock, or injury) to persons.
- Clean operating room in unnecessary areas this resulted in a loss of children, infants, or affected newborns.
children away from extended foot support for other similar pain).
Use this product only for its intended use as described in this manual. Do not use attachments nor recommend by the manufacturer
or dropped into water. Return this product to a service center for examination and repair.
Do not carry this appliance by supply cord or use cord as a handic - Always keep the powder cold away from heated surfaces.
Nevse opnate this prcd with the air opeings hocket.Keep the air openings free inl, teir and Pie like. - for not use bulldogs
Do not operate where aerosol spray products are being used or where oxygen is being administered
To disceee, turn all controls to the OFF position, then remove plug from outlet
Do not massage any area of the body that is swollen, inamed or covered with skin eruptions. - to hse onexepnent can
Connect this apolance to a properly grounded outct only: See GROUNDING INSTRUCTIONS
- the real use this product if noise above normal sound is heard.
hi h
of experience and knowledge, unless they have been given supervision or instruction concerning use of the appliance by a person responsible for their safety. Children should be supervised to ensure that they do not play with the appliance.
SAFETY PRECAUTIONS
Carmarable clothing is recommended while using this product.
This product was meanie be used in a relaxed position. Never fore any body part in the borkes are white the milles are roying.
If you feel any abnormal discomfort during the operation of this product, turn off the power immediately and do not use the product. Consult your physician.
Do not st on the controier.
Do not pull on the AC card.
- When using this product after it has been in storage, check to see that the product is operating properly prior to use
- Always confirm that there are no obstacles behind the product and that there is sufficient space to recircinate
SAVE THESE INSTRUCTIONS
Do not attempt to repair this product yourself.
This product is designed for personal use. Commercial use will be sold warrany.
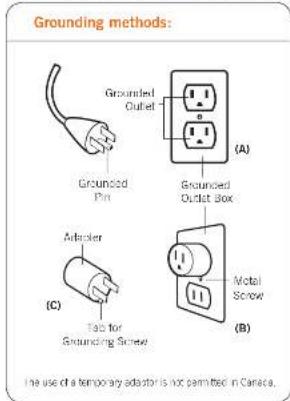
Grounding Instructions:
This product must be grounded. If it shows malfunction or breakdown, grounding provides a path of lead resistance for electrical current to reduce the risk of electric shock. This product is equipped with a cord having an equipment grounding conductor and a grounding plug. The plug must be plugged into an appropriate outlet that is properly installed and grounded in accordance with all local codes and ordinances.
DANGER: Improper connection of the equipment-grounding conductor can result in a risk of electronic shock. Check with a qualified electrician or serviceman if you are in doubt as to whether this product is properly grounded. Do not modify the plug provided with the product - if it will not fit the outlet, have a proper outlet installed by a qualified electrician.
This product is for use on a normal 120 wolt circuit and has a grounding plug that looks like the plug illustrated in sketch (A). A temporary adaptor that looks like the adapter used in sketches (B) and (C) may be used to connect this plug to a 2-pole receptacle as shown in sketch (B); if a properly grounded plug is not available, The temporary adaptor should be used only until a properly grounded outlet (swelt A) can be insulated by a qualified electrician. The green colored, red car cab or the like extending from the adaptor must be connected to a permanent ground such as a property grounded outlet box cover. Whenever the adaptor is used, it must be held in place by a metal screw.
For all grounded cord-connected products:

This device complies with Part 15 of the FCC Rules. Operation is subject to the following two conditions: (1) This device may not cause harmful interference, and (2) this device must accept any interference received, including multifunction these may cause undesired operation.
WARNING: This product is equipped with a thermoeissling production device. This is an added safety feature to protect you and this product from overheating. If the product should suddenly stop and will not start, turn the main power switch, located on the back of the product, off and do not operate the product for at least 30 minutes. Failure to turn the product may result in the product starting unexpectedly when the device costs.
get ready
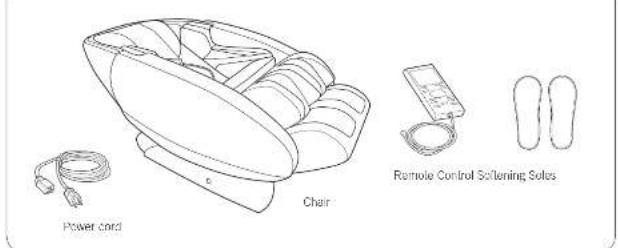
Unpack the box
Choose a location
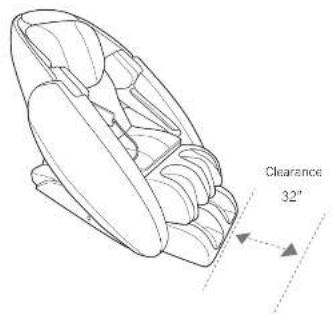
When deciding where to place your Now Xi, consider the following.
- Place the unit on a flat surface, away from direct sunlight or any other direct heat source (to avoid fading).
- If you wish to place the unit on a hard surface, it is recommended that you place a piece of carpet or a soft metal underneath it to avoid damaging the floor (minimum 48^× 28^ ).
To accommoate the foolrest when deployed, make sure the area in front of the chair is clear for at least 321.
Assembling your massage chair is easy! Simply plug in the power cord and the remote control, and you're set to go!
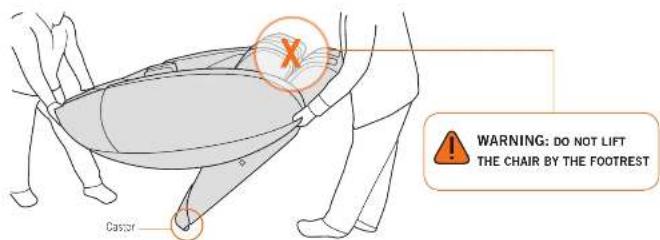
Move the chair to the desired location
CAUTION: To avoid injury to yourself and damage to the product, have two or more people move the chair.
- Using too people, push down on the backrest and lift up on the front sides. WARNING: Do not lift the chair by the footrest.
Never manually lift the footrest. - Roll the chair on its casters to the desired location.
- Gently lower the chair all the way to the floor: WARNING: Dropping the front of the chair to the floor may damage the chair and/or floor.
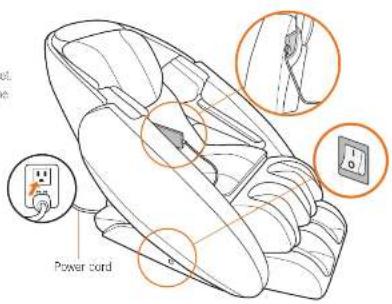
Attach the remote control and power cord
- Plug the power cord into the receptacle on the back rear of the char.
- Plug the remote control cord into the receptacle on the inside of the right side of the chair, near the seat.
- Turn the metal ring surrounding the remote control connector clockwise to secure it.

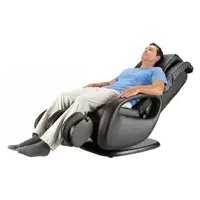
take a seat
Now take a seat and get comfortable! You're about to experience a truly amazing massage.
Power on
- Plug the power cord into a grounded 120-volt outlet.
- Turn the power switch on the right-hand side of the chair to On.
- Make sure the remote control is secured in the remote control pocket, then take a seat.
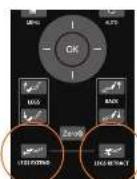
Adjust the recline angle
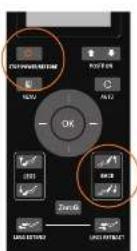
Press the STOP/POWER/RESTORE button on the remote control, then use the BACK buttons to recite the smile to the closed angle.
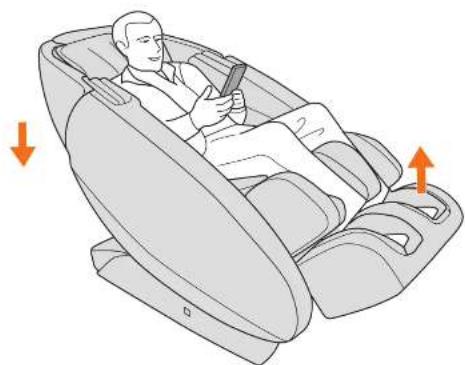
Adjust the footrest angle
Use the LEGS button to adjust the footrest angles so that your feet are on the back of your calves or crossing on the back of the calf massless rolls.
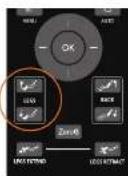
If your calves are not pressing against the rear calf message well, use the LEGS EXTEND/LEGS RETRACT buttons to extend the calf message until they are in that position.
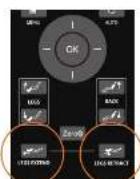
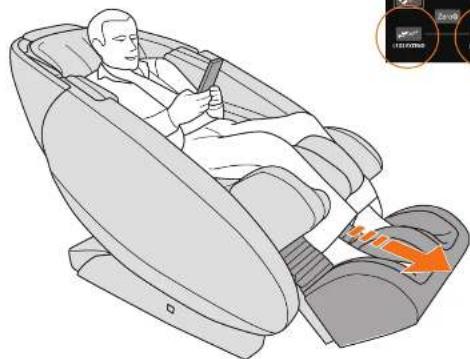

WARNING: Do not sit or stand on the calf massager. lo avoid injury or permanent damage to your chair.
take control
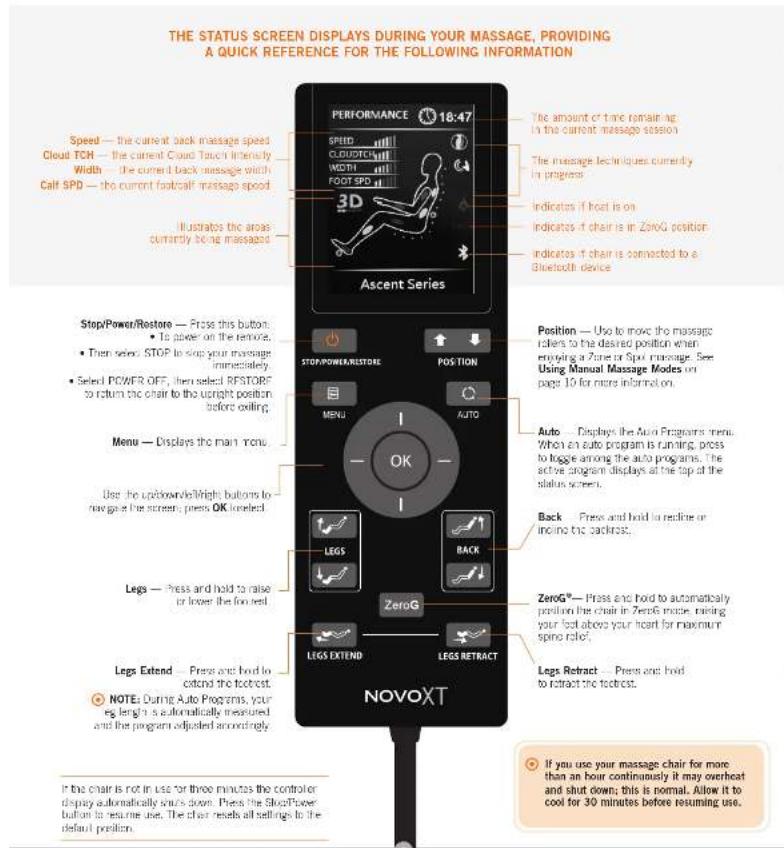
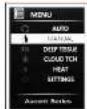
Choose from 34 Auto Programs based on your current need, or configure your own massage using the Manual Massage screens. You can also control the Cloud Touch air massage intensity. For an ultra-soothing massage, turn the heat on and connect your smartphone or tablet to the chair's speaker system.
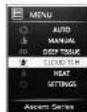
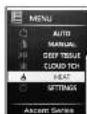
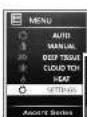
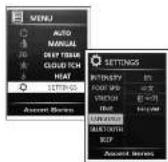
USING THE AUTO PROGRAMS
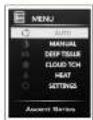
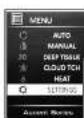
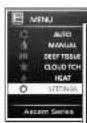
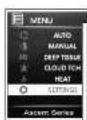
- From the main menu, select AUTO to display the Auto Programs menu.

AWAKE - Gets you up and moving for the day.
ENERGIZE - Soothes and STRETCHES you from head to toe.
PERFORMANCE - Delivers an intense Cloud Touch air massage.
RECOVERY - Focuses on relieving tension in the neck and shoulders.
UPPER BACK - Focuses the massage on your upper back.
LOWER BACK - Focuses the massage on your lower back.
DEMO - Demonstrates all of the chairs massage techniques.
-
Before selecting an auto massage program, make sure your feet are pressed firmly against the bottom of the foot/ball massage wells. Shortly after the massage begins, the foot/ball massager extends/ refracts to measure the length of your legs. The program then uses this information to tailor your massage to your leg length. If your feet are not pressed firmly against the bottom of the foot/ball massager, your leg length cannot be measured, and the program will not function properly (for example, the stretch function will not activate).
-
Select the desired auto program group to display the program list. The primary program displays at the top of the group, followed by variations of that program.
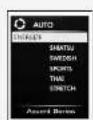
SHATSU A varied massage, using soft, medium and aggressive intensities. SWEDISH A moderate massage using soft to medium intensity. SPORTS -A massage that starts soft and increases to an aggressive intensity. THAI -A massage that begins aggressively and decreases to a soft intensity. NOTE: The Energize auto program message style also includes an independent Stretch program.

- Select the desired program. The Set Shoulder Height screen displays. 5. Set the shoulder height to the desired position, ranging from small (1) to large (9). Your massage will automatically be mapped to the selected shoulder height, for maximum effectiveness. 6. Sit back and enjoy a world-class massage! NOTE: You can access the Set Shoulder Height screen during any message by pressing one of the Position buttons on the remote control.
take control
USING MANUAL MASSAGE MODES
From the main menu, select MANUAL to display the Manual Programs menu. From this menu you can customize your back massage mode, focus, width and speed.
If you have not already selected a shoulder height from the Manual Programs menu during this message session, the Set Shoulder Height screen displays. Set the shoulder height to the desired position, ranging from small (1) to large (9). Your message will automatically be mapped to the selected shoulder height, for maximum effectiveness.
IMPORTANT: After selecting your shoulder height, you cannot select any additional manual settings until the status screen displays with the selected massage mode listed at the top, indicating that the program is now adjusted to your selected setting.
| OPTION MODE DESCRIPTION | ||
| Mode | Kneading | Kneads your back in a small, circular motion on both sides of your spine simultaneously. |
| Tap Touch | A pulsing and rolling massage. | |
| Percussion | Alternates rapid-tapping strokes along the spine to stimulate both spinal muscles and spinal joint areas, emulating the percussive massage technique used in sports medicine for deep muscle therapy. | |
| Shiatsu | Rolls gently up and down your back near your spine. | |
| Knead + Perc | Combines circular kneading motion with rapid-tapping percussion strokes. | |
| Audio Sync | When connected to a smartphone or tablet, synchronizes the message to your music. | |
| Focus | Full | Messages your full back. |
| Zone | Focuses your message in a limited zone. Use the Position buttons to position the massage zone where you want it. Choose from Short (3°), Medium (6°), or Long (8°) zone range. | |
| Spot | Messages your back in a single spot. Use the position buttons to position the message quickly where you need it. | |
| Width | Adjusts Uro horizontal message range during Tap Touch, Pecussion, or Shaltsu message modes. Options are wide (default), medium, narrow. | |
| Knd Speed | In manual mode, adjusts the kneading and tap touch message speed. | |
NOTE: All manual massages include footcaft massage and Cloud Touch air massage.
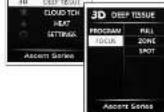
USING THE DEEP TISSUE PROGRAMS
Deep Tissue programs
Customize your massage program by selecting from the following settings: Deep Stretch: Intense lower back stretch for deep muscle penetration.
- Deep Breath: Sync your breath with the rhythmic movement of the chair and relax into deep meditation.
- Deep Sothe: Relax with acupressure for a deep and soothing massage.

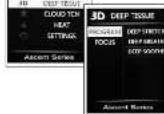
Customize your massage Focus by selecting from the following settings:
Full: Massages your full back.
Zone. Focuses your massage in a limited zone. Use the Position buttons to position the massage zone where you want it. Choose from Short (3"), Medium (6"), or Long (9") zone range.
- Spot: Messages your back in a single spot. Use the position buttons to position the massage exactly where you need it.

CONFIGURING CLOUD TOUCH, HEAT, AND OTHER SETTINGS
Setting Cloud Touch massage focus and intensity
The Cloud Touch massage uses air to massage you from head to toe. You can select one or more Cloud Touch massage areas and set the intensity at any time during an auto massage program. You can also enjoy a Cloud Touch massage Independent of any auto program.
- From the main menu, select CLOUD TCH to display the Cloud Touch menu.
- Select FOCUS, then select the area(s) you wish to activate. You must select a massage focus before selecting the intensity.
- Select INTENSITY, then select the desired air intensity, or select OFF to stop the Cloud Touch massage.

TIP: During any massage, press the left/right buttons on the remote control to adjust the Cloud Touch intensity.
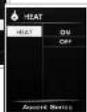
Using backrest heat
The default backrest heat setting is Off. To turn on the heat:
1. From the main menu select HEAT to display the Heat screen. 2. Select ON

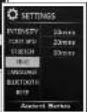
Setting back massage intensity
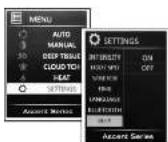
- From the main menu, select SETTINGS to display the Settings menu.
- Select INTENSITY, then select the desired back massage intensity.
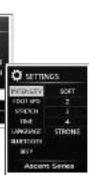
Setting the underfoot roller speed
You can set the underfoot roller speed to slow, medium, or fast. You can also turn the rollers off.
- From the main menu, select SETTINGS to display the Settings menu.
- Select FOOT SPD, then select the desired speed.

Configuring and disabling the Stretch feature
You can set the stretch direction to stretch your legs either outward or down. You can also turn off the stretch feature. When stretch is turned off, the Energize programs do not include the stretch feature. When the chair is powered off and on again, this stretch setting resets to On.
- From the main menu select SETTINGS to display the Settings menu.
- Select STRETCH, then select the desired setting.
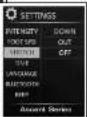
Configuring massage duration
You can set your massage duration to 10 (default), 20, or 30 minutes.
- From the main menu, select SETTINGS to display the Settings menu.
- Select TIME, then select the desired massage duration.
Selecting a language
You can choose to display all interface text in either English (default), Mandarin Chinese, Korean, or Vietnamese.
- From the main menu, select SETTINGS to display the Settings menu.
- Select LANGUAGE, then select the desired language
If you select a non-English language that you do not understand, follow these steps to return the display to English:
- Power the chair off, and then on.
- Select the last option on the screen to display the Settings screen.
- Select the second option on the screen to display the four languages on the right hand side of the screen.
- Select EN to restore the display to English.
Connecting a device to the speaker system
Your massage chair contains a built-in high-quality speaker system, to which you can connect via Bluetooth. The default Bluetooth setting is On.
- From the main menu, select SETTINGS to display the Settings menu.
- Select BLUETOOTH, then verify that it is set to On. The massage chair is now discoverable by your device.
- Using your device, scan for Bluetooth devices and select Novo XT to connect. See your device instructions for more information.
- Enjoy your favorite music along with your favorite massage gel
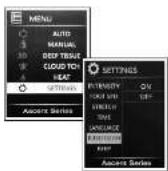
Configuring remote sound
You can choose whether or not to hear a beep when you push remote control buttons.
- From the main menu, select SETTINGS to display the Settings menu.
- Select BEEP, then select On (default) or Off
care and maintenance
To keep your product working and looking its best, please follow these simple care guidelines.
WARNING:
- Be sure to disconnect the power cord from the electrical outlet before cleaning.
- When cleaning the controller or power switch, use a dry cloth only. Never use a damp cloth to clean the controller or power switch.
- Be sure to use any cleaning solution on a small, inconspicuous part of the product to ensure that the odor does not fade prior to using the solution on the entire product surface.
- Do not use benzene, thinner or any other solvents on your product.
Cleaning Code Standard: W
To maintain your Human Touch product in optimum condition, dust it frequently and/or vacuum it with a soft brush vacuum extension. If your product becomes dirty, use a water-biased upholstery cleaner only. To fresh stains, spot clean with an upholstery shampoo or a mild detergent foam. To clean the fool's half message well inserts, remove the inserts from the chair, hand-wash with a mild detergent, then line dry.
Maintenance and Repair:
- The mechanics of this product are specially designed and constructed to be maintenance free. No periodic lubrication or servicing is required.
- Your chair should only be serviced by an authorized service center.
Use and Storage Environment:
- When not in use for a long period of time, we recommend that the chair be covered, the power cord be coiled and that the unit be placed in an environment free of dust and moisture.
- Do not store near crest or open flame
-
Do not leave this product exposed to direct sunlight for long periods of time. This may cause fading or damage.
-
Do not use or store in extreme temperatures; product stored in cold temperatures may require 48 hours at room temperature to function properly.
-
Product should be used and stored in an environment with non-condensing humidity ranging from 10 to 80% ; excessive humidity will damage the mechanics.
Miscellaneous:
- Foreign objects should not be inserted between the message nodes or the unit housing
- Care should be taken not to overload the unit.
Specifications*
Operating Voltage: AC110-120V/60 H
Pone Consumption:
1.3A
Chair Szo(Ucright): 63°L x 31°W x 43°H
Chair Size (reined): 71" L x 31" W x 38"H
Repuried Recine Clearance: 5
Product Weight:
273.18
Maximum Load Weight: 285 Lbs.
*Specifications are subject to change without prior notice.
Having Trouble? Visit www.humantouch.com/troubleshooting-guides or contact our Customer Experience team at
800-355-2762 from 6 AM to 5 PM PST, or csadmin@humantouch.com

human touch
humantouch.com
855.794.5660

www.humantouch.com/register
www.humantouch.com/register

human touch
If your calves are not pressing against the rear calf message well, use the LEGS EXTEND/LEGS RETRACT buttons to extend the calf message until they are in that position.
www.humantouch.com/register
www.humantouch.com/register

human touch
DouveleAeEaeGnneBnHgltepdctreTey