RY404015 - Blower RYOBI - Free user manual and instructions
Find the device manual for free RY404015 RYOBI in PDF.

| Product Type | Cordless Blower / Vacuum |
| Brand | RYOBI |
| Model | RY404015 |
| Power Supply | 40 V lithium-ion battery (not included) |
| Motor | Brushless |
| Air Speed (blowing) | 100 km/h (600 ft³/min) |
| Air Speed (vacuum) | 100 km/h (600 ft³/min) |
| Functions | Blowing, vacuum, leaf shredding |
| Included Accessories | Lower tube, vacuum nozzle, collection bag, accelerator nozzle, shoulder harness |
| Handle | Adjustable (4 positions) |
| Mode Selector | Blower / Vacuum |
| Speed Control | Variable (on/off and adjustment) |
| Collection Bag | With zipper closure, easy to empty |
| Shoulder Harness | Included, adjustable |
| Noise Level | Not specified - use hearing protection |
| Weight | Approximately 4.5 kg (with battery) |
| Maintenance | Clean with a dry cloth; do not use water or solvents |
| Safety | Automatic shutdown if tube improperly installed; battery lock |
| Warranty | 5 years (domestic use) |
| Use | Domestic only |
| Spare Parts | Available online or at service center |
Frequently Asked Questions - RY404015 RYOBI
Refer to the list of recommended batteries in the manual (supplement no. 987000-432).
Make sure the tube is securely latched for the tool to operate.
User questions about RY404015 RYOBI
0 question about this device. Answer the ones you know or ask your own.
Ask a new question about this device
Download the instructions for your Blower in PDF format for free! Find your manual RY404015 - RYOBI and take your electronic device back in hand. On this page are published all the documents necessary for the use of your device. RY404015 by RYOBI.
USER MANUAL RY404015 RYOBI
natural_image
Line drawing of a cylindrical mechanical device with labeled components (RYOBI, 400 KΩ, 35000Ω) and no readable text or symbols beyond branding.TABLE OF CONTENTS
■ Important Safety Instructions...... 2-4
■ Symbols.... 4-5
■ Features....6
■ Assembly....6-7
■ Operation....8-9
■ Maintenance....10
■ Troubleshooting.... 11-12
■ Parts Ordering/Service...... Back Page

WARNING: To reduce the
risk of injury, the user must read and understand the operator's manual before using this product.
SAVE THIS MANUAL FOR
FUTURE REFERENCE
TABLE DES MATIÈRES
See this fold-out section for all of the figures referenced in the operator's manual.
A - Rear port (rear port, rear port)
B - Leaf collection bag (sac de collecte de feuilles, bolsa de recolección de hojas)
natural_image
Line drawing of a person wearing safety harness and headgear, holding a device (no text or symbols)A - Shoulder harness (harnais d'épaules, arnés para hombro)
Fig. 8
A - Shoulder harness (harnais d'épaules, arnés para hombro)
B - Clip (clip, sujetador)
Fig. 9
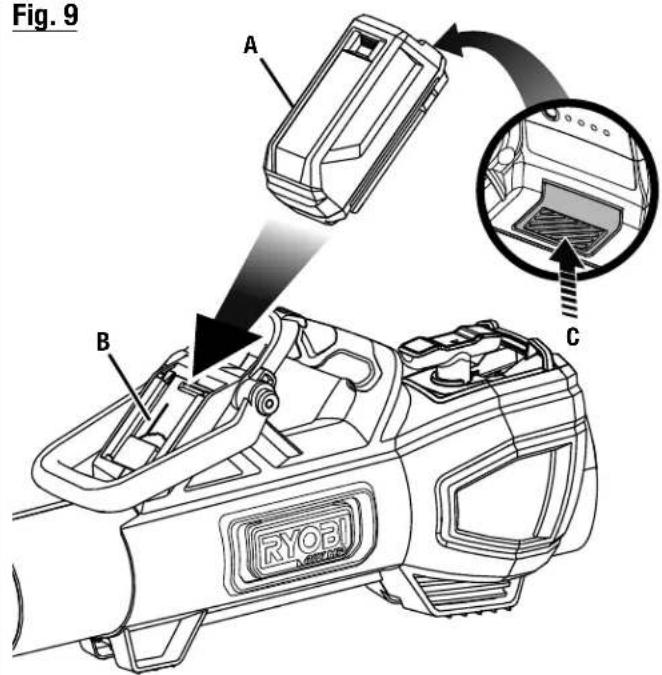
A - Battery pack (bloc-piles, paquete de baterías)
B - Battery port (logement de batteries, receptáculo para baterías)
C - Latch (loquet, pestillo)
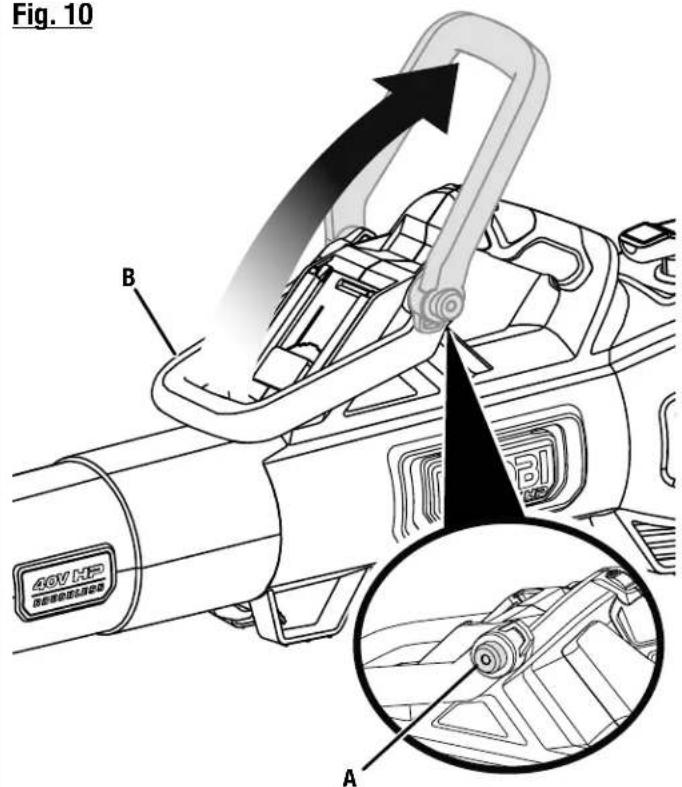
Fig. 10
natural_image
Line drawing of a person using a handheld device to clean leafy materials (no text or symbols)natural_image
Line drawing of a person using a shoveling machine to clean leafy materials (no text or symbols)IMPORTANT SAFETY INSTRUCTIONS
When using an electrical appliance, basic precautions should always be followed, including the following:

WARNING!
READ AND UNDERSTAND ALL INSTRUCTIONS BEFORE USING THIS BLOWER/VACUUM. To reduce the risk of electric shock, fire and/or serious personal injury.
- Know your blower/vacuum. Read operator's manual carefully. Learn its applications and limitations, as well as the specific potential hazards related to this blower/vacuum. Following this rule will reduce the risk of electric shock, fire, or serious injury.
■ Do not permit children to use blower/vacuum. It is not a toy. Close attention is necessary when used near children.
■ Use only accessories that are recommended by the manufacturer for your model described in this manual. Accessories that may be suitable for one blower/vacuum may create a risk of injury when used on another blower/vacuum. Use only as described in this manual.
■ Do not handle charger, including charger plug, and charger terminals with wet hands.
■ Do not put any object into openings. Do not use with any opening blocked; keep free of dust, lint, hair, and anything that may reduce air flow.
■ Do not charge the unit outdoors.
- Keep hair, loose clothing, fingers, and all parts of body away from openings and moving parts.
■ Turn off all controls before removing battery.
■ Use extra care when cleaning on stairs or steps.
■ Do not operate blower/vacuums in explosive atmospheres, such as in the presence of flammable liquids, gases, or dust. Blower/vacuums create sparks which may ignite the dust or fumes.
- Keep your work area clean and well lit. Cluttered benches and dark areas invite accidents.
- Keep bystanders, children, and visitors at least 50 ft. away while operating a blower/vacuum. Distractions can cause you to lose control.
■ A battery operated blower/vacuum with integral batteries or a separate battery pack must be recharged only with the specified charger for the battery. A charger that may be suitable for one type of battery may create a risk of fire when used with another battery.
■ Use battery operated blower/vacuum only with specifically designated battery pack. Use of any other batteries may create a risk of fire.
■ Use this product only with batteries and chargers listed in tool/appliance/battery pack/charger correlation supplement 987000-432.
■ Do not operate charger with a damaged cord or plug, which could cause shorting and electric shock. If damaged, have the charger replaced by an authorized service center.
■ If appliance is not working as it should, has been dropped, damaged, left outdoors, or dropped into water, return it to a service center.
■ Stay alert, watch what you are doing and use common sense when operating a blower/vacuum. Do not use blower/vacuum while tired, upset, or under the influence of drugs, alcohol, or medication. A moment of inattention while operating blower/vacuums may result in serious personal injury.
■ Secure long hair above shoulder level to prevent entanglement in moving parts.
■ Avoid accidental starting. Be sure dial is in the off position before inserting battery pack.
■ Use safety equipment. Always wear eye protection. Dust mask, non-skid safety shoes, hard hat, or hearing protection must be used for appropriate conditions.
■ Do not wear loose clothing or jewelry. Contain long hair. Loose clothes, jewelry, or long hair can be drawn into air vents.
■ Do not use on a ladder, rooftop, tree, or other unstable support. Stable footing on a solid surface enables better control of the blower/vacuum in unexpected situations.
■ Do not use blower/vacuum if dial does not turn it on or off. A blower/vacuum that cannot be controlled with the dial is dangerous and must be repaired.
■ Disconnect battery pack from blower/vacuum or place the dial in the off position before making any adjustments, changing accessories, or storing the blower/vacuum. Such preventive safety measures reduce the risk of starting the blower/vacuum accidentally.
■ When battery pack is not in use, keep it away from other metal objects like: paper clips, coins, keys, nails, screws, or other small metal objects that can make a connection from one terminal to another. Shorting the battery terminals together may cause sparks, burns, or a fire.
- Check for misalignment or binding of moving parts, breakage of parts, and any other condition that may affect the blower/vacuum's operation. If damaged, have the blower/vacuum serviced before using. Many accidents are caused by poorly maintained blower/vacuums.
IMPORTANT SAFETY INSTRUCTIONS
- Keep the blower/vacuum and its handle dry, clean and free from oil and grease. Always use a clean cloth when cleaning. Never use brake fluids, gasoline, petroleum-based products, or any strong solvents to clean your blower/vacuum. Following this rule will reduce the risk of loss of control and deterioration of the enclosure plastic.
■ Always wear safety glasses with side shields. Everyday glasses have only impact resistant lenses. They are NOT safety glasses. Following this rule will reduce the risk of eye injury.
■ Always wear eye protection with side shields marked to comply with ANSI Z87.1 along with hearing protection when operating this equipment.
■ Protect your lungs. Wear a face or dust mask if the operation is dusty. Following this rule will reduce the risk of serious personal injury.
■ Protect your hearing. Wear hearing protection during extended periods of operation. Following this rule will reduce the risk of serious personal injury.
■ Battery blower/vacuums do not have to be plugged into an electrical outlet; therefore, they are always in operating condition. Be aware of possible hazards when not using your battery powered blower/vacuum or when changing accessories. Following this rule will reduce the risk of electric shock, fire, or serious personal injury.
■ Under abusive conditions, liquid may be ejected from the battery; avoid contact. If contact accidentally occurs, flush with water. If liquid contacts eyes, additionally seek medical help. Liquid ejected from the battery may cause irritation or burns.
■ Do not use a battery pack or appliance that is damaged or modified. Damaged or modified batteries may exhibit unpredictable behavior resulting in fire, explosion or risk of injury.
■ Do not expose a battery pack or appliance to fire or excessive temperature. Exposure to fire or temperature above 265^ F may cause explosion.
■ Follow all charging instructions and do not charge the battery pack or appliance outside of the temperature range specified in the instructions. Charging improperly or at temperatures outside of the specified range may damage the battery and increase the risk of fire.
■ Do not modify or attempt to repair the appliance or the battery pack except as indicated in the instructions for use and care.
■ Do not place battery powered blower/vacuums or their batteries near fire or heat. This will reduce the risk of explosion and possibly injury.
- Don't expose blower/vacuums to rain or wet conditions. Water entering a blower/vacuum will increase the risk of electric shock.
■ Wear heavy long pants, long sleeves, and boots. Avoid loose garments or jewelry that could get caught in moving parts of the machine or its motor.
■ Do not operate the equipment while barefoot or when wearing sandals or similar lightweight footwear. Wear protective footwear that will protect your feet and improve your footing on slippery surfaces.
- Keep firm footing and balance. Do not overreach. Overreaching can result in loss of balance.
- Check the work area before each use. Remove all objects such as rocks, broken glass, nails, wire, or string which can be thrown or become entangled in the machine.
■ Do not point the blower nozzle in the direction of people or pets.
■ When not in use, blower/vacuum should be stored indoors in a dry, locked up place—out of the reach of children.
■ Do not dispose of a severely damaged or worn out battery pack or this blower/vacuum by incinerating. The battery can explode in fire.
■ Stop the motor, wait until all moving parts come to a complete stop, and disconnect from the power supply before cleaning or performing any maintenance.
- Never use water or any liquids to clean or rinse off your product and do not expose the product to rain or wet conditions. Store indoors in a dry area. Corrosive liquids, water, and chemicals can enter the product's electronic components and cause damage, which can result in a short circuit, increased risk of fire, and serious personal injury. Remove any buildup of dirt and debris by wiping the product clean with a dry cloth occasionally.
■ Blower/vacuum service must be performed only by qualified repair personnel. Service or maintenance performed by unqualified personnel may result in a risk of injury.
■ When servicing a blower/vacuum, use only identical replacement parts. Follow instructions in the Maintenance section of this manual. Use of unauthorized parts or failure to follow Maintenance Instructions may create a risk of shock or injury.
■ Never use blower/vacuum near fires, fireplaces, hot ashes, bar becue pits, etc. Use near fires or ashes can spread fires and result in serious injury and/or property damage.
IMPORTANT SAFETY INSTRUCTIONS
■ Never use blower/vacuum to spread chemicals, fertilizers, or any other toxic substances. Spreading these substances could result in serious injury to the operator or bystanders.
■ Never place blower/vacuum on any surface, except a hard, clean surface when motor is running. Gravel, sand, and other debris can be picked up by the air inlet and thrown at the operator or bystanders, causing possible serious injuries.
■ For household use only.
■ Remove the battery pack from the tool when not in use, before servicing, and before storing the tool. Such preventative safety measures reduce the risk of starting the tool accidentally.
■ Do not operate in poor lighting.
■ Do not pick up flammable or combustible liquids such as gasoline or use in areas where they may be present.
■ Do not pick up anything that is burning or smoking such as cigarette matches or hot ashes.
■ Do not put any object into openings. Do not use with any opening blocked; keep free of dust, lint, hair, and anything that may reduce air flow.
■ Maintain tool with care. Keep fan area clean for best and safest performance. Follow instructions for proper maintenance.
■ Do not attempt to clear clogs from tool without first removing the battery pack.
■ Rotating impeller blades can cause severe injury. Remove the battery pack and make sure impeller blades have stopped rotating before installing the blower inlet or leaf collection bag.
■ Never run the unit without the proper equipment attached. When used as a blower, always install the blower inlet and lower tube. When used as a vacuum, always install the lower tube and leaf collection bag. Make sure the leaf collection bag is installed properly when the unit is running to avoid flying debris.
■ Avoid situations that could catch the leaf collection bag on fire. Do not operate near an open flame. Do not vacuum warm ash from fireplaces, barbecue pits, brush piles, etc. Do not vacuum discarded cigars or cigarettes unless the cinders are completely cool.
■ Save these instructions. Refer to them frequently and use them to instruct others who may use this tool. If you loan someone this tool, loan them these instructions also.
SAVE THESE INSTRUCTIONS
SYMBOLS
| The following signal words and meanings are intended to explain the levels of risk associated with this product. SYMBOL SIGNAL MEANING | ||
 | DANGER: | Indicates a hazardous situation, which, if not avoided, will result in death or serious injury. |
 | WARNING: | Indicates a hazardous situation, which, if not avoided, could result in death or serious injury. |
 | CAUTION: | Indicates a hazardous situation, that, if not avoided, may result in minor or moderate injury. |
| NOTICE: | (Without Safety Alert Symbol) Indicates information considered important, but not related to a potential injury (e.g. messages relating to property damage). | |
SYMBOLS
| Some of the following symbols may be used on this product. Please study them and learn their meaning. Proper interpretation of these symbols will allow you to operate the product better and safer. SYMBOL NAME DESIGNATION/EXPLANATION | ||
 | Safety Alert Indicates a potential | personal injury hazard. |
 | Read Operator's Manual | To reduce the risk of injury, user must read and understand operator's manual before using this product. |
 | Eye and Hearing Protection | Always wear eye protection with side shields marked to comply with ANSI Z87.1 along with hearing protection when operating this equipment. |
 | Impeller Blades Rotating impeller | blades can cause severe injury. |
 | Wet Conditions Alert | Risk of fire and burns. Do not expose battery, battery compartment, or electronic components to rain, water, or liquids. Close cover during use. Do not operate on wet ground. |
 | Keep Bystanders Away Keep all | bystanders at least 50 ft. away. |
 | Long Hair | Failure to keep long hair away from the air inlet could result in personal injury. |
 | Blower Tube Do not operate without tube in place. | |
 | Loose Clothing | Failure to keep loose clothing from being drawn into air intake could result in personal injury. |
 | Ricochet | Thrown objects can ricochet and result in personal injury or property damage. |
 | Recycle Symbol | This product uses lithium-ion (Li-ion) batteries. Local, state, or federal laws may prohibit disposal of batteries in ordinary trash. Consult your local waste authority for information regarding available recycling and/or disposal options. |
| V Volts Voltage | ||
| min Minutes Time | ||
| == | Direct Current Type or a characteristic of current | |
| n_0 | No Load Speed Rotational speed, at no load | |
| .../min | Per Minute | Revolutions, strokes, surface speed, orbits etc., per minute |
FEATURES
PRODUCT SPECIFICATIONS
Motor....40 Volts DC
Air Velocity
MPH....100 (blower) and 100 (vacuum)
CFM....600 (blower) and 600 (vacuum)
KNOW YOUR BLOWER/VACUUM
See Figure 1.
The safe use of this product requires an understanding of the information on the tool and in this operator's manual as well as a knowledge of the project you are attempting. Before use of this product, familiarize yourself with all operating features and safety rules.
ADJUSTABLE HANDLE
The front handle assembly can be adjusted for ease of operation and to help prevent loss of control.
BRUSHLESS MOTOR
This product features a brushless motor that maximizes power and performance as well as battery run time.
LOWER TUBE
The lower tube can be installed on the blower/vacuum without using any tools.
MODE SELECTOR KNOB
Use the mode selector knob to switch from blower operation to vacuum operation.
SHOULDER HARNESS
The shoulder harness helps to redistribute the weight of the tool during operation.
SPEED DIAL
The speed dial allows you to quickly adjust air velocity and turn the blower/vacuum on and off.
SPEED TIP
The speed tip increases air velocity during blower operation.
ASSEMBLY
UNPACKING
This product requires assembly.
■ Carefully remove the product and any accessories from the box. Make sure that all items listed in the Packing List are included.

WARNING:
Do not use this product if any parts on the Packing List are already assembled to your product when you unpack it. Parts on this list are not assembled to the product by the manufacturer and require customer installation. Use of a product that may have been improperly assembled could result in serious personal injury.
■ Inspect the product carefully to make sure no breakage or damage occurred during shipping.
■ Do not discard the packing material until you have carefully inspected and satisfactorily operated the product.
■ If any parts are damaged or missing, please call 1-800-525-2579 for assistance.
PACKING LIST
Blower/Vacuum
Lower Tube
Vacuum Nozzle
Shoulder Harness
Leaf Collection Bag
Speed Tip
Operator's Manual

WARNING:
If any parts are damaged or missing do not operate this product until the parts are replaced. Use of this product with damaged or missing parts could result in serious personal injury.
ASSEMBLY

WARNING:
Do not attempt to modify this product or create accessories not recommended for use with this tool. Any such alteration or modification is misuse and could result in a hazardous condition leading to possible serious personal injury.

WARNING:
To prevent accidental starting that could cause serious personal injury, always remove the battery pack from the tool when assembling parts.
ASSEMBLING THE TOOL
See Figures 2 - 4.

WARNING:
Contact with rotating impeller blades could result in serious personal injury. Always remove the battery pack and make sure impeller blades have stopped rotating before installing the blower inlet or leaf collection bag. Do not put hands or any other object into the vacuum tubes while they are installed on the unit.
This tool can be assembled for vacuum or blower operation.
To assemble the tool for vacuuming:
■ Remove the battery pack.
■ If applicable, lift and rotate the mode selector to the center (unlocked) position then remove the blower inlet from the rear port.
■ Align the tabs on the leaf collection bag with the notches on the rear port and slide together.
■ Lift and rotate the mode selector to the vacuum position to lock the leaf collection bag in place.
■ Attach the lower portion of the leaf collection bag to the strap hanger on the bottom of the blower/vacuum.
■ Install lower tube and vacuum nozzle as described later in this section.
To assemble the tool for blowing:
■ Remove the battery pack.
If applicable, lift and rotate the mode selector to the center (unlocked) position then remove the leaf collection bag from the rear port.
■ Align the tabs on the blower inlet with the notches on the rear port and slide together.
■ Lift and rotate the mode selector to the blower position to lock the blower inlet in place.
■ Install lower tube and speed tip as described later in this section.
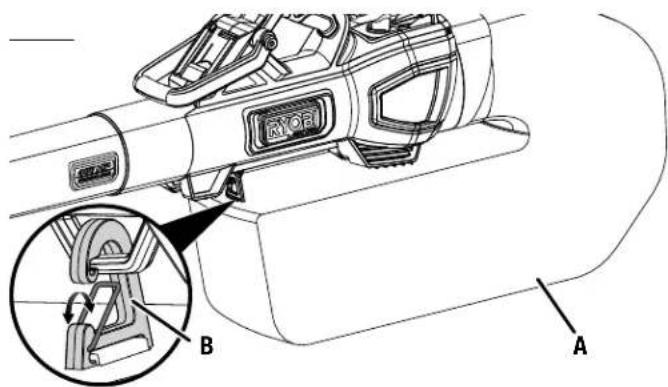
INSTALLING THE LOWER TUBE
See Figures 5 - 6.
■ With the tab facing down, slide the lower tube over the upper tube on the motor housing.
■ Push the lower tube on the upper tube until the tab locks into place through the notch in the motor housing.
NOTE: The lower tube must be fully locked into place or the tool will not operate.
■ To remove the tube, depress the tab and slide tube off.
■ To install the speed tip or vacuum nozzle: Align the tab on the speed tip or nozzle with the notch on the lower tube and press together until the tab locks into place.
■ To remove the speed tip or vacuum nozzle: depress the tab and slide off the speed tip or nozzle.
NOTICE:
When correctly assembled, the tube is difficult to separate. If it can easily be pulled apart, the tube is not locked. Check that the tab is aligned, and push the lower tube on to the motor housing until the tube snaps into the locked position. If the tube is not in the locked position, it can separate during operation.
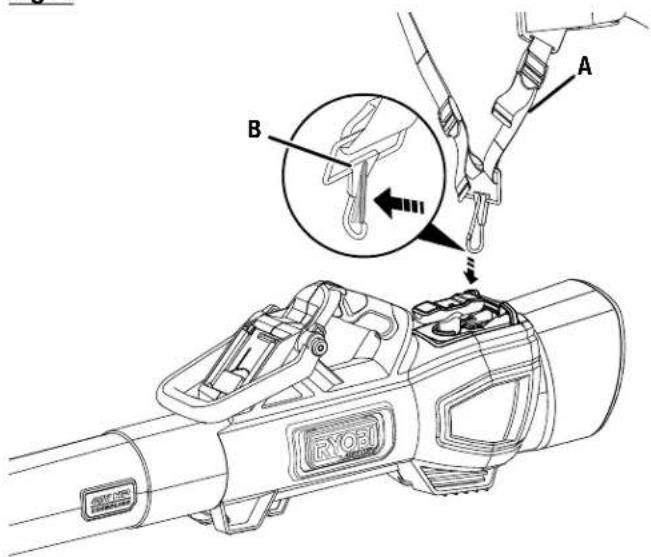
CONNECTING AND ADJUSTING THE SHOULDER HARNESS
See Figures 7 - 8.
The shoulder harness is recommended when vacuuming. Straps should be adjusted to a comfortable position before starting the blower/vacuum.
■ Slip arm through harness strap and onto shoulder, then repeat for the other shoulder.
■ Connect the waist straps and adjust for comfort.
■ Adjust the shoulder straps until the harness rests comfortably against the small of the back.
■ Once the harness is in a comfortable position, connect the harness to the strap hangers on the blower/vacuum.
OPERATION

WARNING:
Do not allow familiarity with products to make you careless. Remember that a careless fraction of a second is sufficient to inflict serious injury.

WARNING:
Always wear eye protection with side shields marked to comply with ANSI Z87.1, along with hearing protection. Failure to do so could result in objects being thrown into your eyes resulting in possible serious injury.

WARNING:
Do not use any attachments or accessories not recommended by the manufacturer of this product. The use of attachments or accessories not recommended can result in serious personal injury.

WARNING:
Verify that all guards and tubes are in place prior to use. If the blower/vacuum is dropped, stop blower/vacuum and verify that no damage has occurred. If any guard, part, or tube is damaged or missing, do not use blower/vacuum until it has been repaired or replaced by a qualified service center. Use of blower/vacuum with damaged or missing guards, parts, or tubes can result in serious personal injury or further damage to the blower/vacuum.

WARNING:
The vacuum function is for use with leaves only. Vacuuming rocks, mulch, and other debris can result in serious personal injury or damage to the unit.
NOTICE:
Before each use, inspect the entire product for damaged, missing, or loose parts such as screws, nuts, bolts, caps, etc. Tighten securely all fasteners and caps and do not operate this product until all missing or damaged parts are replaced. Please contact customer service or an authorized service center for assistance.
APPLICATIONS
You may use this product for the purposes listed below:
■ Clearing leaves and other debris from your lawn
- Keeping decks and driveways free from grass clippings, leaves, pine needles, and other debris
INSTALLING/REMOVING BATTERY PACK
See Figure 9.

WARNING:
Always remove battery pack from your tool when you are assembling parts, making adjustments, cleaning, or when not in use. Removing battery pack will prevent accidental starting that could cause serious personal injury.
To install:
- Place the battery pack in the unit. Align the raised rib on the battery pack with the groove in the unit's battery port.

WARNING:
Make sure the latch on the bottom of the battery pack snaps in place and the battery pack is fully seated and secure in the unit's battery port before beginning operation. Failure to securely seat the battery pack could cause the battery pack to fall out, resulting in serious personal injury.
NOTICE:
When placing battery pack in the tool, be sure raised rib on battery pack aligns with the bottom of the tool and latches into place properly. Improper installation of the battery pack can cause damage to internal components.
To remove:
- Locate the latch on the bottom of the battery pack and depress to release the battery pack from the blower.

WARNING:
Battery tools are always in operating condition. Therefore, switch should always be in the OFF position when not in use or carrying at your side. Remove battery pack when transporting or carrying blower to avoid accidental starting, which could result in serious injury.
OPERATION
For complete charging instructions, see the operator's manuals for your battery pack and charger.
ADJUSTING THE HANDLE
See Figure 10.
Remove the battery pack.
Place the blower/vacuum on a sturdy flat surface.
Push pivot button and adjust handle until it snaps securely into place at one of the four detents.
STARTING AND STOPPING THE BLOWER/VACUUM
See Figures 11 - 12.
Use the speed dial to start and stop the blower/vacuum and adjust speeds.
Assemble the unit for blowing or vacuuming as described previously. Make sure that all parts are correctly assembled. The shoulder harness is recommended when vacuuming.
Verify that the mode selector switch is rotated to the blower position for blowing or the vacuum position for vacuuming.
Install the battery pack.
Rotate the speed dial forward to start the unit at low speeds. Continue rotating the dial forward for medium and high speeds.
Rotate the speed dial backward to decrease speeds. Continue rotating the dial backward to stop the unit.
Assemble the unit for blowing or vacuuming as described previously. Make sure that all parts are correctly assembled.
Verify that the mode selector switch is rotated to the blower position for blowing or the vacuum position for vacuuming.
Slip an arm through each of the shoulder straps and place the harness on your shoulders. Secure the shoulder harness and attach it to the blower/vacuum.
Hold the tool in the proper operating position and begin operation.
To keep from scattering debris, blow around the outer edges of a debris pile. Never blow directly into the center of a pile.
To reduce sound levels, limit the number of pieces of equipment used at any one time.
Use rakes and brooms to loosen debris before blowing. In dusty conditions, slightly dampen surfaces when water is available.
Conserve water by using power blowers/vacuums instead of hoses for many lawn and garden applications, including areas such as screens, patios, grills, porches, and gardens.
The vacuum is designed to pick up leaves. Take care not to vacuum large twigs. Do not vacuum wet leaves.
Watch out for children, pets, open windows, or freshly washed cars, and blow debris safely away.
After using blowers/vacuums or other equipment, CLEAN UP! Dispose of debris properly.
When cleaning is complete, stop the blower/vacuum and disconnect the shoulder harness.
WARNING:
Battery tools are always in operating condition. Therefore, switch should always be in the OFF position when not in use or carrying at your side.
EMPTYING THE LEAF COLLECTION BAG
Periodically empty the leaf collection bag for best performance and to prevent the bag from becoming too heavy.
Remove the battery pack.
Remove the leaf collection bag.
Grasp the zipper pull and pull downward.
Properly dispose of the contents.
Close the zipper.
Reinstall the leaf collection bag.
Reinstall the battery pack.
CHECKING FOR CLOGS
If the leaf vacuum seems to be losing suction, check the tubes for possible clogs or obstructions.
Remove the battery pack.
Release the lower tube.
Clear any debris or leaves from the tubes and the housing area.
WARNING:
To avoid serious personal injury, always remove the battery pack from the product when cleaning or performing any maintenance.
WARNING:
Always wear eye protection with side shields marked to comply with ANSI Z87.1, along with hearing protection. Failure to do so could result in objects being thrown into your eyes resulting in possible serious injury.
WARNING:
When servicing, use only identical replacement parts. Use of any other parts can create a hazard or cause product damage.
WARNING:
Never use water or any liquids to clean or rinse off your product and do not expose the product to rain or wet conditions. Store indoors in a dry area. Corrosive liquids, water, and chemicals can enter the product's electronic components and/or battery compartment and damage electronic components and/or the battery pack, which can result in a short circuit, increased risk of fire, and serious personal injury. Remove any buildup of dirt and debris by wiping the product clean with a dry cloth occasionally.
NOTICE :
Periodically inspect the entire product for damaged, missing, or loose parts such as screws, nuts, bolts, caps, etc. Tighten securely all fasteners and caps and do not operate this product until all missing or damaged parts are replaced. Please contact customer service or an authorized service center for assistance.
GENERAL MAINTENANCE
Avoid using solvents when cleaning plastic parts. Most plastics are susceptible to damage from various types of commercial solvents and may be damaged by their use. Use clean cloths to remove dirt, dust, oil, grease, etc.
WARNING:
Do not at any time let brake fluids, gasoline, petroleum-based products, penetrating oils, etc., come in contact with plastic parts. Chemicals can damage, weaken or destroy plastic which can result in serious personal injury.
STORAGE
■ Remove the battery and store in a safe, dry place out of the reach of children.
■ Clean all foreign material from the blower/vacuum.
■ Store indoors in a secure place that is inaccessible to children. Keep away from corrosive agents such as garden chemicals and de-icing salts.
TROUBLESHOOTING
IF THESE SOLUTIONS DO NOT SOLVE THE PROBLEM CONTACT YOUR AUTHORIZED SERVICE DEALER.
| PROBLEM POSSIBLE CAUSE SOLUTION | ||
| Product will not operate or starts and stops | Lower tube not fully installed on the motor housing | Ensure tab on the lower tube is fully latched onto bottom of motor housing. SeeInstalling the Lower Tubein the Assemblysection. Product has a safety switch and will not operate without lower tube installed. |
| Leaf collection bag or blower inlet is not fully installed onto rear port of motor housing | Ensure leaf collection bag or blower inlet is properly attached to rear port and locked in place with the mode selector knob. SeeAssembling the Toolin the Assemblysection. Product has a safety switch and will not operate without attachment installed. | |
| Sudden stop of product during operation | Mulching blade clogged Remove battery | and then remove lower tube. Use a tool to remove clog from mulching blade. Be careful not to damage any fan blades while cleaning. |
| Battery charge is low Remove and replace battery with fully charged battery. SeeInstalling/Removing Battery Packin the Operationsection. | ||
| Reduced performance | Leaf collection bag is full of debris | Remove battery and empty contents of leaf collection bag to restore vacuum performance. SeeEmptying the Leaf Collection Bagin the Operationsection. |
| Battery charge is low Remove and replace battery with fully charged battery. SeeInstalling/Removing Battery Packin the Operationsection. | ||
| Clog in the lower tube or motor housing | Remove battery and then remove lower tube. Use a tool to clean out lower tube and inside of motor housing up to the fans. Be careful not to damage any fan blades while cleaning. SeeChecking for Clogs in the Operationsection.NOTE: Product is not intended to be used with wet leaves. | |
| Debris build up between fans in motor housing | Remove battery and then rotate mode selector knob to access the fans. Use a tool to clean any debris between fans making sure not to let debris into motor housings. Be careful not to damage any fan blades while cleaning.NOTE: Product is not intended to be used with wet leaves. | |
IF THESE SOLUTIONS DO NOT SOLVE THE PROBLEM CONTACT YOUR AUTHORIZED SERVICE DEALER.
PROBLEM POSSIBLE CAUSE SOLUTION
| Abnormal noise or noise change during product operation | Clog in the lower tube or motor housing | Remove battery and then remove lower tube. Use a tool to clean out lower tube and inside of motor housing up to the fans. Be careful not to damage any fan blades while cleaning. See Checking for Clogs in the Operation section. |
| NOTE: Product is not intended to be used with wet leaves. | ||
| Debris build up between fans in motor housing | Remove battery and then rotate mode selector knob to access the fans. Use a tool to clean any debris between fans making sure not to let debris into motor housings. Be careful not to damage any fan blades while cleaning. | |
| NOTE: Product is not intended to be used with wet leaves. | ||
| Difficult to rotate mode selector knob | Mulching blade clogged Remove battery and then remove lower tube. Use a tool to remove clog from mulching blade. Be careful not to damage any fan blades while cleaning. | |
| Debris around rotating fan assembly in motor housing | Remove battery and then rotate mode selector knob back and forth to loosen debris trapped around rotating fan assembly. Hold product upright to allow debris to escape motor housing. | |
| Assist handle slipping out of position | Handle removed from locking feature Avoid applying side pressure to adjustable handle. SeeAdjusting the Handlein the Operationsection. Adjustable handle is designed to be gripped on the shorter side of the handle only. | |
| Leaf collection bag detaching from product while in use | Leaf collection bag is full of debris Remove battery and empty contents of leaf collection bag. SeeEmptying the Leaf Collection Bagin theOperationsection. Too much weight in the leaf collection bag will cause attachment to unlatch. | |
RÈGLES DE SÉCURITÉ IMPORTANTES
- PARTS AND SERVICE: Prior to requesting service or purchasing replacement parts, please obtain your item, manufacturing, and serial numbers from the product data plate.
ITEM NO.*
MANUFACTURING NO.
SERIAL NO.
* Model/item number on product may have additional letters at the end. These letters designate manufacturing information and should be provided when calling for service.
HOW TO OBTAIN REPLACEMENT PARTS: Replacement parts can be purchased online at www.ryobitools.com or by calling 1-800-525-2579. Replacement parts can also be obtained at one of our service centers.
HOW TO LOCATE A SERVICE CENTER: Service centers can be located online at www.ryobitools.com or by calling 1-800-525-2579.
HOW TO OBTAIN CUSTOMER OR TECHNICAL SUPPORT: To obtain customer or technical support please contact us at 1-800-525-2579.
RYOBI is a registered trademark of Ryobi Limited and is used pursuant to a license granted by Ryobi Limited.