99401 - Climate control TREBS - Free user manual and instructions
Find the device manual for free 99401 TREBS in PDF.


User questions about 99401 TREBS
0 question about this device. Answer the ones you know or ask your own.
Ask a new question about this device
Download the instructions for your Climate control in PDF format for free! Find your manual 99401 - TREBS and take your electronic device back in hand. On this page are published all the documents necessary for the use of your device. 99401 by TREBS.
USER MANUAL 99401 TREBS
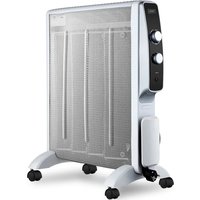
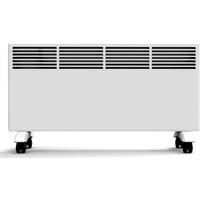
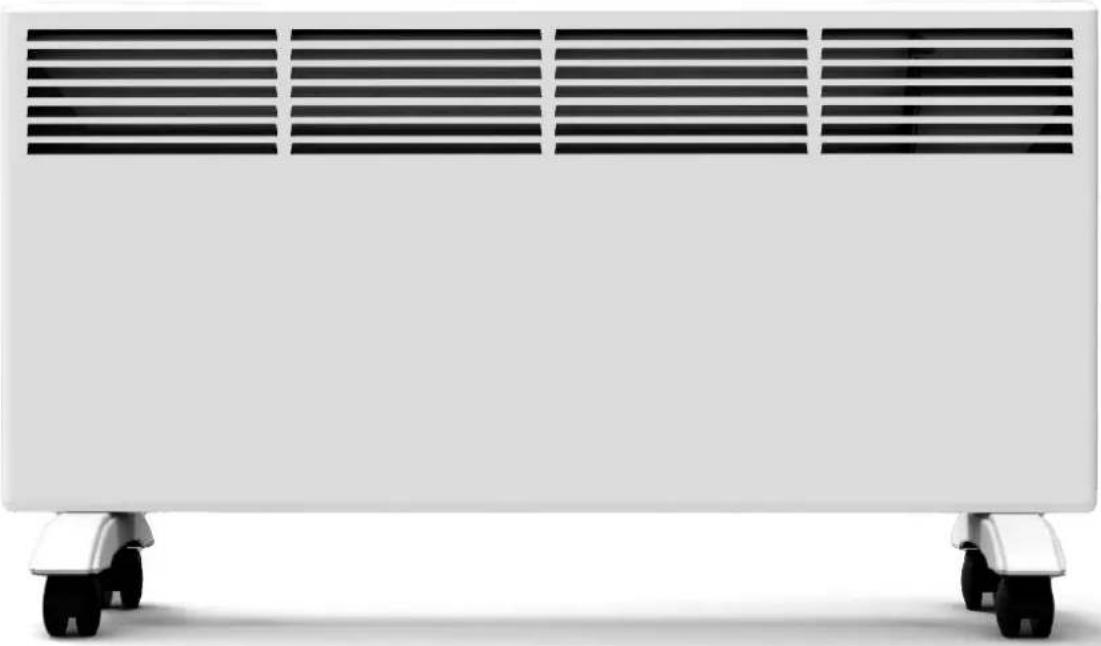
Mobile panel heater with wheels
Model: 99401
natural_image
Front view of a white electric heater with four black ventilation grilles and wheels (no text or symbols visible)Manual mobile panel heater with wheels
Index
Nederlands 3
Français.... 15
Deutsch....27
English....40
natural_image
Technical line drawing of a mechanical assembly with diagonal hatching and a vertical support (no text or symbols)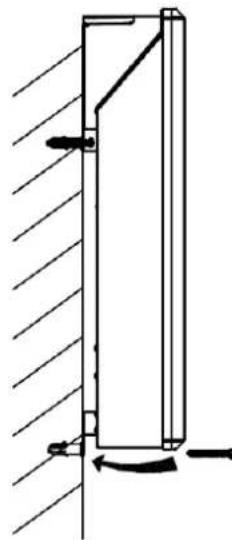
natural_image
Technical line drawing of a mechanical assembly with hatched walls and a vertical component (no text or symbols)(4)
natural_image
Technical line drawing of a rectangular device with ventilation grilles and two separate views of a mechanical component (no text or symbols)flowchart
graph TD
    A["Hand Icon"] --> B["Arrow to Gear Icon"]
    B --> C["Arrow to Hand Icon"]
    C --> D["Arrow to Gear Icon"]
    D --> E["Arrow to Hand Icon"]
    E --> F["Arrow to Hand Icon"]
text_image
Diagram illustrating the decomposition of a sun into moon and moon icons, with a symbolic figure and a transformation arrow.text_image
Weather icons and weather symbols for solar, moon, and sun with time indicators (3s)2.2.4 Weektimer
natural_image
Pure geometric diagram of a rectangle with dimension labels (30cm, 40cm) and centerlines, no text or symbols present.(1)
text_image
M2)
(3)
natural_image
Technical line drawing of a mechanical assembly with diagonal hatching and a vertical support (no text or symbols)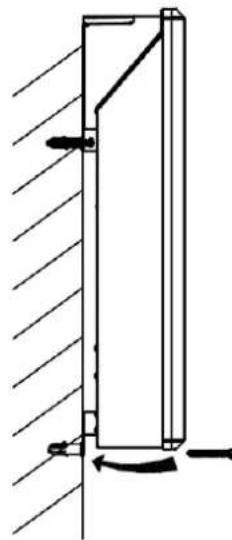
natural_image
Technical line drawing of a mechanical assembly with hatched walls and a vertical component (no text or symbols)(4)
natural_image
Technical line drawing of a rectangular device with ventilation grilles and two separate views of a mechanical component (no text or symbols)natural_image
Simple line drawing of a hand holding a circular object, followed by an arrow pointing to a gear-like shape (no text or symbols)flowchart
graph LR
    A["Camera icon + LCD screen"] --> B["Transformed rectangle"]
    B --> C["Arrow pointing left"]
    C --> D["Rotate gear with hands"]
    D --> E["/ 15s"]
text_image
x2 + H → ↑ → 15stext_image
Diagram illustrating the decomposition of a flower into sun and moon symbols, with an arrow indicating the total count.text_image
Diagram illustrating time frame and weather icons with 3s clock and moon symbols, showing progression from sun to moon.2.2.4 Minuterie hebdomadaire
natural_image
Technical line drawing of a mechanical assembly with diagonal hatching and a vertical support (no text or symbols)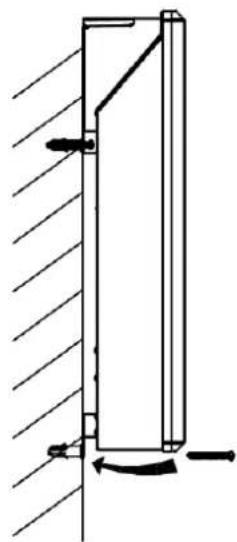
natural_image
Pure mechanical diagram showing a vertical structural component with hatched walls and a rotation arrow, no text or symbols present.(4)
natural_image
Technical line drawing of a rectangular air vent with internal grating and two separate views showing internal components (no text or symbols)= 3, Donnerstag = 4,
Freitag = 5, Samstag = 6,
flowchart
graph LR
    A["Hexagon"] --> B{Transformation}
    B --> C["Hand Icon with 'P' and 'H'"]
Drücken der -Taste.
text_image
Diagram showing a hand gesture transforming into a gear mechanism with labeled parts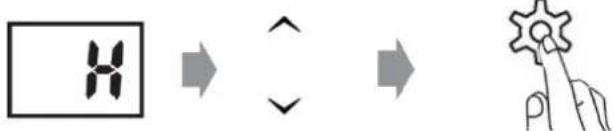
flowchart
graph LR
    A["Grid Box"] --> B["Arrow"]
    B --> C["Arrow"]
    C --> D["Hand Icon"]
text_image
x3 + 0.5 → ↑ ↓ → gear / 15sflowchart
graph LR
    A["Camera with gear icon"] --> B["+ 15s"]
    B --> C["Rotation arrow"]
    C --> D["→"]
    D --> E["Clock with gear icon"]
    E --> F["/ 15s"]
text_image
x2 + H → ↑ → 15stext_image
Diagram illustrating the decomposition of a flower into sun and moon symbols, with an arrow indicating the total count.text_image
Weather icons and weather symbols for solar, moon, and sun with time indicators (3s)2.2.4 Wochentimer
1. Important safety regulations
Read this user manual carefully before using the appliance and save it for future use. Only install this device if it complies with local/national laws, regulations and standards. This product is intended to be used as a mobile heater in residential homes and is only suitable for use in normal domestic conditions, indoors. This device is only suitable for earthed sockets, connection voltage 220V-240V \~50 Hz.
- Make sure the voltage is the same as that indicated on the rating plate of the appliance.
- Do not operate this appliance if the cable or plug becomes damaged.
- Keep the appliance and cable away from sources of heat, sharp objects or anything that may cause damage.
- If the cord is damaged, it must be replaced by the professional service people, in order to avoid a hazard, please don't repair it yourself.
- Ensure the appliance is switched off before connecting to the mains power supply.
- Switch off the power supply and disconnect from mains supply when not in use, before cleaning or other maintenance.
- Do not operate it in areas where gasoline, paint or other flammable liquids are used or stored.
- In order to avoid overheating, do not cover the heater.
- To prevent a possible fire, do not block air intakes or exhaust in any manner.
- Don't touch the hot surfaces.
- Do not insert or allow foreign objects to enter any ventilation or exhaust opening, as this may cause an electric shock, fire or damage to the appliance.
- Always ensure that hands are dry before operating or adjusting any switch on the product or touching the plug and socket-outlet.
- This appliance is not intended for use by persons (including children) with reduced physical, sensory or mental capabilities, or lack of experience and knowledge, unless they have been given supervision or instruction concerning use of the appliance by a person responsible for their safety.
- Children should be supervised to ensure that they do not play with the appliance.
- Do not leave this appliance unattended when it's in use.
- The most common cause of overheating is deposits of dust or fluff in the appliance. Ensure these deposits are removed regularly by disconnect the appliance and vacuum cleaning air vents and grilles.
- Do not place the heater on a carpet, don't place the cable under carpets. Arrange cord away from traffic areas so that it will not be tripped over.
- Don't use this heater in the immediate surroundings of a bath, a shower or a swimming pool. Never locate the heater where it may fall into a bathtub or other water container. It is life danger!
-
If you want to use it to warm up the bathroom before shower/bath, special attention should be paid: make sure it is far away enough from the liquid sprays and remove it from the bathroom before having a shower or a bath to avoid the moisture. Make sure it is far away from the soft things like clothes, cushions or blankets which are easy to be burned in case of overheating.
-
When heating up and cooling down the heater, you may hear a ticking sound. This is normal.
- There may be a paint smell when using your heater for the first time. This will disappear after several hours of using the heater.
- Do not store away the heater until the heater is cool down. Store the heater in a cool dry location when not in use.
- When in use, keep the distance between window(wall) at least 50cm.
2. Device
2.1 Assembly
After unpacking, check the appliance for any damage. If in doubt, do not use the appliance but contact your local dealer's customer service. Keep packaging materials (plastic bags, etc.) away from children as they may cause dangerous situations for children.
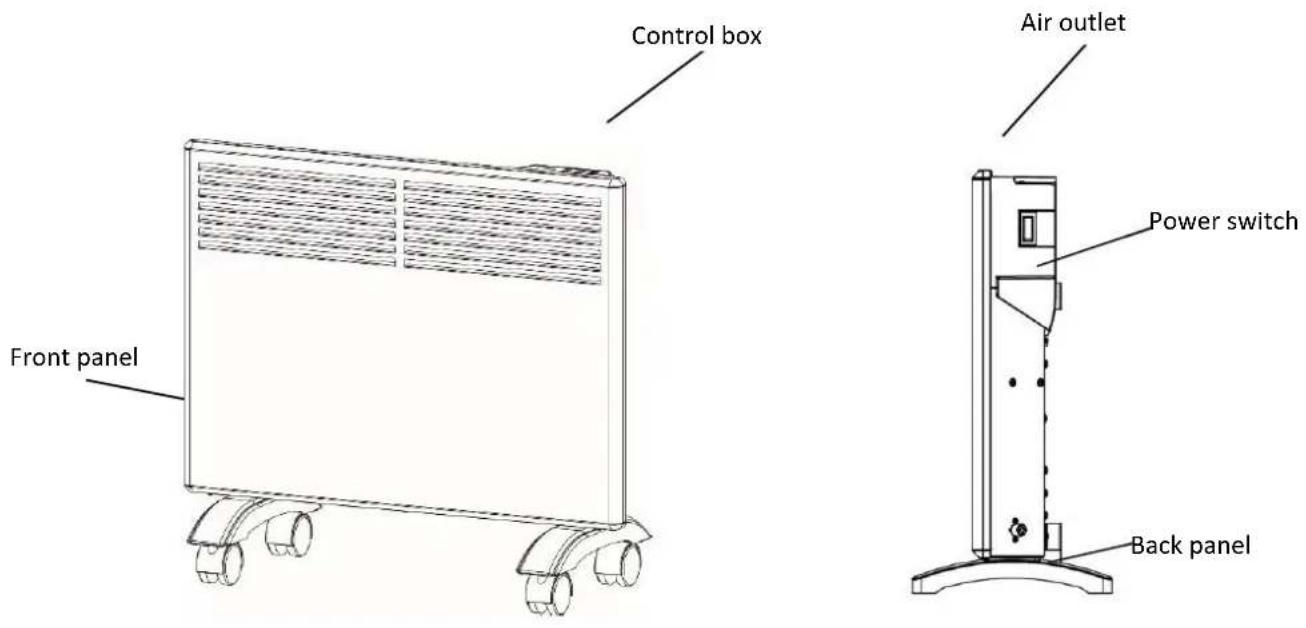
text_image
Control box Front panel Air outlet Power switch Back panel2.1.1 For wall mounted
natural_image
Pure geometric diagram of a rectangle with dimension labels (30cm, 40cm) and directional arrows, no text or symbols present.(1)
text_image
M2)
(3)
natural_image
Technical line drawing of a mechanical assembly with diagonal hatching and a vertical support (no text or symbols)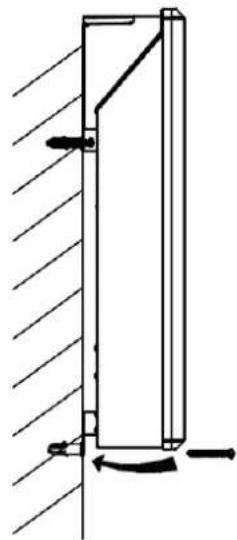
natural_image
Technical line drawing of a mechanical assembly with hatched walls and a vertical component, showing no text or symbols.(4)
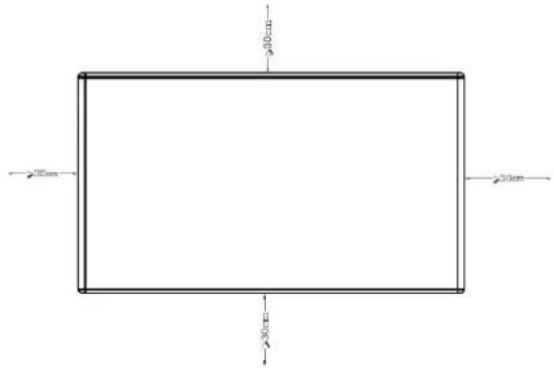
- Be sure to keep the distance between the heater, floor and wall as at least 30cm as mentioned on the picture (1).
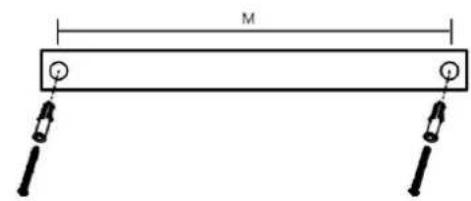
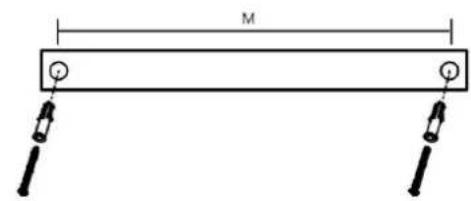
- Use drill dimension paper to drill two holes(Φ8) on the wall and put the expansion screws in the holes as mentioned on picture (2).
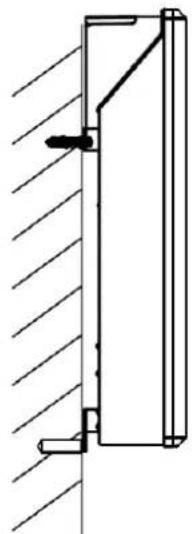
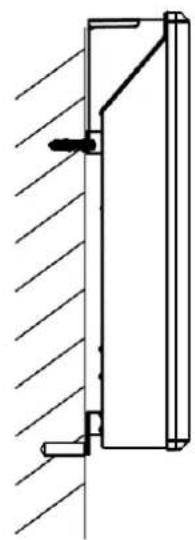
- The hook racks are pre-assembled on the back of the heater, hang the two hook racks on the screws as picture (3). Mark the hook racks' position on the wall and take away the heater, then drill two holes(Φ8) on the wall and put expansion screw's plastic cover in the holes as mentioned on picture (3).
- Hang the heater on the wall and put the expansion screws in the bottom into the two holes as mentioned on picture (4).
2.1.2 For stand
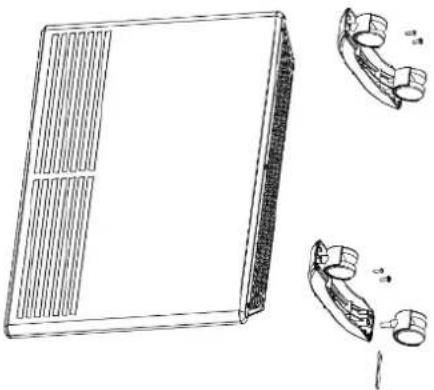
Fix the wheels on the bottom of the panel heater and fasten them with the screws.
natural_image
Line drawing of a rectangular device with ventilation grilles and three separate views of a mechanical component (no text or symbols)2.2 Instructions electronic thermostat
2.2.1 Setting daytime – nighttime
text_image
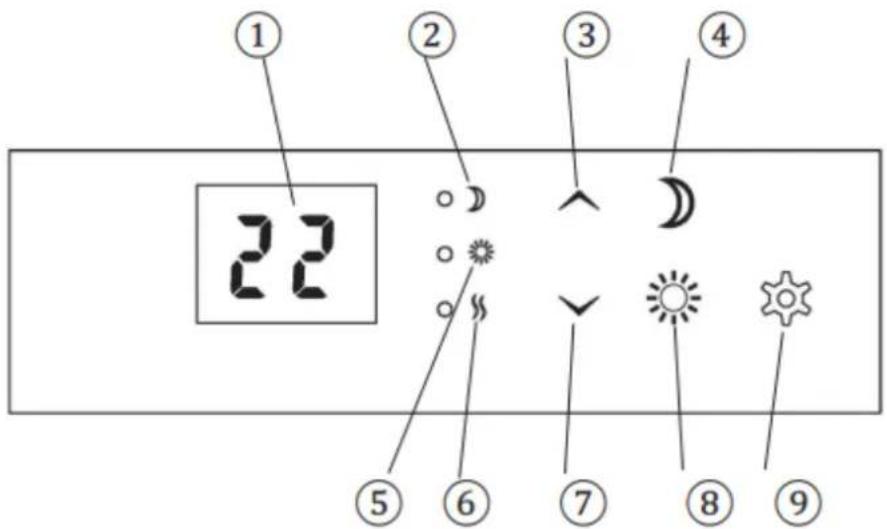
① 22 ② ③ ④ ⑤ ⑥ ⑦ ⑧ ⑨-
Display (shows the desired room temperature by default)
-
Control light - Night function
-
Control button (+) (increase temperature)
-
Night function
-
Control light - day function
-
Power indicator
-
Control button (−) (reduce temperature)
-
Day function
-
Function button / Open window function
Warning: Before the heater is turned on, it must be attached to a wall or stand. If the heater is not installed correctly this may cause the heater to malfunction or in the worst case, be damaged.
text_image
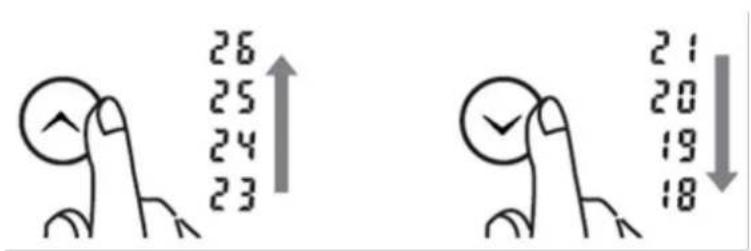
26 25 24 23 21 20 19 18Set the desired temperature by pressing the arrow buttons.
Remark: If the temperature sensor is not functioning properly, you will see the
symbol on the display. Please contact the dealer or importer.
Please use underneath instructions to set the daytime thermostat:
When you want the heater to reduce the temperature during the day (set for weekdays from now on)
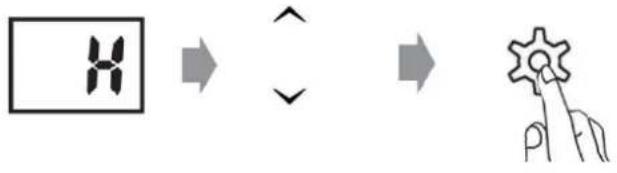
press .The display shows "d.
Use the arrow buttons to enter the correct weekday. (Monday=1, Tuesday=2, Wednesday=3, Thursday=4, Friday=5, Saturday=6, Sunday=7).
Save by pressing . Enter the desired temperature for daytime setback. Save by pressing


text_image
Diagram illustrating a sequence of icons and numbers, including hand gestures, gear symbols, and numeric display.Enter the desired number of hours for daytime setback. Save by pressing
flowchart
graph LR
    A["Hexagon"] --> B["Arrow"]
    B --> C["Arrow"]
    C --> D["Hand gesture icon"]

The Control light is steady green when the heater is in an active setback period. The control light is steady red when the setback period is inactive but has been programmed.
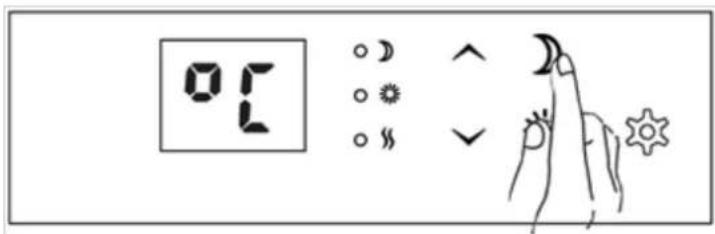
Please use underneath instructions to set the nighttime thermostat:
When you want the heater to reduce the temperature in the evening (applicable every evening/night from
now on) press .the
display shows .°C
Enter the desired temperature for nighttime setback. Save by pressing

Enter the desired number of hours for nighttime setback. Save by pressing

flowchart
graph TD
    A["Hand gesture"] --> B["Arrow to gear icon"]
    B --> C["Arrow to hand icon with 'P' label"]
    C --> D["Arrow to gear icon with 'P' label"]
    D --> E["Arrow to hand icon with 'P' label"]
    E --> F["Arrow to hand icon with 'P' label"]
    F --> G["Arrow to hand icon with 'P' label"]
The Control light is steady green when the heater is in an active setback period. The control light is steady red when the setback period is inactive but has been programmed.
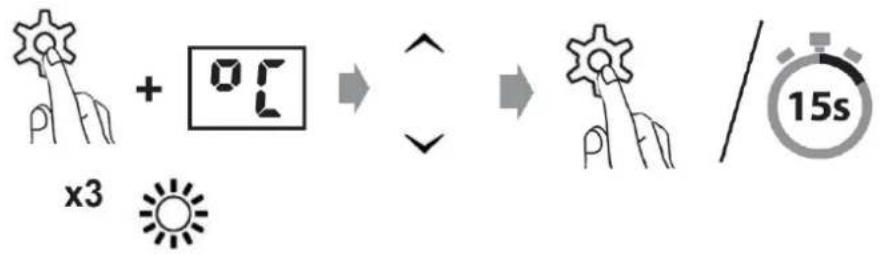
Please follow underneath steps to change setback temperature – Daytime:
Press and hold and press 3 times. Enter the desired temperature for daytime setback. Save by pressing or wait 15 seconds for automatic confirmation.
text_image
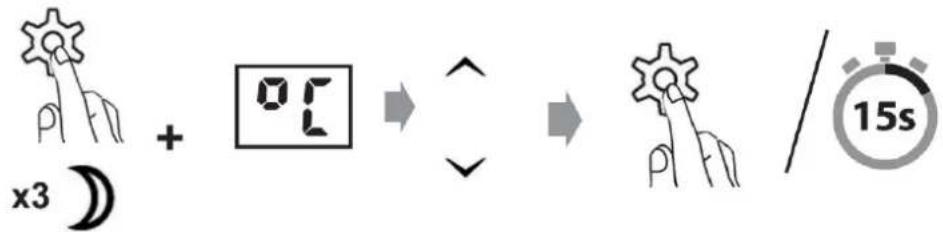
x3 + 0.5 15sPlease follow underneath steps to change setback temperature – Nighttime:
Press and hold and press 3 times. Enter the desired temperature for daytime setback. Save by pressing or wait 15 seconds for automatic confirmation.
text_image
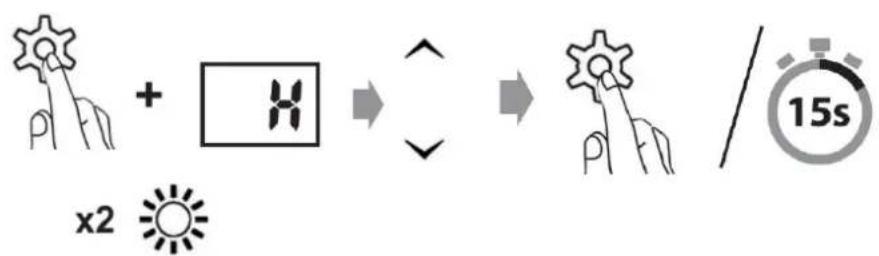
x3 ) + 0.5 → ^ → gear / 15sPlease follow underneath steps to change numbers of hours - Daytime:
Press and hold and press 2 times. Enter the desired numbers of hours for daytime setback. Save by pressing or wait 15 seconds for automatic confirmation.
flowchart
graph LR
    A["Camera icon + screen"] --> B["Rotation arrow"]
    B --> C["Clock with hand"]
    C --> D["15s stopwatch"]
Please follow underneath steps to change numbers of hours- Nighttime:
Press and hold and press 2 times. Enter the numbers of hours for nighttime setback. Save by pressing or wait 15 seconds for automatic confirmation.
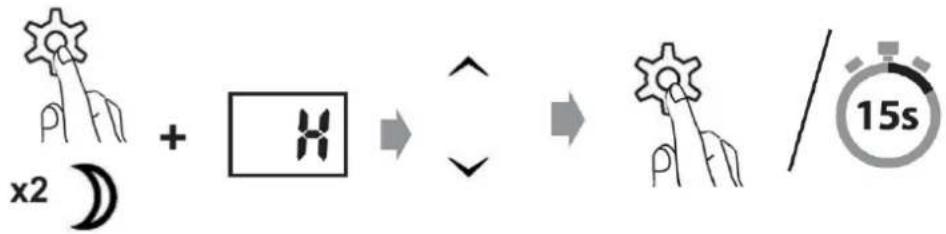
text_image
x2 + H → ↑ → 15s2.2.2 Cancel (skip) setback period
Press and hold and press or once (depending on which setback period you want to cancel).
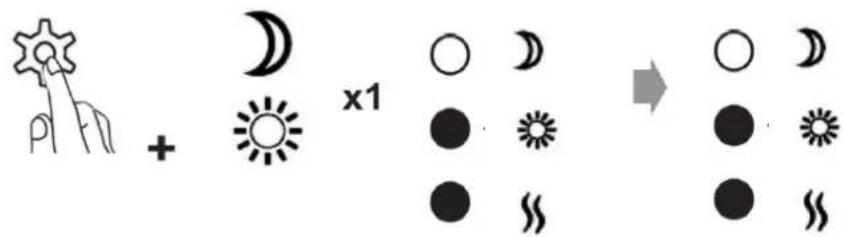
text_image
Diagram illustrating the decomposition of a sun into moon and star symbols, with an associated symbolic representation.*The heater will skip an active setback period or the next setback period.
*During the next setback period will the heater automatically resume the programmed temperature reduction.
2.2.3 Delete a setback program
Press and hold of (depending on which setback period you want to cancel) for 3 seconds.
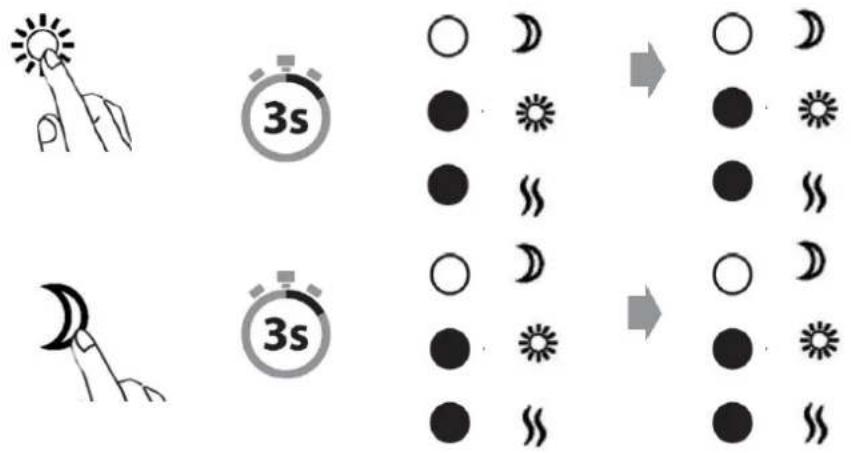
text_image
Weather icons and weather symbols for solar, moon, and sun with time indicators (3s)2.2.4 Week timer
The heater has a week timer function. After set daytime/nighttime setback for each day of the week (Monday to Sunday), it will repeat the same settings in the next weeks.
2.2.5 Open window function
The heater has an open window function.
If you open a window widely in the space where the heater is located and the temperature drop 2 °C or more than 2°C in two minutes, a sensor will detect the sharp drop in temperature. The heater will switch out automatically and show F_B the display.
The heater will be reignited automatically after 10 minutes. However you can
manually relight the radiator before the 10 minutes end by pressing F0 disappears and shows the previous operation mode.
When Default setting of open window function is closed. Press and hold button for 5 seconds. The display shows, then press button to open "open window function" and the display shows icon "ON" and will flash for 15 seconds to
confirm automatically or you can press 🏠 to confirm directly. If the open window function is opened and you want to close then press and hold
button for 5 seconds. The display shows F0 then press button to close the open window function and the display shows icon "OFF" and will flash for 15 seconds to confirm automatically or you can press 🔊 to confirm directly.
2.2.6 Resetting the heater
Turn off the heater's main switch. Press and hold heater's main switch.
while you turn on the
2.2.7 Memory function
The heater remembers free mode's temperature settings and will automatically return to the desired temperature after a power failure. But it will not remember the settings for day mode and night mode.
3. Maintenance and storing
- Always disconnect the appliance and let it completely cool down before any maintenance or storing.
- Use a vacuum cleaner to remove dust on grilles.
- Clean the outside of the unit with a damp cloth and then dry it with a dry cloth. Never immerse the unit in water, nor let water drip into the unit. Avoid using detergents to clean the heater. Never let any water get inside cause this can be hazardous.
- If you do not use the device for a long period, put back the unit and the instruction manual to the original carton and store in a dry and ventilated place.
- Do not place any heavy items on top of carton during storing as this may damage the appliance.
4. Recycling (Disposal of the product)
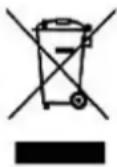
Old electric and electronic devices often contain valuable materials. However, they also contain harmful substances that were necessary for their functionality and safety. If these are placed with the non-recyclable waste or disposed of incorrectly, they can be harmful to human health and the environment. Never place your device with the non-recyclable waste.
Remark: Use the collection points available in your community and recycle old electric and electronic devices. Contact your town hall, the local waste disposal company or your dealer for more information. Make sure that your old device, until it's picked up, is safely stored out of reach of children.
5. Warranty
We provide a warranty of 24 months for this product. The warranty starts on the date of purchase and is intended for faults due to production or the used materials. Your statutory warranty rights in accordance with § 439 ff. BGB-E will remain unaffected by this.
The warranty does not apply to damages as a result of improper handling or use, nor to malfunctions that only have a minor effect on the functionality or value of the product. Normal wear and tear, transport damage, to the extent that we are not responsible for this, as well as damages caused by repairs not performed by us, are also excluded from the warrant.
This device is designed for household use and has the right performance levels.
Any use in commercial situations is only covered by the warranty if the device is not put under a heavier strain that in a household situation. The device is not intended for additional commercial use. In the case of well-founded complaints, we will repair the defective device at our discretion or replace it with a device that shows no problems.
All possible manufacturing faults must be reported within 14 days of delivery. All further claims are excluded. When invoking the warranty, please contact us first before sending us the product (you must always provide us with proof of purchase).
6. Technical Specifications:
| Model | 99401 |
| Rated Voltage | 220V - 240V~ |
| Rated Frequency | 50 Hz |
| Rated Power | 2000W |
| IP rating | IP24 |
7. Service
If you have any further questions regarding the product after having read the user's manual, please contact the Trebs customer service on www.trebsshop.com
8. CE regulations

Products with the CE marking comply with the EMC Directive (2014/30/EU) and the Low Voltage Directive (2014/35/EU) issued by the Commission of the European Community.
Hereby, Commaxx BV, Wiebachstraat 37, 6466 NG Kerkrade, The Netherlands, declares that this product is in compliance with the essential requirements. The declaration of conformity may be consulted on techdoc@commaxxgroup.com