USER MANUAL Ingrid Lionelo
natural_image
Line drawing of a baby stroller with a canopy and wheels (no text or symbols)
flowchart
graph LR
    A["Front View"] --> B["Side-view"]
    B --> C["Side-view with Button Button"]
    C --> D["Side-view with Click Button"]
4
B
natural_image
Line drawing of a baby stroller with wheels and a curved arrow indicating rotation (no text or symbols)

natural_image
Line drawing of a baby stroller with wheels and seat, labeled 'C' (no text or symbols on the diagram itself)
D
natural_image
Line drawing of a mechanical device with wheels and a handle (no text or symbols)
5
natural_image
Diagram of a bicycle's seat and wheel assembly with directional arrows indicating motion (no text or labels)
natural_image
Line drawing of a bicycle's wheel and suspension mechanism, showing motion direction with no text or symbols
natural_image
Illustration of a hand pressing a button on a device, with an arrow indicating motion (no text or symbols)

natural_image
Diagram of a mechanical component with directional arrows indicating movement or force (no text or symbols)

natural_image
Line drawing of a mechanical device with an arrow indicating rotation or movement (no text or symbols)
natural_image
Line drawing of a car seat with a directional arrow indicating clockwise motion (no text or symbols)
natural_image
Technical diagram of a mechanical component with a circular inset showing a tool interacting with a curved arrow (no text or symbols)
Dear Customer!
Should you have any remarks or questions concerning the product, please do not hesitate to contact us: help@lionelo.com
Producer:
BrandLine Group Sp. z o. o.
IMPORTANT! READ CAREFULLY AND KEEP FOR FUTURE REFERENCE
WARNING!
- Never leave the child unattended.
- Ensure that all the locking devices are engaged before use.
- To avoid injury ensure that the child is kept away when unfolding and folding this product.
- Do not let the child play with this product.
- This seat unit is not suitable for children under 6 months.
- Always use the restraint system.
- Check that the pram body or seat unit or car seat attachment devices are correctly engaged before use.
- This product is not suitable for running or skating.
- The product is suitable for a child weighing up to 22 kg or up to 4 years old (whichever comes first).
- If you want to take the child out of the stroller or put it in it, make sure the locking mechanism is locked.
- The maximum allowable load of the basket is 3 kg.
- Any load attached to the handle and / or on the back of the backrest and / or on the sides of the product will affect the stability of the stroller.
- Only one child may use the product at a time.
-
Do not use accessories that have not been approved by the manufacturer.
-
Use only replacement parts supplied or recommended by the manufacturer.
- Do not use the product on stairs.
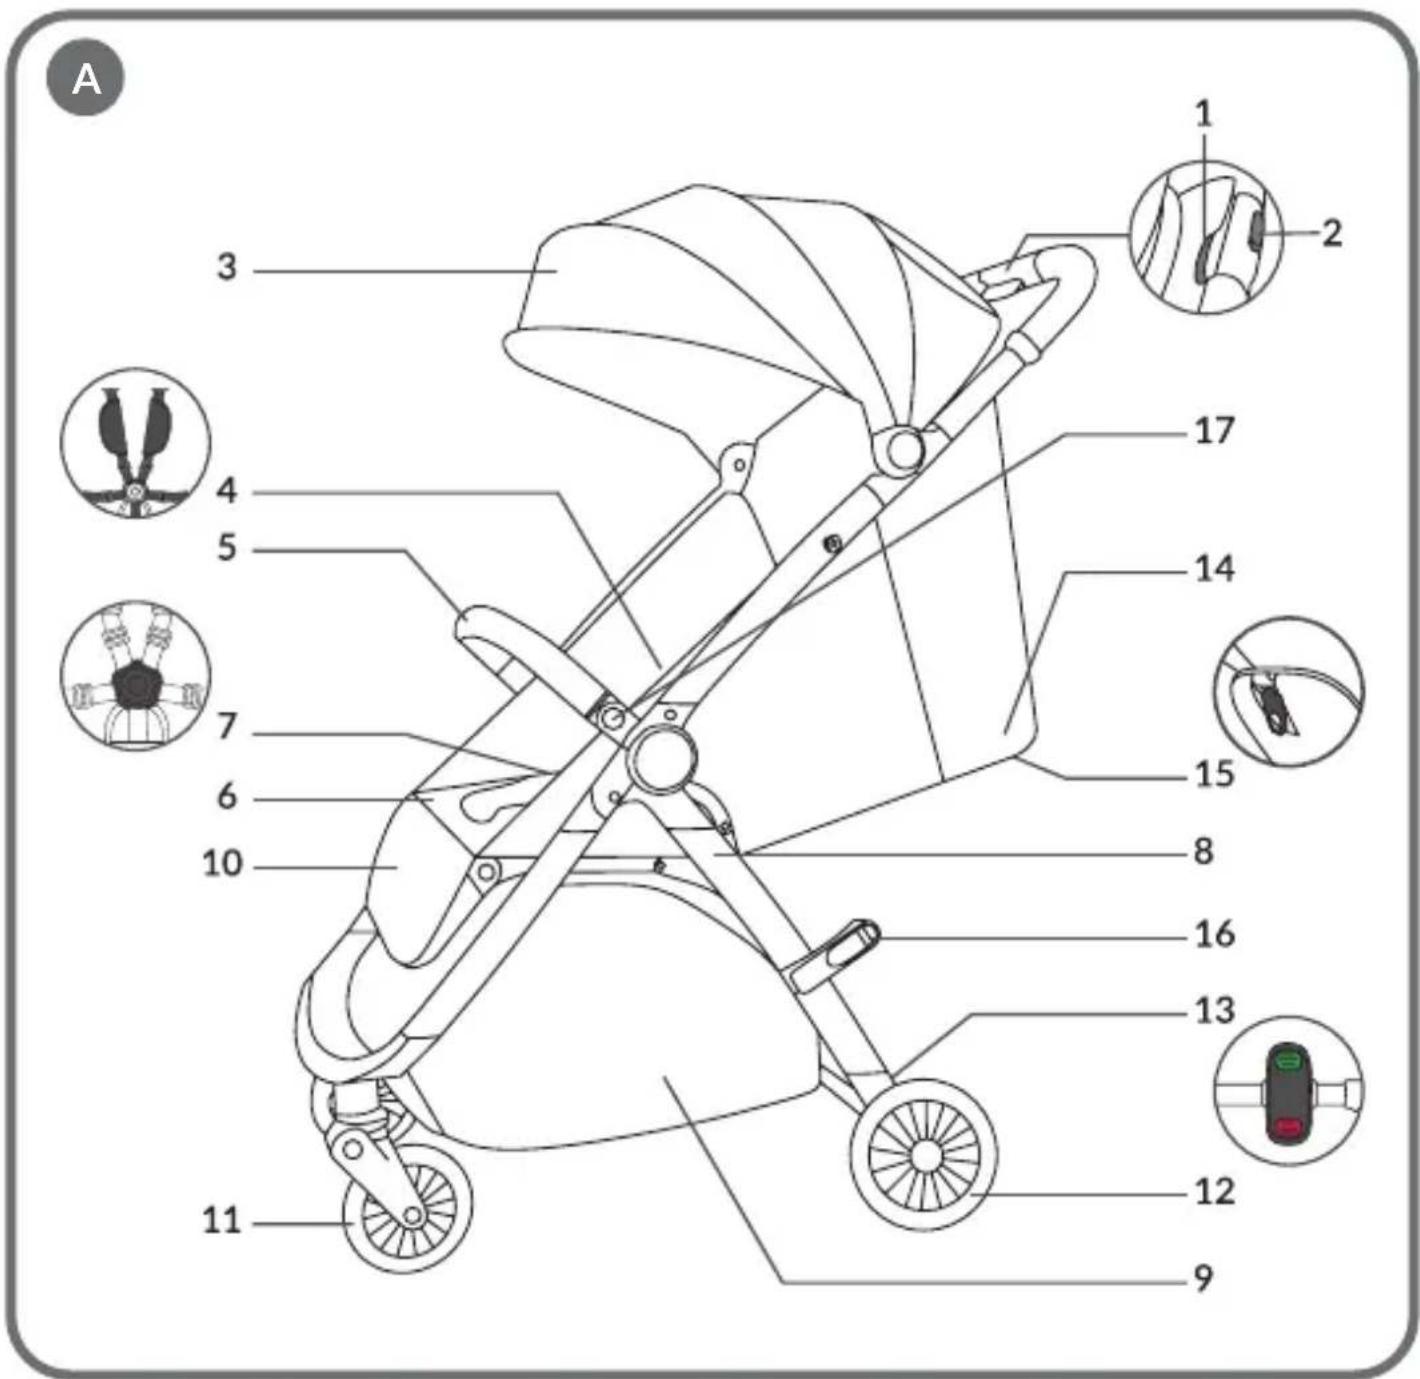
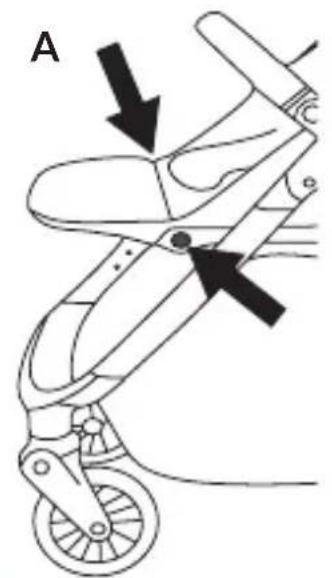
PART DESCRIPTION (FIG. A)
- Folding button
- Sliding folding button
- Canopy
- Seat belts
- Handrail
- Cover
- Seat belt buckle
- Frame
- Basket
- Footrest
- Front wheels
- Rear wheels
- Locking mechanism
- Backrest
- Backrest adjustment lever
- Lock
- Handrail adjustment button
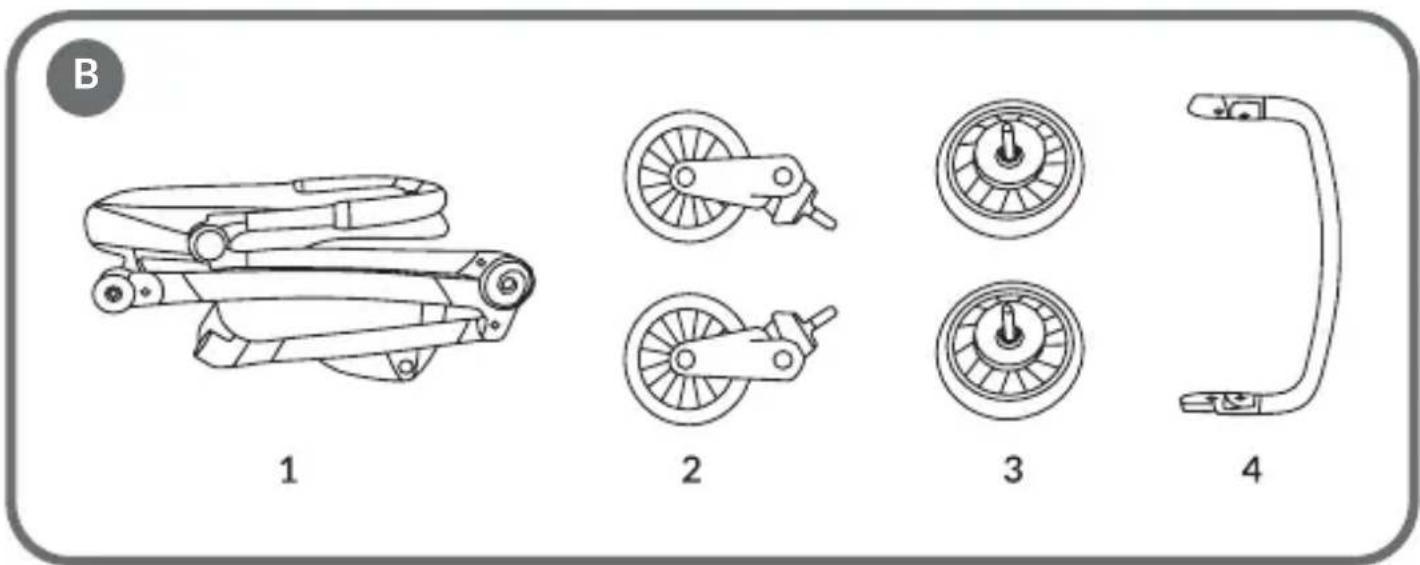
THE SET (FIG. B)
- Stroller
- Front wheels
- Rear wheels
- Handrail
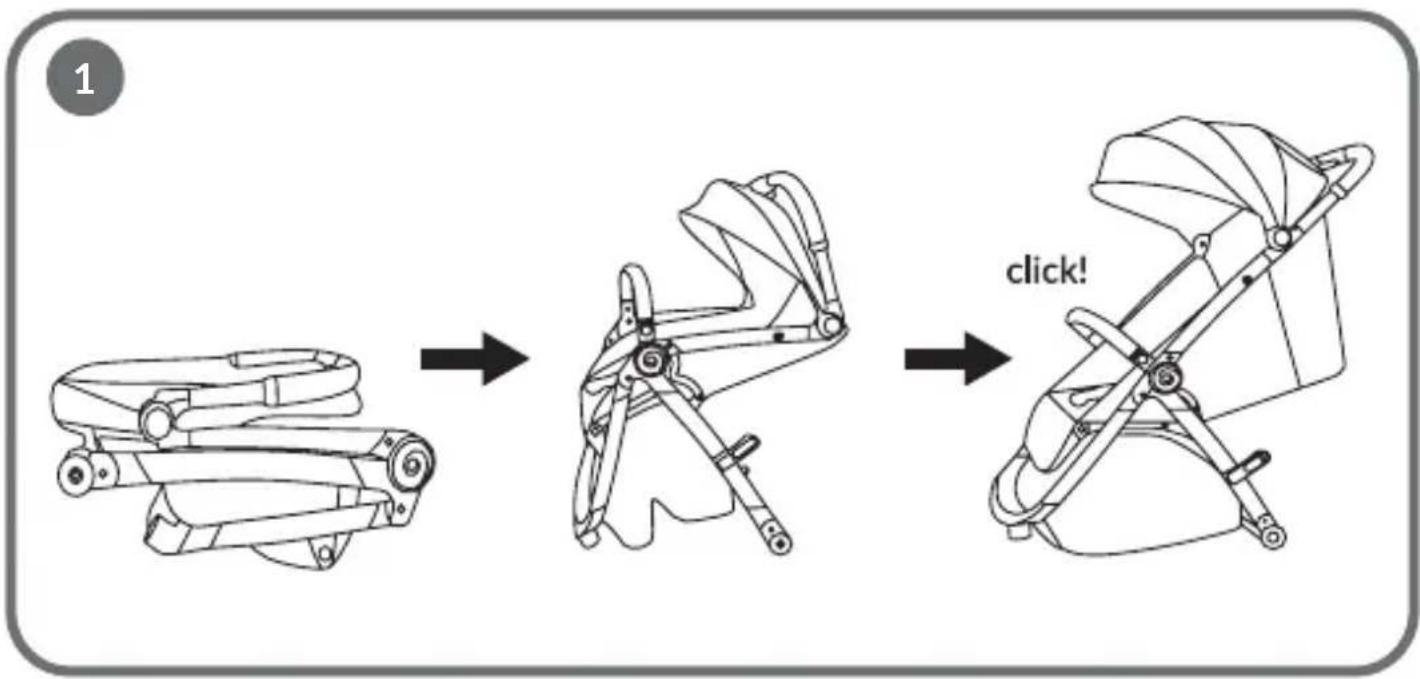
UNFOLDING OF THE STROLLER
To unfold the stroller, tilt the lock (16, fig. A), grasp the handle, and then dynamically pull the handle upward. The stroller will unfold itself (fig. 1). The correct unfolding of the stroller will be signaled by a click on both sides of the stroller.
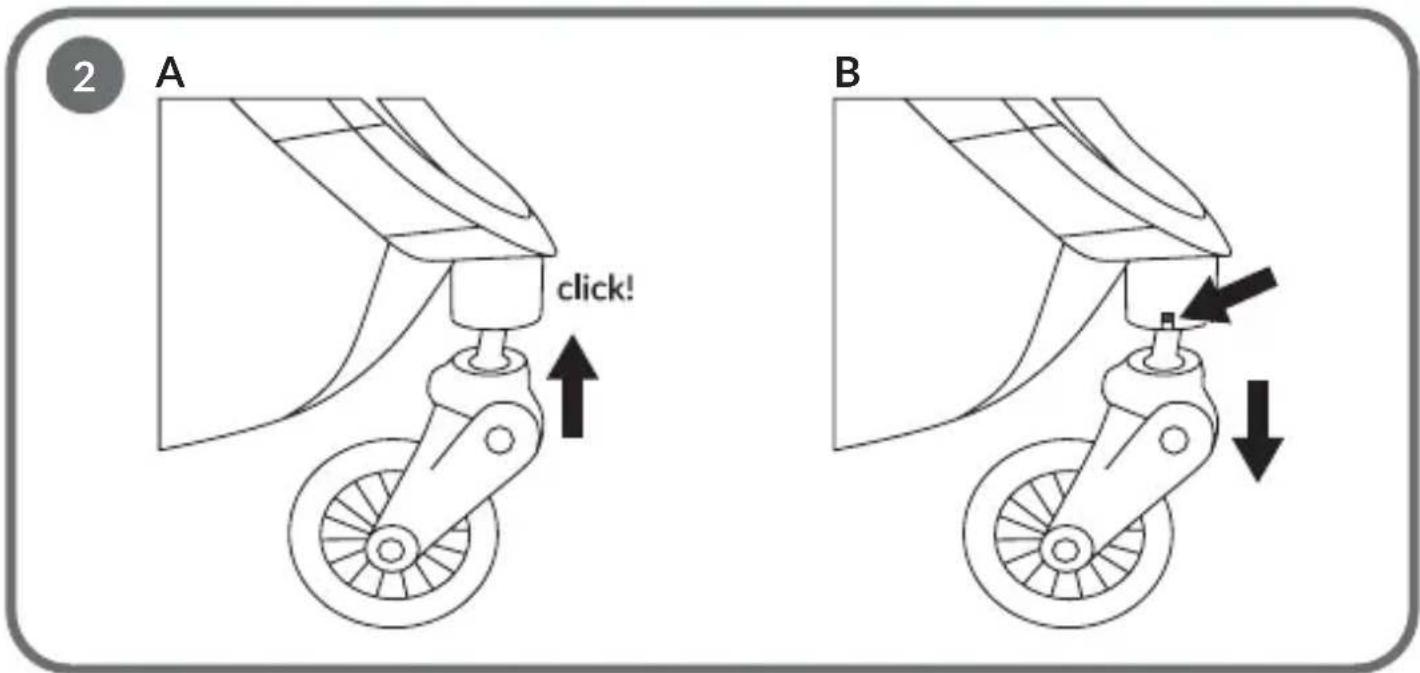
INSTALLATION AND REMOVAL OF THE FRONT WHEELS
Insert the pin of the front wheels into the corresponding holes in the frame of the stroller (A, fig. 2). The correct installation will be signaled by a click.
To remove the wheels, press the button (B, fig. 2) and pull them out of the stroller frame.
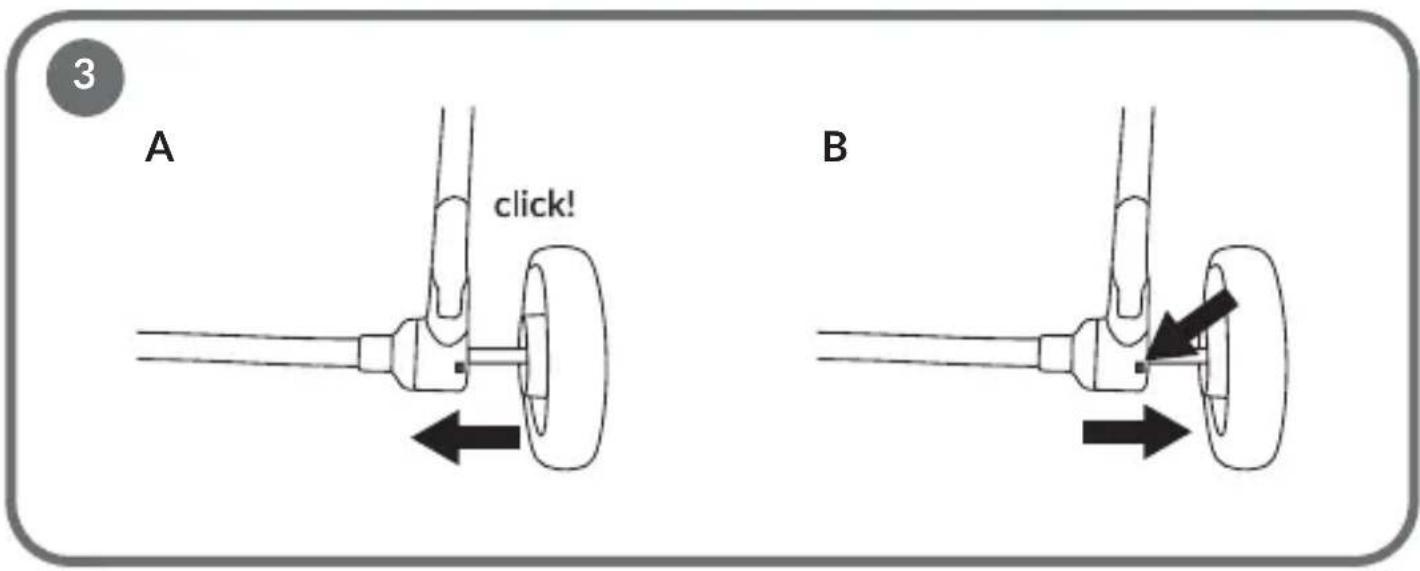
INSTALLATION AND REMOVAL OF THE REAR WHEELS
Insert the pin of the rear wheels into the corresponding holes in the stroller frame (A, fig. 3). The correct installation will be signaled by a click.
To remove the wheels, press the button (B, fig. 3) and pull them out of the stroller frame in a horizontal direction.
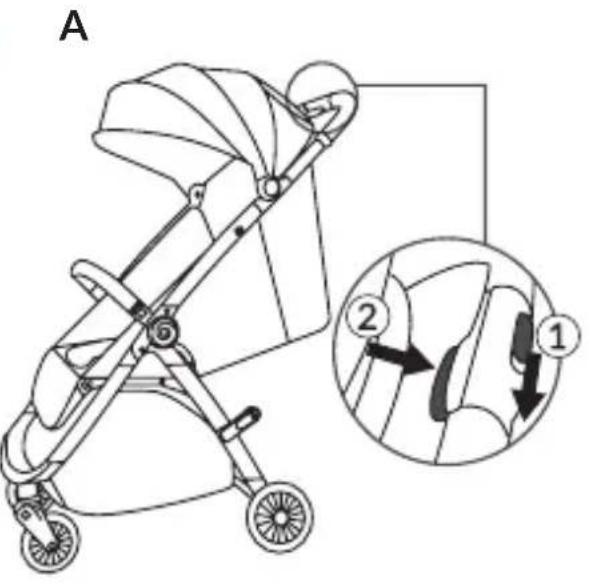
- Unfold the seat to the reclining position and fold the canopy.
- Press the fold button and slide the sliding fold button at the same time (A, fig. 4)
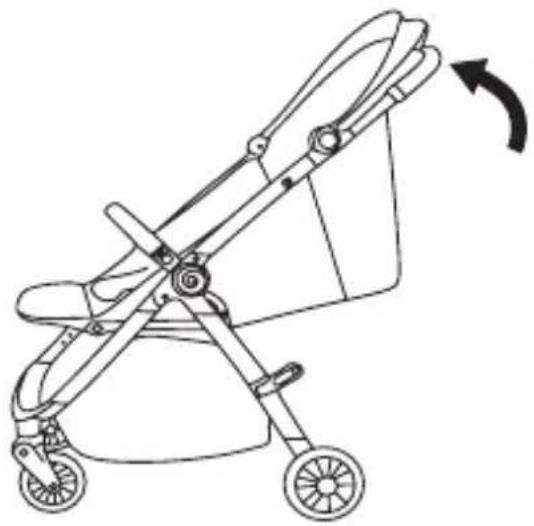
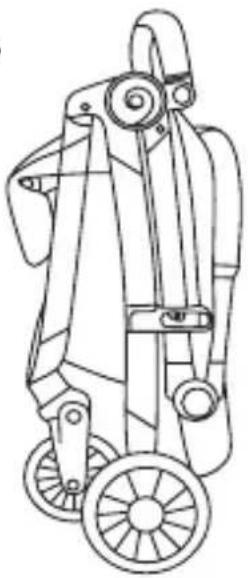
- Push the handle forward (B, fig. 4) and then down (C, fig. 4). The stroller will fold automatically (D, fig. 4). Fasten the lock and press down on the stroller to make sure it is folded correctly.
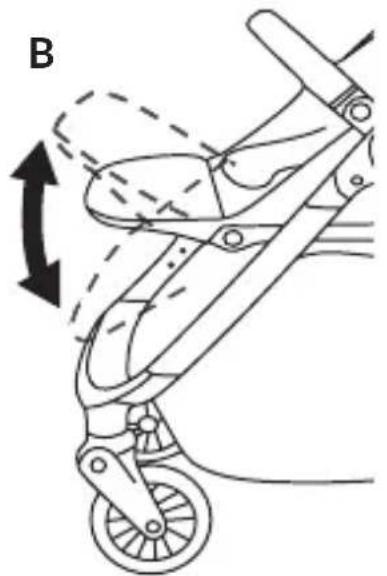
Press the adjustment buttons on either side of the footrest (A, fig. 5), then adjust the footrest to one of the available positions (B, fig. 5).
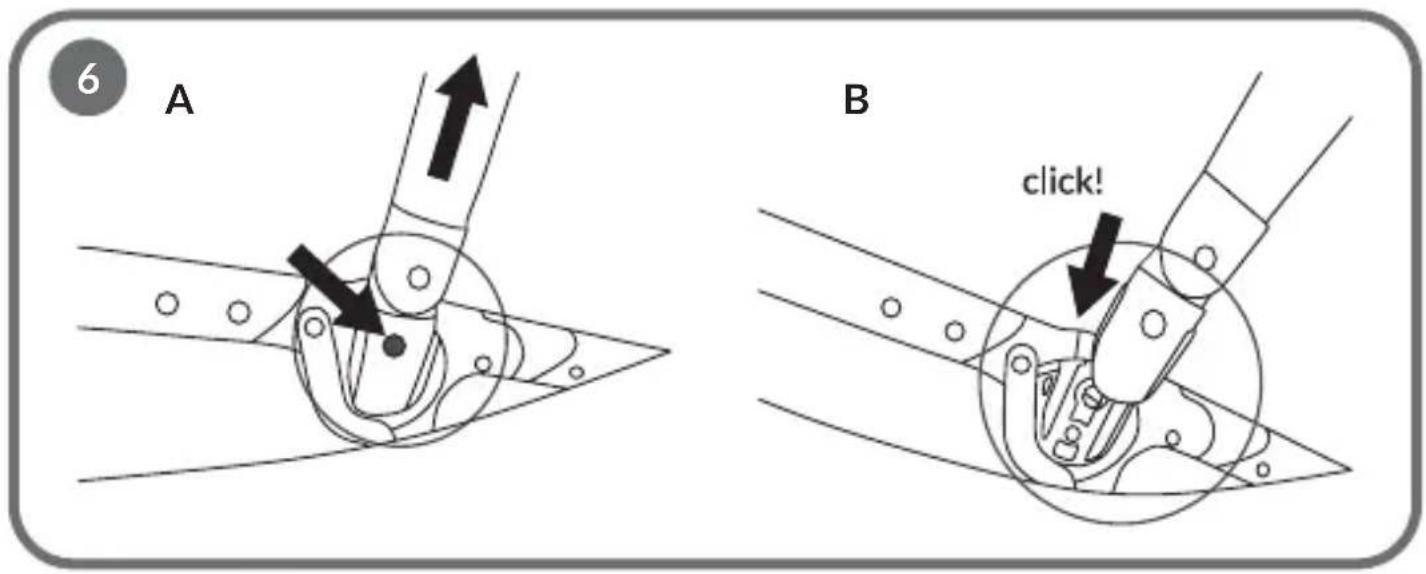
INSTALLATION AND REMOVAL OF THE HANDRAIL
- To remove the handrail, press both release buttons (A, fig. 6), then pull out the handrail.
- To install the railing, insert it into the appropriate holes on the stroller frame (B, fig. 6). The correct installation will be signaled by a click.
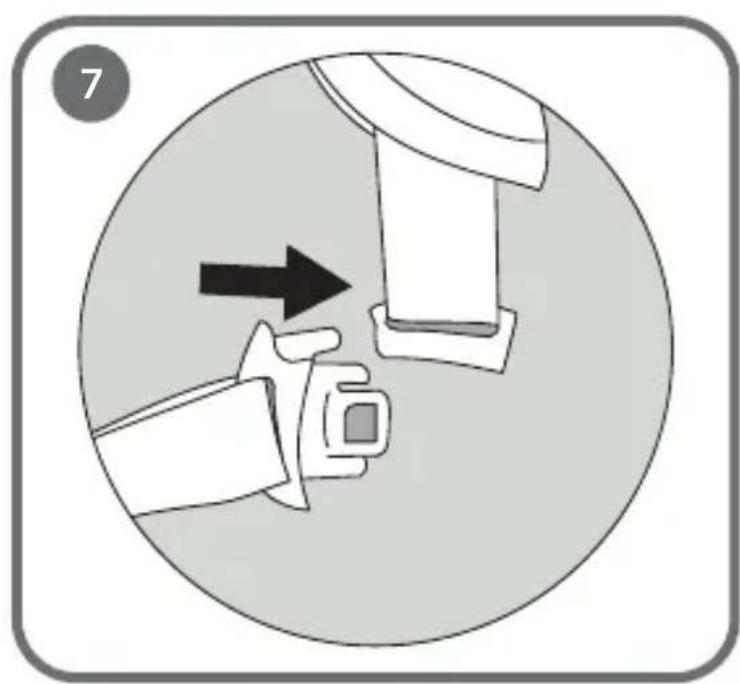
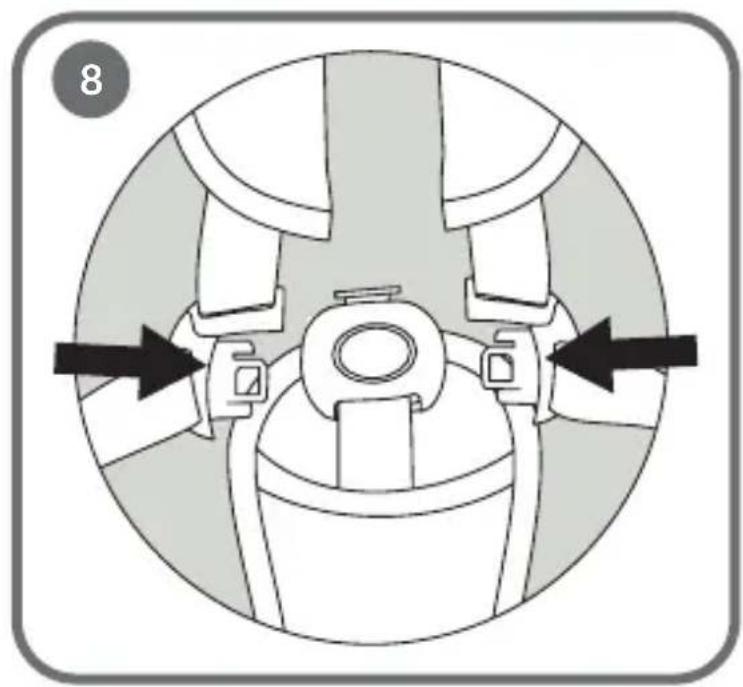
SEAT BELTS
- Connect the upper and lower components of the buckle (fig. 7), and insert the whole into the main buckle (fig. 8). The correct connection will be signaled by a click.
-
Adjust the length of the belts to the child's body using the buckles located on the belts (A, fig. 9).
-
To adjust the belts, remove the buckle through the hole located in the seat and put it in the desired place (B, fig. 9). Make sure the buckles are in the correct, stable position after repositioning.
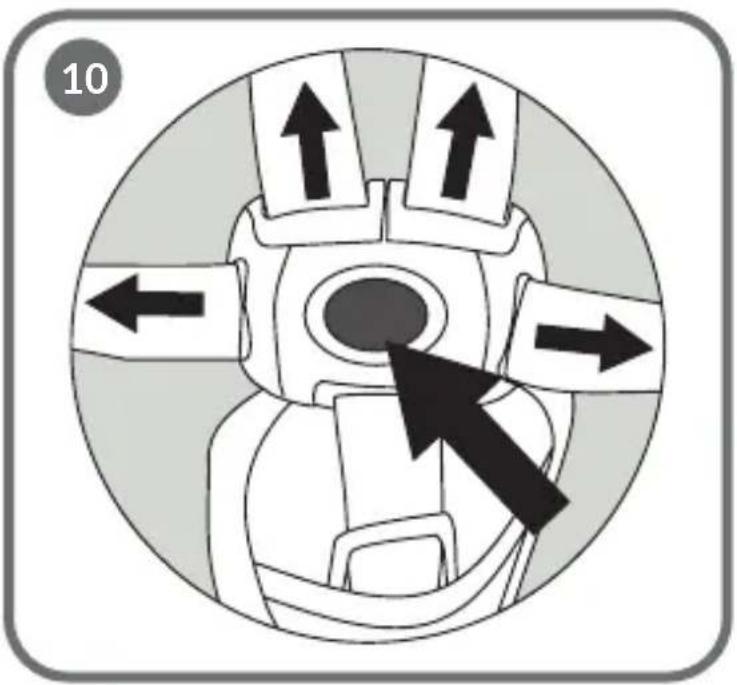
- To unbuckle the belts, press the button located in the main buckle (fig. 10).
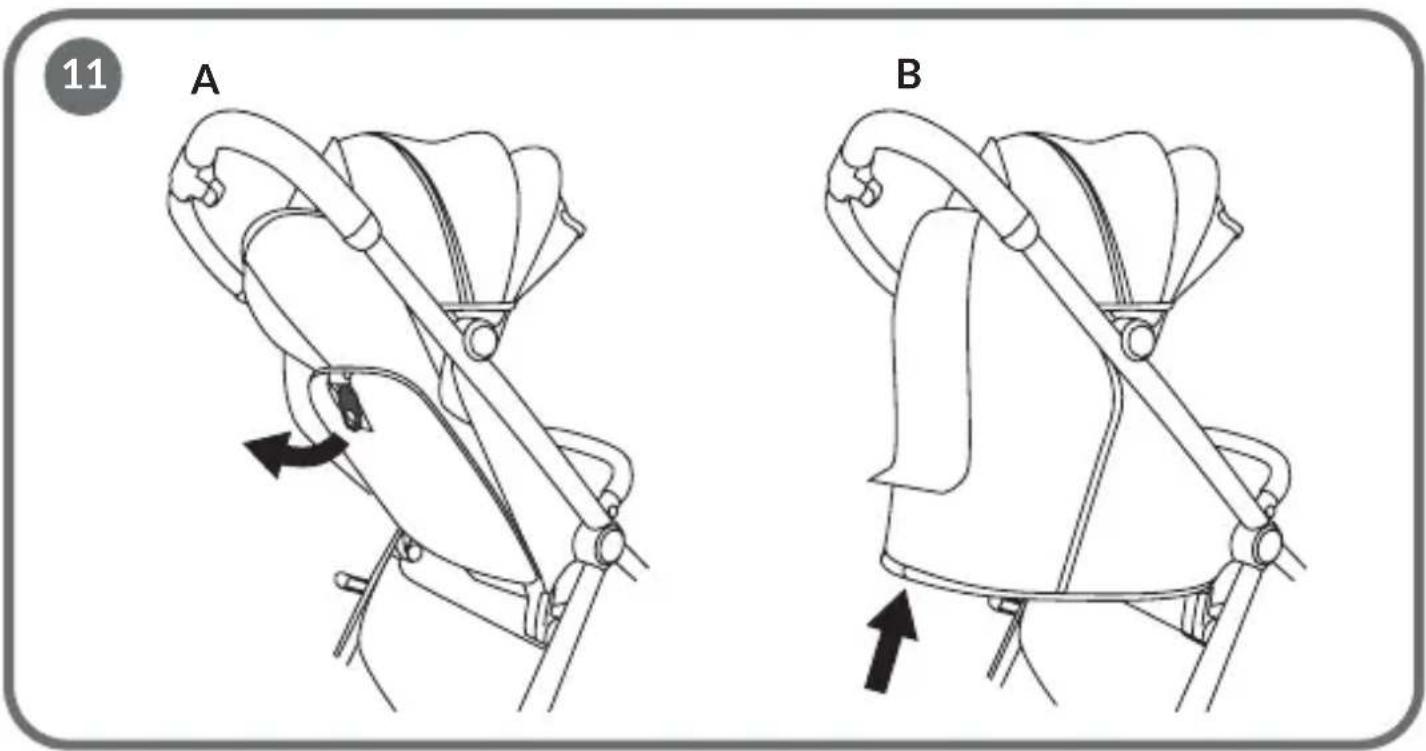
SEAT ADJUSTMENT
Note! Do not adjust the seat when there is a baby in the stroller. There are 3 positions available.
- To unfold the seat to the reclining position, pull the lever on the back of the seat (A, fig. 11).
- To return to the sitting or semi-reclining position, push the seat forward until you hear a characteristic click (B, fig. 11).
LOCKING MECHANISM
Note! If you want to take the child out of the stroller or put it in it, make sure the locking mechanism is locked.
Use the locking mechanism only as intended. Incorrect use may result in permanent damage to the product.
- To lock the front and rear wheels, press the part of the locking mechanism marked in red (A, fig. 12).
- To unlock, press the part of the parking mechanism marked in green (B, fig. 12). The locking mechanism system used requires alternate operation. Follow the intuitive signage: red – stop, green – go.
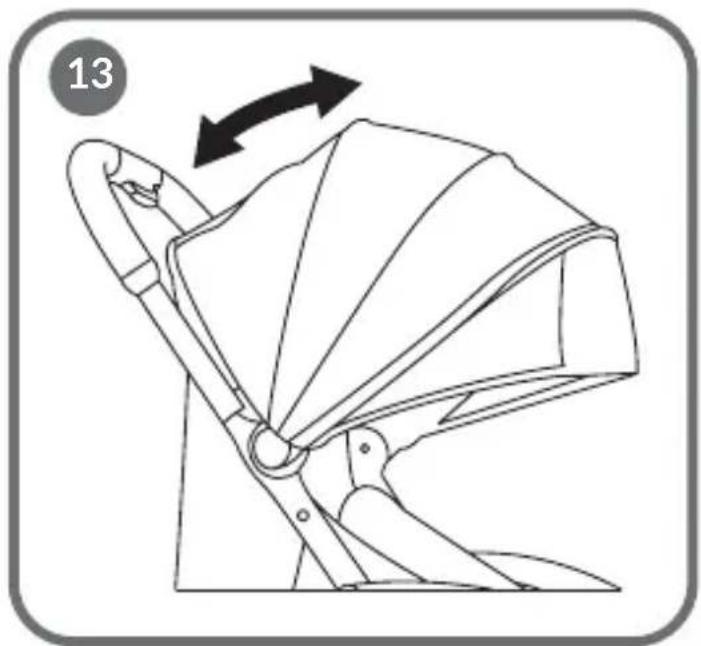
CANOPY ADJUSTMENT
Unfold the canopy and adjust it to the desired position (fig. 13). The correct setting will be signaled by a click.
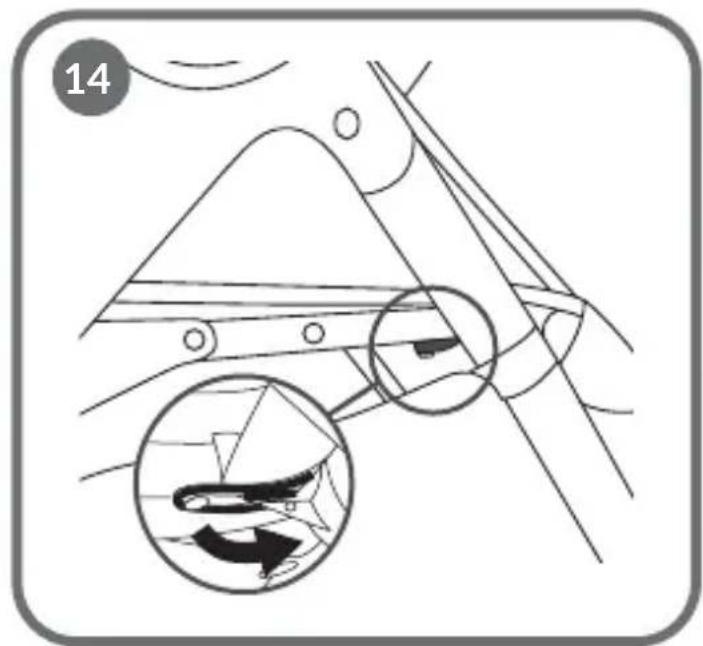
CANOPY REMOVAL
To remove the fabric cover, follow the steps below:
- Remove the rubber hooks located under the seat (fig. 14).
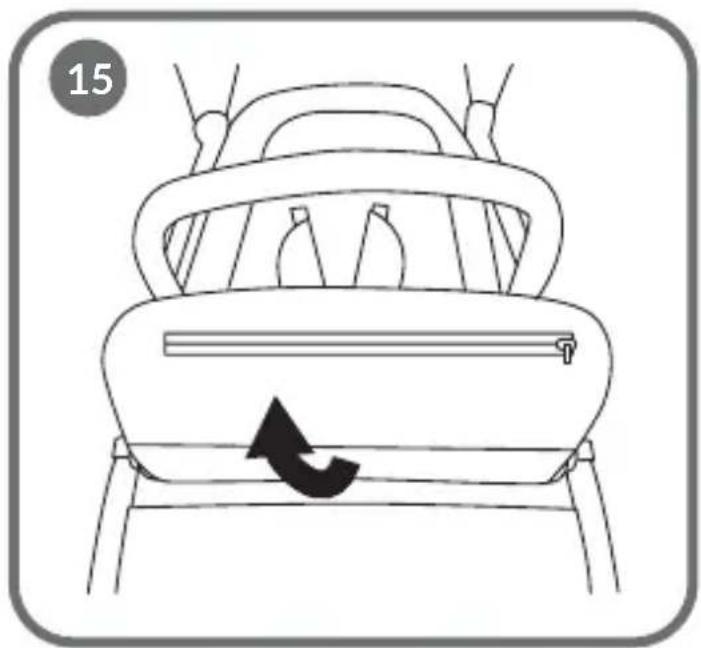
- Unfasten the hook-and-loop fastener located under the footrest (fig. 15).
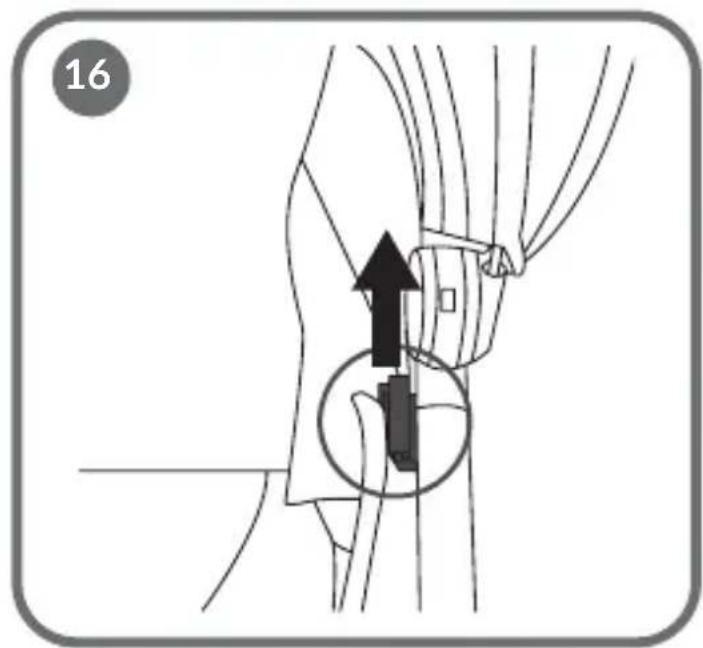
- Slide out the buckles located at the top of the cover from the guides (fig. 16).
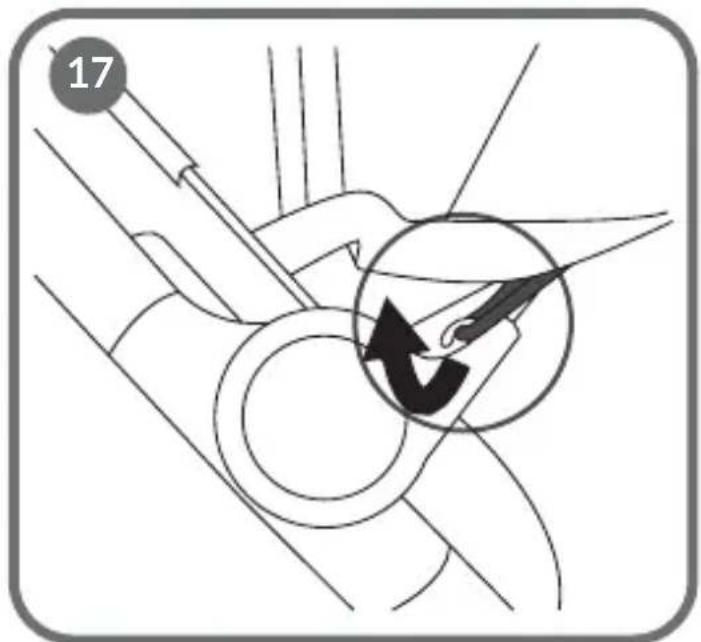
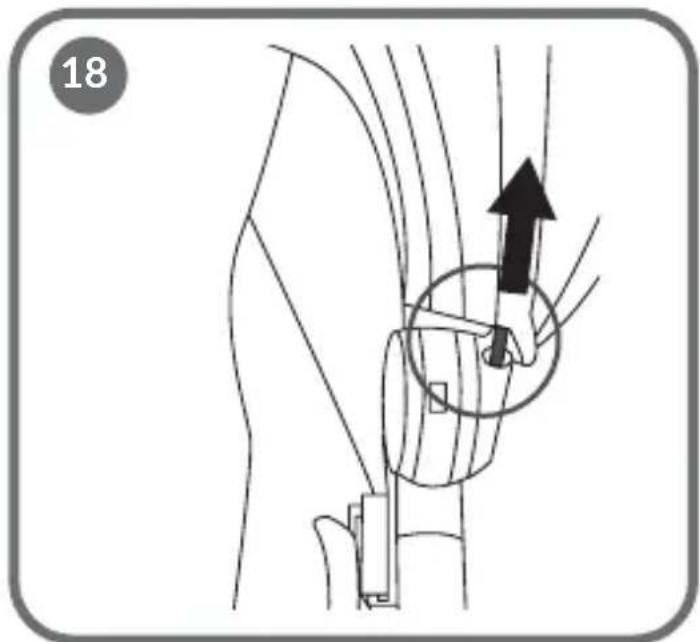
-
Remove the rubber hooks located on both sides of the canopy (fig. 17). Remove the iron rod from the stroller frame and from the canopy cover (fig. 18).
-
Pull the cover upward (fig. 19).
BASKET REMOVAL
To remove the basket, follow the steps below:
- Unfasten the hook-and-loop fastener (fig. 20) and the metal latches (fig. 21) located on the rear part of the stroller frame.
- Unfasten the hook-and-loop fastener (fig. 22) and the metal latches (fig. 23) located on the front part of the stroller frame.
CLEANING AND MAINTENANCE
- Regularly check the condition of the stroller and wheels. Do not use accessories that are not included. Use only original spare parts.
- Upholstery and basket can be hand washed in water at a maximum temperature of 30^ C.
- Clean the frame of the stroller with a damp cloth and mild detergents.
- The material cannot be washed in a washing machine, should not be chlorinated, ironed, dry-cleaned or tumble-dried.
- Before reuse, the material should be dry.
- Do not expose the stroller to direct sunlight for too long.
- Do not expose the stroller to salt water, as this may cause rust.
Photos are for reference only, the actual appearance of the products may differ from that shown in the photos.
PL
Drogi Kliencie!
BrandLine Group Sp. z o.o.
BrandLine Group Sp. z o.o.
BrandLine Group Sp. z o.o.
BrandLine Group Sp. z o.o.
BrandLine Group Sp. z o.o.
BrandLine Group Sp. z o.o.
BrandLine Group Sp. z o.o.
A. Kręglewskiego 1, 61-248 Poznanė, Lenkija
SVARBU – ATIDŽIAI PERSKAITYKITE IR SAUGOKITE, KAD VĖLIAU GALĖTUMĖTE PASISKAITYTI ĮSPĖJIMAS
BrandLine Group Sp. z o.o.
MONTÁŽ A DEMONTÁŽ ZADNÍCH KOL
MONTÁŽ A DEMONTÁŽ MADLA
BrandLine Group Sp. z o.o.
BrandLine Group Sp. z o.o.
BrandLine Group Sp. z o.o.
BrandLine Group Sp. z o.o.
A. Kręglewskiego 1, 61-248 Poznań, Puola
TÄRKEÄÄ! LUE HUOLELLISESTI JA SÄILYTÄ VASTAISUUDEN VARALLE VAROITUS!
Detailed warranty conditions are available on the website: