
V12 - Projector Yaber - Free user manual and instructions
Find the device manual for free V12 Yaber in PDF.


| Product type | Projector |
| Brand | Yaber |
| Model | V12 |
| Dimensions (L x W x H) | 27 x 21 x 10 cm |
| Weight | 2.5 kg |
| Power supply | AC 100-240 V, 50/60 Hz |
| Power consumption | 120 W |
| Native resolution | 1920 x 1080 pixels (Full HD) |
| Brightness | 5000 lumens |
| Contrast ratio | 10000:1 |
| Lamp life | 50,000 hours |
| Keystone correction | ±15° (vertical and horizontal) |
| Focus | Manual |
| Connectivity | HDMI, USB, VGA, AV, Audio 3.5 mm |
| Wireless | Wi-Fi 802.11 b/g/n, Bluetooth 5.0 |
| Main functions | Projection, screencast, media playback, built-in applications |
| Operating system | Android 9.0 |
| Maintenance and cleaning | Clean the lens with a soft dry cloth; dust the ventilation grilles |
| Safety | Do not look directly at the light source; keep out of reach of children |
| Spare parts and repairability | Remote control, power cable, LED bulb (replaceable) |
Frequently Asked Questions - V12 Yaber
User questions about V12 Yaber
0 question about this device. Answer the ones you know or ask your own.
Ask a new question about this device
Download the instructions for your Projector in PDF format for free! Find your manual V12 - Yaber and take your electronic device back in hand. On this page are published all the documents necessary for the use of your device. V12 by Yaber.
USER MANUAL V12 Yaber
natural_image
Line drawing of a portable radio with a circular lens and two buttons (no text or symbols)V12 PROJECTOR
LANGUAGE
English 03-36
Deutsch 39-70
Français 73-104
Italia 107-138
日本語日本語 141-172
Polish 175-206
CONTENTS
YABER Lifetime Professional Support 04
Precaution 04
Package List 05
Projector Specifications 06
Base Installation 09
Install on the Ceiling 10
Distance and Projection Size. 10
Maintenance Tips ········36
YABER Lifetime Professional Support
Dear valued customer,
Thank you for choosing Yaber V12 projector. This manual will help you navigate through all the features.
We understand that there may be many questions and concerns that arise during the use of the projector. We are also eager to hear your feedback.
However, leaving a review on the product page does not provide the fastest solution. Many common problems, such as inability to autofocus or keystone, Dolby sound issues, WiFi or Bluetooth connection issues, can usually be resolved with appropriate settings adjustments.
If you encounter any issues, feel free to send your order number and the problem to us at service@yaber.com.(e.g. US+V12+000-0000000-0000000+Issues)
Rest assured, our service team will offer the solution to you with 24 hours.
Your satisfaction is our top priority, and we encourage you to thoroughly explore the contents of this manual.
We wish you an outstanding experience with the V12.
Yaber Consumer Service Team
Precaution
1. Suitable Environment (5°C - 35°C)
Ensure the projector is placed in an environment with a suitable temperature, as extreme heat or cold may impact its lifespan. Avoid placing it in damp environments, such as damp basements or near swimming pools.
2. Adequate Ventilation
Please position the projector in a well-ventilated area to prevent overheating during operation, which may cause power cuts or screen flickering issues.
3. Avoid Prolonged Continuous Use
Please refrain from keeping the projector running for extended periods. We recommend limiting each session to no more than 3 hours to prevent component damage due to prolonged exposure to high temperatures.
4. Power
Please ensure the power source is within the required power range. During thunderstorms, please unplug the power cord from the projector.
5. Safely Care
Handle the projector with care to prevent strong impacts, extrusions, or vibrations, as these may result in internal circuit faults. Avoid moving it during such conditions.
6. Lens Maintenance
The lens directly affects picture quality. Excessive dust accumulation can degrade image quality. Use a soft cotton cloth to gently wipe the lens surface. Avoid using hard cloth or abrasives, as they may damage the glass lens.
Package List

natural_image
Line drawing of a vintage portable radio with a circular lens and antenna (no text or symbols)V12 Projector
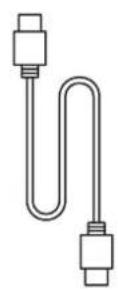
HDMI Cable
natural_image
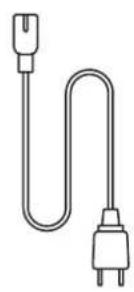
Simple line drawing of a U-shaped electrical plug with two terminal pins (no text or symbols)Power Cord
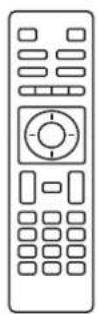
Remote Control
natural_image
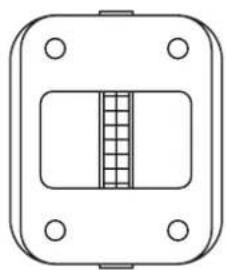
Pure technical diagram of a rectangular component with internal grid pattern (no text or symbols)Projector Base

Cleaning Cloth
Lens Cover
natural_image
Two overlapping document sheets with horizontal lines, no text or symbols presentQuick Start Guide
Projector Specifications
| Model No. V12 | |||
| Focus Auto/Eletric | Keystone Correction | Auto/Eletric | |
| Light Source LED Display Technology LCD | |||
| Aspect Ratio 16:9/4:3 Interfaces | USB2.0*2/HDMI1.4*2/3.5mmAudio Out*1, Lan*1 | ||
| Projection Ratio 1.36:1 | Recommended Projection Distance | 1.3~5.0m(4.5-16.4 Ft.) | |
| Native Resolution 1920*1080P Unit Dimension | 9.8*8.8*7.6 inches(25*22.5.*19.3CM)7.27lbs (3.3KG) | ||
| Power Voltage | 100-240V/50-60Hz2A | Power Consumption | 140W |
| Projector Weight | 7.27 lbs/3.3 kg(With Base) | Projection Method | Front/Rear on Desk, Front/Rear on Ceiling |
| Picture Format JPEG | GIF, BMP, PNG, JPG | ||
| Audio Format MP3,W | AV,MKA,OGG,FLAC,Dolby Audio | ||
| Video Format | AVI,TS,MPEG,MP4,MOV,M2TS,MKV,FLV,VOB,DAT,M4V,ASF,F4V,3GP,3G2,TP,TRP,RMVB | ||
Projector Overview
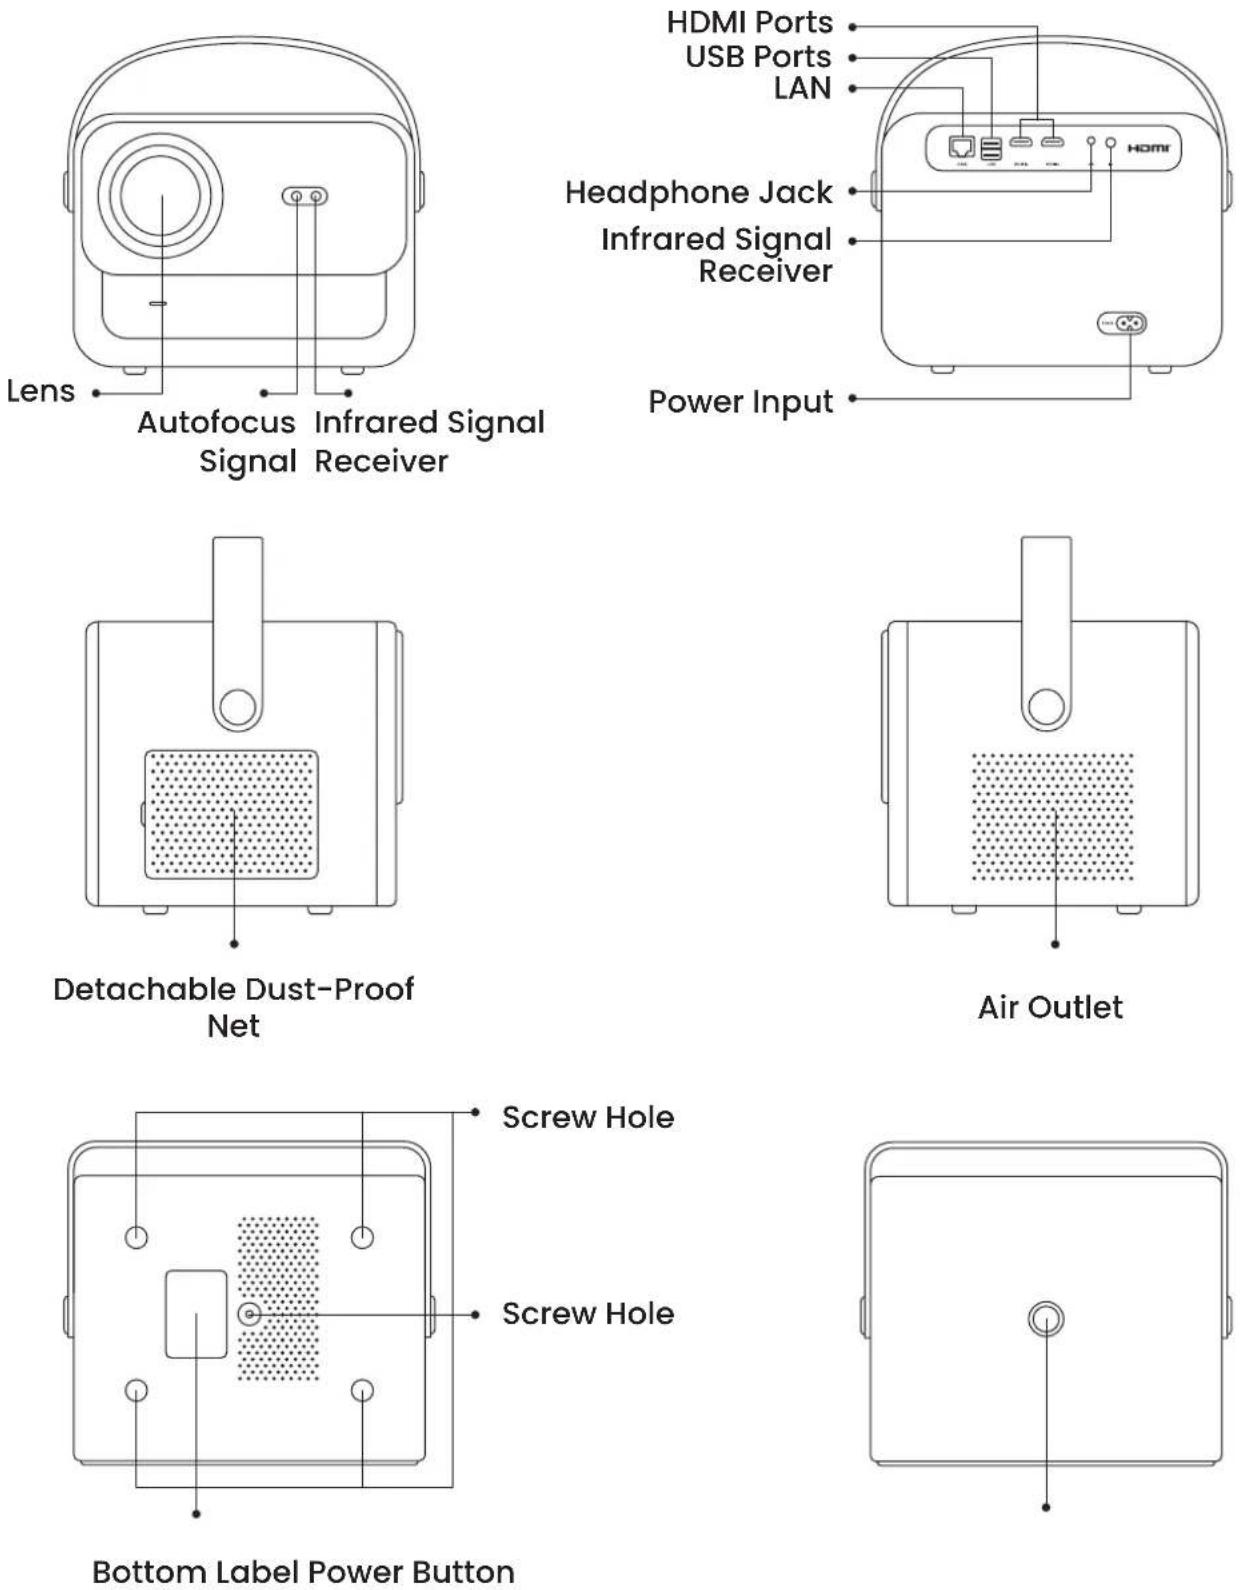
Remote Control Overview
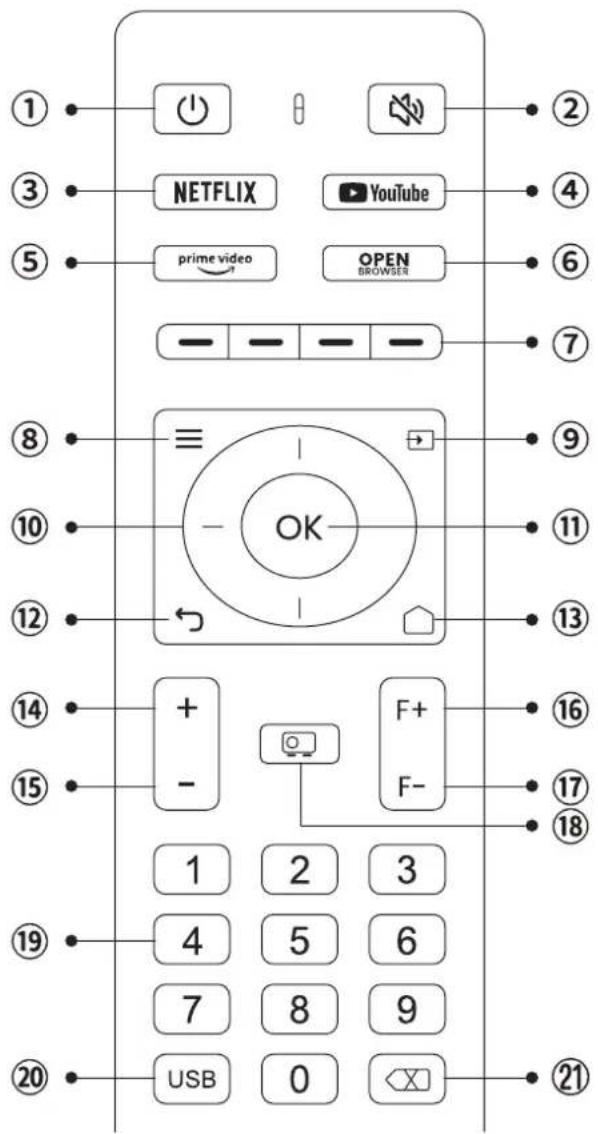
- Power
- Mute
- NETFLIX
- YouTube
- Prime Video
- Open BROWSER
- Red/Green/Yellow/Blue keys
- Menu
- Input Source
- Arrow keys
- Confirmation key
- Back
- Homepape
- Volume+
- Volume-
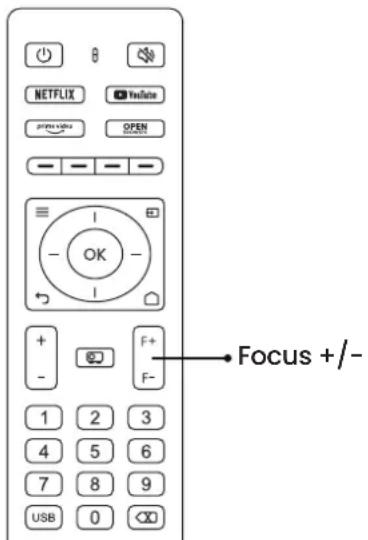
- Focus+
- Focus-
- Projection mode
- Number
- USB
- Backspace
• Prepare the remote control
- Open the battery compartment.
- Insert two AAA batteries with correct polarity indicated.
- Close the battery compartment.
Note: You must use the Yaber remote control to complete the first time setup of the projector.
Base Installation

natural_image
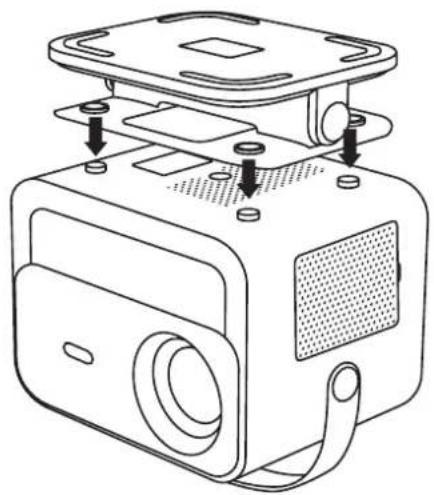
Line drawing of a rectangular electronic device with a speaker grille and mounting holes (no text or symbols)- Turn the machine over, back side up.
natural_image
Technical line drawing of a device with mounting holes and a textured base (no text or symbols)- Match the holes of the base to the screw holes on the projector.

natural_image
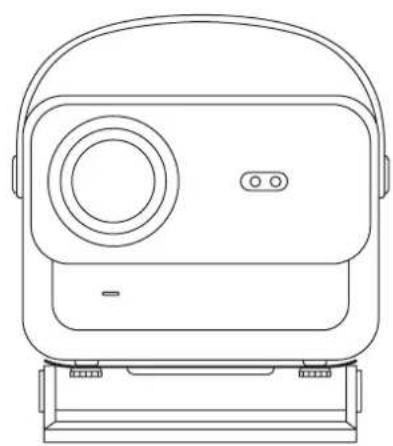
Line drawing of a portable electronic device with control knobs and a speaker grille (no text or symbols)- Tighten the screws in the accessory box.
natural_image
Line drawing of a portable electronic device with front-mounted base and control panel (no text or symbols)- Complete the installation.
Install on the Ceiling
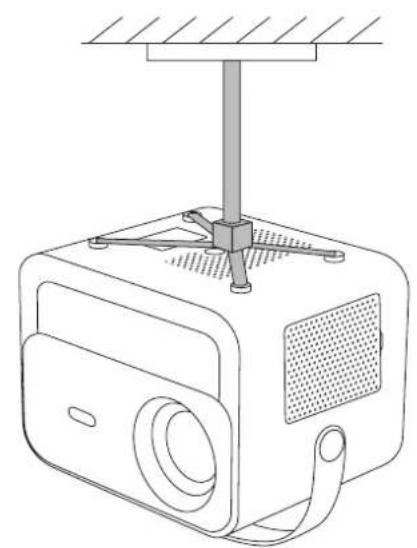
- Prepare a universal projector ceiling mount. (Not included in the package)
- Use M5*15mm screws to securely install the projector on the ceiling using the hanger frame.
natural_image
Line drawing of a projector with a stand and base mount (no text or symbols)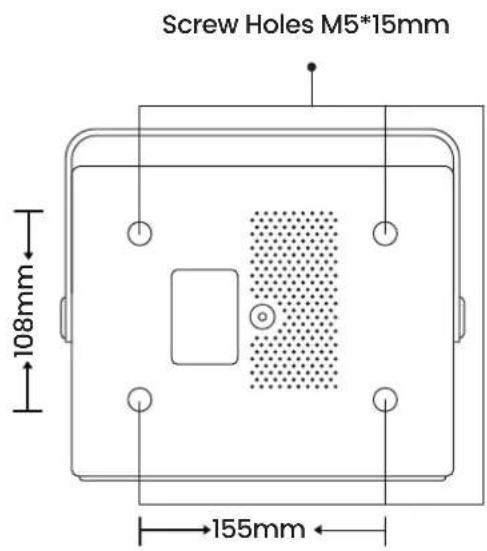
Distance and Projection Size

bar
| Dimension | Height (ft) | | :--- | :--- | | 1.4m | 4.5 | | 2.1m | 6.7 | | 2.7m | 8.9 | | 3.4m | 11.2 | | 4.1m | 13.4 | | 6.8m | 22.4 | | 200" | |The recommended projection distance is about 8.9 ft, and the shortest projection distance is 4.5 ft.
The image size depends on the distance between projector and screen.
There may be 3% deviation among above listed data. Different settings cause various distances.
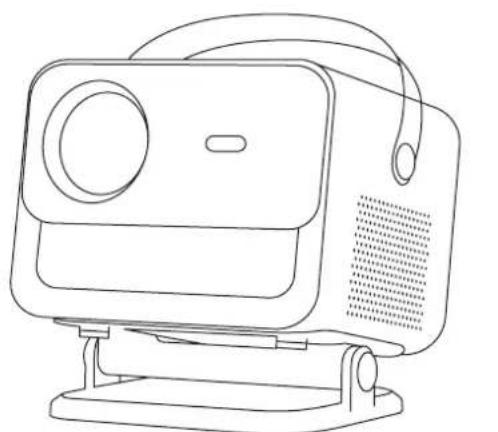
Adjustable base mount
natural_image
Line drawing of a portable electronic device with a circular lens and handle (no text or symbols)
Max Degree: ±30°
Recommend Degree: ±15°
You can adjust the projection angle by rotating the Stand.
The maximum adjustment angle for the stand is ±30^ , but for optimal auto-focus and auto-keystone effects, we recommend using angles within ±15^ .
Connect Devices
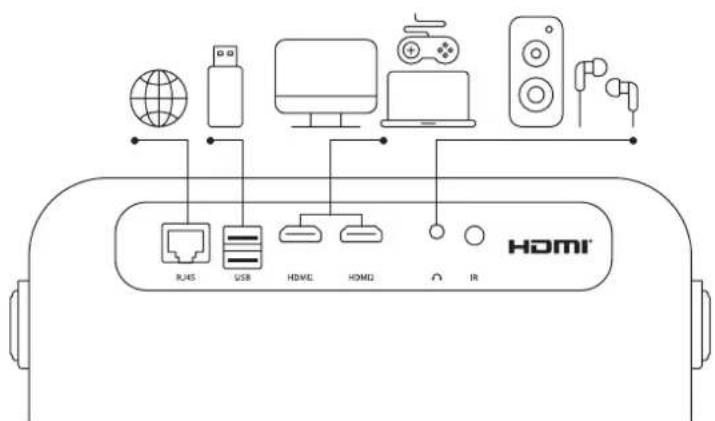
The projector has 6 ports, LAN/HDMI port*2/USB port/USB-C port/Aduio out. Please select the correct connecting ports to connect your devices.
Operation
1. Starting Up the Projector
- Power on

natural_image
Line drawing of a portable radio with a speaker and a circular button, no text or symbols presentTake off the protective cover.

natural_image
Line drawing of a microwave oven connected to a power outlet (no text or symbols)Connect the power cable to an outlet.
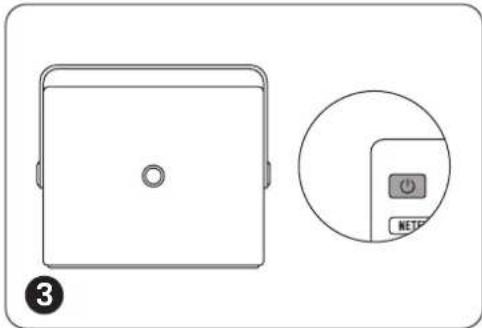
natural_image
Simple line drawing of a device with a circular button labeled 'NETF' and a square panel, no text or symbols present.Press the power button once to turn on the projector.
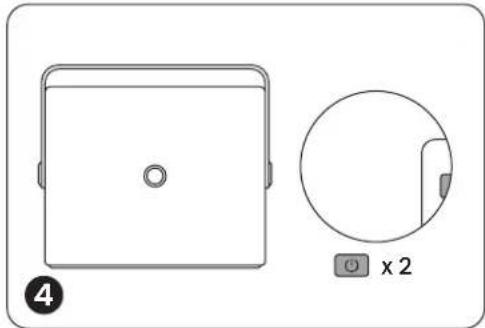
natural_image
Technical diagram showing a rectangular component with a circular cutout and a magnified view of a corner detail (no text or symbols)Press the power button twice to turn off the projector.
Notice: When you connect the power cord to projector, the orange light will flash 10 seconds. Please wait patiently until the power light stop blinking.
Orange power Light on --- Standby Mode Orange power Light off--- Working Mode
- First time setup
When you turn on the projector for the first time or the projector is reset to the Factory Default Settings, you are prompted to make the first time setup.
After setup, the projector will go to the Homepage.
2. Image Adjustment
- Auto Focus
When the projector is turned on, please wait for a few seconds, it will automatically adjust the focus. (If not, ensure the auto focus function is activated in Settings -> Focus -> Auto Focus -> On)
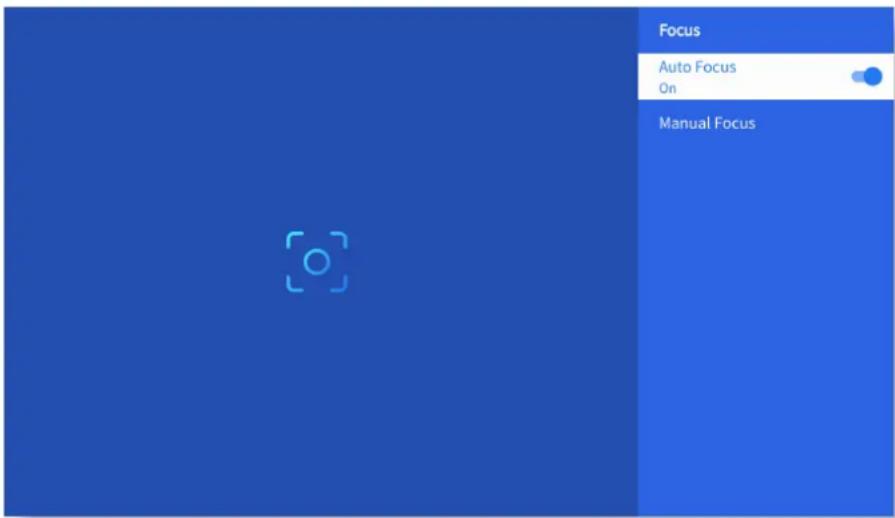
- Eletric Focus
You can also adjust the clarity of the screen by clicking or holding down the F+ and F- buttons on the remote control.
• Auto Keystone Correction
Please place the projector horizontally face to the wall first. After turn it on, it will automatically adjust the screen to a regular shape. (If not, ensure the auto keystone function is activated in Settings -> Keystone -> Auto Keystone -> On) - Manual Keystone Correction
Go to Setting-> Keystone -> Four Points Correction  Tips: When the projector detects shaking or rapid movement, it will automatically initiate autofocus adjustment and keystone correction to ensure optimal image quality. If you encounter unclear images or an imperfectly squared display, please use the remote control's focus button for manual adjustment or utilize the four-point keystone correction to manually correct the image shape.- Projection Mode
Go to Setting-> Projection to select the appropriate projection mode based on the placement of the projector. - Zoom
Go to Setting-> Zoom to reduce or enlarge the image size between 50% to 100%. 3. Play Content from Officially Licensed Apps like Netflix, Youtube and Prime Video
Go to the homepage, select your preferred channel, or access it through the shortcuts on the remote. Log in to your account to play the corresponding content.  4. Projection Connection and Input Source
Please follow the page 11 instructions to properly connect your devices to the projector, then select the correct input source.- USB Disk Input Mode
1. Insert the USB Disk 2. Click on the input source [→] on the remote control or choose the input source icon on the homepage. 3. Select "USB" as input source    Warning: If the projector cannot recognize the USB disk, please refer to the following methods to solve the problem. 1. Please confirm whether your USB disk meets the following formats: (1) FAT32: 8G/16G/32G; (2) NTFS: 64G 2. If the USB disk is not recognized/detected, please format it.Before you format the USB disk, make sure to backup everything. After formatting, everything will be lost forever. 3. If the problem is still not solved, please send your problem to this email: service@yaber.com- HDMI Input Mode
Connect your device with an HDMI output to the projector using the provided HDMI cable. Press the input source button on the remote and select HDMI1 or HDMI2.   - Wired Speaker and Headphones Connection
This option is not required to select AV input source5. Screencast
Warming Tips:
1. The fluency of screen mirroring with wireless connection will be affected by the network environment. A bandwidth of 100Mbit or more is recommended when using screen mirroring. 2. Make sure your mobile device is close to the projector when using wireless connection. A distance within 1 meter is recommended. 3. Some mobile devices may not support screen mirroring due to the compatibility. 4. Any questions, please feel free to email YABER via service@yaber.comiOS Cast (for iOS Devices)
- iOS Wi-Fi Mirroring
Step1: Connect the projector and your mobile device to the same router's WiFi flowchart
graph TD
    A["Device"] -->|Wireless Signal| B["Rout"]
    B -->|Signal| C["Smartphone"]
    C -->|Data Flow| D["Radio Station"]
Step2:
Go to [Hompage] -> [My Apps] -> [App Assistant] and then select and download ScreenShare   Step3:
Go back to [My Apps] page -> Launch the [ScreenShare] App and remain on the following page.  flowchart
graph LR
    A["1 Click the button"] --> B["2 Select Smart Projector_c1c3"]
Step4:
Go to the Control Center of your iOS device. Then tap Screen Mirroring/Air Playing to search for the projector.Step5:
Choose [Smart\_Projector\_XXXX] from the list, and once the connection is successful, the content on your iOS device will be mirrored onto the projection screen or wall. flowchart
graph LR
    A["1 Connect the same network"] --> B["2 Click the button"]
    B --> C["3 Select S8"]
- iOS AP Mirroring
Step1:
Turn on the Wi-Fi on your iPhone/iPad and connect to projector hotspot: [Smart\_Projector\_XXXX] Step2:
Press the ☐ Screen Mirroring of iOS device and then choose[Smart\_Projector\_XXXX] flowchart
graph LR
    A["Connect the same network"] --> B["Click the button"]
    B --> C["Select SB"]
Miracast (For Android Device)
Warning: To activate this function, your android device must support Multi-Screen/Wireless Display. The name of "Multi-Screen" may vary depending on various brands of Android devices. Step1: Please enable the Wi-Fi function on your Android phone (no need to connect to Wi-Fi). Step2: Go to Hompage -> My Apps -> ScreenCast  Step3: Activate the 'Multi-Screen/Wireless Display' feature on your Android device  Step4: Choose [Smart\_Projector\_XXXX] from the list, and once the connection is successful, the content on your iOS device will be mirrored onto the projection screen or wall. • DLNA
Step1:
Connect the projector and your mobile device to the same router's WiFi.Step2:
Go to Homepage -> My Apps -> HomeShare and remain on the following page.   flowchart
graph LR
    A["Connect the same network"] --> B["Click the button"]
    B --> C["Select Smart_Projector"]
Step3:
Launch a video player App on your mobile device and select a video to play.Step4:
Tap☐ to search for the projector and select [Smart\_Projector\_XXXX] to connect. The contents on your device will be cast to the wall/screen.Note:
When you cast a video from your mobile device, the video will only be displayed on the projected screen and you can still use your mobile device without interrupting the video or showing any of your other content.6. Bluetooth Setting
- Connect to an External Bluetooth Speaker
Step1: Turn on your Bluetooth device and make it ready for a Bluetooth connection. Step2: Go to Homepage -> Setting -> Bluetooth to scan available Bluetooth devices, then select your Bluetooth device and pair it with the projector: IMPORTANT:
Compared with the wired connection to a speaker, a Bluetooth connection spends more time processing digital audio data, converting said data to an audio signal, and streaming the signal. There may be a delay or slight lag on audio due to signal interference. As a result, the sound on the speaker may not be in sync with the image on the projector, especially when you are using wireless screen mirroring with WiFi and Bluetooth connection at the same time.If you are experiencing this situation, please check the following options to improve audio quality:
\* Instead of using wireless screen mirroring and Bluetooth connection at the same time, we recommend using an HDMI connection via the provided HDMI cable and Bluetooth connection simultaneously. If you still want to use wireless screen mirroring, it is recommended to output the audio via a wired speaker \* Move your Bluetooth device closer to the projector. \*Keep the projector and your Bluetooth speaker away from other Bluetooth devices to avoid interference. \* You may be able to adjust the latency(Lip Sync)on your device which is playing the video. The way to adjust the latency varies with different devices; please consult with the device manufacturer. Due to the compatibility issue between Bluetooth speakers/headphones and the projector, few Bluetooth devices may not be paired with the projector via the Bluetooth connection. Please contact us at service@yaber.com for further assistance- Connect to Device as Bluetooth Speaker
Step1:
Go to Homepage -> My Apps -> Bluetooth Speaker and remain on the following page.Step2:
Enable the Bluetooth functionality on your device, scan and connect the projector.  7. Other Setting
- Setup
Go to home page -> Select [Setting] -> Select the [Setup]. Use the arrow keys on the remote control to switch the menu, press the "OK" to confirm and set. | Menu Content | |
| OSD Language English/France | /Italian/Japanese etc |
| Time Setup Set Local Time | |
| Screensaver Turn on/off screen saver | |
| Sleep Timer | On/Off: Set the sleep time from 10 - 120 minutes |
| Auto Sleep | On/Off: Set the time from 30minutes - 8Hours |
| USB Auto Upgrade Local Update | |
| Internet Update Check Check | Internet Environment |
| Reset Default Restore Factory | Default |
- Picture Mode Menu
Go to home page -> Select [ Setting ] -> Select the [ Picture Mode ]. Use the arrow keys on the remote control to switch the menu, press the "OK" to confirm and set. | Menu Content | |
| Picture Mode | Standard/Cinema/Sport/Vivid/Hi-Bright/Custom |
| Brightness Set the Screen Brightness Value | |
| Contrast Set the Screen Contrast Value | |
| Saturation Set the Screen Saturation Color | |
| Hue Set the Screen Hue Color | |
| Sharpness Set the Screen Sharpness Value | |
| Gamma Bright/Dark/Middle | |
| Color Temperature Normal/Cool/Warm/Standard | |
- Audio Setting
Go to home page -> Select [ Setting ] -> Select the [ Audio ]. Use the arrow keys on the remote control to switch the menu, press the "OK" to confirm and set. | Menu Content | |
| Bass/Treble Set Preferred Values | |
| Sound Style | User/Standard/Movie/Music/Sports/Vivid/News |
| Digital Output Mode | Auto/PCM/Dolby Audio-Dolby Digital/Dolby Audio-Dolby Digital Plus |
| Dialogue Enhancement | On/Off: Conversation enhancement function, voice, broadcast function for special peopleLow/Medium/High |
- About
Go to home page -> Select [ Setting ] -> Select the [ About ]. Use the arrow keys on the remote control to switch the menu, press the "OK" to confirm and set. | Menu Content | |
| Netflix Netflix Officially-Licensed | |
| Version/License Info | View the Latest Version/License Information |
| Device Name Projector Model Name | |
| Device Temperature 50°C |
8. Signal Lines Connection
① USB Multimedia Connecting
Select the USB signal source, the machine will detect them automatically. Step1: Select the required category "photos" "music" or "video" in the main interface, and press the "OK" key on the remote control to enter the corresponding category. Step2: Choose the file you want to play, and press the key "OK" to play or pause the file. (You cannot enter the required category without connecting a USB disk.) Note: For the "Office Suite" option, PPT/Excel/Word/TXT files cannot be played or presented normally.② Connecting with PC
Step1: Connect to the computer and V12 projector with the HDMI cable (Included). Step2: Select the HDMI source to project on the projector; Step3: On your laptop, hold down the key "Win+P" board keys to change your display mode.  Computer only: it is the default option – only displays on the main monitor. Duplicate: make all the monitors display the same thing duplicating the desktop on each monitor. Extend: make all your monitors act like one big monitor extending the desktop across all of them. Projector only: display only on the secondary monitor like a projector. To change the screen resolution in Projector Only mode, follow these steps: Step: Start -> Control Panel -> Appearance and Personalization -> Adjust Screen Resolution  ③ Connecting with MacBook or MacBook Air Step1: Use a Type-C to HDMI adapter to connect your MacBook, or a Mini Display to HDMI adapter to connect with your MacBook Air. (Adapter NOT INCLUDED) Step2: Choose the media signal channel : "HDMI" ④ Connecting with XBOX/PS5 Step1: Use HDMI cable to connect to XBOX/PS5 Step2: Choose the media signal channel : "HDMI" Step3: Succeed ⑤ Connecting with DVD player: Step1: Use HDMI cable to connect to DVD player Step2: Select "HDMI" mode for connection Step3: Enter Menu key Step4: Change the PC mode from [On] to [Off] to avoid the risk of white pixel edges in the image.9. Power On Mode
In the Power On Standby mode, plug in the power supply, and the Power LED on the projector will light up. You need to press the power button to turn on the projector. If switched to Power On, the machine will automatically turn on after plugging in the power cord.10. Safe Shutdown
1. Press the power button on the projector or remote controller, then press OK key to power off the projector. 2. Unplug the power cord of the projector. 3. Cover the lens and store the projector in a cool and dry place. 4. If you are unable to cover the lens, please adjust the lens forward or backward by pressing the F+ and F- buttons on the remote control before shutting down.Maintainance Tips
- Care of Projectors
1. Do not place projector in too warm or too cold room, because the high temperature or low temperature will shorten lifespan of the device. The working environment would be 5^ C- 35^ C better. 2. If there are black spots on the projection screen, please don't worry. Please contact service@yaber.com via email, we can send you a video about how to remove the dust. 3. The projector shall be strictly protected from strong impact, extrusion and vibration. 4. Lens, as the core component of the projector, is directly related to the picture definition and effect. Clean the lens whenever you noticed dirt or dust on the surface. Use a canister of compressed air to remove dust from the lens. If there is dirt or smears, use the cleaning cloth to gently wipe the lens surface.  Scan and download the PDF user manualWhere to Get More Help
service@yaber.com aftersales@yabertch.com www.yaber.com @Yaber Entertainment Projector @YaberLANGUAGE
English 03-36 Deutsch 39-70 Français 73-104 Italia 107-138 日本語日本語 141-172 Polish 175-206Inhaltsverzeichnis
YABER Lebenslanger Professioneller Support 04
Vorsichtsmaßnahmen 04
Paketlisten 05
Projektorspezifikationen 06
Projektor Strukturdiagramm. . . . . . . . . . . . . . . . . . . . . . . . . . . . . . . . . . . . . . . . . . . . . . . . . . . . . . . . . . . . . . . . . . . . 07
Fernbedienung Strukturdiagramm 08
Installation der Projektorbasis 09
Install on the Ceiling · · · · · · · · · · · · · · · · · · · · · · · · · · · · · · · · · · · · · · · · 10
Installation der Projektor 10
Projektionsabstand und Größe 11
Geräte Verbinden 11
Betrieb 12
1. Schalten Sie den Projektor ein · · · · · · · · · · · · · · · · · · · · · · · · · · · · · · · · · · · · · · · · · 12 2. Bildeinstellung· · · · · · · · · · · · · · · · · · · · · · · · · · · · · · · · · · · · · · · · · · · · · 13 3. Spielen Sie Inhalte von offiziell lizenzierten Apps wie Netflix, Youtube und Amazon Prime ab 16 4. Projektionsanschluss und Eingangsquelle · · · · · · · · · · · · · · · · · · · · · · · · · · · · · · · · · · · · · · · · · · · · · · · · · · · · · · · · · · · · · · · · · · · · · · · · · · · · · · · · · · · · · · · · · · · · · · · · · · · 17 5. Screencast · · · · · · · · · · · · · · · · · · · · · · · · · · · · · · · · · · · · · · · · · · 19 6. Bluetooth-Einstellung 27 7. Weitere Einstellungen 29 8. Anschluss von Signalleitungen 33 9. Einschaltmodus 35 10. Sicheres Herunterfahren · · · · · · · · · · · · · · · · · · · · · · · · · · · · · · · · · 35Sicheres Herunterfahren 36
YABER Lebenslanger Professioneller Support
Sehr geehrter Kunde, Vielen Dank, dass Sie sich für den Yaber V12 Projektor entschieden haben. Dieses Handbuch hilft Ihnen, durch alle Funktionen zu navigieren. Wir verstehen, dass Sie bei der Verwendung Ihres Projektors möglicherweise viele Fragen und Bedenken haben. Wir sind auch gespannt auf Ihr Feedback. Wenn Sie jedoch direkt auf der Produktseite eine Bewertung hinterlassen, erhalten Sie nicht die schnellste Lösung. Viele häufige Probleme, wie z. B. fehlende Autofokus- oder Trapezkorrektur, Dolby-Sound-Probleme, WLAN- oder Bluetooth-Verbindungsprobleme, können oft durch die richtigen Einstellungsanpassungen gelöst werden. Wenn Sie auf Probleme stoßen, zögern Sie nicht um Ihre Bestellnummer und das Problem an uns unter service@yaber.com zu senden. (z. B. US+V12+000-0000000-0000000+Probleme) Seien Sie versichert, unser Serviceteam bietet Ihnen die Lösung innerhalb von 24 Stunden an. Ihre Zufriedenheit hat für uns oberste Priorität, und wir empfehlen Ihnen, den Inhalt dieses Handbuchs gründlich zu lesen. Wir wünschen Ihnen ein hervorragendes Erlebnis mit dem V12 Projektor. Yaber Konsumenten-Service-TeamVorsichtsmaßnahmen
1. Richtige Umgebung(5°C - 35°C)
Stellen Sie den Projektor in einer Umgebung mit geeigneter Temperatur auf und sorgen Sie für eine gute Belüftung. Extreme Hitze oder Kälte können die Lebensdauer des Projektors beeinträchtigen.2. Reinigung (Schwarze Flecken)
Wenn Sie schwarze Flecken auf der Projektionsfläche bemerken, machen Sie sich bitte keine Sorgen. Kontaktieren Sie uns einfach unter service@yaber.com und wir stellen Ihnen ein Video-Tutorial zur Entfernung von Staubpartikeln zur Verfügung.3. Täglicher Gebrauch
Der Projektor muss streng vor starken Stößen, Stößen und Vibrationen geschützt werden. Versuchen Sie nicht, das Gerät bei starken Stößen, Stößen oder Vibrationen zu bewegen, da dies zu Störungen im internen Schaltkreis führen kann.4. Linse
Das Objektiv steht in direktem Zusammenhang mit der Bildauflösung und -wirkung. Der übermäßige Staub darauf beeinträchtigt die Bildqualität. Die verschmutzte Linse muss mit einem weichen Baumwolltuch für die Glaslinsenoberfläche abgewischt werden. Harte Tücher oder Scheuermittel dürfen nicht verwendet werden.Package List
natural_image
Line drawing of a vintage portable radio with a circular lens and handle (no text or symbols)natural_image
Pure technical diagram of a rectangular component with internal hatched structure and mounting holes (no text or symbols)natural_image
Simple line drawing of two overlapping document sheets with horizontal lines (no text or symbols)| Modell-Nr. V12 | |||
| Fokus Auto/Elektrisch | Trapezkorrektur Auto/Elektrisch | ||
| Lichtquelle LED Display-Technologie LCD | |||
| Seitenverhältnis 16:9 | /4:3 Schnittstellens | USB2.0*2/HDMI*2/Audioausgang3.5mm*1/LAN*1 | |
| Projection Ratio 1.36:1 | EmpfohlenerProjektionsabstand | 1.3~5.0m(4.5-16.4 Ft.) | |
| Native Auflösung 1920 | *1080P ProduktgröBe | 9.8*8.8*7.6 inches(25*22.5.*19.3CM)7.27lbs (3.3KG) | |
| Netzspannung | 100-240V/50-60Hz2A | Energieverbrauch 140W | |
| Produktgewicht | 7.27 lbs/3.3kg(Mit Basis) | Projektionsmethode | Vorne/Hinten/Decke/Desktop |
| Photo Format JPEG, GIF, BMP, PNG, JPG | |||
| Audio Format MP3,W | AV,MKA,OGG,FLAC,Dolby-Unterstützung | ||
| Video Format | AVI,TS,MPEG,MP4,MOV,M2TS,MKV,FLV,VOB,DAT,M4V,ASF,F4V,3GP,3G2,TP,TRP,RMVB | ||
Projektor Strukturdiagramm
Fernbedienung Strukturdiagramm
 1. Netztaste 2. Stumm 3. NETFLIX 4. YouTube 5. Prime Video 6. Öffnen Sie BROWSER 7. Rote/Grüne/Gelbe/Blauе Tasten 8. Menü 9. Quelle 10. Pfeiltasten 11. Bestätigung 12. Zurück/Beenden 13. Hauptseite 14. Lautstärke+ 15. Lautstärke- 16. Fokus+ 17. Fokus- 18. Projektions-Modus 19. Zahlwort 20. USB 21. Rücktaste- Hinweis:
1. Installieren Sie 2 Stück AAA-Batterien (nicht im Lieferumfang enthalten) in die Fernbedienung vor der Verwendung. 2. Bei Verwendung der Fernbedienung stellen Sie bitte sicher, dass der Signalsender der Fernbedienung auf Infrarotsignal des Projektors abzielt. 3. Wenn Sie die Fernbedienung über einen längeren Zeitraum nicht verwenden. Bitte nehmen Sie die Batterien heraus, um ein Auslaufen zu verhindern. Hinweis: Sie müssen die Yaber-Fernbedienung verwenden, um die Ersteinrichtung des Projektors abzuschließen.Installation der Projektorbasis
natural_image
Line drawing of a portable electronic device with a speaker grille and control panel (no text or symbols)natural_image
Technical line drawing of a device with mounting holes and a textured base (no text or symbols)natural_image
Line drawing of a portable electronic device with control knobs and a speaker grille (no text or symbols)natural_image
Line drawing of a portable electronic device with front-mounted base and control panel (no text or symbols)Installation der Projektor
1. Bereiten Sie eine universelle Projektor-Deckenhalterung vor. (Nicht im Paket enthalten) 2. Entfernen Sie die vier Gummipads an der Unterseite des Projektors, um die Schraubenlöcher freizulegen. 3. Befestigen Sie den Projektor mithilfe des Aufhängerahmens mit M5\*10-mm-Schrauben sicher an der Decke. natural_image
Line drawing of a projector with a stand and base mount (no text or symbols)Projektionsabstand und Größe
bar
| Dimension | Height (ft) | | :--- | :--- | | 1.4m | 4.5 | | 2.1m | 6.7 | | 2.7m | 8.9 | | 3.4m | 11.2 | | 4.1m | 13.4 | | 6.8m | 22.4 | | 200" | |Verstellbare Basis
 Sie können den Projektionswinkel ändern, indem Sie die Position der Halterung anpassen. Der Verstellbereich beträgt sowohl vertikal nach oben als auch nach unten bis zu 15 Grad.Geräte Verbinden
 Der Yaber V12-Projektor verfügt über 6 Anschlüsses, einen Netzwerkanschluss \* 1, einen USB-Anschluss \* 2 / einen HDMI-Anschluss \* 2 / Audioausgang 3.5mm \* 1. Bitte wählen Sie den richtigen Anschluss, um Ihr Gerät anzuschließen.Operation
1. Schalten Sie den Projektor ein
- Einschalten/Ausschalten
natural_image
Line drawing of a portable radio with a speaker and a small circular component below (no text or symbols)natural_image
Line drawing of a microwave oven connected to a power outlet, showing ports and wiring (no text or symbols)natural_image
Simple line drawing of a device casing with a circular button labeled 'NETP' and a numbered label (3) at the bottom left.natural_image
Technical diagram showing a rectangular component with a circular inset view labeled 'x 2' (no text or symbols on the main diagram)- Erstmalige Einrichtung
Wenn Sie den Projektor zum ersten Mal einschalten oder den Projektor auf die Werkseinstellungen zurücksetzen, werden Sie aufgefordert, die Ersteinrichtung vorzunehmen. Nach der Einrichtung kehrt der Projektor zur Startseite zurück.2. Bildeinstellung
- Auto Fokus
Wenn der Projektor eingeschaltet ist, warten Sie bitte einige Sekunden, er passt den Fokus automatisch an. (Ist dies nicht der Fall, stellen Sie sicher, dass die Autofokusfunktion in den Einstellungen aktiviert ist >> Fokus >> Autofokus Nach Dem Booten >> ein) - Manueller Fokus
Sie können die Klarheit des Bildschirms auch anpassen, indem Sie auf der Fernbedienung auf die Tasten F+/F- klicken oder diese gedrückt halten.  3. Spielen Sie Inhalte von offiziell lizenzierten Apps wie Netflix, Youtube und Amazon Prime ab
Gehen Sie auf die Startseite, wählen Sie Ihren bevorzugten Kanal aus oder greifen Sie über die Verknüpfungen auf der Fernbedienung darauf zu. Melden Sie sich bei Ihrem Konto an, um die entsprechenden Inhalte abzuspielen.  4. Projektionsanschluss und Eingangsquelle
Bitte befolgen Sie die Anweisungen auf Seite 9, um Ihre Geräte ordnungsgemäß an den Projektor anzuschließen, und wählen Sie dann die richtige Eingangsquelle aus.• USB-Festplatten-Eingabemodus
1. Schließen Sie den USB-Datenträger an 2. Klicken Sie auf die Eingabequelle [→] auf der Fernbedienung oder wählen Sie das Symbol für die Eingangsquelle auf der Startseite. 3. Wählen Sie "USB" als Eingangsquelle    Tipps: Wenn der Projektor den USB-Datenträger nicht erkennen kann, wenden Sie sich bitte an die folgenden Methoden, um das Problem zu beheben. 1. Bitte überprüfen Sie, ob Ihr USB-Datenträger die folgenden Formate erfüllt: (1) FAT32: 8G/16G/32G; (2) NTFS: 64G 2. Wenn der USB-Datenträger nicht erkannt/erkannt wird, formatieren Sie ihn bitte. Bevor Sie die USB-Festplatte formatieren, stellen Sie sicher, dass Sie alles sichern. Nach der Formatierung ist alles für immer verloren. 3. Wenn das Problem immer noch nicht gelöst ist, senden Sie Ihr Problem bitte an diese E-Mail: service@yaber.com• HDMI-Eingangsmodus
Schließen Sie Ihr Gerät mit einem HDMI-Ausgang über das mitgelieferte HDMI-Kabel an den Projektor an. Drücken Sie die Taste für die Eingangsquelle auf der Fernbedienung und wählen Sie HDMI1 oder HDMI2 aus.    \- Kabelgebundener Lautsprecher- und Kopfhöreranschluss 2. Für diese Option ist es nicht erforderlich, eine Eingangsquelle auszuwählen.5. Screencast
Tipps:
1. Die Geschwindigkeit der Bildschirmspiegelung bei drahtloser Verbindung wird durch die Netzwerkumgebung beeinflusst. Eine Bandbreite von 100 Mbit oder mehr wird empfohlen, wenn die Bildschirmspiegelung verwendet wird. 2. Stellen Sie sicher, dass sich Ihr Mobilgerät in der Nähe des Projektors befindet, wenn Sie eine drahtlose Verbindung verwenden. Ein Abstand innerhalb von 1 Meter wird empfohlen. 3. Einige Mobilgeräte unterstützen die Bildschirmspiegelung aufgrund der Kompatibilität möglicherweise nicht. 4. Bei Fragen wenden Sie sich bitte per E-Mail an YABER über service@yaber.comiOS Cast (für iOS-Geräte)
\- iOS Wi-Fi-Spiegelung Schritt 1: Verbinden Sie den Projektor und Ihr Mobilgerät mit dem WLAN desselben Routers flowchart
graph TD
    A["Smartphone"] -->|Signal| B["Rear/Router"]
    B -->|Data Transmission| C["Electronic Device"]
    C -->|Data Transmission| A
Schritt 2:
Gehen Sie zu Startseite > Meine Apps > App-Assistenten, wählen Sie ScreenShare aus und laden Sie es herunter   Schritt 3:
Kehren Sie zur Seite "Meine Apps" zurück >> Starten Sie die ScreenShare-App und bleiben Sie auf der folgenden Seite.  flowchart
graph LR
    A["1 Click the button"] --> B["2 Select Smart Projector_c1c3"]
Schritt 4:
Rufen Sie das Kontrollzentrum Ihres iOS-Geräts auf und tippen Sie auf Bildschirmspiegelung/Air-Wiedergabe, um nach dem Projektor zu suchen.Schritt 5:
Wählen Sie [Smart\_Projector\_XXXX] aus der Liste, und sobald die Verbindung hergestellt ist, wird der Inhalt Ihres iOS-Geräts auf die Leinwand oder Wand gespiegelt. flowchart
graph LR
    A["1 Connect the same network"] --> B["2 Click the button"]
    B --> C["3 Select S8"]
- iOS-AP-Spiegelung
Schritt 1:
Schalten Sie das WLAN auf Ihrem iPhone/iPad ein und stellen Sie eine Verbindung zum Projektor-Hotspot her: [Smart\_Projector\_XXXX] Schritt 2:
Drücken Sie auf die Bildschirmspiegelung des iOS-Geräts und wählen Sie dann [SmartProjector\_XXXX] flowchart
graph LR
    A["1 Connect the same network"] --> B["2 Click the button"]
    B --> C["3 Select S8"]
Miracast Cast (für Android-Geräte)
Warning: Um diese Funktion zu aktivieren, muss Ihr Android-Gerät Multi-Screen/Wireless Display unterstützen. Der Name von "Multi-Screen" kann je nach Marke von Android-Geräten variieren. Schritt 1: Bitte aktivieren Sie die Wi-Fi-Funktion auf Ihrem Android-Telefon (keine WLAN-Verbindung erforderlich). Schritt 2: Gehe zu Homepage > Meine Apps > ScreenCast  Schritt 3: Aktivieren Sie die Multi-Screen-/Wireless-Display-Funktion auf Ihrem Android-Gerät  Schritt 4: Wählen Sie [Smart\_Projector\_XXXX] aus der Liste, und sobald die Verbindung hergestellt ist, wird der Inhalt Ihres iOS-Geräts auf die Leinwand oder Wand gespiegelt • DLNA
Schritt 1:
Verbinden Sie den Projektor und Ihr Mobilgerät mit dem WLAN desselben Routers.Schritt 2:
Gehen Sie auf Startseite > Meine Apps > HomeShare und bleiben Sie auf der folgenden Seite.   flowchart
graph LR
    A["Connect the same network"] --> B["Click the button"]
    B --> C["Select Smart_Projector"]
Schritt 3:
Starten Sie eine Videoplayer-App auf Ihrem Mobilgerät und wählen Sie ein Video zum Abspielen aus.Schritt 4:
Tippen Sie, um nach dem Projektor zu suchen, und wählen Sie [Smart\_Projector\_XXXX], um eine Verbindung herzustellen. Der Inhalt Ihres Geräts wird an die Wand/den Bildschirm übertragen.Tipps:
Wenn Sie ein Video von Ihrem Mobilgerät streamen, wird das Video nur auf dem projizierten Bildschirm angezeigt und Sie können Ihr Mobilgerät weiterhin verwenden, ohne das Video zu unterbrechen oder andere Inhalte anzuzeigen.6. Bluetooth-Einstellung
- Verbinden mit einem externen Bluetooth-Lautsprecher
Schritt 1: Schalten Sie Ihr Bluetooth-Gerät ein und bereiten Sie es für eine Bluetooth-Verbindung vor. Schritt 2: Gehen Sie zur Startseite > Einstellungen > Bluetooth Verbindung, um verfügbare Bluetooth-Geräte zu scannen, wählen Sie dann Ihr Bluetooth-Gerät aus und koppeln Sie es mit dem Programm. WICHTIG:
Im Vergleich zur kabelgebundenen Verbindung zu einem Lautsprecher verbringt eine Bluetooth-Verbindung mehr Zeit damit, digitale Audiodaten zu verarbeiten, diese Daten in ein Audiosignal umzuwandeln und das Signal zu streamen. Aufgrund von Signalstörungen kann es zu Verzögerungen oder leichten Verzögerungen bei der Audiowiedergabe kommen. Dies kann dazu führen, dass der Ton auf dem Lautsprecher nicht mit dem Bild auf dem Projektor synchronisiert ist. Vor allem, wenn Sie die drahtlose Bildschirmspiegelung mit WiFi- und Bluetooth-Verbindung gleichzeitig verwenden. Wenn Sie in dieser Situation auftreten, überprüfen Sie bitte die folgenden Optionen, um die Audioqualität zu verbessern. \* Anstatt die drahtlose Bildschirmspiegelung und die Bluetooth-Verbindung gleichzeitig zu verwenden, empfehlen wir, eine HDMI-Verbindung über das mitgelieferte HDMI-Kabel und eine Bluetooth-Verbindung gleichzeitig zu verwenden. Wenn Sie dennoch die drahtlose Bildschirmspiegelung verwenden möchten, empfiehlt es sich, den Ton über einen kabelgebundenen Lautsprecher auszugeben. \*Bringen Sie Ihr Bluetooth-Gerät näher an den Projektor heran. \*Halten Sie den Projektor und den Bluetooth-Lautsprecher von anderen Bluetooth-Geräten fern, um Interferenzen zu vermeiden. \* Möglicherweise können Sie die Latenz (Lippensynchronisation) auf Ihrem Gerät, das das Video abspielt, anpassen. Die Art und Weise, wie die Latenz angepasst werden kann, variiert je nach Gerät. Bitte wenden Sie sich an den Gerätehersteller. Aufgrund des Kompatibilitätsproblems zwischen Bluetooth-Lautsprechern/-Kopfhörern und dem Projekt können einige Bluetooth-Geräte möglicherweise nicht über die Bluetooth-Verbindung mit dem Projektor gekoppelt werden. Bitte kontaktieren Sie uns für weitere Unterstützung: service@yaber.com.- Verbinden Sie sich mit dem Gerät als Bluetooth-Lautsprecher
Schritt 1:
Gehen Sie auf Startseite > Meine Apps > Bluetooth-Lautsprecher und bleiben Sie auf der folgenden Seite.Schritt 2:
Aktivieren Sie die Bluetooth-Funktion auf Ihrem Gerät, scannen Sie und verbinden Sie den Projektor. 7. Weitere Einstellungen
- Einstellung
Gehen Sie zur Startseite -> Wählen Sie [Einstellungen] -> Wählen Sie [Einstellungen]. Verwenden Sie die Pfeiltasten auf der Fernbedienung, um das Menü zu wechseln, drücken Sie die Taste "OK" zur Bestätigung und stellen Sie es ein. | Menü Inhalt | |
| OSD-Sprache | Englisch/französisch/italienisch/japanisch usw |
| Zeiteinstellung Setze die lokale zeit ein | |
| Bildschirmschoner An-/auss | chalten des bildschirmschoners |
| Sleep-Timer | Ein-/aus: die dauer des schlafs beträgt 10 bis 120 Minuten |
| Automatischer Schlaf Ist an/aus :30 minuten 8 stunden | |
| Automatischer USB-Upgrade | Lokales Update |
| Internet-Update-Check Überprüfen Sie die Internetumgebung | |
| Standard zurücksetzen Die werkseinstellungen wieder herstellen | |
- Bild-Einstellung
Gehen Sie zur Startseite -> Wählen Sie [Einstellungen] -> Wählen Sie den [Bildmodus]. Verwenden Sie die Pfeiltasten auf der Fernbedienung, um das Menü zu wechseln, drücken Sie die Taste "OK", um zu bestätigen, und stellen Sie. | Menü Inhalt | |
| Bildmodus | Standard/Kino/Sport/Vivid/He-Bright/Gewohnheit |
| Helligkeit | Festlegen des Werts für die Bildschirmhelligkeit |
| Kontrast Festlegen des Bildschirmkontrastwerts | |
| Sättigung | Festlegen der Bildschirmsättigungsfarbe |
| FARBTON | Festlegen der Farbe des Bildschirmfarbtons |
| Schärfe | Festlegen des Werts für die Bildschirmschärfe |
| Gamma Licht/dunkelheit/mitte | |
| Farbtemperatur Normal/Kühl/Warm/Standard | |
• Audio-Einstellung
Gehen Sie zur Startseite -> Wählen Sie [Einstellungen] -> Wählen Sie [Audio]. Verwenden Sie die Pfeiltasten auf der Fernbedienung, um das Menü zu wechseln, drücken Sie die Taste "OK", um zu bestätigen, und stellen Sie. | Menü Inhalt | |
| Bass Festlegen bevorzugter Werte | |
| Klangstil | Benutzer/Standard/Film/Musik/Sport/Lebhafte/News |
| Digitaler Ausgangsmodus | Auto/PCM/Dolby Audio-Dolby Digital/Dolby Audio-Dolby Digital Plus |
| Dialogverbesserung | OEin/Aus: Konversationsverbesserung sfunktion, Stimme, Broadcast-Funktion für besondere PersonenNiedrig/Mittel/Hoch |
- Über
Gehen Sie zur Startseite -> Wählen Sie [Einstellungen] -> Wählen Sie die Option [Um]. Verwenden Sie die Pfeiltasten auf der Fernbedienung, um das Menü zu wechseln, drücken Sie die Taste "OK", um zu bestätigen, und stellen Sie. | Menü Inhalt | |
| Netflix Netflix Offiziell lizenziert | |
| Versions/Lizenz Information | Anzeigen der neuesten Version/Lizenzinformationen |
| Gerätename Modellname des Projektors | |
| Gerätetemperatur 50°C | |
8. Anschluss von Signalleitungen
① USB-Multimedia-Anschluss
Wählen Sie die USB-Signalquelle aus, das Gerät erkennt sie automatisch. Schritt 1: Wählen Sie die gewünschte Kategorie "Fotos", "Musik" oder "Video" in der Hauptoberfläche aus und drücken Sie die Taste "OK" auf der Fernbedienung, um die entsprechende Kategorie aufzurufen. Schritt 2: Je nach Programm zur Auswahl: "Fotos", "Musik" oder "Video". Schritt 3: Wählen Sie die Datei aus, die Sie abspielen möchten, und drücken Sie die Taste "OK", um die Datei abzuspielen oder anzuhalten. (Sie können die erforderliche Kategorie nicht eingeben, ohne einen USB-Datenträger anzuschließen)Hinweis: Bei der Option "Office Suite" können PPT/TXT-Dateien nicht normal abgespielt oder präsentiert werden.
② Herstellen einer Verbindung mit dem PC
Schritt 1: Verbinden Sie den Computer und den V12-Projektor mit dem HDMI-Kabel (im Lieferumfang enthalten). Schritt 2: Wählen Sie die HDMI-Quelle aus, die auf den Projektor projiziert werden soll. Schritt 3: Halten Sie auf Ihrem Laptop die Taste "Win+P" gedrückt, um den Anzeigemodus zu ändern.  Nur Computer: Dies ist die Standardoption – wird nur auf dem Hauptmonitor angezeigt. Duplizieren: Lässt alle Monitore das Gleiche anzeigen, wobei der Desktop auf jedem Monitor dupliziert wird. Erweitern: Alle Ihre Monitore verhalten sich wie ein großer Monitor, der den Desktop auf alle Monitore ausdehnt. Nur Projektor: Wird nur auf dem sekundären Monitor wie ein Projektor angezeigt. Gehen Sie folgendermaßen vor, um die Bildschirmauflösung im Modus "Nur Projektor" zu ändern: Schritt: Starten Sie > Systemsteuerung > Darstellung und Personalisierung > Anpassen der Bildschirmauflösung  ③ Herstellen einer Verbindung mit MacBook oder MacBook Air Schritt 1: Wählen Sie den Mediensignalkanal: "HDMI" Schritt 2: Verwenden Sie einen Typ-C-auf-HDMI-Adapter, um Ihr MacBook anzuschließen, oder einen Mini-Display-auf-HDMI-Adapter, um eine Verbindung zu Ihrem MacBook Air herzustellen (Adapter nicht im Lieferumfang enthalten). Herstellen einer Verbindung mit dem MacBook oder Mac Book Air. (Adapter NICHT IM Lieferumfang enthalten) ④ Verbinden mit XBOX/PS5 Schritt 1: Verwenden Sie das HDMI-Kabel, um eine Verbindung zur XBOX/PS5 herzustellen Schritt 2: Wählen Sie den Mediensignalkanal: "HDMI" Schritt 3: Erfolgreich ⑤ Anschließen an den DVD-Player Schritt 1: Verwenden Sie das HDMI-Kabel, um eine Verbindung zum DVD-Player herzustellen Schritt 2: Wählen Sie den Modus "HDMI" für die Verbindung Schritt 3: Menütaste eingeben Schritt 4: Ändern Sie den PC-Modus von [Ein] auf [Aus], um das Risiko weißer Pixelränder im Bild zu vermeiden.9. Einschaltmodus
Schließen Sie im Standby-Modus das Netzteil an, und die Betriebs-LED am Projektor leuchtet aufleuchten. Sie müssen die Ein-/Aus-Taste drücken, um den Projektor einzuschalten. Wenn das Gerät eingeschaltet ist, schaltet es sich nach dem Einstecken des Netzkabels automatisch ein.10. Sicheres Herunterfahren
1. Drücken Sie die Taste am Projektor oder auf der Fernbedienung und drücken Sie dann die OK-Taste, um den Projektor auszuschalten. 2. Ziehen Sie das Netzkabel des Projektors ab. 3. Decken Sie das Objektiv ab und lagern Sie den Projektor an einem kühlen und trockenen Ort.Tipps zur Wartung
- Pflege des Projektors
1. Stellen Sie den Projektor nicht in einen zu warmen oder zu kalten Raum, da die hohe oder niedrige Temperatur die Lebensdauer des Geräts verkürzt. Die Arbeitsumgebung wäre um 5°C–35 °C besser. 2. Wenn es schwarze Flecken auf der Projektionsfläche gibt, machen Sie sich bitte keine Sorgen. Bitte kontaktieren Sie service@yaber.com per E-Mail, wir können Ihnen ein Video zusenden, wie Sie den Staub entfernen können. 3. Der Projektor muss streng vor starken Stößen, Extrusionen und Vibrationen geschützt werden. 4. Das Objektiv als Kernkomponente des Projektors steht in direktem Zusammenhang mit der Bilddefinition und dem Bildeffekt. Reinigen Sie das Objektiv, wenn Sie Schmutz oder Staub auf der Oberfläche bemerkt haben. Verwenden Sie einen Kanister mit Druckluft, um Staub von der Linse zu entfernen. Wenn Schmutz oder Schlieren vorhanden sind, wischen Sie die Linsenoberfläche mit dem Reinigungstuch vorsichtig ab.  Scannen Sie das PDF-Benutzerhandbuch und laden Sie es herunterWo bekomme ich weitere Hilfe?
service@yaber.com aftersales@yabertch.com www.yaber.com @Yaber Entertainment Projector @YaberLANGUAGE
English 03-36 Deutsch 39-70 Français 73-104 Italia 107-138 日本語日本語 141-172 Polish 175-206CONTENU
Assistance professionnelle à vie YABER 04
Conseils 04
Liste des paquets 05
Spécifications du projecteur 06
Présentation du projecteur 07
Présentation de la télécommande 08
Installation du socle . . . . . . . . . . . . . . . . . . . . . . . . . . . . . . . . . . . . . . . . . . . . . . . . . . . . . . . . . . . . . . . . . . . . 09
Install on the Ceiling 10
Distance et taille de projection 10
Support de base réglable. 11
Connector les appareils. 11
Opération 12
1. Démarrage du projecteur · · · · · · · · · · · · · · · · · · · · · · · · · · · · · · · · · · · 12 2. Ajustement de l'image 13 3. Lire du contenu à partir d'applications sous licence officielle · · · · 16 4. Connexion de projection et source d'entrée · · · · · · · · · · · · · · · · · 17 5. Capture d'écran 19 6. Paramètres Bluetooth 27 7. Autre réglage 29 8. Connexion des lignes de signal· · · · · · · · · · · · · · · · · · · · · · · · · 33 9. Mode de mise sous tension 35 10. Arrêt sécurisé 35Conseils d'entretien 36
Assistance professionnelle à vie YABER
Très cher client, Merci d'avoir choisi le projecteur Yaber V12 Ce manuel vous aidera à naviguer à travers toutes les fonctionnalités. Si vous rencontrez des problèmes, n'hésitez pas à nous envoyer votre numéro de commande et le problème à service@yaber.com. (Réponse sous 24 heures) De nombreux problèmes peuvent être facilement résolus par réglage, tels que l'absence de signal, l'absence de son, l'échec de la connexion Bluetooth, l'échec de la connexion WiFi, les points sombres, l'animation saccadée, etc. Votre satisfaction est notre priorité absolue et nous vous encourageons à explorer attentivement le contenu de ce manuel. Je vous souhaite une expérience exceptionnelle avec la V12. Équipe du service client YABERConseils
1. Environnement approprié(5°C - 35°C)
Placez le projecteur dans un environnement à température appropriée, en assurant une ventilation adéquate. La chaleur ou le froid extrême peuvent avoir un impact sur la durée de vie du projecteur.2. Nettoyage (points noirs)
Si vous remarquez des points noirs sur l'écran de projection, ne vous inquiétez pas. Contactez-nous simplement à service@yaber.com et nous vous fournirons un didacticiel vidéo sur la façon d'éliminer les particules de poussière.3. Prendre soin en toute sécurité
Le projecteur doit être strictement protégé contre les chocs violents, l'extrusion et les vibrations. N'essayez pas de le déplacer en cas de fort impact, d'extrusion ou de vibration, car cela pourrait entraîner des défauts du circuit interne.4. Objectif
L'objectif est directement lié à la définition et à l'effet de l'image. La poussière excessive qui s'y trouve affectera la qualité de l'image. La lentille sale doit être essuyée avec un chiffon en coton doux pour la surface de la lentille en verre. Aucun chiffon dur ou abrasif ne doit être utiliséPackage List
natural_image
Line drawing of a vintage portable radio with a circular lens and handle (no text or symbols)natural_image
Pure technical diagram of a rectangular component with internal hatched structure (no text or symbols)natural_image
Simple line drawing of two overlapping document sheets with horizontal lines (no text or symbols)| Modèle No. V12 | |||
| Concentrer Auto/Électrique | KCorrection trapézoïdale | Auto/Électriquec | |
| Source Lumineuse LED | Technologie d'affichage | LCD | |
| Ratio d'aspect 16:9/4:3 Interfaces | USB2.0*2/HDMI1.4*2/3.5mm Audio Out*1,Lan*1 | ||
| Taux de projection 1.36:1 | Recommandé Distance de projection | 1.3~5.0m(4.5-16.4 Ft.) | |
| Résolution native 1920*1080P | Dimension de l'unité | 9.8*8.8*7.6 inches(25*22.5.*19.3CM)7.27lbs (3.3KG) | |
| Tension de puissance | 100-240V/50-60Hz2A | Consommation d'énergie | 140W |
| Poids du projecteu | 7.27 lbs/3.3 kg(Avec Socle) | Méthode de projection | Avant/Arrière sur bureau,Avant/Arrière au Plafond |
| Format d'image JPEG, GIF, BMP, PNG, JPG | |||
| Format audio MP3,WAV,MKA,OGG,FLAC,Dolby Support | |||
| Format vidéo | AVI,TS,MPEG,MP4,MOV,M2TS,MKV,FLV,VOB,DAT,M4V,ASF,F4V,3GP,3G2,TP,TRP,RMVB | ||
Projector Overview
Remote Control Overview
 1. Puissance 2. Muet 3.NETFLIX 4. YouTube 5. Vidéo principale 6. Ouvrez le NAVIGATEUR 7. Touches rouge/vert/jaune/bleu 8. Menus 9. Source d'entrée 10. Touches fléchées 11. Touche de confirmation 12. Retour 13. Papier d'accueil 14. Volume+ 15. Volume- 16. Concentration+ 17. Concentrez-vous- 18. Mode de projection 19. Numéro 20. USB 21. Retour arrière- Préparez la télécommande
1. Ouvrez le compartiment à piles. 2. Insérez deux piles AAA en indiquant la polarité correcte. 3. Fermez le compartiment à piles. Remarque : Vous devez utiliser la télécommande Yaber pour terminer la première configuration du projecteur.Installation du socle
service@yaber.com natural_image
Line drawing of a portable electronic device with a speaker grille and control panel (no text or symbols)natural_image
Technical line drawing of a device with mounting holes and a textured base (no text or symbols)natural_image
Line drawing of a portable electronic device with control knobs and a speaker grille (no text or symbols)natural_image
Line drawing of a portable electronic device with front panel and control buttons (no text or symbols)Installer au plafond
1. Préparez un support de plafond universel pour projecteur. (Non inclus dans le forfait) 2. Retirez les quatre patins en caoutchouc au bas du projecteur pour révéler les trous de vis. 3. Utilisez des vis M5\*10 mm pour installer solidement le projecteur au plafond à l'aide du cadre de suspension. natural_image
Line drawing of a portable projector with a stand and ventilation grille (no text or symbols)bar
| Distance | Value | | :--- | :--- | | 1.4m (4.5ft) | 40" | | 2.1m (6.7ft) | 60" | | 2.7m (8.9ft) | 80" | | 3.4m (11.2ft) | 100" | | 4.1m (13.4ft) | 120" | | 6.8m (22.4ft) | 150" | | 200" | 200" |Support de base réglable
 Vous pouvez régler l'angle de projection en modifiant la position du support, avec une plage de réglage allant jusqu'à 15 degrés verticalement vers le haut et vers le bas.Connector des appareils
 Le projecteur dispose de 5 ports, port HDMI/port USB/port USB-C/sortie audio. Veuillez sélectionner les ports de connexion appropriés pour connecter vos appareils.Exploitation
1. Démarrage du projecteur
- Allumer
natural_image
Line drawing of a portable radio with a speaker and a small circular component below (no text or symbols)natural_image
Line drawing of a microwave oven connected to a power outlet (no text or symbols)natural_image
Simple line drawing of a device with a circular button labeled 'NETF' and a square panel, no text or symbols present.natural_image
Technical diagram showing a rectangular box with a circular inset and a magnified view labeled 'x 2' (no text or symbols on the main diagram)- Première configuration
Lorsque vous allumez le projecteur pour la première fois ou que le projecteur est réinitialisé aux paramètres d'usine par défaut, vous êtes invité à effectuer la première configuration de l'heure. Après la configuration, le projecteur ira à la page d'accueil.2. Ajustement de l'image
- Mise au point automatique
Lorsque le projecteur est allumé, attendez quelques secondes, il ajustera automatiquement la mise au point. (Sinon, assurez-vous que la fonction de mise au point automatique est activée dans Paramètres >> Mise au point >> Mise au point automatique >> Activé) - Mise au point électrique
Vous pouvez également régler la clarté de l'écran en cliquant ou en maintenant enfoncés les boutons F+ et F- de la télécommande. 3. Lisez du contenu à partir d'applications sous licence officielle comme Netflix, Youtube et Amazon Prime
Accédez à la page d'accueil, sélectionnez votre chaîne préférée ou accédez-y via les raccourcis de la télécommande. Connectez-vous à votre compte pour lire le contenu correspondant.  4. Connexion de projection et source d'entrée
Veuillez suivre les instructions de la page 9 pour connecter correctement vos appareils au projecteur, puis sélectionner la bonne source d'entrée.- Mode d'entrée sur disque USB
1. Insérez le disque USB 2. cliquez sur la source d'entrée [→] sur la télécommande ou choisissez l'icône de la source d'entrée sur la 3. Sélectionnez « USB » comme source d'entrée    Avertissement: Si le projecteur ne parvient pas à reconnaître le disque USB, veuillez vous référer aux méthodes suivantes pour résoudre le problème. 1. Veuillez confirmer si votre disque USB répond aux formats suivants : (1)FAT32 : 8G/16G/32G ; (2)NTFS : 64 G 2. Si le disque USB n'est pas reconnu/détecté, veuillez le formater. Avant de formater le disque USB, assurez-vous de tout sauvegarder. Après le formatage, tout sera perdu à jamais. 3. Si le problème n'est toujours pas résolu, veuillez envoyer votre problème à cet e-mail : service@yaber.com• Mode d'entrée HDMI
Connectez votre appareil doté d'une sortie HDMI au projecteur à l'aide du câble HDMI fourni. Appuyez sur le bouton de source d'entrée de la télécommande et sélectionnez HDMI1 ou HDMI2.    \- Connexion filaire des haut-parleurs et des écouteurs 2. "Cette option n'est pas requise pour sélectionner une source d'entrée any"5. Capture d'écran
Conseils de réchauffement :
1. La fluidité de la mise en miroir d'écran avec une connexion sans fil sera affectée par l'environnement réseau. Une bande passante de 100 Mbits ou plus est recommandée lors de l'utilisation de la mise en miroir d'écran. 2. Assurez-vous que votre appareil mobile est proche du projecteur lorsque vous utilisez une connexion sans fil. Une distance inférieure à 1 mètre est recommandée. 3. Certains appareils mobiles peuvent ne pas prendre en charge la mise en miroir d'écran en raison de la compatibilité. 4. Pour toute question, n'hésitez pas à envoyer un e-mail à YABER via support@yabertech.comiOS Cast (pour les appareils iOS)
\- Mise en miroir Wi-Fi iOS Étape 1: Connectez le projecteur et votre appareil mobile au WiFi du même routeur flowchart
graph TD
    A["Smartphone"] -->|Wireless Signal| B["Rear"]
    B -->|Wireless Signal| C["Electronic Device"]
    C -->|Wireless Signal| A
Étape2:
Accédez à la page d'accueil > Mes applications > App Assistant, puis sélectionnez et téléchargez ScreenShare   Étape3:
Revenez à la page Mes applications >> Lancez l'application de partage d'écran et restez sur la page suivante.  flowchart
graph LR
    A["1 Click the button"] --> B["2 Select Smart Projector_c1c3"]
Étape4:
Accédez au centre de contrôle de votre appareil iOS. Appuyez ensuite sur Screen Mirroring/Air Playing pour rechercher le projecteur.Étape5:
Choisissez [Smart\_Projector\_XXXX] dans la liste et une fois la connexion réussie, le contenu de votre appareil iOS sera reflété sur l'écran de projection ou sur le mur. flowchart
graph LR
    A["1 Connect the same network"] --> B["2 Click the button"]
    B --> C["3 Select S8"]
- Mise en miroir des points d'accès iOS
Étape1:
Activez le Wi-Fi sur votre iPhone/iPad et connectez-vous au point d'accès du projecteur : [Smart\_Projector\_XXXX] Étape2:
Appuie sur le Screen Mirroring de l'appareil iOS, puis choisissez [Smart\_Projector\_XXXX] flowchart
graph LR
    A["Connect the same network"] --> B["Click the button"]
    B --> C["Select S8"]
Miracast Cast (pour appareil Android)
Attention: pour activer cette fonction, votre appareil Android doit prendre en charge l'affichage multi-écrans/sans fil. Le nom de « Multi-Screen » peut varier selon les différentes marques d'Androiddispositifs. Étape 1: Veuillez activer la fonction Wi-Fi sur votre téléphone Android (pas besoin de vous connecter au Wi-Fi). Étape 2 : Accédez à la page d'accueil > Mes applications > ScreenCast  Étape 3 : activez la fonctionnalité « Affichage multi-écrans/sans fil » sur votre appareil Android  Étape 4 : Choisissez [Smart\_Projector\_XXXX] dans la liste et une fois la connexion réussie, le contenu de votre appareil iOS sera reflété sur l'écran de projection ou sur le mur. • DLNA
Étape 1:
Connectez le projecteur et votre appareil mobile au WiFi du même routeur.Étape 2:
Accédez à la page d'accueil > Mes applications > HomeShare et restez sur la page suivante.   flowchart
graph LR
    A["Connect the same network"] --> B["Click the button"]
    B --> C["Select SmartProjector"]
Étape 3:
Lancez une application de lecteur vidéo sur votre appareil mobile et sélectionnez une vidéo à lire.Étape 4:
Appuyez pour rechercher le projecteur et sélectionnez [Smart\_Projector\_XXXX] pour vous connecter. Le contenu de votre appareil sera projeté sur le mur/l'écran.Note:
Lorsque vous diffusez une vidéo depuis votre appareil mobile, la vidéo ne sera affichée que sur l'écran projeté et vous pourrez toujours utiliser votre appareil mobile sans interrompre la vidéo ni afficher aucun de vos autres contenus.6. Paramètres Bluetooth
- Connectez-vous à un haut-parleur Bluetooth externe
Étape 1:
Allumez votre appareil Bluetooth et préparez-le pour une connexion Bluetooth.Étape 2:
Accédez à la page d'accueil > Paramètres > Bluetooth pour analyser les appareils Bluetooth disponibles, puis sélectionnez votre appareil Bluetooth et associez-le au projecteur IMPORTANT:
Par rapport à la connexion filaire à un haut-parleur, une connexion Bluetooth passe plus de temps à traiter les données audio numériques, à convertir ces données en signal audio et à diffuser le signal. Il peut y avoir un retard ou un léger décalage dans l'audio en raison d'interférences de signal. Par conséquent, le son du haut-parleur peut ne pas être synchronisé avec l'image du projecteur, en particulier lorsque vous utilisez simultanément la mise en miroir d'écran sans fil avec une connexion WiFi et Bluetooth. Si vous rencontrez cette situation, veuillez vérifier les options suivantes pour améliorer la qualité audio : \* Au lieu d'utiliser simultanément la mise en miroir d'écran sans fil et la connexion Bluetooth, nous vous recommandons d'utiliser simultanément une connexion HDMI via le câble HDMI fourni et une connexion Bluetooth. Si vous souhaitez toujours utiliser la mise en miroir d'écran sans fil, il est recommandé de diffuser l'audio via un haut-parleur filaire. \* Rapprochez votre appareil Bluetooth du projecteur. \*Gardez le projecteur et votre haut-parleur Bluetooth éloignés des autres appareils Bluetooth pour éviter les interférences. Vous pourrez peut-être régler la latence (Lip Sync) sur votre appareil qui lit la vidéo. La manière de régler la latence varie selon les différents appareils ; veuillez consulter le fabricant de l'appareil. En raison du problème de compatibilité entre les haut-parleurs/écouteurs Bluetooth et le projet, il est possible que quelques appareils Bluetooth ne soient pas couplés au projecteur via la connexion Bluetooth. S'il te plaît- Se connecter à l'appareil en tant que haut-parleur Bluetooth
Étape 1:
Accédez à la page d'accueil > Mes applications > Haut-parleur Bluetooth et restez sur la page suivante.Étape 2:
Activez la fonctionnalité Bluetooth sur votre appareil, numérisez et connectez le projecteur. 7. Autre paramètre
- Installation
Accédez à la page d'accueil -> Sélectionnez [ Paramètres ] -> Sélectionnez [ Configuration ]. Utilisez les touches fléchées de la télécommande pour changer de menu, appuyez sur « OK » pour confirmer et valider. | Menü Inhalt | |
| OSD-Sprache | Englisch/französisch/italienisch/japanisch usw |
| Zeiteinstellung Setze die lokale zeit ein | |
| Bildschirmschoner An-/auss | chalten des bildschirmschoners |
| Minuterie de mise en veille | Marche/Arrêt: réglez le temps de sommeil de 10 à 120 minutes |
| Automatischer Schlaf | Marche/Arrêt: réglez l'heure de 30 minutes à 8 heures |
| Automatischer USB-Upgrade | Mise à jour locale |
| Internet-Update-Check Vérifier l'environnement Internet | |
| Standard zurücksetzen Restaurer les paramètres d'usine | |
- Menu du mode image
Accédez à la page d'accueil -> Sélectionnez [ Paramètres ] -> Sélectionnez le [ Mode Image ]. Utilisez les touches fléchées de la télécommande pour changer de menu, appuyez sur « OK » pour confirmer et régler. | Menu Contenu | |
| Mode image | Standard/Cinéma/Sport/Vif/Hi-Bright/Personnalisé |
| Luminosité Définir la valeur de luminosité de l'écran | |
| Contraste Définir la valeur du contraste de l'écran | |
| Saturation | Définir la couleur de saturation de l'écran |
| Teinte Définir la couleur de la teinte de l'écran | |
| Acuité Définir la valeur de netteté de l'écran | |
| Gamma Clair/Sombre/Moyen | |
| Température de couleur Normal | /Froid/Chaud/Standard |
- Audio-Einstellung
Gehen Sie zur Startseite -> Wählen Sie [Einstellungen] -> Wählen Sie [Audio]. Verwenden Sie die Pfeiltasten auf der Fernbedienung, um das Menü zu wechseln, drücken Sie die Taste "OK", um zu bestätigen, und stellen Sie. | Menu Contenu | |
| Graves/Aigus Définir les valeurs | préférées |
| Style sonore | Utilisateur/Standard/Film/Musique/Sports/Vif/Actualités |
| Mode de sortie numérique | Auto/PCM/Dolby Audio-Dolby Digital/Dolby Audio-Dolby Digital Plus |
| Amélioration des dialogues | Marche/Arrêt : amélioration de la conversation fonction, voix, fonction de diffusion pour personne spécialeFaible/Moyen/Élevé |
- À propos
Accédez à la page d'accueil -> Sélectionnez [ Paramètres ] -> Sélectionnez [ À propos ]. Utilisez les touches fléchées de la télécommande pour changer de menu, appuyez sur « OK » pour confirmer et régler. | Menu Contenu | |
| NetFix Netflix sous licence officielle | |
| Informations sur la version/licence | Afficher les dernières informations sur la version/licence |
| Nom de l'appareil Nom du modèle du projecteur | |
| Température de l'appareil 50°C |
8. Connexion des lignes de signal
① Connexion multimédia USB
Sélectionnez la source du signal USB, la machine les détectera automatiquement. Étape 1 : Sélectionnez la catégorie requise « photos », « musique » ou « vidéo » dans l'interface principale, et appuyez sur la touche « OK » de la télécommande pour entrer dans la catégorie correspondante. Étape 2 : Selon les programmes à choisir : « photos » « musique » ou « vidéo ». Étape 3 : Choisissez le fichier que vous souhaitez lire et appuyez sur la touche « OK » pour lire ou mettre en pause le fichier. (Vous ne pouvez pas accéder à la catégorie requise sans connecter un disque USB.) Remarque : Pour l'option « Office Suite », les fichiers PPT/TXT ne peuvent pas être lus ou présentés normalement.② Connexion avec un PC
Étape 1: Connectez-vous à l'ordinateur et au projecteur V12 avec le câble HDMI (inclus). Étape 2 : Sélectionnez la source HDMI à projeter sur le projecteur ; Étape 3 : Sur votre ordinateur portable, maintenez enfoncées les touches du tableau « Win+P » pour changer votre mode d'affichage.  Ordinateur uniquement : c'est l'option par défaut – s'affiche uniquement sur le moniteur principal. Dupliquer : fait en sorte que tous les moniteurs affichent la même chose en dupliquant le bureau sur chaque moniteur. Étendre : fait en sorte que tous vos moniteurs agissent comme un seul grand moniteur étendant le bureau sur chacun d'eux. Projecteur uniquement : s'affiche uniquement sur le moniteur secondaire comme un projecteur. Pour modifier la résolution de l'écran en mode Projecteur uniquement, procédez comme suit : Étape : Démarrer > Panneau de configuration > Apparence et personnalisation > Ajuster la résolution de l'écran ③ Connexion avec MacBook ou MacBook Air
Étape 1 : Choisissez le canal du signal multimédia : « HDMI » Étape 2 : utilisez un adaptateur Type-C vers HDMI pour connecter votre MacBook, ou un adaptateur Mini Display vers HDMI pour vous connecter à votre MacBook Air (adaptateur non inclus). Connexion avec MacBook ou Mac Book Air. (Adaptateur NON INCLUS) ④ Connexion avec XBOX/PS5 Étape 1 : utilisez le câble HDMI pour vous connecter à la XBOX/PS5 Étape 2 : Choisissez le canal du signal multimédia : « HDMI » Étape 3 : Réussir ⑤ Connexion avec un lecteur DVD : Étape 1 : utilisez le câble HDMI pour vous connecter au lecteur DVD Étape 2 : Sélectionnez le mode « HDMI » pour la connexion Étape 3 : Entrer la touche Menu Étape 4 : Changez le mode PC de [On] à [Off] pour éviter le risque de bords de pixels blancs dans l'image.9. Mode de mise sous tension
En mode veille à la mise sous tension, branchez l'alimentation électrique et le voyant d'alimentation du projecteur s'allumera. Vous devez appuyer sur le bouton d'alimentation pour allumer le projecteur. Si elle est activée, la machine s'allumera automatiquement après avoir branché le cordon d'alimentation.10. Arrêt sécurisé
1. Appuyez sur le bouton du projecteur ou de la télécommande, puis appuyez sur la touche OK pour éteindre le projecteur. 2. Débranchez le cordon d'alimentation du projecteur. 3. Couvrez l'objectif et rangez le projecteur dans un endroit frais et sec.Conseils d'entretien
- Entretien des projecteurs
1. Ne placez pas le projecteur dans une pièce trop chaude ou trop froide, car la température élevée ou basse réduirait la durée de vie de l'appareil. L'environnement de travail serait meilleur de 5°C à 35°C. 2. S'il y a des points noirs sur l'écran de projection, ne vous inquiétez pas. Veuillez contacter service@yaber.com par e-mail, nous pouvons vous envoyer une vidéo sur la façon de retirer la poussière. 3. Le projecteur doit être strictement protégé contre les chocs violents, l'extrusion et les vibrations. 4. L'objectif, en tant que composant principal du projecteur, est directement lié à la définition et à l'effet de l'image. Nettoyez l'objectif chaque fois que vous remarquez de la saleté ou de la poussière sur la surface. Utilisez une cartouche d'air comprimé pour éliminer la poussière de l'objectif. S'il y a de la saleté ou des traces, utilisez le chiffon de nettoyage pour essuyer délicatement la surface de l'objectif.  Scan and download the PDF user manualWhere to Get More Help
service@yaber.com aftersales@yabertch.com www.yaber.com @Yaber Entertainment Projector @YaberLINGUA
English 03-36 Deutsch 39-70 Français 73-104 Italia 107-138 日本語日本語 141-172 Polish 175-206CONTENUTI
YABER Supporto professionale a vita 04
Suggerimenti 04
Elenco dei pacchetti 05
Specifiche del proiettore 06
Panoramica del proiettore · · · · · · · · · · · · · · · · · · · · · · · · · · · · · · · · · · · · · · · · · · · · · · · · · · · · · · · · · · · · · · · · · · · · · · · · · · · · · · · · 07
Panoramica del telecomando 08
Installazione della base · · · · · · · · · · · · · · · · · · · · · · · · · · · · · · · · · · · · · · · · · · · · · · · · · · · · · · · · · · · · · · · · · 09
Installare sul soffitto 10
Distanza e dimensione di proiezione 10
Supporto base regolabile....11
Connetti i dispositivi. Install on the Ceiling 11
Operazione 12
1. Avvio del proiettore · · · · · · · · · · · · · · · · · · · · · · · · · · · · · · · · · · · · · · · · · · 12 2. Regolazione dell'immagine 13 3. Riproduci contenuti da app con licenza ufficiale · · · · · · · · · · · · · 16 4. Connessione di proiezione e sorgente di ingresso · · · · · · · · · · · 17 5. Screencast · · · · · · · · · · · · · · · · · · · · · · · · · · · · · · · · · · · · · · 19 6. Impostazione Bluetooth 27 7. Altre impostazioni 29 8. Collegamento delle linee di segnale 33 9. Modalità di accensione10. Safe · · · · · · · · · · · · · · · · · · · · · · · · · · · · 35 10. Safe Shutdown 35Suggerimenti per la manutenzione . . . . . . . . . . . . . . . . . . . . . . . . . . . . . . . . . . . . . . . . . . . . . . 36
YABER Supporto Professionale a Vita
Gentile cliente, Grazie per aver scelto il proiettore Yaber V12. Questo manuale ti aiuterà a navigare attraverso tutte le funzionalità. Se riscontri problemi, sentiti libero per inviarci il numero dell'ordine e il problema all'indirizzo service@yaber.com. (Rispondere entro 24 ore) Molti problemi possono essere facilmente risolti impostando, ad esempio, nessun segnale, nessun suono, Bluetooth connessione non riuscita, connessione WiFi non riuscita, punti scuri, animazione discontinua, ecc La tua soddisfazione è la nostra massima priorità e ti invitiamo a esplorarne i contenuti manuale in modo approfondito. Ti auguro un'esperienza eccezionale con V12. Team del servizio consumatori YABERPunte
1. Ambiente adatto(5°C - 35°C)
Posizionare il proiettore in un ambiente con temperatura adeguata, assicurando una corretta ventilazione. lazione. Il caldo o il freddo estremi possono compromettere la durata del proiettore.2. Pulizia (punti neri)
Se noti punti neri sullo schermo di proiezione, non preoccuparti. Contattaci semplicemente a service@yaber.com e forniremo un video tutorial su come rimuovere le particelle di polvere.3. Cura sicura
Il proiettore deve essere rigorosamente protetto da forti impatti, estrusione e vibrazioni. Non tentare di spostarlo durante un forte impatto, estrusione o vibrazione, poiché ciò potrebbe causare danni interni guasti al circuito.4. Obiettivo
L'obiettivo è direttamente correlato alla definizione e all'effetto dell'immagine. La polvere eccessiva al suo interno lo farà influenzare la qualità dell'immagine. La lente sporca deve essere pulita con un panno di cotone morbido per la lente di vetro superficie. Non devono essere utilizzati panni duri o abrasiviElenco dei Pacchetti
natural_image
Line drawing of a vintage portable radio with a circular lens and handle (no text or symbols)natural_image
Simple line drawing of a U-shaped electrical plug with two terminal pins (no text or symbols)natural_image
Pure technical diagram of a rectangular component with internal hatched structure (no text or symbols)natural_image
Simple line drawing of two overlapping document sheets with horizontal lines (no text or symbols)| Modello n. V12 | |||
| Focus | Automatico/elettrico | Correzione trapezoidale | Automatica/Elettrica |
| Sorgente Luminosa | LED Display Technology | LCD | |
| Rapporto d'aspetto | 16:9/4:3 Interfacce | USB2.0*2/HDMI1.4*2/3.5mm Audio Out*1,Lan*1 | |
| Projection Ratio 1.36:1 | Consigliato Distanza di Proiezione | 1.3~5.0m(4.5-16.4 Ft.) | |
| Risoluzione nativa 19 | 20*1080P | Dimensione dell'unità | 9.8*8.8*7.6 inches(25*22.5.*19.3CM)7.27lbs (3.3KG) |
| Tensione di alimentazione | 100-240V/50-60Hz2A | Consumo di Energia | 140W |
| Peso del proiettore | 7.27 lbs/3.3 kg(Avec Socle) | Metodo di Proiezione | Fronte/Retro Sulla Scrivania,Fronte/Retro a Soffitto |
| Formato immagine | JPEG, GIF, BMP, PNG, JPG | ||
| Formato audio MP3, | WAV,MKA,OGG,FLAC,Supporto Dolby | ||
| Formato Video | AVI,TS,MPEG,MP4,MOV,M2TS,MKV,FLV,VOB,DAT,M4V,ASF,F4V,3GP,3G2,TP,TRP,RMVB | ||
Panoramica del Proiettore
Panoramica del Telecomando
 1. Potenza 2. Disattiva audio 3.NETFLIX 4. YouTube 5. Primo Video 6. Apri BROWSER 7. Tasti Rosso/Verde/Giallo/Blu 8. Menù 9. Sorgente di ingresso 10. Tasti freccia 11. Tasto di conferma 12. Indietro 13. Homepaper 14. Volume+ 15. Volume- 16. Concentrazione+ 17. Concentrarsi- 18. Modalità di proiezione 19. Numero 20.USB 21. Indietro• Preparare il telecomando
1. Aprire il vano batterie. 2. Inserire due batterie AAA con la polarità corretta indicata. 3. Chiudere il vano batterie. Nota: è necessario utilizzare il telecomando Yaber per completare la prima configurazione del proiettore.Installazione Della Base
natural_image
Line drawing of a portable electronic device with a speaker grille and control panel (no text or symbols)natural_image
Technical line drawing of a device with mounting holes and a textured base (no text or symbols)natural_image
Line drawing of a portable electronic device with control knobs and a speaker grille (no text or symbols)natural_image
Line drawing of a portable electronic device with front-mounted base and control panel (no text or symbols)Installare sul Soffitto
1. Preparare un supporto da soffitto universale per proiettore. (Non incluso nella confezione) 2. Rimuovere i quattro cuscinetti di gomma sul fondo del proiettore per rivelare i fori delle viti. 3. Utilizzare viti M5\*10mm per installare saldamente il proiettore sul soffitto utilizzando il telaio di sospensione. natural_image
Line drawing of a portable projector with a stand and ventilation grille (no text or symbols)bar
| Height (m) | Distance (ft) | |---|---| | 1.4 | 4.5 | | 2.1 | 6.7 | | 2.7 | 8.9 | | 3.4 | 11.2 | | 4.1 | 13.4 | | 6.8 | 22.4 | | 200 | - |Supporto base Regolabile
 È possibile regolare l'angolo di proiezione modificando la posizione della staffa, con un range di regolazione fino a 15 gradi sia verticalmente verso l'alto che verso il basso.Connetti i Dispositivi
 Il proiettore è dotato di 5 porte, porta HDMI/porta USB/porta USB-C/uscita audio. Seleziona le porte di connessione corrette per connettere i tuoi dispositivi.Operazione
1. Avvio del Proiettore
- Accensione
natural_image
Line drawing of a portable radio with a speaker and a small circular component below (no text or symbols)natural_image
Line drawing of a microwave oven connected to a power outlet, showing ports and wiring (no text or symbols)natural_image
Simple line drawing of a device casing with a circular button labeled 'NETP' and a numbered label (3), no text or symbols present.natural_image
Technical diagram showing a rectangular component with a circular inset view labeled 'x 2' (no text or symbols on the main diagram)- Configurazione per la Prima Volta
Quando si accende il proiettore per la prima volta o il proiettore viene ripristinato alle impostazioni di fabbrica Impostazioni, verrà richiesto di effettuare la prima configurazione. Dopo la configurazione, il proiettore andrà alla Home Page.2. Regolazione Dell'Immagine
- Messa a fuoco automatica
Quando il proiettore è acceso, attendere alcuni secondi e regolerà automaticamente messa a fuoco. (In caso contrario, assicurati che la funzione di messa a fuoco automatica sia attivata in Impostazioni >> Messa a fuoco >> Messa a fuoco automatica >>SU) - Messa a fuoco elettrica
È inoltre possibile regolare la nitidezza dello schermo facendo clic o tenendo premuti i pulsanti F+ e F- sul telecomando.  3. Riproduci contenuti da app con licenza ufficiale come Netflix, Youtube e Amazon Prime
Vai alla home page, seleziona il tuo canale preferito o accedi tramite le scorciatoie sul telecomando. Accedi al tuo account per riprodurre il contenuto corrispondente.  4. Connessione di proiezione e sorgente di ingresso
Seguire le istruzioni a pagina 9 per collegare correttamente i dispositivi al proiettore, quindi selezionare la sorgente di ingresso corretta.- Modalità di input del disco USB
1. Inserire il disco USB 2. Fare clic sulla sorgente di ingresso [→] sul telecomando o scegliere l'icona della sorgente di ingresso sulla home page. 3.Selezionare "USB" come sorgente di    Avvertenza: se il proiettore non riesce a riconoscere il disco USB, fare riferimento ai seguenti metodi per risolvere il problema. 1. Conferma se il tuo disco USB soddisfa i seguenti formati: (1) FAT32: 8G/16G/32G; (2) NTFS: 64G 2. Se il disco USB non viene riconosciuto/rilevato, formattarlo. Prima di formattare il disco USB, assicurarsi di eseguire il backup di tutto. Dopo la formattazione, tutto andrà perso per sempre. 3. Se il problema persiste, invia il problema a questa email: service@yaber.com- Modalità ingresso HDMI
Collega il tuo dispositivo con uscita HDMI al proiettore utilizzando il cavo HDMI in dotazione. Premere il pulsante della sorgente di ingresso sul telecomando e selezionare HDMI1 o HDMI2.    \- Collegamento via cavo di altoparlanti e cuffie 2. "Questa opzione non è necessaria per selezionare una sorgente di ingresso"5. Screencast
Suggerimenti per il riscaldamento: :
1. La fluidità del mirroring dello schermo con la connessione wireless sarà influenzata dalla rete ambiente. Si consiglia una larghezza di banda di 100 Mbit o più quando si utilizza il mirroring dello schermo. 2. Assicurati che il tuo dispositivo mobile sia vicino al proiettore quando usi la connessione wireless. Si consiglia una distanza entro 1 metro. 3. Alcuni dispositivi mobili potrebbero non supportare il mirroring dello schermo a causa della compatibilità. 4. Per qualsiasi domanda, non esitate a inviare un'e-mail a YABER tramite support@yabertech.comiOS Cast (per dispositivi iOS)
\- Mirroring Wi-Fi iOS Passo 1: Collega il proiettore e il tuo dispositivo mobile allo stesso router WiFi flowchart
graph TD
    A["Mobile Device"] -->|Signal| B["R wireless Router"]
    B -->|Transmission| C["Radio Receiver"]
    C -->|Transmission| A
Passo 2:
Vai su Home page > Le mie app > Assistente app, quindi seleziona e scarica ScreenShare   Passaggio 3:
Torna alla pagina Le mie app >> Avvia l'app Screen Share e rimani nella pagina successiva.  flowchart
graph LR
    A["1 Click the button"] --> B["2 Select Smart Projector_c1c3"]
Passaggio 4:
Vai al Centro di controllo del tuo dispositivo iOS. Quindi toccare Screen Mirroring/Air Playing per cercare il proiettore.Passaggio 5:
Scegli [Smart\_Projector\_XXXX] dall'elenco e, una volta stabilita la connessione, il contenuto sul tuo dispositivo iOS verrà riflesso sullo schermo di proiezione o sulla parete flowchart
graph LR
    A["1 Connect the same network"] --> B["2 Click the button"]
    B --> C["3 Select S8"]
- Mirroring dell'AP iOS
Passo 1:
Accendi il Wi-Fi sul tuo iPhone/iPad e connettiti all'hotspot del proiettore: [SmartProjector\_XXXX] Passo 2:
Premi ilScreen Mirroring del dispositivo iOS e quindi scegliere [Smart\_Projector\_XXXX] flowchart
graph LR
    A["Connect the same network"] --> B["Click the button"]
    B --> C["Select S8"]
Miracast Cast (per dispositivi Android)
Avvertenza: per attivare questa funzione, il tuo dispositivo Android deve supportare la visualizzazione multischermo/wireless. Il nome "Multi-Screen" può variare a seconda delle varie marche di dispositivi Android. Passaggio 1: attiva la funzione Wi-Fi sul tuo telefono Android (non è necessario connettersi al Wi-Fi). Passaggio 2: vai su Home page > Le mie app > ScreenCast  Passaggio 3: attiva la funzione "Display multischermo/wireless" sul tuo dispositivo Android  Passaggio 4: Scegli [Smart\_Projector\_XXXX] dall'elenco e, una volta stabilita la connessione, il contenuto del tuo dispositivo iOS verrà riflesso sullo schermo di proiezione o sulla parete • DLNA
Passo 1:
Connetti il proiettore e il tuo dispositivo mobile allo stesso router WiFi.Passo 2:
Vai su Home page > Le mie app > HomeShare e rimani nella pagina successiva.   flowchart
graph LR
    A["Connect the same network"] --> B["Click the button"]
    B --> C["Select SmartProjector"]
Passaggio 3:
Avvia un'app di riproduzione video sul tuo dispositivo mobile e seleziona un video da riprodurre.Passaggio 4:
Tocca per cercare il proiettore e seleziona [Smart\_Projector\_XXXX] per connetterti. I contenuti del tuo dispositivo verranno proiettati sulla parete/schermo.Nota:
Quando trasmetti un video dal tuo dispositivo mobile, il video verrà visualizzato solo sullo schermo proiettato e potrai comunque utilizzare il tuo dispositivo mobile senza interrompere il video o mostrare altri contenuti.6. Impostazione Bluetooth
- Connettersi a un altoparlante Bluetooth esterno
Passo 1:
Accendi il tuo dispositivo Bluetooth e rendilo pronto per una connessione Bluetooth.Passo 2:
Vai su Homepage > Impostazioni > Bluetooth per scansionare i dispositivi Bluetooth disponibili, quindi seleziona il tuo dispositivo Bluetooth e associato al proiettore: IMPORTANTE:
Rispetto alla connessione cablata a un altoparlante, una connessione Bluetooth impiega più tempo nell'elaborazione dei dati audio digitali, nella conversione di tali dati in un segnale audio e nello streaming del segnale. Potrebbe verificarsi un ritardo o un leggero ritardo nell'audio a causa dell'interferenza del segnale. Di conseguenza, l'audio sull'altoparlante potrebbe non essere sincronizzato con l'immagine sul proiettore, soprattutto quando si utilizza contemporaneamente il mirroring dello schermo wireless con connessione WiFi e Bluetooth. Se riscontri questa situazione, controlla le seguenti opzioni per migliorare la qualità audio: \* Invece di utilizzare contemporaneamente il mirroring dello schermo wireless e la connessione Bluetooth, consigliamo di utilizzare contemporaneamente una connessione HDMI tramite il cavo HDMI fornito e una connessione Bluetooth. Se si desidera comunque utilizzare il mirroring dello schermo wireless, si consiglia di trasmettere l'audio tramite un altoparlante cablato \* Avvicina il tuo dispositivo Bluetooth al proiettore. \*Tenere il proiettore e l'altoparlante Bluetooth lontano da altri dispositivi Bluetooth per evitare interferenze. \* Potresti essere in grado di regolare la latenza (Lip Sync) sul tuo dispositivo che sta riproducendo il video. Il modo di regolare la latenza varia a seconda dei dispositivi; consultare il produttore del dispositivo. A causa del problema di compatibilità tra altoparlanti/cuffie Bluetooth e il progetto, alcuni dispositivi Bluetooth potrebbero non essere associati al proiettore tramite la connessione Bluetooth. Vi preghiamo di contattarci all'indirizzo service@yaber.com per ulteriore assistenza- Connetti al dispositivo come altoparlante Bluetooth
Passo 1:
Vai su Home page > Le mie app > Altoparlante Bluetooth e rimani nella pagina successiva.Passo 2:
Abilita la funzionalità Bluetooth sul tuo dispositivo, scansiona e collega il proiettore. 7. Altre impostazioni
- Impostare
Vai alla home page -> Seleziona [Impostazioni] -> Seleziona [Impostazioni]. Utilizzare i tasti freccia sul telecomando per cambiare menu, premere "OK" per confermare e impostare. | Menù Contenuto | |
| OSD-Sprache Inglese/Francia | /Italiano/Giapponese ecc |
| Impostazione dell'ora Imposta | a l'ora locale |
| Salvaschermo Attiva/disattiva | a il salvaschermo |
| Sveglia | On/Off: imposta il tempo di spegnimento da 10 a 120 minuti |
| Sospensione automatica On | /Off: imposta l'ora da 30 minuti a 8 ore |
| Aggiornamento automatico USB | Aggiornamento locale |
| Controllo degli aggiornamenti Internet | Controlla l'ambiente Internet |
| Ripristina predefinito Ripristina | a le impostazioni di fabbrica |
- Menu Modalità immagine
Vai alla home page -> Seleziona [Impostazioni] -> Seleziona [Modalità immagine]. Utilizzare i tasti freccia sul telecomando per cambiare menu, premere "OK" per confermare e impostare. | Menù Contenuto | |
| Modalità immagine | Standard/Cinema/Sport/Vivido/Alta luminosità/Personalizzato |
| Luminosità | Imposta il valore della luminosità dello schermo |
| Contrasto | Imposta il valore del contrasto dello schermo |
| Saturazione | Imposta il colore della saturazione dello schermo |
| Tonalità | Imposta il colore della tonalità dello schermo |
| Nitidezza | Imposta il valore di nitidezza dello schermo |
| Gamma Luminoso/Scuro/Medio | |
| Temperatura di colore Normale | /Freddo/Caldo/Standard |
- Impostazione audio
Vai alla home page -> Seleziona [Impostazioni] -> Seleziona [Audio]. Utilizzare i tasti freccia sul telecomando per cambiare menu, premere "OK" per confermare e impostare. | Menù Contenuto | |
| Bassi/Alti Imposta i valori preferiti | |
| Stile sonoro | Utente/Standard/Film/Musica/Sport/Vivace/Notizie |
| Modalità di uscita digitale | Utente/Standard/Film/Musica/Sport/Vivace/Notizie |
| Miglioramento del dialogo | On/Off: funzione di miglioramento della conversazione, voce, funzione di trasmissione per persone specialiBasso medio alto |
• Di
Vai alla home page -> Seleziona [Impostazioni] -> Seleziona [Informazioni]. Utilizzare i tasti freccia sul telecomando per cambiare menu, premere "OK" per confermare e impostare. | Menù Contenuto | |
| NetFix Netflix con licenza ufficiale | |
| Informazioni sulla versione/licenza | Visualizza le informazioni sulla versione/licenza più recenti |
| Nome del dispositivo Nome del | modello del proiettore |
| Temperatura del dispositivo 50°C |
8. Collegamento delle linee di segnale
① Connessione multimediale USB
Seleziona la sorgente del segnale USB, la macchina li rileverà automaticamente. Passaggio 1: selezionare la categoria richiesta "foto" "musica" o "video" nell'interfaccia principale e premere il tasto "OK" sul telecomando per accedere alla categoria corrispondente. Passo 2: In base ai programmi scegliere: "foto" "musica" o "video". Passo 3: Scegli il file che desideri riprodurre e premi il tasto "OK" per riprodurre o mettere in pausa il file. (Non è possibile accedere alla categoria richiesta senza collegare un disco USB.) Nota : per l'opzione "Office Suite", i file PPT/TXT non possono essere riprodotti o presentati normalmente.② Connessione al PC
Passaggio 1: collegare al computer e al proiettore V12 con il cavo HDMI (incluso). Passaggio 2: selezionare la sorgente HDMI da proiettare sul proiettore; Passaggio 3: sul tuo laptop, tieni premuti i tasti della scheda "Win+P" per modificare la modalità di visualizzazione.  Solo computer: è l'opzione predefinita: viene visualizzata solo sul monitor principale. Duplica: fa sì che tutti i monitor visualizzino la stessa cosa duplicando il desktop su ciascun monitor. Estendi: fa sì che tutti i tuoi monitor si comportino come un grande monitor estendendo il desktop su tutti loro. Solo proiettore: viene visualizzato solo sul monitor secondario come un proiettore. Per modificare la risoluzione dello schermo in modalità Solo proiettore, attenersi alla seguente procedura: Passaggio: Start > Pannello di controllo > Aspetto e personalizzazione > Regola risoluzione dello schermo ③ Connessione con MacBook o MacBook Air
Passaggio 1: scegliere il canale del segnale multimediale: "HDMI" Passaggio 2: utilizza un adattatore da tipo C a HDMI per collegare il tuo MacBook o un adattatore da Mini Display a HDMI per connetterti al tuo MacBook Air (adattatore non incluso). Collegamento con MacBook o Mac Book Air. (Adattatore NON INCLUSO) ④ Connessione con XBOX/PS5 Passaggio 1: utilizzare il cavo HDMI per connettersi a XBOX/PS5 Passaggio 2: scegliere il canale del segnale multimediale: "HDMI" Passaggio 3: successo ⑤ Collegamento con il lettore DVD: Passaggio 1: utilizzare il cavo HDMI per connettersi al lettore DVD Passaggio 2: selezionare la modalità "HDMI" per la connessione Passaggio 3: accedere al tasto Menu Passaggio 4: modificare la modalità PC da [On] a [Off] per evitare il rischio di bordi di pixel bianchi nell'immagine.9. Modalità di accensione
Nella modalità Power On Standby, collegare l'alimentatore e il LED di alimentazione sul proiettore si accenderà. È necessario premere il pulsante di accensione per accendere il proiettore. Se impostata su Acceso, la macchina si accenderà automaticamente dopo aver collegato il cavo di alimentazione.10. Spegnimento sicuro
1. Premere il pulsante sul proiettore o sul telecomando, quindi premere il tasto OK per spegnere il proiettore. 2. Scollegare il cavo di alimentazione del proiettore. 3. Coprire l'obiettivo e conservare il proiettore in un luogo fresco e asciutto.Conseils d'entretien
- Entretien des projecteurs
1. Ne placez pas le projecteur dans une pièce trop chaude ou trop froide, car la température élevée ou basse réduirait la durée de vie de l'appareil. L'environnement de travail serait meilleur de 5°C à 35°C. 2. S'il y a des points noirs sur l'écran de projection, ne vous inquiétez pas. Veuillez contacter service@yaber.com par e-mail, nous pouvons vous envoyer une vidéo sur la façon de retirer la poussière. 3. Le projecteur doit être strictement protégé contre les chocs violents, l'extrusion et les vibrations. 4. L'objectif, en tant que composant principal du projecteur, est directement lié à la définition et à l'effet de l'image. Nettoyez l'objectif chaque fois que vous remarquez de la saleté ou de la poussière sur la surface. Utilisez une cartouche d'air comprimé pour éliminer la poussière de l'objectif. S'il y a de la saleté ou des traces, utilisez le chiffon de nettoyage pour essuyer délicatement la surface de l'objectif.  Scansiona e scarica il manuale utente in PDFWhere to Get More Help
service@yaber.com aftersales@yabertch.com www.yaber.com @Yaber Entertainment Projector @Yaber言語
English 03-36 Deutsch 39-70 Français 73-104 Italia 107-138 日本語日本語 141-172 Polish 175-206コンテンツ
YABER 生涯アフターサービス サポート · · · · · · · · · · · · · · · · · · · · · · · · · · 04 ヒント 04 パッケージリスト 05 プロジェクトター仕様 06 プロジェクター概要 07 リモコンの概要 · · · · · · · · · · · · · · · · · · · · · · · · · · · · · · · · · · · · · · · · · · · · · 08 ベースの設置 ······09 天井に設置する……10 距離と投影サイズ 10 調整可能なベースマウント ・・・・・・・・・・・・・・・・・・・・・・・・・・・・・・・・・・・・・・・11 デバイスを接続する……11 プロジェクターのご利用について……12 1. プロジェクターの起動 · · · · · · · · · · · · · · · · · · · · · · · · · · · · · · · · 12 2. 画像調整……13 3. APP のコンテンツを再生する……16 4. 投影接続と入力ソース · · · · · · · · · · · · · · · · · · · · · · · · · · · · · 17 5. スクリーンキャスト 19 6. Bluetooth 設定 ······27 7. 他の設定 ······29 8. 信号線の接続……33 9. パワーオンモード ······35 10. 安全なシャットダウン ······35 メンテナンスのヒント 36YABER 生涯アフターサービス サポート
お客様へ YABER V12 プロジェクターをお選びいただきありがとうございます。 このマニュアルは、すべての機能をナビゲートするのに役立ちます。問題が発生した場合は、注文番号と問題をservice@yaber.comまでお気軽に送信してください。(24時間以内に返信させていただきます) 信号がない、音が出ない、Bluetooth 接続に失敗した、WiFi 接続に失敗した、暗いスポット、アニメーションが途切れるなど、多くの問題は設定で簡単に解決できます。 お客様にご満足いただくことが当社の最優先事項であり、このマニュアルの内容を徹底的に検討することをお勧めします。 V12 で素晴らしい体験をお楽しみください。 YABER サービス チームヒント
1. 適切な環境 (5°C \~ 35°C) プロジェクターを適切な温度の環境に置き、適切な換気を確保してください。極端な暑さや寒さはプロジェクターの寿命に影響を与える可能性があります。 2. クリーニング(黒点.白点) 投影画面に黒い点がある場合でも、ご安心ください。service@yaber.com までご連絡ください。粉塵の除去方法に関するビデオチュートリアルを提供します。 3. 安全なケア プロジェクターは強い衝撃、押し出し、振動から厳重に保護してください。内部回路の故障の原因となりますので、強い衝撃や押し出し、振動を与えた状態で移動させないでください。 4. レンズ レンズは画像の鮮明さと効果に直接関係します。ゴミが多量に付着すると画質に影響を与えます。汚れたレンズは、ガラスレンズ表面用の柔らかい綿布で拭き取ってください。硬い布や研磨剤は使用しないでください。パッケージリスト
natural_image
Line drawing of a vintage portable radio with a circular lens and handle (no text or symbols)natural_image
Pure technical line drawing of a rectangular component with internal grid pattern (no text or symbols)natural_image
Simple line drawing of two overlapping document sheets with horizontal lines (no text or symbols)| モデル No. V12 | |||
| フォーカス | 自動/電動フォーカス | 台形補正 | 自動/電動 |
| 光源LED ディスプレイ技術 LCD | |||
| アスペクト比 16:9/4:3 | ポート | USB2.0*2/HDMI1.4*2/3.5mmオーディオ出力*1,Lan*1 | |
| 投影率 1.36:1 最適な投影距離 | 1.3~5.0m(4.5-16.4 Ft.) | ||
| ネイティブ解像度 1920 | *1080P 単位寸法 | 9.8*8.8*7.6 inches(25*22.5.*19.3CM)7.27lbs (3.3KG) | |
| 電源電圧 | 100-240V/50-60Hz2A | 消費電力 140W | |
| プロジェクター重量 | 7.27 lbs/3.3 kg(ベース付き) | 取り付けタイプ | 前面/背面が机上前面/背面が天井 |
| 画像フォーマット JPEG, GIF, BMP, PNG, JPG | |||
| オーディオフォーマット | MP3,WAV,MKA,OGG,FLAC,Dolby サポート | ||
| ビデオ オフォーマット | AVI,TS,MPEG,MP4,MOV,M2TS,MKV,FLV,VOB,DAT,M4V,ASF,F4V,3GP,3G2,TP,TRP,RMVB | ||
プロジェクターの概要
リモコンの概要
 1. NO/OFF 2. ミュート 3. NETFLIX 4. YouTube 5. Prime Video 6. ブラウザ 7. 赤 / 緑 / 黄 / 青キー 8. メニュー 9. 入カソース 10. 矢印キー 11. 確認キー 12. 戻る 13. ホームページ 14. 音量 + 15. 音量 - 16. フォーカス + 17. フォーカス - 18. 投影モード 19. 番号 20. USB 21. バックスペース・リモコンを準備する
1. 電池収納部を開けます。 2. 正しい極性を示した 2 本の AAA 電池を挿入します。 3. 電池収納部を閉じます。 注:プロジェクトターの初回セットアップを完了するには、Yaber リモコンを使用する必要があります。ベースの設置
natural_image
Line drawing of a portable electronic device with a speaker grille and control panel (no text or symbols)natural_image
Technical line drawing of a device with mounting holes and a textured base (no text or symbols)natural_image
Line drawing of a portable electronic device with control knobs and a speaker grille (no text or symbols)natural_image
Line drawing of a portable electronic device with front-mounted base and control panel (no text or symbols)天井に設置する
1. 通用プロジェクター用天吊り金具をご用意ください。(パッケージには含まれません) 2. プロジェクターの底面にある4つのゴムパッドを外すと、ネジ穴が現れます。 3. プロジェクターをハンガーフレームを使用して天井に M5\*10mm ネジでしっかりと取り付けます。 natural_image
Line drawing of a portable projector with a central hub and ventilation grille (no text or symbols)bar
| Height (m) | Distance (ft) | |---|---| | 1.4 | 4.5 | | 2.1 | 6.7 | | 2.7 | 8.9 | | 3.4 | 11.2 | | 4.1 | 13.4 | | 6.8 | 22.4 | | 200 | - |調整可能なベースマウント
 ブラケットの位置を変えることで投写角度を調整でき、調整範囲は垂直上向き、下向きともに最大15度ですデバイスを接続する
 ブラケットの位置を変えることで投写角度を調整でき、調整範囲は垂直上向き、下向きともに最大15度ですプロジェクターのご利用について
1. プロジェクターを起動する
- 電源オン
natural_image
Line drawing of a portable radio with a speaker and a small circular component below (no text or symbols)natural_image
Line drawing of a microwave oven connected to a power outlet, showing ports and wiring (no text or symbols)natural_image
Simple line drawing of a device casing with a circular inset showing a control panel labeled 'METF' (no text or symbols on the main diagram)natural_image
Technical diagram showing a rectangular component with a circular inset view labeled 'x 2' (no text or symbols on the main diagram)- 初めてのセットアップ
初めてプロジェクターの電源をオンにしたとき、またはプロジェクターが工場出荷時のデフォルト設定にリセットされたとき、初回セットアップを行うように求められます。 セットアップ後、プロジェクターはホームページに移動します。2. 画像調整
・オートフォーカス
プロジェクターの電源を入れたら、数秒待つと自動的に焦点が調整されます。(そうでない場合は、「設定 >> フォーカス >> オートフォーカス >> オン」でオートフォーカス機能を有効にしてください) - 電動フォーカス
リモコンの F+ と F- ボタンをクリックまたは押し続けることによって、画面の鮮明さを調整することもできます。  3. Netflix、Youtube、Prime video などの正式にライセンスされたアプリのコンテンツを再生する
ホームページにアクセスし、お気に入りのチャンネルを選択するか、リモコンのショートカットキーからアクセスし、アカウントにログインして、対応するコンテンツを再生します。  4. 投影接続と入力ソース
9 ページの指示に従ってデバイスをプロジェクターに正しく接続し、正しい入カソースを選択してください。- USB ディスク入力モード
1. USB ディスクを挿入します 2. リモコンの入力ソース [▶] をクリックするか、ホームページの入力ソース アイコンを選択します。 3. 入カソースとして「USB」を選択します    注:プロジェクトターが USB ディスクを認識できない場合は、次の方法を参照して問題を解決してください。 1. USB ディスクが次のフォーマットを満たしているかどうかを確認してください。(1)FAT32:8G/16G/32G。(2)NTFS:64G 2. USB ディスクが認識 / 検出されない場合は、フォーマットしてください。USB ディスクをフォーマットする前に、必ずすべてをバックアップしてください。フォーマット後は、すべてが永久に失われます。 3. それでも問題が解決しない場合は、このメールに問題を送信してください:service@yaber.com- HDMI 入力モード
付属の HDMI ケーブルを使用して、HDMI 出力を持つデバイスをプロジェクターに接続します。リモコンの入力ソース ボタンを押して、HDMI1 または HDMI2 を選択します。   ・有線スピーカーとヘッドフォンの接続
「このオプションは、anv 入カソースを選択するのには必要ありません」5. スクリーンキャスト
ヒント: 1. ワイヤレス接続による画面ミラーリングの流暢さは、ネットワーク環境の影響を受けます。画面ミラーリングを使用する場合は、100Mbit以上の帯域幅を推奨します。 2. ワイヤレス接続を使用するときは、モバイルデバイスがプロジェクターの近くにあることを確認してください。1メートル以内の距離を推奨します。 3. 一部のモバイルデバイスは互換性のため、画面ミラーリングをサポートしていない場合があります。 4. ご質問がございましたら、このメールで yaber までご連絡ください: suppqrt@yabertech.comOS キャスト (iOS デバイス
- iOS Wi-Fi ミラーリング
ステップ1: プロジェクターとモバイルデバイスを同じルーターの WiFi に接続します flowchart
graph TD
    A["Smartphone"] -->|Wireless Signal| B["Rear"]
    B -->|Wireless Signal| C["Electronic Device"]
    C -->|Wireless Signal| A
flowchart
graph LR
    A["1 Click the button"] --> B["2 Select Smart Projector_c1c3"]
flowchart
graph LR
    A["Connect the same network"] --> B["Click the button"]
    B --> C["Select S8"]
- iOSAP 镜像
ステップ1: iPhone/iPad の Wi-Fi をオンにして、プロジェクトクターのホットスポットに接続します:[SmartProjector\_XXXX]  ステップ2: iOS デバイスのスクリーンミラーリングを押し、[Smart\_Projector\_XXXX] を選択します flowchart
graph LR
    A["Connect the same network"] --> B["Click the button"]
    B --> C["Select S8"]
Miracast Cast (Android デバイス用)
注:この機能を有効にするには、Android デバイスがマルチスクリーン / ワイヤレス ディスプレイをサポートしている必要があります。「Multi-Screen」の名前は、Android デバイスのさまざまなブランドによって異なる場合があります。 ステップ 1: Android スマートフォンの Wi-Fi 機能を有効にしてください (Wi-Fi に接続する必要はありません)。 ステップ 2: [ ホームページ ] > [ 私の APP ] > [ ScreenCast ] に移動します。  ステップ 3: Android デバイスで「マルチスクリーン / ワイヤレス ディスプレイ」機能を有効にします。  ステップ4: リストから [Smart\_Projector\_XXXX] を選択すると、接続が成功すると、iOS デバイス上のコンテンツが投影スクリーンまたは壁にミラーリングされます。 - DLNA
ステップ1: プロジェクターとモバイルデバイスを同じルーターの WiFi に接続します。 ステップ2: [ホームページ] > [私の APP] > [ホームシェア] に移動し、次のページに留まります。   flowchart
graph LR
    A["Connect the same network"] --> B["Click the button"]
    B --> C["Select SmartProjector"]
注記:
Quando trasmetti un video dal tuo dispositivo mobile, il video verrà visualizzato solo sullo schermo proiettato e potrai comunque utilizzare il tuo dispositivo mobile senza interrompere il video o mostrare altri contenuti.6. Bluetooth 設定
- 外部 Bluetooth スピーカーに接続する
ステップ1: Bluetooth デバイスの電源をオンにして、Bluetooth 接続の準備をします。 ステップ2: [ホームページ] > [設定] > [Bluetooth] を選択して利用可能な Bluetooth デバイスをスキャンし、Bluetooth デバイスを選択してプロジェクターとペアリングします: 重要な点:
スピーカーへの有線接続と比較して、Bluetooth 接続はデジタル オーディオ データの処理、そのデータのオーディオ信号への変換、および信号のストリーミングに多くの時間を費やします。信号の干渉により、音声に遅延や若干の遅れが生じる場合があります。 その結果、特に WiFi と Bluetooth 接続を同時に使用してワイヤレス スクリーン ミラーリングを使用している場合、スピーカーのサウンドがプロジェクターの画像と同期しない場合があります。 この状況が発生した場合は、次のオプションを確認してオーディオ品質を改善してください: \* ワイヤレス画面ミラーリングと Bluetooth 接続を同時に使用する代わりに、付属の HDM1 ケーブルを介した HDM1 接続と Bluetooth 接続を同時に使用することをお勧めします。それでもワイヤレス画面ミラーリングを使用したい場合は、有線スピーカー経由で音声を出力することをお勧めします。 \* Bluetooth デバイスをプロジェクターに近づけます。 \* 干渉を避けるため、プロジェクターと Bluetooth スピーカーを他の Bluetooth デバイスから離してください。 \* ビデオを再生しているデバイスの遅延(リップシンク)を調整できる場合があります。遅延を調整する方法はデバイスによって異なります。メーカーにご相談ください。 Bluetooth スピーカー / ヘッドフォンとプロジェクトの間の互換性の問題が原因で、または一部の Bluetooth デバイスは Bluetooth 接続経由でプロジェクトとペアリングできない場合があります。詳細については、service@yaber.com までお問い合わせください。- Bluetooth スピーカーとしてデバイスに接続
ステップ1: [ホームページ] > [私の APP] > [Bluetooth スピーカー] に移動し、次のページに留まります。 ステップ2: デバイスの Bluetooth 機能を有効にし、プロジェクトクターをスキャンして接続します。 7. その他の設定
- 設定
ホームページに移動 → [設定] を選択 → [設定] を選択し、リモコンの矢印キーを使用してメニューを切り替え、「OK」を押して確定し、設定します。 | メニュー コンテンツ | |
| OSD 言語 | 英語 / フランス語 / イタリア語 / 日本語など |
| 時間設定 現地時間を設定する | |
| スクリーンセーバースクリーンセーバーのオン / オフ | |
| 目覚まし時計 | オン / オフ: スリープ時間を 10 ~ 120 分から設定します。 |
| オートスリープ | オン / オフ: 時間を 30 分から 8 時間まで設定します |
| USB 自動アップグレード ローカルアップデート | |
| インターネットアップデートチェック | インターネット環境を確認する |
| デフォルトにリセット 工場出荷時のデフォルトに戻す | |
- ピクチャーモードメニュー
ホームページ→「設定」→「画質モード」を選択し、リモコンの矢印キーでメニューを切り替え、「OK」を押して確認・設定します。 | メニュー コンテンツ | |
| ピクチャーモード | スタンダード・/・シネマ・/・スポーツ・/・ビビッド・/・ハイブライト・/・カスタム |
| 輝度・画面の明るさの値を設定する | |
| 対比・画面のコントラスト値を設定する | |
| 飽和・画面の彩度の色を設定する | |
| 色相・画面の色相を設定する | |
| 明瞭さ・画面のシャープネス値を設定する | |
| ガンマ・明るい・/・暗い・/・中くらい | |
| 色温度 | ノーマル・/・クール・/・ウォーム・/・スタンダード |
・オーディオ設定
ホームページ→「設定」→「音声」を選択し、リモコンの矢印キーでメニューを切り替え、「OK」を押して確認・設定します。 | メニュー コンテンツ | |
| 低音・/・高音・優先値の設定 | |
| サウンドスタイル | ユーザー・/・標準・/・映画・/・音楽・/・スポーツ・/ビビッド・/・ニュース |
| デジタル出力モード | オート・/PCM/・ドルビーオーディオ・・・ドルビーデジタル・/・ドルビーオーディオ・・・ドルビーデジタルプラス |
| 会話の強化 | オン・/・オフ:会話促進機能、音声、特別な人向けブロードキャスト機能低中高 |
- について (About)
ホームページ→「設定」→「バージョン情報」を選択し、リモコンの矢印キーでメニューを切り替え、「OK」を押して確認・設定します。 | Menù Contenuto | |
| Netflix Netflix 公式ライセンス取得 | |
| バージョン / ライセンス情報 | 最新のバージョン / ライセンス情報を表示する |
| 装置名 プロジェクターのモデル名 | |
| デバイスの温度 50°C |
8. 信号線の接続
① USB マルチメディア接続
USB 信号ソースを選択すると、マシンが自動的に検出します。 ステップ1: メインインターフェイスで希望のカテゴリ「写真」、「音楽」、または「ビデオ」を選択し、リモコンの「OK」キーを押して、対応するカテゴリに入ります。 ステップ 2: 選択するプログラムに応じて: 「写真」「音楽」または「ビデオ」 ステップ3: 再生したいファイルを選択し、「OK」キーを押してファイルを再生または一時停止します(USB ディスクが接続されていないと、必要なカテゴリに入ることができません)。 | 注記:「Office Suite」オプションでは、PPT/TXT ファイルを正常に再生または表示できません。②パソコンと接続する
ステップ 1: HDMI ケーブル (付属) でパソコンと V12 プロジェクターに接続します。 ステップ 2: プロジェクターで投影する HDMI ソースを選択します。 ステップ3: ラップトップで「Win+P」ボードキーを押したままにして、表示モードを変更します。  パソコンのみ:これはデフォルトのオプションであり、メインモニターにのみ表示されます。 コピー:すべてのモニターに同じものを表示させ、各モニターにデスクトップを複製します。 伸ばす:すべてのモニターが、デスクトップをすべてのモニターに拡張した1つの大きなモニターのように動作します。 プロジェクターのみ:プロジェクターと同様にセカンダリモニターにのみ表示します。 プロジェクターのみモードで画面解像度を変更するには、次の手順に従います。 ステップ: [スタート] > [コントロールパネル] > [外観と個人設定] > [画面解像度の調整] ③ MacBook または MacBook Air との接続
ステップ1: メディア信号チャンネルを選択します: 「HDMI」 ステップ 2: Type-C to HDMI アダプターを使用して MacBook に接続するか、ミニディスプレイ HDMI アダプターを使用して MacBook Air に接続します(アダプターは付属しません)。MacBook または Mac Book Air との接続。(アダプターは含まれておりません)④ Connessione con XBOX/PS5
ステップ 1: HDMI ケーブルを使用して XBOX/PS5 に接続します ステップ 2: メディア信号チャンネルを選択します:「HDMI」 ステップ 3: 成功しました。⑤ Collegamento con il lettore DVD:
ステップ 1: HDMI ケーブルを使用して DVD プレーヤーに接続します ステップ2: 接続には「HDMI」モードを選択してください ステップ3: メニューキーを入力してください ステップ4: 画像内に白いピクセルエッジが発生するリスクを回避するには、PCモードを[オン]から[オフ]に変更します。9. Modalità di accensione
パワーオン スタンバイ モードで電源を接続すると、プロジェクターの電源 LED が点灯します。 プロジェクターの電源を入れるには、電源ボタンを押す必要があります。 「電源オン」に切り替えると、電源コードを接続すると、マシンの電源が自動的にオンになります。10. Spegnimento sicuro
1. プロジェクターまたはリモコンのボタンを押し、OK ボタンを押してプロジェクタの電源をオフにします。 2. プロジェクターの電源コードを抜きます。 3. レンズをカバーし、プロジェクターを涼しく乾燥した場所に保管します。メンテナンスのヒント
- プロジェクターをメンテナンスする
1. 高温または低温はデバイスの寿命を縮めるため、プロジェクターを暖かすぎる部屋や寒すぎる部屋に置かないでください。作業環境は 5°C \~ 35°C が望ましいです。 2. 投影画面に黒い点がある場合は、service@yaber.com まで電子メールでご連絡ください。ほこりの除去方法に関するビデオをお送りしますので、ご安心ください。 3. プロジェクターは強い衝撃、押し出し、振動から厳重に保護してください。 4. レンズは、プロジェクターの核となるコンポーネントであり、画像の解像度と効果に直接関係しています。表面に汚れやほこりがあることに気付いたときは、常にレンズを掃除してください。圧縮空気の入ったキャニスターを使用して、レンズからほこりを取り除きます。汚れがある場合は、汚れや汚れがある場合は、クリーニングクロスを使用してレンズ表面を軽く拭きます。  PDF の説明書をスキャンしてダウンロードするさらにサポートを受ける
service@yaber.com aftersales@yabertch.com www.yaber.com @Yaber Entertainment Projector @YaberIDIOMA
English 03-36 Deutsch 39-70 Français 73-104 Italia 107-138 日本語日本語 141-172 Polish 175-206CONTENIDO
YABER Soporte Profesional de por Vida 04
Consejos 04
Lista de Paquetes 05
Especificaciones del Proyector 06
Descripción general del Proyector · · · · · · · · · · · · · · · · · · · · · · · · · · · · · · · · · · · · · · · · · · · · · · · · · · · · · · · · · · · · · · · · · · · · · · · · · · · · · · · · · · · · · · · · · · · 07
Descripción General del Control Remoto 08
Instalación Básica 09
Instalar en el Techo. 10
Distancia y Tamaño de Proyección 10
Soporte de Base Ajustable 11
Conectar Dispositivos ······ 11
Operación. 12
1. Iniciar el proyector 12 2. Ajuste de imagen · · · · · · · · · · · · · · · · · · · · · · · · · · · · · · · · · · · · · · · · · · 13 3. Reproduzca contenido de aplicaciones con licencia oficial · · · · · 16 4. Conexión de proyección y fuente de entrada · · · · · · · · · · · · · · · · · · 17 5. Screencast · · · · · · · · · · · · · · · · · · · · · · · · · · · · · · · · · · · · · · · 19 6. Configuración de Bluetooth 27 7. Otro entorno 29 8. Conexión de líneas de señal 33 9. Modo de encendido 35 10. Apagado seguro · · · · · · · · · · · · · · · · · · · · · · · · · · · · · · · 35Consejos de Mantenimiento....36
YABER Soporte Profesional de por Vida
Estimado cliente, Gracias por elegir el proyector Yaber V12. Este manual le ayudará a navegar por todas las funciones. Si tiene algún problema, no dude en enviarnos su número de pedido y el problema a service@yaber.com. (Responder dentro de las 24 horas) Muchos problemas se pueden resolver fácilmente configurando, como sin señal, sin sonido, bluetooth, error de conexión, error de conexión WiFi, puntos oscuros, animación entrecortada, etc. Su satisfacción es nuestra principal prioridad y le animamos a explorar el contenido de este manual detenidamente. AEquipo de Atención al Consumidor de YABERConsejos
1. Ambiente adecuado(5°C - 35°C)
Coloque el proyector en un ambiente con temperatura adecuada, asegurando una ventilación adecuada. El calor o el frío extremos pueden afectar la vida útil del proyector.2. Limpieza (puntos negros)
Si nota algún punto negro en la pantalla de proyección, no se preocupe. Simplemente contáctenos en service@yaber.com y le proporcionaremos un video tutorial sobre cómo eliminar las partículas de polvo.3. Cuidar de forma segura
El proyector deberá estar estrictamente protegido contra fuertes impactos, extrusiones y vibraciones. No intente moverlo durante un fuerte impacto, extrusión o vibración, ya que esto puede provocar fallas en el circuito interno.4. Lente
La lente está directamente relacionada con la definición y el efecto de la imagen. El exceso de polvo afectará la calidad de la imagen. La lente sucia se debe limpiar con un paño de algodón suave para la superficie de la lente de vidrio. No se utilizarán paños duros ni abrasivos.Package List
natural_image
Line drawing of a vintage portable radio with a circular lens and handle (no text or symbols)natural_image
Pure technical line drawing of a rectangular component with internal grid pattern (no text or symbols)natural_image
Simple line drawing of two overlapping document sheets with horizontal lines (no text or symbols)| Model No. V12 | |||
| Focus Auto/Eletric | Keystone Correction | Auto/Eletric | |
| Fuente de Luz LED | Tecnología de Visualización | LCD | |
| Relación de Aspecto | 16:9/4:3 Interfaces | USB2.0*2/HDMI1.4*2/3.5mm Audio Out*1,Lan*1 | |
| Relación de proyección | 1.36:1 | Recomendado Distancia de proyección | 1.3~5.0m(4.5-16.4 Ft.) |
| Resolución Nativa 19 | 20*1080P | Dimensión de la unidad | 9.8*8.8*7.6 inches(25*22.5.*19.3CM)7.27lbs (3.3KG) |
| Voltaje de Potencia | 100-240V/50-60Hz2A | El consumo de energía | 140W |
| Peso del proyector | 7.27 lbs/3.3 kg(With Base) | Método de proyección | Delantero/trasero en el escritorio, Delantero/trasero en el techo |
| Formato de imagen | JPEG, GIF, BMP, PNG, JPG | ||
| Formato de audio MP3,WAV,MKA,OGG,FLAC,Dolby Support | |||
| Formato de video | AVI,TS,MPEG,MP4,MOV,M2TS,MKV,FLV,VOB,DAT,M4V,ASF,F4V,3GP,3G2,TP,TRP,RMVB | ||
Panoramica del Proiettore
Remote Control Overview
 1. Fuerza 2. Mudo 3. NETFLIX 4. YouTube 5. Prime Video 6. Abra el NAVEGADOR 7. Teclas roja/verde/amarilla/azul 8. Menú 9. Fuente de entrada 10. Teclas de flecha 11. Clave de confirmación 12. Volver 13. Inicio 14. Volumen+ 15. Volumen- 16. Focus+ 17. Focus- 18. Modo de proyección 19. Número 20. USB 21. Retroceso• Prepare el control remoto
1. Abra el compartimiento de la batería. 2. Inserte dos baterías AAA con la polaridad correcta indicada. 3. Cierre el compartimento de la batería. Nota: Debe utilizar el control remoto Yaber para completar la configuración del proyector por primera vez.Instalación Básica
service@yaber.com natural_image
Line drawing of a portable electronic device with a speaker grille and control panel (no text or symbols)natural_image
Technical line drawing of a device with mounting holes and a textured base (no text or symbols)natural_image
Line drawing of a portable electronic device with control knobs and a speaker grille (no text or symbols)natural_image
Line drawing of a portable electronic device with front-mounted base and control panel (no text or symbols)Instalar en el Techo
1. Prepare un soporte de techo universal para proyector. (No incluido en el paquete) 2. Retire las cuatro almohadillas de goma en la parte inferior del proyector para revelar los orificios para los tornillos. 3. Utilice tornillos M5\*10 mm para instalar de forma segura el proyector en el techo utilizando el marco colgante. natural_image
Line drawing of a portable projector with a stand and ventilation grille (no text or symbols)bar
| Height (m) | Distance (ft) | |---|---| | 1.4 | 4.5 | | 2.1 | 6.7 | | 2.7 | 8.9 | | 3.4 | 11.2 | | 4.1 | 13.4 | | 6.8 | 22.4 | | 200 | - |Soporte de Base Ajustable
 Puedes ajustar el ángulo de proyección modificando la posición del soporte, con un rango de ajuste de hasta 15 grados tanto verticalmente hacia arriba como hacia abajo.Conectar Dispositivos
 El proyector tiene 5 puertos, puerto HDMI/puerto USB/puerto USB-C/salida de audio. Seleccione los puertos de conexión correctos para conectar sus dispositivos.Operación
1. Iniciar el proyector
- Encendido
natural_image
Line drawing of a portable radio with a speaker and a small circular component below (no text or symbols)natural_image
Line drawing of a microwave oven connected to a power outlet, showing ports and wiring (no text or symbols)natural_image
Simple line drawing of a rectangular device with a circular button labeled 'NETP' and an inset circle showing a control panel (no text or symbols beyond basic labels)natural_image
Technical diagram showing a rectangular component with a circular inset view labeled 'x 2' (no text or symbols on the main diagram)- Configuración por primera vez
Cuando enciende el proyector por primera vez o se restablece el proyector a la configuración predeterminada de fábrica, se le solicita que realice la configuración por primera vez. Después de la configuración, el proyector irá a la página de inicio.2. Ajuste de Imagen
- Enfoque automático
Cuando el proyector esté encendido, espere unos segundos, ajustará automáticamente el enfoque. (De lo contrario, asegúrese de que la función de enfoque automático esté activada en Configuración >> Enfoque >> Enfoque automático >> Activado) - Enfoque Eléctrico
También puede ajustar la claridad de la pantalla haciendo clic o manteniendo presionados los botones F+ y F- en el control remoto.  3. Reproduzca contenido de aplicaciones con licencia oficial como Netflix, Youtube y Amazon Prime
Vaya a la página de inicio, seleccione su canal preferido o acceda a él a través de los accesos directos del control remoto. Inicie sesión en su cuenta para reproducir el contenido correspondiente.  4. Conexión de Proyección y Fuente de Entrada
Siga las instrucciones de la página 9 para conectar correctamente sus dispositivos al proyector y luego seleccione la fuente de entrada correcta.- Modo de entrada de disco USB
1. Inserte el disco USB 2. haga clic en la fuente de [→]on the remote control or choose the input source icon on the entrada. 3. Select "USB" as input source    Advertencia: Si el proyector no puede reconocer el disco USB, consulte los siguientes métodos para resolver el problema. 1. 1. Confirme si su disco USB cumple con los siguientes formatos: (1) FAT32: 8G/16G/32G; (2) NTFS: 64G 2. Si no se reconoce o detecta el disco USB, formatéelo. Antes de formatear el disco USB, asegúrese de hacer una copia de seguridad de todo. Después de formatear, todo se perderá para siempre. 3. Si el problema aún no se resuelve, envíe su problema a este correo electrónico:service@yaber.com- Modo de Entrada HDMI
Conecte su dispositivo con una salida HDMI al proyector usando el cable HDMI provisto. Presione el botón de fuente de entrada en el control remoto y seleccione HDMI1 o HDMI2.   - Conexión de Altavoz y Suriculares con Cable
2. "Esta opción no es necesaria para seleccionar ninguna fuente de entrada"5. Screencast
Consejos para Calentar:
1. La fluidez de la duplicación de pantalla con conexión inalámbrica se verá afectada por el entorno de red. Se recomienda un ancho de banda de 100 Mbit o más cuando se utiliza la duplicación de pantalla. 2. Asegúrese de que su dispositivo móvil esté cerca del proyector cuando utilice la conexión inalámbrica. Se recomienda una distancia de 1 metro. 3. Es posible que algunos dispositivos móviles no admitan la duplicación de pantalla debido a la compatibilidad. 4. Si tiene alguna pregunta, no dude en enviar un correo electrónico a YABER a través de service@yaber.comiOS Cast (para dispositivos iOS)
- Duplicación Wi-Fi de iOS
Paso 1: Conecte el proyector y su dispositivo móvil al WiFi del mismo enrutador. flowchart
graph TD
    A["Mobile Device"] -->|Signal| B["R wireless Router"]
    B -->|Transmission| C["Radio Receiver"]
    C -->|Transmission| A
Paso 2:
Vaya a Página de inicio > Mis aplicaciones > Asistente de aplicaciones y luego seleccione y descargue ScreenShare   Paso 4:
Regrese a la página Mis aplicaciones >> Inicie la aplicación ScreenShare y permanezca en la página siguiente.  flowchart
graph LR
    A["1 Click the button"] --> B["2 Select Smart Projector_c1c3"]
Paso 4:
Vaya al Centro de control de su dispositivo iOS. Luego toque Screen Mirroring/Air Playing para buscar el proyector.Paso 5:
Elija [Smart\_Projector\_XXXX] de la lista y, una vez que la conexión sea exitosa, el contenido de su dispositivo iOS se reflejará en la pantalla o pared de proyección. flowchart
graph LR
    A["Connect the same network"] --> B["Click the button"]
    B --> C["Select S8"]
- Duplicación de AP de iOS
Paso 1:
Encienda el Wi-Fi en su iPhone/iPad y conéctese al punto de acceso del proyector: [Smart\_Projector\_XXXX] Paso 2:
Presione el Screen Mirroring del dispositivo iOS y luego elija [Smart\_Projector\_XXXX] flowchart
graph LR
    A["Connect the same network"] --> B["Click the button"]
    B --> C["Select S8"]
Miracast Cast (Para Dispositivo Android)
Advertencia: Para activar esta función, su dispositivo Android debe admitir pantalla múltiple/pantalla inalámbrica. El nombre de "Multipantalla" puede variar según las distintas marcas de dispositivos Android. Paso 1: Habilite la función Wi-Fi en su teléfono Android (no es necesario conectarse a Wi-Fi). Paso 2: Vaya a la página de inicio > Mis aplicaciones > ScreenCast  Paso 3: active la función 'Pantalla múltiple/Pantalla inalámbrica' en su dispositivo Android  Paso 4: Elija [Smart\_Projector\_XXXX] de la lista y, una vez que la conexión sea exitosa, el contenido de su dispositivo iOS se reflejará en la pantalla de proyección o en la pared. • DLNA
Paso 1:
Conecte el proyector y su dispositivo móvil al mismo WiFi del enrutador.Paso 2:
Vaya a Página de inicio > Mis aplicaciones > HomeShare y permanezca en la página siguiente.   flowchart
graph LR
    A["Connect the same network"] --> B["Click the button"]
    B --> C["Select SmartProjector"]
Paso 3:
Inicie una aplicación de reproducción de video en su dispositivo móvil y seleccione un video para reproducir.Paso 4:
Toque para buscar el proyector y seleccione [Smart\_Projector\_XXXX] para conectarse. El contenido de su dispositivo se transmitirá a la pared/pantalla.Nota:
Cuando transmite un video desde su dispositivo móvil, el video solo se mostrará en la pantalla proyectada y aún podrá usar su dispositivo móvil sin interrumpir el video ni mostrar ningún otro contenido.6. Configuración de Bluetooth
- Conectarse a un altavoz Bluetooth externo
Paso 1:
Encienda su dispositivo Bluetooth y prepárelo para una conexión Bluetooth.Paso 2:
Vaya a Página de inicio > Configuración > Bluetooth para escanear los dispositivos Bluetooth disponibles, luego seleccione su dispositivo Bluetooth y vincúlelo con el proyector: IMPORTANTE:
En comparación con la conexión por cable a un altavoz, una conexión Bluetooth dedica más tiempo a procesar datos de audio digital, convertir dichos datos en una señal de audio y transmitir la señal. Puede haber un retraso o un ligero retraso en el audio debido a la interferencia de la señal. Como resultado, es posible que el sonido del altavoz no esté sincronizado con la imagen del proyector, especialmente cuando utiliza la duplicación de pantalla inalámbrica con conexión WiFi y Bluetooth al mismo tiempo. Si está experimentando esta situación, verifique las siguientes opciones para mejorar la calidad del audio: \* En lugar de utilizar la duplicación de pantalla inalámbrica y la conexión Bluetooth al mismo tiempo, recomendamos utilizar una conexión HDML a través del cable HDML proporcionado y la conexión Bluetooth simultáneamente. Si aún desea utilizar la duplicación de pantalla inalámbrica, se recomienda emitir el audio a través de un altavoz con cable. \* Acerque su dispositivo Bluetooth al proyector. \*Mantenga el proyector y su altavoz Bluetooth alejados de otros dispositivos Bluetooth para evitar interferencias. \* Es posible que puedas ajustar la latencia (Lip Sync) en tu dispositivo que está reproduciendo el video. La forma de ajustar la latencia varía según los diferentes dispositivos; consulte con el fabricante del dispositivo. Debido al problema de compatibilidad entre los parlantes/auriculares Bluetooth y el proyecto, es posible que algunos dispositivos Bluetooth no se emparejen con el proyector a través de la conexión Bluetooth. Por favor contáctenos en service@yaber.com para obtener más ayuda- Conéctese al dispositivo como altavoz Bluetooth
Paso 1:
Vaya a Página de inicio > Mis aplicaciones > Altavoz Bluetooth y permanezca en la página siguiente.Paso 2:
Habilite la funcionalidad Bluetooth en su dispositivo, escanee y conecte el proyector. 7. Otro Ajuste
- Configuración
Vaya a la página de inicio -> Seleccione [Configuración] -> Seleccione [Configuración]. Utilice las teclas de flecha del control remoto para cambiar el menú, presione "OK" para confirmar y configurar. | Menú Contenido | |
| Idioma OSD Inglés/Francia/italiano/japonés, etc. | |
| Configuración de hora Establecer hora local | |
| Screensaver | Activar/desactivar el protector de pantalla |
| Tiempo de dormir | On/Off: Establece el tiempo de sueño entre 10 y 120 minutos. |
| Reposo automático | On/Off: Establezca el tiempo entre 30 minutos y 8 horas |
| Actualización automática USB | Actualización local |
| Comprobación de actualización de Internet | Comprobar Entorno de Internet |
| Restablecer valor predeterminado | Restaurar los valores predeterminados de fábrica |
- Menú de modo de imagen
Vaya a la página de inicio -> Seleccione [Configuración] -> Seleccione [Modo de imagen]. Utilice las teclas de flecha del control remoto para cambiar el menú, presione "OK" para confirmar y configurar. | Menú Contenido | |
| Modo delmagen | Estándar/Cine/Deporte/Vívido/Alto brillo/Costumbre |
| Brillo | Establecer el valor de brillo de la pantalla |
| Contraste | Establecer el valor de contraste de la pantalla |
| Saturación | Establecer el color de saturación de la pantalla |
| Matiz | Establecer el color del tono de la pantalla |
| Nitidez | Establecer el valor de nitidez de la pantalla |
| Gama Brillante / Oscuro / Medio | |
| Temperatura del Color Normal/Frío/Cálido/Estándar | |
- Configuracion de Audio
Vaya a la página de inicio -> Seleccione [Configuración] -> Seleccione [Audio]. Utilice las teclas de flecha del control remoto para cambiar el menú, presione "OK" para confirmar y configurar. | Menú Contenido | |
| Graves Agudos Establecer Valores Preferidos | |
| Estilo de Sonido | Usuario/Estándar/Película/Música/Deportes/Vivid/Noticias |
| Modo de Salida Digital | Automático/PCM/Dolby Audio-Dolby Digital/Dolby Audio-Dolby Digital Plus |
| Mejora del Diálogo | On/Off: Función de mejora de conversación, voz, función de transmisión para personas especiales Mejora del Diálogo Bajo / Medio / Alto |
- Acerca de
Vaya a la página de inicio -> Seleccione [Configuración] -> Seleccione [Acerca de]. Utilice las teclas de flecha del control remoto para cambiar el menú, presione "OK" para confirmar y configurar. | Menú Contenido | |
| Netflix Netflix con licencia oficial | |
| Información de versión/licencia | Ver la última versión/información de licencia |
| Nombre del Dispositivo Nombre | del modelo del proyector |
| Temperatura del dispositivo 50°C |
8. Conexión de Líneas de Señal
① Conexión multimedia USB
Seleccione la fuente de señal USB, la máquina las detectará automáticamente. Paso 1: seleccione la categoría requerida "fotos", "música" o "video" en la interfaz principal y presione la tecla "OK" en el control remoto para ingresar a la categoría correspondiente. Paso2: Según los programas a elegir: "fotos" "música" o "video". Paso 3: Elija el archivo que desea reproducir y presione la tecla "OK" para reproducir o pausar el archivo. (No puede ingresar a la categoría requerida sin conectar un disco USB). Nota : Para la opción "Office Suite", los archivos PPT/TXT no se pueden reproducir ni presentar normalmente.② Conexión con PC
Paso 1: Conéctese a la computadora y al proyector V12 con el cable HDMI (incluido). Paso 2: seleccione la fuente HDMI para proyectar en el proyector; Paso 3: En su computadora portátil, mantenga presionadas las teclas del tablero "Win + P" para cambiar el modo de visualización.  Solo computadora: es la opción predeterminada, solo se muestra en el monitor principal. Duplicar: hace que todos los monitores muestren lo mismo duplicando el escritorio en cada uno monitor. Extender: hace que todos sus monitores actúen como un monitor grande extendiendo el escritorio a todos a ellos. Solo proyector: se muestra solo en el monitor secundario como un proyector. Para cambiar la resolución de la pantalla en el modo Solo proyector, siga estos pasos: Paso: Inicio > Panel de control > Apariencia y personalización > Ajustar resolución de pantalla ③ Conexión con MacBook o MacBook Air
Paso 1: elija el canal de señal multimedia: "HDMI" Paso 2: Utilice un adaptador de tipo C a HDMI para conectar su MacBook, o un adaptador Mini Display a HDMI para conectar con su MacBook Air (adaptador no incluido). Conexión con MacBook o Mac Book Air. (Adaptador NO INCLUIDO) ④ Conexión con XBOX/PS5 Paso 1: Use el cable HDMI para conectarse a XBOX/PS5 Paso 2: Elija el canal de señal multimedia: "HDMI" Paso 3: Tener éxito ⑤ Conexión con un reproductor de DVD: Paso 1: Use el cable HDMI para conectarse al reproductor de DVD Paso 2: Seleccione el modo "HDMI" para la conexión Paso 3: Ingrese la tecla Menú Paso 4: Cambie el modo de PC de [Activado] a [Desactivado] para evitar el riesgo de que aparezcan bordes de píxeles blancos en la imagen.9. Modo de Encendido
En el modo de encendido en espera, conecte la fuente de alimentación y el LED de encendido del proyector se iluminará. Debe presionar el botón de encendido para encender el proyector. Si se cambia a Encendido, la máquina se encenderá automáticamente después de enchufar el cable de alimentación.10. Apagado seguro
1. Presione el botón en el proyector o en el control remoto, luego presione la tecla OK para apagar el proyector. 2. Desenchufe el cable de alimentación del proyector. 3. Cubra la lente y guarde el proyector en un lugar fresco y seco.Consejos de Mantenimiento
- Cuidado de los proyectores
1. No coloque el proyector en una habitación demasiado cálida o demasiado fría, porque la temperatura o baja temperatura acortará la vida útil del dispositivo. El entorno de trabajo sería 5 °C-35 °C mejor. 2. Si hay puntos negros en la pantalla de proyección, no se preocupe. Póngase en contacto con service@yaber.com por correo electrónico, podemos enviarle un video sobre cómo eliminar el polvo. 3. El proyector deberá estar estrictamente protegido del fuerte impacto, extrusión y vibración. 4. La lente, como componente central del proyector, está directamente relacionado con la definición y el efecto de la imagen. Limpie la lente siempre que note la suciedad o el polvo en la superficie. Use un recipiente de aire comprimido para eliminar el polvo de la lente. Si hay suciedad o manchas, use el paño de limpieza para limpiar suavemente la superficie de la lente.  Escanee y descargue el manual de usuario de PDFDonde Obtener Más Ayuda
service@yaber.com aftersales@yabertch.com www.yaber.com @Yaber Entertainment Projector @Yaber
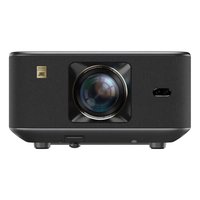
- LANGUAGE
- CONTENTS
- YABER Lifetime Professional Support 04
- Precaution 04
- Package List 05
- Projector Specifications 06
- Base Installation 09
- Install on the Ceiling 10
- Distance and Projection Size. 10
- Maintenance Tips ········36
- YABER Lifetime Professional Support
- Precaution
- Suitable Environment (5°C - 35°C)
- Adequate Ventilation
- Avoid Prolonged Continuous Use
- Power
- Safely Care
- Lens Maintenance
- Package List
- Projector Overview
- Remote Control Overview
- • Prepare the remote control
- Base Installation
- Install on the Ceiling
- Adjustable base mount
- Connect Devices
- Operation
- Starting Up the Projector
- - Power on
- - First time setup
- Image Adjustment
- - Auto Focus
- - Eletric Focus
- • Auto Keystone Correction
- - Manual Keystone Correction
- - Projection Mode
- - Zoom
- Play Content from Officially Licensed Apps like Netflix, Youtube and Prime Video
- Projection Connection and Input Source
- - USB Disk Input Mode
- - HDMI Input Mode
- - Wired Speaker and Headphones Connection
- Screencast
- Warming Tips:
- iOS Cast (for iOS Devices)
- - iOS Wi-Fi Mirroring
- Step2:
- Step3:
- Step4:
- Step5:
- - iOS AP Mirroring
- Step1:
- Miracast (For Android Device)
- • DLNA
- Note:
- Bluetooth Setting
- - Connect to an External Bluetooth Speaker
- IMPORTANT:
- If you are experiencing this situation, please check the following options to improve audio quality:
- - Connect to Device as Bluetooth Speaker
- Other Setting
- - Setup
- - Picture Mode Menu
- - Audio Setting
- - About
- Signal Lines Connection
- ① USB Multimedia Connecting
- ② Connecting with PC
- Power On Mode
- Safe Shutdown
- Maintainance Tips
- - Care of Projectors
- Where to Get More Help
- Inhaltsverzeichnis
- YABER Lebenslanger Professioneller Support 04
- Vorsichtsmaßnahmen 04
- Paketlisten 05
- Projektorspezifikationen 06
- Projektor Strukturdiagramm. . . . . . . . . . . . . . . . . . . . . . . . . . . . . . . . . . . . . . . . . . . . . . . . . . . . . . . . . . . . . . . . . . . . 07
- Fernbedienung Strukturdiagramm 08
- Installation der Projektorbasis 09
- Install on the Ceiling · · · · · · · · · · · · · · · · · · · · · · · · · · · · · · · · · · · · · · · · 10
- Installation der Projektor 10
- Projektionsabstand und Größe 11
- Geräte Verbinden 11
- Betrieb 12
- Sicheres Herunterfahren 36
- YABER Lebenslanger Professioneller Support
- Vorsichtsmaßnahmen
- Richtige Umgebung(5°C - 35°C)
- Reinigung (Schwarze Flecken)
- Täglicher Gebrauch
- Linse
- Projektor Strukturdiagramm
- Fernbedienung Strukturdiagramm
- - Hinweis:
- Installation der Projektorbasis
- Installation der Projektor
- Projektionsabstand und Größe
- Verstellbare Basis
- Geräte Verbinden
- Schalten Sie den Projektor ein
- - Einschalten/Ausschalten
- - Erstmalige Einrichtung
- Bildeinstellung
- - Auto Fokus
- - Manueller Fokus
- Spielen Sie Inhalte von offiziell lizenzierten Apps wie Netflix, Youtube und Amazon Prime ab
- Projektionsanschluss und Eingangsquelle
- • USB-Festplatten-Eingabemodus
- • HDMI-Eingangsmodus
- Tipps:
- iOS Cast (für iOS-Geräte)
- Schritt 2:
- Schritt 3:
- Schritt 4:
- Schritt 5:
- - iOS-AP-Spiegelung
- Schritt 1:
- Miracast Cast (für Android-Geräte)
- Bluetooth-Einstellung
- - Verbinden mit einem externen Bluetooth-Lautsprecher
- WICHTIG:
- - Verbinden Sie sich mit dem Gerät als Bluetooth-Lautsprecher
- Weitere Einstellungen
- - Einstellung
- - Bild-Einstellung
- • Audio-Einstellung
- - Über
- Anschluss von Signalleitungen
- ① USB-Multimedia-Anschluss
- Hinweis: Bei der Option "Office Suite" können PPT/TXT-Dateien nicht normal abgespielt oder präsentiert werden.
- ② Herstellen einer Verbindung mit dem PC
- Einschaltmodus
- Sicheres Herunterfahren
- Tipps zur Wartung
- - Pflege des Projektors
- Wo bekomme ich weitere Hilfe?
- CONTENU
- Assistance professionnelle à vie YABER 04
- Conseils 04
- Liste des paquets 05
- Spécifications du projecteur 06
- Présentation du projecteur 07
- Présentation de la télécommande 08
- Installation du socle . . . . . . . . . . . . . . . . . . . . . . . . . . . . . . . . . . . . . . . . . . . . . . . . . . . . . . . . . . . . . . . . . . . . 09
- Distance et taille de projection 10
- Support de base réglable. 11
- Connector les appareils. 11
- Opération 12
- Conseils d'entretien 36
- Assistance professionnelle à vie YABER
- Conseils
- Environnement approprié(5°C - 35°C)
- Nettoyage (points noirs)
- Prendre soin en toute sécurité
- Objectif
- - Préparez la télécommande
- Installation du socle
- Installer au plafond
- Support de base réglable
- Connector des appareils
- Exploitation
- Démarrage du projecteur
- - Allumer
- - Première configuration
- Ajustement de l'image
- - Mise au point automatique
- - Mise au point électrique
- Lisez du contenu à partir d'applications sous licence officielle comme Netflix, Youtube et Amazon Prime
- Connexion de projection et source d'entrée
- - Mode d'entrée sur disque USB
- • Mode d'entrée HDMI
- Capture d'écran
- Conseils de réchauffement :
- iOS Cast (pour les appareils iOS)
- Étape2:
- Étape3:
- Étape4:
- Étape5:
- - Mise en miroir des points d'accès iOS
- Étape1:
- Miracast Cast (pour appareil Android)
- Étape 1:
- Étape 2:
- Étape 3:
- Étape 4:
- Paramètres Bluetooth
- - Connectez-vous à un haut-parleur Bluetooth externe
- - Se connecter à l'appareil en tant que haut-parleur Bluetooth
- Autre paramètre
- - Installation
- - Menu du mode image
- - Audio-Einstellung
- - À propos
- Connexion des lignes de signal
- ① Connexion multimédia USB
- ② Connexion avec un PC
- ③ Connexion avec MacBook ou MacBook Air
- Mode de mise sous tension
- Arrêt sécurisé
- Conseils d'entretien
- - Entretien des projecteurs
- LINGUA
- CONTENUTI
- YABER Supporto professionale a vita 04
- Suggerimenti 04
- Elenco dei pacchetti 05
- Specifiche del proiettore 06
- Panoramica del proiettore · · · · · · · · · · · · · · · · · · · · · · · · · · · · · · · · · · · · · · · · · · · · · · · · · · · · · · · · · · · · · · · · · · · · · · · · · · · · · · · · 07
- Panoramica del telecomando 08
- Installazione della base · · · · · · · · · · · · · · · · · · · · · · · · · · · · · · · · · · · · · · · · · · · · · · · · · · · · · · · · · · · · · · · · · 09
- Installare sul soffitto 10
- Distanza e dimensione di proiezione 10
- Supporto base regolabile....11
- Connetti i dispositivi. Install on the Ceiling 11
- Operazione 12
- Suggerimenti per la manutenzione . . . . . . . . . . . . . . . . . . . . . . . . . . . . . . . . . . . . . . . . . . . . . . 36
- YABER Supporto Professionale a Vita
- Punte
- Ambiente adatto(5°C - 35°C)
- Pulizia (punti neri)
- Cura sicura
- Obiettivo
- Elenco dei Pacchetti
- Panoramica del Proiettore
- Panoramica del Telecomando
- • Preparare il telecomando
- Installazione Della Base
- Installare sul Soffitto
- Supporto base Regolabile
- Connetti i Dispositivi
- Operazione
- Avvio del Proiettore
- - Accensione
- - Configurazione per la Prima Volta
- Regolazione Dell'Immagine
- - Messa a fuoco automatica
- - Messa a fuoco elettrica
- Riproduci contenuti da app con licenza ufficiale come Netflix, Youtube e Amazon Prime
- Connessione di proiezione e sorgente di ingresso
- - Modalità di input del disco USB
- - Modalità ingresso HDMI
- Suggerimenti per il riscaldamento: :
- iOS Cast (per dispositivi iOS)
- Passo 2:
- Passaggio 3:
- Passaggio 4:
- Passaggio 5:
- - Mirroring dell'AP iOS
- Passo 1:
- Miracast Cast (per dispositivi Android)
- Nota:
- Impostazione Bluetooth
- - Connettersi a un altoparlante Bluetooth esterno
- IMPORTANTE:
- - Connetti al dispositivo come altoparlante Bluetooth
- Altre impostazioni
- - Impostare
- - Menu Modalità immagine
- - Impostazione audio
- • Di
- Collegamento delle linee di segnale
- ① Connessione multimediale USB
- ② Connessione al PC
- ③ Connessione con MacBook o MacBook Air
- Modalità di accensione
- Spegnimento sicuro
- 言語
- コンテンツ
- YABER 生涯アフターサービス サポート
- ヒント
- パッケージリスト
- プロジェクターの概要
- リモコンの概要
- ・リモコンを準備する
- ベースの設置
- 天井に設置する
- 調整可能なベースマウント
- デバイスを接続する
- プロジェクターのご利用について
- プロジェクターを起動する
- - 電源オン
- - 初めてのセットアップ
- 画像調整
- ・オートフォーカス
- - 電動フォーカス
- Netflix、Youtube、Prime video などの正式にライセンスされたアプリのコンテンツを再生する
- 投影接続と入力ソース
- - USB ディスク入力モード
- - HDMI 入力モード
- ・有線スピーカーとヘッドフォンの接続
- スクリーンキャスト
- OS キャスト (iOS デバイス
- - iOS Wi-Fi ミラーリング
- - iOSAP 镜像
- Miracast Cast (Android デバイス用)
- - DLNA
- 注記:
- Bluetooth 設定
- - 外部 Bluetooth スピーカーに接続する
- 重要な点:
- - Bluetooth スピーカーとしてデバイスに接続
- その他の設定
- - 設定
- - ピクチャーモードメニュー
- ・オーディオ設定
- - について (About)
- 信号線の接続
- ① USB マルチメディア接続
- ②パソコンと接続する
- ③ MacBook または MacBook Air との接続
- ④ Connessione con XBOX/PS5
- ⑤ Collegamento con il lettore DVD:
- メンテナンスのヒント
- - プロジェクターをメンテナンスする
- さらにサポートを受ける
- IDIOMA
- CONTENIDO
- YABER Soporte Profesional de por Vida 04
- Consejos 04
- Lista de Paquetes 05
- Especificaciones del Proyector 06
- Descripción general del Proyector · · · · · · · · · · · · · · · · · · · · · · · · · · · · · · · · · · · · · · · · · · · · · · · · · · · · · · · · · · · · · · · · · · · · · · · · · · · · · · · · · · · · · · · · · · · 07
- Descripción General del Control Remoto 08
- Instalación Básica 09
- Instalar en el Techo. 10
- Distancia y Tamaño de Proyección 10
- Soporte de Base Ajustable 11
- Conectar Dispositivos ······ 11
- Operación. 12
- Consejos de Mantenimiento....36
- YABER Soporte Profesional de por Vida
- Consejos
- Ambiente adecuado(5°C - 35°C)
- Limpieza (puntos negros)
- Cuidar de forma segura
- Lente
- • Prepare el control remoto
- Instalación Básica
- Instalar en el Techo
- Soporte de Base Ajustable
- Conectar Dispositivos
- Operación
- Iniciar el proyector
- - Encendido
- - Configuración por primera vez
- Ajuste de Imagen
- - Enfoque automático
- - Enfoque Eléctrico
- Reproduzca contenido de aplicaciones con licencia oficial como Netflix, Youtube y Amazon Prime
- Conexión de Proyección y Fuente de Entrada
- - Modo de entrada de disco USB
- - Modo de Entrada HDMI
- - Conexión de Altavoz y Suriculares con Cable
- Consejos para Calentar:
- iOS Cast (para dispositivos iOS)
- - Duplicación Wi-Fi de iOS
- Paso 2:
- Paso 4:
- Paso 5:
- - Duplicación de AP de iOS
- Paso 1:
- Miracast Cast (Para Dispositivo Android)
- Paso 3:
- Configuración de Bluetooth
- - Conectarse a un altavoz Bluetooth externo
- - Conéctese al dispositivo como altavoz Bluetooth
- Otro Ajuste
- - Configuración
- - Menú de modo de imagen
- - Configuracion de Audio
- - Acerca de
- Conexión de Líneas de Señal
- ① Conexión multimedia USB
- ② Conexión con PC
- ③ Conexión con MacBook o MacBook Air
- Modo de Encendido
- Apagado seguro
- Consejos de Mantenimiento
- - Cuidado de los proyectores
- Donde Obtener Más Ayuda
Brand : Yaber
Model : V12
Category : Projector