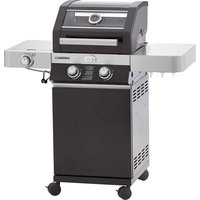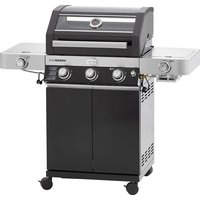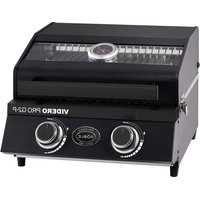
VIDER PRO G2-P - Barbecue Roesle - Free user manual and instructions
Find the device manual for free VIDER PRO G2-P Roesle in PDF.


User questions about VIDER PRO G2-P Roesle
0 question about this device. Answer the ones you know or ask your own.
Ask a new question about this device
Download the instructions for your Barbecue in PDF format for free! Find your manual VIDER PRO G2-P - Roesle and take your electronic device back in hand. On this page are published all the documents necessary for the use of your device. VIDER PRO G2-P by Roesle.
USER MANUAL VIDER PRO G2-P Roesle
BBQ Portable Videro G2-P BBQ Portable Videro Pro G2-P
The installation manual for assembly can be found in the separate supplement. Read the instructions before using the appliance. Please keep the instructions in a safe place so that you can refer to them in detail at any time. Use outdoors only.
Important safety instructions at a glance .... 31
If you smell gas 31
Application area and intended use 31
Location 31
Start-up 32
Symbols 33
Safety instructions 34
for the grill 34
for operation 34
for avoiding a fat fire 35
for the gas cylinder 35
for gas hoses 36
for the gas pressure regulator 36
for storage 36
Overview of portable VIDERO 37
Instructions for the gas connection 37
Size of gas cylinder 37
Gas cylinder positioning 38
Fitting the pressure regulator 38
Fitting the gas hose 38
Before starting the gas grill 39
Checking the main burners 39
Cleaning the fat collecting system 39
Leak check 39
Inserting individual parts 40
"Burning-in" the gas grill 41
Lighting the burners 42
Lighting procedure for main burners with the Jet Flame ignition system 42
Cooking with the RÖSLE grill 43
Preheating 43
Grates 43
Leaping flames 43
Hose breakage protection 43
Barbecuing methods 44
Direct barbecuing with the lid of the grill closed 44
Indirect barbecuing with the lid of the grill closed 44
Combination of both barbecuing methods ..44
Cooking times: When is the food cooked? ... 44
Easy steps to becoming a barbecue expert ... 46
After use 47
Using for the first time after removal from storage 47
Maintenance, cleaning and storage 48
Maintenance of grill parts 48
Cleaning the cooking compartment/areas 48
Cleaning the grates 48
Cleaning the fat catcher tray 49
Cleaning the main burners 49
Removing the burners 49
Winter 50
Tips for extending the service life 50
Troubleshooting 51
Declaration of Conformity 53
Disposal 53
General information and warranty 53
Service and contact 54
Technical data 55
Dear RÖSLE customer,
Congratulations! You are now the owner of a high-quality RÖSLE grill. A good choice - and a good decision for a long-lasting, quality product.
This operating manual is part of this product. It contains important notices regarding safety, use and disposal. Familiarise yourself with all operating and safety instructions before using the product. Only use the product as described and for the specified applications. Hand over all documents to third parties when passing on the product.
Important safety instructions at a glance

Only use outdoors!
ATTENTION: Accessible parts may be very hot. Keep away from children.
The appliance must be kept well clear of combustible materials when in use.
Do not move the appliance while it is in use.
After use turn off the gas supply at the cylinder.
Do not make any changes to the appliance.

If you smell gas
- Turn off the gas supply at the gas cylinder immediately.
- Extinguish all naked flames and turn the control knobs to the position "●" OFF.
- Open the lid of the grill.
- If possible, remove the appliance from buildings and flammable objects.
- Stand well back from the appliance and immediately call the fire service if the smell of gas persists.
- Escaping gas can cause fires or explosions. This can result in serious personal injury, fatal accidents and damage to property.

Application area and intended use
- This appliance is solely intended for private use.
- The gas grill may not be operated with natural gas. The conversion of the grill to natural gas, or an attempt to use natural gas with this liquid petroleum gas grill, is dangerous and voids the operating licence.
- This gas grill may only be used for cooking food that is suitable for barbecuing using butane/propane liquid gas. Any other use is not allowed and may be dangerous. Use of the grill as a fireplace is also prohibited.

Location
This appliance is solely intended for outdoor use and may not be operated in a garage, on a covered or closed veranda and terrace, or at modified sites, in or on caravans/camper vans and/or watercraft.
- The gas grill may not be operated under an unprotected flammable roof, awning or overhang.
- When operating the grill there must be no combustible materials within 1.5 metres above, below, at the side, in front of or behind the grill. Combustible materials include, for example (but are not limited to), treated wooden decking, wooden porches or patios and textiles.
- A greater distance is recommended if the appliance is positioned in the vicinity of vinyl cladding or large window fronts. The distance to house facades should also be increased as they can get dirty from possible smoke generation.
- Only use the grill on an even, firm and heat-resistant base frames. Never stand the grill on surfaces made of combustible materials when in use and do not store any combustible objects under your grill.

Start-up
Before using the appliance, carefully carry out all procedures for checking gas leaks that are listed in this operating manual. Perform a leak check before every start-up, even if the dealer or third party installed the appliance.
Before every use, check all outlets leading to the detachable fat catcher tray for fat accumulations. Remove excess fat and deposits to prevent fat fires. A fat fire can cause serious material damage and personal injury.
Please pay close attention to the guidance set out below in order to exclude any safety risks and prevent damage to the appliance. Please read all safety instructions carefully before using the grill and keep the operating manual for future reference.
This appliance is not intended for use by persons (including children) with limited physical, sensory or mental capabilities or who lack the necessary experience and/or knowledge, unless they are supervised by a person responsible for their safety or have been instructed by such a person on how to use the appliance safely.
Symbols
Please pay close attention to the warnings and notices in this operating manual listed below.
Non-compliance with the dangers, warnings and precautionary measures listed in this operating manual may cause serious or even fatal injuries, or material damage as a result of fire or explosion. The manufacturer accepts no liability for damage resulting from incorrect handling and/or failure to observe the safety precautions.

Caution - danger! Where you find this sign in the instructions, we ask you to take particular care.

Warning - hot surfaces! Risk of skin burns from hot surfaces. Always wear protective gloves (DIN EN 407)!

This symbol indicates possible dangers in relation to fat fire or overheating.

This symbol indicates possible dangers in relation to cuts.

Important operating instructions and explanations which require particular attention and which refer to special functions or useful tips.
Safety instructions

Safety instructions for the grill
- The appliance must be properly assembled according to the instructions in the assembly instructions.
- Before every start-up, the operator shall make sure that everything is in proper condition. For example, parts may have been installed incorrectly, or screw fixings may have come loose, or something may have been damaged. This must be rectified before starting the grill.
- Never tamper with components. Violations may cause a fire or an explosion, which may lead to serious injuries, fatal accidents or material damage.
- Do not set down the lid of the grill or other combustible objects in the storage area, or in/under the grill.
- Never search for gas leaks using a naked flame and do not operate your gas grill if a gas connection is leaking.
- Maintain the safety distances of 1.5m all around the grill.
- Accessible parts of the grill can become very hot. Keep small children away from the grill.
If a burner goes out during operation, close all gas valves. Open the lid and wait five minutes before you light the burner again. - To protect the grill, the temperature should not be allowed to exceed 350^ / 662^ . Grill parts may warp at higher temperatures.
- Do not use charcoal, briquettes, firewood or lava stones in the gas grill.
- Make sure that the slots and air outlets at the back of the hood are always clear.
- Never cover the entire cooking surface with food, grill plates, drip trays, pizza stones, etc., as it may cause trapped heat in the lower area of the firebox.
- Damaged appliances or accessories may no longer be used.
- Do not use sharp or pointed objects to clean the grill grates and the firebox. Otherwise, the surface may be damaged.
- For every transportation lock the lid with the firebox using the clasps. Ensure that the fastening clasps are always closed tightly on both sides.
- The gas grill is not intended for assembly or use in or on caravans, camper vans, motor homes and/or watercraft.

Safety instructions for operation
- Do not use in enclosed spaces in case poisonous fumes and exhaust gases gather that may lead to serious or even fatal poisoning.
- Only use this grill outdoors, at a well-ventilated location and not in a garage, in a building or modified sites. Never use the grill under combustible roofs, shelters, etc.
- Before every use, check the gas grill for leaks, and the burners and nozzles for any blockages.
- Open the lid of the grill and if necessary the covers of the cooking surfaces before you light the grill.
- Remove excess fat and deposits to prevent fat fires.
Take appropriate care when using the grill. - Never leave the grill unattended when in use and do not move the grill when in use.
- Keep flammable vapours and liquids away from the cooking surface of the grill, e.g. alcohol and other combustible mixtures.
- The ability of the user to correctly assemble and safely use the grill can be impaired by the consumption of alcohol and/or prescription or non-prescription drugs.
-
This appliance is not intended for use by persons (including children) with limited physical, sensory or mental capabilities or who lack the necessary experience and/or knowledge.
-
This grill gets very hot and, when in operation, should only be taken hold of with barbecue gloves and only at the designated points necessary for operation.
- There is an increased risk of fire when barbecuing. Always have a fire extinguisher ready in case of an accident or mishap (Class F).

Safety instructions for avoiding a fat fire
- Deep clean your gas grill at regular/adapted intervals!
"Burnout" as a substitute for cleaning is not sufficient for the lower area of the firebox. -
Remove adhesions and deposits in the firebox, on lids of burners, grates and grill plates.
-
Before every use, check all outlets leading to the detachable fat catcher tray for fat accumulations. Remove excess fat and deposits to prevent fat fires. A fat fire can cause serious material damage and personal injury.
- Never line the cooking compartment or the fat catcher tray with foil or sand. This prevents the fat from passing through and draining off. It may cause a fat fire. Instead, you should use drip trays to catch the juices running out of the meat.
- If uncontrolled shooting flames occur, take the food from the flames until the flames reduce.
- If fats start to burn, turn off all burners, close the gas cylinder, take all food off the grate and if possible leave the lid open until the fire has gone out.
- In the case of thick flames and if the fire cannot be controlled, attempt to extinguish the fire directly using a suitable extinguishing agent. Check the information on the fire extinguisher.
Note:
- Your own protection comes first!
- Never pour water into the gas grill to suppress shooting flames.
- Call the fire service in an emergency, remove yourself from the source of the fire and inform a third party.

Safety instructions for the gas cylinder
- Do not smoke and keep well away from sources of ignition when you are handling gas cylinders.
- Keep gas cylinders away from excessive heat (over 50^ ).
The gas cylinder must always be fitted upright, and transported and stored with the safety cap fitted. - Ensure that the air vents of the gas cylinder installation area in the lower cabinet are not sealed.
Gas cylinders must not be dropped and must always be handled with care. - A dented or rusty gas cylinder may be dangerous and should be checked by your gas supplier. Do not use a gas cylinder with a damaged valve.
- Under no circumstances try to remove the gas control knob or other assembly parts of the gas pipeline while the grill is in use.
- Never attempt any DIY modifications to a gas cylinder connector. Consult the manufacturer or an authorised dealer.
- When the gas in the gas cylinder is running out, you can either have it refilled by an authorised dealer or replace it with a new one.
- Only ever change the gas cylinder in well-ventilated areas.
- When replacing the gas cylinder, keep it well away from possible sources of ignition.
- Have the gas cylinder checked every 10 years at an authorised dealer. The inspection dates are attached on the gas cylinder.
- LPG is a petrochemical product similar to motor fuel and natural gas. It is gaseous at normal atmospheric pressures and temperatures. When sufficiently pressurised, e.g. inside a gas cylinder, it is liquid.
When the pressure is released, the liquid vaporises immediately and becomes fuel gas with 250% volume.
- LPG has a similar smell to natural gas. You should be able to recognise that smell.
- Handle "empty" gas cylinders just as carefully as full ones. Even if there is no more liquid in the gas cylinder, there may still be pressurised gas in the apparently empty gas cylinder.

Safety instructions for gas hoses
- Ensure that the gas hose is uncovered and not near hot areas. When the gas hose touches hot areas, it may melt and leak.
- The gas hose may not be laid directly under the fat catcher tray.
- Avoid twisting the gas hose unnecessarily.
Before every start-up, check the screw fixings of the gas hose connections are tight. If necessary, tighten with two open-end spanners. - Before every use, check the gas hose for animal bites, cracks, porous areas, pinches, wear and other damage. Replace the gas hose immediately if damaged.
- Only approved gas hoses may be used.
- The maximum length of the gas hose must not exceed 1.5 metres.
- We recommend that you replace the gas hose of your gas grill every 5 years. In some countries it is mandatory to replace the gas hose sooner. National regulations shall take precedence.

Safety instructions for the gas pressure regulator
- Make sure that the gas pressure regulator is attached so that the small air outlet faces downwards and no water can enter the hole. This air outlet must be kept clean and free of dirt, grease, insects, etc.
- No dirt may get into the gas pressure regulator or onto the screw fixing.
Before every start-up, check the screw fixings of the hose connection are tight. If necessary, tighten with two open-end spanners. - Only approved pressure regulators that correspond to the national operating pressure may be used. Obtain information from your dealer.
- In order to guarantee proper functioning of the gas pressure regulator in normal operating conditions, it is recommended that you replace the gas pressure regulator prior to the end of 10 years after the date of manufacture. Deviating national regulations shall take precedence.

Safety instructions for storage
- Close the shut-off valve of the gas cylinder every time when the grill is not in use in order to avoid any leaks.
Gas cylinders must be stored outdoors in a well-ventilated location and out of reach of children and third-party access. Gas cylinders that have been removed may not be stored in buildings, garages or other enclosed spaces. Fuel gas is heavier than air. Escaping gas may collect in low level locations and not disperse. Therefore, avoid entrances to basements, light shafts and water runoffs in order to avoid a fire or explosions. - If the gas grill is stored in an enclosed space, the gas cylinder must be removed from the grill and stored outdoors in a well-ventilated place.
- Nozzles, gas supply pipes and gas burners must be checked regularly for spider webs, insects, larva cocoons and blockages by other factors.
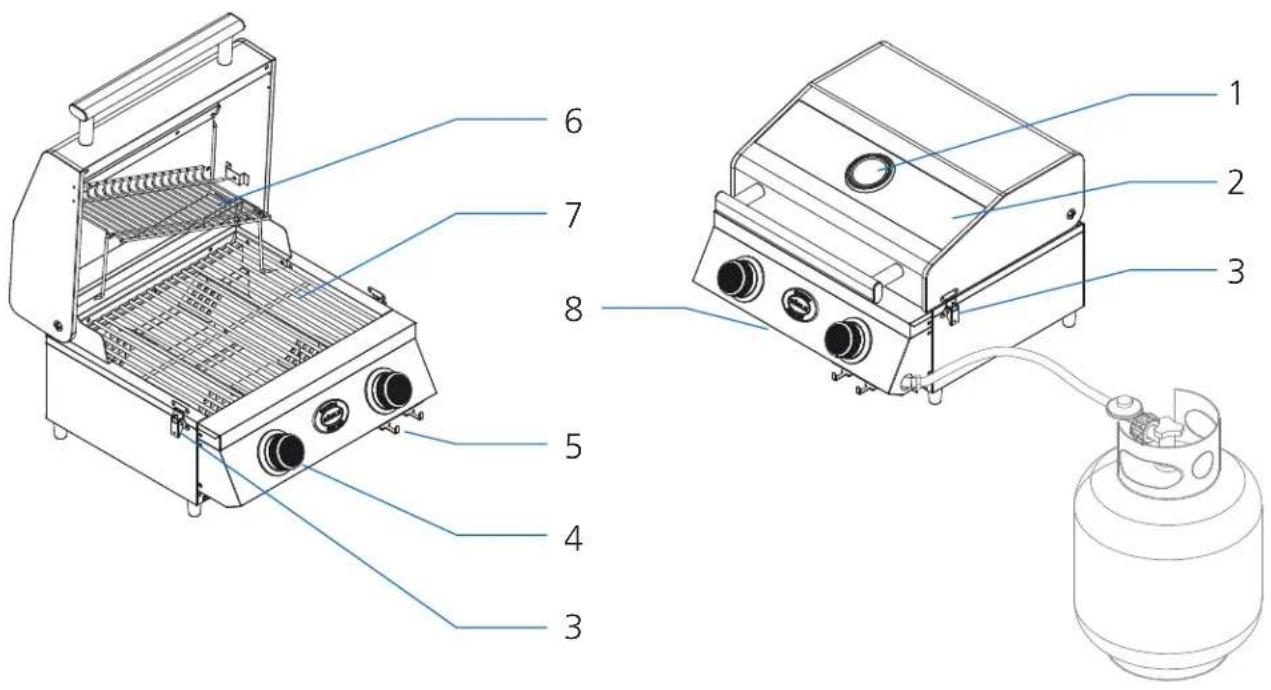
Overview of portable VIDERO
English
| VIDERO G2-P in detail | |||
| 1 Lid thermometer 5 Cutlery holder | |||
| 2 Lid with glass insert 6 Removable warming rack | |||
| 3 Fastening clasp 7 Two-part main grate | |||
| 4 Control knob for main burner 8 Fat catcher tray | |||
Instructions for the gas connection
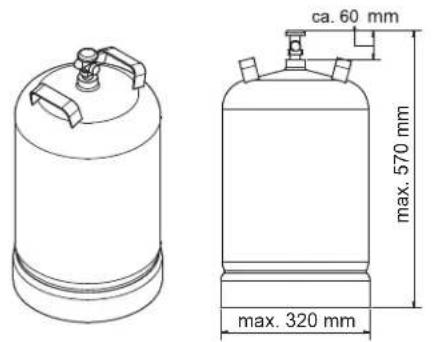
Size of gas cylinder:
Gas cylinder positioning
- Position the gas cylinder upright beside the grill.
- Ensure that the gas hose is uncovered and not near hot areas.
- Avoid twisting the gas hose unnecessarily.
- Perform the step "Fitting the pressure regulator".
- Once you have fitted and checked the gas hose/pressure regulator connection to the gas grill, check the connectors for leaks according to the section "Leak check".
Fitting the pressure regulator (depending on the version of the pressure regulator)
- The gas pressure regulator must comply with the current version of standards EN 16436 or EN 16129, as well as national regulations.
- In the first step check the gas hose/gas pressure regulator screw fixing is tight using a spanner and if necessary tighten the screw fixing.
- Remove the safety cap on the gas cylinder.
- Insert the tip of the pressure regulator into the valve of the gas cylinder and turn the union nut anticlockwise by hand.
- Tighten the union nut by hand. Alternatively, you can use a gas pressure regulator spanner.
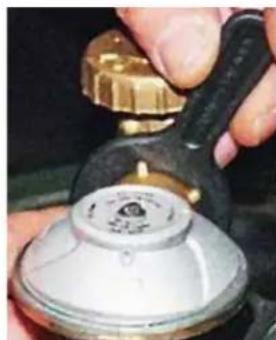
Fitting the gas hose
A) Attaching the hose connector - for Germany, Austria and Switzerland
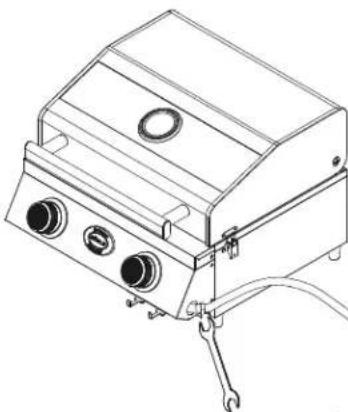
- Screw the gas hose to the pipe connection.
- Ensure that the gas hose connection is firmly tightened and tighten if necessary (using two spanners).
- Once you have fitted and checked the gas hose/pressure regulator connection to the gas grill, check the connectors for leaks according to the section "Leak check".
B) Fitting the hose - for BE, DK, ES, FI, NL, NO, SE, FR, GB, IE, IT, LU
A universal adapter is included in the scope of delivery for connecting the gas hose coming from the pressure regulator to the hose for the burner.
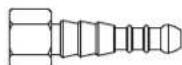
- Connect the universal adapter to the 14 BSP external thread of the pipe connection.
- Tighten the connection. Use the second spanner for resistance.
- Use suitable hose clips or crimp clamps to fix the hose to the adaptor and tighten the clips/clamps securely.
- Once you have fitted and checked the gas hose/pressure regulator connection to the gas grill, check the connectors for leaks according to the section "Leak check".
Before starting the gas grill
Checking the main burners
- Open the lid of the grill.
- Lift up all the grates.
- Remove all burner covers.
- Make sure that all stainless steel main burners are correctly positioned above the nozzle of the gas valve.
- If the burner is no longer above the nozzle due to transportation, for example, you must remove the burner (see section "Removing the burners").

Refitting is the reverse of the removal procedure.
Cleaning the fat collecting system
- Before every use, remove fat deposits in the removable fat catcher tray and at all outlets leading to it
- Also remove adhesions and deposits in the firebox, on lids of burners, grates and grill plates.
- After cleaning reinsert the fat catcher tray as far as the stop and lock into the hooks on the front left and right.

Leak check
The gas connections of the gas grill were checked for leaks at the factory. However, for safety reasons you should check all connections again for leaks before you start up your gas grill. Individual gas connections may have come loose during transportation, or incurred damage.

For your own safety check the gas connections every time before you start the grill!
- Check whether all control knobs on the grill are at "●" OFF.
-
Connect the gas pressure regulator according to the section "Fitting the gas pressure regulator".
-
Open the gas cylinder valve by turning anticlockwise (at least two full turns).
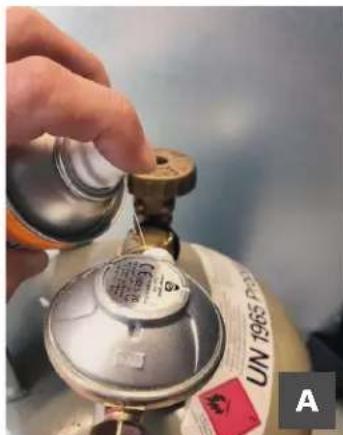
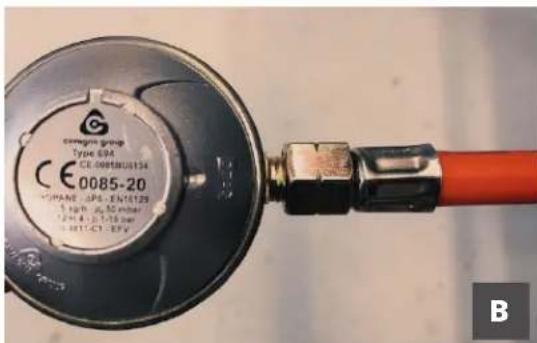
- Check all gas connections for leaks. Apply soapy solution (approx. 50% liquid soap / 50% water) to all parts carrying gas. Alternatively, use a suitable leak detector spray.
- If you see fine bubbles forming in the soapy solution at any point, this indicates a leak.
- Eliminate the leaks by tightening the loose screw fixing or hose clips, if possible, or replacing the defective parts.
- Repeat the test again (from step 3).
- If the leaks cannot be eliminated, consult your dealer. You may not operate the grill in this condition!

As some leak detector sprays, including soapy water, are possibly slightly corrosive, you must rinse all connections with water after the leak test and dry them.
A) Connection of pressure regulator to gas cylinder (using union nut) (the connection is located at the gas cylinder valve)
B) Connection of gas hose to pressure regulator (the connection is located downstream of the pressure regulator)
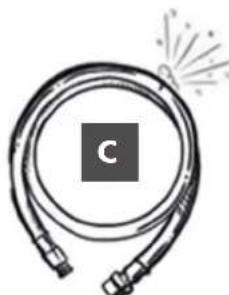
C) Apply soapy solution (approx. 50% liquid soap / 50% water) to all parts carrying gas. Alternatively, use a suitable leak detection spray. Small bubbles form if the gas hose is leaking.
By means of a visual inspection check whether the gas hose has cracks, porous areas, wear, indentations on animal bites.
Also perform the smell test. If you smell gas, the hose is possibly leaking.
If you detect damage to the hose, the grill must not be used. The hose must only be replaced with an approved replacement hose.
Inserting individual parts
- Place all necessary individual parts such as burner covers, grates and warming rack in the grill.
- Proceed carefully in order to avoid chipping the enamel of the firebox.
- Consult the assembly instructions in the event of uncertainties.
"Burning-in" the gas grill

Remove all stickers and labels from the lid window before "burning-in" the gas grill. If you do not do so, the stickers and labels may melt and will then be very difficult to remove.
The gas grill emits a slight smell when used for the very first time. The smell is caused by the "burning-in" of the interior coatings and burning of the lubricant from the production process.
This is quite normal and no longer occurs with further use.
- Take out the grates and wash them with a mild detergent.
- Refit the grates.
- Before using the grill for the first time you should operate all main burners at full load and close the lid. See section "Lighting the burners".
- Switch the appliance off after the 30-minute "burning-in" stage.
Lighting the burners

Everyone who operates the appliance must be familiar with the lighting procedure. Children or persons with reduced mobility must not be allowed to operate the grill. Never bend over the open grill.
Always keep at least 30~cm away from the source of ignition when lighting the grill.
Keep your face, hair, beard, loose and flowing clothing, etc., well clear.
Lighting procedure for main burners with the Jet Flame ignition system
- Before starting the lighting procedure, all control knobs must be set to the position "●" OFF.
- Open the lid of the grill before you light the main burners.
- Open the gas cylinder valve by turning anticlockwise (at least two full turns).
- Check all gas connections for leaks. See section "Leak check".
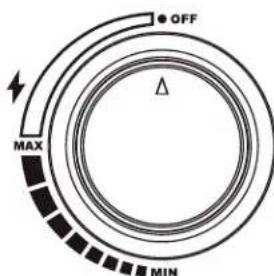
- Press the desired control knob inwards and turn it slowly anticlockwise to the "MAX" position or until you hear the click of the Jet Flame ignition system.
- Hold down the control knob after the "click" for approx. 2 seconds so that the flame of the Jet Flame can light the burner.
- It is possible to visually check the ignition system. Look at the Jet Flame ignition area at the side from a distance. After the ignition spark was triggered by the control knob, the gas flowing past is ignited and a pilot flame is produced which lights the main burner.
- If the burner does not light immediately, turn the control knob back to "●" OFF and wait 2 minutes to allow the accumulated gas to disperse. Now you can repeat the ignition procedure.
- When the main burner has been lit, repeat this process until all the burners are lit or until you have lit all the burners you wish to use.
- You can now use the control knob to adjust the flame to suit your particular requirements. For the lowest setting, you turn the control knob anticlockwise to "MIN".
- If you do not succeed in lighting the gas grill, refer to the section "Troubleshooting".
- After use press in the control knob (gas valve) for the respective burner and turn it clockwise to the position "●" OFF.
Cooking with the RÖSLE grill
Some (chemical/poisonous) by-products produced when barbecuing, especially if the appliance is not used properly, can be harmful to health. These could lead to cancer, problems with pregnancy and other consequences.
Preheating
- Light the main burners as described in the section "Lighting the burners".
- Turn the control knobs of the main burners to the "MAX" position and preheat the gas grill for 15 minutes with the lid closed or until the lid thermometer temperature reaches 250^ .
Grates
It is advisable to apply a thin coat of fat to the grates before using the grill on each occasion. You can apply a little cooking oil to the cooking surface with a long-handled brush. In that way you can help prevent food residues sticking to the surface. Alternatively, you can also use a separating spray.
Leaping flames
When you cook meat over an open fire, you have to expect the flames shoot up.
This is caused by the natural meat juices dripping onto the burner covers. The leaping flames and the resulting smoke are what give the meat the smoky barbecue flavour.
Barbecuing very fatty meat or at very high temperatures can also cause the flames to shoot up.
You have to keep the shooting flames under control as otherwise the food will burn.
- Remove excess fat from meat and poultry before placing it on the grill.
It is recommended to cook very fatty meat on a barbecue tray.
Vegetables coated in oil should also be cooked on a barbecue tray. - If necessary, barbecue on a lower heat.
Hose breakage protection (optional equipment)
The integrated hose breakage protection in the gas pressure regulator is a small, but important safety device for liquid gas systems or gas grills, which protects against the uncontrolled escape of gas and any consequential damages.
Gas may escape in the event of damage to the hose line or if the hose tears off or comes loose. The hose breakage protection monitors the flow of the gas whilst the grill is in use. If damage occurs, the hose breakage protection detects this and blocks the gas flow directly.
Barbecuing methods
Direct barbecuing with the lid of the grill closed
Direct barbecuing means that the high heat generated by the grill is transferred directly from below to the food. Place your food on the grate and set all burners to the heat specified in the recipe. Close the lid and only open it when you want to turn the food or test the meat after the specified cooking time. Barbecuing should always be done with the lid closed so that the heat is evenly distributed and the food is cooked in an energy-efficient manner.
Indirect barbecuing with the lid of the grill closed
For indirect barbecuing, the lid is closed and only the two outer main burners are lit.
Place a fat catcher tray in the middle under or on the grate and position the food above it.
In that way, the food is not cooked directly but by the convection throughout the cooking compartment produced by the closed lid. The food is cooked much gentler and also does not have to be turned.
Combination of both barbecuing methods
Particularly for juicy roasts or steaks you can also combine both barbecuing methods. First of all, the food is grilled by the direct heat until it is crispy on the outside, then the temperature is turned down and the meat is finished over a low heat. By occasionally coating the meat with oil or marinade, the crust stays crispy and the inside succulent and tender.
Cooking times: When is the food cooked?
Meat that is not properly cooked through can cause serious health hazards.
Barbecuing is affected by many factors such as the thickness of the food, initial temperature, outdoor temperature, wind, etc.
If in doubt, use a thermometer to check the core temperature. Do not necessarily trust fixed cooking times. If using a roasting or steak thermometer, follow the manufacturer's instructions for use.
- When using a meat thermometer, you should leave it in the meat for a few seconds before reading off the temperature.
- For steaks, hamburgers and also roasts, etc., insert the thermometer into the food from the side so that the tip is in the centre of the food. When doing so, make sure that the measuring tip is not touching any bone.
-
To check the temperature of poultry, insert the thermometer into the thickest part of the breast or the leg. Take care not to touch the bones. If the poultry is cooked through, the breast should have a core temperature of 75^ , the leg 80^ .
-
Take the roast meat or poultry off the barbecue about 5 minutes before it reaches the desired core temperature. Then leave it to rest for about 10 minutes before cutting it so that the juices run back into the meat.
The following information for pieces, thickness, weight and grilling times are guidelines only and not binding. Grilling times are influenced by height, wind, outside temperature and the desired way the food is to be done.
Grill steaks, fish fillets, boneless chicken pieces and vegetables using the direct method for the time shown in the table or according to taste and turn the food once halfway through cooking.
Grill joints, poultry with bones, whole fish and thick cuts using the indirect method using the times shown in the table as a guide. Alternatively a roasting thermometer can be used that shows the desired temperature. Grill times for beef are for medium, unless otherwise stated.
The approximate cooking times relate to meat at a fridge temperature of 7^
If you work with higher barbecue temperatures, we recommend that you do not apply marinades to the meat
until the last 15 to 30 minutes of cooking time so as to prevent excessive browning or burning.
| Food Thickness/Weight | Barbecuing time | Temperature | |
| Beef | |||
| Steak: New York, Porterhouse, rib, T-Bone or fillet | 2 cm thick 4-6 minutes with direct, high heat | ||
| 4 cm thick 10-14 minutes with direct, high heat | |||
| 4 cm thick 6-8 minutes | Sear and then barbecue for 8-10 minutes on indirect heat at high setting | ||
| 5 cm thick 14-18 minutes with direct, high heat | |||
| 5 cm thick 6-8 minutes | Sear and then barbecue for 8-10 minutes at high setting | ||
| Flank steak | 500 g to 700 g, 2 cm thick | 8-10 minutes with direct, high heat | |
| Pork | |||
| Chops, with or without bones 2 cm thick 6-8 minutes with direct, high heat | |||
| 2.5 cm thick 8-10 minutes with direct, medium heat | |||
| Spare ribs, suckling pigs | 0.45 kg-0.90 kg | 3-4 minutes | with direct, low heat |
| Ribs, spare ribs | 0.9 kg-1.35 kg | 3-6 | with direct, low heat |
| Country-style ribs with bones | 1.36 kg-1.81 kg | 1.5-2 hours | with direct, medium heat |
| Poultry | |||
| Boneless, skinless chicken breast | 170 g-230 g | 8-12 minutes | with direct, medium heat |
| Boneless, skinless chicken thighs | 120 g | 8-10 minutes | with direct, high heat |
| Chicken breast with bones | 280 g-350 g | 30-40 minutes | with medium heat |
| Chicken drumsticks | 30-40 minutes | Medium heat | |
| Chicken wings | 50 g-80 g | 18-20 minutes | with direct, medium heat |
| Whole chicken | 1.2 kg-1.8 kg | 45-90 minutes | with medium heat |
| Whole turkey, without stuffing | 4.5 kg-5.5 kg | 2.5-3.5 hours | on low heat |
| 5.5 kg-7.0 kg | 3.5-4.5 hours | on low heat | |
| Fish and seafood | |||
| Fish fillets or pieces per 1 cm 3-5 minutes with direct, high heat | |||
| Per 2.5 cm 8-10 minutes | with direct, high heat | ||
| Whole fish 500 g | 15-20 minutes with medium heat | ||
| 1.5 kg 30-45 minutes with medium heat | |||
| Vegetables | |||
| Corn on the cob 10-15 minutes with direct, medium heat | |||
| MushroomsShiitake or button /Portobella | 8-10 minutes10-15 minutes | with direct, medium heat /with medium heat | |
| Onions: halved/sliced 1.0 cm thick | 35-40 minutes8-10 minutes | with direct, medium heat /with medium heat | |
| Potatoes: Whole /Sliced 1.0 cm thick | 45-60 minutes12-14 minutes | with direct, medium heat /with medium heat | |
Easy steps to becoming a barbecue expert
- Read the recipe and follow the specific instructions.
- Do not try to save time by placing food on the barbecue too soon, before it has reached the right temperature.
- Use a barbecue turner or tongs, but not a fork. Piercing with a fork will allow juices, and therefore flavour, to escape and the food will dry out.
- Check the food fits onto the grill before closing the lid of the grill. Ideally there should be a gap of approx. 2 cm between individual food items.
- Do not keep opening the lid to look at the food. Every time the lid is lifted, heat is lost, i.e. the food will take longer to be ready to be served.
Closing the grill lid shortens the cooking time and produces better cooking results.
Only turn the food once, or when the recipe requires. - Never flatten food such as burgers. Doing this squeezes the juice out of the meat and dries the food.
- Wash your hands and the implements thoroughly with hot water and washing-up liquid before and after handling fresh meat, fish or poultry. Alternatively you could use disposable gloves.
- Never put cooked food on the same tray on which you have had raw food.
- Do not defrost food for barbecuing at room temperature, but rather in a refrigerator.
After use
- When you have finished barbecuing, leave your gas grill alight for another 5 minutes to burn off excess fat and adhesions, etc., that could otherwise clog up the burner jets.
-
A "burnout" is not necessary and also does not constitute a sufficient cleaning process.
After use press in all control knobs (gas valve) and turn them clockwise to the position " " OFF. -
Observe the section "Safety instructions for storage"
-
To clean the grates, use a long-handled barbecue cleaning brush to remove grease and food residue. Some parts may be very hot. Wear barbecue gloves to protect your hands.
After your gas grill has cooled down completely, remove all fat accumulations in the removable fat catcher tray and at all outlets leading to it. - Clean the external surfaces and remove marinade and grease accumulations using a mild detergent. Observe the manufacturer's instructions.
- Put the grill in the carrying bag once it has fully cooled down and store it in a location protected from the effects of the weather.
Using for the first time after removal from storage
The following steps should be taken into account when you first use the gas grill again at the start of the barbecue season, after winter or after an extended period:
- Carefully read through the operating manual again.
- Obtain information at www.roesle.com after an update of your operating manual.
- Carefully perform steps according to the section "Before starting the gas grill".
- Check the fill level of the gas cylinder.
- Check and clean the valve nozzles at the valve block.
- Check the valve and ignition area for spiders and other insects. They like to settle in this area. As a result, the gas flow is obstructed.
Also check and clean if one of the following symptoms occurs:
Smell of gas with very yellow and weak flame.
- The grill does not reach the temperature.
- The grill heats unevenly.
One or several burners do not light.
Maintenance, cleaning and storage

Ensure that the grill has cooled down completely before you start with the thorough cleaning.

Wear suitable protective gloves for your own protection, when cleaning the grill surfaces and pay particular attention to sharp-edged corners or edges.
Maintenance of grill parts
- Use an oven cleaner or suitable barbecue cleaner for cleaning the firebox. Thoroughly rinse with clean water and dry the surfaces. Observe the manufacturer's instructions.
- Do not allow any water or cleaning agent to get into the burner jets and nozzles.
- For cleaning the grates loosen the deposits using a barbecue cleaning bush or a soft stainless steel brush. Then wipe over with a damp cloth.
Sunflower oil should be applied regularly to any cast parts and particularly in the event of prolonged storage in order to protect the cast parts against corrosion (rust). - Check regularly that all screw fixings are tight and that the support feet are firmly attached.
- With any outdoor appliance made of steel, occasional spots of rust on the surface are to be expected.
- If you always keep your grill covered over, clean and dry then you will already have gone a long way towards preventing rust.
Cleaning the cooking compartment/areas
If the cooking area is dirty: First clean the fat catcher tray and the grate and also remove any coarse grease accumulations. Heat up the grill for approx. 15 - 20 minutes at full power. Then leave it to cool down. Ensure that the grill has cooled down completely before you start with the thorough cleaning. If necessary, observe the specifications of the cleaning agent manufacturer.
- Remove all grates, burner covers and burners before the thorough cleaning.
- Never use abrasive stainless steel polish, oven cleaners, abrasive cleaning agents (kitchen cleaners), acid cleaning agents or scouring pads for cleaning the grill.
- Clean the outer casing with a mild detergent and water. Thoroughly rinse with clean water and dry the surfaces.
- Do not allow any water or cleaner to get into the burner jets.
- Loosen deposits on the grates using the RÖSLE barbecue cleaning brush.
After the grill has been thoroughly cleaned, always dry it out by heating it up.
Cleaning the grates
- Always allow to cool down before cleaning.
- Soak burnt leftovers in hot water and gently clean all surfaces in a prompt manner. Do not use any unalloyed steel brush, steel wool or abrasives.
- Then rinse them thoroughly in clean water.
Always dry thoroughly after cleaning.
Cleaning the fat catcher tray
The fat catcher tray must be cleaned on a regular basis! If the grill is used a lot, more frequent cleaning may be required. Adapt your care plan according to usage. If they are not, accumulated fat and oil could cause a fat fire in the grill.

Your guarantee does not cover damage caused by a fire started by fat and oil residues.
- Remove the fat catcher tray
- Remove the excess fat, clean the fat catcher tray and cooking compartment with warm soapy water and rinse them with clear water.
- Never line the cooking compartment and the fat catcher tray with foil or sand.
Cleaning the main burners
Especially after long periods of use, the burners can become clogged with excess fat, juices and marinades and surface corrosion may set in.
- Remove burners, see instructions below.
- Clean burners with warm water and cleaning agent.
- Make sure that the burner jets are clear.
- Rinse burners with water, dry and insert again.
- Light burners immediately to prevent rusting and corrosion.
- Gently oil burners if the gas grill has not been used for an extended period.
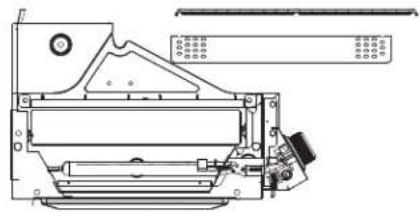
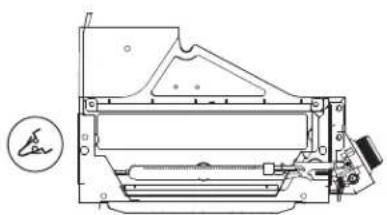
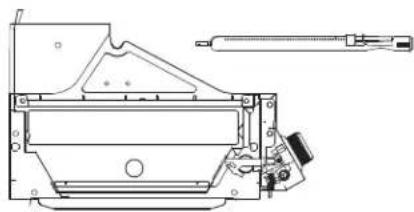
Removing the burners

Make sure that the gas grill has cooled down, all control knobs are set to "●" OFF and the gas cylinder is also turned off. Make sure that all stainless steel main burners are correctly positioned above the respective nozzle of the gas valve.
- Close the gas supply.
- Lift up the grates and the burner covers.
- Release the clip of the burner fastening at the back.
- Move the burner at the back to the right and push it towards the valves.
- Then lift the burner at the back and take it out from the valve by lifting towards the front.
- Clean the burner as described in the section "Cleaning the main burners".
Refitting is the reverse of the removal procedure.

Ensure that the burner jet is at the nozzle.
Winter
Over the winter months the grill should be stored in a dry, protected place.
Clean and dry the grates and rub some sunflower oil into them to prevent rusting.
Wrap the grates and the burners in paper if necessary and store them in a dry and well-ventilated place.
- If you have any questions or are uncertain about anything, seek advice from your gas appliance supplier or sales point.
- Regularly oil the metal parts (e.g. hinge).
- After an extended storage period you should check the gas hose carefully, particularly for cracks, kinks, bite marks and other damage. If the gas hose is damaged, it must be replaced at once.
- Check all gas valves, burner pipes and connections for any faults.
- Check the proper fastening of all gas-conveying parts.
- When you first use the gas grill again at the start of the barbecue season or after an extended period, carefully read through the instructions for use again.
- Check that all burners are correctly attached.
- Before use, make sure that all grates and hotplates have been cleaned.
- Turn all control knobs to "OFF" and connect the gas cylinder.
Tips for extending the service life
With any outdoor appliance made of steel, occasional spots of rust on the surface are to be expected. If you always keep your grill covered over, clean and dry then you will already have gone a long way towards preventing rust.
If you follow these tips, your RÖSLE gas grill will give you many years of reliable service.
Each time before using the gas grill, check the gas grill for any leaks using a soapy solution or leak detector spray.
- The cooking surfaces (including burner cover) should be kept clean and dry after barbecuing, especially after barbecuing with marinades. They contain salt and attack the surface.
- You should rub a little oil into the surfaces of the grates after use.
- Do not leave your grill outside unprotected. After the grill has fully cooled down, you should store it in the appropriate RÖSLE carrying bag in a dry location. Do not store the grill beside road salt.
- Do not store your grill when wet. Carefully dry it first.
- Slight surface rusting can easily be removed with a cloth soaked in vinegar essence or with a commercial rust remover. Observe the information of the cleaning agent manufacturer.
- Check regularly that the screw fixings are tight and that the support feet are firmly attached.
Troubleshooting
| Problem Solution | |
| Appliance does not light, no flame, burner fault | ·Check whether the shut-off valve of the gas cylinder is opened. ·Make sure that there is enough gas in the cylinder. ·Is there a kink in the gas hose? – Straighten out the hose. ·Check whether sparks are jumping across from the electrode to the burner. ·Is it possible to light the burner with a long match? – Check the ignition system! |
| Grill does not function properly | STOP, turn off the gas cylinder and turn all valves to "●" OFF. DO NOT smoke. ·Check all gas connections. ·Wait 3 minutes to allow the accumulated gas to disperse and then repeat the lighting procedure. |
| ·The burners are not properly fitted over the outlets: Fit burners exactly over the outlets. ·Gas pipe is blocked: Remove the gas hose from the gas grill. Turn on the gas cylinder just for a second to remove any blockage from the hose. Turn off the gas cylinder again after a second and reconnect the gas hose to the gas grill. ·Blocked outlets: Remove the burners as described above. Check the gas valve outlets and use a thin metal wire to remove any residues that might be causing a blockage. Place burner over the outlets again and check whether the burner is now functioning properly. ·Check the burner regularly in order to ensure that it is free of insects and spiders which may block the gas system or impair the gas flow. Make sure that the Venturi tubes of the burner are cleaned carefully so that there are no more obstacles. We recommend a tube brush for cleaning the Venturi tubes. | |
| No spark | ·The distance between the burner and the electrode should not be more than 5-8 mm. ·If necessary, clean electrode and readjust it. |
| Uneven burner flame pattern | Have the burners been cleaned? – Clean the burners; remove all residues. Do not allow any water or cleaner to get into the burner jets. |
| Flash flames occur | ·You may not have sufficiently preheated the grill. Preheat the grill for approx. 15 minutes with all burners lit. ·Clean the grill grates, fat catcher tray, etc., so that all fat deposits are removed. |
| Food burns on the grate | Your grill temperature is too low. Wait a few minutes before turning the food so it has time to cook properly. |
| Leak • Turn off the gas | cylinder. • Ventilate the area so that any accumulated gas can completely disperse. • Check all gas connections. • If there is a leak at the gas cylinder, remove it from the cabinet and place it upright in an open area. • Keep well away from any gas or liquid escaping from the cylinder. • Keep the gas cylinder at least 20 metres away from sources of ignition, electrical appliances, flashing lights, machinery, motors or engines. • Ensure maximum air circulation to allow the accumulated gas to disperse. |
| Other problems not listed here | Contact your specialist retailer. E-mail us at reclamation@roesle.de |
| Danger! | Do not line the bottom funnel with aluminium foil. Is the bottom funnel "dirty", whereby the fats cannot drain off into the fat catcher tray? - Clean the bottom funnel! |
| Appliance fire | If a fire starts in the appliance, turn off the gas cylinder. Use a wet cloth to put out the fire. If the gas cylinder is on fire or if you cannot reach or turn off the switch, call the fire service immediately. Direct a garden hose at the centre of the gas cylinder to cool it down but never extinguish the flames with water. As long as the gas is burning, it cannot form pools and explode. Evacuate the area. Notice: Most fires in gas grills occur because fat and oil has accumulated or because the gas connections have not been regularly and properly checked. Remember to follow the manufacturer's instructions regarding cleaning and connecting the gas fittings. Insects Spiders and other insects may occasionally make cobwebs or nests in the burner pipes. This may inhibit the flow of gas and cause a fire. This is known as flashback and can cause serious damage to the gas grill and endanger the surrounding area. We recommend that the burner pipes are regularly inspected and cleaned. |
Declaration of Conformity

We hereby declare that this product complies with the legal requirements of European Regulation (EU) 2016/426.
Disposal

Your new appliance was protected in transit by the materials it was packed in. All of the packaging materials used are environmentally friendly and reusable. Please help to make a contribution by disposing of the packaging responsibly. Your dealer or your local recycling facility will be able to inform you about the available disposal methods.

Do not allow children to play with the packaging or parts of it. Risk of suffocation from foil and other packing materials
Used appliances are not worthless scrap. Valuable raw materials can be recovered by recycling the product in an ecologically responsible manner. Ask your municipal or local authority about the possibilities for proper and ecological recycling of the appliance. The materials are recyclable as indicated by their identification marks.
General information and warranty
You receive the statutory warranty for this product. The warranty relates to defects, which are based on a material and/or manufacturing fault. The statutory warranty starts from the date of the invoice/sales receipt. Please retain this invoice/sales receipt as proof of purchase.
We accept no liability for damage to RÖSLE products which can be traced back to the following causes:
- defects incurred because of damages in transit for which we are not responsible
- defects that can be traced back to inappropriate, improper or negligent use
- all parts subject to natural or normal wear and tear
- typical signs of wear
- defects based on the effects of the weather, chemical, physical, electrochemical or electrical factors
- defects arising from non-compliance with regulations and manufacturer specifications on the treatment, maintenance, cleaning and care of the product
- improperly conducted repairs
- installation of spare parts and accessories not corresponding to the original version.
Should you have any questions or wish to make a complaint, please contact your dealer from whom you purchased your product.
Keep these operating instructions for future reference.
Service and contact
Please use our contact form on www.roesle.com/service for any questions or suggestions.
RÖSLE GmbH & Co. KG
| BBQ Portable | |
| Model | Videro G2-P / Videro Pro G2-P |
| matt-black | |
| Equipment | |
| Fire bowl Stainless steel | |
| Primezone — | |
| Lid thermometer | 60° - 350°C (±10°C) |
| Main grate Stainless steel | |
| Warming rack Stainless steel | |
| Heat distributor Stainless steel | |
| Fat catcher tray Stainless steel | |
| Barbecue specifications | |
| Barbecue area size in cm 39 x 32.5 | |
| Hotplate in cm 36 x 16 | |
| Dimensions and weight | |
| Width in cm 45 | |
| Depth in cm 45 | |
| Height with lid closed in cm 34.7 | |
| Approx. weight in kg 12.5 | |
| Country code AT, CH, DE | |
| Article number | 25563, 25636, 25574 |
| Category | 13 B/P(50) |
| Gas type Butane (G30)/Propane (G31): 50 mbar | |
| Main burner nozzle in mm 0.65 | |
| Country code | BE, DK, ES, FI, NL, NO, SE, FR, GB, IE, IT, LU |
| Article number | 25566 |
| Category | 13 B/P(30) |
| Gas type Butane (G30)/Propane (G31): 30 mbar | |
| Main burner nozzle in mm 0.72 | |
| Burner unit | |
| CE | 2575-22 |
| Burners | 2 |
| Side burner output in kW | 2.0 |
| Primezone output in kW | - |
| Main burner output in kW | 2 x 2.2 |
| Total output in kW | 4.4 |
| Overall consumption g/h | 320 |
| Ignition system for main burner | Jet Flame piezo-electric ignition |
Subject to errors and technical amendments.
The dimensions stated are approximate figures.
Table des matieres
Gentile cliente RÖSLE,
We wish you long lasting service from your new RÖSLE Grill.
Your RÖSLE-Team