
RoadMate 7771T-LMB - Browser MAGELLAN - Free user manual and instructions
Find the device manual for free RoadMate 7771T-LMB MAGELLAN in PDF.

| Product type | GPS navigator with built-in camera (DVR) |
| Brand | Magellan |
| Model | RoadMate 7771T-LMB |
| Approximate dimensions | 17.8 x 10.2 x 1.3 cm (7-inch screen) |
| Approximate weight | 280 g (with battery) |
| Display | 7-inch color touch screen |
| Power supply | Built-in rechargeable lithium-ion battery (non-removable); 12V cigarette lighter adapter included |
| Connectivity | Wi-Fi (802.11 b/g/n), Bluetooth, mini USB, microSD slot |
| Main features | GPS navigation with voice guidance, DVR video recording (Full HD), G-Sensor impact detection, emergency recording, headlight reminder, driving break reminder, OneTouch, multi-destination routes |
| Map updates | Via Wi-Fi (wireless download) |
| Voice assistant | Spoken street names, audible turn and speed warnings |
| Video storage | microSD card (Class 10, 8 GB minimum recommended) |
| Additional information | PhantomALERT (speed camera and red light warnings), live traffic, junction view, lane assist |
| Care and cleaning | Clean with a soft, dry cloth; do not use abrasive products. Do not expose to extreme temperatures or humidity. |
| Safety | Windshield mounting compliant with local laws; use only the provided mount; do not obstruct driver's view or airbags. |
| Spare parts and repairability | Battery not user-replaceable; for service, contact Magellan technical support (800-707-9971). Spare parts available at magellanGPS.com. |
Frequently Asked Questions - RoadMate 7771T-LMB MAGELLAN
User questions about RoadMate 7771T-LMB MAGELLAN
0 question about this device. Answer the ones you know or ask your own.
Ask a new question about this device
Download the instructions for your Browser in PDF format for free! Find your manual RoadMate 7771T-LMB - MAGELLAN and take your electronic device back in hand. On this page are published all the documents necessary for the use of your device. RoadMate 7771T-LMB by MAGELLAN.
USER MANUAL RoadMate 7771T-LMB MAGELLAN
MAGELLAN
Safety.
This Magellan device is a dashboard camera and recording device designed to assist you in recording videos, taking photos, and managing the content stored on the device.
Please check with your state or local law enforcement for applicable regulations regarding mounting to the windshield. Go to the Magellan store at magellanGPS.com for alternate mounting solutions.
The driver should enter data or program the Magellan receiver only when the vehicle is stopped. Only a vehicle passenger should enter data or program the device while the vehicle is moving. It is your responsibility to comply with all traffic laws.
Every attempt is made to ensure that the database is accurate. However, roadways, points of interest (POIs), and business and service locations may change over time.
Keep the receiver safe from extreme temperature conditions. For example, do not leave it exposed to direct sunlight for an extended period of time. The maximum operating temperature is 140^ F ( 60^ C).
Take care when mounting the device in your vehicle, whether using the windshield mount or other mount or accessories, that it does not obstruct the driver's view of the road, interfere with the operation of the vehicle's safety devices such as air bags, or present a hazard to occupants of the vehicle should the receiver be dislodged while driving.
You assume the risks associated with damage to your vehicle or vehicle occupants as the result of your choices in mounting the receiver.
The battery is rechargeable and should not be removed. In the event it should need to be replaced, please contact Magellan Technical Support at support.magellanGPS.com or 800-707-9971.
In some jurisdictions, audio recordings require the consent of all parties before you begin recording. It is your responsibility to know and comply with applicable audio recording consent laws in your jurisdiction.
In some jurisdictions, it could be considered an invasion of privacy rights to take or publicly display photographs or videos of people or their vehicles using this product. It is your responsibility to know and comply with applicable laws and rights to privacy in your jurisdiction.
Before using the suction cup mount on your windshield, check the state and local laws and ordinances where you drive. Some state laws prohibit or restrict drivers from using suction mounts on their windshields while operating motor vehicles.
IT IS THE USER'S RESPONSIBILITY TO MOUNT AND OPERATE THE DEVICE IN COMPLIANCE WITH ALL APPLICABLE LAWS AND ORDINANCES.
FCC RF Radiation Exposure Statement
- This Transmitter must not be co-located or operating in conjunction with any other antenna or transmitter.
- This equipment complies with FCC RF radiation exposure limits set forth for an uncontrolled environment. This equipment should be installed and operated with a minimum distance of 20 centimeters between the radiator and your body.
Wi-Fi 5G Band 1 is for indoor use only.
Magellan Take-Back Program
Magellan's Take-Back Program provides a way for customers to recycle certain Magellan equipment. As part of this program, all Magellan GPS models will be accepted.
Visit support.magellangps.com_for more information.
Magellan RoadMate
6630/6620/6615

Tested To Comply With FCC Standards
FOR HOME OR OFFICE USE
Table of Contents.
Getting To Know Your RoadMate....4
Hardware ....4
Software ....4
Setting Up 5
Mounting Your RoadMate In A Vehicle....6
Registering Your Device ....7
Connecting To Wi-Fi 8
Update Your Maps and Software....9
Set Up Bluetooth 10
Using the Headlight Reminder....11
Using the Driving Break Reminder ....11
Using Your RoadMate 12
Searching For And Routing To An Address....12
Routing To A Location....13
Using the OneTouch Menu....15
Using MyPlaces Menu....15
Using Multi-Destination Routes....15
Using DVR Recording....16
Make An Emergency Recording ....17
Access Recorded Videos and Photos 17
Set Video Recording Limits....17
Changing System Settings....18
General....18
Network....18
Navigation + Maps ....18
Safety + Security 19
DVR Recordings....19
Information....20
Registration 20
Using MiVue Manager....21
Installing MiVue Manager....21
Playing Recorded Files....22
Warranty....24
Setting Up.
Thank you for purchasing a Magellan RoadMate Navigation Device, or the GPS receiver with Digital Video Recorder (DVR) functionality.
This User Manual describes every function you need to know in order to operate your RoadMate. Go to magellangps.com/Vehicle-Navigation for more information about RoadMate products as well as Magellan's complete line of vehicle navigation products.
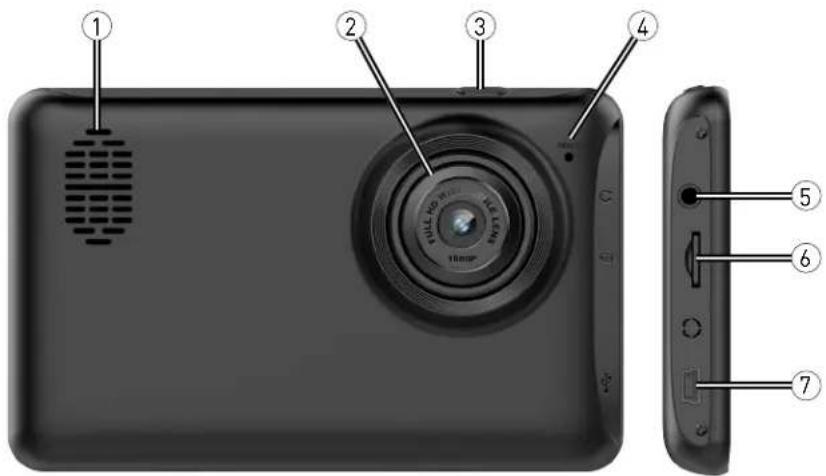
① Speaker Power EditionCamera ^1 ③
④ Reset Button
⑤ AUX Out SD Card Slot
2 ⑦ USB Power Input ^3
^1 Only available on select models.
^2 For best performance, use a Class 10 SD card with at least 8GB of storage capacity.
^3 Be sure to use the included power adapters, which are specially rated for your device.
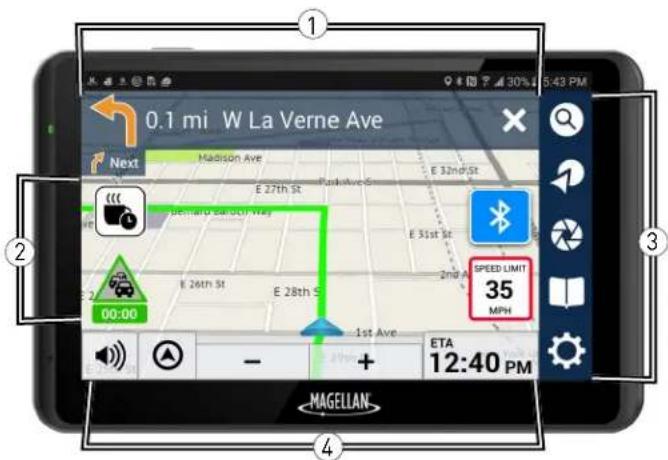
① Navigation Bar ② On-Screen Icons ③ Menu Bar ④ Dashboard
Setting Up.
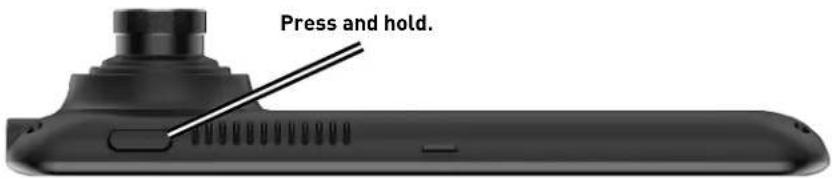
1. Power On.
Press and hold the Power button on the top of your device. Within seconds, you'll see the Magellan logo, and your device will boot up.
2. Charge the Device.
Using the included AC Adapter or Vehicle Power Adapter (VPA):
- Insert AC adapter into wall outlet or insert VPA plug into vehicle power outlet.
- Insert mini-USB connector end of AC adapter or VPA into the left side of the device.
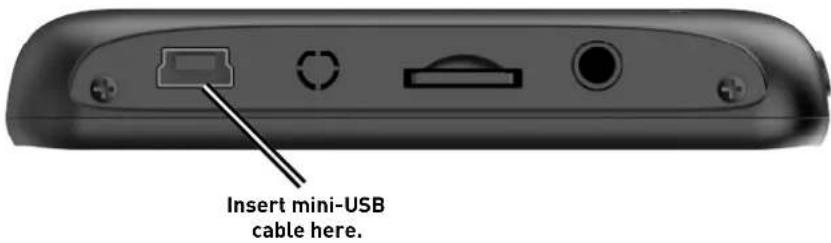
Note: Your device may take several hours to reach a full charge.
Setting Up.
3. Mount the Device.
Attach your device to the included cradle and mount and use suction cup base to adhere your device to your vehicle's windshield or dashboard.
For best image quality, mount your device as follows:
Windshield Dashboard
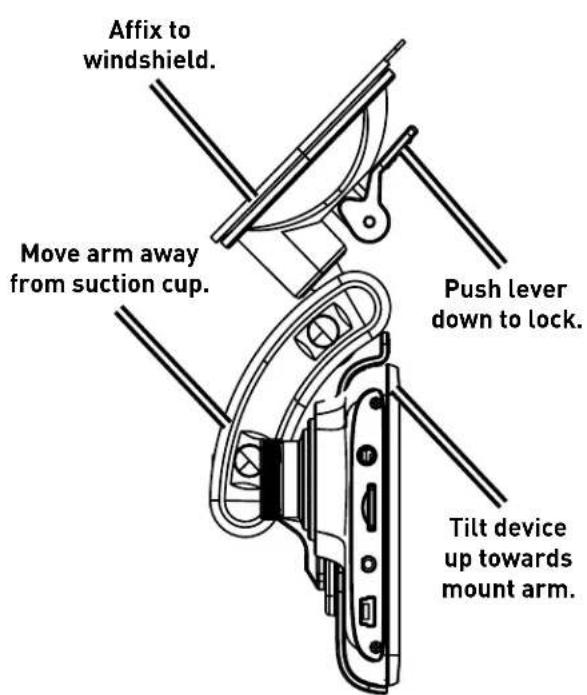

WARNING: Observe local laws and regulations regarding proper mounting of devices.
Setting Up.
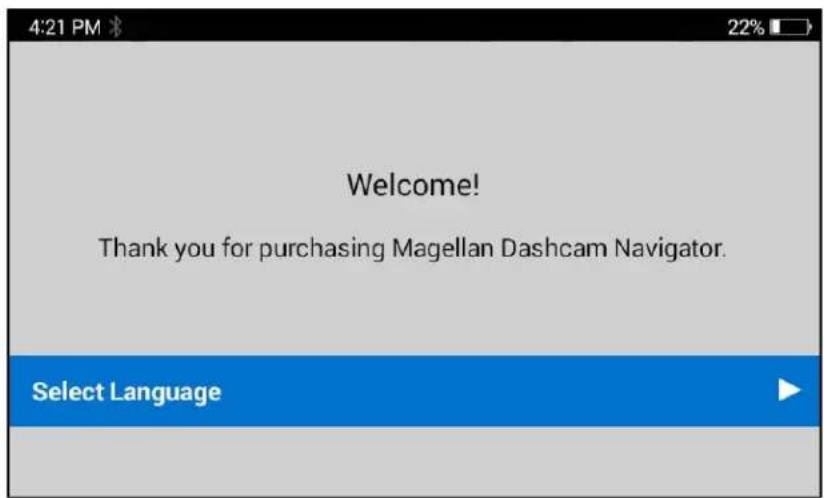
Registering Your Device.
Register your RoadMate on your device wirelessly via WiFi (no USB cables required).
1. Select Language.
Tap on the Welcome screen > select a language > tap OK.
2. Read End-User License Agreement (EULA).
Read the End User License Agreement > tap I've read and agree to the terms to continue or tap I disagree to delay setup.
Note: You cannot proceed with setup until you've read and agreed to the EULA.
Setting Up.
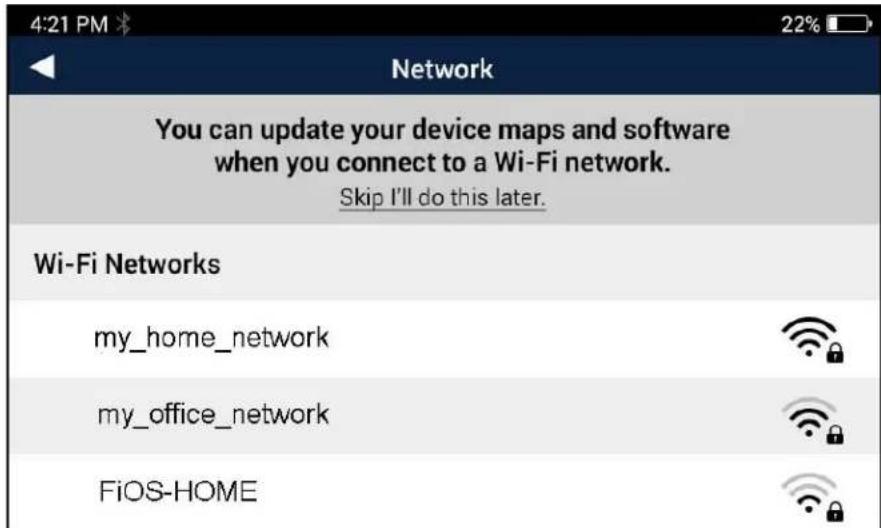
3. Connect to WiFi.
Tap on a WiFi network from the list > enter password (if applicable) > tap Done + Connect.
4. Log In Or Create New ID.
Tap Create a New ID to create a new account > enter account details > tap Sign Up.
If you already have a Magellan account, tap Log-in with Existing ID > enter your account details > tap Log-in.
To log in or register later, tap Skip this, I'll do it later. When you're ready to complete registration, tap from the Map screen > tap Registration.
5. Initial Setup Complete!
Updating Maps and Software.
Download any available maps and software updates for your RoadMate via WiFi:
- Tap from the Map screen.
- Tap Updates when you see a notification (e.g. 2 New Updates).
- Tap Update on Map Update or Software Update.
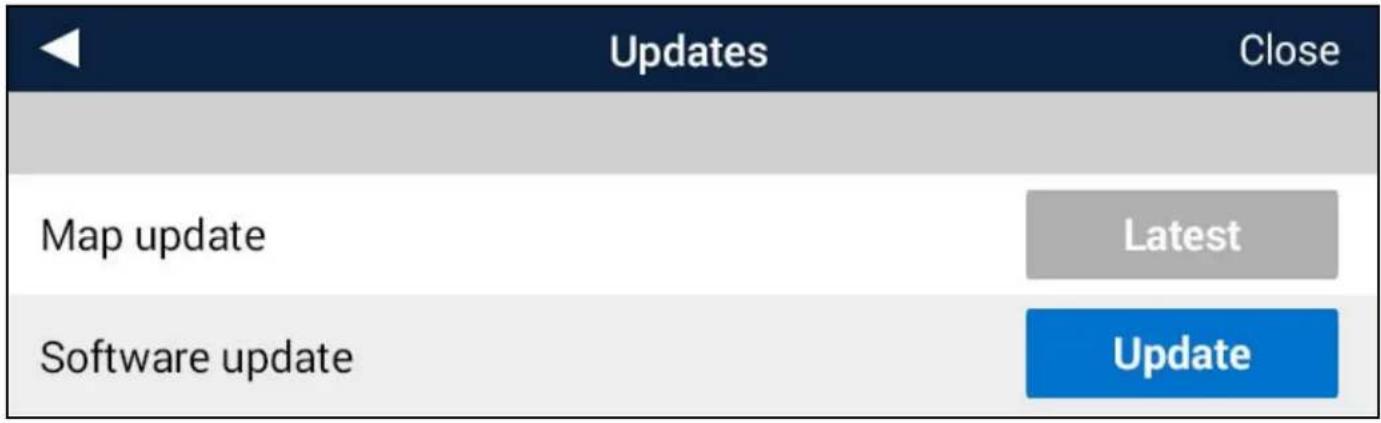
- Wait for the new map or software to download.

Updated maps or software are now downloaded.
Setting Up Bluetooth.
Note: This feature is only available on select models.
Note: Make sure that Bluetooth is enabled on your phone or other mobile device before attempting to activate Bluetooth on your RoadMate device.
- Tap from the Map screen. Your screen will display a PIN number.
- Open your phone's Bluetooth menu > select Magellan RoadMate from the device list.
- Enter the PIN displayed on your RoadMate as the Bluetooth pin on your mobile device.
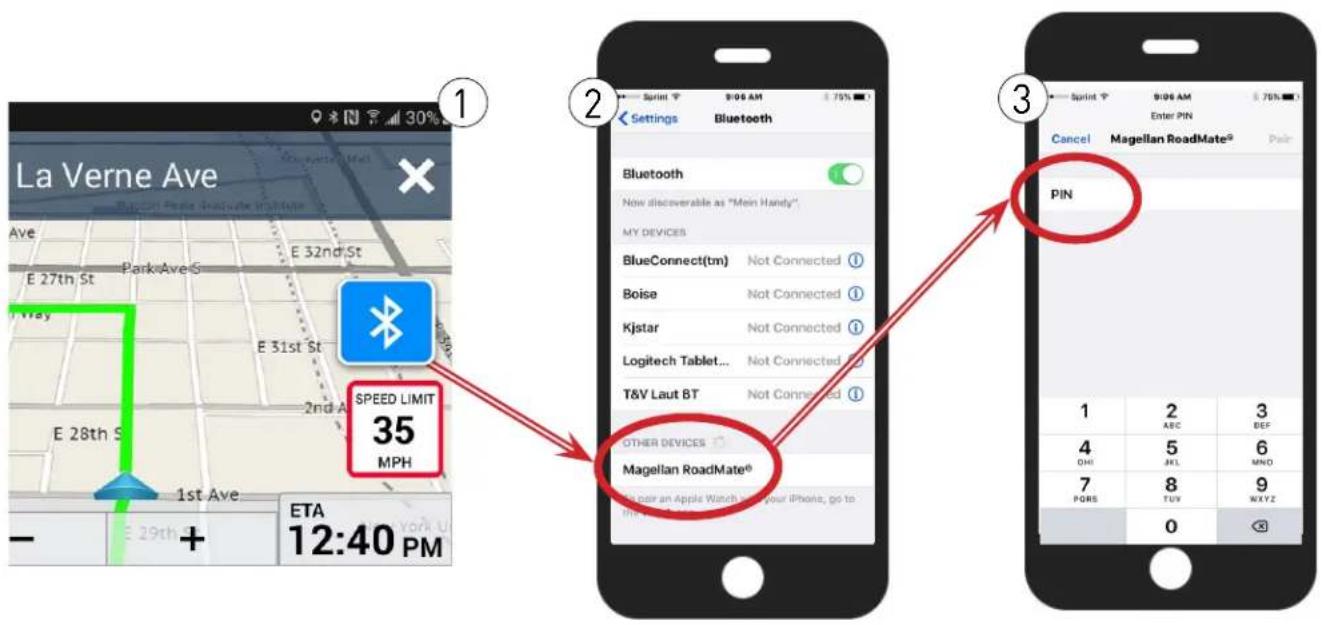
Your RoadMate device is now connected to your phone or mobile device via Bluetooth.
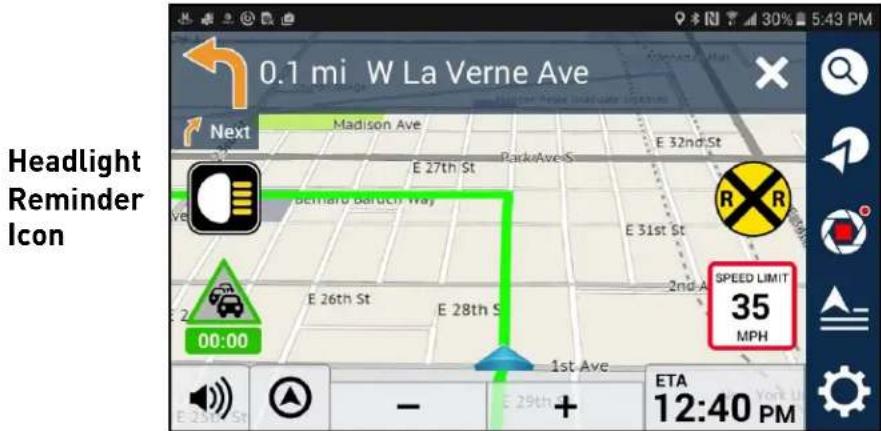
Use the Headlight Reminder.
The Headlight Reminder alerts you to turn on your vehicle headlights around sunset.
To set the Headlight Reminder:
-
Tap from the Map screen.
-
Tap √ Safety and Security.
-
Tap the check box next to Headlight Reminder to turn the Headlight Reminder on (checked) or off (unchecked).
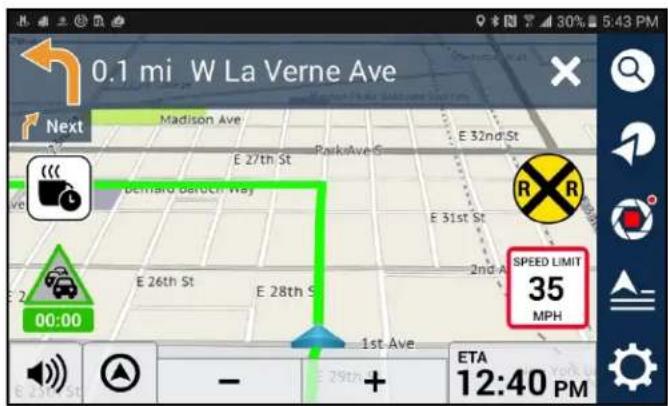
Use the Driving Break Reminder.
The Driving Break Reminder alerts you with an icon to take a break after driving for a specified duration of time.
To set the Driving Break Reminder:
- Tap from the Map screen.
- Tap Safety and Security.
- Tap Driving Break Reminder.
- Choose a duration: 1 hour, 2 hours, or 3 hours.
Driving Break
Reminder Icon
Using Your Device.
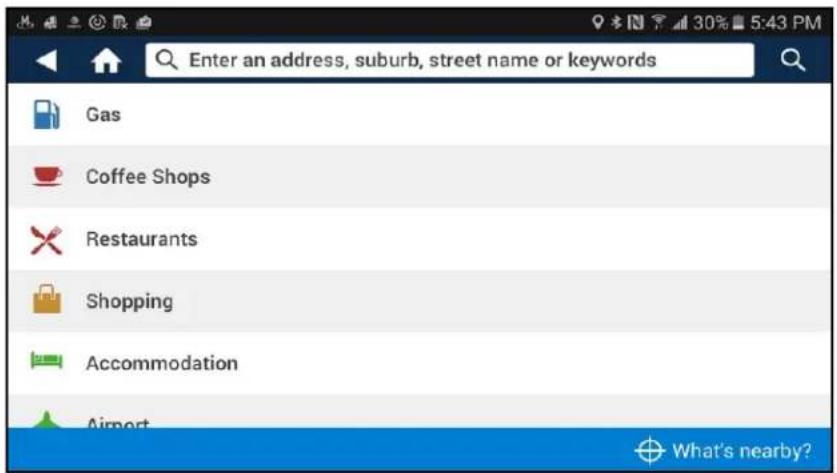
Searching For And Routing To An Address.
To find and route to a nearby location while in Free-Driving Mode:
- Tap Search from the Map screen.
- Tap on a category (e.g. Gas, Coffee Shops, etc.).
2a. Tap on a location in the category list.
2b. Tap ↓ Save to store the location in My Places OR
2c. Tap Route to view routing details.
Note: Tap ... to change Routing Options.
2d. Tap to begin routing to the location.
- Tap What's Nearby? to see locations around you.
3a. Tap on a location in the Search Results.
3b. Tap ↓ Save to store the location in My Places OR
3c. Tap Route to view routing details.
Note: Tap ... to change Routing Options.
3d. Tap to begin routing to the location.
Routing To A Location.
Follow the on-screen map and voice prompts as you drive to the location you entered. You can change routing options while driving or walking to a location.
Note: DO NOT operate your RoadMate while driving. Always be fully aware of all driving conditions.
Using Your Device.
While routing, you can:
Tap a Manuever at the top of the screen to open the Turn List. Tap on any turn in the Turn List to view the details of that turn.

Note: Tap

to stop navigating and return to Free-Driving Mode.
Tap 12:59 to view route information (tap on any option to change the display):
Direction of Travel (N, E, S, or W)
Estimated Time of Arrival (ETA)
Remaining Duration of Route
Remaining Distance of Route
Vehicle Speed
Tap to open the Camera (Only applies to all-in-one models):
Tap Start Recording to activate DVR Recording while you're driving.
Take Take a Photo to take and save a photo to your device.
Tap Recording List to see all Looped Videos, Impact Videos, and Photos.
Tap 📋 to open the Settings menu. Refer to Changing System Settings for more information about setting system preferences on your RoadMate.
Using the OneTouch Menu.
The OneTouch menu gives you quick access to your home address, emergency services, gas stations, and any searched locations you've saved to the OneTouch menu.
To access the OneTouch menu:

- Tap from the Map screen.
- Tap the Home icon to add your home address. Now, whenever you tap the Home icon, you'll immediately begin receiving routing instructions to your home.
- Tap the Emergency icon to see the closest emergency locations (e.g. Sheriff's office, Fire Station, Hospital, etc.) and begin routing to that location.
- Tap on any of the empty boxes to add a new OneTouch location.
- Tap the Pencil button to edit or remove a location from the OneTouch menu. Tap the Checkmark to finish editing OneTouch menu items.
Using My Places Menu.
The My Places menu allows you to route to any location you've saved to My Places.
To use My Places:

- Tap from the Free Driving Map screen.
- Select a location from My Places, Recent, or Trips.
- Tap GO to route to that location.
Note: Tap ⋯ to change Routing Options. Tap the Pencil button > tap Delete to remove the location from My Places.
Using Multi-Destination Routes.
The Multi-Destination Routes menu allows you to modify and add locations to your route.
To add multiple destinations to your active route:

- Tap from the Map screen while routing.
- Tap the Pencil button > tap Add.
- Select a destination from the menu > tap Add.
- Tap the Check Mark when you're finished adding destinations > tap Back to return to the Routing screen.
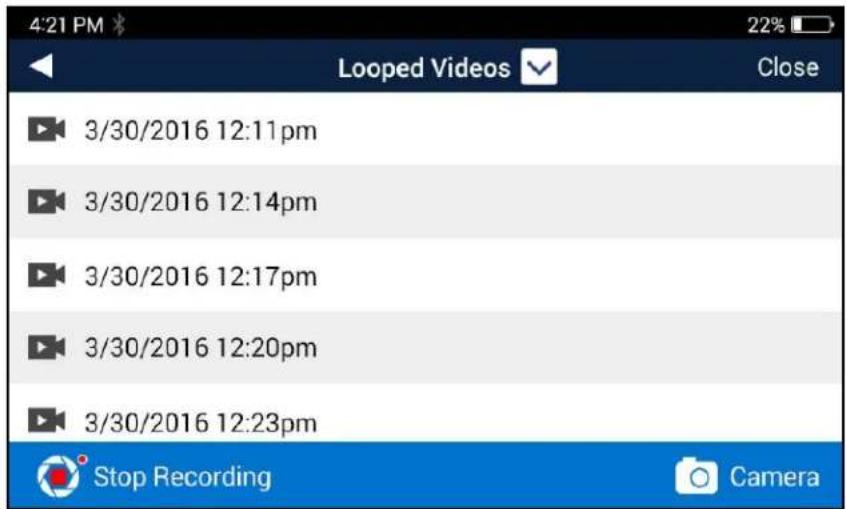
Using DVR Recording.
Tap from the Map screen to open the device camera.
From here, you can:
- Tap Start Recording to begin recording DVR video while you're driving. Tap Stop Recording to end DVR video recording.
- Tap Take a Photo to capture a photo of the current view from the camera.
- Tap Recording List to view a list of your photos and videos.
To edit your recorded photos and videos:

-
Tap from the Map screen.
-
Tap Recording List.
-
Tap Looped Videos for Continuous recordings, Impact Videos for emergency recordings, or Photos.
-
Tap on an item to watch a video or view a photo.
-
Tap Delete to remove the video or photo, and tap Lock to keep a video from being recorded over by new video.
Make An Emergency Recording.
Emergency recordings, are recorded, locked, and saved as three consecutive videos to Impact Videos when the G-Sensor detects impacts from collisions or similar events.
Tap and hold 📋 to manually record an emergency video.
Access Recorded Videos and Photos.
All recorded videos and photos are time-stamped and saved to one of three categories under Recording List: Looped Videos, Impact Videos, and Photos. To access recordings:
- Tap from the Map screen > Recording List.
- Tap on a folder > select a time-stamped file to view a photo or video.
- Tap Delete to remove the video, or Lock to keep the file from being recorded over.
Set Video Recording Limits.
To set a time limit for video recordings:
- Tap from the Map screen.
- Tap DVR Recordings.
- Tap Video Time > select 1 min, 3 min, or 5 min.
This time limit also applies to Impact Recording.
Changing System Settings.
Tap Settings from the Map screen to access the Settings menu.
General: Set general device preferences.
- Screen Brightness: Change brightness level for Day Mode, Night Mode, and Auto Brightness.
- Auto Power Off: Change the duration of time of inactivity before your RoadMate powers off (10 mins, 20 mins, and 30 mins).
- Disable Auto Power Off: Disable the Auto Power Off function (checked) or enable the function (unchecked).
- Sounds: Select Sound options for your device:
• Volume: Change overall system volume. - Button Sounds: On (checked) or Off (unchecked).
- Turn Warnings: Receive notifications of upcoming turns while routing (None, Bells, Chimes, Beeps, or Voice).
- Spoken Street Names: Turn On (checked) or Off (unchecked) voice notifications of street names while routing.
- Audible Speed Warning: Turn On (checked) or Off (unchecked) audible warnings when you drive above the speed limit.
Network: Find and connect to Wi-Fi networks.
To connect to a Wi-Fi network:
- Scan for nearby Wi-Fi networks until you locate a network.
- Tap on a Wi-Fi network.
- Enter the Wi-Fi network password (if applicable) > tap Connect.
Navigation + Maps: Set GPS navigation, mapping, and routing preferences.
- Navigation: Change routing preferences.
- Minimize U-Turns: Avoid U-Turns where possible (checked) or allow U-Turns while routing (unchecked).
- Minimize toll road usage: Avoid toll roads where possible (checked) or allow toll roads while routing (unchecked).
- Minimize unpaved road usage: Avoid unpaved roads where possible (checked) or allow unpaved roads while routing (unchecked).
- Simulation Control: Enable options for simulating your entire route while routing (checked) or disable simulation options (unchecked).
- Map Display: Set map interface and display preferences.
• Map Orientation: 3D, 2D, or 2D North Up.
• Night Mode: Auto, On, or Off.
• Auto-Zoom on Turns: On (checked) or Off (unchecked).
- Lane Assist: On (checked) or Off (unchecked).
- Junction View: On (checked) or Off (unchecked).
• Live Traffic: On (checked) or Off (unchecked).
- Points of Interest Visibility: Tap to select which POIs you want displayed on the Map screen (check/uncheck each type you want displayed/not displayed, or tap Check all to display all POIs on the Map).
• GPS Position: Change GPS positioning settings.
- Set position by GPS: Set to GPS or Manual (set position by What's Nearby?, My Places, or OneTouch).
- Region: View which geographical area you're located in (e.g. US48 AK HI PR CAN).
- PhantomALERT: Set PhantomALERT warnings on your device.
- Standard Alerts: Turn PhantomALERT warnings for Red light cameras or Fixed speed cameras On (checked) or Off (unchecked).
- Premium Alerts: Turn PhantomALERT Premium alerts On or Off. Purchase PhantomALERT subscriptions at magellangps.com/premiumalerts in order to use this feature.
Safety + Security: Set safety and driving assistance features.
- Headlight Reminder: Alerts you to turn on your headlights when your device switches to Night Mode. Turn the Headlight Reminder On (checked) or Off (unchecked).
- Driving Break Reminder: Alerts you to take a break after driving for a set duration. Set the Driving Break Reminder to 1 hour, 2 hours, 3 hours, or Off.
DVR Recordings: Set video recording preferences.
- Auto Record: Set DVR to begin recording automatically when you turn on your device. Turn Auto Record On (checked) or Off (unchecked).
- All Watermarks: Set watermarks for recorded videos: Timestamp, Speed Information, and GPS Location. Turn all watermarks On (checked), Off (unchecked), or turn on individual watermarks.
- Recording Sound: Set DVR to record sound (checked) or not record sound to accompany video recordings.
-
Video Time: Set how long you want individual video files to record before starting a new Looped Video. Set to 1 min, 3 min, or 5 min.
-
SD Card Storage Information: View how much space each type of video/photo takes up on your SD card.
- Format Card: Clears your SD card so that it can be optimized for use with your RoadMate device. This erases all data on the SD card.
Information: View product details, legal documentation, support information, and more.
- Product Information: View product details, including Serial Number, Software Versions, and more.
-
Check for Updates: Check for the latest Software and Map Updates.
-
If you have the latest versions, you'll see Latest next to each type of update.
- If you need to download a new Software or Map update, tap the Download button to wirelessly download the newest version.
• End-User License Agreement: View the full End-User License Agreement (EULA).
- Acknowledgements: View copyright information for map data providers.
- Support: View contact information for Magellan GPS technical support.
- Reset to Factory Default: Restore your device to factory default settings. This erases all data saved to your device.
Registration: View Magellan GPS account details.
- Create New ID: Create a new Magellan GPS account to use with your device. Enter your account details > tap Sign up to create a new account.
- Log-in with Existing ID: Log in with your existing Magellan GPS account to use with your device.
Using MiVue Manager.
MiVue Manager™ allows you to view the videos recorded on your dashcam.
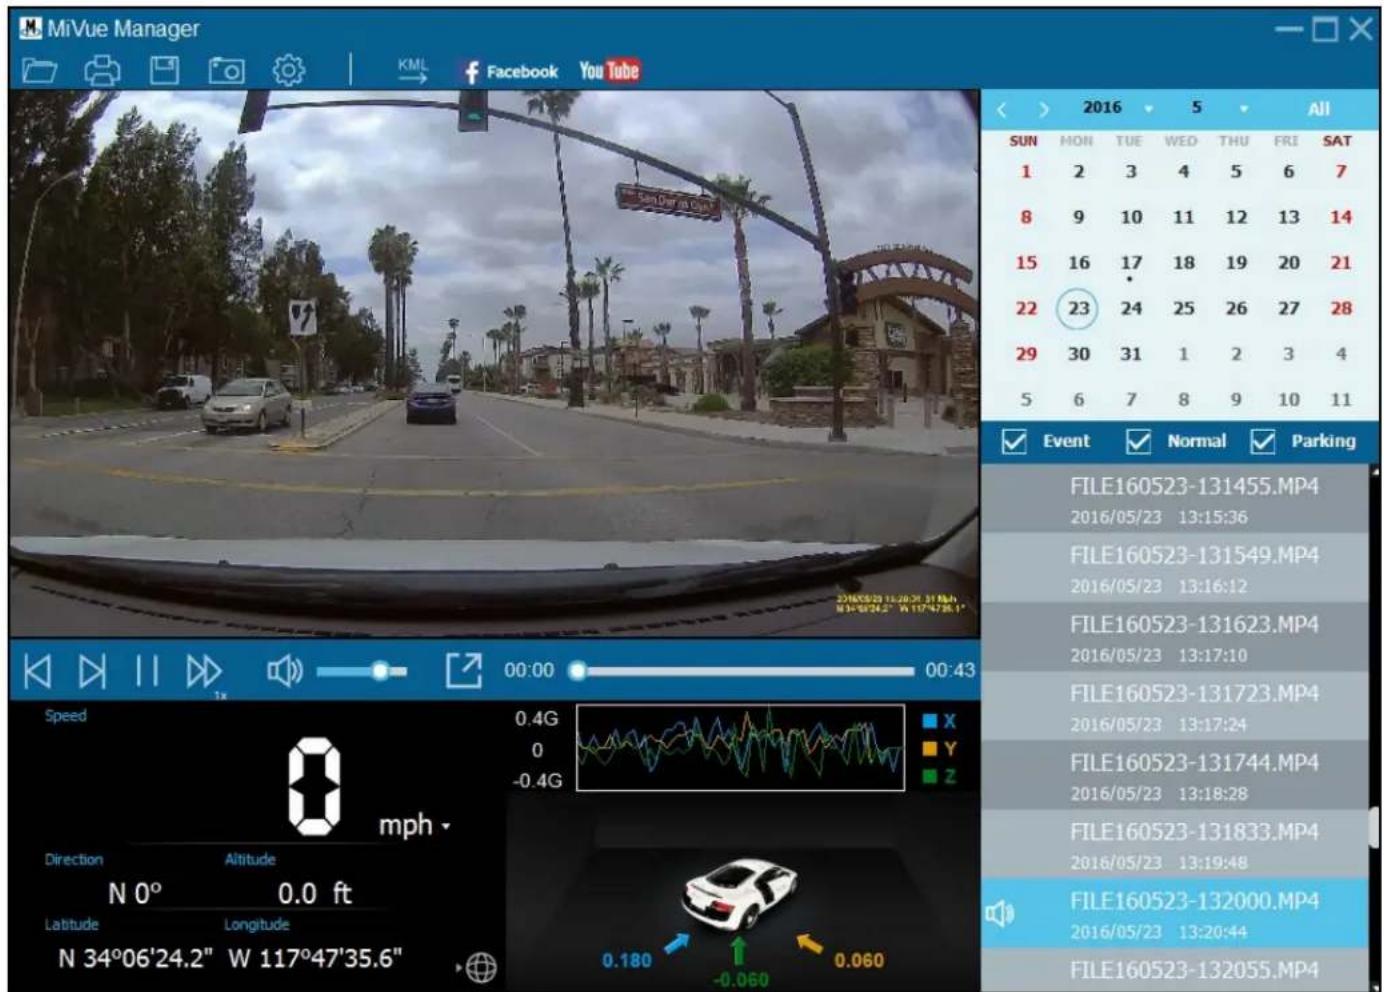
Note: Not all features are available for every RoadMate model.
Installing MiVue Manager.
Download MiVue Manager from support.magellangps.com and follow the on-screen prompts to install it. Make sure to download the correct software version (Windows or Mac) according to your computer's operating system.
Playing recorded files.
- Remove the memory card from the recorder and access the card on the computer via a card reader.
- Copy the recording files to your computer for backup and playback. You may also leave the memory card inserted in the MiVue device and connect the device to your computer via a USB cable.
- Start MiVue Manager on the computer. By default, MiVue Manager shows the calendar and the file list on the right. When a recording file exists you will see the date marked with “.”. Click that date to display the files that were recorded on that date. You can choose the file type to display: Event / Normal / Parking.
- Click All to display all files in the current folder,. To return to the calendar view, click Calendar. Double-click a file on the file list to start playback.
- The playback controls are described as follows:

① Skip to next or previous file.
② Start/pause playback.
③ Change playback speed.
4 Mute/unmute volume.
⑤ Adjust volume level.
6 Play full-screen video.
⑦ Display playback progress. Click along the bar or drag the slider to move directly to that point in the video.
- During playback, you can check more driving information from the dashboard panel and the G sensor chart that are displayed below the video playback screen.
- Click 📋 on the Dashboard panel to display the Map screen.
- G sensor chart displays data in 3-axis waveform about the car's shift forward/backward (X), to the right/left (Y) and upward/downward (Z).
The tool bar allows you to do the following:

flowchart
graph LR
    1["1"] --> 2["2"]
    2 --> 3["3"]
    3 --> 4["4"]
    4 --> 5["5"]
    5 --> 6["6"]
    6 --> 7["7"]
    7 --> 7
① Select folder that stores files.
② Preview/print current image.
③ Save files to your computer.
4 Capture/save video image to your computer.
⑤ Open Settings menu.*
⑥ Export and save GPS info as KML format to your computer.
⑦ Upload files to Facebook and YouTube.
*Settings menu:
- Change Language: Sets the display language of MiVue Manager.
- Change Skin: Sets the colour scheme of MiVue Manager.
- Check for Update: Checks if there is any new version of MiVue Manager. Internet access required.
- About: Displays the version and copyright information of MiVue Manager.
Warranty.
Magellan Limited Warranty
All Magellan global positioning system (GPS) receivers are navigation aids, and are not intended to replace other methods of navigation. The purchaser is advised to perform careful position charting and use good judgment. READ THE USER GUIDE CAREFULLY BEFORE USING THE PRODUCT.
1. MAGELLAN WARRANTY
(a) MiTAC Digital Corp. ("Magellan") warrants its GPS receivers and hardware accessories to be free from defects in material and workmanship and will conform to its published specifications for the product for a period of one year from the date of original purchase. THIS WARRANTY APPLIES ONLY TO THE ORIGINAL CONSUMER PURCHASER OF THIS PRODUCT.
(b) In the event of a defect, Magellan will, at its discretion, repair or replace the hardware product with a product of like kind or quality, which may be new or reconditioned, with no charge to the purchaser for parts or labor. Magellan's limit of liability under the limited warranty shall be the actual cash value of the product at the time the purchaser returns the product to Magellan for repair less a reasonable amount for usage, as determined by Magellan in its sole discretion. The repaired or replaced product will be warranted for 90 days from the date of return shipment, or for the balance of the original warranty, whichever is longer.
(c) Magellan warrants that software products or software included in hardware products will be free from defects in the media for a period of 30 days from the date of shipment and will substantially conform to the then current user documentation provided with the software (including updates thereto). Magellan's sole obligation shall be the correction or replacement of the media or the software so that it will substantially conform to the then- current user documentation. Magellan does not warrant the software will meet purchaser's requirements or that its operation will be uninterrupted, error-free or virus-free. The purchaser assumes the entire risk of using the software.
2. PURCHASER'S REMEDY
PURCHASER'S EXCLUSIVE REMEDY UNDER THIS WRITTEN WARRANTY OR ANY IMPLIED WARRANTY SHALL BE LIMITED TO THE REPAIR OR REPLACEMENT, AT MAGELLAN'S OPTION, OF ANY DEFECTIVE PART OF THE RECEIVER OR ACCESSORIES WHICH ARE COVERED BY THIS WARRANTY. REPAIRS UNDER THIS WARRANTY SHALL ONLY BE MADE AT AN AUTHORIZED MAGELLAN SERVICE CENTER. ANY REPAIRS BY A SERVICE CENTER NOT AUTHORIZED BY MAGELLAN WILL VOID THIS WARRANTY.
3. PURCHASER'S DUTIES
For repair or replacement on a Magellan product the purchaser must obtain a Return Materials Authorization (RMA) number from Magellan Technical Support or by submitting a repair request through our website at www.magellanGPS.com, prior to shipping. The purchaser must return the product postpaid with a copy of the original sales receipt, purchaser's return address and the RMA number clearly printed on the outside of the package to the Authorized Magellan Service Center address provided by Magellan with the RMA number. Magellan reserves the right to refuse to provide service free-of-charge if the sales receipt is not provided or if the information contained in it is incomplete or illegible or if the serial number has been altered or removed. Magellan will not be responsible for any losses or damage to the product incurred while the product is in transit or is being shipped for repair. Insurance is recommended. Magellan recommends the use of a trackable shipping method such as UPS or FedEx when returning a product for service.
4. LIMITATION OF IMPLIED WARRANTIES
Except as set forth in item 1 above, all other expressed or implied warranties, including those of fitness for any particular purpose or merchantability, are hereby disclaimed AND IF APPLICABLE, IMPLIED WARRANTIES UNDER ARTICLE 35 OF THE UNITED NATIONS CONVENTION ON CONTRACTS FOR THE INTERNATIONAL SALE OF GOODS. Some national, state, or local laws do not allow limitations on implied warranty on how long an implied warranty lasts, so the above limitation may not apply to you.
5. EXCLUSIONS
The following are excluded from the warranty coverage:
(a) periodic maintenance and repair or replacement of parts due to normal wear and tear;
(b) batteries;
(c) finishes;
(d) installations or defects resulting from installation;
(e) any damage caused by (i) shipping, misuse, abuse, negligence, tampering, moisture, liquids, proximity or exposure to heat, or improper use; (ii) disasters such as fire, flood, wind, and lightning; (iii) unauthorized attachments or modification;
(f) service performed or attempted by anyone other than an authorized Magellan Service Center;
(g) any product, components or parts not manufactured by Magellan,
(h) that the receiver will be free from any claim for infringement of any patent, trademark, copyright or other proprietary right, including trade secrets
(i) any damage due to accident, resulting from inaccurate satellite transmissions. Inaccurate transmissions can occur due to changes in the position, health or geometry of a satellite or modifications to the receiver that may be required due to any change in the GPS.
(Note: Magellan GPS receivers use GPS or GPS+GLONASS to obtain position, velocity and time information. GPS is operated by the U.S. Government and GLONASS is the Global Navigation Satellite System of the Russian Federation, which are solely responsible for the accuracy and maintenance of their systems. Certain conditions can cause inaccuracies which could require modifications to the receiver. Examples of such conditions include but are not limited to changes in the GPS or GLONASS transmission.).
The opening, dismantling or repairing of this product by anyone other than an authorized Magellan Service Center will void this warranty.
6. EXCLUSION OF INCIDENTAL OR CONSEQUENTIAL DAMAGES
(a) MAGELLAN SHALL NOT BE LIABLE TO PURCHASER
(b) OR ANY OTHER PERSON FOR ANY INDIRECT, INCIDENTAL OR CONSEQUENTIAL DAMAGES WHATSOEVER, INCLUDING BUT NOT LIMITED TO LOST PROFITS, DAMAGES ARISING FROM A DELAY OR LOSS OF USE, OR OUT OF THE BREACH OF THIS WARRANTY OR ANY IMPLIED WARRANTY EVEN IF CAUSED BY THE NEGLIGENCE OR ANOTHER FAULT OF MAGELLAN OR OUT OF THE NEGLIGENCE USAGE OF THE PRODUCT. IN NO EVENT WILL MAGELLAN BE HELD RESPONSIBLE FOR SUCH DAMAGES, EVEN IF MAGELLAN HAS BEEN ADVISED OF THE POSSIBILITY OF SUCH DAMAGES.
(c) Some national, state, or local laws do not allow the exclusion or limitation of incidental or consequential damages, so the above limitation or exclusion may not apply to you.
7. COMPLETE AGREEMENT
(a) This written warranty is the complete, final and exclusive agreement between Magellan and the purchaser with respect to the quality of performance of the goods and any and all warranties and representations. THIS WARRANTY SETS FORTH ALL OF MAGELLAN'S RESPONSIBILITIES REGARDING THIS PRODUCT. THIS WARRANTY GIVES YOU SPECIFIC RIGHTS. YOU MAY HAVE OTHER RIGHTS WHICH VARY FROM LOCALITY TO LOCALITY AND CERTAIN LIMITATIONS CONTAINED IN THIS WARRANTY MAY NOT APPLY TO YOU.
(b) If any part of this limited warranty is held to be invalid or unenforceable, the remainder of the limited warranty shall nonetheless remain in full force and effect.
This limited warranty is governed by the laws of the State of California, without reference to its conflict of law provisions or the U.N. Convention on Contracts for the International Sale of Goods, and shall benefit Magellan, its successors and assigns. This warranty does not affect the consumer's statutory rights under applicable laws in force in their locality, nor the customer's rights against the dealer arising from their sales/purchase contract.
For further information concerning this limited warranty, please visit Magellan's website at magellangps.com or contact:
MiTAC Digital Corp. 279 E Arrow Hwy, San Dimas, CA 91773, USA
USA & Canada: 800-707-9971
Need Technical Support?
If you need technical support for your Magellan product, go to support.magellangps.com for answers to most questions.
If you can't find a solution there, contact Magellan Technical Support by e-mail at support.us@cs.magellangps.com or call 800-707-9971.
Connect with us
@MagellanGPS


You


MiTAC Digital Corporation
279 E Arrow Hwy, San Dimas, CA 91773 USA
www.magellanGPS.com
MAGELLAN
112-0124-001
© 2017 MiTAC Digital Corporation. The Magellan logo and Magellan are registered trademarks of MiTAC International Corporation, and OneTouch is a trademark of MiTAC International Corporation and are used under license by MiTAC Digital Corporation. All rights reserved.
All other trademarks and registered trademarks are property of their respective owners.
RoadMate
Manual de usuario
MAGELLAN
Seguridad.
Tested To Comply With FCC Standards
FOR HOME OR OFFICE USE
Tabla de contenido.
natural_image
Close-up of a black electronic device rear panel showing ports and buttons (no text or symbols visible)Uso del RoadMate.
Uso del dispositivo
Nota: Pulse

Desde aquí, puede:
• Night Mode: Auto, On o Off.
MAGELLAN
Sécurité.
Tested To Comply With FCC Standards
FOR HOME OR OFFICE USE
Table des matières.
1. Choisir la langue.

- Safety.
- FCC RF Radiation Exposure Statement
- Magellan Take-Back Program
- Table of Contents.
- Getting To Know Your RoadMate....4
- Setting Up 5
- Using Your RoadMate 12
- Using DVR Recording....16
- Changing System Settings....18
- Using MiVue Manager....21
- Warranty....24
- Setting Up.
- Power On.
- Charge the Device.
- Mount the Device.
- Registering Your Device.
- Select Language.
- Read End-User License Agreement (EULA).
- Connect to WiFi.
- Log In Or Create New ID.
- Initial Setup Complete!
- Updating Maps and Software.
- Setting Up Bluetooth.
- Use the Headlight Reminder.
- Use the Driving Break Reminder.
- Using Your Device.
- Searching For And Routing To An Address.
- Routing To A Location.
- Using the OneTouch Menu.
- Using My Places Menu.
- Using Multi-Destination Routes.
- Using DVR Recording.
- Make An Emergency Recording.
- Access Recorded Videos and Photos.
- Set Video Recording Limits.
- Changing System Settings.
- Using MiVue Manager.
- Installing MiVue Manager.
- Playing recorded files.
- Warranty.
- Magellan Limited Warranty
- MAGELLAN WARRANTY
- PURCHASER'S REMEDY
- PURCHASER'S DUTIES
- LIMITATION OF IMPLIED WARRANTIES
- EXCLUSIONS
- EXCLUSION OF INCIDENTAL OR CONSEQUENTIAL DAMAGES
- COMPLETE AGREEMENT
- Need Technical Support?
- MAGELLAN
- RoadMate
- Manual de usuario
- Seguridad.
- Tabla de contenido.
- Uso del RoadMate.
- Uso del dispositivo
- Nota: Pulse
- Sécurité.
- Table des matières.
- Choisir la langue.
Brand : MAGELLAN
Model : RoadMate 7771T-LMB
Category : Browser