
TR5 - Browser MAGELLAN - Free user manual and instructions
Find the device manual for free TR5 MAGELLAN in PDF.


| Product Type | Portable GPS Navigator |
| Display | 4.3-inch Color TFT Touchscreen |
| Dimensions | 130 x 80 x 20 mm |
| Weight | 150 g |
| Power Source | Rechargeable Lithium-Ion Battery |
| Battery Life | Up to 3 hours |
| Maps | Preloaded with Detailed 3D Maps (Europe) |
| Voice Guidance | Turn-by-Turn Voice Directions |
| Memory | 4 GB Internal + microSD Slot (up to 32 GB) |
| Connectivity | USB 2.0 for Data Transfer and Charging |
| Operating Temperature | 0°C to 60°C |
| Accessories Included | Car Charger, Suction Cup Windshield Mount, USB Cable |
| Maintenance | Wipe with Soft Dry Cloth; Avoid Harsh Chemicals |
| Safety | Do Not Operate While Driving; Use Only as a Driving Aid |
| Spare Parts & Repairability | Available via Magellan Official Website or Authorized Service Centers |
Frequently Asked Questions - TR5 MAGELLAN
User questions about TR5 MAGELLAN
0 question about this device. Answer the ones you know or ask your own.
Ask a new question about this device
Download the instructions for your Browser in PDF format for free! Find your manual TR5 - MAGELLAN and take your electronic device back in hand. On this page are published all the documents necessary for the use of your device. TR5 by MAGELLAN.
USER MANUAL TR5 MAGELLAN
Trail and Street GPS Navigator
natural_image
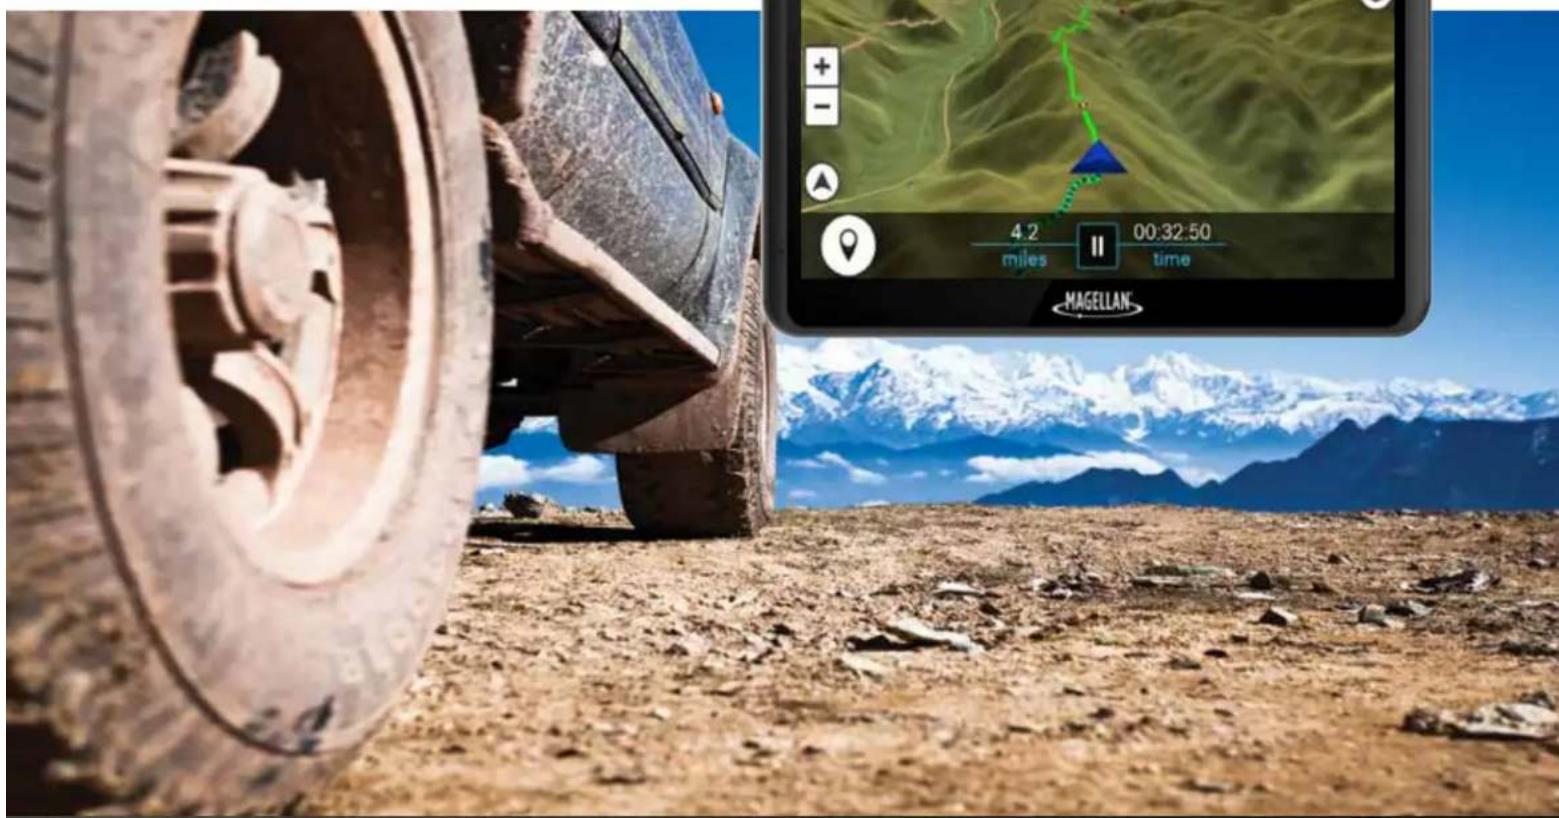
Exterior view of a vehicle on a dirt road with snow-capped mountains in the background; inset shows a map navigation interface displaying time and distance metrics.User Manual
TR5/TN7551SGLUC
Safety.
IMPORTANT SAFETY WARNINGS
The Magellan TR5 is an off-road vehicle navigation tool designed to assist you in driving on off-road routes as well as across municipal streets. Please check with your state or local law enforcement for applicable regulations regarding mounting to the windshield. The driver should enter data or program the Magellan device only when the vehicle is stopped. Only a vehicle passenger should enter data or program the device while the vehicle is moving. It is your responsibility to comply with all traffic laws. Every attempt is made to ensure that the database is accurate. However, roadways, points of interest (POIs), and business and service locations may change over time. Keep the device safe from extreme temperature conditions. For example, do not leave it exposed to direct sunlight for an extended period of time. The minimum operating temperature is 14°F (-10°C), and the maximum operating temperature is 140°F (60°C). Mount the device in your vehicle, whether using the windshield mount or other mount or accessories, so that the device does not obstruct the driver's view of the road, interfere with the operation of the vehicle's safety devices, such as airbags, or present a hazard to occupants of the vehicle should the device become dislodged while driving. Comply with all local, state, and federal laws before mounting the device in your vehicle. You assume the risks associated with damage to your vehicle or vehicle occupants as the result of your choices in mounting the device. The battery is rechargeable and should not be removed. Should the battery need to be replaced, please contact Magellan Technical Support at 877-255-4161, or go to trxsupport.magellangps.com.
Charging the Magellan eXplorist TR5
An AC adapter and vehicle power adapter are included with your TR5. Use ONLY the car charger approved for/supplied with your TR5. Use of another type of car charger could result in fire or electric shock. For safety reasons, the battery in your TR5 will stop charging when the ambient temperature is less than 32^ F ( 0^ C) or more than 113^ F ( 45^ C). The TR5 requires approximately 4 hours of charging through the vehicle power adapter or AC adapter to obtain a full battery charge. Charge your TR5 battery initially for at least 2 hours. Estimated usage of the TR5 on battery power is approximately 1 hour. Note: Use a 3.5V-5V 2A charger should you need to replace your adapter.
FCC RF Radiation Exposure Statement
- This Transmitter must not be co-located or operating in conjunction with any other antenna or transmitter.
- This equipment complies with FCC RF radiation exposure limits set forth for an uncontrolled environment. This equipment should be installed and operated with a minimum distance of 20 centimeters between the radiator and your body.
Wi-Fi 5G Band 1 is for indoor use only.
Canada, Industry Canada (IC) Notices
This device complies with Industry Canada licence-exempt RSS standard(s). Operation is subject to the following two conditions: (1) this device may not cause interference, and (2) this device must accept any interference, including interference that may cause undesired operation of the device.
© 2017 MiTAC International Corporation. The Magellan logo and Magellan are registered trademarks of MiTAC International Corporation, and OneTouch is a trademark of MiTAC International Corporation and are used under license by MiTAC Digital Corporation. All rights reserved. All other trademarks and registered trademarks are property of their respective owners. All other products and brand names are trademarks of their respective holders. No part of this user manual may be reproduced or transmitted in any form or by any means, electronic or mechanical, including photocopying and recording, for any purpose other than the purchaser's personal use, without the prior written permission of MiTAC International Corporation. The information provided in this document is correct at the time that it is created. MiTAC International Corporation assumes no responsibility or liability for any errors or inaccuracies that may appear in the contents of this User Manual.
Magellan Take-Back Program
Magellan's Take-Back Program provides a way for customers to recycle certain Magellan equipment. This program accepts all Magellan GPS models. Visit magellanGPS.com for more information.
Magellan
TR5

Tested To Comply With FCC Standards
FOR HOME OR OFFICE USE
Table of Contents.
TR5 Overview....5
TR5 Hardware....6
TR5 Software 7
Getting Started 8
Language and Wi-Fi settings 8
Create Your TRX Account and Register Your TR5 9
Update Software 10
Update Maps....11
Mount the TR5 in Your Vehicle 12
Power/Charging....13
Create Your Vehicle Profile 14
Link to Social Media....15
Riding with TR5....16
Use Street Navigation....16
Tracking....17
Change Map Options 18
Mark Waypoints....19
Social Post 21
Backtrack 22
Finish (Save) Your Track 22
Use the Journal 24
Create A New Trip....24
Delete A Trip....25
Exploring with TR5 26
Search For Map Content 26
View and Save Searched Items 28
Use Satellite Imagery 28
Purchase a DigitalGlobe Subscription....29
Save Satellite Imagery from the Map Screen....30
Save Satellite Imagery Automatically....30
Import GPX Files....31
Export Tracks As GPX Files....32
Table of Contents.
4
TRX Trailhead 33
Use TRX Trailhead 33
Sign In to TRX Trailhead 34
Wish List and Log....36
Search for Trails, Tracks, Trips, OHV Attractions, and POIs 38
Save To Your Wish List....41
Report Issues....41
Create a Route 42
Connect to Social Media....43
Upload GPX Files 43
Add a New Trip....44
TRX Glossary 45
Warranty....47
Technical Support 49
TR5 Overview
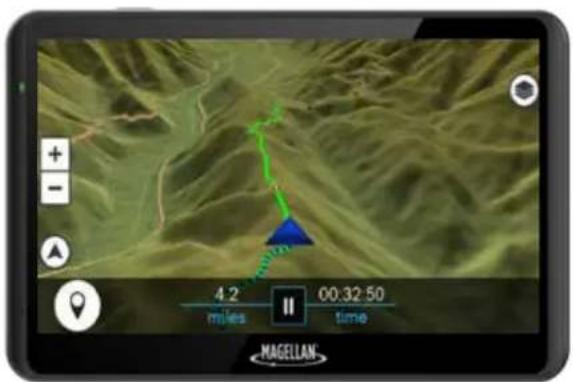
The Magellan TR5 Trail and Street GPS Navigator is an off- and on-road navigation system purpose-built to navigate you seamlessly on trails, streets, highways, and everything in between.
The TR5 includes the largest database of off-road trails in the U.S., with over 100,000 preloaded OHV trails.
The TR5 gives you access to a growing database of user-generated tracks, allowing you and thousands of other off-roaders to upload custom tracks, waypoints, detailed terrain info, and up-to-date trail conditions for the TRX community to see.
The TR5 is interconnected with an ecosystem of TRX products, including:
- TRX Trailhead, an online planning and sharing tool at www.TRXTrailhead.com.
- TRX Support, a site for troubleshooting, technical support, and feedback at trxsupport.magellangps.com.
• TRX companion mobile apps for iOS and Android
TR5 Hardware
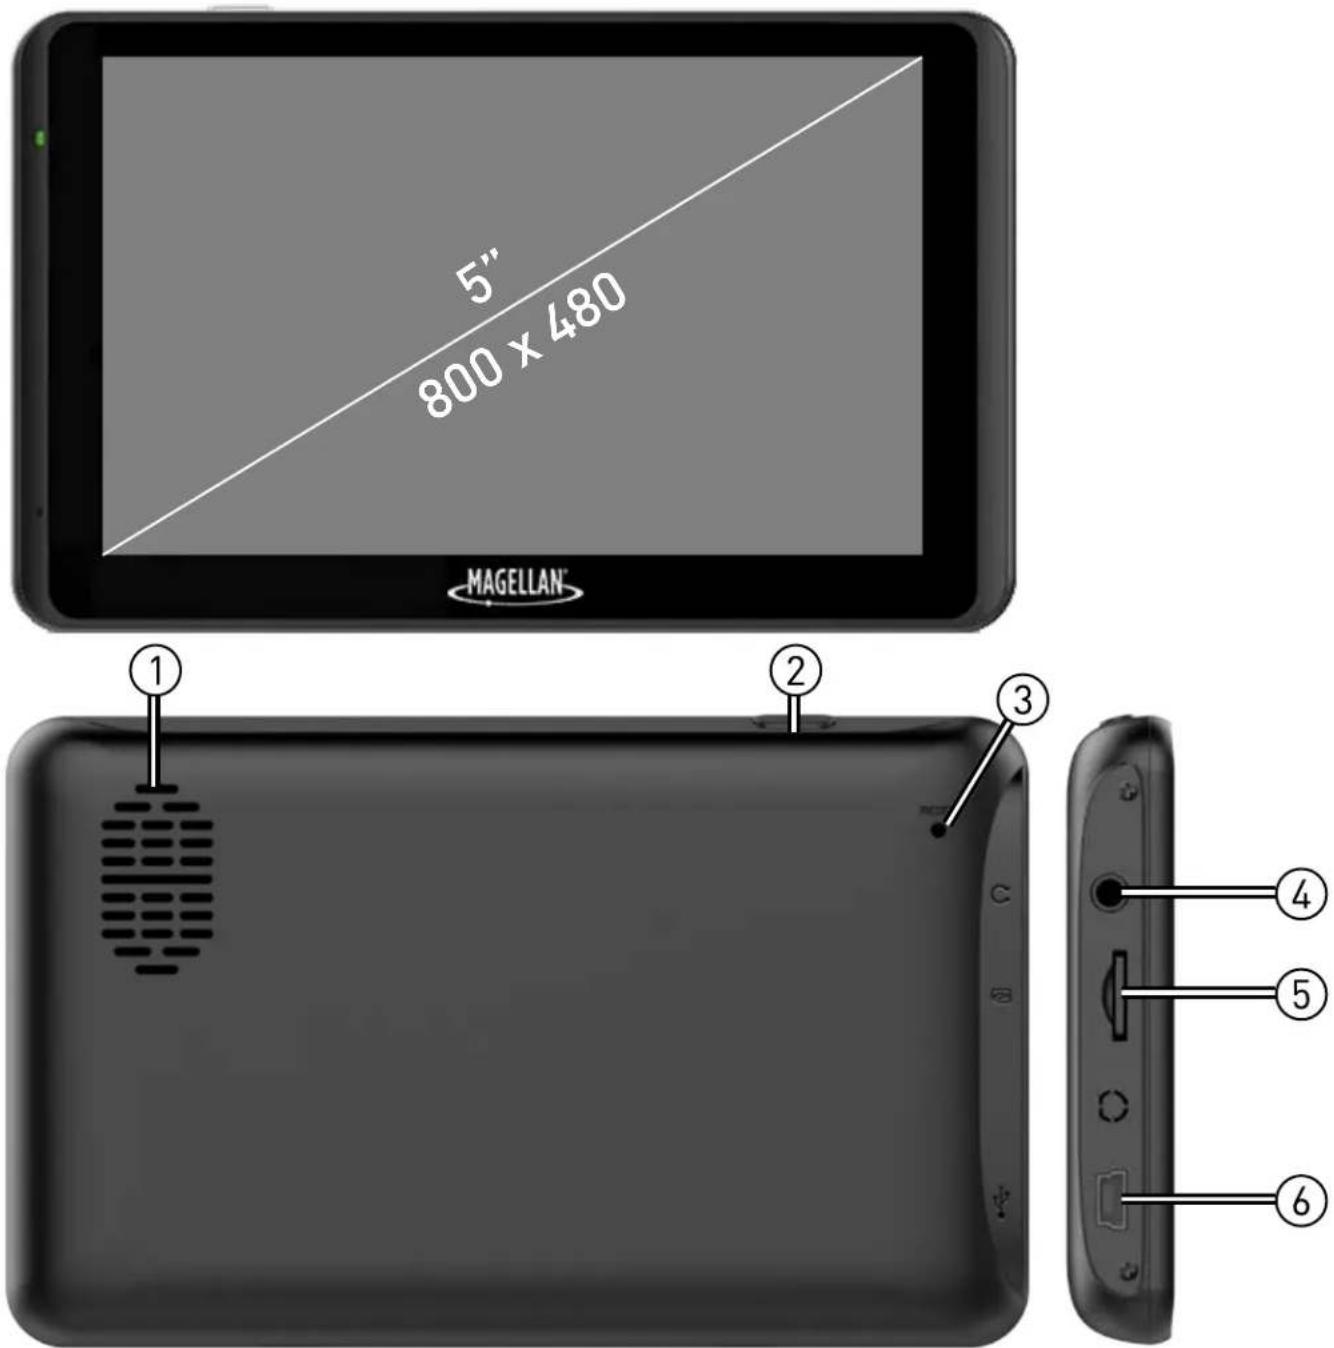
① Speaker Reset 📋 Power Button ③
④ AUX Out ⑤ microSD Slot USB Power Input
^1 Your device requires additional power to function at optimal levels. For best performance, use the included power adapters, which are specially rated for your device.
TR5 Software
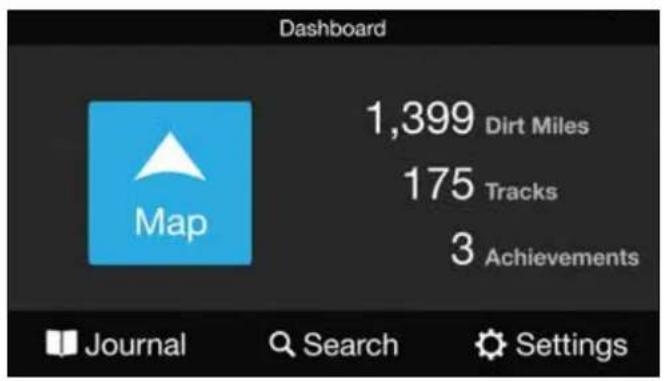
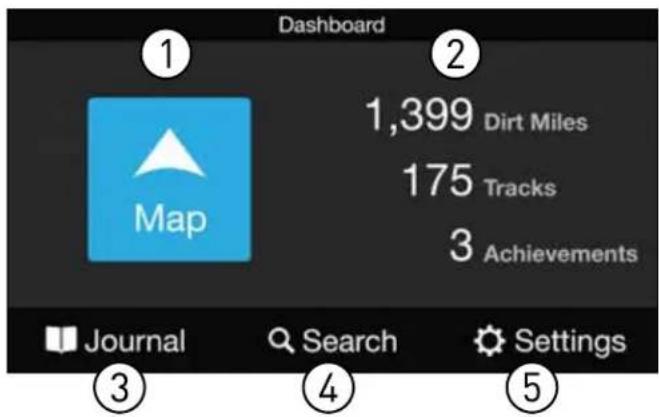
Dashboard Screen
- Map: Tap to open Map screen.
- Dirt Miles traveled, Tracks recorded, and Achievements earned displayed here.
- Journal: Contains track Log and Wish List of saved trails.
- Search: Search for Trails, Tracks, POIs, etc.
- Settings: Edit account, vehicle profiles, connectivity, etc.
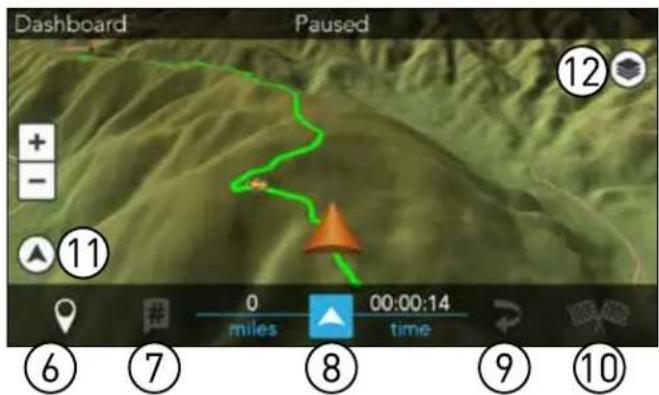
Map Screen
-
Waypoint: Mark Waypoints while driving or recording a Track.
-
Social Post: Share your adventures with a Tweet.
-
Start/Pause: Pause tracking or resume tracking.
-
Backtrack: Follow active Track back to starting point.
-
Finish: Save Track with details and commentary.
-
Orientation: Toggle View to North Up or Track Up.
-
Map Options: ^1 View and modify map display settings.
Getting Started
Account Creation & Registration.
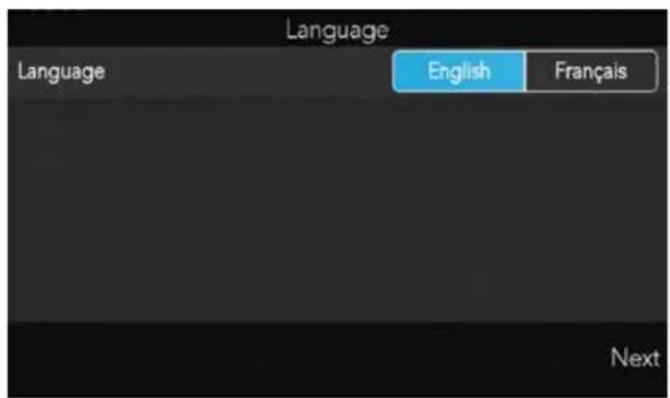
1. Select Language.
Set your device language to English or French > tap Next.
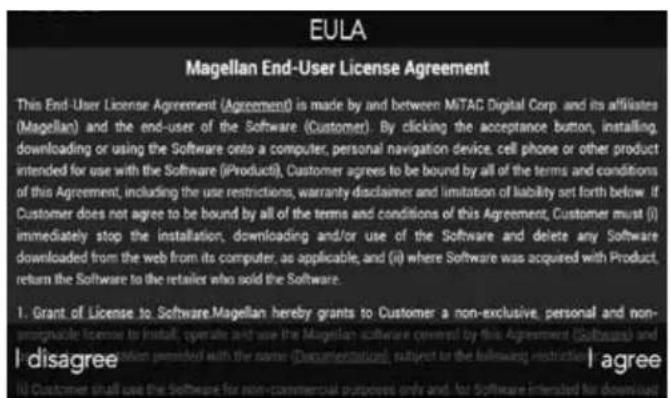
2. Read and Agree to End-User License Agreement (EULA).
Read the EULA > tap I agree to continue or I disagree to delay setup.
Note: You cannot proceed with setup until you've read and agreed to the EULA.
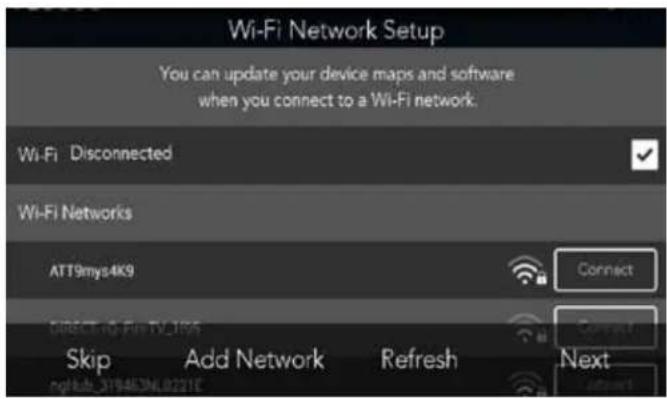
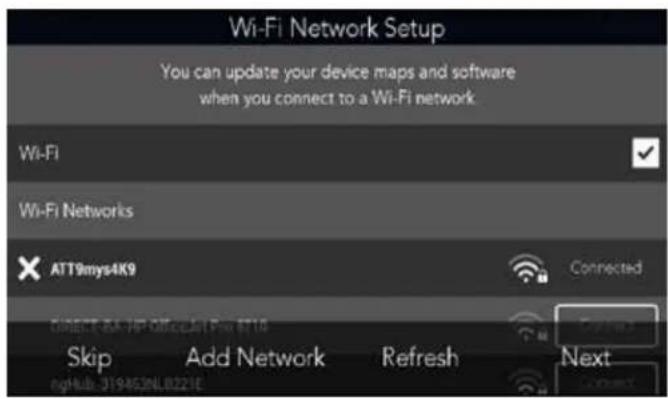
3. Connect to Wi-Fi.
- Tap on a Wi-Fi network from the list > enter your network password (if applicable) >
- Tap Connect. Once your device is connected to Wi-Fi, tap Next.
Don't see your Wi-Fi network on the list? Tap Refresh until your device recognizes your network, or tap Add Network to configure Wi-Fi settings and add your network to the list.
Getting Started
Account Creation & Registration.
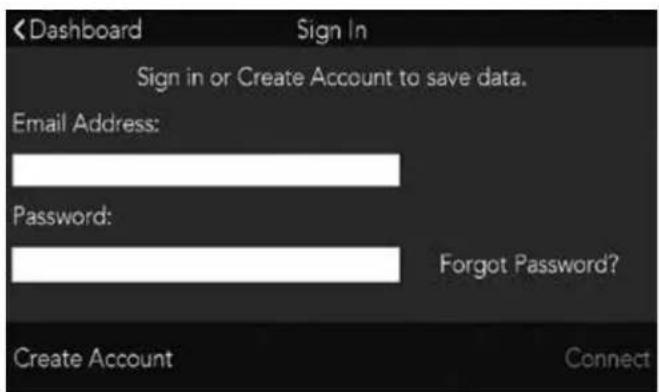
4. Create Your TRX Account and Register Your Device.
You must create a TRX account to save data to your device or sync with TRX Trailhead. Not having a TRX account can result in lost data.
IMPORTANT: If you already have a Magellan GPS email address and password, use those account credentials to create your TRX account.
- When you reach the Sign In screen, enter an existing TRX account email address and password OR tap Create Account if you haven't yet created a TRX account.
- Enter your account details. Use an existing MagellanGPS.com account if you have one.
- Tap Create Account to finish creating your TRX account. Your device will also be registered to that account.
A MagellanGPS.com account will also be created if you're new to Magellan and you're registering an email address for the first time.
Account Creation & Registration.
5. Update Software.
If any software updates are available when you purchase your device, you will be prompted to install the latest update. To update your software: 1. When you reach the Updates screen, tap Software Update > tap Download. 2. Wait a few minutes for the update to finish downloading > tap Install. 3. When you see a notification asking you if you want to install an update to the existing application, Tap Install. Make sure that the NEW tab is selected, NOT the ALL tab. This option may erase any existing TRX user data. 4. Wait a few minutes for the software update to finish installing > tap Open. 5. When you see a notification that says "Magellan TRX needs to download resources", tap Start download Make sure Download over Wi-Fi only is checked. Wait a few minutes for the update to finish downloading. You'll see a notification that says "Software update complete" once the new software has been installed.| < Settings | Update |
| Software Update | No updates needed |
| Map Update Version 0.00.-001, 0b null | Updated |
| Kernel Update | No updates needed |
Account Creation & Registration.
6. Update Maps.
Note: Make sure that you download the latest software version before downloading new map packages. Visit trxsupport.magellangps.com for a list of latest software versions. To update your maps: 1. On the Updates screen, tap Map Update. 2. Tap Update. Wait for the update to download. The map update is installed to your device automatically once all the files have been downloaded. 3. Tap Restart to restart the TRX app and complete the map update. Note: Map packages can be large (approximately 500MB-1GB) and take some time to download depending on your Wi-Fi network speed. File and Size information will update on your screen as the map files are downloaded.| < Settings | Update |
| Software Update | No updates needed |
| Map Update Version 0.00.-001, 0b null | Updated |
| Kernel Update | No updates needed |
Getting Started
Mount the Device.
Attach your device to the included cradle and mount and use suction cup base to adhere your device to your vehicle's windshield or dashboard. For best image quality, mount your device as follows: WARNING: Observe local laws and regulations regarding proper mounting of devices. Windshield  Dashboard 1. Power On.
Press and hold the Power button on the top of your device. Within seconds, you'll see the Magellan logo, and your device will boot up. Press and hold. natural_image
Black rectangular device with a handle and screw base, no visible text or symbols2. Charge the Device.
Using the included AC Adapter or Vehicle Power Adapter (VPA): 1. Insert AC adapter into wall outlet or insert VPA plug into vehicle power outlet. 2. Insert mini-USB connector end of AC adapter or VPA into the left side of the device.  Note: Your device may take several hours to reach a full charge.Getting Started
Now that you've got the TR5 basics, customize your profile before you hit the trail.Create Your Vehicle Profile.
Create a customized Vehicle Profile. You can create a separate vehicle profile for your OHV vehicles and tow rigs. 1. Tap Settings from the Dashboard > tap Account Profile 2. Tap Vehicles > tap + Add Vehicle 3. Enter vehicle information: Nickname, Year, Make, Model, and City and State. 4. Tap □ Active Vehicle if this will be your primary vehicle. 5. Tap to add a picture of your vehicle from your device (optional) > tap Save.   Tip: Tap > from Add Vehicle to add other vehicles. The first vehicle you add is automatically designated as your Active Vehicle. To select a different Active Vehicle: 1. Tap Settings from the Dashboard > tap Account Profile 2. Tap Vehicles > tap on the vehicle you wish to assign as your Active Vehicle. 3. Tap □ Active Vehicle > Select when you see the prompt to confirm the change, or to stop the change.Getting Started
Link to Social Media.
Link your Twitter and Instagram accounts to your TRX Account to Tweet your Dirt Miles and share off-roading photos while tracking using the Social Post (#) button.Link Your Twitter Account
To link your TR5 to your Twitter account: 1. Tap Settings from the Dashboard > tap Social Networks  2. Tap + next to the Twitter option > tap Connect  3. Enter account details > tap Connect > tap Done mesh linking to Twitter.Link Your Instagram Account
To link your TR5 to your Instagram account, tap+ next to the Instagram option and repeat the steps for linking your Twitter account.Riding with TR5
Using Street Navigation.
You can route to any location on the map (trails, tracks, POIs, addresses, and more) on your TR5 without having to use another navigation device. To use street navigation on your TR5: 1. Tap Search from the TRX Dashboard. 2. Search for an Address, Trail, or other location that you want to get to. Not all addresses in the U.S. will appear in your search results. 3. Tap on the desired location from the search results. 4. Tap GO to begin routing to an Address, or tap Save to add a trail to your Wish List. 5. Return to the TRX Dashboard > tap Journal > Wish List. 6. Tap on the Trail you want to get to from your Wish List. 7. Tap Follow > Start to End or End to Start. Once you begin routing, you'll automatically be given visual and audible turn-by-turn navigation instructions to the Trail. To cancel your route, tap X on the top right of the screen > tap YES to cancel the route.   Tip: Tap on the Estimated Duration box (to the bottom right of directions at the time screen) to view your current MPH, Elevation, and Direction of Travel.  Tip: Tap on the navigation icons on the top left of the screen to view a list of ng turns and maneuvers.Riding with TR5
Tracking.
To track your progress from any location: 1. Tap Map from the Dashboard to get to the Map screen.  2. Tap ▲ to start tracking > tap □ to pause tracking at any time. On the Active Map screen, you can:  Mark a Quick Waypoint.  Customize map view. Note: From the TRX Dashboard, go to Settings >Map Display to configure your default Map View and Orientation as well as to toggle the North Up and Zoom buttons on and off.  Tip: Tap to snap the map view back to your current location after you've around the map.Riding with TR5
Change Map Options
Tap 📋 to customize your map view:  2. Tap Save to save Waypoint to your Track, or tap < Cancel to your Track.Riding with TR5
To save a Detail Waypoint: 1. Tap Ⅱ to pause your track > tap 2. Tap Detail Waypoint option.  Audio Waypoint: Record custom audio message. 1. Tap REC > record your message. 2. Tap Save to save Audio Waypoint. Current Location: Select Waypoint for your location.  1. Tap Waypoint type > choose applicable Waypoint sub-type > tap Next. 2. Enter Waypoint name and comment. 3. Tap Save to save the Waypoint to your track, orRiding with TR5
Social Post.
Tweeting from your Track lets your friends and other off-roaders know where your location and how many Dirt Miles you've driven. To Tweet from your track: 1. Tap □ to pause your track > Tap # 2. Tap OK when you see the message (if not connected to Wi-Fi).  3. Tap OKRiding with TR5
Backtrack.
Follow a track back to the starting point: 1. Tap ↩. You'll see this notification:  2. Tap OK to begin Backtracking, or to return to the Pause screen. While Backtracking, you'll see guidance arrows moving to the start of your track.  WARNING: Use Backtracking with caution. Direction of travel can affect Route difficulty.Finish (Save) Your Track.
When you've finished tracking, save your track to your Log. Note: You must follow these steps in order to save any track that you've recorded. If you turn off the unit before saving, you will lose your track data. 1. Tap II > tap > enter track attributes. 2. Tap Name to type in a track name.  3. Tap a 4WD (four-wheel drive) option.  4. Tap a 4LO (low-gear) option. Riding with TR5
5. Tap a Terrain type.  6. Tap Terrain information.  7. Tap Pitch, Tilt, 1-5 Star Rating, and Difficulty Level. other
| Pitch | 20-30 | Tilt | 20-30 | 10-20 | 0-10 | | :--- | :--- | :--- | :--- | :--- | :--- | | Rating | ★ | ★★ | ★★★ | ★★★★ | ★★★★ || Comment |
Riding with TR5
Use The Journal.
The Journal (le from TRX Dashboard) contains your saved items in two lists:  recent saved Track at the top.  : Contains your completed tracks in chronological order, with the most Track at the top. : Contains trails, tracks, and waypoints that you've saved from Search.Create A New Trip
 1. Tap > + New Trip 2. Type a name for the trip > tap Done 3. Check each track or trail you want to add to the trip > tap Save. Riding with TR5
Delete A Trip
1. Tap > tap the check box next to each trip you want to delete > tap 2. Tap OK to delete the trip, or to return to your Log or Wish List.  To navigate to a trail, POI, or other item that you've saved to your Wish List, tap an item on your Wish List > tap ▲GO.  To follow a trail from your Wish List: 1. Tap an item on your Wish List. 2. Tap ▲ Follow, then tap ▲ Start to End ▲ End to Start 3. Follow the arrows and voice guidance to ride safely along the track or trail.  Tip: You'll receive audio guidance when following official TRX Basemap Trails, on user-generated Tracks.Exploring with TR5
Search For Map Content.
Tap Q Search h through the TR5 Basemap of over 100,000 preloaded trails in addition to user tracks, POIs, OHV Attractions, and more.  Search by keyword or manually enter search criteria in the Search Options menu (Nearby, Near City or ZIP, Near Point on Map, or Near Coordinates).  Search by category:  : search for official OHV Trails supplied by the managing authority in each area. (i.e. BLM, NSFS, State, etc.)  Tracks: search for the TRX community for user-recorded tracks.  Trips : search for the TRX community for user-recorded trips.  ORV Attractions : search for OHV parks.Exploring with TR5
Tap Do repulate the map with results related to your search.  Tap Sort by to refine results > choose a sorting option.  Tap Sort by again to refine your search results on the map.  Tip: Searching by cities or regions (e.g. Moab, Rubicon) in the keyword search can help expedite your search for specific trails.Exploring with TR5
View and Save Searched Items
You can save items from your search results to your Wish List. 1. Tap on a Marker Label on the Map to see an item's attributes.  2. Tap Save to save the item to your Wish List. 3. Tap OK to confirm. Trail Saved to Wish List OKUse Satellite Imagery.
You have several options for saving satellite imagery to your TR5 so that you can access the satellite imagery associated with that map area even when you're outside of network coverage.Notes
- You must have a DigitalGlobe subscription before you can access satellite imagery on your TR5 (available through Magellan GPS for \$29.99/year). - You must have a strong, reliable Wi-Fi connection to download satellite imagery. Satellite images are saved to large files and can take a long time to download using a weak Wi-Fi connection. - DigitalGlobe only permits you to download up to 2GB per day to your TR5.Exploring with TR5
Purchase a DigitalGlobe Subscription.
IMPORTANT: You do NOT need to download VantagePoint or any other additional software to use DigitalGlobe on your TR5. 1. On a laptop or desktop computer to the following URL: http://www.magellangps.com/Store/Satellite-Imagery/Digital-Globe-Satellite-Imagery Make sure you're signed into MagellanGPS.com with your TRX account email address and password and that you've already registered your TR5. Click Login on this page to sign into your Magellan GPS account. 2. Select Magellan eXplorist TR5 - Product Registration - [TR5 serial number] from the drop-down menu. Make sure the serial number on the drop-down menu matches the serial number on the back of your TR5 unit. 3. Click Add to Cart > go to the shopping cart and click Proceed to Checkout when you're ready to check out. 4. Enter your address, billing, and payment information > click Continue. 5. Read the Terms and Conditions > click the check box next to I have read and agree to the Terms and Conditions to proceed. 6. Click Submit Order to complete the order. 7. Check your email for a confirmation email. Please save this email for your records. Once you've purchased the subscription, DigitalGlobe satellite imagery will be available on your TR5 and on www.TRXTrailhead.com. Go to Settings > In-App Purchases to verify that the subscription has been successfully purchased. Note: Your DigitalGlobe subscription may not appear in your account right away. Please allow 10-20 minutes before the subscription is activated on your devices. You may also need to restart your TR5 in order to refresh the software and begin using your DigitalGlobe subscription.Exploring with TR5
Save Satellite Imagery from the Map Screen.
1. Tap Map from the TRX Dashboard > tap Map Options in the top right of the screen. 2. Toggle to the Satellite option > tap Save Map on the bottom left of the screen. 3. Zoom out on the map view on the left side of the screen until you see the entire map area that you want to save OR until the Size exceeds the Max limit. 4. Tap Next > Enter a name for the map area > tap Save. 5. Go to Settings > Map Save > Saved Maps to view all saved map areas. Tap the Pencil (Edit) button to delete imagery from your saved areas.Save Satellite Imagery Automatically.
1. Go to Settings from the TRX Dashboard >Map Save. 2. Tap the check box next to Automatic Satellite Map Save to turn it ON (checked) or OFF (unchecked). When this option is checked, your TR5 will automatically download satellite imagery for all current Wish List items when you save a new map area to your Wish List. Now, you can automatically save satellite imagery in a map area around a Trail, Track or other map content from the Search function: 1. Tap Search from the TRX Dashboard. 2. Search for a Trail, Track, or other map content > tap on an item from the search results to open the Attributes page. 3. Tap Save to add the item to your Wish List. Satellite imagery in the map area around the item will be available when you travel to that location using your TR5, even without network coverage. Note: Satellite imagery is saved to the TR5's internal storage. To save space, delete all unused satellite map areas from your Saved Maps once you've finished using them. To delete satellite Imagery: 1. Go to Settings from the TRX Dashboard > Map Save > Saved Maps. 2. Tap the Pencil (Edit) button. 3. Check the box next to the satellite imagery that you wish to remove. 4. Tap the Trash Can button to delete the selected imagery.Using GPX Files.
Import GPX Files.
You can import GPX files that you've downloaded from off-roading sites as personal tracks on your TR5. When the GPX file has been converted to an user track on your TR5, you can navigate on them just as you can with any of your personal tracks or public OHV trails. To import a GPX file into your TR5 as an user track: 1. Find and download a GPX file to your computer. 2. Insert a microSD card into your computer. Use a microSD card adapter if necessary. Move/copy the GPX file to your microSD card. 3. Eject microSD card from your computer and insert into the microSD card slot on the left side of your TR5. Make sure that you see a notification on the top right of the screen that says "SD card is mounted". 4. From the TRX Dashboard, tap Journal > tap the Pencil button in your Log. 5. Tap Import > tap SD Card. 6. Tap the check box next to each file you want to import > tap Import. Wait a few moments for the file to be uploaded. Your GPX file is now uploaded as an user track in your Log. The track will display the same name as the original GPX file. To begin navigating on the new GPX track: 1. Tap on the new track in your Log. In some cases, you'll need to tap on a file within the track. 2. Tap Follow > Start to End or End to Start to begin navigating on the track. Using GPX Files.
Export Tracks As GPX Files.
You can export any track that you've recorded as a GPX file to be used on external devices. IMPORTANT: Make sure you insert a microSD card before exporting a track. Use a 32GB (or smaller) microSD formatted to FAT32 (or FAT16 if you're using a 16GB card). Using a microSD card larger than 32GB may result in data loss. To export a recorded track as a GPX file: 1. From the TRX Dashboard, tap Journal > tap the Pencil button in your Log. 2. Tap the check box next to the track you want to export > tap Export GPX.  3. Wait a few moments for the export to be completed > tap OK. Your track is now saved as a GPX file on your microSD card and can be used on any device compatible with GPX files. The file will be named after the original track name.TRX Trailhead
Use TRX Trailhead
TRX Trailhead allows you to instantly see all 100,000+ Trails in the TRX Basemap to quickly search for Trails for your Wish List. You can also edit/review Tracks in your Log, edit Waypoints, search for user Tracks, and publicly share your Tracks.  ① Minimize Log/Wish List. Enter? Search Terms. Enter Location Criteria. ④ Search Button. View Profile View Page Settings. ⑥ ⑦ Access Personal Log. Access 8 Personal Wish List. Upload GPX File. ⑩ Create New Trip. Zoom In/Out Change Map View. ⑫ ⑬ Map Content Key.TRX Trailhead
Sign In to TRX Trailhead
1. Go to www.TRXTrailhead.com. 2. Click Sign In  3. Enter your account details. 4. Click Sign In Note: Refer to Create Your Account on TRX Trailhead for information about registering on TRX Trailhead. If you forget your TRX account password, use TRX Trailhead to reset it: 1. Click Forgot your password? > enter your TRX email address > click Send. 2. Go to the email inbox associated with your TRX account > click the link in the email you receive from noreply@mytrxjournal.com. 3. Enter a new password > click Continue to reset your password.TRX Trailhead
Once you've logged in, you'll see two tabs for your Wish List and Log.   Tip: Click on the top right of the screen to:  • View recently earned achievements. • View devices registered to your account. • View In-App Purchases. - Connect your Account Profile to Twitter and Instagram. • : Edit Account Profile. - Logout: Log out of TRX Trailhead.TRX Trailhead
Wish List and Log
Access your Log and Wish List by clicking on the tabs on the left side of the screen. All items that you've saved to your Log and Wish List on your TR5 will appear here when you log into TRX Trailhead with your TRX account. Click Tracks, Trails, or Waypoints in your Log or Wish List to view details on the Map.  To delete items from your Journal: 1. Click next to the item. 2. Click Delete to delete the item, or to stop the deletion.  Select any saved Tracks or Trips in your Log to view details, including Start and End Elevation and Terrain Specs. You can modify Terrain Specs from a saved Track or Trip. TRX Tip: After you've selected an item, click the Click to generate share link option to generate a link to send via email to others who may be interested.TRX Trailhead
 To publish tracks, waypoints, or trips from your Log to the TRX community: 1. Click on the item you wish to publish > review item details to ensure data accuracy. 2. Add Notes: to describe the item > edit Review rating (from 1-5 Stars). 3. Click Publish. A window appears asking you to confirm sharing.  4. Click Publish to publish the item, or to cancel the action. Once your item is published, it's visible to you and the TRX community. WARNING: You cannot remove a published track from the basemap. Please verify that item details are accurate. Describe any safety concerns before publishing an item.  Tip: Unlike with TRX authorized OHV trails added to your Wish List, you cannot visual or audible Trail Guidance on user-generated Tracks.TRX Trailhead
Search for Trails, Tracks, Trips, OHV Attractions, and POIs.
To search for an item in TRX Trailhead: 1. Click an items from Search options at the top of the page. Leave all items unselected if you want to search for an address.   Tip: Click on the user Tracks or Trips icons to filter your search results. Tracks Filter Trips Filter   Tip: Click the blue sphere next to a city name to highlight Trails within a roughly 50-mile radius of that city. 2. Type an address or search term in the Find text box (e.g. 3365 Gingerwood Rd., Beaver, Creek). 3. Type a city, state, zip code, or OHV area in the Near text box (e.g. Moab, 84532, etc.). 4. Click Q or press Enter to search. The Map populates with matching results. If you selected Trails, they appear red on the map.TRX Trailhead
 Click on a Trail or POI for information. Note: Multiple Trails within a single route appear in a list form. Click any of the items in the list to view Trail information.  WARNING: User-published tracks are labeled with the following warning: This is a publicly shared trail that has not been verified for safety. Drive at your own risk! Review all track details carefully before riding the Trail.TRX Trailhead
Each trail and track is represented by a Marker Label as well as Attributes and Elevation details:  TRX Trailhead
Save To Your Wish List
Click next to the item Marker Label to save an item from your search results to your Wish List:  Tip: Any items you add to your Wish List on TRX Trailhead automatically sync with your TR5 Wish List next time you sign in or if you choose Settings > Manual Sync from your TR5.Report Issues
To report issues with an item on the map: 1. Click Report a problem on item details > check applicable boxes.  2. Enter detailed issues in the text box. 3. Click to report a problem, or to stop the action.TRX Trailhead
Create a Route.
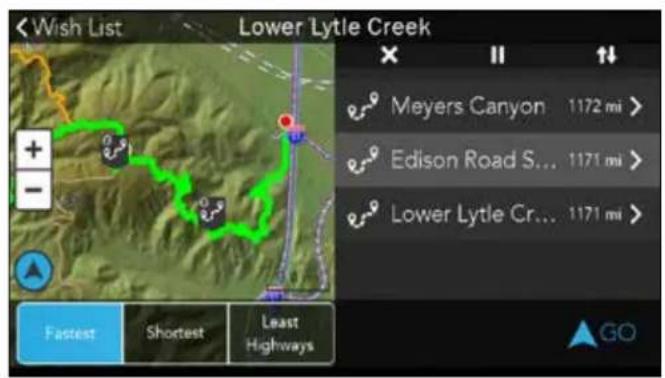
The TRX Routing tool on www.TRXTrailhead.com is designed to help you plan day trips, weekend trips, and even long overland voyages that you can follow using your TR5. With the TRX Routing tool, you can create a custom route, save it to your Wish List, and sync the route with your TR5 Wish List. First, create a custom route on TRX Trailhead: 1. Sign in to TRX Trailhead using your TRX account. 2. Click on the Wish List tab on the left side of the screen > click Try TRX routing Beta. 3. Right-click on the basemap where you want to create a Waypoint as your route starting point OR add an item from your Wish List as your starting point. 4. Continue right-clicking on the map along the route you wish to create to drop Waypoints along your desired route. NOTE: You can also search for Trails using the TRX Trailhead search functions to assist you in creating your route. 5. Click Route name to enter a name for your route. 6. Click Save to add your custom route to your Wish List. Once your route is saved to your Wish List, go to your TR5 and tap Settings > Manual Sync to sync your new Route data to your TR5. Note: If you have a DigitalGlobe subscription, save satellite imagery around your Route by going to Settings >Map Save and turning on Automatic Satellite Map Save before you Manual Sync Now, to follow the route using your TR5: 1. Tap Journal from the TRX Dashboard > tap Wish List. 2. Tap on your custom route in your Wish List. 3. Tap on a routing option: Fastest, Shortest, or Least Highways (if desired). 4. Tap GO to begin routing from your current location to the route and the final destination. Routing provides visual and audible route guidance. Watch a video tutorial on Route Creation on the Magellan TRX YouTube channel: https://www.youtube.com/watch?v=FUQeuFdVk18TRX Trailhead
Connect To Social Media
Connect your Twitter and Instagram accounts to your TRX Trailhead account (if you haven't already on your TR5 device). To connect to Twitter and Instagram: 1. Click at the top right corner of the screen. 2. Click Connect or to go to the Twitter or Instagram login page. 3. Enter your Twitter or Instagram login information, or create a new account for use with your TRX account. Once you've successfully linked a social media account to your TRX account, the icon turns blue: Connected Connected.Upload GPX Files
You can upload properly formatted GPS exchange format XML (GPX) files, with multiple Tracks or Waypoints, to your TRX Trailhead Log. To upload a GPX file: 1. Click in the tab  2. Select GPX file from your computer > open file to upload to TRX Trailhead. 3. Rate and add attributes to the file as if you're adding attributes to a Track.  4. Click Review to save file to your Log.  Tip: Load GPX files that are 2MB or smaller for best uploading results.TRX Trailhead
Add a New Trip
Add a new Trip to your Log from TRX Trailhead by clicking on  To add items to your Trip: 1. Search for an item in the Basemap. 2. Click and hold on the Marker Label > drag the Marker Label to the Trip folder and release your click. The item is added to the Trip. Repeat for each item you want in your Trip.  You can see the Trip in your TR5 Log and once you've synced your account.TRX Glossary
TRX GLOSSARY OF KEY TERMS
Your TR5 account syncs seamlessly with TRX Trailhead and all TRX companion mobile apps. This glossary will familiarize you with all functions associated with your TR5 and all applications accessible with your TRX user account. Unless otherwise noted, all interface terms are applicable to the TR5 device and all TRX mobile apps. Account Profile: overarching term for data associated with a user's account, including user name, password, saved trails/trips, social media accounts, etc. Achievements: aggregate of badges earned by a user for riding a certain amount of miles, riding in specific locations, riding in specific sponsored events, etc. Active Track: the real-time tracking of a user's geographic location. All Trails: trails that appear orange when a user pans across the map in TRX Trailhead. Backtrack: allows a user to return to the beginning of their Active Track. When selected, the user's track is highlighted, guidance arrows mark the route ahead of the user's current position, and child waypoints alert the user along the Active Track. Voice notifications alert the user at the end of the Active Track. Basemap: lowest layer of the map that provides geographic context to orient users on the map. TRX users can toggle between two basemap views: Map View: shows road network, topography, selected land use areas such as forest and park boundaries, street labels, populated areas, etc. Satellite View: shows aerial imagery of the earth's surface (requires subscription). Bearing Line Navigation: user selects a destination waypoint. TRX displays a highlighted bearing line to the destination at all times. All Trail and Track types user has turned ON appear on the Basemap. No guidance arrows, Child Waypoint pop-ups, or audio guidance is provided, but the distance to the user's destination (as the crow flies) is displayed. Child Waypoint: a waypoint recorded either during an active track, when a user attaches the waypoint to a Trip, Track, or Trail that already exists, or when a user attaches the waypoint to a Trip or Track that they are creating but not actively recording at the time. Detail Waypoint: created by a user by pausing an Active Track, selecting the Detail Waypoint icon, and choosing a waypoint and associated details from the Detail Waypoint menus. Dirt Miles: cumulative amount of miles logged by a user when a Track is saved to the user's account. A user can earn Achievements for driving increasing amounts of Dirt Miles. Elevation Profile: interactive box showing elevation gain/loss on a trail, measured by Start and End elevations (TRX Trailhead only). Filter (Search): used in Search to narrow down Trail, Trip, and POI results in the Basemap (TR5 and TRX Apps). Journal: contains a user's Log and Wish List. Log: stores all of a user's recorded tracks, waypoint data, and uploaded GPX data. Mark Waypoint: button that allows a user to add a Quick Waypoint (tracking in progress) or Detailed Waypoint (tracking paused). Marker: icon associated with a location in the basemap indicating the type of Trail, Track, POI, etc. Marker Label: text pop-up associated with a location in the basemap displaying information about the Trail, Track, or POI. Street Route: a path through a road network(s).TRX Glossary
Orientation: button that allows a user to toggle between North Up and Track Up views. This button turns blue and can be tapped to restore North Up orientation when a user has panned around the map (TR5 and TRX Apps). Place: another name for a Point of Interest (POI). Private Files: accessible only to their owner(s). Public Files: accessible by any search by visitors to TRX Trailhead. Quick Waypoint: created by a user by selecting the Quick Waypoint icon during an Active Track. Road network: a set(s) of interconnected points and lines that represent possible street routes from one location to another. Searched Trails: trails that appear highlighted in red when a user enters search criteria in TRX Trailhead. Social Post: button available while on an Active Track that allows a user to generate an automatic Tweet to their Twitter account (TR5 and TRX Apps). Syncing: updates content and settings between TRX system components, TRX Apps, TRX devices, and TRX Trailhead to maintain consistency of content and experience across all platforms. Terrain Spec: a list of conditions (4WD, 4LO, Dirt, Mud, Sand, etc.) associated with a Trail or generated by a user to describe a saved Track. Track: a recorded track line saved to a TRX user's Log and which can contain waypoints saved along the Active Track. A user's personal tracks are saved to the TRX user's Log. Downloaded user tracks are saved to the Wish List. Trail: an off-highway vehicle pathway in the Basemap or other map layer that is published by a verified source that created or legally maintains responsibility for the trail. Trail Guidance: a user's personal Track from their Log or Trail from their Wish List is highlighted. Guidance arrows mark the route ahead of the user's current position. Child waypoints alert the user along the track. Voice notifications alert the user at the end of the track. Trail Detail: a list of coordinates, number of users driven, Drive Miles (length of trail), etc. associated with a trail. Trail network(s): a set(s) of interconnected points and lines that represent possible OHV routes from one location to another. Trail Route: a path through a trail network(s). Trip: an user-generated file that contains one or more Tracks from the user's Log or one or more trails from the user's Wish List. TRX Tip: a short blurb of information found in all TRX documentation intended to help you optimize your user experience of the TRX product family. While a Note provides essential information that you should take note of, a TRX Tip provides commentary that may help you find easier or more efficient ways of navigating the TRX software. Unguided Navigation: all Trail and Track types that a user has turned ON are displayed on the Basemap. No highlighting, guidance arrows, Child Waypoint pop-ups, or audio guidance is provided. The Current Position marker shows user's position on the Basemap. Wish List: stores all Public items that a user saves for future reference.Magellan Limited Warranty
All Magellan global positioning system (GPS) receivers are navigation aids, and are not intended to replace other methods of navigation. The purchaser is advised to perform careful position charting and use good judgment. READ THE USER GUIDE CAREFULLY BEFORE USING THE PRODUCT.1. MAGELLAN WARRANTY
(a) MiTAC Digital Corp. ("Magellan") warrants its GPS receivers and hardware accessories to be free from defects in material and workmanship and will conform to its published specifications for the product for a period of one year from the date of original purchase. THIS WARRANTY APPLIES ONLY TO THE ORIGINAL CONSUMER PURCHASER OF THIS PRODUCT. (b) In the event of a defect, Magellan will, at its discretion, repair or replace the hardware product with a product of like kind or quality, which may be new or reconditioned, with no charge to the purchaser for parts or labor. Magellan's limit of liability under the limited warranty shall be the actual cash value of the product at the time the purchaser returns the product to Magellan for repair less a reasonable amount for usage, as determined by Magellan in its sole discretion. The repaired or replaced product will be warranted for 90 days from the date of return shipment, or for the balance of the original warranty, whichever is longer. (c) Magellan warrants that software products or software included in hardware products will be free from defects in the media for a period of 30 days from the date of shipment and will substantially conform to the then current user documentation provided with the software (including updates thereto). Magellan's sole obligation shall be the correction or replacement of the media or the software so that it will substantially conform to the then- current user documentation. Magellan does not warrant the software will meet purchaser's requirements or that its operation will be uninterrupted, error-free or virus-free. The purchaser assumes the entire risk of using the software.2. PURCHASER'S REMEDY
PURCHASER'S EXCLUSIVE REMEDY UNDER THIS WRITTEN WARRANTY OR ANY IMPLIED WARRANTY SHALL BE LIMITED TO THE REPAIR OR REPLACEMENT, AT MAGELLAN'S OPTION, OF ANY DEFECTIVE PART OF THE RECEIVER OR ACCESSORIES WHICH ARE COVERED BY THIS WARRANTY. REPAIRS UNDER THIS WARRANTY SHALL ONLY BE MADE AT AN AUTHORIZED MAGELLAN SERVICE CENTER. ANY REPAIRS BY A SERVICE CENTER NOT AUTHORIZED BY MAGELLAN WILL VOID THIS WARRANTY.3. PURCHASER'S DUTIES
For repair or replacement on a Magellan product the purchaser must obtain a Return Materials Authorization (RMA) number from Magellan Technical Support or by submitting a repair request through our website at www.magellanGPS.com, prior to shipping. The purchaser must return the product postpaid with a copy of the original sales receipt, purchaser's return address and the RMA number clearly printed on the outside of the package to the Authorized Magellan Service Center address provided by Magellan with the RMA number. Magellan reserves the right to refuse to provide service free-of-charge if the sales receipt is not provided or if the information contained in it is incomplete or illegible or if the serial number has been altered or removed. Magellan will not be responsible for any losses or damage to the product incurred while the product is in transit or is being shipped for repair. Insurance is recommended. Magellan recommends the use of a trackable shipping method such as UPS or FedEx when returning a product for service.4. LIMITATION OF IMPLIED WARRANTIES
Except as set forth in item 1 above, all other expressed or implied warranties, including those of fitness for any particular purpose or merchantability, are hereby disclaimed AND IF APPLICABLE, IMPLIED WARRANTIES UNDER ARTICLE 35 OF THE UNITED NATIONS CONVENTION ON CONTRACTS FOR THE INTERNATIONAL SALE OF GOODS. Some national, state, or local laws do not allow limitations on implied warranty on how long an implied warranty lasts, so the above limitation may not apply to you.5. EXCLUSIONS
The following are excluded from the warranty coverage: (a) periodic maintenance and repair or replacement of parts due to normal wear and tear; (b) batteries; (c) finishes; (d) installations or defects resulting from installation;Warranty
(e) any damage caused by (i) shipping, misuse, abuse, negligence, tampering, moisture, liquids, proximity or exposure to heat, or improper use; (ii) disasters such as fire, flood, wind, and lightning; (iii) unauthorized attachments or modification; (f) service performed or attempted by anyone other than an authorized Magellan Service Center; (g) any product, components or parts not manufactured by Magellan, (h) that the receiver will be free from any claim for infringement of any patent, trademark, copyright or other proprietary right, including trade secrets (i) any damage due to accident, resulting from inaccurate satellite transmissions. Inaccurate transmissions can occur due to changes in the position, health or geometry of a satellite or modifications to the receiver that may be required due to any change in the GPS. (Note: Magellan GPS receivers use GPS or GPS+GLONASS to obtain position, velocity and time information. GPS is operated by the U.S. Government and GLONASS is the Global Navigation Satellite System of the Russian Federation, which are solely responsible for the accuracy and maintenance of their systems. Certain conditions can cause inaccuracies which could require modifications to the receiver. Examples of such conditions include but are not limited to changes in the GPS or GLONASS transmission.). The opening, dismantling or repairing of this product by anyone other than an authorized Magellan Service Center will void this warranty.6. EXCLUSION OF INCIDENTAL OR CONSEQUENTIAL DAMAGES
(a) MAGELLAN SHALL NOT BE LIABLE TO PURCHASER (b) OR ANY OTHER PERSON FOR ANY INDIRECT, INCIDENTAL OR CONSEQUENTIAL DAMAGES WHATSOEVER, INCLUDING BUT NOT LIMITED TO LOST PROFITS, DAMAGES ARISING FROM A DELAY OR LOSS OF USE, OR OUT OF THE BREACH OF THIS WARRANTY OR ANY IMPLIED WARRANTY EVEN IF CAUSED BY THE NEGLIGENCE OR ANOTHER FAULT OF MAGELLAN OR OUT OF THE NEGLIGENCE USAGE OF THE PRODUCT. IN NO EVENT WILL MAGELLAN BE HELD RESPONSIBLE FOR SUCH DAMAGES, EVEN IF MAGELLAN HAS BEEN ADVISED OF THE POSSIBILITY OF SUCH DAMAGES. (c) Some national, state, or local laws do not allow the exclusion or limitation of incidental or consequential damages, so the above limitation or exclusion may not apply to you.7. COMPLETE AGREEMENT
(a) This written warranty is the complete, final and exclusive agreement between Magellan and the purchaser with respect to the quality of performance of the goods and any and all warranties and representations. THIS WARRANTY SETS FORTH ALL OF MAGELLAN'S RESPONSIBILITIES REGARDING THIS PRODUCT. THIS WARRANTY GIVES YOU SPECIFIC RIGHTS. YOU MAY HAVE OTHER RIGHTS WHICH VARY FROM LOCALITY TO LOCALITY AND CERTAIN LIMITATIONS CONTAINED IN THIS WARRANTY MAY NOT APPLY TO YOU. (b) If any part of this limited warranty is held to be invalid or unenforceable, the remainder of the limited warranty shall nonetheless remain in full force and effect. This limited warranty is governed by the laws of the State of California, without reference to its conflict of law provisions or the U.N. Convention on Contracts for the International Sale of Goods, and shall benefit Magellan, its successors and assigns. This warranty does not affect the consumer's statutory rights under applicable laws in force in their locality, nor the customer's rights against the dealer arising from their sales/purchase contract. For further information concerning this limited warranty, please visit Magellan's website at magellangps.com or contact: MiTAC Digital Corp. 279 E Arrow Hwy, San Dimas, CA 91773, USA USA & Canada: 800-707-9971 Mexico: 866-310-7223MAGELLAN®
Need Technical Support?
To get technical support for your Magellan TRX product, go to trxsupport.magellangps.com for troubleshooting, tutorials, and more. If you can't find a solution there, contact Magellan Technical Support directly by e-mail at trxsupport@magellangps.com or call 877-255-4161. Connect with us @MagellanTRX    You - User Manual
- Safety.
- IMPORTANT SAFETY WARNINGS
- Charging the Magellan eXplorist TR5
- FCC RF Radiation Exposure Statement
- Canada, Industry Canada (IC) Notices
- Magellan Take-Back Program
- Table of Contents.
- TR5 Overview....5
- Getting Started 8
- Riding with TR5....16
- Exploring with TR5 26
- TRX Trailhead 33
- TRX Glossary 45
- Warranty....47
- Technical Support 49
- TR5 Overview
- TR5 Hardware
- TR5 Software
- Dashboard Screen
- Map Screen
- Getting Started
- Account Creation & Registration.
- Select Language.
- Read and Agree to End-User License Agreement (EULA).
- Connect to Wi-Fi.
- Create Your TRX Account and Register Your Device.
- Update Software.
- Update Maps.
- Mount the Device.
- Power On.
- Charge the Device.
- Create Your Vehicle Profile.
- Link to Social Media.
- Link Your Twitter Account
- Link Your Instagram Account
- Riding with TR5
- Using Street Navigation.
- Tracking.
- Change Map Options
- Mark Waypoints.
- Social Post.
- Backtrack.
- Finish (Save) Your Track.
- Use The Journal.
- Create A New Trip
- Delete A Trip
- Exploring with TR5
- Search For Map Content.
- View and Save Searched Items
- Use Satellite Imagery.
- Notes
- Purchase a DigitalGlobe Subscription.
- Save Satellite Imagery from the Map Screen.
- Save Satellite Imagery Automatically.
- Using GPX Files.
- Import GPX Files.
- Export Tracks As GPX Files.
- TRX Trailhead
- Use TRX Trailhead
- Sign In to TRX Trailhead
- Wish List and Log
- Search for Trails, Tracks, Trips, OHV Attractions, and POIs.
- of Users
- Save To Your Wish List
- Report Issues
- Create a Route.
- Connect To Social Media
- Upload GPX Files
- Add a New Trip
- TRX Glossary
- TRX GLOSSARY OF KEY TERMS
- Magellan Limited Warranty
- MAGELLAN WARRANTY
- PURCHASER'S REMEDY
- PURCHASER'S DUTIES
- LIMITATION OF IMPLIED WARRANTIES
- EXCLUSIONS
- Warranty
- EXCLUSION OF INCIDENTAL OR CONSEQUENTIAL DAMAGES
- COMPLETE AGREEMENT
- MAGELLAN®
- Need Technical Support?
Brand : MAGELLAN
Model : TR5
Category : Browser