USER MANUAL MFW67440 PROPOWER BOSCH
natural_image
Illustration of a kitchen electrician with a lever and control panel (no text or symbols)
MFW4...
MFW6...

BOSCH
natural_image
Simple line drawing of an open book with a curved arrow indicating rotation (no text or symbols)
Congratulations on the purchase of your new BOSCH appliance.
In doing so, you have opted for a modern, high-quality domestic appliance.
You can find further information about our products on our web page.
Contents
| For your safety | 11 |
| Safety devices | 12 |
| Overview | 12 |
| Predetermined breaking point | 13 |
| Operating the appliance | 13 |
| Cleaning and servicing | 16 |
| Troubleshooting | 16 |
| Recipes and tips | 17 |
| Instructions on disposal | 18 |
| Warranty conditions | 18 |
For your safety
Before use, read these instructions carefully in order to become familiar with important safety and operating instructions for this appliance.
If the instructions for correct use of the appliance are not observed, the manufacturer's liability for any resulting damage will be excluded.
This appliance is designed for processing normal household quantities in the home or similar quantities in non-industrial applications.
Non-industrial applications include e.g. use in employee kitchens in shops, offices, agricultural and other commercial businesses, as well as use by guests in boarding houses, small hotels and similar dwellings. Use the appliance for processing normal quantities of food for domestic use.
This appliance is suitable for cutting and mixing raw and cooked meat, bacon, poultry and fish. Food which is to be processed must not contain any hard components (e.g. bones). Other applications are possible if the accessories approved by the manufacturer are used. It must not be used for processing other objects or substances.
Use the appliance with original accessories only.
Please keep the operating instructions in a safe place. If passing on the appliance to a third party, always include the operating instructions.

General safety instructions
Electric shock risk
The appliance must not be used by children.
The appliance and its power cord must be kept away from children.
Appliances can be used by persons with reduced physical, sensory or mental capabilities or lack of experience and knowledge if they have been given supervision or instruction concerning use of the appliance in a safe way and if they understand the hazards involved.
Children shall not play with the appliance.
Connect and operate the appliance only in accordance with the specifications on the rating plate. Only use indoors. Do not use the appliance if the power cord and/or appliance are damaged.
Always disconnect the appliance from the supply if it is left unattended and before assembling, disassembling or cleaning.
Do not place the power cord over sharp edges or hot surfaces.
To prevent injury, a damaged power cord must be replaced by the manufacturer or his customer service or a similarly qualified person. Only our customer service may repair the appliance.
⚠ Safety instructions for this appliance
Risk of injury
Electric shock risk
Never immerse the base unit in liquids and do not clean in the dishwasher. Do not use a steam cleaner.
Do not insert mains plug until all preparations for working with the appliance are complete.
After a power failure the switched-on appliance starts up again.
Before cleaning the appliance, pull out the mains plug.
Before fitting/removing attachments, wait until the drive has come to a standstill and pull out the mains plug.
Never fit attachments to/remove attachments from the base unit.
Risk of injury from sharp blades/rotating drive
Keep hands clear of rotating parts.
Do not reach into the feed tube. Always use the stuffer to push food down the hole.
The blade is sharp and can cause injury.
Do not grip the sharp blades and edges of the shredding and slicing inserts. During operation do not grip the shredding and slicing inserts.
Warning!
Never press the On/Off button and reverse button at the same time.
Before pressing the other button, wait until the drive has come to a complete standstill. Risk of damaging the appliance.
Safety devices
Overload protection (thermal circuit breaker)
If the motor switches itself off while the appliance is being used, the overload protection feature has been activated.
Possible causes may be the simultaneous processing of large quantities of food or a blockage caused by bones.
If a safety system is activated, see
"Troubleshooting".
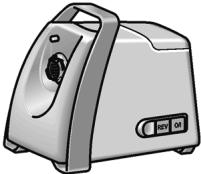
Overview
The operating instructions describe several models, see also overview of models (Fig. K).
Please fold out the illustrated pages.
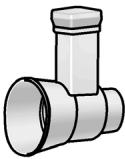
Fig. A
1 Mincer
2 Drive
3 Mincer attachment
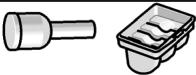
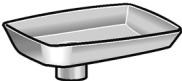
4 Filler tray
Plastic or stainless steel *
5 Pusher
6 Lid for pusher
7 Release button
8 Handle
9 Storage compartment with insert
10 Cover for storage compartment
11 Indicator light
12 Reverse button
13 On/Off button
14 Thermal circuit breaker
15 Cord store
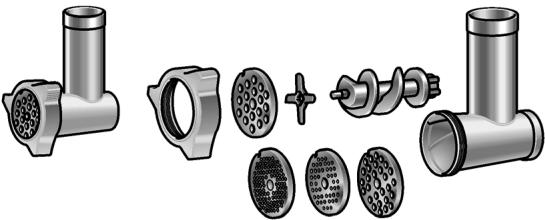
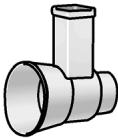
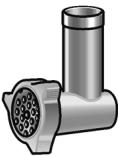
Mincer attachment
16 Casing
17 Worm gear with driver
18 Blade
19 Perforated disc
a) coarse, hole diameter 8 mm
b) fine, hole diameter 3 mm *
c) fine, hole diameter 3.8 mm *
c) medium, hole diameter 4.8 mm *
20 Threaded ring
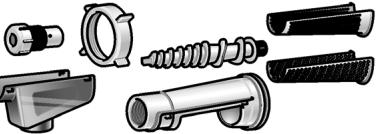
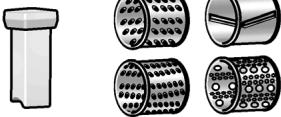
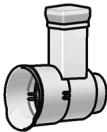
Sausage filler attachment
21 Nozzle
22 Bearing ring
Kebbe attachment
23 Shaper
24 Conical ring
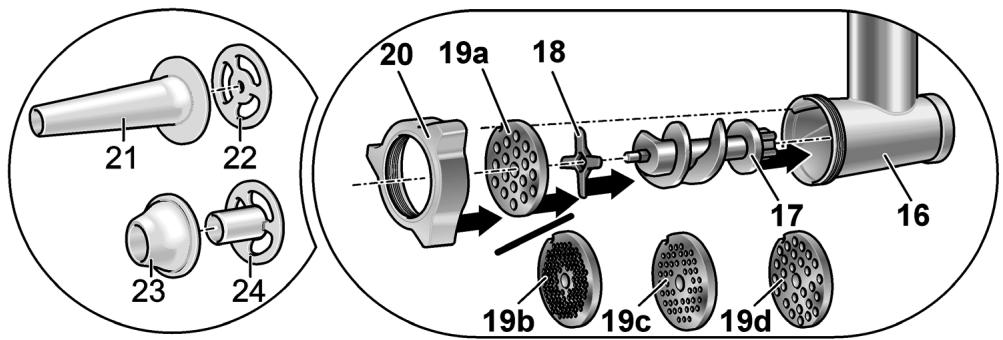
Fruit press attachment *
25 Casing
26 Worm gear
27 Filter insert,
a) fine
b) coarse
28 Filter holder
29 Outlet funnel
30 Threaded ring
31 Pulp nozzle
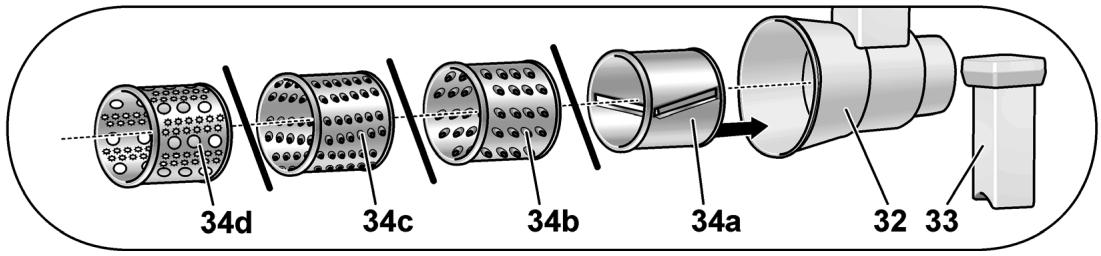
Shredding attachment *
32 Casing
33 Pusher
34 Interchangeable insert
a) Slicing attachment
b) Shredding insert – coarse
c) Shredding insert – fine
d Grating insert
* for some models
Predetermined breaking point
To prevent serious damage to your appliance if the mincer is overloaded, the driver has a notch (predetermined breaking point). If an overload occurs, the driver breaks instead. However, the driver can easily be replaced.
Otherwise spare parts with a predetermined breaking point are not a component of our warranty obligations. Such spare parts can be purchased from customer service (order no. 753348).
Operation

Risk of injury!
Do not insert mains plug until all preparations for working with the appliance are complete.
- Before operating the appliance and accessories for the first time, clean thoroughly; see “Cleaning and servicing”.
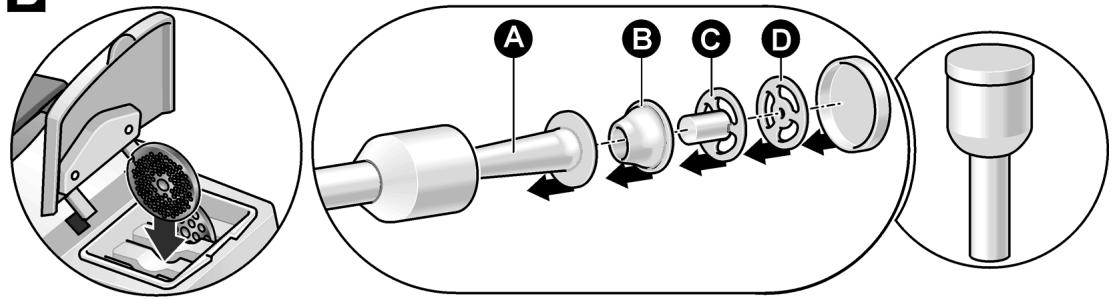
Fig. B
- Stow perforated discs in the storage compartment.
- Stow individual parts of the sausage filler attachment and kebbe attachment in the pusher and close the pusher with the lid.
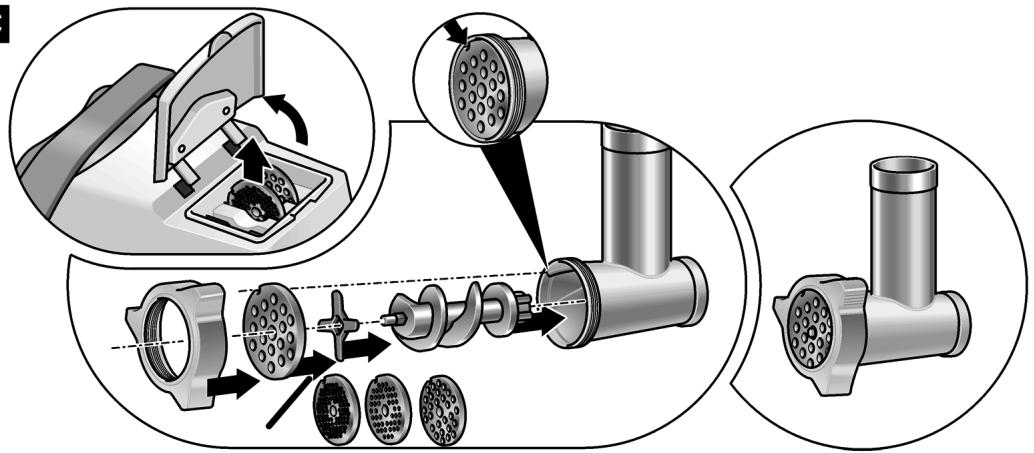
Assembling the mincer attachment Fig. ©
● Take perforated disc with required hole diameter out of the storage compartment.
- Insert worm gear into the housing.
- Put blade on the worm gear.
Blades must face the perforated disc.
- Put perforated disc with the required hole diameter on the worm gear. Recess on the perforated disc must be situated on the lug in the housing.
- Screw on threaded ring clockwise.
Do not tighten the threaded ring too tight.
● Disassembly is in reverse order.
Use for:
- processing raw or cooked meat, bacon, poultry and fish.
- Do not process bones!
- Process steak tartare through the mincer twice.
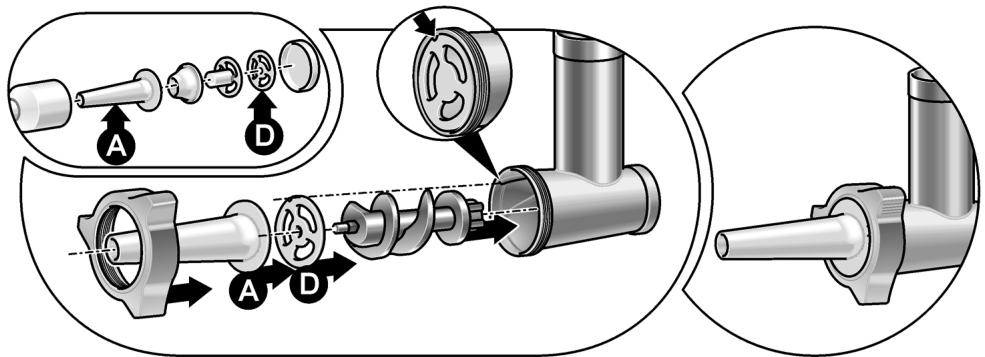
Assembling sausage filler attachment Note:
The parts of the mincer attachment (without perforated disc and blade) are used.
Fig. D
● Take nozzle (A) and bearing ring (D) out of the pusher.
- Insert worm gear into the housing.
- Insert nozzle into the threaded ring.
- Put bearing ring on the worm gear and hold in place. Recess on the bearing ring must be situated on the lug in the housing.
- Screw on threaded ring with nozzle clockwise. Do not tighten the threaded ring too tight.
● Disassembly is in reverse order.
Use for:
Filling artificial and natural casings with sausage meat.
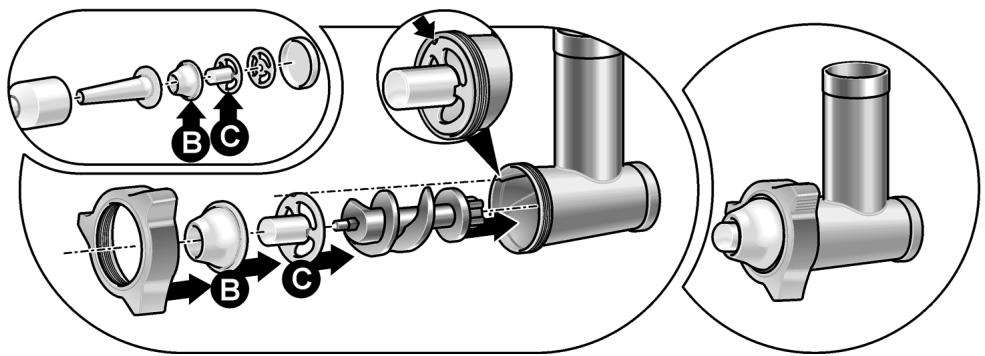
Assembling kebbe attachment
Note:
The parts of the mincer attachment (without perforated disc and blade) are used.
Fig. E
● Take shaper (B) and conical ring (C) out of the pusher.
- Insert worm gear into the housing.
- Insert shaper into threaded ring.
- Put conical ring on the worm gear and hold in place. Recess on the conical ring must be situated on the lug in the housing.
- Screw on threaded ring with shaper clockwise. Do not tighten the threaded ring too tight.
● Disassembly is in reverse order.
Use for:
Shaping dough tubes.
Operating the appliance

Risk of injury
Before fitting/removing attachment, wait until the drive has come to a standstill and pull out the mains plug.
Do not reach into the feed tube. Always use the stuffer to push food down the hole.
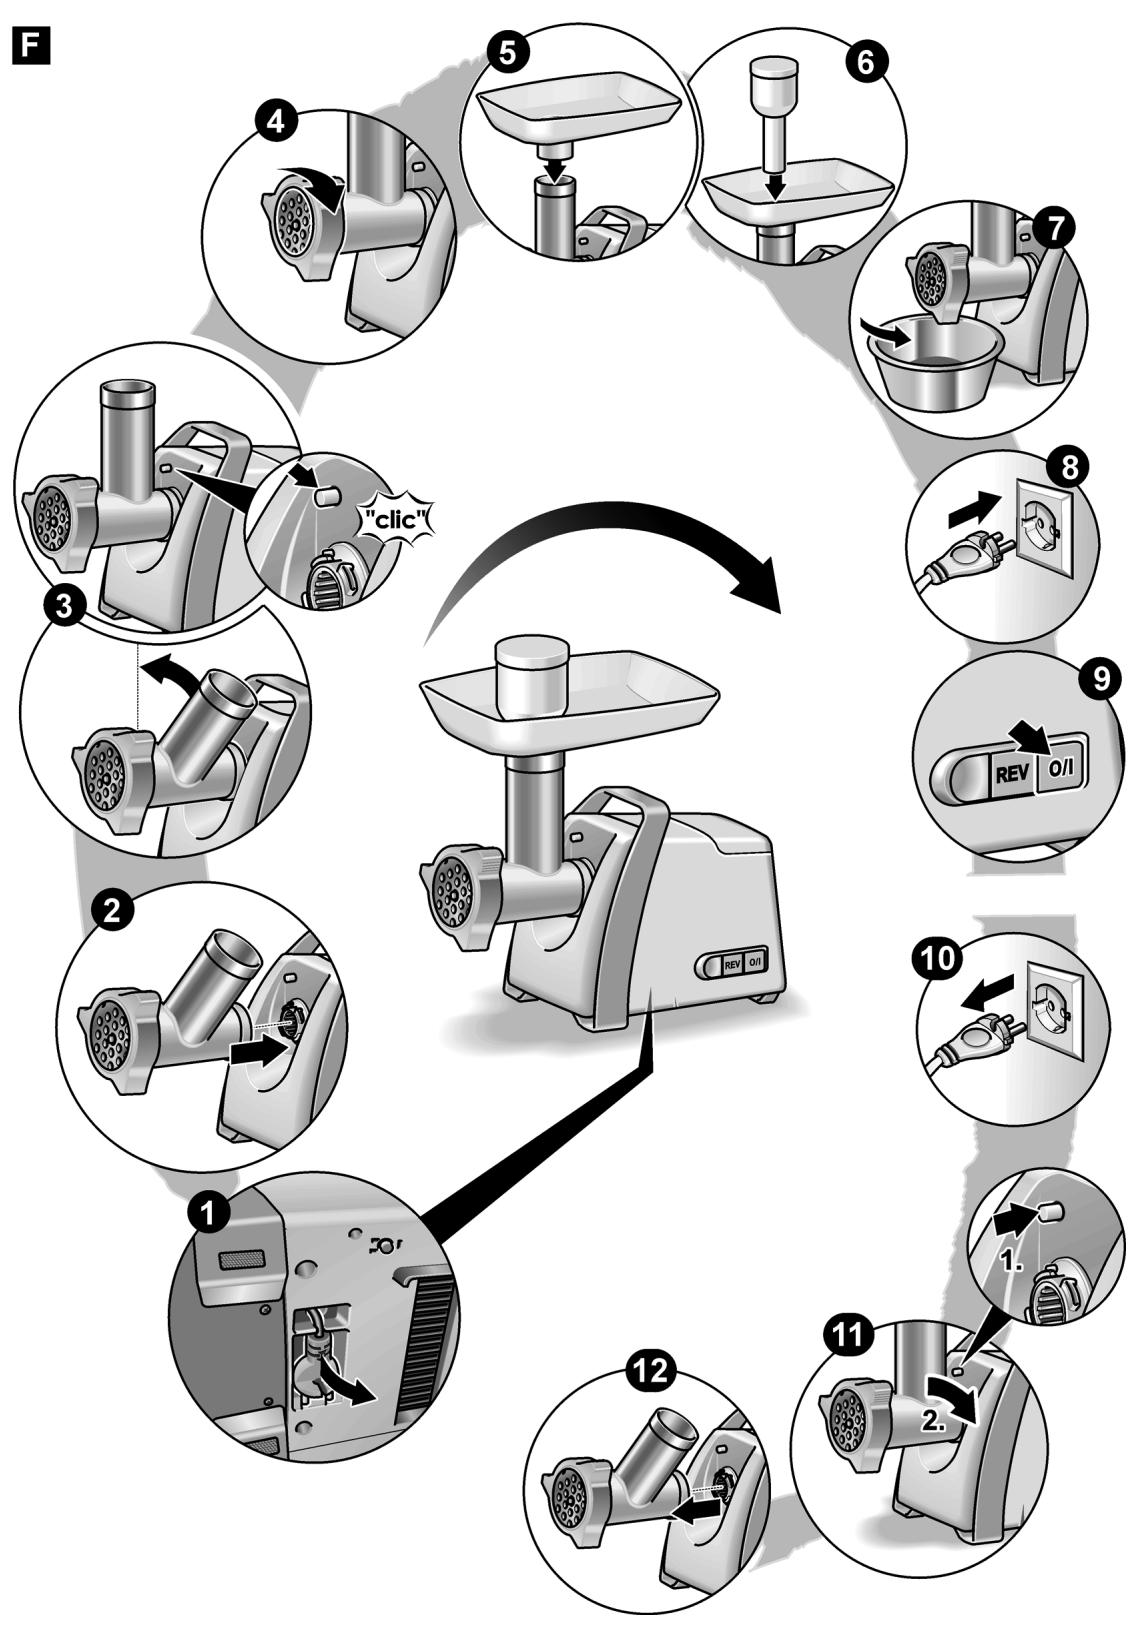
Fig. F
- Stand the mincer on a clean, level work surface.
● Take power cord out of the cable storage and pull out to the required length.
- Put the completely assembled mincer attachment, inclined slightly to the right, on the drive.
- Turn mincer attachment upwards until it engages.
- Tighten threaded ring on the mincer attachment.
- Attach filling tray.
- Insert pusher into filling opening.
- Place a bowl or plate under the outlet opening.
- Insert the mains plug.
- Switch appliance on with the On/Off button.
- Place the food to be processed in the filling tray.
- Only use the pusher when adding more ingredients.
Application instructions:
If the food to be chopped up jams in the worm gear: Use reverse button to remove the blockage.
- Switch appliance off with the On/Off button.
- Wait until the drive comes to a standstill.
- Briefly press reverse button.
- Wait until the drive comes to a standstill.
- Switch appliance on with the On/Off button.
After using the appliance:
- Switch appliance off with the On/Off button.
- Remove mains plug.
- Pull out the pusher.
- Remove filling tray.
- Remove the mincer attachment. Holding down the release button, turn the attachment to the right and remove.
● Disassemble mincer attachment.
- Clean all parts, see “Cleaning and servicing”.
Fruit press attachment
(some models)
Puréeing soft fruit, tomatoes, apples, pears or rosehips. The selection of the filter insert determines the content of fruit pulp in the juice. Do not use for puréeing fruit that contains pips the same size as the holes in the filter insert of the purée attachment (e.g. raspberries).

Risk of injury
Before fitting/removing attachment, wait until the drive has come to a standstill and pull out the mains plug.
Do not reach into the feed tube. Always use the stuffer to push food down the hole.
Warning!
Do not process frozen fruit or vegetables.
Remove stones (cherries, plums, apricots, etc.).
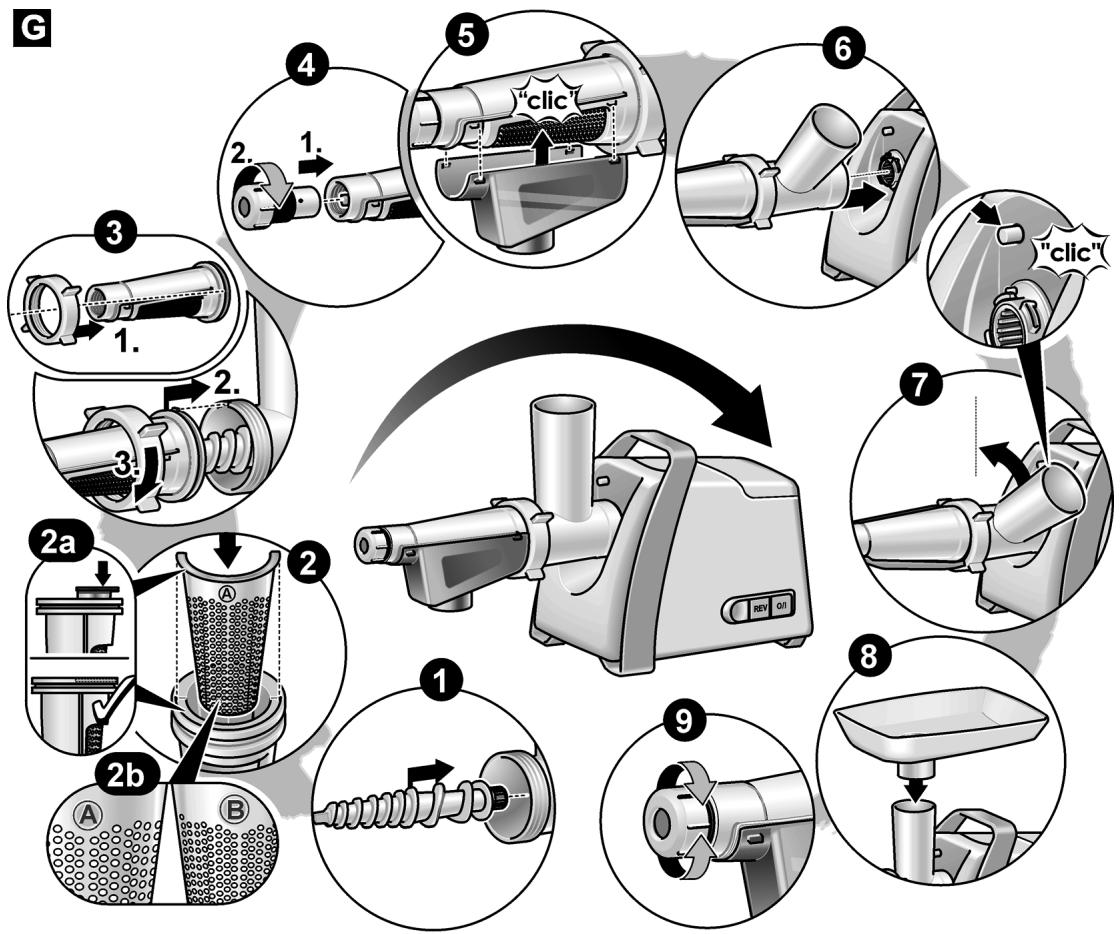
Fig. G
- Insert worm gear into the housing.
- Insert filter insert into the filter holder. Press in filter insert all the way.
- Insert filter holder into threaded ring.
- Screw on threaded ring with filter holder clockwise. Lug on the filter holder must be situated in the recess in the housing.
Do not tighten the threaded ring too tight.
- Screw pulp nozzle into the filter holder.
- Attach outlet funnel to the filter holder and engage.
- Put the completely assembled fruit press attachment, inclined slightly to the right, on the drive.
- Turn fruit press attachment upwards until it engages.
- Tighten threaded ring on the fruit press attachment.
- Attach filling tray.
- Place suitable container under the juice outlet opening.
- Place bowl or plate under the opening of the pulp nozzle.
- Insert the mains plug.
- Place the food to be processed in the filling tray.
- Switch appliance on with the On/Off button.
- Press food down using the pusher. Do not exert too much pressure! Filter insert may be damaged.
Application instructions:
- First loosen the pulp nozzle until the pulp (solid constituents) is still moist when it flows out.
- Then slowly close the pulp nozzle until juice and pulp come out in the required form.
After using the appliance:
- Switch appliance off with the On/Off button.
- Remove mains plug.
- Pull out the pusher.
- Remove filling tray.
- Remove the fruit press attachment. Holding down the release button, turn the attachment to the right and remove.
- Disassemble fruit press attachment. Disassembly is in reverse order.
- Clean all parts, see “Cleaning and servicing”.
Shredding attachment
(some models)
For shredding and slicing cheese, fruit, vegetables, nuts, almonds, dried bread rolls and pieces of bread, chocolate and other hard foods.

Risk of injury
Before fitting/removing attachment, wait until the drive has come to a standstill and pull out the mains plug.
Do not grip the sharp blades and edges of the shredding and slicing inserts.
Do not reach into the feed tube. Always use the stuffer to push food down the hole.
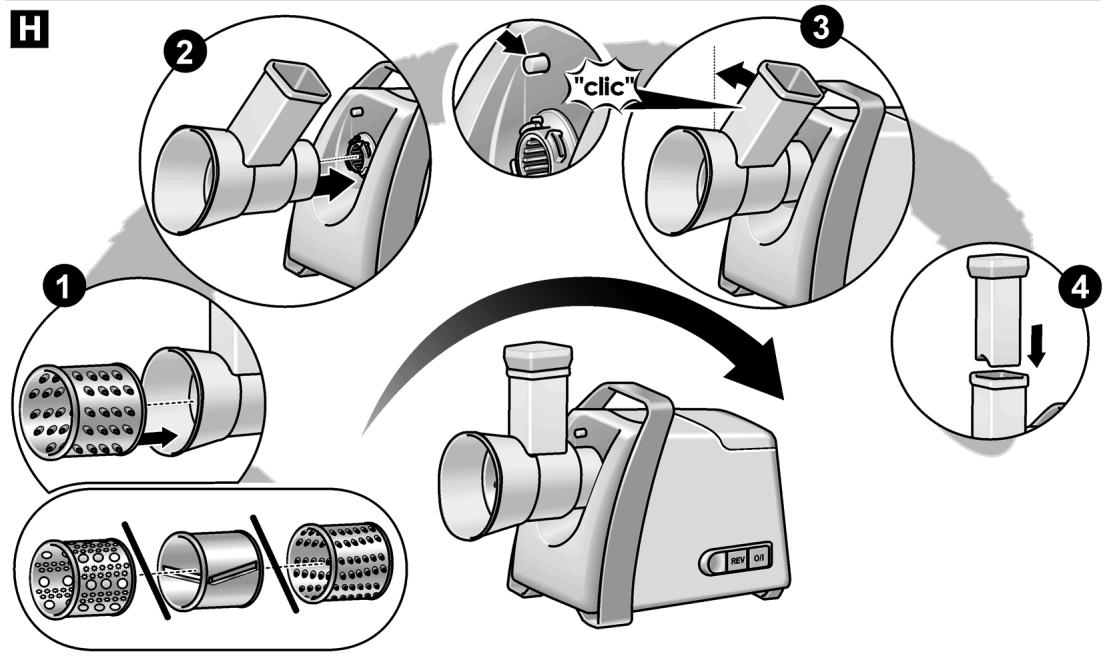
Fig. H
- Place required insert in the housing of the shredding attachment.
The insert is automatically locked when the appliance is switched on.
- Put the shredding attachment, inclined slightly to the right, on the drive.
- Turn shredding attachment upwards until it engages.
en
- Place a bowl or plate under the outlet opening.
- Insert the mains plug.
- Place the food to be processed in the feed tube.
- Insert pusher and hold in place.
Note:
Pusher can be inserted in one direction only. Note position of the curve!
- Switch appliance on with the On/Off button.
- Press food down using the pusher. Do not exert too much pressure!
After using the appliance:
- Switch appliance off with the On/Off button.
- Remove mains plug.
- Pull out the pusher.
- Remove the shredding attachment. Holding down the release button, turn the attachment to the right and remove.
● Disassemble shredding attachment.
- Clean all parts, see “Cleaning and servicing”.
Cleaning and servicing

The appliance requires no maintenance. Thorough cleaning protects the appliance from damage and keeps it functional.

Electric shock risk
Never immerse the base unit in liquids and do not clean in the dishwasher.
Before cleaning the appliance, pull out the mains plug!
Warning!
Do not use abrasive cleaning agents.
Surfaces may be damaged.
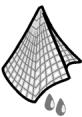
Do not clean the aluminium parts (housing, worm gear and threaded ring of the mincer attachment) in the dishwasher. Harmless discolouration may occur over time.
Cleaning the appliance
- Pull out the mains plug.
- Wipe the mincer clean with a damp cloth. If required, use a little detergent.
Cleaning the attachments
- Rinse housing, worm gear and threaded ring of the mincer attachment by hand.
● Dry metal parts straight away and apply a little edible oil to protect them from rust.
- Fig. 1 gives an overview of how to clean the individual parts.
Troubleshooting
Fault
Appliance stops but does not switch off.
Cause
Appliance overloaded, e.g. mincer blocked.
- Switch appliance off and wait until it comes to a standstill.
- Press reverse button to remove the blockage.
- Wait until the drive comes to a standstill.
- Switch on appliance again.
Fault
Appliance switches off during use.
Cause
Appliance overloaded. Overload protection feature has been activated.
- Switch off the appliance.
- Remove mains plug.
- Leave the appliance to cool down for approx. 60 minutes.
- Lift appliance and press the thermal circuit breaker on the underside of the appliance (Fig. A, 14).
- Insert the mains plug.
- Switch on appliance again.

If the fault cannot be eliminated, please contact customer service.
Recipes and tips
Mincer attachment
Perforated disc, fine (3 mm/3.8 mm):
cooked chicken, pork, beef, cooked liver, cooked fish for soups; raw pork and beef for meat loaf; raw liver, meat and bacon for liverwurst; pork for Mettwurst
Perforated disc, medium (4.8 mm):
Pork and beef for pâté and Cervelat sausage;
Perforated disc, coarse (8 mm):
roast pork for goulash soup; leftovers (joint, sausage, ...) for casserole
Bread dumplings
Mincer Type CNFW5
Using the perforated disc 8 mm
300 g of fresh white bread
40 g of butter or margarine
200 ml of milk
2 eggs
1 tbs. of finely chopped onions
Parsley, salt
A little flour
Mincer Type CNFW6, 7, 8
Using the perforated disc 4.8 mm
300 g of fresh white bread
40 g of butter or margarine
200 ml of milk
2 eggs
1 tbs. of finely chopped onions
Parsley, salt
A little flour
Processing ingredients
- Using the mincer, chop up the white bread (Type CNFW5, 6, 7) for approx. 1 minute and (Type CNFW8) for approx. 12 minute.
- Add the finely chopped onions, a little parsley and butter and mix.
- Whisk eggs, milk and salt and mix into the bread dough.
- Leave the dough to prove for several minutes. Then knead again.
- Shape the dumplings with wet hands. Roll dumplings in flour.
- Place dumplings in boiling water and leave to simmer for approx. 20 minutes. Do not bring to the boil!
Sausage filler attachment
- Soak natural casing in lukewarm water for approx. 10 minutes before processing.
- Do not overfill sausages, otherwise the sausages may burst while they are being boiled or fried.
- The nozzles can also be used without casings! Coat sausage meat with breadcrumbs and then fry.
Kebbe attachment
Recipe for stuffed kebbe
Dough pocket:
500 g of lamb, cut into strips
500 g of bulgur wheat, washed and drained
1 small onion, chopped
- Pass lamb and wheat alternately through the fine perforated disc of the mincer attachment.
- Mix the dough thoroughly, mix in the onion.
● Pass the mixture twice more through the mincer attachment.
Filling:
400 g of lamb, cut into strips
2 medium-sized onions, chopped
1 tablespoon of oil
1 tablespoon of flour
2 teaspoons of pimento
Salt and pepper
- Pass lamb through the fine perforated disc of the mincer attachment.
● Fry onions until golden brown.
- Add lamb and fry until well done.
- Add remaining ingredients. Braise everything for approx. 1–2 minutes.
- Pour off excess fat.
- Leave the filling to cool down.
Preparing the kebbe:
- Pass mixture for dough pockets through the kebbe attachment.
- Divide the hollow strand of dough into pieces approx. 7.5 cm in length.
- Seal one end of the dough pocket.
- Press a little stuffing into the opening and also seal the other end of the dough pocket.
- Heat oil (approx. 180 °C) and deep-fry the dough pockets for approx. 6 minutes until golden brown.
Shredding attachment
Slicing insert
for onions, cabbage, apples, carrots
Shredding insert – coarse
for nuts, chocolate, cheese, hard bread/bread rolls
Shredding insert – fine
for nuts, chocolate, cheese
Grating insert
for potatoes, Parmesan cheese
Instructions on disposal

This appliance has been identified in accordance with the European directive 2012/19/EC on Waste Electrical and Electronic Equipment – WEEE.
The Directive paves the way for effective EU-wide withdrawal and utilization of waste appliances.
Please ask your dealer or inquire at your local authority about current means of disposal.
Warranty conditions
The guarantee conditions for this appliance are as defined by our representative in the country in which it is sold. Details regarding these conditions can be obtained from the dealer from whom the appliance was purchased. The bill of sale or receipt must be produced when making any claim under the terms of this guarantee.
Pour former des tubes de pâte.
Apparaat overbelast.
a) Skjære-innsats
b) Raspe-innsats, grov
c) Raspe-innsats, fin
d) Rive-innsats
* alt etter modell
Beskyttelse mot overbelastning
natural_image
Profile view of a smiling woman wearing a headset (no text or symbols visible)

(waste electrical and electronic equipment – WEEE)
Jebel Ali Free Zone – Dubai
Tel.: 04 881 4401
mailto:service.uae@bshg.com
www.bosch-home.com/ae
AL Republika e Shqiperise, Albania
AERTECH SH.P.K.
Rruga Qemal Stafa
Pallati i ri perball Prokuroris se
Pergjithshme
Hyrja C Kati 10
Tirana
Tel.: 066 206 47 94
mailto:g.volina@aertech.al
HEATHERTON, Victoria 3202
Tel.: 1300 368 339
mailto:bshau-as@bshg.com
www.bosch-home.com.au
BA Bosna i Hercegovina, Bosnia-Herzegovina
"HIGH" d.o.o.
Gradačačka 29b
71000 Sarajewo
Info-Line: 061 100 905
Fax: 033 213 513
mailto:delicnanda@hotmail.com
European Trade Center Building,
5th floor
1784 Sofia
Tel.: 02 892 90 47
Fax: 02 878 79 72
mailto:informacia.servis-bg@
bshg.com
www.bosch.home.bg
+ 7 snt/min (alv 23%)
+ 17 snt/min (alv 23%)
FR France
BSH Electroménager S.A.S.
50 rue Ardoin – BP 47
93401 SAINT-OUEN cedex
To arrange an engineer visit, to
order spare parts and accessories
or for product advice please visit
www.bosch-home.co.uk
or call
*Calls from a BT landline will be charged at up to 3 pence per minute. A call set-up fee of up to 6 pence may apply.
GR Greece, Ελλάς
BSH Ikiakes Siskeves A.B.E.
Central Branch Service
17 km E.O. Athinon-Lamias &
Potamou 20
14564 Kifisia
Unit 1 & 2, 3rd Floor
North Block, Skyway House
3 Sham Mong Road
Tai Kok Tsui, Kowloon
Hong Kong
Tel.: 2565 6151
Fax: 2565 6681
mailto:bosch.hk.service@bshg.com
www.bosch-home.cn
HR Hrvatska, Croatia
BSH kućni uređaji d.o.o.
Kneza Branimira 22
10000 Zagreb
Tel:. 01 640 36 09
Fax: 01 640 36 03
mailto:informacije.servis-hr@
bshg.com
www.bosch-home.com/hr
www.bosch-home.com/hu
IE Republic of Ireland
BSH Home Appliances Ltd.
Unit F4, Ballymount Drive
Ballymount Industrial Estate
Walkinstown
Dublin 12
Service Requests,
Spares and Accessories
Tel.: 01450 2655
Fax: 01450 2520
www.bosch-home.co.uk
IL Israel,
C/S/B Home Appliance Ltd.
Uliel Building
2, Hamelacha St.
Industrial Park North
71293 Lod
Tel.: 08 9777 222
Fax: 08 9777 245
mailto:csb-serv@zahav.net.il
www.bosch-home.co.il
IN India, Bhārat, भारत
BSH Customer Service Front Office
Shop No.4, Everest Grande,
Opp. Shanti Nagar Bus Stop,
Mahakali Caves Road, Andheri East
Mumbai 400093
IS Iceland
Smith & Norland hf.
Noatuni 4
105 Reykjavik
Tel.: 0520 3000
Fax: 0520 3011
www.sminor.is
IT Italia, Italy
www.bosch-home.com/it
IP Turebekov Yerzhan
Nurmanovich
Jangeldina str. 15
Shimkent 160018
Tel.: 0252 31 00 06
mailto:evrika_kz@mail.ru
LB Lebanon, لبنان
Teheni, Hana & Co.
Boulevard Dora 4043 Beyrouth
P.O. Box 90449
Jdeideh 1202 2040
Tel.: 01 255 211
mailto:Info@Teheni-Hana.com
LT Lietuva, Lithuania
Senuku prekybos centras UAB
Jonavos g. 62
44192 Kaunas
Tel.: 0372 12146
Fax: 0372 12165
www.senukai.lt
LU Luxembourg
General Serviss Limited
Bullu street 70c
1067 Riga
Tel.: 07 42 41 37
mailto:bt@olimpeks.lv
Elkor Serviss
Brivibas gatve 201
1039 Riga
Tel.: 067 0705 20; -36
Fax: 067 0705 24
mailto:domoservice@elkor.lv
www.servisacentrs.lv
MD Moldova
S.R.L. "Rialto-Studio"
ул. Щусева 98
2012 Кишинев
тел./факс: 022 23 81 80
mailto:bosch-md@mail.ru
ME Crna Gora, Montenegro
Elektronika komerc
UI. Slobode 17
84000 Bijelo Polje
Tel./Fax: 050 432 575
Mobil: 069 324 812
mailto:ekobosch.servis@
t-com.me
Unit F 2, 4 Orbit Drive
Mairangi Bay
Auckland 0632
Tel.: 09 477 0492
Fax: 09 477 2647
mailto:bshnz-cs@bshg.com
www.bosch-home.co.nz
PL Polska, Poland
Bin Hamran Commercial Centr.
6th Floor 603B
Jeddah 21481
Tel.: 800 124 1247
mailto:service.ksa@bshg.com
www.bosch-home.com/sa
SE Sverige, Sweden
Union Industrial Building
Block A, #01-03
577177 Singapore
Tel.: 6751 5000
Fax: 6751 5005
mailto:bshsgp.service@bshg.com
www.bosch-home.com.sg
SI Slovenija, Slovenia
BSH Hišni aparati d.o.o.
Litostrojska 48
1000 Ljubljana
Tel.: 01 583 07 01
Fax: 01 583 08 89
www.bosch-home.com/tr
4th floor, No. 112 Sec 1
Chung Hsiao E Road
Taipei ROC 100
Tel.: 02 2321 6222
mailto:Bosch@achelis.com.tw
UA Ukraine, Україна
gama-electronics.com
XS Srbija, Serbia
BSH Kućni aparati d.o.o.
Milutina Milankovića 11 ^4
11070 Novi Beograd
Tel.: 011 205 23 97
Fax: 011 205 23 89
mailto:informacije.servis-sr@
bshg.com
www.bosch-home.rs
ZA South Africa
BSH Home Appliances (Pty) Ltd.
15th Road Randjespark
Private Bag X36, Randjespark
1685 Midrand – Johannesburg
Tel.: 086 002 6724
Fax: 086 617 1780
mailto:applianceserviceza@
bshg.com
www.bosch-home.com/za
bosch-infoteam@bshg.com
B
C
D
E
flowchart
graph TD
    A["1: Raw Material Input"] --> B["2: Process Step 1"]
    B --> C["3: Process Step 2"]
    C --> D["4: Process Step 3"]
    D --> E["5: Finishing Panel"]
    E --> F["6: Finishing Panel"]
    F --> G["7: Finishing Panel"]
    G --> H["8: Display Panel"]
    H --> I["9: Display Panel with REV O/II"]
    I --> J["10: Display Panel with REV O/II"]
    J --> K["11: Final Product Inspection"]
    K --> L["12: Final Product Inspection"]
flowchart
graph TD
    A["Input: Initial mixture"] --> B["Step 1: Screen with granular contents"]
    B --> C["Step 2: Process with brush and pencil"]
    C --> D["Step 3: Screen with brush and pencil"]
    D --> E["Step 4: Display on a cylindrical component with checkmark and 'click' annotation"]
    E --> F["Final Product Inspection"]
    style A fill:#f9f,stroke:#333
    style F fill:#bbf,stroke:#333
K
| MFW45020 | MFW66020 | MFW67440 | MFW68640 | MFW68660 | |
 | √ | √ | √ | √ | √ | |
 | √ | √ | √ | | | |
  | | | | √ | √ | |
 | √ | √ | √ | √ | √ | |
 | 3,8 mm  | √ | | | | | |
| 8 mm [A8T0] |
3 mm  8 mm 8 mm |
| 4,8 mm [DH0Z] | √ | √ | √ | √ | |
| [XZ0Y] | √ | √ | √ | √ | √ | |
 | √ | √ | √ | √ | √ | |
 |  | | | √ | √ | √ | |
 | | | | √ | √ | |
 | | | √ | √ | √ | |
 | | | | | √ | |
 | | | | | √ | |