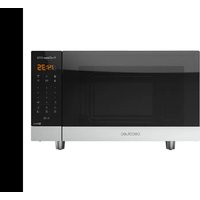
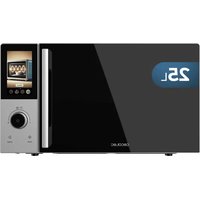
USER MANUAL ProClean 6110 CECOTEC
Safety instructions 8
Read these instructions thoroughly before using the product. Keep this instruction manual for future reference or new users.
- Make sure that the mains voltage matches the voltage stated on the product marking and that the wall outlet is grounded.
- This appliance is designed for domestic use only and is not
intended for bars, restaurants, farmhouses, hotels, motels, and offices.
- The symbol means: CAUTION, hot surface. Accessible surfaces are likely to heat up during use.
- WARNING: if the door or its gaskets are damaged, do not operate the appliance until it has been repaired by a qualified person.
- WARNING: it is dangerous for anyone other than a qualified person to perform maintenance or repair tasks involving the removal of a cover that provides protection against exposure to microwave energy.
- WARNING: liquids and other foods should not be heated up in sealed containers, as they may explode.
- WARNING: when the appliance is being used in combined mode, children should only use it under adult supervision due to the temperatures generated.
- Use this appliance only for its intended purpose, as described in this manual. Do not use corrosive chemicals or vapours in this appliance. It is not designed for industrial or laboratory use.
- This appliance is intended for heating beverages and food. The drying of food or clothing and heating-up of pillows, shoes, sponges, wet clothes, and similar items may lead to injury, ignition, or fire.
- Heating up beverages may cause them to boil. For this reason, precautions must be taken when handling the container.
- The contents of bottles and jars of baby food should be swirled or shaken, and the temperature should be checked before consumption to avoid burns.
-
Eggs in their shell and whole hard-boiled eggs should not be heated in microwaves since they may explode even after microwave heating has ended.
-
Do not operate the microwave when empty.
- This microwave is not intended to be built-in or installed in furniture. It must be freely positioned ensuring the following separation distances:
- Top: at least 20 cm apart.
- Between the appliance and any adjacent wall: at least 5 cm.
- Rear: leave 10 cm of separation.
- Check the power cord regularly for visible damage. If the cord is damaged, it must be replaced by the official Cecotec Technical Support Service or by similarly qualified personnel to avoid hazards or injuries.
- Do not operate this appliance if it has a damaged cord or plug or if it is not operating properly. If the cord is damaged, it must be replaced by the official Cecotec Technical Support Service to avoid any type of danger.
- You must be careful to ensure that the rotary plate does not shift when the containers are removed from the appliance.
- Only use utensils that are suitable for microwave use. Make sure utensils do not touch the interior walls during operation.
- Do not use the cavity for storage purposes.
- Do not attempt to fry food in this oven.
- In order to reduce fire risk:
- Do not overcook food.
- Remove wire twist-ties from paper or plastic bags before placing them inside the microwave.
- The microwave should be watched when heating food in plastic or paper containers.
- In case of smoke or fire inside the device, keep the door closed, turn the product off, and disconnect it from the power supply.
-
Do not place hot or frozen food or utensils on the turntable to prevent breakage.
-
After operation, the container is likely to be very hot. Use gloves in order to avoid burns and injuries.
- The appliance must be cleaned regularly, and you must remove any food remains. You must clean the door sealings, cavities, and adjacent parts of the microwave as indicated in the cleaning and maintenance section.
- The appliance cannot be cleaned with steam.
- Failure to keep the microwave clean could lead to deterioration of the surface and could adversely affect the shelf life of the appliance and cause hazards.
- This appliance can be used by children aged 8 years and above and persons with reduced physical, sensory, or mental capabilities or lack of experience and knowledge if they have been given supervision or instruction concerning use of the appliance in a safe way and understand the hazards involved. Children must not play with the appliance. Cleaning and user maintenance should not be carried out by children unless they are over 8 years old and are under supervision.
- Keep this appliance and its power cord out of reach of children under the age of 8.
- This product is a Group 2 Class B ISM equipment. The definition of Group 2 which contains all ISM (Industrial, Scientific and Medical) equipment in which radio-frequency energy is intentionally generated and/or used in the form of electromagnetic radiation for the treatment of material, and spark erosion equipment. Class B equipment is suitable for domestic use and in establishments directly connected to a low voltage power supply network, which supplies buildings used for domestic purpose.
- Metal food and beverage containers must not be used during microwave cooking.
- The appliance is not intended to be operated by means of external timers or separate remote control systems.
INSTRUCTIONS DE SECURITÉ
- Safety door-interlock system
- Observation window
- Turntable shaft
- Turntable ring assembly
- Turntable
- Control panel
- Mica plate
Fig.2
1.Start/Stop
2. Weight cooking
3. Weight defrost
4. Fast defrost
5. ON button
6. Timer button
7.CRIU/Comi
8. Number pad
9. Default programmes
10. Reset
11. Clock
12. Reheat
NOTE:
The graphics in this manual are schematic representations and may not exactly match the product.
2. BEFORE USE
This appliance is packaged in a way as to protect it during transport. Take the appliance out of its box and remove all packaging materials. You can keep the original box and other packaging elements in a safe place. This will help you prevent product damage when transporting it in the future. In case the original packaging is disposed of, make sure all packaging materials are recycled accordingly.
-
Make sure all parts and components are included and in good conditions. If there is any piece missing or in bad conditions, contact the official Cecotec Technical Support Service immediately.
-
The product must be placed on a flat, stable, and dry place and kept away from corrosive materials, heat, and humidity, such as gas burners or water.
- The product must be sufficiently ventilated and must therefore be placed at least 90cm above the ground. You must ensure a distance of at least 20cm on top and at least 5cm between the device and any adjacent wall. Leave 10cm behind the device.
- The product must be placed at least 5 m away from TVs, radios, or antennas.
- The product must be placed in such way that the plug is accessible and must ensure an effective grounding in case of leakage in order to avoid electric shocks.
The door must be closed for the microwave to work.
- In case there is any manufacturing remains in the microwave cavity or on the heating elements, leave the microwave open to ensure good ventilation. In such case, it is recommended to heat a glass of water at high power for several times.
WARNING:
Do not try to remove the mica plate. This component is essential for the proper functioning of the device. The mica plate must be clean to ensure its proper operation.
3. OPERATION
Beeps during setting
- 1 beep: input accepted.
- 2 beeps: input rejected
Number pad
The keys on the number pad are used to select food kind, cooking time, and power level.
| Key Power % Microwave instruction | |
| On 100 % P100 and P90. high power, 100 | and 90%. Perfect for quick and thorough cooking. |
| 9 | 90% |
| 8 | 80% | P60 and P70: Medium- High power, 80% and 70%. Perfect for medium express cooking. |
| 7 | 70% |
| 6 | 50% | P60 and P50: Medium power, 60% and 50%. Perfect for steaming food. |
| 5 | 50% |
ENGLISH ENGLISH
| 4 40% P40 and P30: Medium-low | power, 40% and 30%, perfect for defrosting food. |
| 3 30% |
| 2 20% P20 and P10: Low power. | and 10%. Perfect for keeping food warm. |
| 110% |
Reset
Press the Reset button to clear all previous settings.
Start/Stop
Press the Start/Stop button to start or stop operation.
Automatic cooking
Use this mode for multi-stage cooking. It allows cooking at different power levels at different pre-set times, changing from one stage to another automatically.
Clock setting
- When the microwave is on Standby, press the Clock button.
- Press the corresponding keys on the number pad to enter the desired time. You must press at least three keys to set the clock (one for hours and two for minutes).
- Press the Clock button again to confirm time.
Warning:
The clock is 24 hours. When the microwave is first plugged in or when power resumes after a power interruption, the display panel will show ENTER, CLOCK, TIME. If you prefer not to have the clock displayed, press the Reset button. You can check the clock time while cooking is in progress by pressing the Clock button.
| Example: Setting clock at 12:30 |
| Steps Display | |
| 1 After powering up, the display | panel shows the colon sign. Press the Reset button once or wait for 30 seconds. | : |
| 2 Press keys "1", "2", "3", "0". 12:30 | |
| 3 Press the Clock button to | confirm. | |
ENGLISH ENGLISH
Warnings:
The maximum programmable cooking time is 99 minutes. 99 seconds.
- It is recommended to turn or stir food at least once during the process.
- Press Reset button once to resume operation.
- If food is removed before the pre-set time, make sure you press the Start/Stop button once to stop operation and prevent the microwave from running automatically while empty and closed.
- When operating at maximum power, the microwave will automatically lower power after a certain time in order to lengthen the shelf life of the appliance.
Two-stage cooking
In order to obtain the best result, some recipes require different steps. This function allows you to personalise and to combine your cooking processes.
| Example: Cooking food on microwave mode at 100 P, for 3 minutes, then 20P for 9 minutes. |
| Steps Display | |
| 1 Select microwave mode at | 100% power for 3 minutes. | |
| 1.1 The display shows colon, | press, press the Reset key once or wait for 30 seconds. | : |
| 1.2 Press "3" "0", "0" to set | cooking time. | 3:00 |
| 1.3 Press the Power button once and then select the desired power level by pressing "1" "0". | 100P | |
| 1.4 Press the Cooking button once to confirm. | | |
| 2 20P for 9 minutes. | | |
| 2.1 Press "9", "0", "0" to set | cooking time. | 9:00 |
| 2.2 Press the Power button once and select microwave power by pressing "2". | 20P | |
| 3 Press the Start/Stop button to start operation. | | |
Quick Defrost
- From the initial or "stand by" position, press the Quick Defrost button.
- Enter desired defrosting time by pressing the correct number keys.
- Press the Start/Stop button.
| Example: Speed defrost 0.2 kg of poultry for 2 minutes, 50 seconds |
| Steps Display | |
| 1 After powering up, the display | panel shows the colon sign. Press the Reset button once or wait for 30 seconds. | : |
| 2 Press Quick Defrost button : | | |
| 3 Press "2","5","0" to set defrost | time. | 2:50 |
| 4 | Press the Start/Stop button to start operation. | |
Warnings:
- Once pre-set time is over, 4 alarm beeps will sound and display will show END. Press the Reset button or open the door to return to Standby mode.
After setting Quick Defrost, the microwave can be programmed to switch automatically to
- 1-stage cooking: before pressing Start/Stop, press the On button to select the power level and enter the cooking time. Then press the Start/Stop key.
- 2-stage cooking: before pressing the Start/Stop key, enter two-stage cooking programme
Weight cooking
- The microwave has default cooking programmes for simple operations.
- Set food weight and type and the microwave will automatically set the cooking time and power level.
|
| Display codes | Food type | Weight |
| 1 Beef | 0.1, 0.15, 0.2...2.9, 2.95, 3 kg | |
| 2 Lamb | 0.1, 0.15, 0.2...2.9, 2.95, 3 kg | |
| 3 Pork | 0.1, 0.15, 0.2...1.9, 1.95, 2 kg | |
| Example: Cooking 1.2 kg of beef |
ENGLISH ENGLISH
| Steps Display | |
| 1 After powering up, the display | panel shows the colon sign. Press the Reset button once or wait for 30 seconds. | |
| 2 Press the Weight Cooking | button. | |
| 3 Select the food kind by | entering code "1". | 1 |
| 4 Set food weight by pressing | number "1" "2" "0". | 1:20 |
| 5 The microwave starts | cooking and time will appear automatically on the display. | 34:24 |
Warnings:
Weight must be specified in kg.
- Once pre-set time is over, 4 alarm beeps will sound and display will show END. Press the
Reset button or open the door to return to the standby state.
Please, wait a few minutes before removing food from inside.
Weight defrost
Set food weight and type and the microwave will automatically set the
defrosting time.
| Example: Defrosting 1.15 kg of beef |
| Steps Display | |
| 1 After powering up, the display | panel shows the colon sign. Press the Reset button once or wait for 30 seconds. | : |
| 2 Press Defrost By weight | button. | 0. |
| 3 Set defrosting weight by | pressing numbers"1", "1", "5". | 1:15 |
| 4 Press the Start/Stop key to | start operation. The LED will display the countdown. | 23:00 |
| During the cooking process, two beeps will sound in order to remind you to turn over the food. After turning over the food, press Start/Stop to resume cooking. |
- It is highly recommended to turn over food during operation in order to obtain a more uniform result.
Defrosting usually needs more time than cooking.
If the food can be cut by knife, the defrosting process is complete.
- Microwave radiation penetrates around 4 cm into most foods.
Defrosted food should be consumed as soon as possible. It is not recommended to freeze or put it back in the fridge again.
Weight must be set in kg, from 0.1 to 3.0 kg.
Grill and Combination
| G (Grill) Only heating elements | will be energised during operation. Perfect for cooking sausages, chicken wings, etc. |
| C1 Combines 30 % microwave | operation and 70 % grill operation. |
| C2 Combines 55 % microwave | operation and 45 % grill operation. |
| Example: Grilling food on C 2 mode for 10 minutes. |
| Steps Display | |
| 1 After powering up, the display | panel shows the colon sign. | : |
| 2 Press the Grill/Combi button | to select the mode. | C 2 |
ENGLISH ENGLISH
| 3 Set the cooking time by | pressing number keys "1", "0","0","0" | 10:00 |
| 4 Press the Start/Stop key to | start operation | |
| Warning: All the microwave's parts may reach high temperatures during operation in Grill/Comb mode. Be careful when removing tools or containers from inside the microwave. |
About "Quick Cook" programmes
These programmes allow cooking or reheating food automatically without setting time or power level. On the control panel, choose from its 6 programmes:
Popcorn
- In standby or clock mode, press Popcorn key which automatically sets the cooking time of microwave popcorn.
- Press the Start/Stop key.
Warning:
To reset Popcorn time, tap Popcorn key twice. ENTER TIME appears on display. Press the number keys to enter minutes and seconds. Press the Start/Stop key. This new cooking time will remain set by default whenever you press the Popcorn key until you reset it.
Baked potato
- In standby or clock state, press the Baked Potato key once.
- Enter the number of potatoes by pressing number keys from 1 to 4.
- Press the Start/Stop key.
Pizza
- In standby or clock state, press the Pizza key once.
- Press the Start/Stop key.
Drinks
- In standby or clock state, press the Beverage key once.
- Enter the number of cups by pressing number keys from 1 to 4.
- Press the Start/Stop key.
Frozen dinner
- In standby or clock state, press the Frozen dinner key once.
- Press 1 or 2 to select 1 or 2 dishes.
- Press the Start/Stop key.
ENGLISH ENGLISH
| Glassware Yes Heat resistant microwave glassware only. Make sure there is no metallic trim. Do not use cracked or chipped dishes. |
| Microwave cooking bags | Yes Follow the manufacturer's instructions. Do not close with a metal tie. Make slits to allow steam to escape. |
| Paper towels | Yes Use to cover food for reheating and absorbing fat. Use with care for short-term cooking/warming only. |
| Baking paper Yes Use as a cover to prevent splattering or a wrap for steaming. |
| Plastic Yes Microwave safe only. Follow the manufacturer's Instructions. It must be labelled as 'Microwave-safe'. Some plastic containers soften, as the food inside gets hot. Bolin-bags and closed plastic bags should be cut or punctured slightly if indicated on the product. |
| Plastic wrap Yes Microwave safe only. Use it to cover food during cooking and retain moisture. Do not allow plastic wrap to touch food. |
| Thermometers Yes Microwave-safe only (meat and candy thermometers). |
| Aluminium tray No May cause arcing. | Move food into a microwave-safe dish or container. | |
| Food carton with metal handle | No May cause arcing. Move food into a microwave-safe dish or container. | |
| Metal or metal trimmed utensils | No Metal shiIelds the food from microwave energy. The metal trim could cause an electric arc. | |
| Metal twist ties No May cause arcing. | Move food into a microwave-safe dish or container. | |
| Paper bags | No May cause a fire in the microwave. | |
| Plastic foam | No | Plastic foam may melt or contaminate the liquid inside when exposed to high temperature. |
| Wood | No Wood may dry out inside the microwave and may split or crack. | |
ENGLISHENGLISH
5. CLEANING AND MAINTENANCE
Warning
Failure to keep the microwave clean could lead to deterioration of the surface and could adversely affect the shelf life of the device and lead to hazards.
The device, as well as food rests, must be cleaned and removed regularly.
- Disconnect the power cord from the wall socket before cleaning. Do not immerse the product in water or any other fluid during cleaning.
- Never use strong detergents, abrasive powders, or a metal brush to clean any part of the product.
Do not remove the mica plate.
- When the microwave has been used for a long time, some strong odours may arise from inside. To eliminate these odours, follow one of the below methods:
1. Fill a 300-ml cup with water and add some lemon slices. Place it inside the microwave and heat it at high power for 5 minutes.
2. Place a cup of red tea inside the microwaves and heat it at high power for 2 or 3 minutes.
3. Use a soft, damp cloth to clean the gaskets, door, interior walls, and turntable.
6. TECHNICAL SPECIFICATIONS
Model: ProClean 6110/ProClean 6120 Full Inox
Reference:01537/01538
Power inlet: 1280 W
Microwave power: 800 W
Power (GRII): 1000 W
Frequency: 2450 MHz
Voltage and frequency: 220-240 V, 50Hz
Capacity: 23L
Technical specifications may change without prior notification to improve product quality.
Made in China | Designed in Spain
7. DISPOSAL OF OLD ELECTRICAL AND ELECTRONIC APPLIANCES

This symbol indicates that, according to the applicable regulations, the product and/or batteries must be disposed of separately from household waste. When this product reaches the end of its shelf life, you should dispose of the batteries/accumulators and take them to a collection point designated by the local authorities.
FRANÇAISFRANÇAIS
1. PIECES ET COMPOSANTS
Img.1
PHOCANB60 PHOCAN6120 HULL INDEX
Avverenza
PROCLEAN E20 FULL INOX
ITALIANOITALIANO
Geproduced in China / Ontworpen in Spanje
PROCLEAN 120 FULL INOX
143142
POLSKIPOLSKI
PHOCAN60C PHOCAN612O HULL INDEX
Napoie
PROCLEAN 120 FULL INOX
167166
CESTINA CESTINA
Reference:01537/01538
PfKoN:1280W
Vykon mikrovnne trouby:800 W
Vykon grilu: 1000 W
Frekvence:2450MHz
Napétia frevence:220-240V,50Hz
Objem:23L
Technique specifikace se monou zmrit bez prdedchozho upozorni za ucelem zlepenski kuality produktu.
Vyrobeno v Cine Navrzeno ve Spanelesku
7. RECYKLACE ELEKTRICKYCH A ELEKTRONICKYCH ZARIZENI

Tento symbol oznacuje, ze v souladu s platnymi predpisy musi byt produkt a/nebo batoric zukvidovany od domavnoi opadu. Koy tento produkt dovahse konc sve zivivotonmi, meui byste yvymout battere/
PHOCANB60 PHOCAN6120 HULL INDEX
baterie/akumulstory a odevzdat je do sberneho mista ureneho mistnimi uady.
Podratae inae form aom, jk sprnivikovat elektricka alektronicka zafiena /nebo bacterie, by mui spotrebite ziskat od misnisti ulad.
DodržovaniVyse uvedenychPokynpispjekochranézivotnihoprostredi
8. ZÁRUKA A TECHNICKY SERVIS
Spocieost Cecotec odopvida konecnmu uizatelne nebo spotbetitel za jolkyol nesoulad, ktery existui v dobe dodi ndani yroblu za podminek a ve lhatst stanoenyich platnmi pfedpsly. Dopurociue se, aby aprvy provadel kvalifikovany personal.
Pokud zijstte probleme vzyblorem ne mozte jakkeoi clozty, obrotte se na officiari technckou podporu spatechnost Cepecat ne cislre -34 96 321 07 28.
9. COPYRIGHT
Prava duševinho vlaustnictv k textum v teto priruce pati spelce nosti CECOTEC INNOVACIONES, S.L. Vsechna prava jsou vyhrazena. Osea teto publacke nesmi byt vceku ani po castech reprodkovan, uklacán do vlyhádavacino systému, prenäsen nebo sifen jakymkoli zpúsobem (eiktonickiy, mechankoly, fotokapovižnim, nahrvičnim nebo podobne) bez predchozho souhlasu spočěncosti CECOTEC INNOVACIONES, S.L.
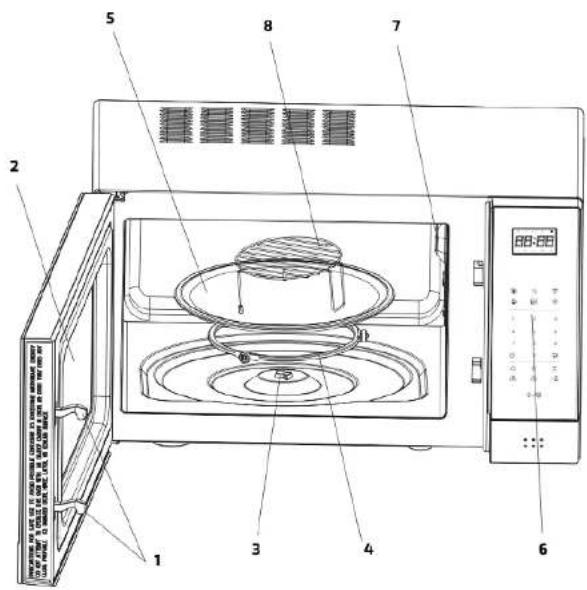
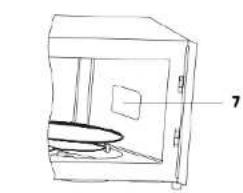
Fig./Img./Abb./Rys./Obr.1
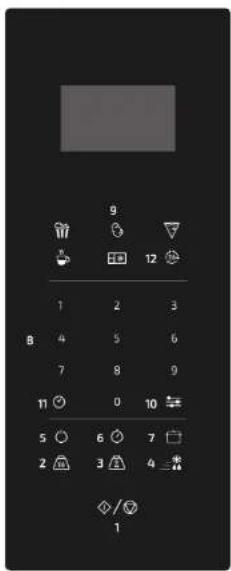
Fig./Img./Abb./Rys./Obr.2
www.ceotec.es