TIPPY - Baby products Kindercraft - Free user manual and instructions
Find the device manual for free TIPPY Kindercraft in PDF.

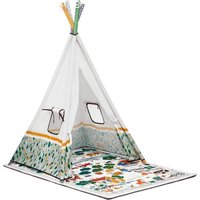
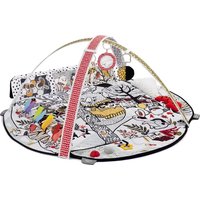
| Product type | Play mat with play arch and tent |
| Brand | Kindercraft |
| Model | TIPPY |
| Recommended age | From birth (under supervision) |
| Box contents | Mat base (1), bars (4), tent (1), mirror (1), rattle with plush (1), teething ring (1), swallow with ribbons (1) |
| Materials | Fabric and plastic (not specified in detail) |
| Mat dimensions | Not specified in the manual |
| Weight | Not specified |
| Power supply | None (mechanical play) |
| Main functions | Sensory stimulation (mirror, rattle, teething, ribbons), configuration mat alone or with tent, roll-up blinds |
| Care and cleaning | Mat base machine washable at 30°C; other parts cleaned with a damp cloth and mild detergent |
| Safety | Supervision required, do not place on elevated surface, keep away from open flames, do not use if damaged |
| Assembly | Assembly of bars by interlocking and hooks; possibility to add the tent for older child |
| Warranty | 24 months, extendable to 120 months under conditions; valid in certain countries |
| Spare parts | Not available separately; use only accessories recommended by the manufacturer |
| Storage | Store disassembled out of reach of children, in a dry place |
Frequently Asked Questions - TIPPY Kindercraft
User questions about TIPPY Kindercraft
0 question about this device. Answer the ones you know or ask your own.
Ask a new question about this device
Download the instructions for your Baby products in PDF format for free! Find your manual TIPPY - Kindercraft and take your electronic device back in hand. On this page are published all the documents necessary for the use of your device. TIPPY by Kindercraft.
USER MANUAL TIPPY Kindercraft
natural_image
Black and white play button icon inside a circle (no text or symbols)Watch manual
VIDEO!

youtube.com/kinderkraftofficial

kinderkraft.com
TIPPY
CZ DIDAKTICKÁ DEČKA
DE LERNSPIELMATTE
EN EDUCATIONAL MAT
1
natural_image
Line drawing of four interlocking loop structures with no text or symbols2
natural_image
Line drawing of a geometric pyramid with a square cutout on top (no text or symbols)3

natural_image
Abstract geometric pattern with a central circle and ring, no text or symbols present4
natural_image
Simple line drawing of a keychain with a leaf design (no text or symbols)5

natural_image
Illustration of an orca with a circular loop and star-shaped elements (no text or symbols)6

natural_image
Illustration of a bird with striped wings and a circular ring above it (no text or symbols)7
natural_image
Technical line drawing of a mechanical clamp or bracket assembly with intersecting lines and a directional arrow (no text or symbols)|
natural_image
Diagram showing a hand holding a coiled spring attached to a curved line, with an arrow indicating direction (no text or symbols)lla
natural_image
Simple line drawing of a knot with two rings, no text or symbols presentIIb

natural_image
Line drawing of hands holding a small object with circular markings, no text or symbols present|||
natural_image
Illustration of a world map with fish, marine life, and a globe, enclosed in a curved frame (no text or symbols)IV
natural_image
Illustration of a person adjusting a garment with a hand holding a small object, showing no text or symbols.V
natural_image
Illustration of a triangular tent with a map and landscape artwork inside (no text or symbols)VI
natural_image
Line drawing of a hand holding a small object near vertical lines (no text or symbols)VII
natural_image
Simple line drawing of a hanging object with two ropes, labeled VIII and IX below (no text or symbols on the object itself)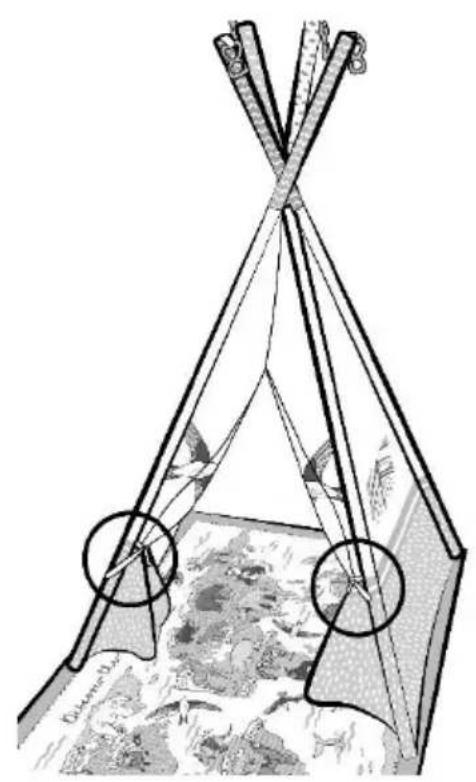
natural_image
Illustration of a tent structure with two circular insets showing different shapes (no text or symbols)Vážený zákazníku!
Thank you for purchasing a Kinderkraft product.
Our products are designed to help your child – we always care about safety and quality, thus ensuring the comfort of the best choice.
IMPORTANT! KEEP THIS MANUAL FOR FUTURE REFERENCE.
SAFETY INSTRUCTIONS AND PRECAUTIONS
WARNINGS!
- Never leave your child unattended.
- This product does not replace a baby crib or bed. If your child needs to sleep, it should be placed in a suitable crib or bed.
- This educational mat is designed for domestic use only, on the floor of the apartment or grass.
- Before laying the mat on a flat surface, clean it, ensuring that there are no sharp or small objects that could damage the product or injure or be swallowed by the child.
- Placing the educational mat on a platform, e.g. on the table is dangerous.
- To avoid injury when folding and unfolding the product, make sure that children are not in the vicinity.
- Do not move or lift the product with the baby inside.
- Never use the baby toy bar as a handle to carry the product.
- Keep the product away from open fire and other heat sources such as electric heaters, gas heaters, etc.
- Do not use the product if any parts are damaged or missing.
- Do not use any accessories or spare parts other than those recommended by the manufacturer.
- Before using the educational mat, remove any foil, cartons and other protective elements from the product.
- Before using, an adult should verify proper installation and condition of the product. If damaged, discontinue use and contact the manufacturer.
Product description
| No | Item Description | Quantity |
| 1 | Playmat base | 1 |
| 2 | The bar ended on both sides with an assembly hook | 4 |
| 3 | Tent | 1 |
| 4 | Mirror with mounting hook | 1 |
| 5 | Baby rattle with a stuffed toy with mounting hook | 1 |
| 6 | orc teether with mounting hook | 1 |
| 7 | swallow with ribbons withmounting hook | 1 |
Folding the playmat for babies
- Open the package and check that all parts are in the box and not damaged.
- Spread the base of the playmat (1) on a flat surface.
CAUTION! Never place the product on a raised platform, e.g. on a table as it may be dangerous.
-
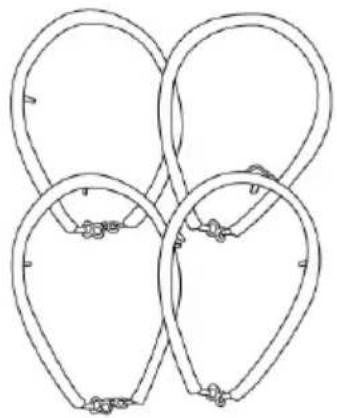
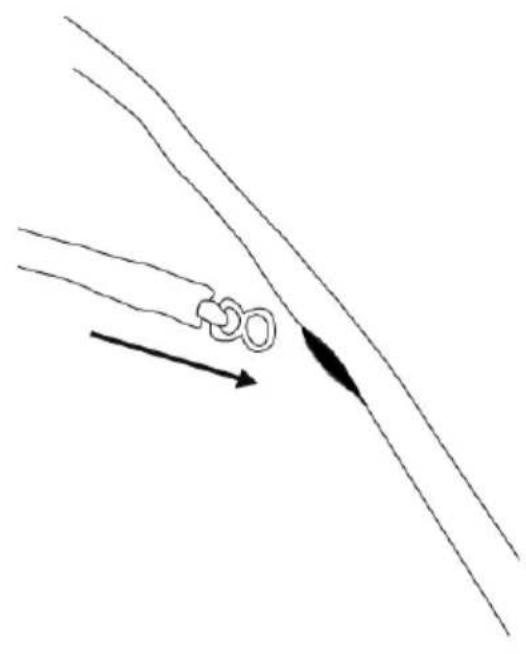
Connect two bars (2) in a central point, sliding one of them through the loop in the other bar (FIG I). Connect the bars (2) to the playmat (1) using the mounting hooks. To do so, insert the mounting hooks through the holes in the mat (FIG. IIa). Then attach them to the four loops on the bottom of the playmat base (FIG IIb).
-
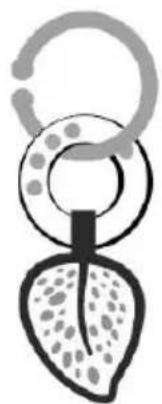
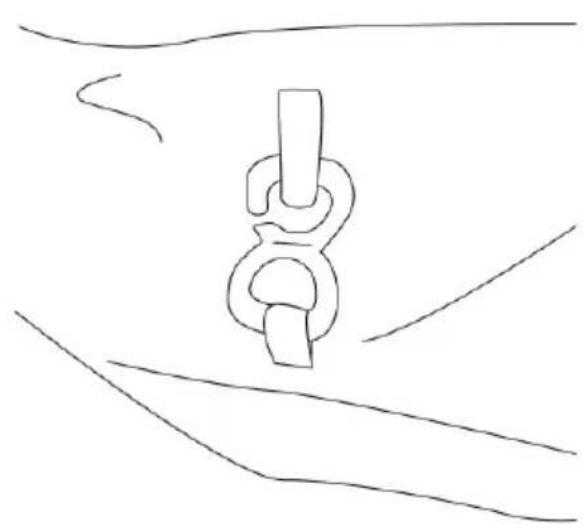
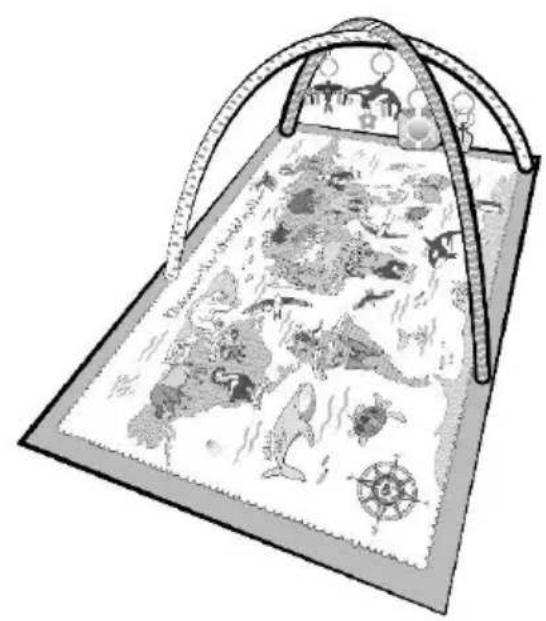
Hang the hooks with the mirror (4), rattle (5), orc teether (6) and swallow (7) from the bars (2) (FIG III). You should obtain a construction shown in Fig IV.
Disassembly
- Remove the hooks with the mirror (4), rattle (5), orc teether (6) and swallow (7) from the bars (2).
- Assemble the bars (2) by detaching the mounting hooks from the base of the playmat (1).
- Fold the base of the playmat (1) and put all the components in the box.
Folding the playmat for an older child
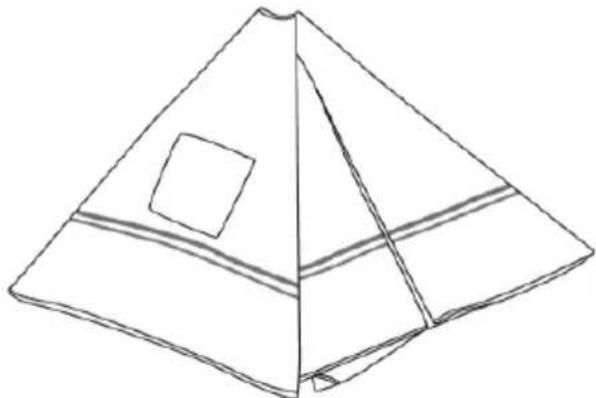
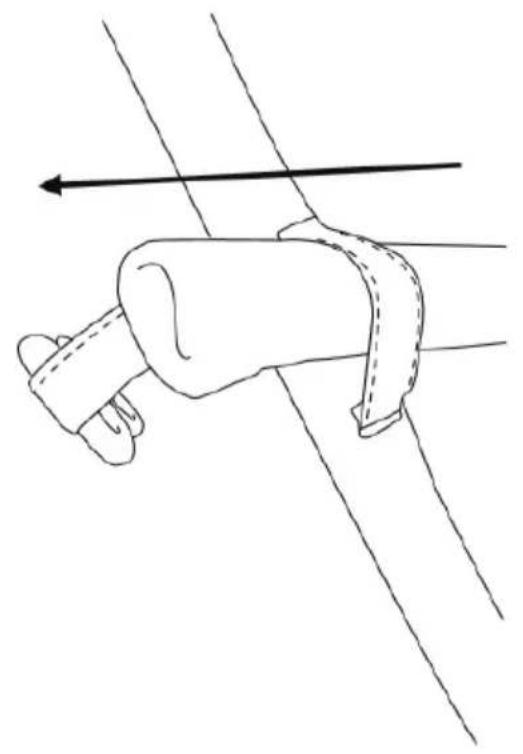
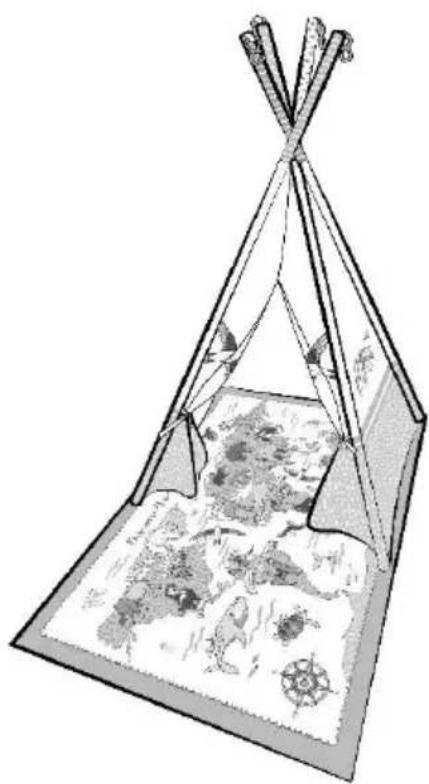
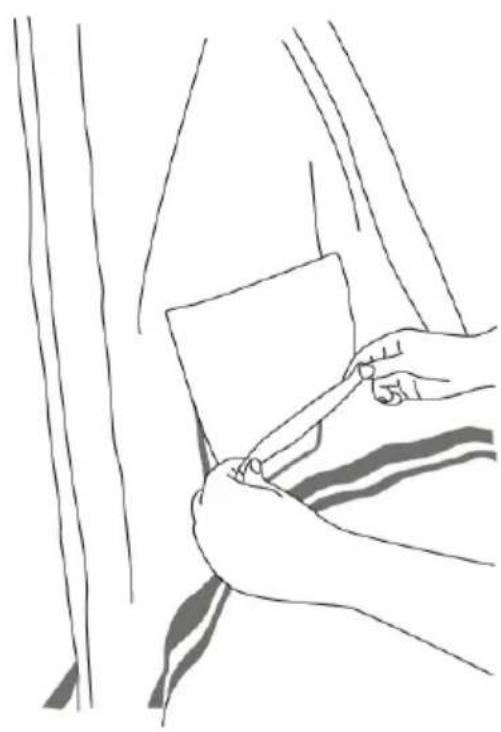
- Slide each bar (2) into one of the four holes in the tent (3) and drag it through (FIG V).
- Connect the bar (2) to the playmat (1) with the mounting hooks. To do this, insert the mounting hooks through the holes in the mat. (Fig. IIa), and then attach to the four loops on the bottom of the playmat base (IIb).
- You should obtain a construction shown in Fig. VI
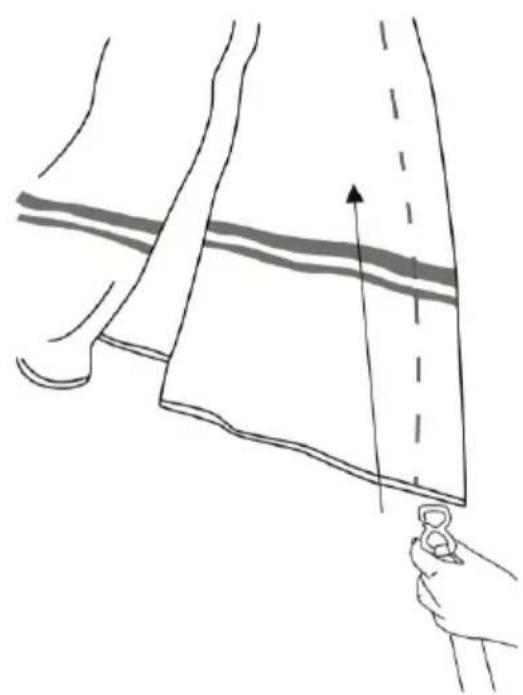
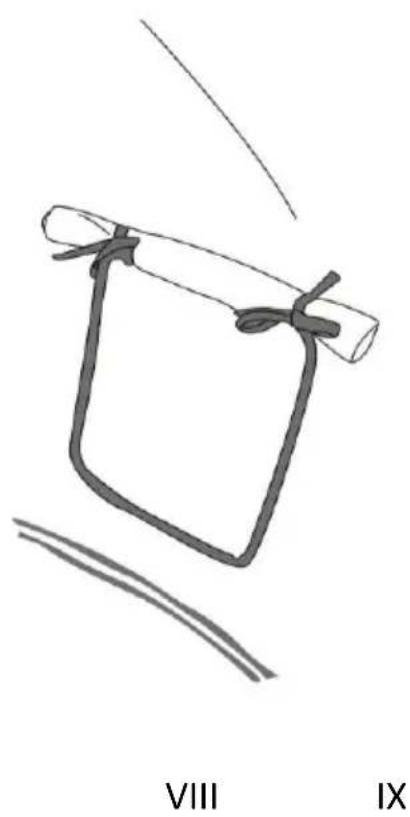
The blinds in the windows can be rolled up. To do this, first roll up the blind (fig.VII) and then fix it to the tent with strings (fig.VIII). (You can also tie the entrance opening with cords (fig. IX).
Disassembly
- Assemble the bars (2) by detaching the mounting hooks from the base of the playmat (1).
- Take out all the bars from the holes in the tent.
- Fold the base of the playmat (1) and put all the components in the box.
Maintenance and cleaning
The educational mat base and the cushion can be machine washed at 30 degrees Celsius. Other elements must not be washed, but cleaned with a damp cloth.
 | Do not wash. Clean the product gently with a damp cloth and a mild detergent. |  | Wash at max. 30°C, gentle process. |
 | Do not bleach |  | Do not tumble dry |
 | Natural drying, on a rope or hanger |  | Do not iron |
 | Do not dry clean |
Do not fold or store the product when it is wet and never store it in wet conditions, as it can lead to mould growth.
Storage
Keep the product folded out of the reach of children.
Warranty
A. All Kinderkraft products are covered by a 24-month warranty. The warranty period begins on the date of releasing the product to the Buyer.
B. The warranty is valid for products sold in the following countries: France, Spain, Germany, Poland, United Kingdom, Italy.
C. In countries not listed above warranty terms and conditions are determined by the Seller.
D. It is possible to extend the warranty period to 120 months (10 years). Full text of the terms and conditions and warranty extension registration form are available at WWW.KINDERKRAFT.COM
E. The warranty is valid only in the country where the purchase was made.
F. Complaints should be submitted by completing the form available at WWW.RMA.KINDERKRAFT.COM
G. The warranty shall not cover:
a. claims arising from product specifications, as long as they comply with those specified by the manufacturer in the instruction manual or other documents of a legislative nature;
b. product damage caused by improper maintenance or use of inadequate chemicals;
c. colour change (discolouration) when the product has been exposed to direct sunlight against the instructions provided in the instruction manual;
d. tear, wear, crack of fabric/plastic that is the fault of the Customer;
e. reduction in the quality of the product and consumables due to normal wear and tear;
f. products which have not been used according to specifications;
H. The warranty period for accessories attached to the device is 6 months from the date of sale, with the exception of mechanical damage.
I. These guarantee terms and conditions are complementary to the Customer's rights in relation to 4KRAFT sp. z o.o. The warranty shall not exclude, limit or suspend the rights of the Customer arising from the provisions on the warranty for defects in the goods sold.
J. Full text of Warranty Terms and Conditions is available at WWW.KINDERKRAFT.COM
All rights to this data are entirely reserved to 4Kraft Sp. z o.o. Any unauthorized use or misuse, including usufruct, copying, duplication and sharing, wholly or partially, without consent of 4Kraft Sp. z o.o. may result in legal consequences.
ES
¡Estimado Cliente!
In the interests of our Clients - we are at your disposal! If you have a problem with the product you received, contact us in the most convenient way for you!