
PMD-602A - Digital audio recorder MARANTZ - Free user manual and instructions
Find the device manual for free PMD-602A MARANTZ in PDF.

| Product type | Digital audio recorder |
| Brand | Marantz |
| Model | PMD-602A |
| Power supply | 4 AA batteries (LR6) or 12V/48V phantom power |
| Audio inputs | 2x combo XLR/6.35 mm jacks (MIC/LINE/PH), 1x 3.5 mm TRS input (camera) |
| Audio outputs | 1x 3.5 mm TRS headphone output, 1x 3.5 mm TRS output (camera) |
| Signal type | Mono or stereo (selectable) |
| Functions | Per-channel adjustable limiter, Hi/Lo gain selector, preamplifier, 12/48V phantom power |
| Level indicators | LED with 3 dB increments (from -18 to +3 dB) |
| Mounting | Shoe mount for standard camera hot shoe, threaded tripod mount |
| Compatibility | DSLR cameras (via 3.5 mm input/output) |
| Dimensions (estimated) | Approximately 150 x 80 x 40 mm |
| Weight (estimated) | Approximately 0.5 kg (without batteries) |
| Included accessories | User guide, safety instructions, and warranty information |
| Maintenance | Clean with a soft, dry cloth. Do not use abrasive products. |
| Safety | Use only recommended batteries. Do not expose to moisture or extreme temperatures. Disconnect before changing batteries. |
| Repairability | Spare parts not specified. Contact Marantz after-sales service for any repairs. |
| Website | marantzpro.com |
Frequently Asked Questions - PMD-602A MARANTZ
User questions about PMD-602A MARANTZ
0 question about this device. Answer the ones you know or ask your own.
Ask a new question about this device
Download the instructions for your Digital audio recorder in PDF format for free! Find your manual PMD-602A - MARANTZ and take your electronic device back in hand. On this page are published all the documents necessary for the use of your device. PMD-602A by MARANTZ.
USER MANUAL PMD-602A MARANTZ
User Guide (English)
Introduction
Box Contents
PMD-602A
User Guide
Safety & Warranty Manual
Support
For the latest information about this product (documentation, technical specifications, system requirements, compatibility information, etc.) and product registration, visit marantzpro.com.
For additional product support, visit marantzpro.com/support.
Features
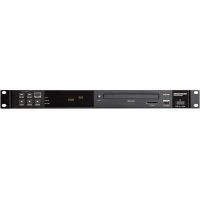
Front Panel
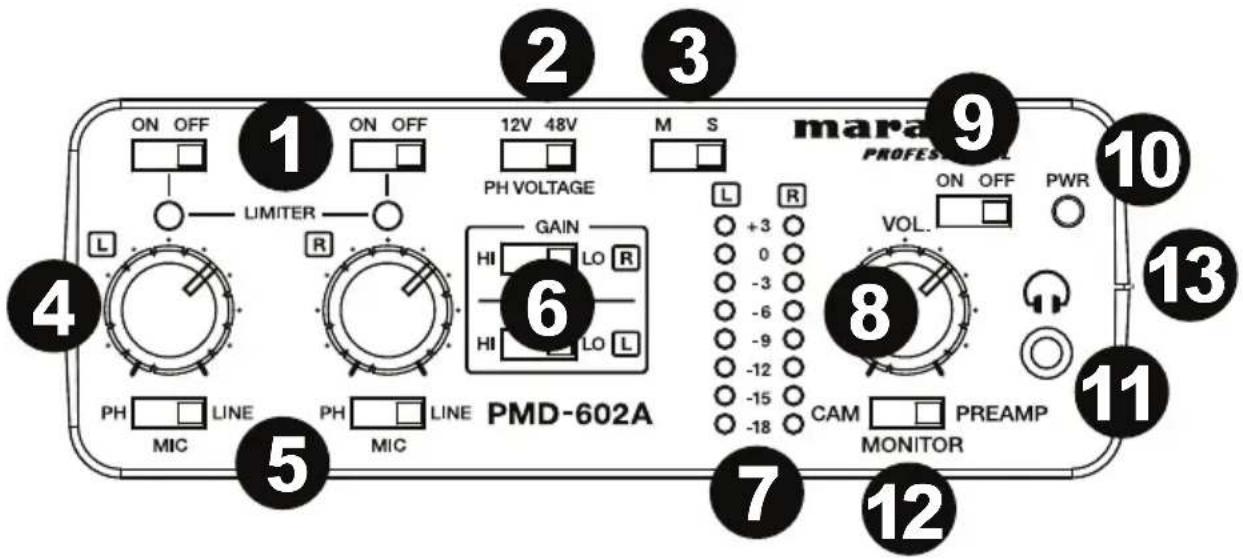
- Limiter: Adjust these switches to turn the limiters On and Off. When the limiter is on, the mic/line input gain will be automatically adjusted according to the set input level so that distortion does not occur.
Note: If the input level is set too high, distortion may occur even when the limiter is on. If this is the case, lower the input level or decrease the distance from the microphone and the sound source.
-
Phantom Power Selector: When using condenser microphones, set the phantom power switch to 12V or 48V accordingly.
-
Output Type: Adjust the switch to select Mono or Stereo for the type of signal that is outputted.
-
Level Control: Adjust the rotary knobs to set the level for the XLR inputs.
-
Input Selector: Adjust the switch to select the input type: Line (for line-level sources), Mic (for self-powered microphones), or PH (for microphones that require phantom power).
-
Gain Selector: Select low or high gain for the XLR inputs.
-
Level Indicator LED: View the input level LEDs in +3dB increments.
-
Headphone Level Control: Adjust the rotary knob to set the level of the headphone output.
-
Power ON/OFF Switch: Adjust this switch to turn the unit On and Off.
-
Power-ON Indicator: This LED will illuminate green when the unit is On.
-
1/8" Headphone Output: Connect headphones to the 1/8" (3.5 mm) TRS output.
-
Output Selector Switch: Adjust this switch to send the audio to your DSLR camera (PREAMP) or to listen to the audio signal from your DSLR camera (CAM).
-
Battery Compartment: Insert 4 AA batteries into this side compartment to power the unit.
Rear Panel
-
XLR-1/4" TRS input: Connect a microphone or line-level device to the XLR-1/4" (6.35 mm) input.
-
XLR-1/4" TRS input: Connect a microphone or line-level device to the XLR-1/4" (6.35 mm) input.
Note: Ensure that phantom power is turned off before connecting a line-level device to the XLR-1/4" inputs. If you connect a line-level device while phantom power is being supplied, this can damage the device or this unit.
Note: When using a condenser microphone, before connecting to and disconnecting from the XLR-1/4" inputs, ensure that phantom power is turned off. If you connect or disconnect a microphone while phantom power is being supplied, this can damage the unit or the microphone.
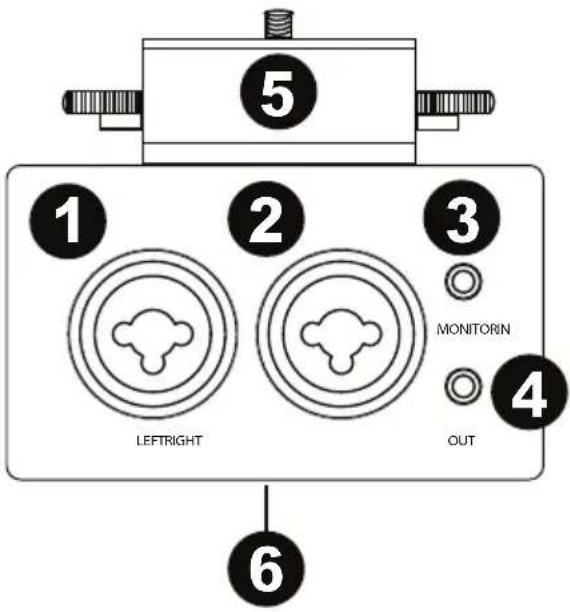
Note: Do not connect a dynamic microphone to an XLR-1/4" input when phantom power is turned on. Doing so could damage the microphone or this unit.
- 1/8" Input: Connect the audio output of a DSLR camera to this 1/8" (3.5 mm) TRS input.
- 1/8" Output: Connect this 1/8" (3.5 mm) TRS output to the audio input of a DSLR camera.
- Hot Shoe Mount: Attach a DSLR camera on top of this hotshoe mount.
- Threaded Insert: Connect your mounting adapter from a tripod, digital recorder, or lighting panel here.
Setup
Items not listed under Introduction > Box Contents are sold separately.
flowchart
graph TD
    A["Microphone"] --> B["Headphones"]
    B --> C["Tripod"]
    C --> D["Camera audio output"]
    D --> E["Camera mic input"]
    C --> F["JPMS-4HT"]
    C --> G["GT"]
    C --> H["Ground"]
Operation
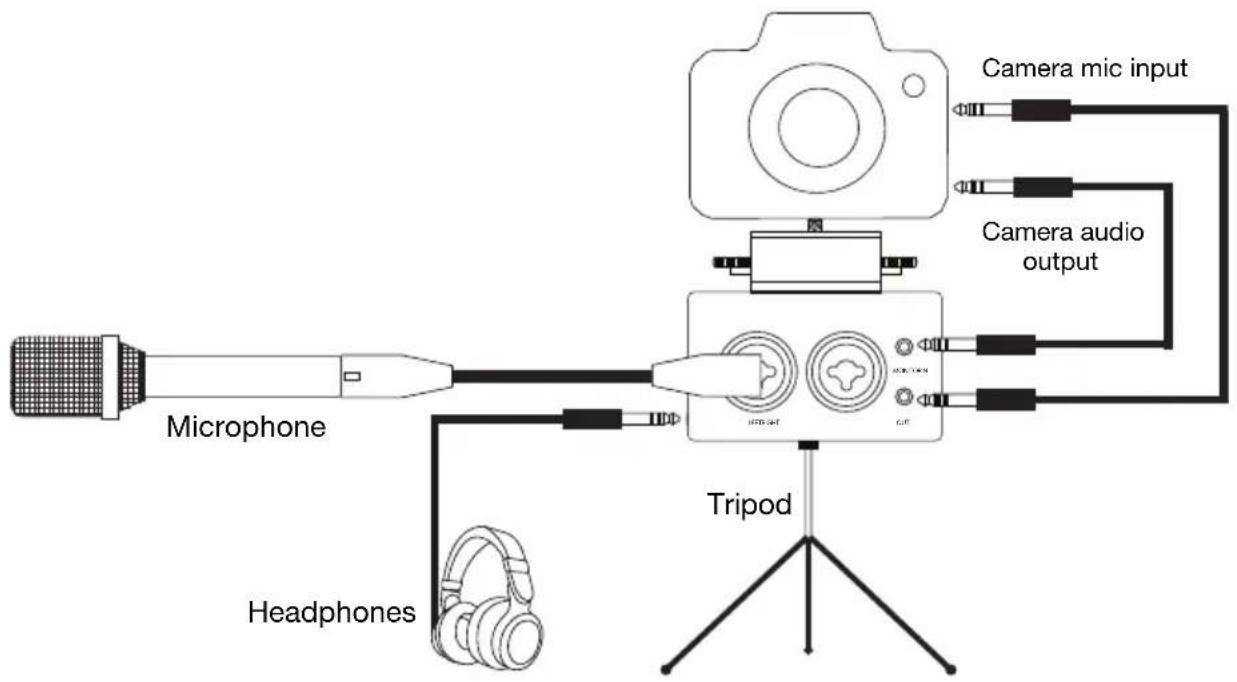
- Attach your DSLR camera securely on top of the hot shoe mount.
- Attach the Threaded Insert on PMD-602A onto your tripod mount.
- Place the tripod on a level surface.
- Connect microphones or line-level devices to PMD-602A and use the Input Selector to choose Line (for line-level sources), Mic (for self-powered microphones), or PH (for microphones that require phantom power).
- If your microphone requires phantom power, select the appropriate voltage for your microphone (12V or 48V) using the PH Voltage switch.
- Adjust the Level control to set the gain for the input signal.
- Set the Gain Selector for the channel to Hi (high) or Lo (low), depending on your source.
- Use headphones to monitor the input signal or to hear the audio playback from your DSLR camera.
Assistance technique
Technical Specifications
| Power Requirement | 4 AA batteries |
| Battery Life | 15 hours (with phantom power off)12 hours (with phantom power on) |
| Power Consumption | < 5 W |
| Operating Temperature | 41-140°F / 5-60°C |
| Operating Humidity | 25-85%, non-condensing |
| Frequency Response | 20 Hz-20 kHz, ±1 dB |
| Signal-to-Noise Ratio | >94 dB |
| Max Mic Input Level | -20 dBu (high gain), +10 dB (low gain) |
| Mic Input Sensitivity | -40 dBu |
| Mic Input Impedance | 2 kΩ |
| Max Line Input Level | +24 dB |
| Line Input Impedance | 10 kΩ |
| Connectors | (2) XLR-1/4" (6.35 mm) TRS stereo inputs(1) 1/8" (3.5 mm) TRS stereo output(1) 1/8" (3.5 mm) stereo headphone output |
| Phantom Power | 12V and 48V (switchable) |
| Maximum Voltage Gain | -24 dB |
| Dimensions(width x depth x height) | 2.5" x 6.0" x 1.5"64 x 152 x 38 mm |
| Weight | 1.40 lbs.0.63 kg |
Specifications are subject to change without notice.
Trademarks & Licenses
Marantz is a trademark of D&M Holdings Inc., registered in the U.S. and other countries. Marantz Professional products are produced by inMusic Brands, Inc., Cumberland, RI 02864, USA.
All other product names, company names, trademarks, or trade names are those of their respective owners.
marantzpro.com
Brand : MARANTZ
Model : PMD-602A
Category : Digital audio recorder