
PMD500D - Digital audio recorder MARANTZ - Free user manual and instructions
Find the device manual for free PMD500D MARANTZ in PDF.
| Product Type | Digital Audio Recorder / Professional DVD Player |
| Brand | Marantz |
| Model | PMD-500D |
| Supported Disc Formats | DVD, DVD+R, DVD-R, DVD+RW, DVD-RW, CD, CD-R, CD-RW, HDCD, SVCD, VCD |
| USB/SD File Formats | Video: .3gp, .avi, .dat, .divx, .mpg, .ogm, .vob - Audio: .mp3, .ogg, .wma - Image: .jpg |
| Audio Outputs | Balanced XLR, unbalanced RCA, digital coaxial, digital optical TOSLINK |
| Video Outputs | HDMI, composite RCA, component Y/Pb/Pr |
| Power Supply | AC mains via included cable |
| Rack Mounting | Standard EIA 19-inch rack, 1U size |
| Main Functions | Disc playback, USB, SD cards; infrared remote control; key, IR and display lock; programmed playback; repeat; cue points; file management (copy, delete) |
| Audio Settings | Variable/fixed volume, dynamic compression, stereo downmix, PCM output |
| Video Settings | Resolution up to 1080p, aspect ratio, adjustments (sharpness, brightness, etc.), HDMI deep color |
| Parental Control | Rating from Kid Safe to Adult, 4-digit password |
| Maintenance | Wipe with a soft cloth, do not use benzene or thinner |
| Safety | Unplug if not used for extended period; avoid condensation; do not expose to heat or moisture |
| Included Accessories | Remote control with batteries, power cable, rack mounting brackets and screws |
Frequently Asked Questions - PMD500D MARANTZ
User questions about PMD500D MARANTZ
0 question about this device. Answer the ones you know or ask your own.
Ask a new question about this device
Download the instructions for your Digital audio recorder in PDF format for free! Find your manual PMD500D - MARANTZ and take your electronic device back in hand. On this page are published all the documents necessary for the use of your device. PMD500D by MARANTZ.
USER MANUAL PMD500D MARANTZ
User Guide (English)
Introduction
| Box Contents | Support | |
| PMD-500D | Rack Ears & Screws | For the latest information about this product (system requirements, compatibility information, etc.) and product registration, visit marantzpro.com. |
| Power Cable | User Guide | |
| Remote Control | Safety & Warranty Manual | |
Safety Instructions
Please also see the included Safety & Warranty Manual for more information.
| Before turning the power on: | Make sure all connections are secure and correct and that there are no problems with the connection cables.Power is supplied to some of the circuitry even when the unit is powered off. When the unit will not be used for long periods of time, disconnect the power cable from the power outlet. |
| Proper ventilation: | If the unit is left in a room which is not properly ventilated or is full of smoke from cigarettes, dust, etc. for long periods of time, the surface of the optical pickup may get dirty, causing incorrect operation. |
| About condensation: | If there is a major difference in temperature between the inside of the unit and the surroundings, condensation may form inside the unit, causing the unit not to operate properly. If this happens, let the unit sit for an hour or two while powered off, and wait until there is little difference in temperature before using the unit. |
| Cautions on using mobile phones: | Using a mobile phone near this unit may cause noise. If this occurs, move the mobile phone away from this unit when it is in use. |
| Moving the unit: | Before moving the unit, turn off its power and disconnect the power cable from the power outlet. Next, disconnect its connection cables from other devices before moving it. |
| About care: | Wipe the cabinet and control panel clean with a soft cloth.Follow the instructions when using a chemical cleaner.Do not use benzene, paint thinner, insecticide, or other organic solvents to clean the unit. These materials can cause material changes and discoloration. |
| Rackmount warnings:(required rack specifications for mounting the unit in a rack) | EIA standard 19-inch (483 mm) rack1U-size installation compatible rackRack that has a guide rail or shelf board that can support this device 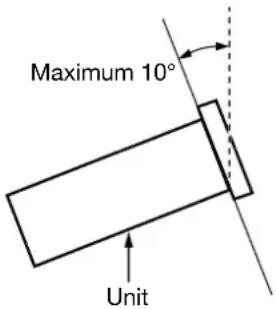 |
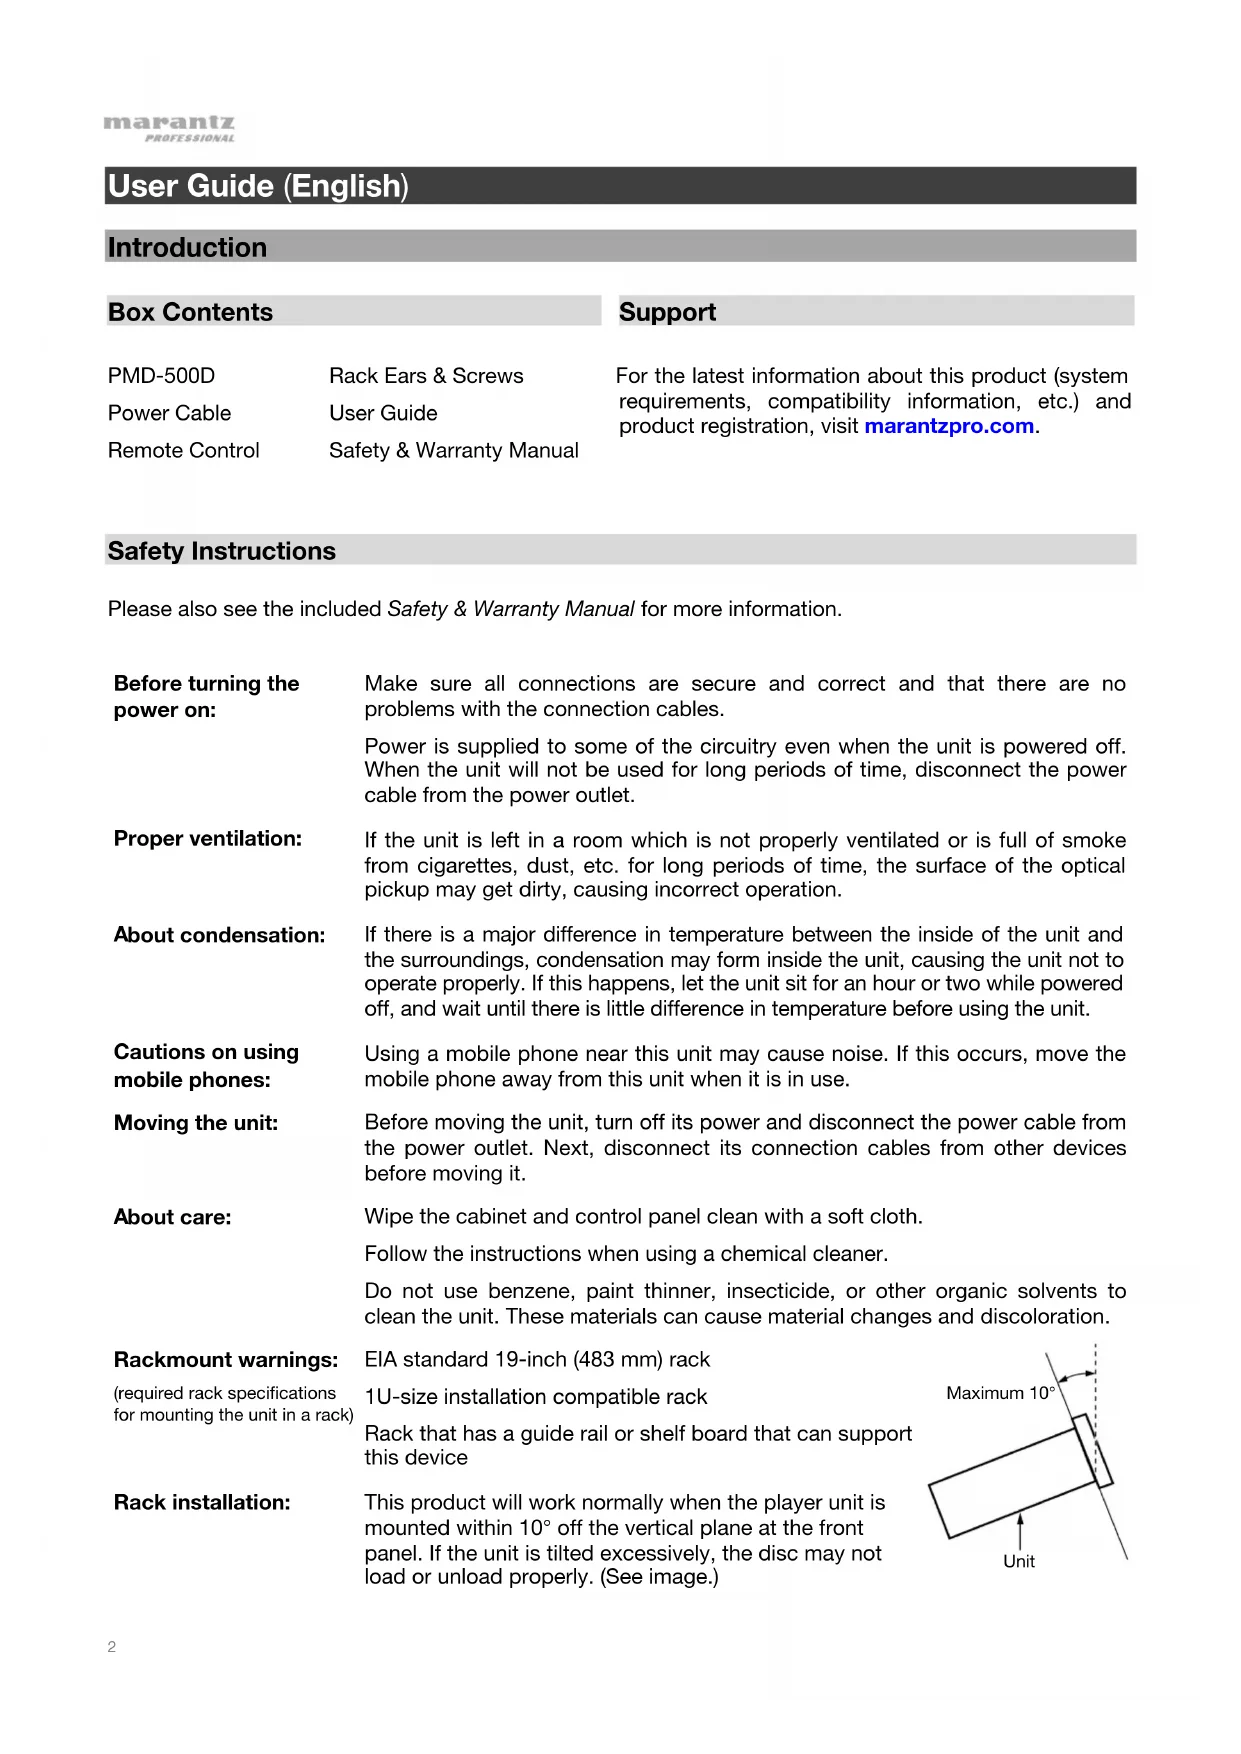
| Rack installation: | This product will work normally when the player unit is mounted within 10^ off the vertical plane at the front panel. If the unit is tilted excessively, the disc may not load or unload properly. (See image.) |
Features
Front Panel

- Power: Press this button to turn PMD-500D on/off. The light above the button will be red when it is in standby mode or green when it is on. Make sure the AC In is properly connected to a power outlet. Do not turn the unit off during media playback—doing so could damage your media.
- USB Port: Connect a mass-storage-class USB device to this port. See Operation > Playing Files (Video, Audio, or Picture) for more information.
- SD Card Slot: Insert an SD or SDHC card into this slot. See Operation > Playing Files (Video, Audio, or Picture) for more information.
- Disc Tray: Insert a compatible disc into this tray when it is open.
- Eject: Press this to eject or close the disc tray.
- Remote Sensor: Point the remote control at this sensor when operating it. See Remote Control for more information.
- Display: This screen indicates the unit's current operation.
- Mode Indicators: These lights indicated whether or not certain functions are enabled or disabled (Lock, IR Lock, or Hide OSD). See Other Features for more information.
- Shift: Press and hold this button to perform the secondary function of any one of the five buttons next to it (described below).
- Skip Back (◀◀): Press this button to skip to the previous chapter, track, or file. Press and hold Shift and press this button to cycle through the Repeat modes. See the Operation chapter for more information.
- Skip Forward (▶▶I): Press this button to skip to the next chapter, track, or file. Press and hold Shift and press this button to loop a section of video or audio during playback. See the Operation chapter for more information.
- Stop (■): Press this button to stop playback. Press and hold Shift and press this button to enable/disable the Lock feature. See Other Features for more information.
- Pause (II): Press this button to pause playback. Press and hold Shift and press this button to enable/disable the IR Lock feature. See Other Features for more information.
- Play (▶): Press this button to start or resume playback. Press and hold Shift and press this button to enable/disable the Hide OSD feature. See Other Features for more information.
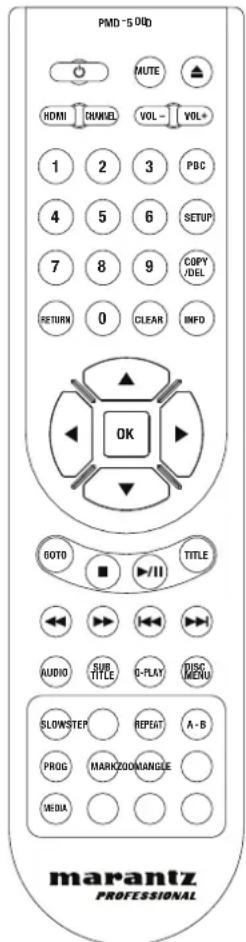
Rear Panel

- Audio Outputs (balanced, XLR): These outputs send the audio signal to your external speakers, receiver, etc. Use XLR cables to make these connections.
- Audio Outputs (unbalanced, RCA): These outputs send the audio signal to your external speakers, receiver, etc. Use RCA cables to make these connections.
- Composite Video Output: This output sends the video signal to your TV, display, etc. Use a standard RCA composite video cable to make this connection.
- Component Video Output: These outputs send the video signal to your TV, display, etc. Use standard RCA component (Y/Pb/Pr) video cables to make these connections.
- Coaxial Output: This output sends the digital audio signal to your TV. Use a standard coaxial cable to make this connection.
- HDMI Output: This output sends an HDMI audio and video signal from an external device. Use a standard HDMI cable to make this connection.
- Digital Optical Audio Output: This output sends the audio signal to your TV, receiver, etc. Use a digital optical TOSLINK cable (IEC60958 Type II S/PDIF compatible) to make this connection.
- Remote Input: This input lets you connect a host device (usually a computer) to PMD-500D. You can use the host device to control PMD-500D via commands sent from it (using RS-232C serial communication). Use a 9-pin D-Sub cable to make this connection.
Note: Visit marantzpro.com to download the serial protocol guide for PMD-500D.
- AC In: Use the included power cable to connect this input to a power outlet.
See Setup > Connections for more information.
Remote Control
Important: Point the remote control at the remote sensor when operating it. If the remote sensor is exposed to direct sunlight, strong artificial light (like from an interverter-type fluorescent lamp), or infrared light, the unit or remote control may not function properly.
- Power ( ⏻): Press this button to turn PMD-500D on/off. The light above the button on PMD-500D will be red when it is in standby mode or green when it is on. Make sure the AC In is properly connected to a power outlet. Do not turn the unit off during media playback—doing so could damage your media.
- Mute: Press this button to mute PMD-500D's audio. If this button does not work, set the Output Volume to Variable instead of Fixed (see Adjusting the Settings > Setting > Audio Setup to learn how to do this).
- Eject (▲): Press this to eject the disc tray.
- HDMI: Press this button to select the next available picture resolution: Auto (PMD-500D will detect the optimal resolution automatically), 480i/576i, 480p/576p, 720p, 1080i, or 1080p.
- Channel: Press this button to change the audio playback mix: Left Mono, Right Mono, Mix-Mono, or Stereo (default).
- Volume -/+: Press these buttons to lower or raise the volume (respectively). If these buttons do not work, set the Output Volume to Variable instead of Fixed (see Adjusting the Settings > Setting > Audio Setup to learn how to do this).
- Number Buttons (0–9): Press these buttons to enter their corresponding numbers. While playing media and not viewing an additional menu or screen, entering a number or numbers will select that disc chapter or audio track.
-
Return: Press this button to return to the previous menu/screen.
-
Clear: Press this button to clear (delete everything in) the current field.
-
PBC: Press this button to enable playback control when using compatible SVCD or VCD discs. Refer to the information supplied with your disc for available playback control functions.
-
Setup: Press this button to open the Setup Menu. See Operation >Adjusting the Settings >Setting for more information.
-
Copy/Del: Press this button to access the media management options in the media center, which will allow you to copy and delete files on your USB and SD/SDHC card drives.
-
Info: Press this button to view available information about the source on your display. The options depend on the current playback source. See the Operation chapter for more information.
-
Cursor Buttons (▲▼◀▶): Use these buttons to navigate through the files and folders.
-
OK: Press this button to confirm a selection.
-
GoTo: Press this button to jump to a specific file, track, chapter, time, etc. The available options depend on the current playback source. See the Operation chapter for more information.
-
Stop (■): Press this button to stop playback.
-
Play/Pause (▶/II): Press this button to start, pause, or resume playback.
-
Title: Press this button to stop playback and return to the disc's title menu.
-
Search Back/Forward (◄◄/►►): Press these buttons to rewind/fast-forward, respectively. Each time you press the same button, the speed will increase. You can do this up to 5 times before it returns to normal playback speed.
-
Skip Back/Forward (◀◀/▶◀): Press one of these buttons to skip to the previous or next track, chapter, or file during playback. When viewing the file list in the media center, press one of these buttons to skip to the previous or next page of files.
- Audio: Press this button during video playback to show current audio setting in the upper-left corner of the screen. Each press after that will select the next available setting. The available settings depend on the supported audio configurations of your video.
- Subtitle: Press this button to show the current subtitle language in the upper-right corner of the screen. Each press after that will select the next available subtitle language. Select Off to disable the subtitles.
- Q-Play: Press this button to initiate Quick Play, which will take you directly to the start of the video, bypassing any titles.
- Disc Menu: Press this button to view the disc's menu without pausing playback. To resume playback, press this button again.
- Slow: Press this button to slow down video playback. Each time you press the button, the playback speed (or direction) will change: Forward 1/2, 1/4, 1/8, 1/16, then Reverse 1/2, 1/4, 1/8, 1/16.
- Step: Press this button to stop playback and step the video playback forward each time you press the button.
- Repeat: Press this button to cycle through the Repeat modes.
- A-B: Use this button to loop a section of video or audio during playback.
- Prog: Press this button to show the Program page, which lets you select tracks that will play in a specific order. See Operation > Playing Audio Discs > Additional Functions for more information.
- Mark: Press this button to "mark" a location of a video. When in the media center, press this button to add a track, video, or picture to a playlist. See Operation > Playing Files (Video, Audio, or Picture) > Additional Functions for more information.
- Zoom: Press this button to zoom in or out of the picture. Each press will select the next available zoom distance: 2x, 3x, 4x, 1/2, 1/3, and 1/4. When no zoom distance is shown on the screen, the picture is at its normal zoom distance.
- Angle: Press this button to select a different camera angle. This feature is available only on certain DVD Discs.
- Media: Press this button to switch between media playback types (DVD, USB, SD/SDHC card).
- Green, Yellow, Blue: Press these buttons to perform functions that are specific to the disc you are using. (Your disc may provide information about how to use these buttons.) These functions vary between discs and may not be supported on all discs.
Battery Usage
To replace the battery:
- On the back of the remote control, remove the battery compartment door.
- Remove any old batteries from the compartment and insert 2 new AAA batteries. Make sure each one is facing the proper direction according to its polarities (+ or -).
- Push the battery compartment door back into its original position.
Important: Keep the following points in mind when using or replacing batteries:
- Use 2 AAA batteries.
- Do not handle batteries roughly or disassemble them.
- When replacing the batteries, place them with their polarities (+ and -) facing the correct directions.
- Do not leave batteries in a place subject to high temperature or direct sunlight.
- Keep batteries in a place beyond the reach of infants or children. If a battery is swallowed, consult a physician immediately.
- Discard any leaking battery immediately. Be careful when handling it as the electrolyte can burn your skin or clothes. If the electrolyte touches your skin or clothes, immediately wash with tap water and consult a physician.
- Before discarding a battery, insulate it with tape, etc. and dispose of it in a place without fire, by following the directions or regulations laid down by the local authorities in the area of its disposal.
Setup
Connections
TV or display
Receiver, amp, powered monitors, etc.
Items not listed in Introduction > Box Contents are sold separately.
Important: Connect all cables securely and properly (with stereo cables: left with left, right with right). Do not bundle or wrap them with the power cable.
Not all of these steps may apply to your specific audio/video setup, but you will need to do Steps 1 and 5 at the very least.
-
Connect PMD-500D to your TV monitor or display by doing one of the following:
-
Use an HDMI cable to connect the HDMI Output to the HDMI input of your TV monitor or display.
- Use an RCA composite video cable to connect the Composite Video Output to the composite video input of your TV monitor or display.
- Use RCA component (Y/Pb/Pr) video cables to connect the Component Video Outputs to the component video inputs of your TV monitor or display.
-
Audio only: Use a coaxial cable to connect the coaxial output to the coaxial input of your TV monitor. Alternatively, use a digital optical TOSLINK cable (IEC60958 Type II S/PDIF compatible) to connect the optical audio output to the optical input of your TV monitor.
-
Optional: Connect PMD-500D to your sound system by doing either/both of the following:
-
Use XLR cables or a stereo RCA cable to connect the audio outputs (balanced or unbalanced) to the analog inputs of your external receiver, amp, powered speakers, etc.
-
Use a digital optical TOSLINK cable (IEC60958 Type II S/PDIF compatible) to connect the optical audio output to the optical input of your external receiver.
-
Optional: Connect a USB hard drive or SD/SDHC card with playable content to the USB port or SD card slot.
- Optional: Use a 9-pin D-Sub cable to connect the Remote Input to a host device (usually a computer) that will control it.
Note: Visit marantzpro.com to download the serial protocol guide for PMD-500D.
- After completing all the connections, use the included power cable to connect the AC In to a power outlet.
Operation
If the unit is in standby mode, press the Power Button to power it on.
Important: Do not place heavy objects on top of PMD-500D. Doing so can cause issues with disc playback or damage the unit.
Playing Video Discs
PMD-500D can play and view the following video disc formats: DVD, DVD+R, DVD-R, DVD+RW, DVD-RW
See the Basic Functions section to learn some basic operations.
See Additional Functions to learn more advanced ones.
Basic Functions
To play a disc:
- Press Eject (▲) on PMD-500D or the remote control to open the disc tray.
- Insert a disc into the disc tray, and press Eject (▲) on PMD-500D or the remote control again to close it. The display will show Loading when the disc is loading.
- Once the disc has loaded, playback will begin immediately. See Operation >Adjusting the Settings >Playback Setup for more information on how to change Auto Play settings.
To stop playback, press Stop (■) on PMD-500D or the remote control.
To pause playback, press Pause (II) on PMD-500D or Play/Pause (▶/III) on the remote control. To resume playback, press Pause (II) or Play (▶) on PMD-500D or Play/Pause (▶/III) on the remote control.
To rewind or fast-forward, press Search Back/Forward (◀◀/▶) on the remote control. Each time you press the same button, the speed will increase. You can do this up to 5 times before it returns to normal playback speed. To resume playback, press Play (▶) on PMD-500D or Play/Pause (▶/II) on the remote control.
To skip to the next chapter, press Skip Forward (▶▶) on PMD-500D or the remote control. If Chapter Repeat is on (described later), this will skip to the beginning of the current chapter.
To skip to the previous chapter, press Skip Back (◀◀) on PMD-500D or the remote control. If Chapter Repeat is on (described later), this will skip to the beginning of the current chapter.
Additional Functions
To view the title menu, press Title on the remote control. This will stop playback.
To view the disc menu without pausing playback, press Disc Menu on the remote control. To resume playback, press the Disc Menu button again.
To display title and chapter information, press the Info button. Continue to press the button to change the what appears in the Info display. You can choose Title Elapsed, Title Remain, Chapter Elapsed, and Chapter Remain. Press Info again to turn the display Off.
To view the GoTo menu, press the GoTo button on the remote control. In this menu, you can access the following options by pressing the up/down cursor buttons (▲▼). While viewing any option, press the left cursor button (◀) to return to the previous menu level.
- Title: Displays the current and total titles on the disc. Press OK to “unlock” this field. Use the number buttons (0–9) to select the number of the desired title, and then press OK to jump to it.
- Chapter: Displays the current and total chapters on the disc. Press OK to “unlock” this field. Use the number buttons (0–9) to select the number of the desired chapter, and then press OK to jump to it.
- Audio: Press OK to view the available audio options. Use the up/down cursor buttons (▲▼) to select an option, then press OK to apply. The available settings depend on the supported audio configurations of your video.
- Subtitle: Press OK to view the available Subtitle languages. Use the up/down cursor buttons (▲▼) to browse the languages, and then press OK to select that language. The available settings depend on the supported subtitle languages of your video.
- Angle: Press OK to “unlock” this field. Use the number buttons (0–9) to select a camera angle, and then press OK to apply. This feature is only available on certain DVDs.
- Tt Time: Displays the total time of the current title. Press OK to “unlock” this field, and then use the number buttons (0–9) to enter a specific time to jump to in the current title.
- Ch Time: Displays the total time of the current chapter. Press OK to “unlock” this field, and use the number buttons (0–9) to enter a specific time in the current chapter.
- Repeat: Press OK to view the Repeat settings. Use the up/down cursor buttons (▲▼) to browse the options, and then press OK to select that repeat mode. You can select Chapter, Title, All, or Off.
- Time Disp.: Press OK to view the time display options. Select Title Elapsed, Title Remain, Chapter Elapsed, or Chapter Remain.
To select a Repeat mode, press Repeat on the remote control, or press Shift and Skip Back (◀◀) on PMD-500D. It will cycle through 4 modes:
- Chapter Repeat: The current chapter will repeat continuously. In this Repeat mode, pressing will Skip Back/Forward (◄◄/►) till skip to the beginning of the current chapter only.
• Title Repeat: The current title will repeat continuously.
• All: All titles will repeat continuously. - Off: Normal operation.
To loop a section of the video:
- Set the desired starting point by pressing A-B on the remote control, or press Shift and Skip Forward (▶▶) on PMD-500D. A- will appear on the screen.
- Set the desired ending point by pressing A-B again or pressing Shift and Skip Forward (▶▶) on PMD-500D again. A-B will appear on the screen, and the loop will start and repeat continuously.
- To stop the loop, press A-B on the remote once more, or press Shift and Skip Forward (▶▶I) on PMD-500D once more. A-B will disappear from the screen, and playback will continue normally.
To jump to a specific chapter of the disc:
- Use the number buttons (0–9) on the remote control to select the number of the desired chapter.
- To confirm your choice, press OK or wait a few seconds. The desired chapter will start playing.
To cancel, press Clear.
A bookmark is a specific location in a video that is stored in PMD-500D's memory. You can set up to 12 bookmarks and then jump to those locations directly, saving you the time of scanning through the video later.
To create a bookmark, press Mark on the remote control at the desired location during video playback. The screen will show the number of the bookmark, current title, current chapter, and current time.
To jump to a bookmark:
- Press Mark on the remote control. Playback will pause and the bookmarks will appear on the screen.
- Use the left/right cursor buttons (◀▶) to move through the bookmarks. When you select a bookmark, you will see the current title, current chapter, and current time above it. The bookmarks you have created are white, and unused bookmarks are gray.
- Press OK or the Play (▶) button to jump to the desired bookmark. Playback will resume from that bookmark's location.
To cancel the operation and return to normal playback, press Mark.
To erase a bookmark:
- Press Mark on the remote control. Playback will pause and the available bookmarks will appear on the screen.
- Press Clear to erase the last-created bookmark.
- Press Mark to close the bookmarks and return to normal playback.
To view subtitles, press Subtitle on the remote control. The current subtitle language will appear in the upper-right corner of the screen. Each press after that will select the next available subtitle language. Select Off to disable the subtitles.
Note: For this feature to work properly, the video must have subtitles available.
Playing Audio Discs
PMD-500D can play and view the following audio disc formats:
Supported CD formats CD, CD-R, CD-RW, HDCD, Super Video CD (SVCD), Video CD (VCD)
Supported DVD formats DVD, DVD+R, DVD-R, DVD+RW, DVD-RW
See the Basic Functions section to learn some basic operations.
See Additional Functions to learn more advanced ones.
Basic Functions
To play audio from a CD:
- Press Eject (▲) on PMD-500D or the remote control to open the disc tray.
- Insert an audio CD into the disc tray, and press Eject (▲) on PMD-500D or the remote control again to close it. (The CD must be properly finalized.) The display will show LOADING when the disc is loading.
- The CD will start playing automatically. See Operation >Adjusting the Settings >Playback Setup for more information on how to change Auto Play settings.
To stop playback, press Stop (■) on PMD-500D or the remote control.
To pause playback, press Pause (II) on PMD-500D or Play/Pause (▶/III) on the remote control. To resume playback, press Pause (II) or Play (▶) on PMD-500D or Play/Pause (▶/III) on the remote control.
To rewind or fast-forward, press Search Back/Forward (◀◀/I) on the remote control. Each time you press the same button, the speed will increase. You can do this up to 5 times before it returns to normal playback speed. To resume playback, press Play (▶) on PMD-500D or Play/Pause (▶/II) on the remote control.
To skip to the next track, press Skip Forward (▶▶) on PMD-500D or the remote control. If Track Repeat is on (described later), this will skip to the beginning of the current track.
To skip to the previous track, press Skip Back (◀◀) on PMD-500D or the remote control. If Track Repeat is on (described later), this will skip to the beginning of the current track.
Additional Functions
To display track and disc information, press the Info button on the remote control. Continue to press the button to change what appears in the Info display. You can choose Single Elapsed, Single Remain, Total Elapsed, or Total Remain. Press Info again to turn the Info display Off.
To select a Repeat mode, press Repeat on the remote control, or press Shift and Skip Back (◀◀) on PMD-500D. It will cycle through 3 modes:
- Repeat Track: The current track will repeat continuously. In this Repeat mode, pressing will Skip Back/Forward (◄◄/►) will skip to the beginning of the current track only.
- Repeat All: The entire disc will repeat continuously.
- Off: Normal operation.
To loop a section of the track:
- Set the desired starting point by pressing A-B on the remote control, or press Shift and Skip Forward (▶▶) on PMD-500D. A- will appear on the screen.
- Set the desired ending point by pressing A-B on the remote control again, or press Shift and Skip Forward (▶▶) on PMD-500D again. A-B will appear on the screen, and the loop will start and repeat continuously.
- To stop the loop, press A-B on the remote once more, or press Shift and Skip Forward (▶▶I) on PMD-500D once more. A-B will disappear from the screen, and playback will continue normally.
To jump to a specific track of the disc:
- Use the number buttons (0–9) on the remote control to select the number of the desired track as a 2-digit number. The desired track will start playing immediately.
To jump to a specific track or time of the disc:
- Press GoTo on the remote control once to select Disc Go To. Use the number buttons (0–9) to enter a 4-digit time to jump to from the total disc time.
- Press GoTo a second time to select Track Go To. Use the number buttons (0–9) to enter a 4-digit time to jump to from the current track.
- Press GoTo a third time to select Select Track. Use the number buttons (0–9) to enter the desired track as a 2-digit number to jump to that track. The track will start playing immediately.
- To exit GoTo without making a selection, wait a few seconds until the pop-up disappears from the display.
- To jump to another location, repeat any Step 1–3.
To create a Program (a list of tracks that will play in a specific order):
- Press Prog on the remote control. The Program page will appear on the screen, showing the 20 available slots of the Program (10 on each page).
- Press OK or the Play/Pause (▶/II) button on the remote control to "unlock" the current slot of the Program (highlighted).
- Use the number buttons (0–9) to enter the desired track with two digits (for example, enter 0, then 4, to select track 4). Once two valid digits have been entered, the program will move to the next available slot.
-
When finished, use the cursor buttons to select Start, and then press OK or the Play/Pause (▶/II) button to begin program playback.
-
You can also do any of the following in the Program page:
-
Press the Skip Back/Forward (◀◀/▶) buttons to switch between viewing program tracks 1-10 and tracks 11-20.
- If the current slot of the Program (outlined in yellow) contains a track number, press Clear on the remote control to clear that slot.
- Use the cursor buttons to select Exit, then press OK or the Play/Pause (▶/II) button to exit Program mode. All selections will be cleared.
While viewing the Program page, you cannot use any buttons (on PMD-500D or the remote control) other than the ones described above.
A bookmark is a specific location in an audio track that is stored in PMD-500D's memory. You can set up to 12 bookmarks and then jump to those locations directly, saving you the time of scanning through the audio later.
To create a bookmark,
- Press Mark on the remote control at the desired location during audio playback. The bookmarks will appear on the screen.
- Use the left/right cursor buttons (◀▶) to move through the bookmarks. The bookmarks you have created are will show a number, and unused bookmarks will be blank.
- Press OK or the Play/Pause (▶/II) button to save the bookmark.
To cancel the operation, press Mark.
To jump to a bookmark:
- Press Mark on the remote control. The bookmarks will appear on the screen.
- Use the cursor buttons to move through the bookmarks. The bookmarks you have created will show a number, and unused bookmarks will be blank. When you select a used bookmark, you will see the current track and current time below it.
- Press OK or the Play/Pause (▶/II) button to jump to the desired bookmark. Playback will resume from that bookmark's location.
To cancel the operation, press Mark.
To erase a bookmark:
- Press Mark on the remote control. The bookmarks will appear on the screen.
- Use the left/right cursor buttons (◀▶) to move through the bookmarks.
- Press Clear to erase the desired bookmark.
- Press Mark to close the bookmarks and return to normal playback.
Playing Files (Video, Audio, or Picture)
PMD-500D can play and view the following file formats on a USB drive (mass storage class) or SD/SDHC card:
Supported video file formats .3gp, .avi, .dat, .divx, .mpg, .ogm, .vob
Subtitle formats (for video) .ass, .smi, .srt, .ssa, .sub
Supported audio file formats .mp3, .ogg, .wma
Supported picture file formats .jpg (or .jpeg)
Important: The USB or SD/SDHC card drive must use a FAT16 or FAT32 file system.
See the Basic Functions section to learn some basic operations.
See Additional Functions to learn more advanced ones.
Basic Functions
To browse your files and play a file:
- Gently insert a USB drive into the USB port or an SD/SDHC card into the SD card slot on the front panel. The display will show LOADING when PMD-500D recognizes the drive.
- Press the Red button to select the desired media source (USB or SD).
-
Do any of the following in the USB or SD/SDHC Media Center:
-
Use the up/down cursor buttons (▲▼) to move to the previous/next item in a list.
- Press OK or Play (▶) to enter a selected folder.
- Press the left cursor button (◀) or Return to return to the next-highest folder (one level above the current one). Alternatively, use the up cursor button (▲) to move to folder labeled .. at the top of the list, and then press OK or Play (▶).
- Press OK or Play (▶) to play a selected file. If you have previously played the file and stopped it before the end, the file will start playing from that point.
To stop playback, press Stop (■) on PMD-500D or the remote control.
To pause playback, press Pause (II) on PMD-500D or the remote control. To resume playback, press Pause (II) or Play (▶) on PMD-500D or Play/Pause (▶/II) on the remote control.
While viewing pictures, these buttons let you pause or resume playback of the slide show.
To rewind or fast-forward, press Search Back/Forward (◀◀/▶) on the remote control. Each time you press the same button, the speed will increase. You can do this up to 5 times before it returns to normal playback speed. To resume playback, press Play (▶) on PMD-500D or Play/Pause (▶/II) on the remote control.
To skip to the next file, press Skip Forward (▶▶) on PMD-500D or the remote control.
To skip to the previous file, press Skip Back (◀◀) on PMD-500D or the remote control.
Additional Functions
To select a Repeat mode, press Repeat on the remote control, or press Shift and Skip Back (◀◀) on PMD-500D. It will cycle through 5 modes:
- Shuffle: All audio, video, or picture files will play in random order.
- Single: The current audio, video, or picture file will play, and then playback will stop.
- Repeat One: The current audio, video, or picture file will repeat.
- Repeat Folder: Audio, video, or picture files in the current folder will repeat.
- Folder: Audio, video, or picture files will play in the order they appear in the current folder. When there are no more files in the current folder, playback will resume in the next folder if there is one. This is the normal operation.
While playing an audio file, the top of the screen will always show the following information: Track Time Elapsed, Total Track Time, and Total Files. Press the Info button to toggle between also displaying Bit Rate and Play/Pause status or Current File Display and Current Repeat Mode.
While viewing a video file, you can do the following:
- Press the Slow button to slow down video playback. Each time you press the button, the playback speed will change: 1/2, 1/4, 1/8, 1/16.
- Press the Step button to stop playback and step the video playback forward each time you press the button.
- Press Info to view the video's Elapsed or Remaining time.
- Press GoTo to jump to another file on the device. Press GoTo a second time to jump to a specific time in the current video.
- Press the Zoom button to change the zoom level.
o Press the cursor buttons to pan the video while zoomed in.
While viewing a picture, you can do the following:
- Press the Stop button to view the picture thumbnails.
- Press the up cursor button (▲) to flip (mirror) the picture vertically.
- Press the down cursor button (▼) to flip (mirror) the picture horizontally.
- Press the left cursor button (◀) to rotate the picture 90° counterclockwise.
- Press the right cursor button (▶) to rotate the picture 90° clockwise.
- Press the Prog button to change the transition effect between pictures in the slide show.
- Press the Zoom button to pause the slide show and change the zoom level.
- After pressing the Zoom button once, you can also use the Search Back/Forward (◀◀/)) buttons on the remote control to change the zoom level. - Press the cursor buttons to pan the picture while zoomed in.
- Press the Angle button to make the picture black and white.
To loop a section of a video or audio track:
- Set the desired starting point by pressing A-B on the remote control, or press Shift and Skip Forward (▶▶) on PMD-500D. A- will appear on the screen.
- Set the desired ending point by pressing A-B on the remote control again, or press Shift and Skip Forward (▶▶) on PMD-500D again. A-B will appear on the screen, and the loop will start and repeat continuously.
- To stop the loop, press A-B on the remote once more, or press Shift and Skip Forward (▶▶) on PMD-500D once more. A-B will disappear from the screen, and playback will continue normally.
To manage files on your USB drive or SD/SDHC card:
- While browsing files in the Media Center, press the Copy button on the remote control.
- Press the right cursor button (▶) to move to the media management options.
- Use the up/down cursor buttons (▲▼) to move to the previous/next item in the list:
- Choose "All Select" to select all files in the current folder.
- Choose "All Unsel" to unselect all files in the current folder.
- Choose "Copy" to copy files between a USB drive and SD/SDHC card.
- Choose "Delete" to delete the select file(s).
-
Choose "Exit" to exit media management.
-
Press Play/Pause (▶/III) or OK on the remote control to select the chosen option.
A playlist is a customized set of audio, photo, or video files that play in a predetermined sequence. You can use playlists to play your media in an order you choose.
Important: Playlists can contain only photo files, only audio files, or only video files. You cannot create playlists with different media (for example, a playlist with photo and video files).
To create a playlist of files:
- While browsing files in the Media Center, select a file you want to add to the playlist, and then press the Mark button. The display will show "Add To Playlist". Repeat this for other files you want to add to the playlist.
To play a playlist:
- Press the Prog button until the Playlist folder is selected.
- Select the file from which you want to start playback, and then press Play (▶) on PMD-500D, or press Play/Pause (▶/II) or OK on the remote control. The playlist will start playing.
To remove files from a playlist:
- Press the Prog button until the Playlist folder is selected.
- Select the file you want to remove from the playlist, and then press the Mark button. Repeat this for other files you want to remove from the playlist that are in the same folder.
Adjusting the Sound
Important: If the Vol -/+ and Mute buttons do not work, set the Output Volume to Variable instead of Fixed (see Adjusting the Settings > Setting > Audio Setup to learn how to do this).
To adjust the volume, use the Vol -/+ buttons on the remote control. Alternatively, use the volume adjustment controls on your TV, your TV's remote control, your audio receiver or amplifier, etc.
Important: These buttons control the output level of the audio outputs only. If you are not using those outputs, use the volume control on your TV, your TV's remote control, your audio receiver or amplifier, etc.
To mute/unmute the audio, press Mute on the remote control.
Important: This button mutes/unmutes the audio outputs only. If you are not using those outputs, use the mute button your TV's remote control, your audio receiver or amplifier, etc.
To change the audio setting, press Audio on the remote control. The current audio setting will appear in the upper-left corner of the screen. Each press after that will select the next available setting. The available settings depend on the supported audio configurations of your video. This feature is available during video playback only.
Adjusting the Picture
To change the picture resolution, press HDMI on the remote control. Each press will select the next available resolution: Auto (PMD-500D will detect the optimal resolution automatically), 480i/576i, 480p/576p, 720p, 1080i, or 1080p.
Alternatively, change the resolution in the Setting menu. See Adjusting the Settings > Setting > Video Setup to learn how to do this.
To change the zoom distance, press Zoom on the remote control. Each press will select the next available zoom distance: 2x, 3x, 4x, 1/2, 1/3, and 1/4. When no zoom distance is shown on the screen, the picture is at its normal zoom distance.
To change the camera angle, press Angle on the remote control to select the desired angle. This feature is available only on certain DVDs.
Other Features
Lock
The Lock feature disables almost all of the buttons on PMD-500D's front panel. This helps prevent accidental changes to playback.
To enable/disable the Lock feature, press and hold Shift and then press Stop on PMD-500D's front panel. When Lock is enabled, the Lock light (to the right of the display) will turn on.
While Lock is enabled, you can still do the following:
- Disable the Lock feature on the front panel.
- Power off PMD-500D using Power button on the front panel.
- Use any function on the remote control (unless the IR Lock feature is enabled).
IR Lock
The IR Lock feature disables the remote control (by disabling the infrared sensor on PMD-500D's front panel). This helps prevent accidental changes to playback.
To enable/disable the IR Lock feature, press and hold Shift and then press Pause on PMD-500D's front panel. When IR Lock is enabled, the IR Lock light (to the right of the display) will turn on.
While IR Lock is enabled, you can still use any function on the front panel (unless the Lock feature is enabled).
Hide OSD
The Hide OSD feature hides the options normally shown on the Home Screen, simplifying the startup process. When DVD/CD Auto Play is set to On, you can simply insert a disc and it will start playing immediately; you will not have to access the Home screen every time you want to play a disc (see Adjusting the Settings > Setting > Playback Setup).
To enable/disable the Hide OSD feature, press and hold Shift and then press Play on PMD-500D's front panel. When Hide OSD is enabled, the Hide OSD light (to the right of the display) will turn on.
Adjusting the Settings
Setting
The Setting menu lets you change settings that affect PMD-500D's overall operation. There are several different types of settings you can configure: playback (see Playback Setup below), video (see Video Setup below), sound (see Audio Setup below), or PMD-500D itself (see Device Setup below).
To enter the Setting menu, press Setup on the remote control. (This is disabled while a disc is playing video.)
In the Setting menu, use the remote control to do any of the following:
- Use the left/right cursor buttons (◀▶) to select one of the four icons at the top of the window: Playback Setup, Video Setup, Audio Setup, or Device Setup. Selecting each icon will show the relevant menus and settings in the window below it. Press OK or the down cursor button (▼) to view and edit those settings.
- To move through a list, use the up/down cursor buttons (▲▼). The current item is outlined in green.
- Press the OK or the right cursor button (▶) to open a submenu with additional options.
- Press left cursor button (◀) to return to the next-highest menu.
- You can use the up/down cursor buttons (▲▼) to select a different option. Press OK to confirm your choice, or press the left cursor button (◀) to return to the next-highest menu without changing anything.
Playback Setup
- Power On Mode
o Repeat: When set to On, a disc will automatically repeat when it starts playing. When set to Off, you will have to set the repeat mode using the front panel or remote control.
o DVD/CD Auto Play: When set to On, a disc will start playing automatically after you insert it. When set to Off, you will have to start disc playback manually after inserting it.
- Setting
o Auto Resume: When set to On, PMD-500D will “remember” where you stop playing a disc. When you start playing that disc again, you can choose to start from that point or from the beginning of the disc. PMD-500D can do this for up to 5 discs, replacing the oldest one if it needs to remember a new one. When set to Off, this feature is disabled.
- Language
o OSD: The language of the text shown in PMD-500D's menus, screens, windows, etc.
o Disc Menu: The language of the text shown in disc menus. The disc must be able to display the selected language for this feature to work properly.
o Audio: The language of the audio on a disc. The disc must be able to play audio in the selected language for this feature to work properly.
o Subtitle: The language of the subtitles shown during video playback. The disc must have subtitles for the selected language for this feature to work properly.
- Parental Control
o Ratings: Select the highest rating that can be viewed: Kid Safe, G, PG, PG-13, PGR, R, NC-17, or Adult. When a disc or video file does not include rating information, no content is restricted. You will need to enter the Password to change the rating.
o Change Password: Select this to change the parental control password, which must be 4 digits. Use the number buttons (0–9) to enter a number. (You must enter the current password first. You must also enter the new password twice to ensure you entered it correctly.)
Video Setup
- Output Setting
o Video Adjust: Press OK to edit Sharpness, Brightness, Contrast, Gamma, Hue, and Saturation. Use the left/right cursor buttons (◀▶) to adjust the sliders. For Sharpness, select High, Medium, or Low. For Gamma, select None, Low, Medium, or High. Press the left cursor to return to the previous screen.
o TV Aspect Ratio: Select the desired aspect ratio: 4:3 Pan & Scan, 4:3 Letterbox, 16:9 Wide, Wide Squeeze.
o TV System: Select the broadcasting standard for your location: NTSC, PAL, or Multi-system. By default, this should already be set to the correct format for your location. Select Multi-system only if your TV supports both NTSC and PAL systems.
o Resolution: Select the picture resolution: Auto (PMD-500D will detect the optimal resolution automatically), 480i/576i, 480p/576p, 720p, 1080i, or 1080p.
o HDMI Deep Color: Select the Deep Color mode for the HDMI output: 30 bits, 36 bits, 48 bits, or Off (24 bits). Each setting indicates the total bit depth that an HDMI v1.3 picture will use. Using a higher bit depth usually improves gradients and color transitions. Your TV must support HDMI v1.3 for this feature to work properly.
o Screen Saver: Set the Screen Saver On or Off.
- Closed Caption
o Closed Caption: Sets the closed captions On or Off.
Audio Setup
- Format
o Downmix: These options allow you to play back a source containing 5.1 Channel (surround) sound to a 2.0 Channel (stereo) output. Select Lt/Rt (Left total/Right total) to create a matrix surround compatible downmix. Select Stereo to create a simple stereo downmix.
Digital Out (Coaxial/Optical Output): Select the format of the audio sent from the coaxial/optical output: Spdif Off, Bitstream (recommended when using an audio/video receiver or processor that supports advanced encoding such as DTS or Dolby Digital), or PCM Out.
o PCM Out: Select the PCM Output Rate: 48K (supported by most audio equipment) or 96K (a higher sampling rate with a wider frequency response).
- Sound Control
o Dynamic Range: When set to On, PMD-500D will apply some compression to smooth out the high and low volume levels of the audio. When set to Off, PMD-500D will not use any compression. When set to Auto, PMD-500D will use the compression specified by the disc being played.
Important: This option applies to the audio outputs only.
o Size: Press OK to set the size of Front Speaker, Center Speaker, Rear Speaker. Choose Large or Small.
o Distance: Press OK to set the distance of your speakers. Use the up/down cursor buttons (▲▼) to select each speaker. Use the left/right cursor buttons (◀▶) to set distance. Press OK to complete.
o Test Tone: Set the Test Tone On or Off.
- Output Control
o Output Volume: When set to Variable, you can use the Vol -/+ buttons on the remote control to adjust the volume level of the audio outputs. When set to Fixed, the Vol -/+ buttons on the remote control will be disabled, and the volume will be set to the Maximum Volume (see below).
o Maximum Volume: Select the highest possible volume level of the audio outputs: -10dB, -6dB, 0dB, +6dB, or +10dB. Be careful—higher volume levels can cause distortion (“clipping”), which can damage your amplifier or speakers. If the Output Volume (see above) is set to Fixed, the audio outputs will play audio at this volume level.
Device Setup
- Firm ware
o Version: PMD-500D's current firmware version.
o Upgrade: When you are upgrading PMD-500D's firmware, select how PMD-500D will access the firmware file: Via USB or Via Disc. Follow the instructions included with the firmware update file.
- Setting
o Remote Control Code: If you are using other similar Marantz Professional products that unintentionally respond to PMD-500D's remote control, select a different remote control code to keep its communication separate: Code 1, Code 2, or Code 3.
o Reset Factory Defaults: Select OK to erase all of PMD-500D's current settings and restore its original/default settings, or select Cancel to keep the current settings. If you select OK, you will see the Initial Wizard screen (as you did when you first set up PMD-500D).
Hide OSD (Ocultar OSD)
Assistance technique
Trademarks and Licenses
Marantz is a trademark of D&M Holdings Inc., registered in the U.S. and other countries.
Dolby and the double-D symbol are registered trademarks of Dolby Laboratories.
DivX ^® and the DivX Mark are trademarks or registered trademarks of DivX, LLC and its affiliates in the United States and other countries and is used under license.
The terms HDMI and the HDMI Logo are trademarks or registered trademarks of HDMI Licensing LLC in the United States and other countries.
All other product names, company names, trademarks, or trade names are those of their respective owners.
Technical Specifications
All specifications are subject to change without notice.
| Digital System | |
| System | Digital media player (DVD, CD, USB device [mass storage class], SD Card) |
| Supported Disc Formats DVD | DVD, DVD+R, DVD-R, DVD+RW, DVD-RW |
| CD | CD, CD-R, CD-RW, HDCD, Super Video CD (SVCD),Video CD (VCD) |
| Supported File Formats Video | .3gp, .avi, .dat, .divx, .mpg, .ogm, .vob |
| Subtitles | .ass, .smi, .srt, .ssa, .sub |
| Audio | .mp3, .ogg, .wma |
| Picture | .jpg (or .jpeg) |
| Supported File Systems | FAT16, FAT32USB drive (mass storage class) with ≤ 2 TB total capacitySD/SDHC Card with ≤ 128 GB total capacity |
| Video | Resolutions Auto, 480i/576i, 480p/576p, 720p, 1080i, 1080p |
| Aspect Ratios 4:3 Pan & Scan, 4:3 Letterbox, 16:9 Wide, Wide Squeeze | |
| System NTSC, PAL, Multi (if supported by TV) | |
| Output HDMI > v1.3 | |
| Decoding Video: DivX 3, 4, 5, 6; MPEG-1; MPEG-2; MPEG-4; XvidAudio: MPEG Audio; WMA | |
| Audio | |
| Analog Outputs | Output Level (balanced XLR): +4 dBuOutput Level (unbalanced RCA): 2.0 Vrms |
| Digital Output | Output Level (coaxial): 0.5V, 75 ΩSignal Format: AES/EBUOutput Level (optical): -21 dBm to -15 dBm (660 nm ± 30 nm) |
| Frequency Response | 10 Hz – 20 kHz (±1.0 dB) |
| Signal-to-Noise Ratio | >100 dB (1 kHz, 0 dB, A-weighted) |
| Total Harmonic Distortion | < 0.05% (1 kHz, 0 dB, A-weighted) |
| Dynamic Range | >106 dB (10–20,000 Hz, A-weighted) |
| Headroom | 6 dB |
| Channel Separation | >90 dB (1 kHz, 0 dB, A-weighted) |
| Communication | |
| Remote Control | Infrared protocol, >200 mV transmission output level |
| Serial Remote Connector: 9-pin D-Sub female, RS-232CMode: Full duplexBaud Rate: 9600 | |
| Other / General | |
| Connections | (2) XLR audio outputs (L/R, balanced)(2) RCA audio outputs (L/R, unbalanced)(1) Optical audio output(1) Coaxial digital audio output(1) HDMI audio/visual output(1) RCA Composite video output(3) RCA Component video outputs (Y/Pb/Pr)(1) 9-pin D-Sub female RS-232C port(1) IEC power connection |
| Power | Connection: IECRequirement: 100–240 VAC, 50/60 HzConsumption: 10 W |
| Environmental Conditions | Operating temperature: 41 – 95 °F (5 – 35 °C)Operating humidity: 25 – 85%, no condensation |
| Dimensions(width x depth x height, with rack ears) | 19.00" x 10.75" x 1.73"483 mm x 273 mm x 44 mm |
| Weight(with rack ears) | 5.9 lbs.2.7 kg |
marantzpro.com
- User Guide (English)
- Safety Instructions
- Features
- Front Panel
- Rear Panel
- Remote Control
- Battery Usage
- To replace the battery:
- Setup
- Connections
- Operation
- Playing Video Discs
- Basic Functions
- To play a disc:
- Additional Functions
- To loop a section of the video:
- To jump to a specific chapter of the disc:
- To jump to a bookmark:
- To erase a bookmark:
- Playing Audio Discs
- To play audio from a CD:
- To loop a section of the track:
- To jump to a specific track of the disc:
- To jump to a specific track or time of the disc:
- To create a bookmark,
- Playing Files (Video, Audio, or Picture)
- To browse your files and play a file:
- To loop a section of a video or audio track:
- To manage files on your USB drive or SD/SDHC card:
- To create a playlist of files:
- To play a playlist:
- To remove files from a playlist:
- Adjusting the Sound
- Adjusting the Picture
- Other Features
- Lock
- IR Lock
- Hide OSD
- Adjusting the Settings
- Setting
- Playback Setup
- - Power On Mode
- - Setting
- - Language
- - Parental Control
- Video Setup
- - Output Setting
- - Closed Caption
- Audio Setup
- - Format
- - Sound Control
- - Output Control
- Device Setup
- - Firm ware
- Hide OSD (Ocultar OSD)
- Assistance technique
- Trademarks and Licenses
- Technical Specifications
- marantzpro.com
Brand : MARANTZ
Model : PMD500D
Category : Digital audio recorder