Franky - Scooter Lionelo - Free user manual and instructions
Find the device manual for free Franky Lionelo in PDF.

| Brand | Lionelo |
| Model | Franky |
| Product type | Convertible scooter and balance bike |
| Maximum load capacity (scooter) | 50 kg |
| Maximum load capacity (balance bike) | 20 kg |
| Recommended age (scooter) | 3 years and up |
| Recommended age (balance bike) | 1 year and up |
| Maximum basket load | 0.5 kg |
| Brake | Rear foot brake |
| Handlebar height | Adjustable |
| Seat height | Adjustable (2 positions) |
| LED lighting | Front wheels, motion-activated |
| Folding mechanism | Quick fold and unfold with button |
| Safety | Use with protective gear, adult supervision required, do not use in traffic |
| Maintenance | Clean with a damp cloth and mild detergent, avoid abrasive products |
| Storage | In a dry place |
| Warranty | Terms available on the manufacturer's website |
Frequently Asked Questions - Franky Lionelo
User questions about Franky Lionelo
0 question about this device. Answer the ones you know or ask your own.
Ask a new question about this device
Download the instructions for your Scooter in PDF format for free! Find your manual Franky - Lionelo and take your electronic device back in hand. On this page are published all the documents necessary for the use of your device. Franky by Lionelo.
USER MANUAL Franky Lionelo
natural_image
Line drawing of a mechanical device with a bucket and lever mechanism (no text or symbols)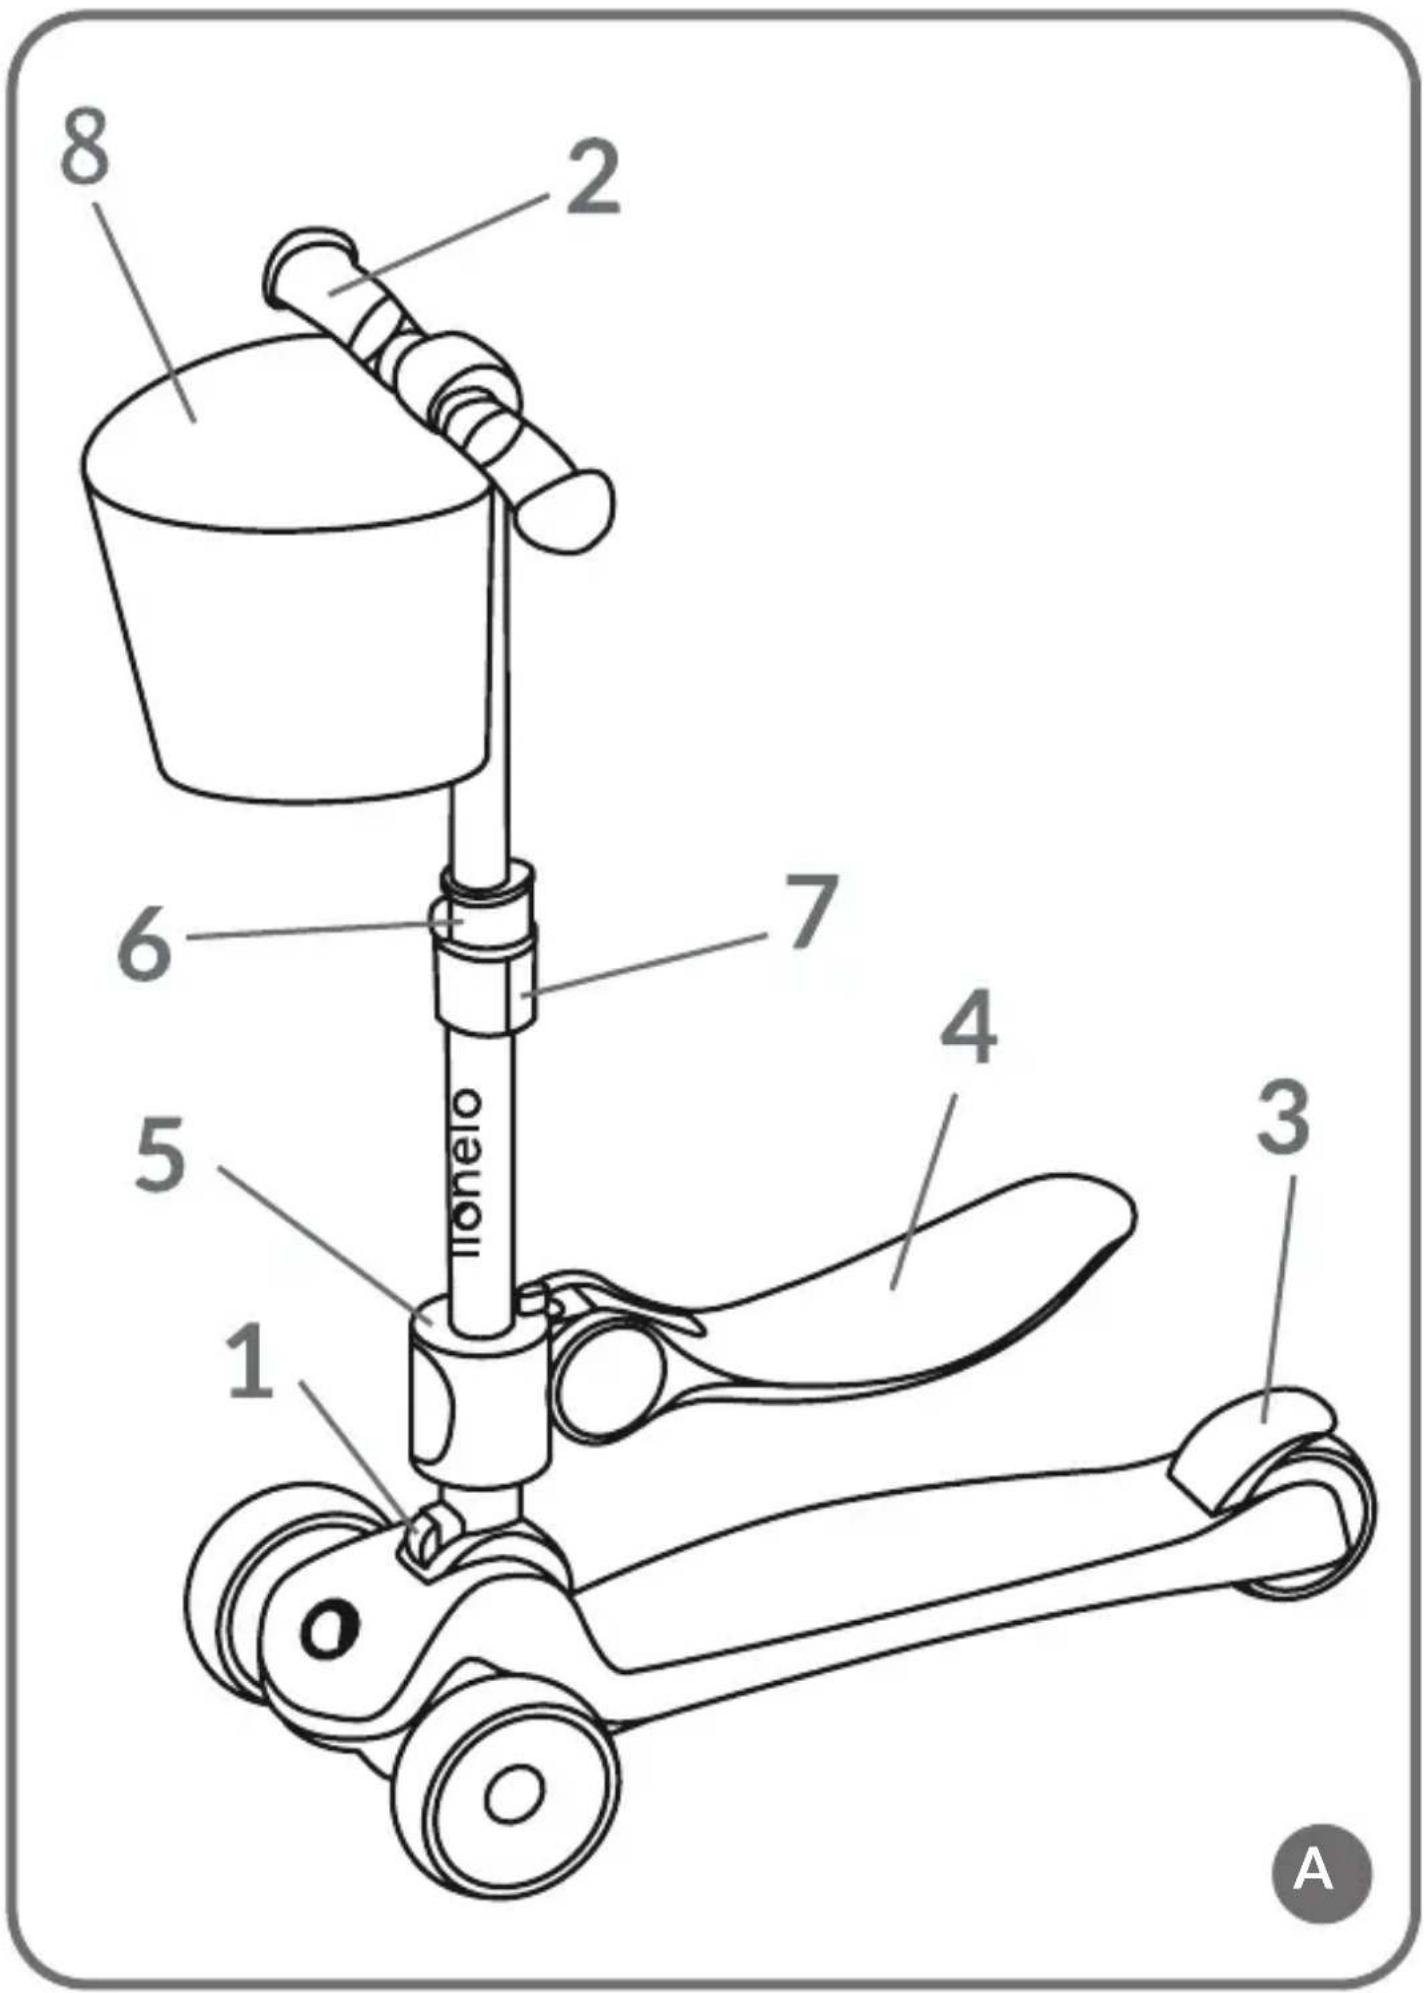
natural_image
Diagram showing a rope being twisted with a directional arrow, no text or symbols present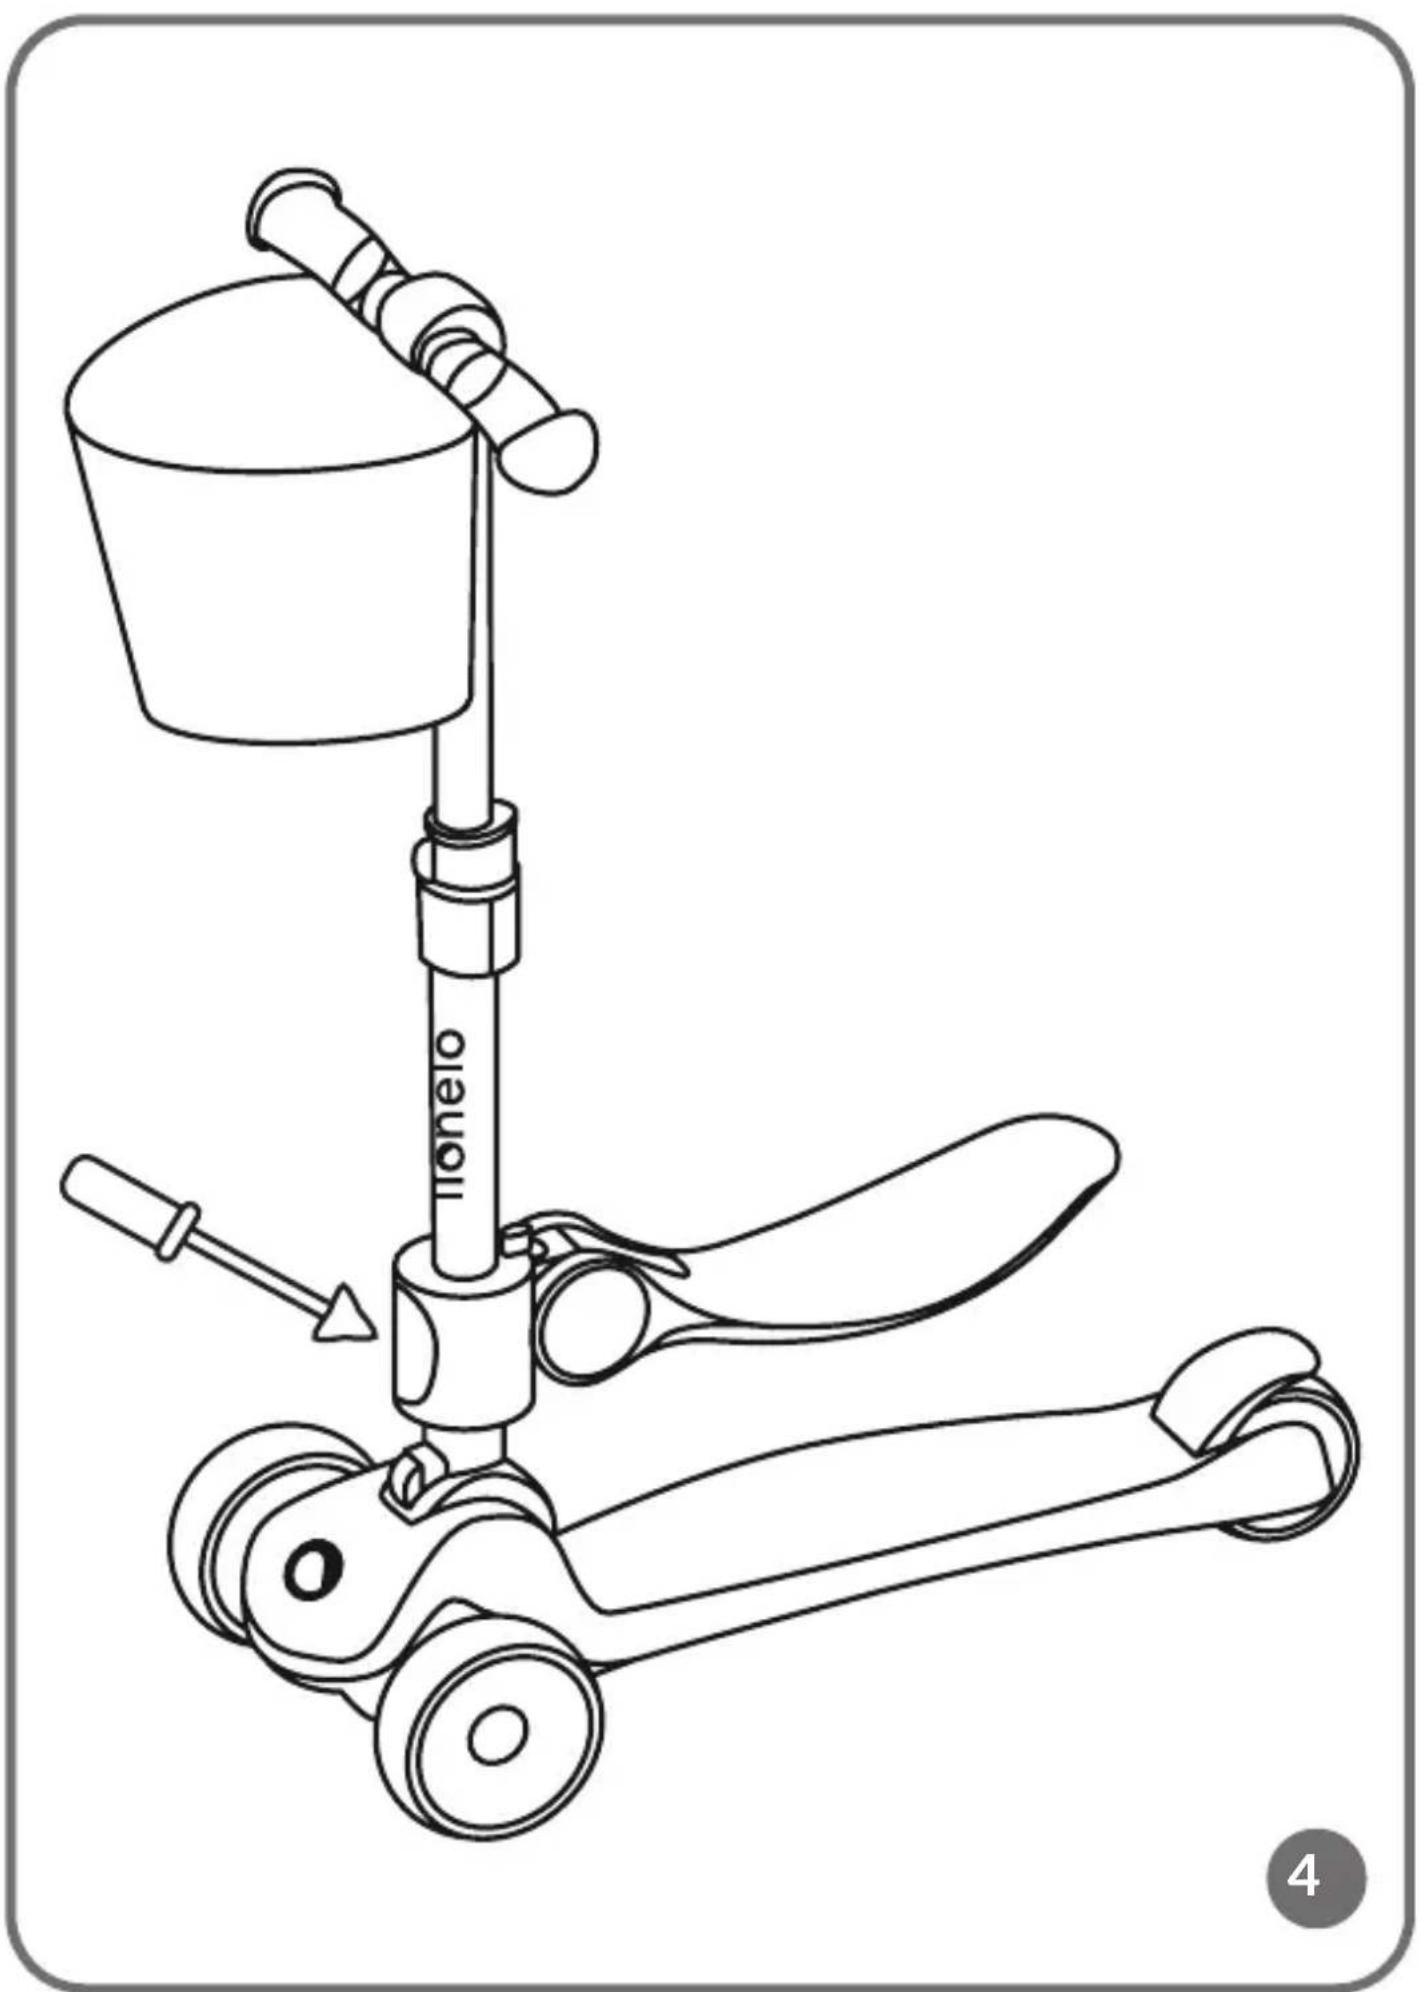
natural_image
Line drawing of a mechanical device with a bucket and propeller, no text or symbols present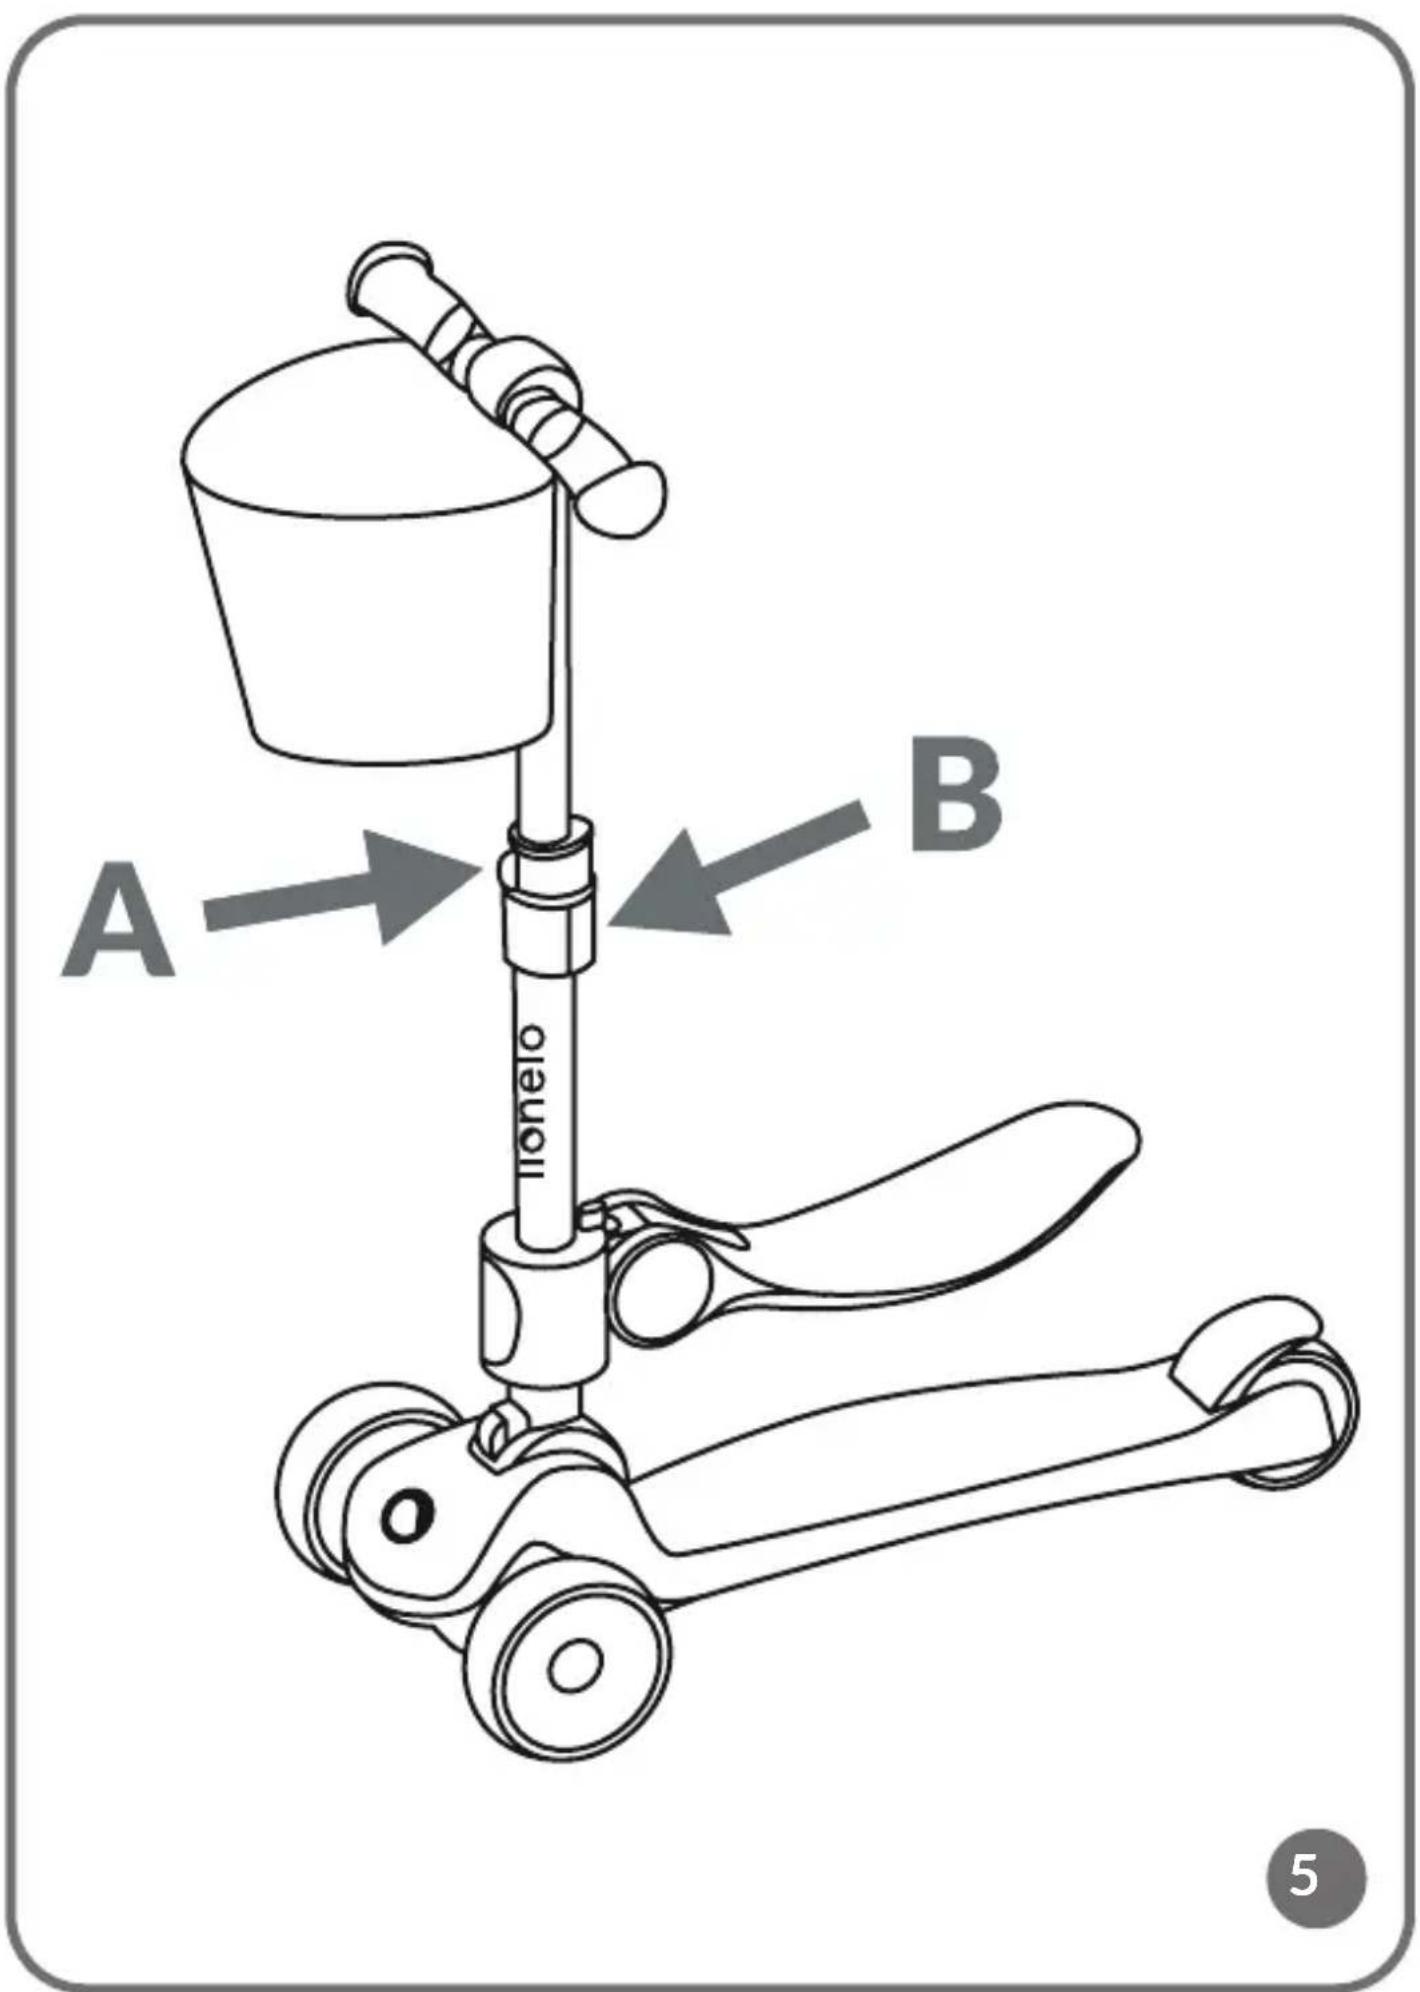
Dear Customer!
In case of any questions or comments on the purchased product, please contact us:
help@lionelo.com
Producer:
BrandLine Group Sp. z o. o.
- Note. Protective equipment required. Do not use in traffic. Maximum load capacity: 50 kg.
- In the bicycle function, the maximum load capacity is 20 kg.
- Applies to the bicycle function: Note! The toy does not have a brake.
- The scooter is suitable for children aged 3 years and over.
- In the function of a bicycle, the product is intended for children from 1 year of age.
- Wear protective equipment (helmet, elbow and knee pads, gloves) when using the scooter.
- Make sure all locking devices are engaged before use.
- The scooter is designed for one person.
- The scooter should only be mounted, dismounted and adjusted by an adult and away from children. Using a scooter in traffic can lead to accidents and significant injury.
- Do not use the scooter on a sloping or uneven surface.
- Do not use the scooter near traffic.
- You should not use the product during adverse weather conditions (e.g. frost, rain, snow, icy conditions).
- Do not use the scooter near potentially dangerous areas (e.g. swimming pool).
- The safest areas to ride a scooter are areas with limited or no traffic, such as private areas, recreational areas, playgrounds, school playing fields.
-
A child using a scooter should be supervised by an adult.
-
A child using a scooter should wear footwear.
- The child should be informed of the correct way to use the product, and how to brake. The child should also be informed that there is no brake in the bicycle function.
- The product should be handled with care. It is required that the user has the skills to avoid falls or collisions that cause injury to the user or others.
- Before each use, check the scooter for damage, loose connections or missing components. Do not use the product if a component is missing or damaged. If this happens, contact the manufacturer's authorised service centre.
- Do not pull the scooter behind a car or other vehicle.
- Keep the product away from heat sources, high temperatures, hot surfaces, sources of spark, open flames, oil and sharp edges.
- Store the product in a dry place.
- Keep plastic packaging away from children as it poses a strangulation risk.
- The maximum load of the basket is 0.5 kg.
PRODUCT DIAGRAM (FIG. A)
- Fold / unfold button
- Handlebar
- Brake
-
Seat
-
Seat installation component
- Handlebar adjustment lock
- Handlebar adjustment button
- Basket
USE
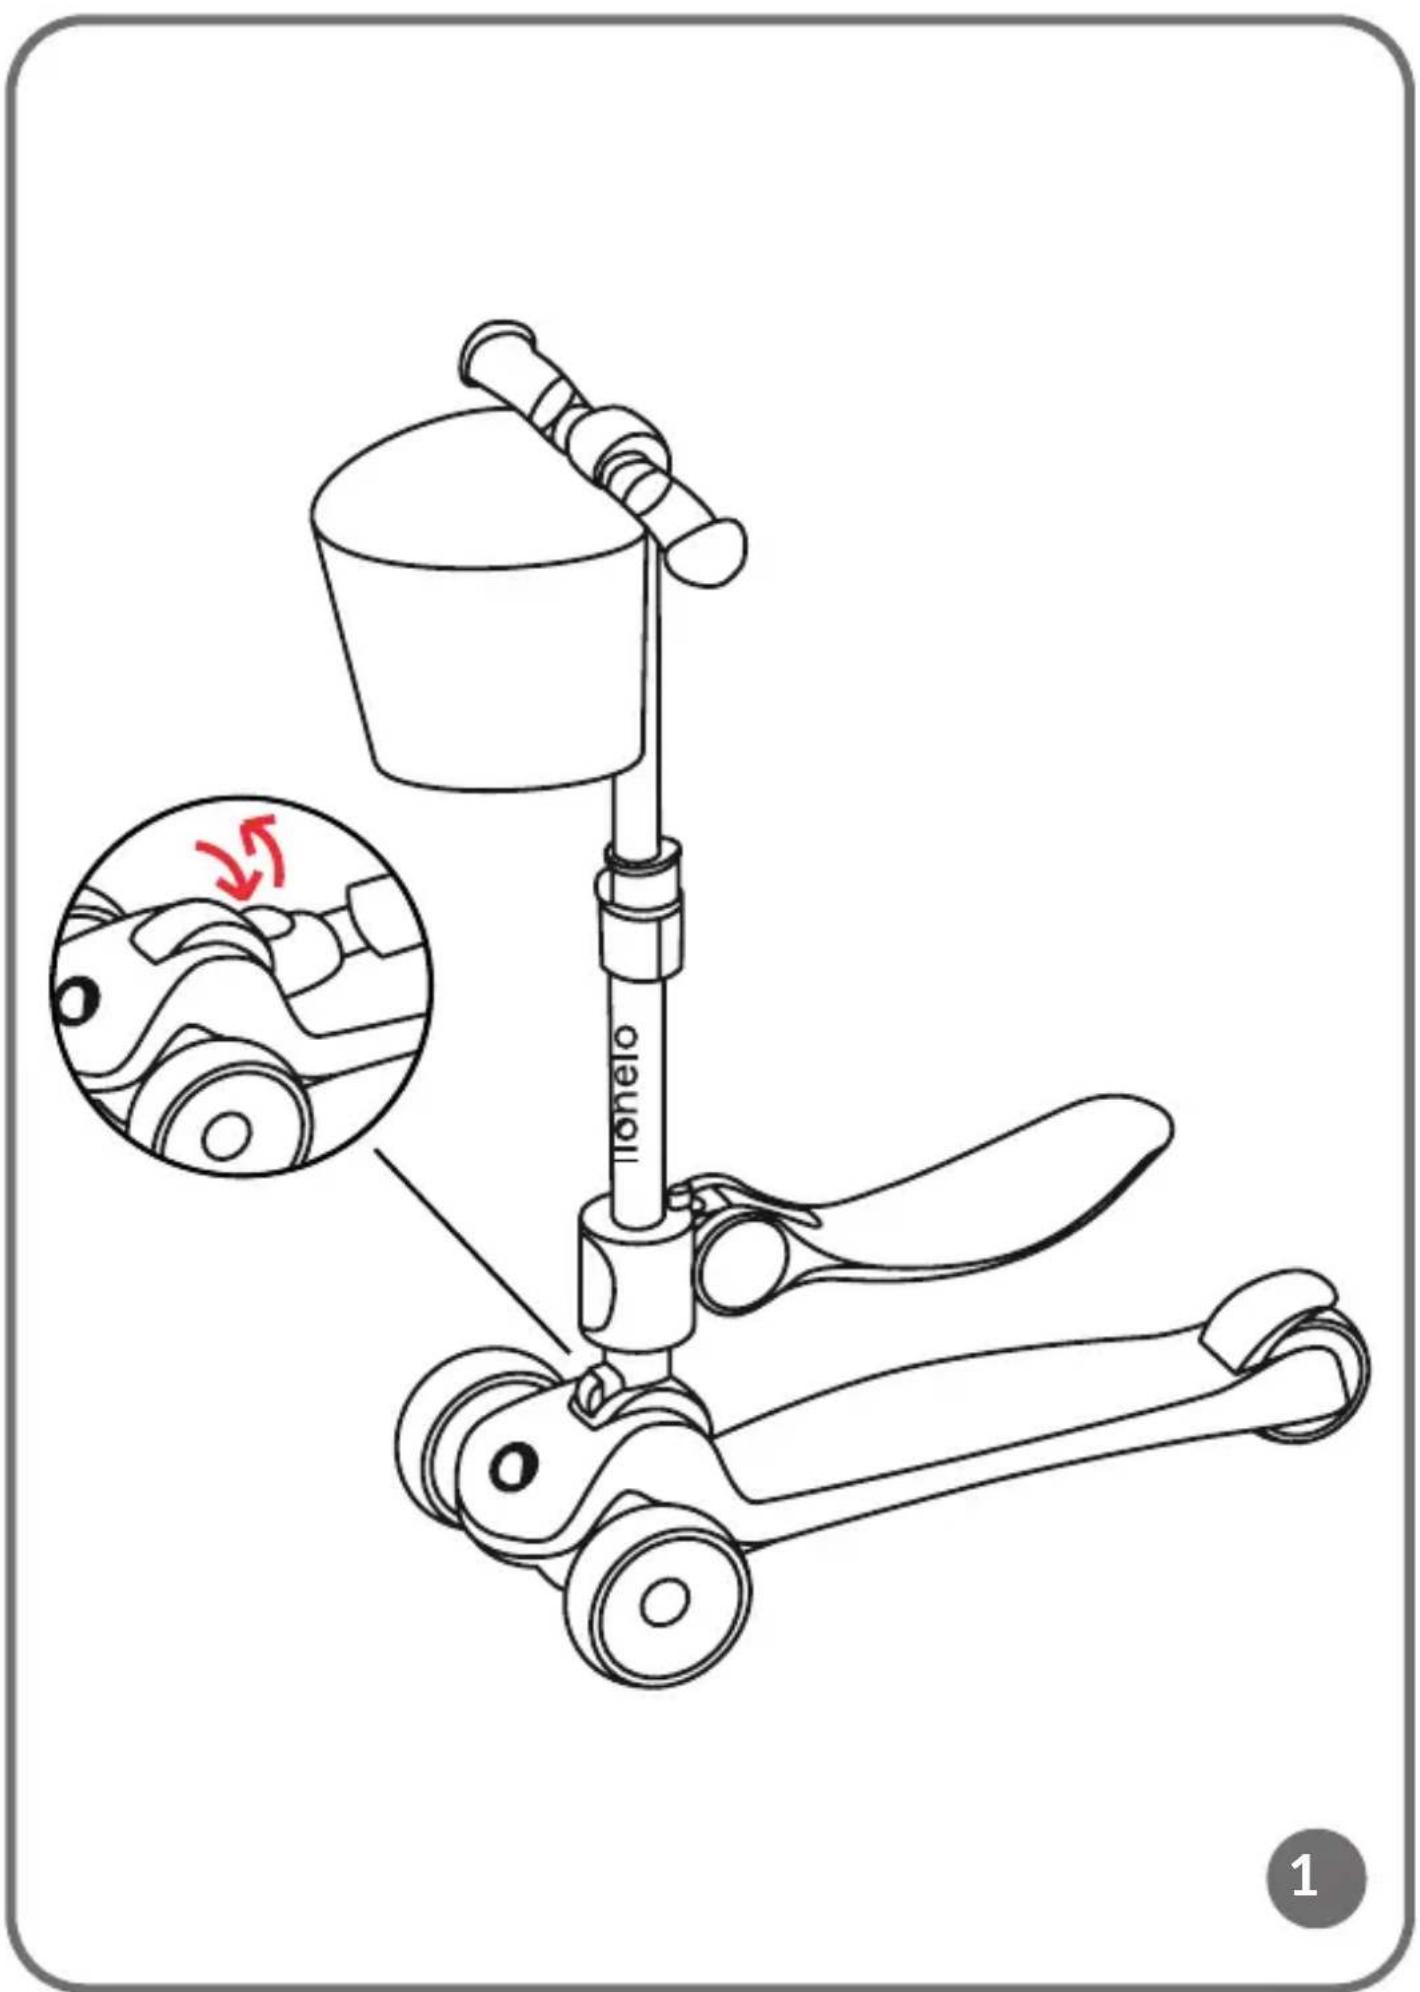
Unfolding
To unfold the scooter, press the unfold button and then lift the handlebars upwards (fig 1). Make sure the scooter is correctly unfolded by gently pressing down on the handlebars. Correct unfolding will be signalled by a click.
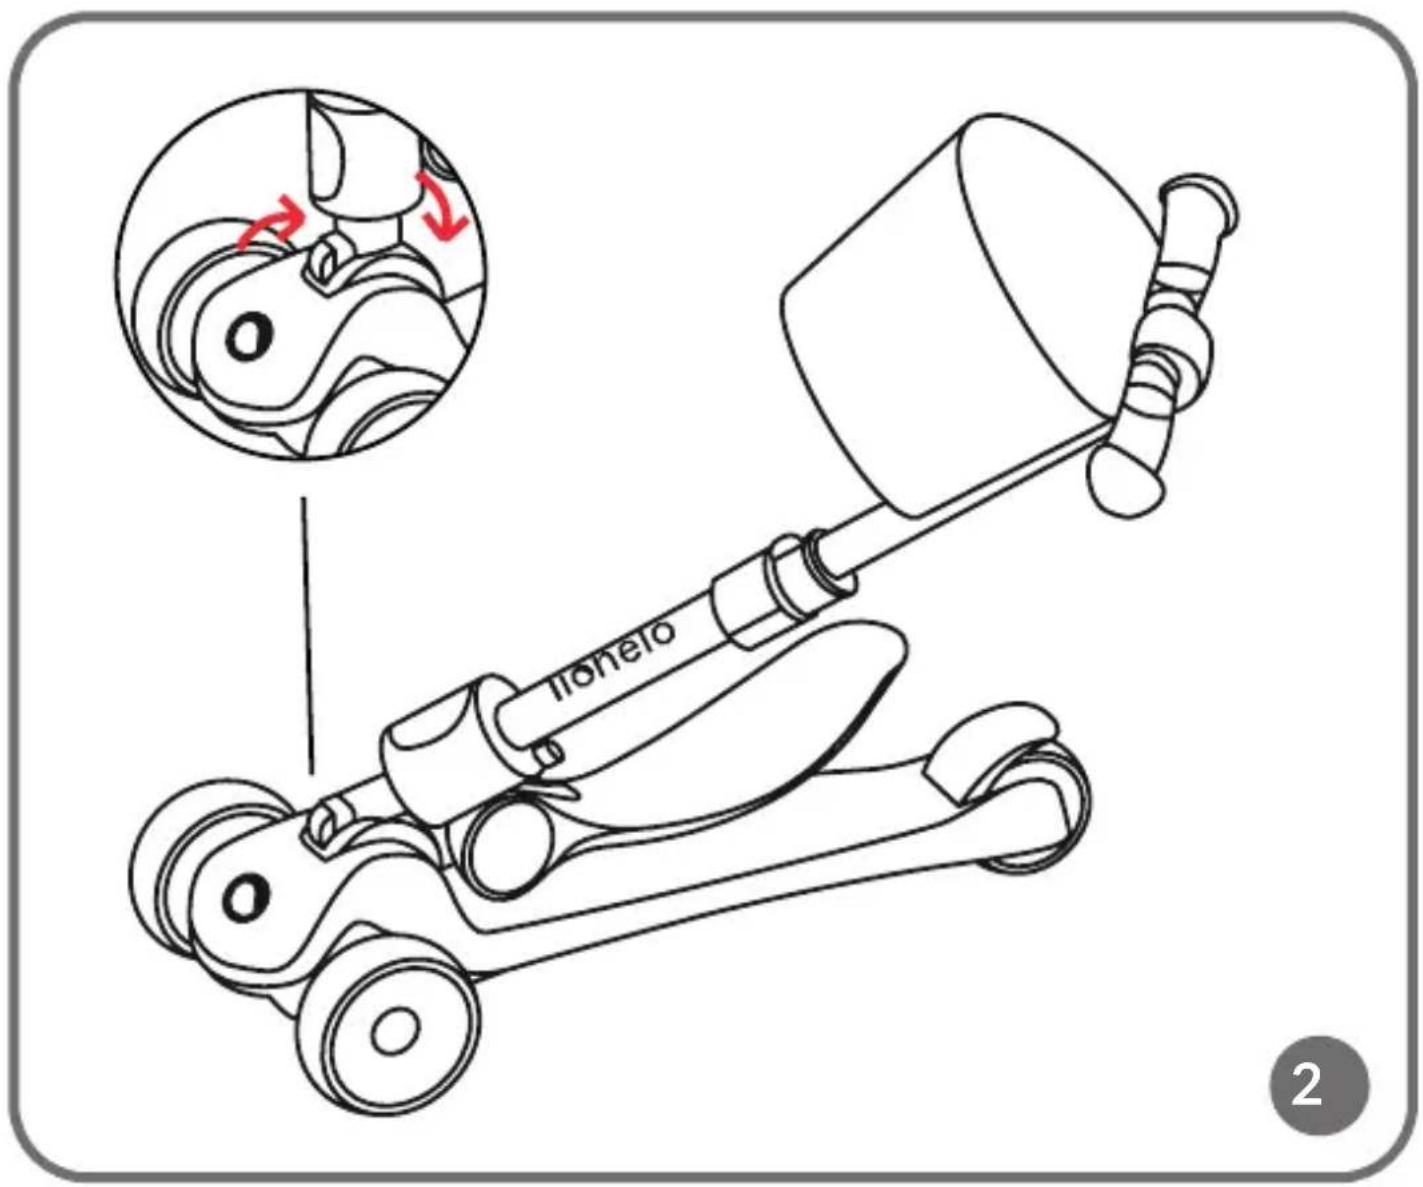
Folding
To fold the scooter, press the fold button, then lower the handlebars down and fold the scooter (fig. 2).
Braking
Braking is achieved by pressing the brake located in the rear axle of the scooter
with your foot (fig. 3). In the scooter function, braking is done by touching the ground with the feet.
Seat adjustment – bicycle function
There are 2 seat heights available.
To change the height of the seat, use a screwdriver to unscrew the fixing screws on the stem and set it to the desired height (fig. 4). Then tighten the fixing screws.
Fasten the seat to the handlebar (2, fig. A) using the mounting clamp (5, fig. A).
Adjusting the handlebar height
To adjust the height of the handlebar, tilt the lock (A, fig. 5) and press the height adjustment button (B, fig. 5), then set the handlebar height you want and close the lock again. The correct position will be signalled by a click.
LED lighting function
The LED lighting in the front wheels is activated by movement.
CLEANING AND MAINTENANCE
Clean the frame and all parts of the scooter with a damp cloth and a mild detergent.
After cleaning, wipe the scooter dry.
Do not use caustic or abrasive cleaners to clean the product.
Photos are for illustrative purposes only, the actual appearance of the products may differ from the photos.
PL
Drogi Kliencie!
SCHÉMA DU PRODUIT (FIG. A)
BrandLine Group Sp. z o.o.
ESQUEMA DEL PRODUCTO (FIG. A)
BrandLine Group Sp. z o.o.
SCHETS VAN HET PRODUCT (AFB. A)
SCHEMA PRODUSULUI (FIG. A)
PRODUKTSCHEMA (FIG. A)
PRODUKTDIAGRAM (FIG. A)
- Folde-/utfoldingsknapp
- Ratt
- Brems
-
Sete
-
Setemonteringselement
- Rattlås
- Rattjusteringsknapp
- Kurv
BRUK
Utfolding
PRODUKTDIAGRAM (FIG. A)
Detailed warranty conditions are available on the website: