Palermo - Coffee machine UFESA - Free user manual and instructions
Find the device manual for free Palermo UFESA in PDF.

User questions about Palermo UFESA
0 question about this device. Answer the ones you know or ask your own.
Ask a new question about this device
Download the instructions for your Coffee machine in PDF format for free! Find your manual Palermo - UFESA and take your electronic device back in hand. On this page are published all the documents necessary for the use of your device. Palermo by UFESA.
USER MANUAL Palermo UFESA
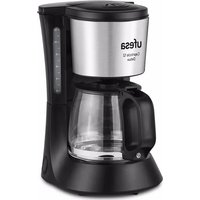
natural_image
Exterior view of a black and silver coffee machine (labeled 'ufesa' and 'Petermo') with no visible text or symbols on the device itself.
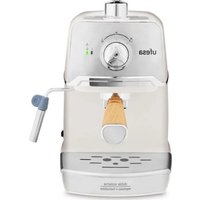
natural_image
Exterior view of a modern white espresso machine (no visible text or symbols)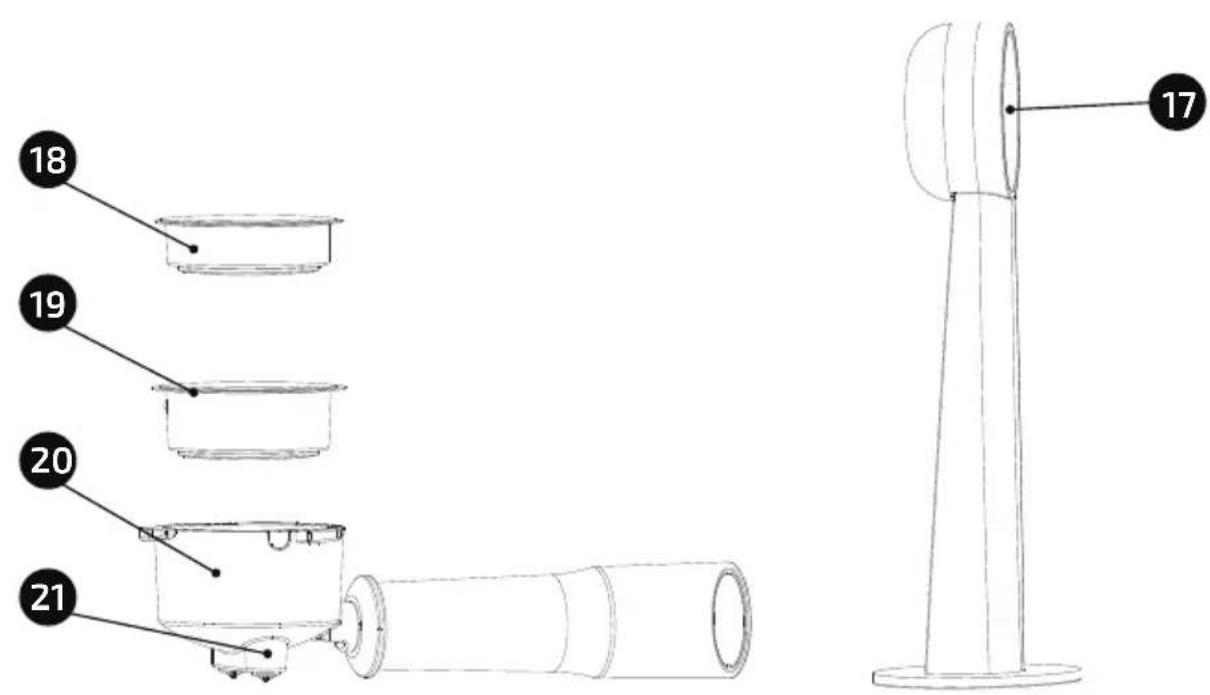
ESPAÑOL
AGRADECEMOS QUE HAYA DEPOSITADO SU CONFIANZA EN UFESA Y DESEAMOS QUE EL FUNCIONAMIENTO DEL PRODUCTO LE SATISFAGA PLENAMENTE.
ATENCIÓN
natural_image
Line drawing of a mechanical device with directional arrows indicating motion or force (no text or symbols)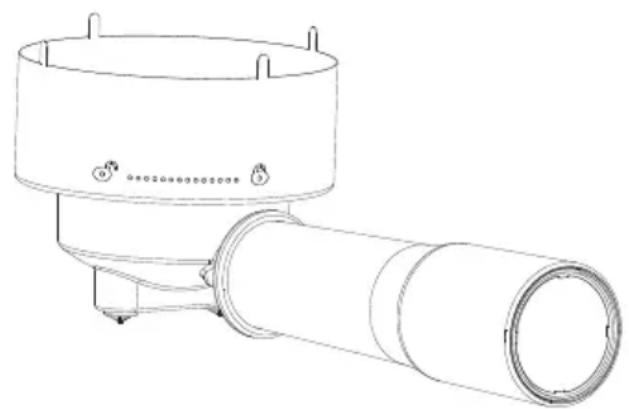
natural_image
Technical line drawing of a mechanical component with cylindrical and flanged sections (no text or symbols)natural_image
Circular diagram with concentric rings and central symbol, no readable text or labelsnatural_image
Technical line drawings of two industrial machines, one with a rotating shaft and the other a cylindrical component (no text or symbols)natural_image
Circular diagram with central emblem and decorative elements, no readable text or symbolsWE WOULD LIKE TO THANKS YOUR FOR CHOOSING UFESA, WE WISH THE PRODUCT PERFORMS TO YOUR SATISFACTION AND PLEASURE.
WARNING
PLEASE READ THE INSTRUCTIONS FOR USE CAREFULLY PRIOR TO USING THE PRODUCT. STORE THESE IN A SAFE PLACE FOR FUTURE REFERENCE.
DESCRIPTION
- Water tank cover
- Water tank
3.Steam control knob
4.Main body - Steam pipe and nozzle
6.Base
7.0N/OFF switch
8.Warm cup board - Top cover
10.Single-cup coffee switch/ indicator lamp - Double-cup coffee switch/ indicator lamp
- Steam warm-up switch/ indicator lamp
13.Funnel holder
14.Buoy - Drip tray cover
- Drip tray
- Coffee spoon
18.Single-cup coffee filter - Double-cup coffee filter
- Filter Holder
21.Coffee outlet
SAFETY INSTRUCTIONS
If the supply cord is damaged it must be replaced by the manufacturer, its service agent or similarly qualified persons in order to avoid a hazard.
This appliance can be used by children aged from 8
years and above if they have been given supervision or instruction concerning use of the appliance in a safe way and if they understand the hazards involved.
Children shall not play with the appliance.
Cleaning and user maintenance shall not be made by children unless they are older than 8 and supervised. Keep the appliance and its cord out of reach of children aged less than 8 years.
Appliances can be used by persons with reduced physical, sensory or mental capabilities or lack of experience and knowledge if they have been given supervision or instruction concerning use of the appliance in a safe way and understand the hazards involved.
This appliance is intended to be used in household. It is not intended to be used in applications such as:
- Staff kitchen areas in shops, offices and other working environments.
- Farm houses.
- By clients in hotels, motels and other residential type environments.
- Bed and breakfast type environments.
Proceed according to maintenance and cleaning section of this manual for cleaning.
Never immerse the appliance in water or any other liquid.
During brewing and after use due to residual heat some parts of the machine are hot.
Warning: potential injury from misuse!
This device is designed for use at a maximum altitude up to 2000m above sea level.
IMPORTANT WARNINGS
Any incorrect use or improper handling of the product shall render the warranty null and void.
Prior to plugging in the product, check that your mains voltage is the same as the one indicated on the product label.
The mains connection cable must not be tangled or wrapped around the product during use. Do not use the device, or connect and disconnect to the supply mains with the hands and / or feet wet.
Do not pull on the connection cord in order to unplug it or use it as a handle.
Never use your coffee machine without water in it.
Unplug the product immediately from the mains in the event of any breakdown or damage and contact an official technical support service.
In order to prevent any risk of danger, do not open the device. Only qualified technical personnel from the brand's Official technical support service may carry out repairs or procedures on the device.
B&B TRENDS SL. disclaims all liability for damages that may occur to people, animals or objects, for the non-observance of these warnings.
INSTRUCTIONS FOR USE
Before use:
Make sure that all the product's packaging has been removed.
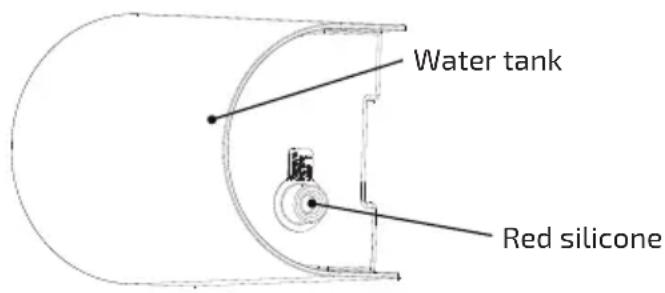
IMPORTANT: Remove the red silicone from the water tank before using the coffee maker:
Before making coffee for the first time, we recommend using the coffee maker twice with water only, in order to clean the system.
Filling with water:
The water tank (2) must be filled with water before turning the appliance on.
Remove the detachable tank, open its cover (1) and fill the tank. Never fill beyond the level "MAX".
Close the cover.
Replace the tank into the appliance properly.
Make espresso coffee
- Plug in and press the ON/OFF switch ⏻ the indicator lamps 📋, 📋 and 🔔 are flashing on and the machine starts to preheat. When the all indicator lamps stop blinking and turns normal on, the preheating is completed and the machine enters the making coffee or hot water mode.
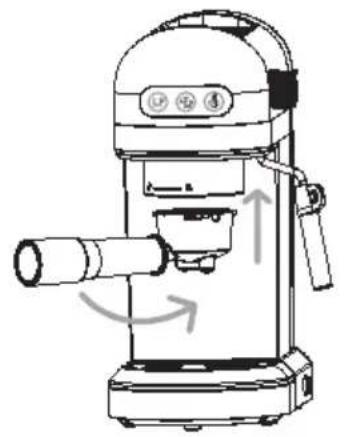
- Remove the funnel (20) by turning it in clockwise.
- Add ground coffee to the steel mesh (18) with the measuring spoon (17). Then press the grounded coffee tightly with the tamper.
- Rotate the high-pressure funnel assembly counterclockwise from position 🔒 to position 🔒 (must be tightened).
natural_image
Line drawing of a kitchen mixer with handle and control panel (no text or symbols)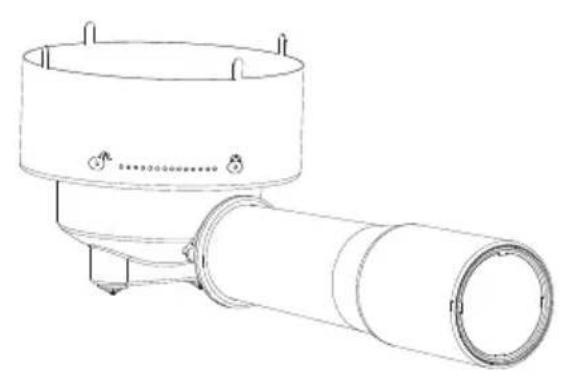
natural_image
Technical line drawing of a cylindrical mechanical component with mounting brackets (no text or symbols)- Put a cup under coffee outlet.
- Touch the one-cup coffee switch 📋, the machine starts pumping water, and coffee flows out of the coffee nozzle.
- The coffee machine automatically stops working (the light from Breathing light on to a constant light), and the coffee is made at this time.
- After the coffee is made, take out the high-pressure funnel assembly by rotating it clockwise, clean the coffee grounds in the filter in time, and rinse it with hot water.
- When making a double cup of coffee, use the double-cup coffee filter (19), touch the double-cup coffee switch and the other steps are the same as single-cup coffee making.
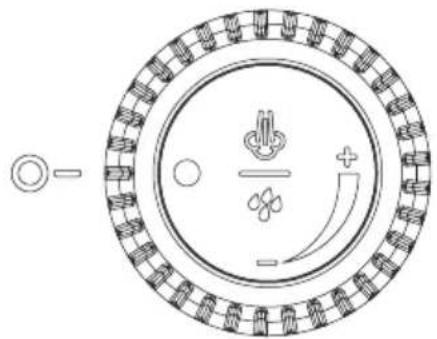
Frothing milk/ making cappuccino
The steam knob:
The steam knob shown below is in the closed position. There are two working states when the steam knob is turned on. When the machine is in coffee mode, the steam pipe gives hot water. When the machine is in steam mode, the steam tube gives steam.
natural_image
Circular diagram with concentric rings, central floral motif, and a plus sign (no text or symbols)Note: If when the power is turned on the steam preheating indicator keeps flashing fast, it means that the steam knob is not closed. Turn the steam knob to the closed position.
- Prepare espresso first with a large enough cup according to part "MAKE ESPRESSO COFFEE"
- Use whole, fresh cold milk out of the fridge (8°C-10°C), and pour 1/3 milk in cup.
- Touch steam switch 🔒, it starts preheating, Single-cup and Double -cup coffee indicator go out, steam indicator is flashing, then wait for steam indicator lights on, now preheating finished.
- Put a stainless steel cup under steam nozzle. Let the steam pipe nozzle float below the surface of the milk.
- Open steam knob, rotate it to the maximum position to frothing milk.
- When desired milk foam reached, then turn off knob, steam is stopped, remove cup and pour the frothed milk into prepared espresso, now cappuccino is ready.
Making hot water
- Put a container under hot water outlet.
- When all indicator lamp stop blinking, open steam knob, rotate it to the maximum position, hot water will be come out from hot water pipe immediately; In the process of making hot water, the indicator / flashes.
- When the hot water reaches the required amount, turn the "steam knob" clockwise to the off position, and the hot water stops flowing out.
Heating liquid (steam function)
- Use a stainless steel cup, pour cold liquid to 1/2 cup.
- Touch steam button ⚙, it starts preheating, the single and double cup coffee indicator lights go out, then steam indicator lamp is flashing, preheating will be finished after steam indicator lamp light on.
- Put a cup under steam nozzle, let steam nozzle insert into the liquid.
- Turn on steam knob, release steam.
- Turn off the steam knob when desired temperature is reached, now steam is stopped.
DECALCIFICATION
- The machine builds up lime scale deposits over time, and you need descale the machine every 2-3 months.
- Pour water and descale liquid in water tank up to MAX capacity (water and descale ratio is 4:1) Please use "household descale", or you can use the citric acid replace descale (water and citric acid ratio is 100:3).
- Lock the filter holder (no coffee powder) into the group as explained in "Make espresso coffe".
- Touch coffee button, make about 150ml coffee(or Make 3 cups of coffee). Then touch Steam warm-up switch, it starts preheating, open steam knob after steam indicator is with the light on. Release steam about 2min and turn off the knob. Wait 15 minutes for the machine to cool down before proceeding to step 5.
- Repeat the step 4 for 3 times.
MAINTENANCE AND CLEANING
Do not forget to remove the plug from the socket before cleaning the appliance.
Wipe outside with soft dry cloth when coffee machine is wet, never use metal polish.
The removable items should be washed in hot soapy water. Rinse them before fixing.
Detach the metal funnel through turn it anticlockwise, get rid of coffee residue inside, then you can clean it with cleanser, but at last you must rinse with clear water.
Never use a dishwasher to clean any parts from the machine.
Put the coffee maker in a dry and not very hot place.
PRODUCT DISPOSAL
This product complies with European Directive 2012/19/EU on electrical and electronic devices, known as WEEE (Waste Electrical and Electronic Equipment), provides the legal framework applicable in the European Union for the disposal and reuse of waste electronic and electrical devices. Do not dispose of this product in the bin, instead going to the electrical and electronic waste collection centre closest to your home.
FRANÇAIS
NOUS VOUS REMERCIONS D'AVOIR CHOISI UFESA, NOUS SOUHAITONS QUE CE PRODUIT VOUS APPORTE SATISFACTION ET VOUS FASSE PLAISIR.
AVERTISSEMENT
VEUILLEZ LIRE ATTENTIVEMENT LE MODE D'EMPLOI AVANT D'UTILISER LE PRODUIT. VEUILLEZ CONSERVER CE DOCUMENT DANS UN ENDROIT SÛR POUR UN USAGE ULTÉRIEUR.
DESCRIPTION
natural_image
Technical line drawing of a manual pump and cylindrical device (no text or symbols)natural_image
Diagram of a circular mechanical or electrical component with internal components and directional arrows (no text or symbols)ÉLIMINATION DU PRODUIT
natural_image
Technical line drawing of a kitchen mixer and its cylindrical device (no text or symbols)natural_image
Circular diagram with concentric rings, central cross symbol, and a plus sign, no readable text or labelsnatural_image
Line drawing of a Kiosk with handle and control panel (no text or symbols)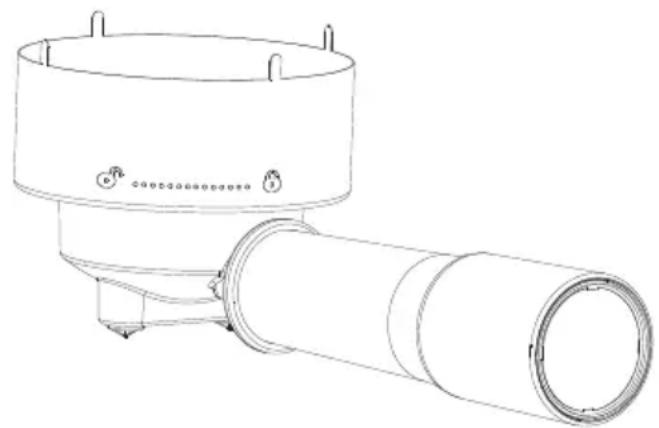
natural_image
Technical line drawing of a mechanical component with cylindrical and flanged sections (no text or symbols)natural_image
Circular diagram with concentric rings and central symbol, no readable text or labelsnatural_image
Technical line drawing of a kitchen grater and its cylindrical device (no text or symbols)natural_image
Circular diagram with concentric rings, central floral motif, and a plus sign (no text or symbols)natural_image
Circular diagram with concentric rings, central symbol, and directional arrows (no text or labels)natural_image
Technical line drawing of a mechanical component with cylindrical shaft and flange (no text or symbols)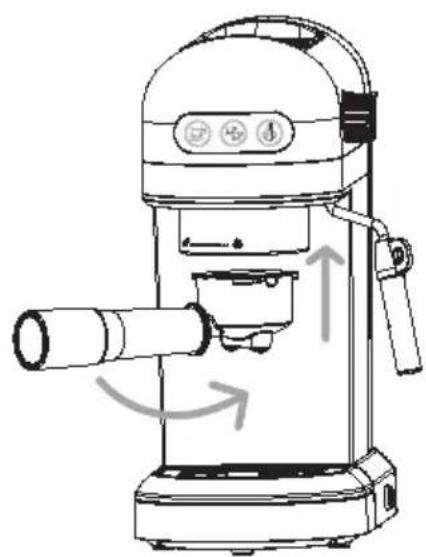
natural_image
Line drawing of a Kiosk with directional arrows indicating motion (no text or symbols)B&B TRENDS, SL. guarantees compliance of this product, for the use for which it is, during the period established by the legislation in force in the country of sale. In the case of breakdown during the term of this warranty, users are entitled to repair or else the replacement of the product at no charge if the former is unavailable, unless one of these options proves impossible to fulfil or is disproportionate. In this case, you can then opt for a reduction in price or cancellation of the sale, which must be dealt with directly with the sales vendor. This also covers replacement of spare parts provided that the product has been used according to the recommendations specified in this manual for both cases, and has not been tampered with by any third party that is not authorised by B & B TRENDS, SL. The warranty will not cover any parts subject to wear and tear. This warranty does not affect your rights as a consumer in accordance with the provisions in Directive 1999/44/EC for member states of the European Union.
USE OF WARRANTY
Customers must contact a B&B TRENDS, SL., authorised Technical Service for repair of the product. Since any tampering of the same by anyone not authorised by B&B TRENDS, SL., or the careless or improper use of the same shall render this warranty null and void.
You must keep the purchase invoice, receipt or delivery docket in order to exercise your warranty rights.
For technical service and after-sales care outside the Spanish territory, please submit your query to the point of sale where you purchased the item.
BON DE GARANTIE
Check out your nearest service station at https://sat.ufesa.com/
ufesa
B&B TRENDS, S.L. · C.I.F. B-86880473