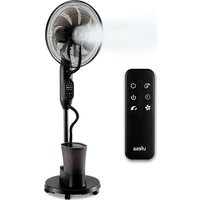
Nevada+ - Fan UFESA - Free user manual and instructions
Find the device manual for free Nevada+ UFESA in PDF.


| Brand | Ufesa |
| Model | Nevada+ |
| Product type | Misting fan |
| Power supply | 220-240 V, 50 Hz |
| Power consumption | 31.7 W |
| Standby consumption | 0.40 W |
| Maximum airflow | 52.44 m³/min |
| Maximum air speed | 2.58 m/s |
| Noise level | 57.7 dB(A) |
| Seasonal consumption | 10.592 kWh/year |
| Number of speeds | 9 (3 low, 3 medium, 3 high) |
| Ventilation modes | Normal, Natural, Sleep |
| Misting | Ultrasonic, 3 levels (low, medium, high) |
| Timer | 0.5 to 7.5 h in 0.5 h steps |
| Oscillation | Yes, button controlled |
| Remote control | Yes, with AAA 1.5V batteries (not included) |
| Water tank capacity | Not specified (fill by sight) |
| Tank cleaning | Every 72 hours |
| Maximum operating altitude | 2000 m |
Frequently Asked Questions - Nevada+ UFESA
User questions about Nevada+ UFESA
0 question about this device. Answer the ones you know or ask your own.
Ask a new question about this device
Download the instructions for your Fan in PDF format for free! Find your manual Nevada+ - UFESA and take your electronic device back in hand. On this page are published all the documents necessary for the use of your device. Nevada+ by UFESA.
USER MANUAL Nevada+ UFESA
MF Nevada+ / MF VNDC
natural_image
Black outdoor fan with visible blades and a digital display stand (no text or symbols on the fan body)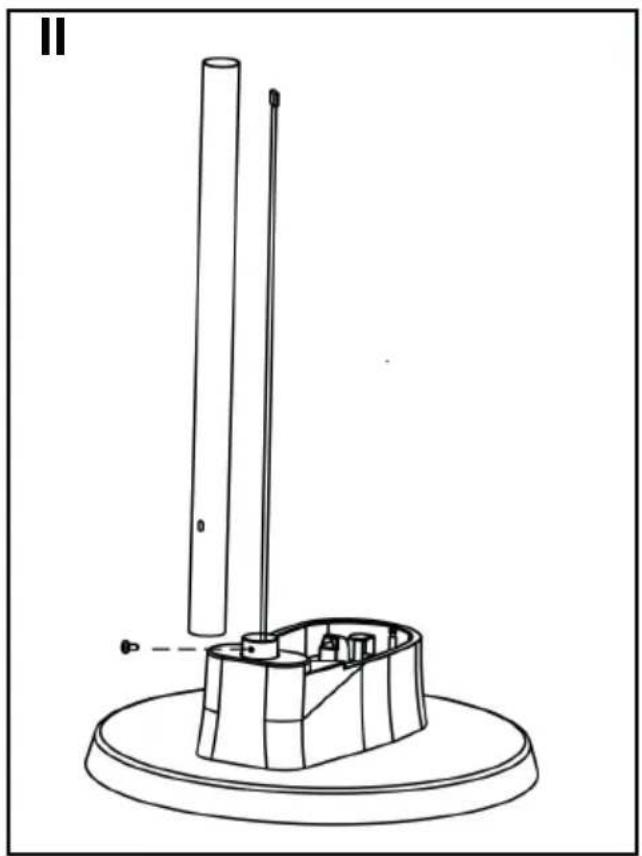
natural_image
Technical line drawing of a mechanical device with a vertical rod and base mount (no text or symbols)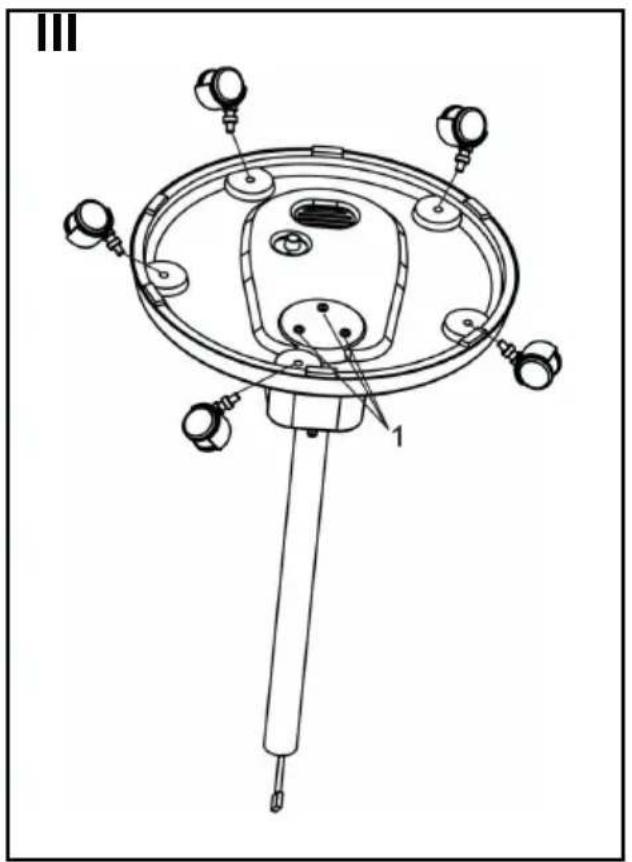
natural_image
Technical line drawing of a mechanical device with internal components and a base plate (no text or symbols)
flowchart
graph LR
    A["External Motor"] --> B["Internal Sector"]
    B --> C["Central Component"]
    C --> D["Final Motor"]
    style A fill:#f9f,stroke:#333
    style B fill:#ccf,stroke:#333
    style C fill:#cfc,stroke:#333
    style D fill:#fcc,stroke:#333
natural_image
Diagram of a mechanical or optical device with two curved blades and a central vertical bar, showing directional flow (no text or symbols)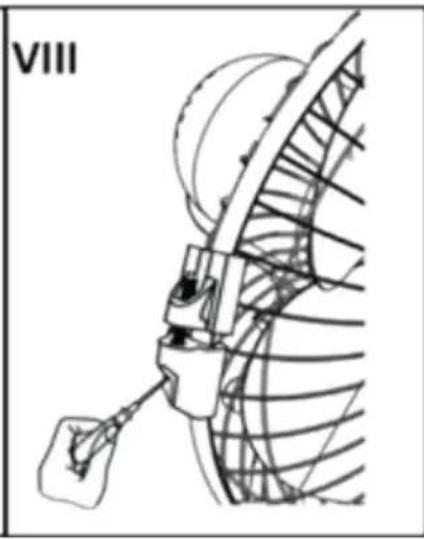
natural_image
Technical line drawing of a mechanical device with a labeled section VIII (no text or symbols on the diagram itself)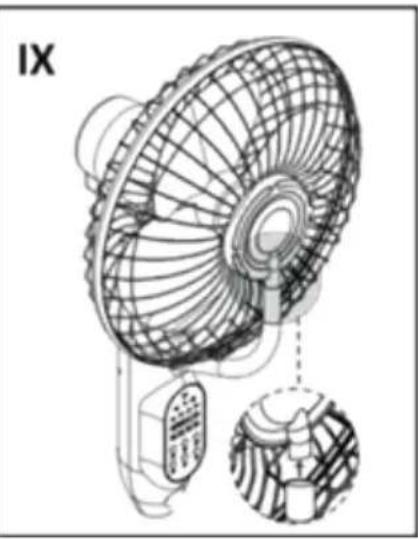
natural_image
Line drawing of a front-mounted air conditioner fan with internal mesh structure and an inset close-up view (no text or symbols)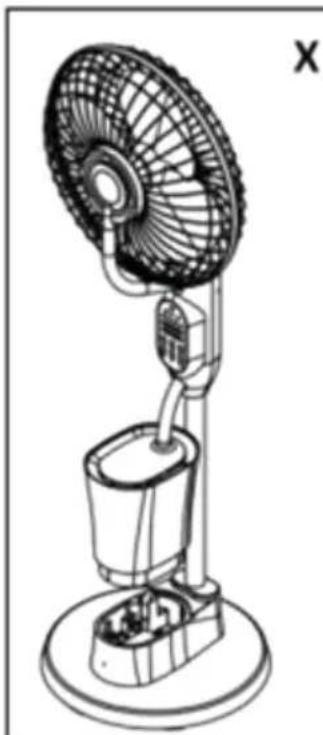
natural_image
Line drawing of a small outdoor fan with a bucket and stand (no text or symbols)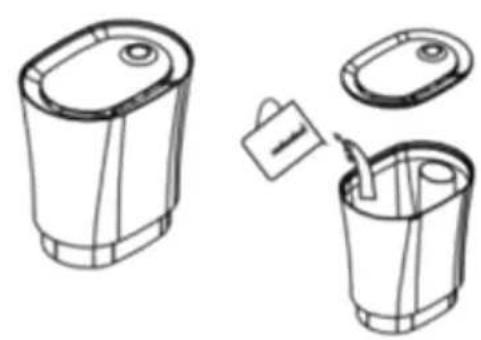
natural_image
Line drawing of a cylindrical container with lid and side view, showing a separate view of its internal structure (no text or symbols)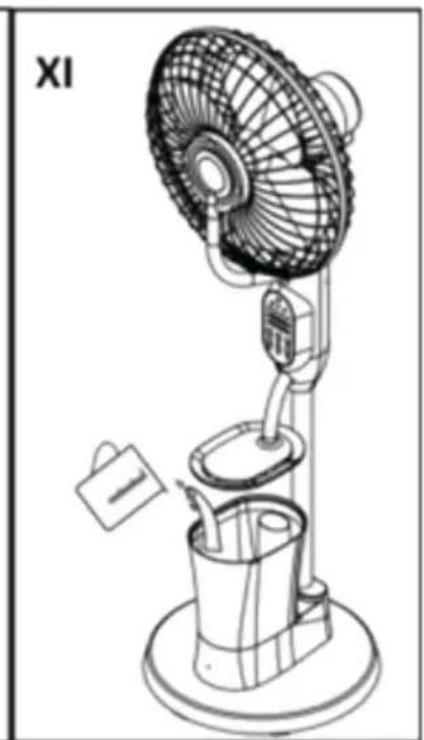
natural_image
Line drawing of a portable air conditioner with fan, stand, and bucket (no text or symbols)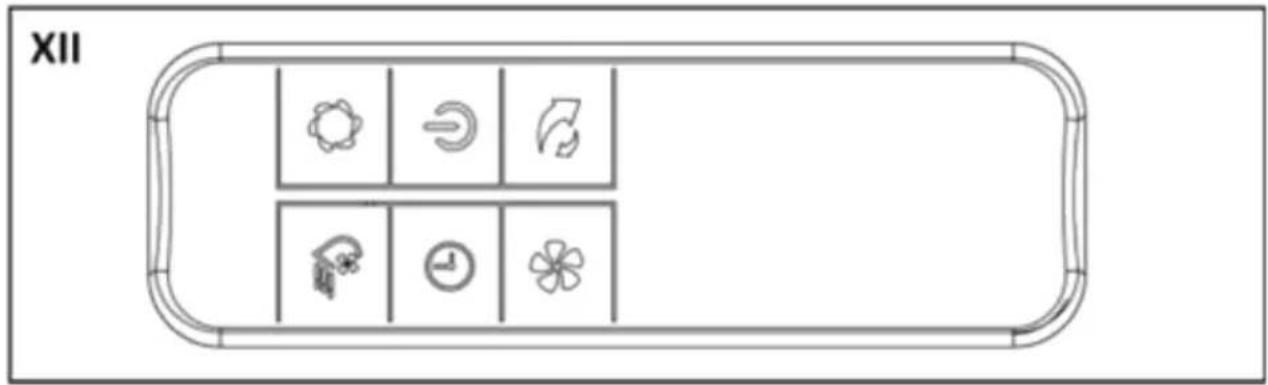
ESPAÑOL
AGRADECEMOS QUE HAYA DEPOSITADO SU CONFIANZA EN UFESA Y DESEA-MOS QUE EL FUNCIONAMIENTO DEL PRODUCTO LE SATISFAGA PLENAMENTE.
ATENCIÓN
WE WOULD LIKE TO THANKS YOU FOR CHOOSING UFESA, WE WISH THE PRODUCT PERFORMS TO YOUR SATISFACTION AND PLEASURE.
WARNING
PLEASE READ THE INSTRUCTIONS FOR USE CAREFULLY PRIOR TO USING THE PRODUCT. STORE THESE IN A SAFE PLACE FOR FUTURE REFERENCE.
DESCRIPTION
MAIN BODY (Figure I)
- Decorative ring
- Front guard
- Blades lock nut
- Blades
- Grill ring
- Grill lock nut
- Back grill
- Back shell
- Support tube
- Watertank
- Base
- Casters
- Misting tube
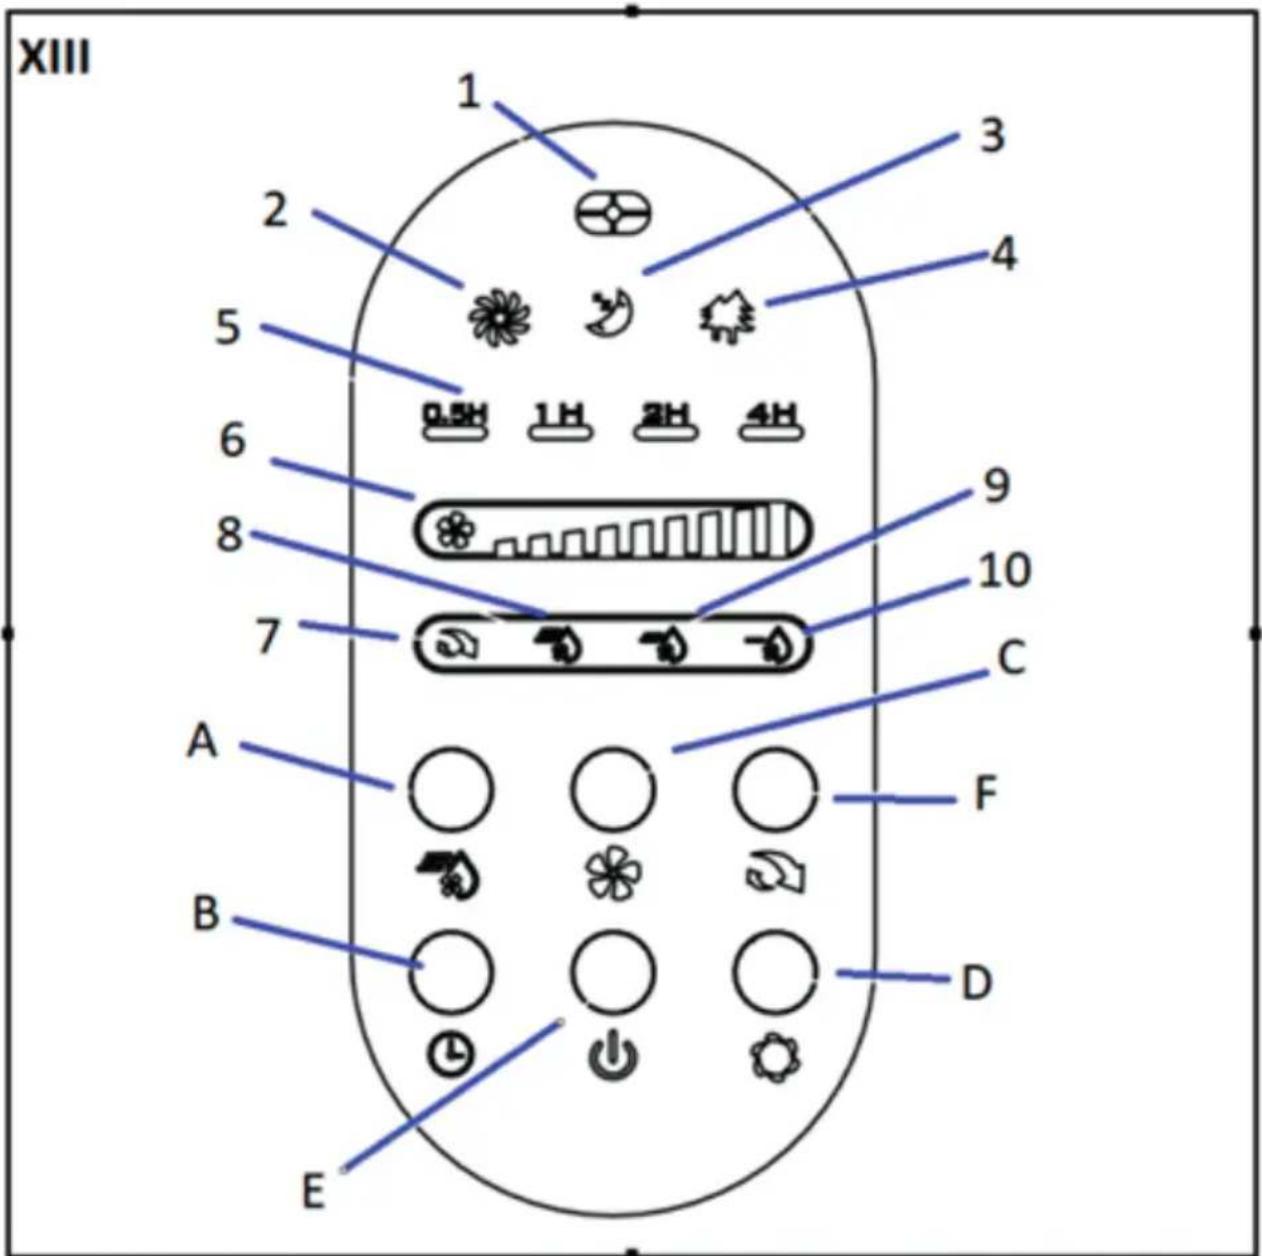
CONTROL PANEL (Image XIII)
- Remote control signal receiver
- Normal mode light
- Sleep mode light
- Natural mode light
- Timer light (0.5/1h/2h/4h)
- Speed light: Low (1,2,3), Medium (4,5,6), High (7,8,9)
- Oscillation light
- Max. mist light
- Medium mist light
- Min. mist light
A. Mist button
B. Timer button
C. Wind speed button
D. Mode button
E. Standby button
F. Oscillation button
SAFETY INSTRUCTIONS
This appliance may be used by children over 8 years of age, by people with physical, sensory or mental disabilities and by the inexperienced, provided they are correctly supervised and instructed regarding its safe use and are aware of the risks involved. Children must not play with the appliance or carry out unsupervised cleaning and user maintenance. If the power cord is damaged it should be changed by the manufacturer's technical support service, or by a similarly qualified person, in order to avoid any danger. It is necessary to disconnect the appliance before assembling, disassembling, cleaning and during water filling. For filling, cleaning and descaling the appliance follow the instructions described below. Do not cover or obstruct the product when in use. Empty the tank and refill it every 72 hours. Before refilling, clean it with fresh tap water or cleaning agents if required. Remove any scale, deposits, or film that has formed on the sides of the tank or on interior surfaces. And wipe all surfaces dry. Ensure that the fan is switched off from the supply mains before removing the guard. Instructions include details regarding filling, cleaning and descaling. This device is designed for use at a maximum altitude up to 2000m above sea level.
IMPORTANT INFORMATION
This appliance is intended exclusively for domestic use for ventilation of rooms: do not use it for other purposes. Any other usage should be considered improper and dangerous. The manufacturer shall not be held responsible for any damage resulting from improper, incorrect and irresponsible use and/ or for repairs made by unqualified technicians. Do not insert fingers or any other objects through the fan's protector grille. The appliance must be kept out of the reach of children. Do not use the appliance if it is not working properly, or if it appears to be damaged; if in doubt, take it to a professional, qualified technician. Do not move the appliance while it is operating. When the appliance is not being used, remove the plug from the mains socket. Do not touch the appliance with wet hands or feet. Do not drag the appliance by the cable to move it. Do not pull the cable or the appliance itself to remove the plug from the mains socket. To clean the appliance, follow the instructions in the section of the manual dedicated to cleaning and maintenance. The water should be replaced every 3-4 days, even if it has not been used. In case the appliance has not been used for long periods, remove the water from the humidifier.
B&B TRENDS, S.L. will not be held liable for any harm or damage which may occur to people, animals or objects as a result of failure to observe the aforementioned warnings.
GETTING STARTED
Before using the mist fan for the first time:
- Unpack the mist fan and remove all the packing materials.
- See Image I. Please check whether there are any missing parts. The mist fan can be assembled only when the parts are complete.
- Use a soft cloth to remove any dust on the surface that may happen during packing and transport.
- Place the mist fan on a flat and stable surface.
ASSEMBLY INSTRUCTIONS
- See Image II. Unscrew the screw of the short iron pipe, and then pass the wire through the long iron pipe. Then put the long iron pipe on the short iron pipe. Align the screw hole of the iron pipe on the base, fix it with the unscrewed screws.
- See Image III. Install the weight plate on the base first, and fasten it with the M5x25 screws. Cover the metal rod of the 5 wheels with the 5 black plastic sleeves and insert them in the holes under the base.
- See Image V. Loosen the fixing screw of the fan body, and then plug the fan body terminal and the terminal wire in the iron pipe. Tighten the screw.
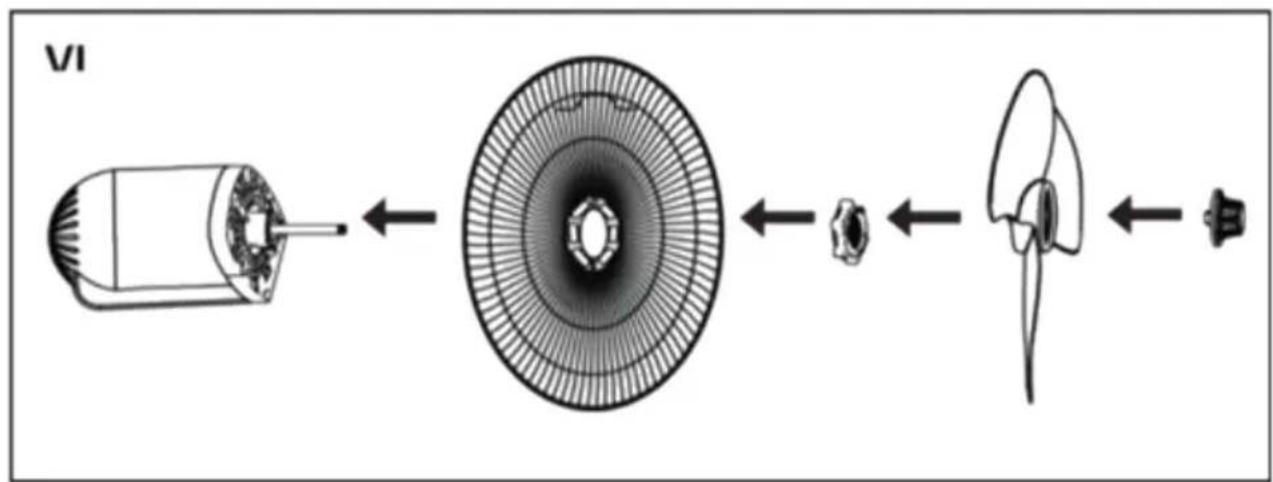
- See Image VI. Install the rear grid, plastic nut, blades, and blade spinner to the motor shaft and fix in place.
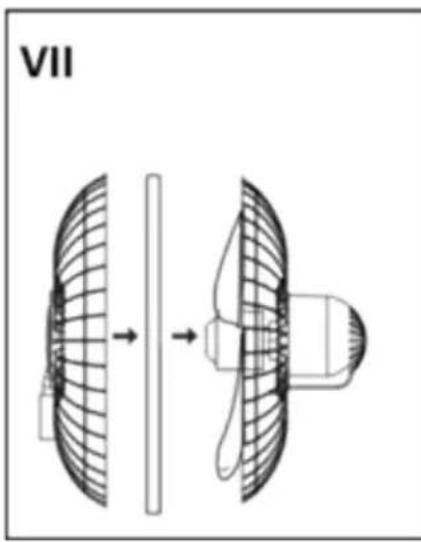
- See Image VII, VIII and IX. Install the front grid and net frame, and secure using the screw on the net frame. Insert the upper flexible hose into the mist vent that is located at the front of the fan grid (ensure the hose is free of kinks).
WATER TANK ASSEMBLY
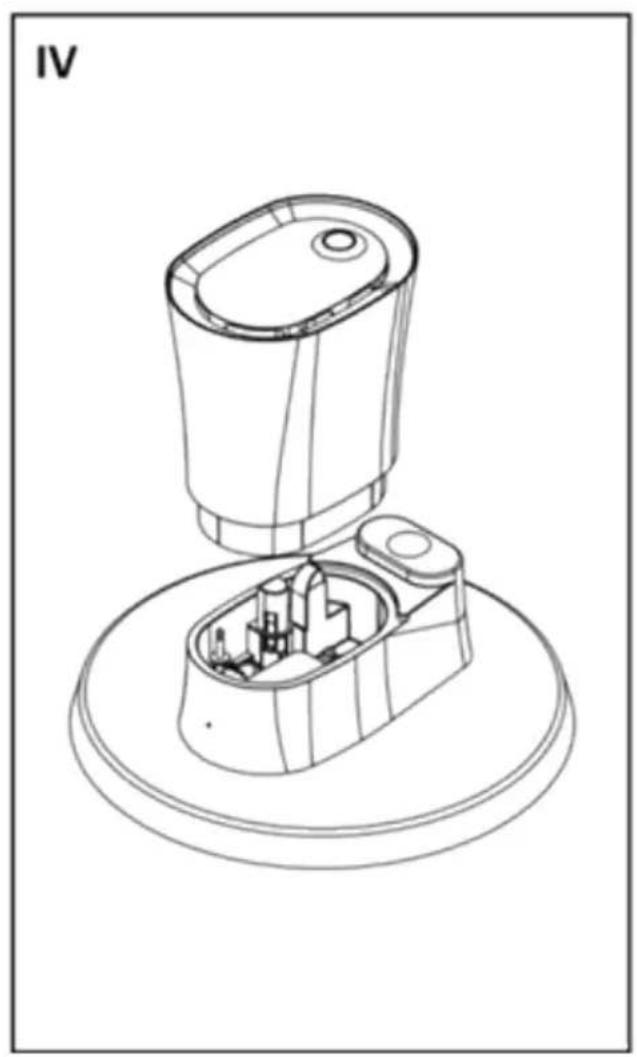
- See Image IV, Put the water tank on the mist generator, ensuring it is appropriately seated in the recess.
- Fit the cover to the top of the water tank.
- Insert the lower flexible hose of the fan body into the water tank cover (ensure the hose is free of kinks)
FILLING THE WATER TANK
- See Image X or XI, take off the cover of the water tank.
- Fill the tank with cold and clean water, making sure not to overfill it.
- See Image IV, put the cover on the tank and place the tank back on the mist generator.
ATTENTION!
- Ensure the product is unplugged from the mains before filling or refilling the water tank.
- Only use water in the water tank. Do not add any chemicals, oils, or other additives.
• The water must not be warmer than 50°C.
When connected to the power supply, the fan is under standby mode. It can be controlled with the control buttons or remote.
OPERATION INSTRUCTIONS
A: MIST BUTTON
- Press the "Mist" button to switch the ultrasonic mist on or off. Adjust the mist volume (Max-Medium-Minimum) by pressing the "Mist" button several times.
- When the mist function is selected, the corresponding mist volume indicator light will be illuminated.
- If the water tank is empty (or short of water), the 3 mist indicator light will be flash continuously at the same time.
- The mist function and fan function can be worked independently or together.
B: TIMER BUTTON
Press the “Timer” button when the fan is on. The indicator will show the time remaining until the fan is due to switch off. You can select the length of time the fan will be in operation from spans ranging from 0.5 to 7.5 hours in 0.5-hour increments. Press the TIMER button repeatedly, and the sum of the values of the lights is the remaining time until shut down.
$$ 0 5. H \quad 1 H \quad 2 H \quad 4 H = 7. 5 H $$
C: WIND SPEED BUTTON
- Press the Power "ON/OFF" button to switch the fan ON.
- Set the fan speed from 9 options (1,2,3) Low speed-(4,5,6) Medium speed-(7,8,9) High speed by pressing the "WIND SPEED" button several times. The LED light will show low speed, Medium speed and high speed Correspondingly.
D: MODE BUTTON
- The wind mode can be adjusted by pressing the "MODE" button.
- Normal: The fan will operate in High, Medium or Low mode as set.
- Natural: The fan will operate at low, medium and high speeds in different patterns to provide a wind flow that replicated natural airflow.
- Sleep: Sleep mode can operate at low, medium and high speeds. In sleep mode, the wind speed will decrease in set patterns before operating at a low speed until shut down.
E: ON/OFF BUTTON
- Press the "ON/OFF" button to switch the fan on or off.
- Every 72 hours, the control panel lights flash to indicate that the water tank needs to be cleaned. Press the "ON/OFF" button 5 seconds to reset.
F: OSCILLATING BUTTON
When you press the "OSC" button, the mist fan head will move continuously from side to side. Pressing the button again will stop the oscillation of the mist fan.
G: REMOTE CONTROL
The above functions can be controlled using the remote control by pressing the corresponding function buttons. See Image XII. To use the remote control, insert two AAA 1.5V batteries in the battery housing in the remote.
CLEANING AND MAINTENANCE
- Always unplug the fan before cleaning it.
- Clean the water tank and water every 72 hours to prevent the formation of scale, algae, or bacteria.
- If you do not intend to use the fan for an extended period, empty the water tank and dry the water unit with a microfiber cloth.
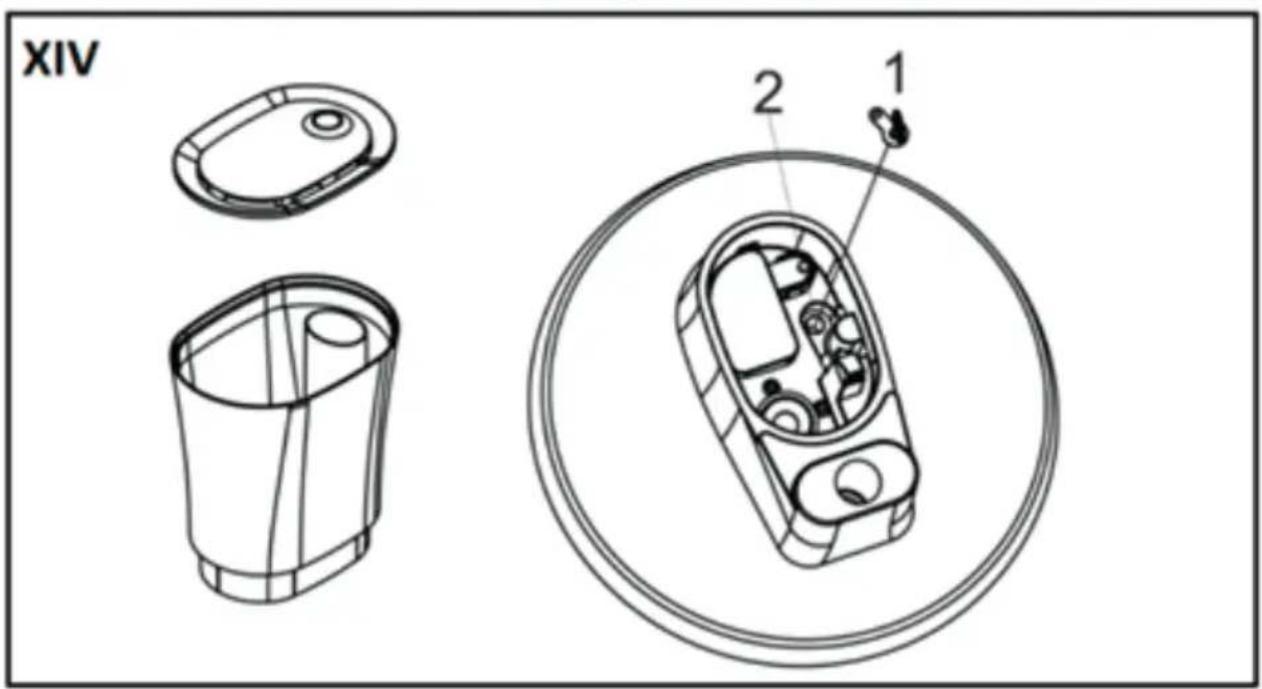
- See Image XIV, pull out the rubber stopper(1) from the drain outlet(2) to drain the water from the humidifier base.
- If the fan will be placed in storage for a more extended period of time (over winter, etc), keep it safe and away from dust or damage.
- To avoid damaging the plastic and indicators, do not use any abrasive cleaning agents or chemicals.
- The fan must not be opened by unauthorized persons.
CAUTION: Unplug the fan from the electrical supply source before cleaning. After servicing, any safety device (including grilles and blades) it must be reinstalled or remounted as previously installed. Use a soft damp cloth then wipe with a dry cloth. Do not use harmful detergents. Do not bend the blades.
PRODUCT DISPOSAL
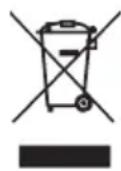
This product complies with European Directive 2012/19/EU regarding electrical and electronic devices, known as WEEE (Waste electrical and electronic equipment), which establishes the applicable legal framework in the European Union regarding the elimination and recycling of electrical and electronic devices. Do not put this product in the bin. Take it to your closest electrical and electronic waste treatment centre.
The product may use batteries. Remove them before dipping of the product and deposit them in the special containers proved for this purpose.
DESCRIPTION OF THE SYMBOLS
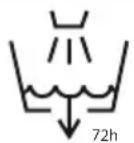
Clean the water tank every 72 hours
| Description Symbol Value Unit | |||
| Maximum fan flow rate F 52.44 m3/min | |||
| Fan power input P 31.7 W | |||
| Service value SV 1.65 (m3/min)/W | |||
| Standby power consumption | PSB 0.40 W | ||
| Fan sound power level LWA 57.7 dB(A) | |||
| Maximum air velocity C 2.58 meters/s | |||
| Seasonal electricity consumption | Q 10.592 | kWh/a | |
| Measurement standard for service value | IEC 60879:2019 - Comfort fans and regulators for household and similar purposes - Methods for measuring performance |
FRANÇAIS
NOUS VOUS REMERCIONS D'AVOIR ACHETÉ UN PRODUIT UFESA. NOUS ESPÉRONS QUE LE PRODUIT RÉPONDRA À VOS ATTENTES.
AVERTISSEMENT
VEUILLEZ LIRE ATTENTIVEMENT LES INSTRUCTIONS D'UTILISATION AVANT D'UTILISER LE PRODUIT. VEUILLEZ CONSERVER CES INSTRUCTIONS DANS UN ENDROIT SÛR POUR UN USAGE ULTÉRIEUR.
DESCRIPTION
CORPS PRINCIPAL (FIGURE I)
ÉLIMINATION DU PRODUIT
ÉLIMINATION DU PRODUIT

B&B TRENDS, SL. guarantees compliance of this product, for the use for which it is, during the period established by the legislation in force in the country of sale. In the case of breakdown during the term of this warranty, users are entitled to repair or else the replacement of the product at no charge if the former is unavailable, unless one of these options proves impossible to fulfil or is disproportionate. In this case, you can then opt for a reduction in price or cancellation of the sale, which must be dealt with directly with the sales vendor. This also covers replacement of spare parts provided that the product has been used according to the recommendations specified in this manual for both cases, and has not been tampered with by any third party that is not authorised by B & B TRENDS, SL. The warranty will not cover any parts subject to wear and tear. This warranty does not affect your rights as a consumer in accordance with the provisions in Directive 1999/44/EC for member states of the European Union.
USE OF WARRANTY
Customers must contact a B&B TRENDS, SL., authorised Technical Service for repair of the product. Since any tampering of the same by anyone not authorised by B&B TRENDS, SL., or the careless or improper use of the same shall render this warranty null and void. You must keep the purchase invoice, receipt or delivery docket in order to exercise your warranty rights. For technical service and after-sales care outside the Spanish territory, please submit your query to the point of sale where you purchased the item.
BON DE GARANTIE
Check out your nearest service station at https://sat.ufesa.com/
ufesa
B&B TRENDS, S.L. · C.I.F. B-86880473
- MF Nevada+ / MF VNDC
- ESPAÑOL
- ATENCIÓN
- WARNING
- DESCRIPTION
- MAIN BODY (Figure I)
- CONTROL PANEL (Image XIII)
- SAFETY INSTRUCTIONS
- IMPORTANT INFORMATION
- GETTING STARTED
- ASSEMBLY INSTRUCTIONS
- WATER TANK ASSEMBLY
- FILLING THE WATER TANK
- ATTENTION!
- OPERATION INSTRUCTIONS
- A: MIST BUTTON
- B: TIMER BUTTON
- C: WIND SPEED BUTTON
- D: MODE BUTTON
- E: ON/OFF BUTTON
- F: OSCILLATING BUTTON
- G: REMOTE CONTROL
- CLEANING AND MAINTENANCE
- PRODUCT DISPOSAL
- DESCRIPTION OF THE SYMBOLS
- FRANÇAIS
- AVERTISSEMENT
- CORPS PRINCIPAL (FIGURE I)
- ÉLIMINATION DU PRODUIT
- USE OF WARRANTY
- BON DE GARANTIE
- ufesa
Brand : UFESA
Model : Nevada+
Category : Fan