Memphis - Turntable GPO - Free user manual and instructions
Find the device manual for free Memphis GPO in PDF.


User questions about Memphis GPO
0 question about this device. Answer the ones you know or ask your own.
Ask a new question about this device
Download the instructions for your Turntable in PDF format for free! Find your manual Memphis - GPO and take your electronic device back in hand. On this page are published all the documents necessary for the use of your device. Memphis by GPO.
USER MANUAL Memphis GPO
natural_image
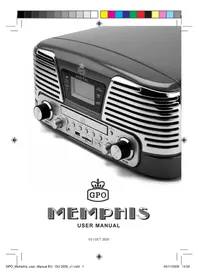
Black digital audio amplifier with CD-ROM, MP3, and USB interface (no visible text or symbols on main body)
text_image
GPOMEMPHIS
USER MANUAL
V3 | OCT 2020

natural_image
Color palette bar with grayscale swatches and a central crosshair symbol (no text or labels)

natural_image
Simple black square with two horizontal lines and the number '2' in the top-right corner (no text or symbols beyond the number)GPO_Memphis_user_Manual EU - Oct 2020_v1.indd 2

Content
English 5
German 17
French 31
Dutch 45
Spanish 59
Italian 73
Portuguese 87


text_image
GPO_Memphis_user_Manual EU - Oct 2020_v1.indd 4 04/11/2020 14:22English
natural_image
Line drawing of a plug being inserted into a socket, with a hand holding the socket (no text or symbols)
natural_image
Technical line drawing of a mechanical assembly with a tool and component, no visible text or symbols
natural_image
Line drawing of a plug socket with a bulb inserted, no text or symbols present
natural_image
Color palette bar with grayscale gradient and a central crosshair symbol (no text or labels)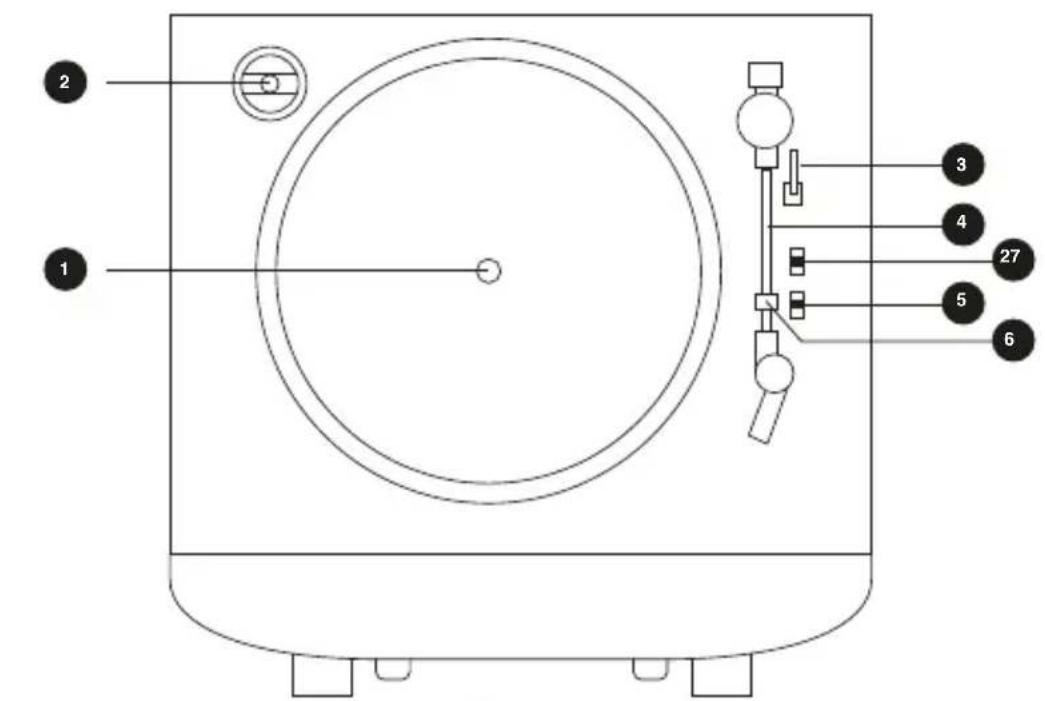
text_image
2 1 3 4 27 5 6
text_image
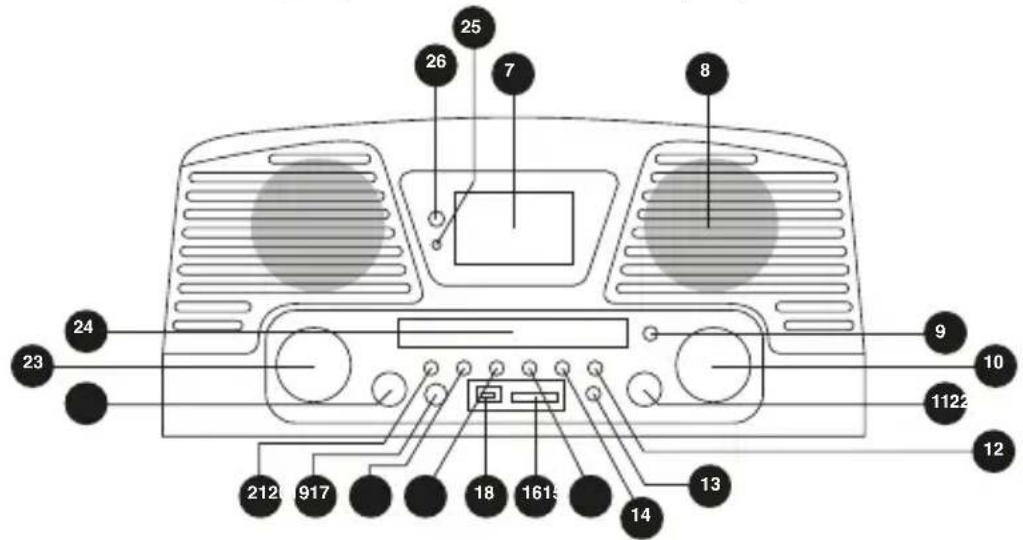
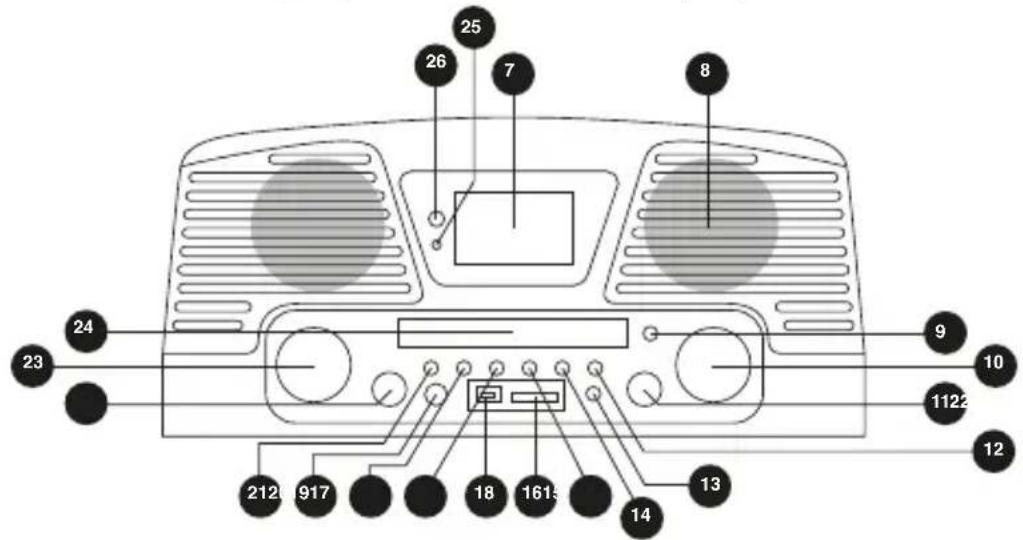
25 26 7 8 23 24 9 10 1122 12 13 14 18 1615 212 917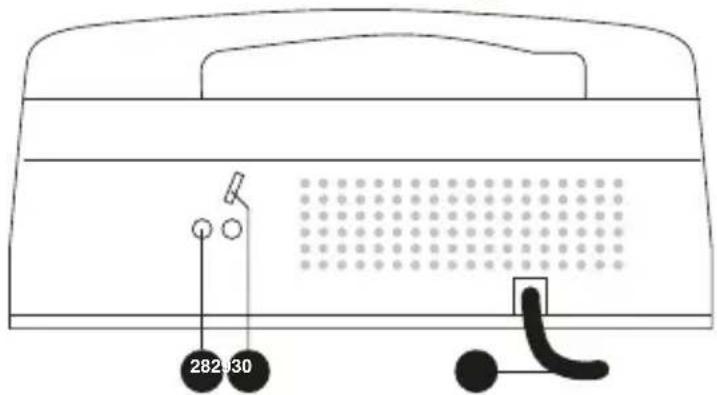
text_image
282030
natural_image
Simple black square with a number 6 and two horizontal lines extending from its top (no text or symbols beyond the number)
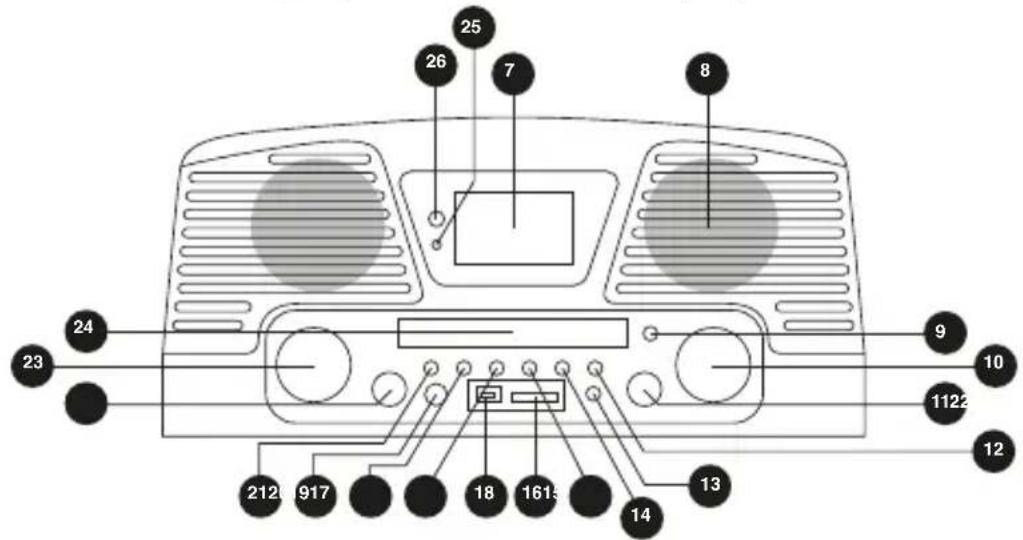
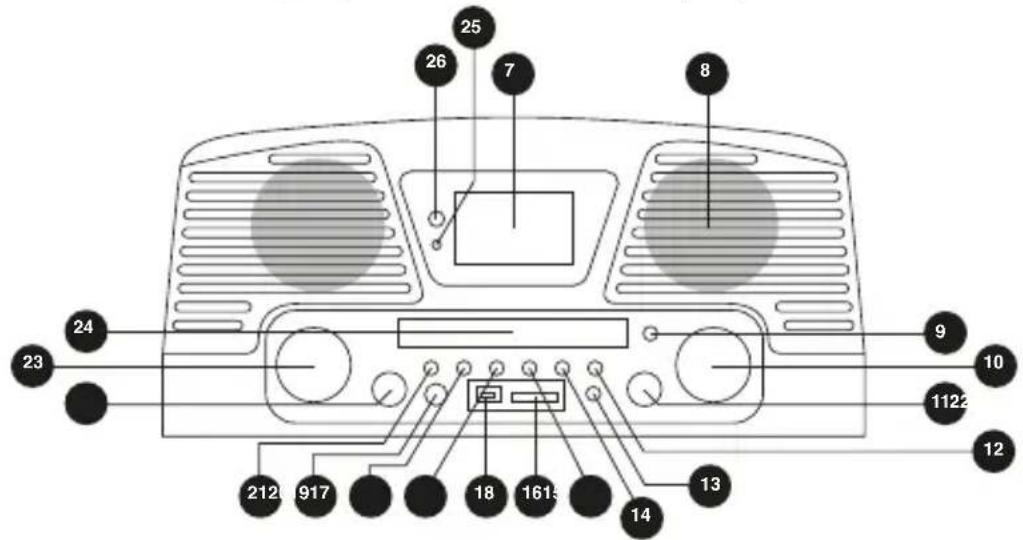
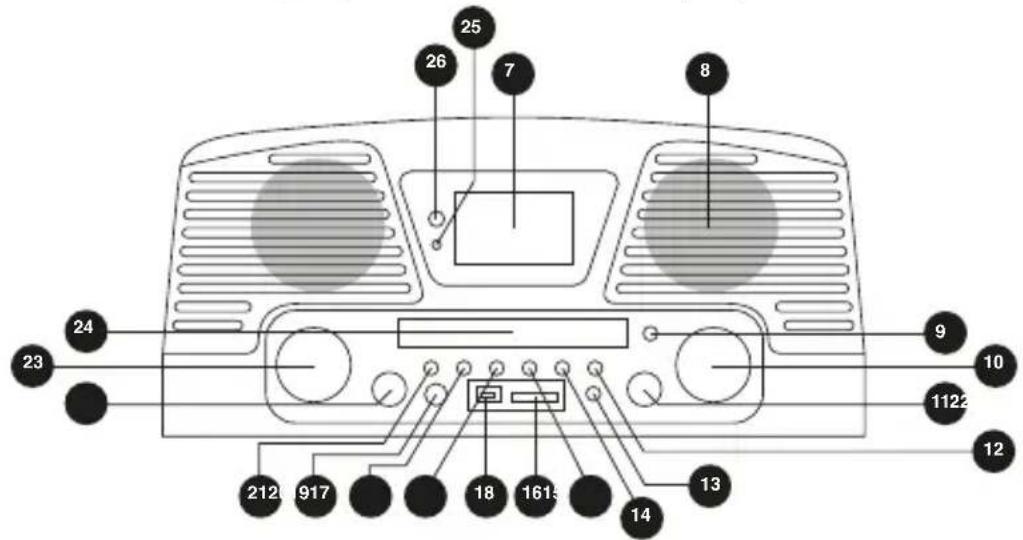
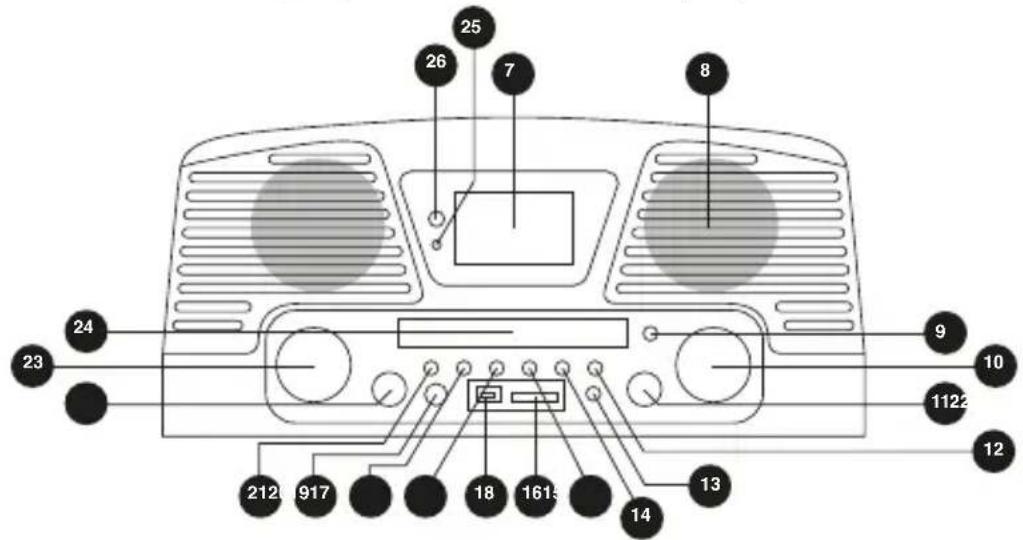
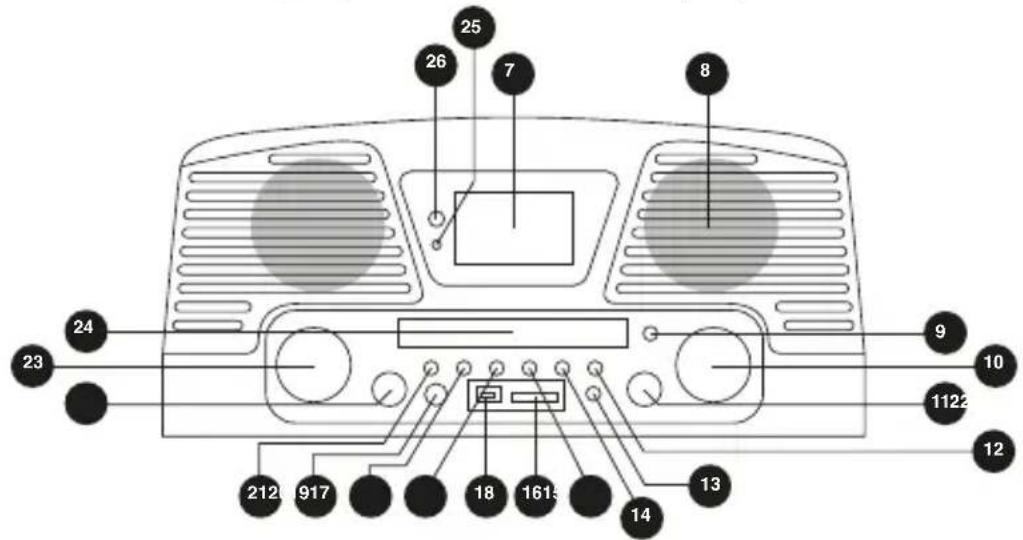
PARTS / BUTTONS
Before use, detach the stylus guard (white plastic cover) by pulling it straight off the front of the cartridge in the direction of the arrow.
- Turntable platter 20. AUX IN
- 45 rpm adapter 21. Record button
- Lift lever (use this lever 22. Function button to lift the tonearm) 23. Volume control
- Tonearm 24. CD door
- Speed selector 25. Power indicator
-
Tonearm rest 26. IR sensor
-
Display
8.Speakers
-
Open/Close button
-
Tuning control knob
-
FM/FM stereo selector
-
Mode button (Programme, Repeat 1, Repeat Album, Repeat All)
-
BBS button
-
Skip + button
-
Skip - button
-
SD/MMC card slot
-
Stop/CD/USB/SD button
-
USB port
-
Play/Pause button
-
Auto-stop(ON/OFF) selector
-
Line out socket
-
FM antenna
-
AC power cord


OPERATING THE RADIO
FM TUNER
- Set the FUNCTION button (22) to the RADIO position.
- Tune in to the desired radio station by turning the Tuning control knob (10).
- Adjust the volume (23) to the desired level.
- Set the FUNCTION button (22) to the OFF position to turn off the radio.
Antenna
Extend the wire to obtain the best reception. You may need to turn or change the position of the unit to improve reception.

FM Stereo and Mono Reception
When an FM signal is tuned to the FM stereo (11) position it can be received in stereo. The FM Stereo indicator will appear on the LCD display (7).
Before use, please make sure to: Lift the dust cover.
Release the tonearm clamp and remove the stylus protector.
Listening to records
- Set the FUNCTION button (22) to the PHONO position.
- Place a record on the turntable, over the central spindle. Place the EP adapter over the central spindle when playing 17cm EP records.
-
Set the Speed selector (5) to 33, 45 or 78 rpm depending on the record.
-
Release the tonearm clamp and remove the stylus protector.
-
Lift the tonearm from the tonearm rest by using the Lift lever.
-
Place the tonearm on the desired position of the record.
-
Gently lower the tonearm onto the record to start playing.
-
When the record is finished the tonearm will automatically stop. Lift the tonearm from the record and put it back on the rest.
-
To stop manually, lift the tonearm from the record and return it to the rest.
-
Set the Auto-stop (ON/OFF) selector to the ON position to use the auto-stop function.
In the ON position, 33 rpm records will automatically stop when the end of the record is reached.
45 and 78 rpm records can play the whole song when the auto-stop function is OFF.
Note: Do not stop or turn the platter manually.
Moving or jarring the turntable without securing the tonearm clamp could result in damage to the tonearm.
Replace the protective cap on the stylus when not in use.


LINE-OUT CONNECTION
You can connect the unit to external speakers (4 ohm) via the Speaker output L, R sockets (external speakers are not included).
Note: Sound will still come from the original built-in speakers even after the external speakers are connected.
SELECTING THE SOURCE - Stop/CD/USB/SD (17) button
Press this button and hold for 3 seconds to switch between CD, USB or SD mode.
Remark: Please note that only the USB keys with format FAT32 and under a capacity of 32Gb can be read by the unit.
LISTENING TO COMPACT DISCS
- Set the FUNCTION button (22) to the CD position.
- Press the PLAY/PAUSE button once to start playing the CD from the first track. "Play" will appear on the display.
- Press the PLAY/PAUSE button once again to pause playback. "Pause" will appear on the display and the track number will flash.
- To stop playback, press the Stop/CD/USB/SD button.
In CD mode, this unit can read CD, CD-R and CD-RW discs. This unit cannot play MP3 CDs, but it can play MP3 files on a USB flash drive.
SKIPPING TRACKS
Selecting a different track during playback
- Press the SKIP +/ SKIP - buttons (14, 15). The track number appears on the display.
- Press the PLAY/PAUSE button to start playing the selected track.
REPEAT CD PLAY
- When playing a CD, if you wish to listen to the same track repeatedly, press the MODE button (12) on the unit.
- To play the entire disc over and over again, press the MODE button twice. "REP ALL" will be displayed.
- To cancel repeat play, press the STOP button or press the MODE button repeatedly until the repeat indicator disappears.
Note: The “REP ALL” function affects both normal and programmed playback.

PROGRAMMED DISC PLAY (CD)
You cannot enter programs while playing a CD. Press the STOP button (17) and then follow the instructions below.
- Press the unit's MODE button (12) and select PROGRAMME. The information is displayed on the LCD display.
- Press the unit's SKIP +/SKIP - buttons (14, 15) to select the location in which the track should be stored i.e. track 03.
- Press the MODE button (12) and select PROGRAMME. The first programmed selection is now stored in the programme memory.
Listening to programmed tracks
Press the PLAY/PAUSE button (19). The CD will start playing at the beginning of the first programmed track.
To clear the programmed memory:
If the disc is playing, press the STOP button (17) to stop the disc.
Turn off the device or use the FUNCTION button (22) to exit CD mode.
USING A USB / SD CARD
- Insert the USB flash drive into the USB port (18) or the SD card into the SD card slot (16).
- Press the Stop/CD/USB/SD button (17). The total number of tracks will be shown on the display and play automatically. NOTE: Only MP3 format files are supported.
Not all USB flash drive brands are supported.
Playing the entire USB or SD card
When inserting a USB flash drive or SD CARD, playback will start automatically with the first track. The current track number is displayed.
- To stop playback, press the PLAY/ PAUSE button (19). The time elapsed will flash.
- To continue playback, press the PLAY/ PAUSE button again.
- To stop playback, press the STOP button (17).
RECORDING AND STORING FROM CD
You can record your favourite CD songs in MP3 format and store them on a memory device via the USB port (18) or SD/MMC card slot (16).
- Set the FUNCTION button (22) to CD mode.
- Press the SKIP +/SKIP - buttons (14, 15) to select the song or track you wish to record and then press the PLAY/PAUSE button (19).
- Insert the USB flash drive into the USB port (18). Press the RE-CORD button (21) to start synchronized recording. ">USB" will be displayed indicating the track is being recorded to USB.
-
Insert the SD/MMC card into the SD/MMC slot (16). Press the RECORD button (21) to start synchronized recording. “>SD” will be displayed indicating the track is being recorded to SD or MMC.
-
Press the STOP button (17) to stop recording.
-
If you insert the USB flash drive and SD/MMC card into the unit at the same time: press the RECORD button (21) to start synchronised recording; "USB or CARD" will flash on the display. Then press the SKIP +/SKIP - buttons (14, 15) to select recording to USB or card and press the RECORD button to confirm.
-
Press the STOP button (17) to stop recording.
-
Note: CD recording must be synchronised. Press the STOP button to confirm.
Attention: Some original CDs may not be recordable as they are copy-protected.
RECORDING AND STORING FROM TURNTABLE
You can record you favourite vinyl songs in MP3 format and store them on a memory device via the USB port (18) or SD/MMC card slot (16).
- Set the FUNCTION button (22) to PHONO mode.
- Insert the USB flash drive into the USB port (18). Press the RE-CORD button (21) to start synchronized recording. ">USB" will be displayed indicating the track is being recorded to USB.
- Insert the SD/MMC card into the SD/MMC slot (16). Press the RECORD button (21) to start synchronized recording. “>SD” will be displayed indicating the track is being recorded to SD or MMC.
BASS BOOST
Press the BASS button (13) once to the ON position to enjoy a more powerful Bass sound.
REMOTE CONTROL
- Remove the battery cover from the back of the remote control.
- Insert a CR2025 (3V) battery (included) making sure that the + and symbols on the battery match those on the battery compartment.
- Replace the battery cover.

natural_image
Color palette bar with grayscale swatches and a central crosshair symbol (no text or labels)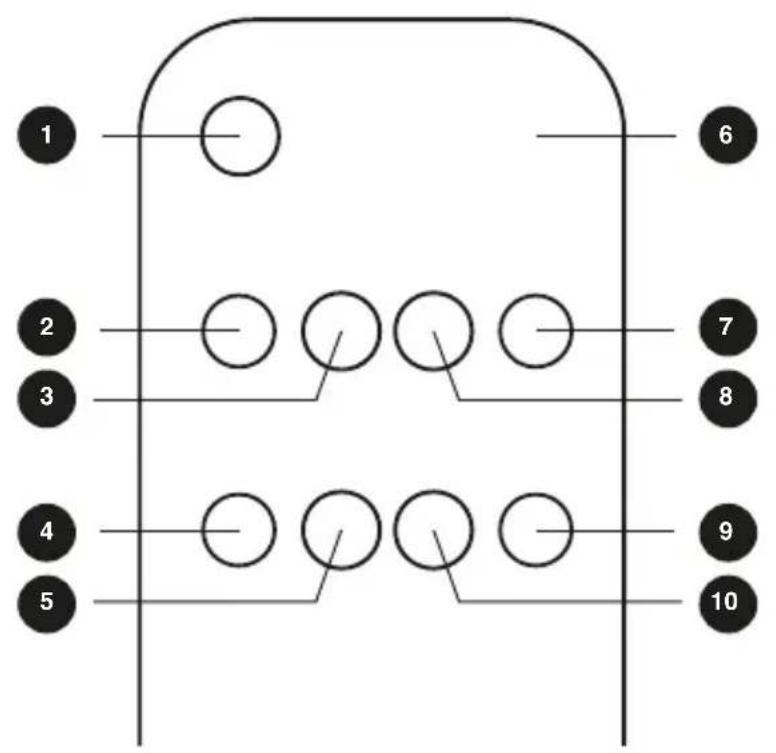
text_image
1 2 3 4 5 6 7 8 9 10

- PLAY/PAUSE button 8. MODE button
- RECORD button (Programme, Repeat 1, Repeat Album, Repeat All)
- Stop/CD/USB/SD button 9. Folder Up button
- Skip - button 10. Folder Down button
- Skip + button 11. Remote sensor
- OPEN button
- PROGRAMME button

BATTERY REPLACEMENT
When the battery runs low, the distance at which the remote control will operate is greatly reduced and you will need to replace the battery.
Remark: In order to save energy when the unit has no sound output for a while, the unit will be switched to stand-by automatically. It can be switched ON by using the function selector again.
USING THE REMOTE CONTROL
- To use the remote control, point it at the remote sensor (11) and press the button gently but firmly. Since the remote control range is reduced when the unit is used at an angle, try to aim it directly at the remote sensor.
- Do not expose the remote sensor to strong light (direct sunshine or artificial light) and make sure that there are no obstacles between the remote sensor and the remote control.
SPECIFICATIONS
Power supply: AC 230V - 50Hz
Power consumption: 13W
Radio frequency coverage: FM - 108 MHz
German
natural_image
Line drawing of a plug being inserted into a socket, with a hand holding the socket (no text or symbols)
natural_image
Technical line drawing of a mechanical assembly with a tool and component, no visible text or symbols
natural_image
Line drawing of a plug socket with a bulb inserted, no text or symbols present
natural_image
Color calibration bar with grayscale and RGB color swatches, no text or symbols present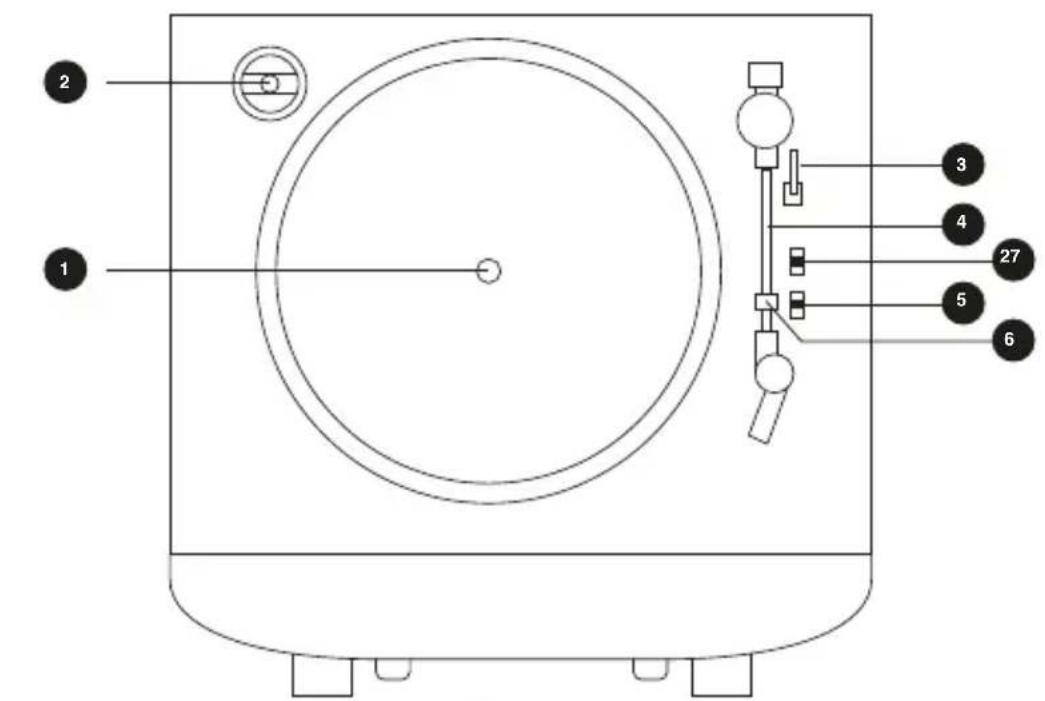
text_image
2 1 3 4 27 5 6
text_image
25 26 7 8 23 24 9 10 1122 12 13 14 18 1615 212 917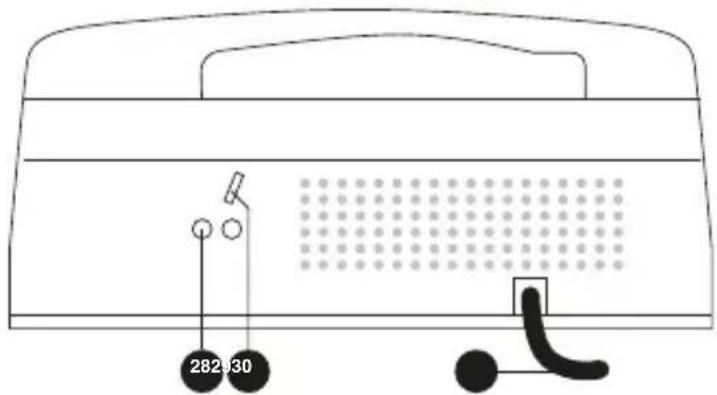
text_image
28203018

TEILE / TASTEN
natural_image
Color palette bar with grayscale swatches and a central crosshair symbol (no text or labels)TECHNISCHE OATEN
natural_image
Line drawing of a plug being inserted into a socket, with a hand holding the socket (no text or symbols)
natural_image
Technical line drawing of a mechanical assembly with a tool and component, no visible text or symbols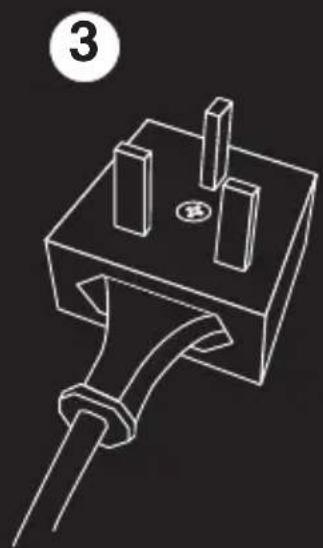
natural_image
Line drawing of a plug socket with a bulb inserted, no text or symbols present
natural_image
Color palette bar with grayscale gradient and a central crosshair symbol (no text or labels)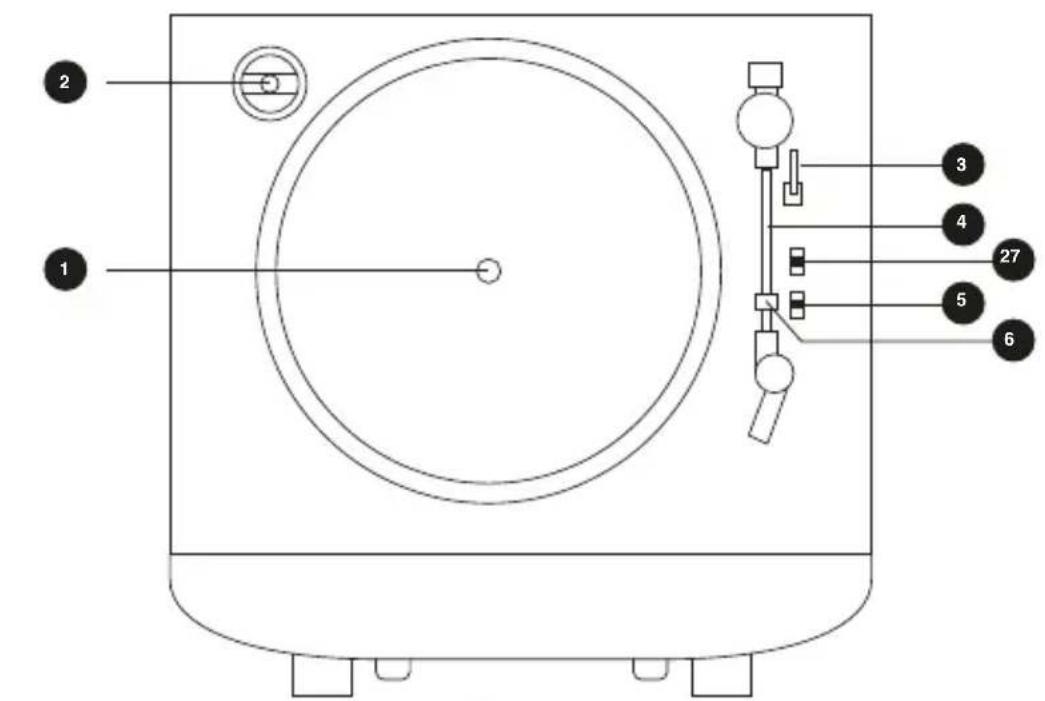
text_image
2 1 3 4 27 5 6
text_image
25 26 7 8 23 24 9 10 1122 12 13 14 18 1615 212 917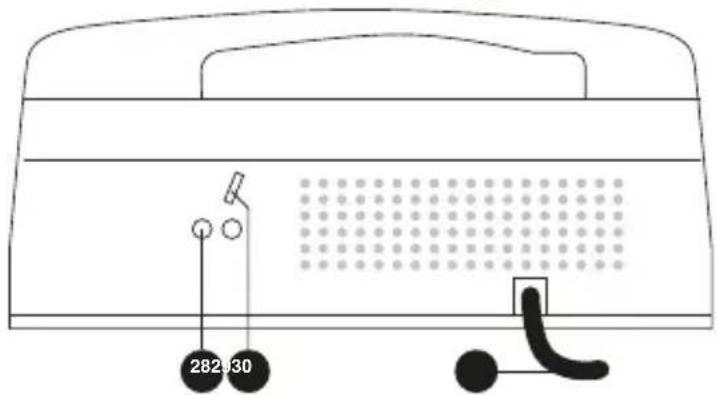
text_image
282030
text_image
32
PIECES/BOUTONS
natural_image
Line drawing of a plug being inserted into a socket, with a pencil inserted (no text or symbols)
natural_image
Technical line drawing of a mechanical assembly with a tool and component, no visible text or symbols
natural_image
Line drawing of a mechanical component with a base and protruding rod (no text or symbols)
natural_image
Color calibration bar with grayscale and RGB color swatches, no text or symbols present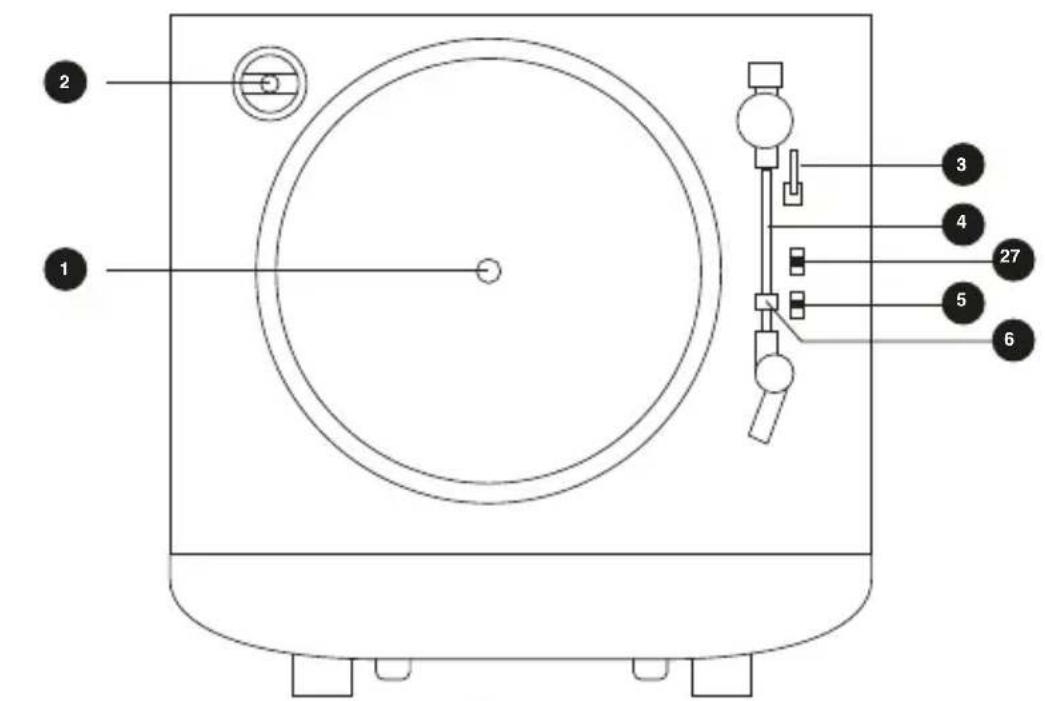
text_image
2 1 3 4 27 5 6
text_image
25 26 7 8 23 24 9 10 1122 12 13 14 18 1615 212 917
text_image
282030
text_image
46
ONDERDELEN/KNOPPEN
natural_image
Color bar with grayscale gradient and a central crosshair symbol (no text or labels)

GPO_Memphis_user_Manual EU - Oct 2020_v1.indd 57

text_image
57 04/11/2020 14:22
text_image
GPO_Memphis_user_Manual EU - Oct 2020_v1.indd 58 04/11/2020 14:22Spanish
natural_image
Line drawing of a plug being inserted into a socket, with a pencil inserted (no text or symbols)
natural_image
Technical line drawing of a mechanical assembly with a tool and component, no visible text or symbols
natural_image
Pure technical line drawing of a mechanical component with no text or symbols
natural_image
Color palette bar with grayscale gradient and a central crosshair symbol (no text or labels)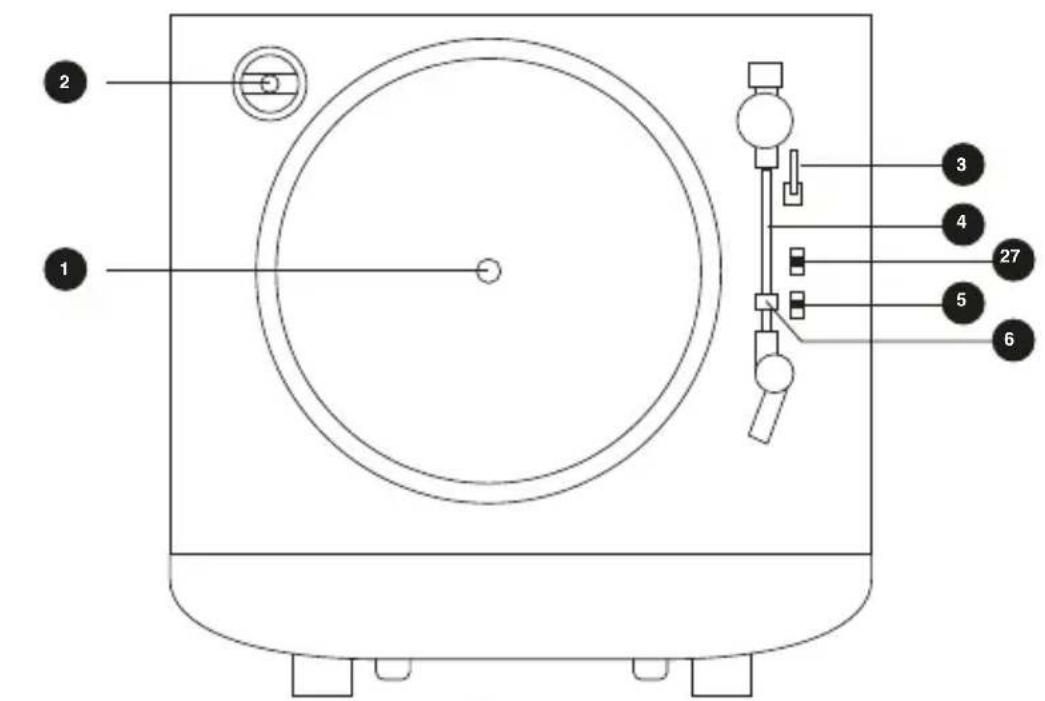
text_image
2 1 3 4 27 5 6
text_image
25 26 7 8 23 24 9 10 1122 12 13 14 18 1615 212 917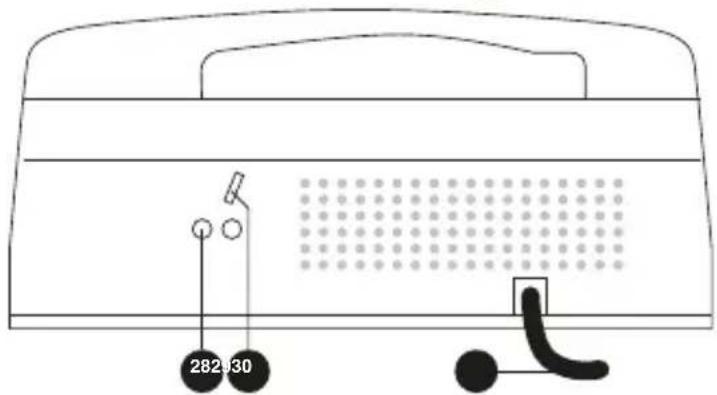
text_image
282030
text_image
60
PARTES/BOTONES
natural_image
Line drawing of a plug being inserted into a socket, with a hand holding the socket (no text or symbols)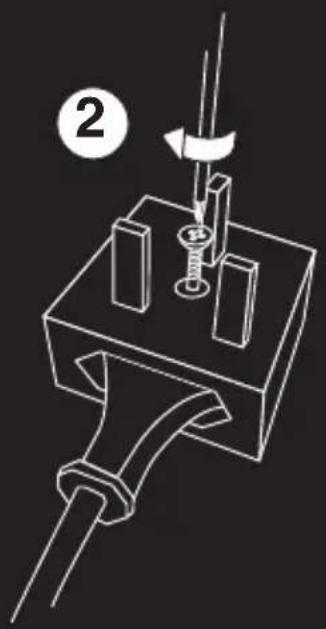
natural_image
Technical line drawing of a mechanical assembly with a tool and component, no visible text or symbols
natural_image
Line drawing of a plug socket with a bulb inserted, no text or symbols present
natural_image
Color palette bar with grayscale gradient and a central crosshair symbol (no text or labels)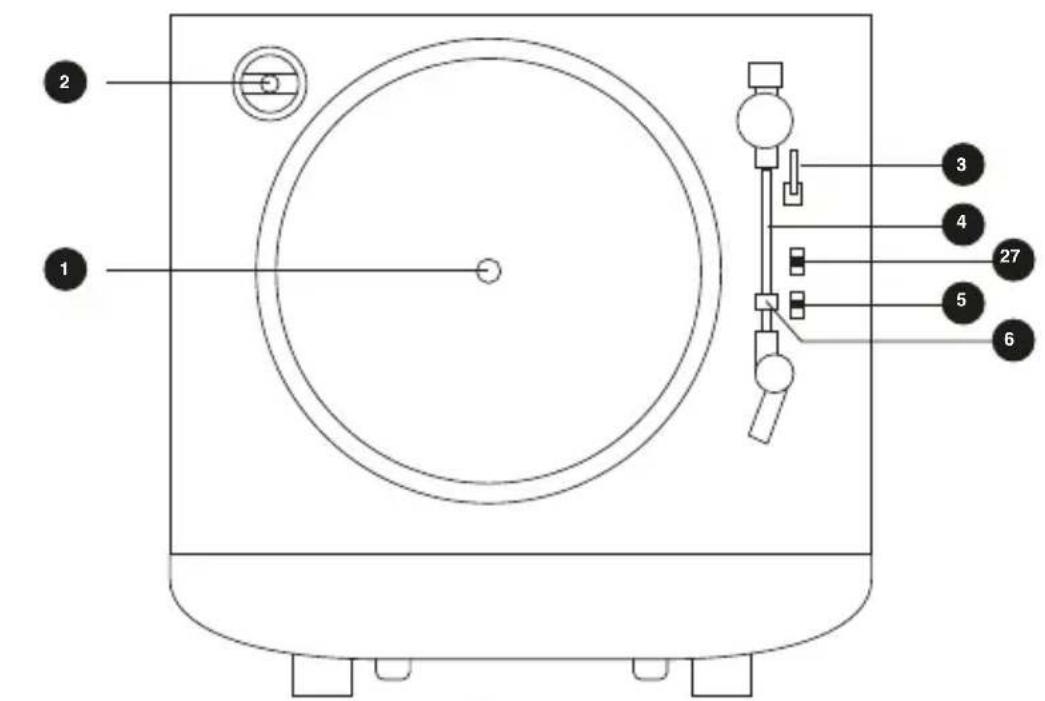
text_image
2 1 3 4 27 5 6
text_image
25 26 7 8 23 24 9 10 1122 12 13 14 18 1615 212 917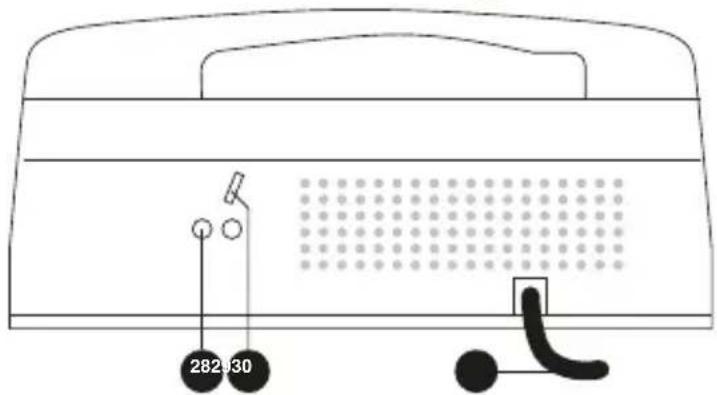
text_image
282030
text_image
74
COMPONENT! / PULSANTI
natural_image
Line drawing of a plug being inserted into a socket, with a hand holding the socket (no text or symbols)
natural_image
Technical line drawing of a mechanical assembly with a tool and component, no visible text or symbols
natural_image
Line drawing of a plug socket with a bulb inserted, no text or symbols present
natural_image
Color palette bar with grayscale gradient and a central crosshair symbol (no text or labels)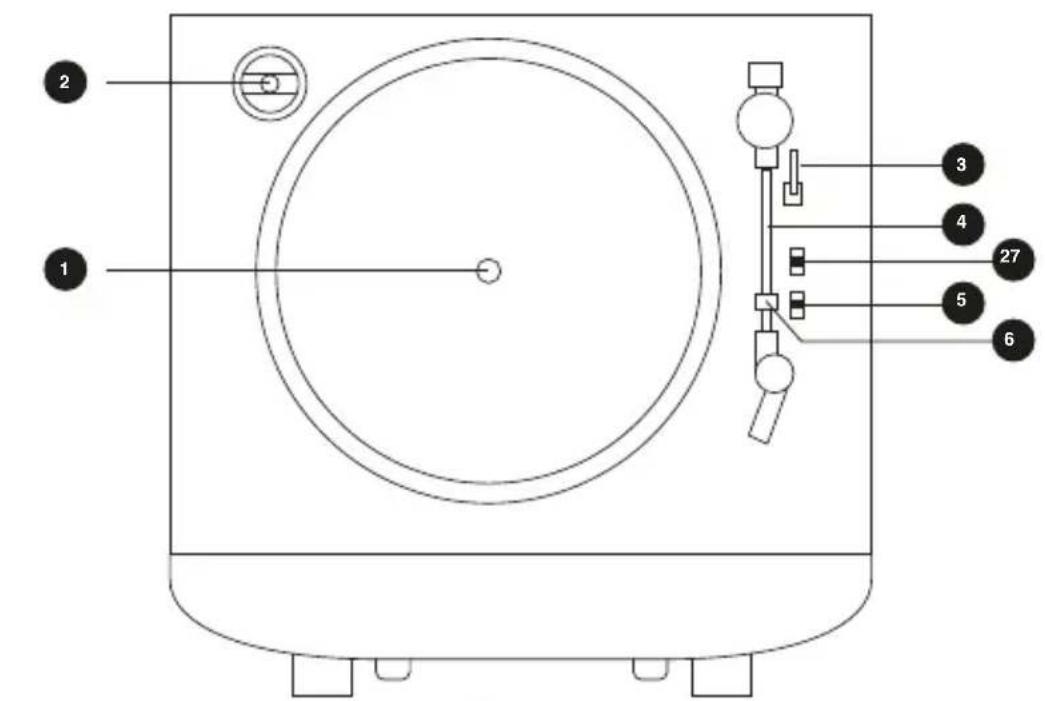
text_image
1 2 3 4 27 5 6
text_image
25 26 7 8 23 24 9 10 1122 12 13 14 18 1615 212 917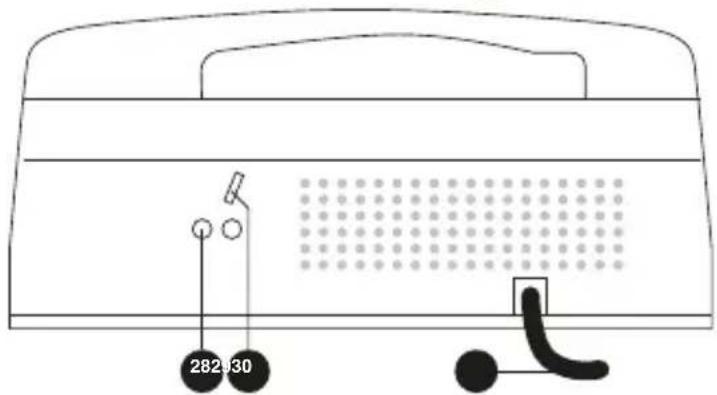
text_image
282030
text_image
88
COMPONENTES/BOT0ES
natural_image
Color palette bar with grayscale shades and a central crosshair symbol (no text or labels)

GPO_Memphis_user_Manual EU - Oct 2020_v1.indd 99

99
04/11/2020
14:22
EN
Hereby ProtelX, declares that this equipment (GPO MEMPHIS) is in compliance with the essential requirements and other relevant provisions of Directive, you can access a copy of this certificate on www.gporetro.com/Certificate-of-Conformity
DE
ProTelX Ltd, Unit 6, Park 17 Industrial Estate, Moss Lane, Whitefield, Manchester, M45 8FJ