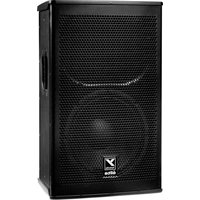
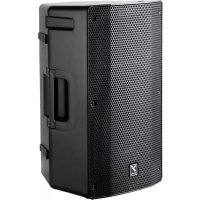
NX8P - Speaker YORKVILLE - Free user manual and instructions
Find the device manual for free NX8P YORKVILLE in PDF.

User questions about NX8P YORKVILLE
0 question about this device. Answer the ones you know or ask your own.
Ask a new question about this device
Download the instructions for your Speaker in PDF format for free! Find your manual NX8P - YORKVILLE and take your electronic device back in hand. On this page are published all the documents necessary for the use of your device. NX8P by YORKVILLE.
USER MANUAL NX8P YORKVILLE
natural_image
Technical line drawing of a multi-chamber electronic device with fan and speaker components (no text or symbols)
Owner's Manual
IMPORTANT SAFETY INSTRUCTIONS

This lightning flash with arrowhead symbol, within an
equilateral triangle, is intended to alert the user to the presence of uninsulated "dangerous voltage" within the product's enclosure that may be of sufficient magnitude to constitute a risk of electric shock to persons.
The DO NOT STACK symbol is intended to alert the user that the product shall not be vertically stacked because of the nature of the product.
The exclamation point within an equilateral triangle is intended to alert the user to the presence of important operating and maintenance (servicing) instructions in the literature accompanying the appliance.
Instructions pertaining to a risk of fire, electric shock, or injury to a person
CAUTION: TO REDUCE THE RISK OF ELECTRIC SHOCK, DO NOT REMOVE COVER (OR BACK). NO USER SERVICEABLE PARTS INSIDE. REFER SERVICING TO QUALIFIED SERVICE
PERSONNEL. THIS DEVICE IS FOR INDOOR USE ONLY!
INSTALLED BATTERY PACKS SHALL NOT BE EXPOSED TO EXCESSIVE HEAT
SUCH AS SUNSHINE, FIRE OR THE LIKE.
Read Instructions: The Owner's Manual should be read and understood before operation of your unit. Please, save these instructions for future reference and heed all warnings.
Cleaning: Clean only with dry cloth.
Packaging: Keep the box and packaging materials, in case the unit needs to be returned for service.
Warning: To reduce the risk or fire or electric shock, do not expose this apparatus to rain or moisture. Do not use this apparatus near water!
Warning: When using electric products, basic precautions should always be followed, including the following
Power Sources
Your unit should be connected to a power source only of the voltage specified in the owners manual or as marked on the unit. This unit has a polarized plug. Do not use with an extension cord or receptacle unless the plug can be fully inserted. Precautions should be taken so that, the grounding scheme on the unit is not defeated. An apparatus with CLASS I construction shall be connected to a Mains socket outlet with a protective earthing connection. Where the MAINS plug or an appliance coupler is used as the disconnect device, the disconnect device shall remain readily operable.
Hazards
Do not place this product on an unslable cart, stand, tripod, bracket or table. The product may fall, causing serious personal injury and serious damage to the product. Use only with cart, stand, tripod, bracket, or table recommended by the manufacturer or sold with the product. Follow the manufacturer's instructions when installing the product and use mounting accessories recommended by the manufacturer. Only use attachments/accessories specified by the manufacturer.
Equipment that is suspended overhead must use a secondary safeguard to prevent personal injury in the event the primary mounting mechanism fails. Safety eyelots attached to the equipment and galvanized steel wire can be used together to implement a fallsafe mounting thus ensuring the safety of the equipment and anyone positioned below the equipment.
Improper installation can result in bodily injury or death. If you are not qualified to attempt the installation get help from a professional structural rigger. Note: Prolonged use of headphones at a high volume may cause health damage to your ears.
The apparatus should not be exposed to dripping or splashing water; no objects filled with liquids should be placed on the apparatus.
Terminals marked with the "tightning bolt" are hazardous live; the external wiring connected to these terminals require installation by an instructed person or the use of ready made leads or cords.
Ensure that proper ventilation is provided around the appliance. Do not install near any heat sources such as radiators, heat registers, stoves, or other apparatus (including amplifiers) that produce heat.
No naked fame sources, such as lighted candles, should be placed on the apparatus.
Power Cord
Do not defeat the safety purpose of the polarized or grounding-type plug. Apolarized plug has two blades with one wider than the other. Agrounding type plug has two blades and a third grounding prong. The wide blade or the third prong are provided for your safety. If the provided plug does not fit into your outlet, consult an electrician for replacement of the obsolete outlet. The AC supply cord should be routed so that it is unlikely that it will be damaged. Protect the power cord from being walked on or pinched particularly all plugs. If the AC supply cord is damaged DO NOT OPERATE THE UNIT. To completely disconnect this apparatus from the AC Mains, disconnect the power supply cord plug from the AC receivable. The mains plug of the power supply cord shall remain readily operable.
Unplug this apparatus during lightning storms or when unused for long periods of time.
Service
The unit should be serviced only by qualified service personnel. Servicing is required when the apparatus has been damaged in any way, such as power-supply cord or plug is damaged, liquid has been spilled or objects have fallen into the apparatus, the apparatus has been exposed to rain or moisture, does not operate normally, requires battery pack replacement or has been dropped. Disconnect power before servicing!
IMPORTANT SAFETY INSTRUCTIONS

The Lightning Flash with arrowhead symbol within an equilateral triangle, is intended to alert the user to the presence of uninsulated "dangerous voltage" within the product enclosure that may be of sufficient magnitude to constitute a risk of shock to persons

The exclamation point within an equilateral triangle is intended to alert the user to the presence of important operating and maintenance (servicing) instructions in the literature accompanying the product
-
Read these instructions.
-
Keep these instructions.
-
Heed all warnings.
-
Follow all instructions.
-
Do not use this apparatus near water.
-
Clean only with dry cloth.
-
Do not block any ventilation openings, install in accordance with the manufacturer's instructions.
-
Do not install near any heat sources such as radiators, heat registers, stoves, or other apparatus (including amplifiers) that produce heat.
-
Do not defeat the safety purpose of the polarized or grounding-type plug. A polarized plug has two blades with one wider than the other. A grounding type plug has two blades and a third grounding prong. The wide blade or the third prongs are provided for your safety. If the provided plug does not fit into your outlet, consult an electrician for replacement of the opposite outlet.
-
Protect the power cord from being walked on or pinched particularly at plugs, convenience receptacles, and the point where they exit from the apparatus.
-
Only use attachments/accessories specified by the manufacturer.
-
Use only with the cart, stand, tripod, bracket, or table specified by the manufacturer, or sold with the apparatus. When a cart is used, use caution when moving the cart/apparatus combination to avoid injury from tip-over.
-
Unplug this apparatus during lightning storms or when unused for long periods of time.
-
Refer all servicing to qualified service personnel. Servicing is required when the apparatus has been damaged in any way, such as power-supply cord or plug is damaged, liquid has been spilled or objects have fallen into the apparatus, the apparatus has been exposed to rain or moisture, does not operate normally, or has been dropped.
WARNING:
• To reduce the risk of fire or electric shock, do not expose this apparatus to rain or moisture and objects filled with liquids, such as vases, should not be placed on this apparatus.
• To completely disconnect this apparatus from the ac mains, disconnect the power supply cord plug from the ac receptacle.
- The mains plug of the power supply cord or appliance coupler shall remain readily accessible.

NX Powered Enclosures......a
Important Safety Instructions - English / Français......i
EMC Declaration TYPE A - English / Français ......ii
Table of Contents......ii
Introduction....1
Channel Features....1
-
Channels 1 and 2 - Mono....1
-
Channel 3 - Stereo....1
Bluetooth ^TM 2
Bluetooth™ Operation....2
-
Pairing 2
-
Status 2
-
Level Control 2
-
Stereo Mode....2
-
Button Operation 2
-
Range....2
Master Section....3
-
Master Control....3
-
w/Sub Switch....3
-
Performance Modes....3
Main Input/Output Section 3
Main Input and Output Jacks 3
Introduction....4
Warranty - English / Français 12
Rear Page 13
This equipment has been tested and found to comply with the limits for a Class A digital device, pursuant to part 15 of the FCC Rules. These limits are designed to provide reasonable protection against harmful interference when the equipment is operated in a commercial environment. This equipment generates, uses, and can radiate radio frequency energy and, if not installed and used in accordance with the instruction manual may cause harmful interference to radio communications. Operation of this equipment in a residential area is likely to cause harmful interference in which case the user will be required to correct the interference at his own expense.
This device complies with ISED Canada's license-exempt RSS standard(s). Operation is subject to the following two conditions: (1) This device may not cause interference, and (2) This device must accept any interference, including interference that may cause undesired operation of the device.
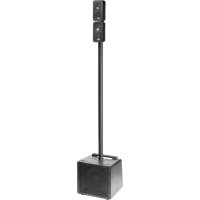
Congratulations on your purchase of an NX Series active loudspeaker. If your live performances or DJ gigs require peak performance, the latest generation of our NX power loudspeakers were designed to deliver.
Some features of the Yorkville NX Series:
- Dual purpose full-range and wedge monitor enclosure
- Bluetooth™ connection for streaming audio to the system
• Built-in 3-channel mixer with input settings for line and mic sources - Activity and Clip indicators on all channels with a Limit indicator on the Master channel
- Main input/output for connecting two or more NX loudspeakers together as well as other applications
- 48V phantom power available on channels 1 and 2
- Selectable high-pass filters on channels 1 and 2
- Selectable Sub high-pass filter for connecting with a subwoofer
• Live, Club, and Monitor system modes which tailor the sound of the system for the intended application
natural_image
Technical line drawing of a speaker or fan assembly (no text or symbols)
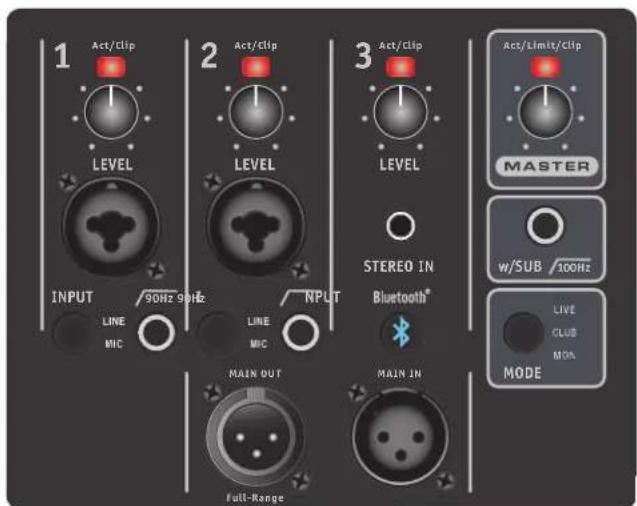
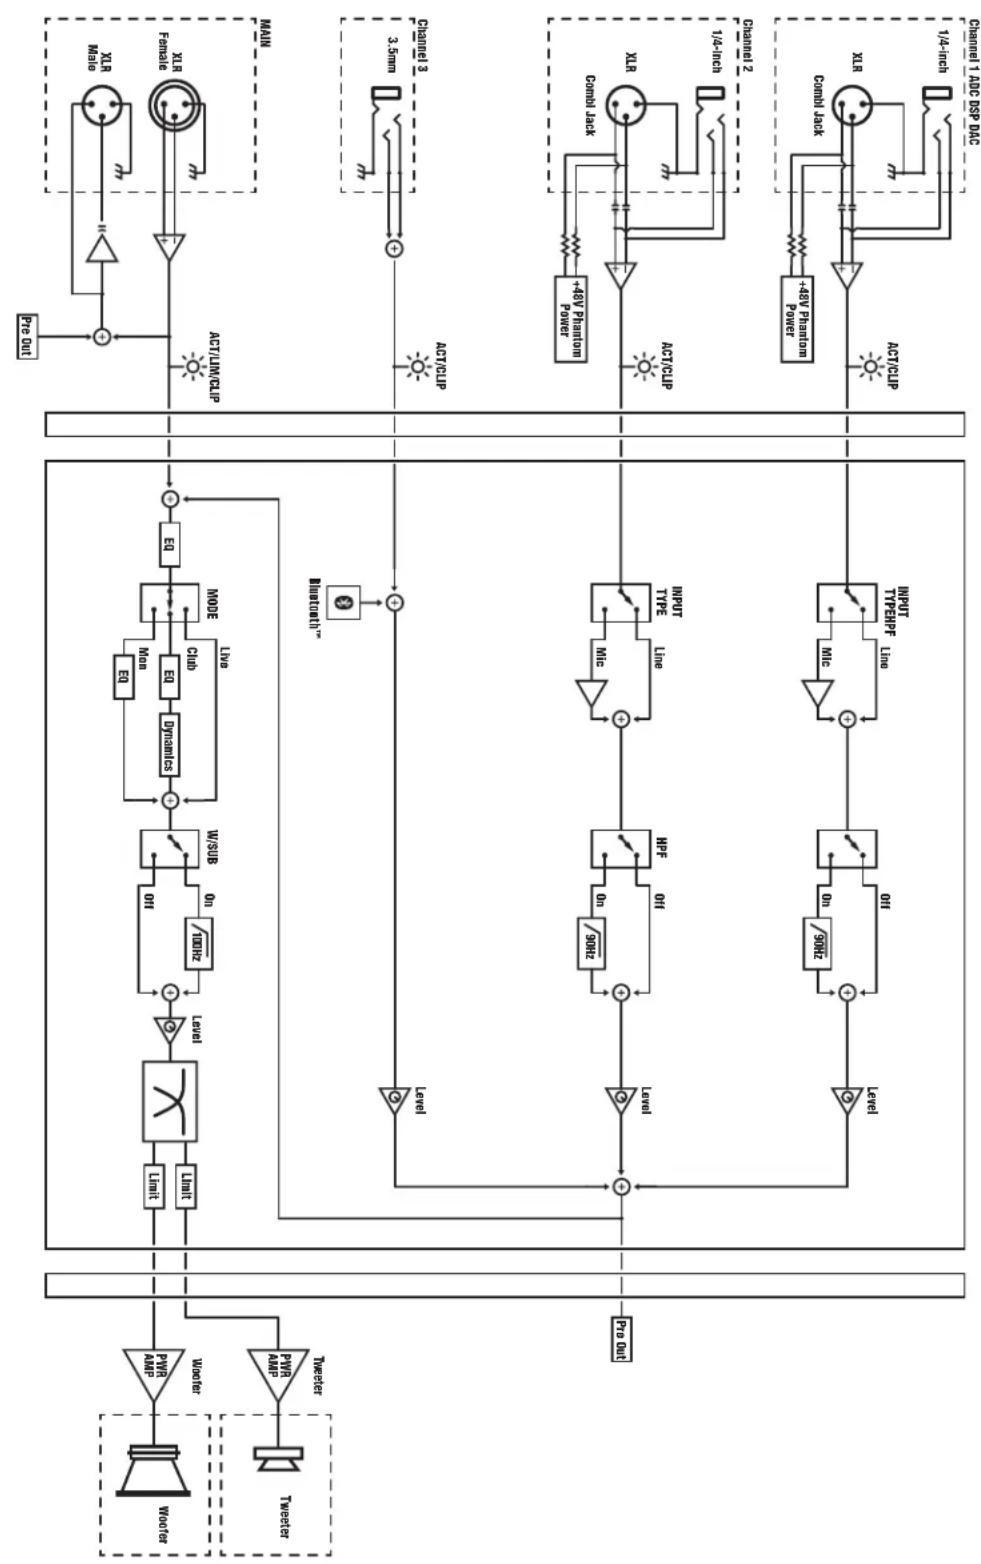
Channel Features
1. Channels 1 and 2 - Mono
Channel 1 and 2 inputs are designed for mono signals, the combi-jacks allow either an XLR or 1/4-inch jack to be used. These channels are set up to handle both line level and microphone level sources,
with 48V phantom power present on the XLR inputs. To best optimize volume, input sensitivity and audio quality (for a given input type), use the channel's input switch to select between "Line" or "Mic." Each of these channels comes equipped with a switchable 90Hz high-pass filter (HPF), the pushbutton switch illuminates when active. This high-pass filter is often used when low-frequency content may not be desirable, such as with vocals and some instruments. Use the level control to adjust the level of the channel's signal being sent to the Master. The Act/Clip led will illuminate green when a signal is being detected at the input and will illuminate red when clipping.
text_image
1 Act/Clip LEVEL INPUT /90Hz 90Hz LINE MNC 2 Act/Clip LEVEL LINE NPUT MNC MAIN OUT Full-Range 3 Act/Clip LEVEL STEREO IN Bluetooth® MAIN IN Act/Limit/Clip MASTER w/SUB /100Hz LIVE CLUB MON MODENote: The Act/Clip LED
responds only to the strength of
the input signal and is not affected by the channel's level control.

2. Channel 3 - Stereo
The Channel 3 input has been designed for stereo input sources, connect using the 1/8-inch input jack and/or Bluetooth™. The left and right signals from the stereo source/s will be summed properly and the signal will be passed to the master section. The level control, as well as the Act/Clip indicator for this channel, behave in a similar fashion to channels 1 and 2.
Bluetooth™
These new Yorkville NX Series loudspeakers are capable of Bluetooth™ audio streaming from devices such as smart phones, tablets and laptops. Pairing your device with an NX Series loudspeaker is simple and gives you the freedom to play your music wirelessly.
Bluetooth™ Operation
When the NX Series cabinet is powered on, Bluetooth™ will be disabled by default. To enable it and connect to your device, simply tap the Bluetooth™ button. If a device was previously connected to the NX Series cabinet, it will attempt to automatically reconnect. Similarly, if a wireless stereo connection was previously established, both NX Series cabinets used will attempt to automatically re-establish the wireless stereo connection (in the same Primary or Secondary role they previously performed).
1. Pairing
To pair your device to an NX Series cabinet, simply press the Bluetooth™ button down and hold for 4 seconds, then release the button.
2. Status
The blue status indicator alerts let you know the current status of the Bluetooth™ connection as described in this chart:

| Mode | Linked | Link-Back | Standby | Pairing | Stereo Grouping | Grouped |
| Standalone | ON ON, blinks 1x every 2 seconds. | Flashes 1x every 2 seconds | Flashes 2x per second | N/A | ||
| Stereo Primary | N/A | ON, blinks 1x every 2 seconds. | Flashes 2x every 2 seconds | Flashes 3x per second | Double flash | O N |
| Stereo Secondary | N/A | N/A | N/A | N/A | Double flash | Slow flash |
3. Level Control
The streamed music's volume can be changed via the connected Bluetooth™ device as well as the Channel 3 Level control on the NX Series cabinet. For optimal audio quality, try to keep the volume control of the Bluetooth™ device above 50% and use the Channel 3 level control on the NX Series cabinet to achieve the desired output volume.
4. Stereo Mode
The NX Series supports wireless stereo playback between two NX Series cabinets, for an enhanced listening experience. One cabinet will act as the Primary unit, while the other acts as a Secondary unit. The Primary unit will play the left audio channel of streamed music, and also maintain the Bluetooth™ connection with your device, while the Secondary unit will play the right audio channel. Your device only connects to the Primary unit, not the Secondary.
To enable Stereo Mode, simply double tap the Bluetooth™ button on the NX Series cabinet that should act as the Primary unit (left channel), then double tap the Bluetooth™ button on the other NX Series cabinet (right channel). The order matters, as the first unit double tapped will become the Primary unit (left channel). Both NX Series cabinets will automatically attempt to re-establish the Stereo Mode connection the next time they are powered on and enabled, with the same Primary and Secondary roles previously used.
You can still pair new devices to an NX Series Primary cabinet if it is in Stereo Mode. Pairing a device to an NX Series cabinet that is in Secondary mode will end the stereo wireless connection.
5. Button Operation
Single Tap – Enables Bluetooth™
Double Tap - Enter Stereo Mode
Press and Hold (4 seconds) - Enter Pairing Mode
Press and Hold (8 seconds) – Disables Bluetooth™
6. Range
The NX's Bluetooth™ operating range is rated for 10 meters (33 feet) line of sight. The quality of the link can be affected by an excess of traffic in the 2.4 GHz bandwidth or structures between the Bluetooth™ unit and the streaming device.
Note: When connected with Bluetooth™, ALL audio is streamed from your device. If you don't want your streaming music to be interrupted, turn off 'notifications' on your device.

text_image
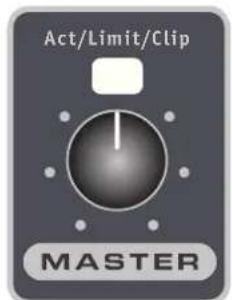
Act/Limit/Clip MASTERMaster Section
1. Master Control
The Master Control is used to set the overall level of the NX system. Like with the mixer channels, the master section contains an LED to show when activity is detected at the input of the channel (green), and if there is clipping detected (red). In addition to these two indicators, the master LED will glow orange if the system is in limiting. For optimal performance, the level of the system should be set such that the Activity/Limit/Clip indicator is primarily green during use. Occasional indications of limiting (orange) is okay, but the unit should not be operated into clipping.
Note: When two systems are linked together, the Master Control only affects the level of the unit on which it is located.

2. w/Sub Switch
The sub switch provides a system-level 100Hz high-pass filter that should be enabled when the system is linked with an external subwoofer. The switch will illuminate when active.
Note: While the NX Series loudspeakers can use Bluetooth™ to connect to each other, the use of a subwoofer requires a cable attached from the MAIN OUT and the w/SUB pushbutton must be enabled.
text_image
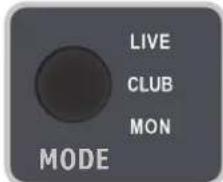
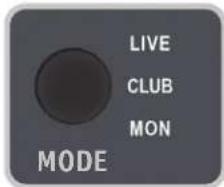
LIVE CLUB MON MODE3. Performance Modes
The NX Series contains 3 system performance modes which alter the unit's EQ and dynamics to best suit its intended use and application. For music playback, Club mode should be selected. For live performance, Live mode should be selected. When used as a wedge monitor, the Mon mode should be selected.
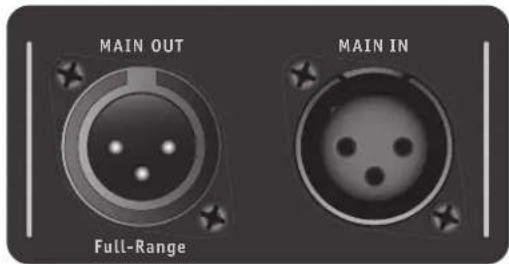
Main Input/Output Section
In situations where additional bass or input channels are needed, the Link jacks can be used to connect multiple NX systems and/or a subwoofer.
Main Input and Output Jacks
The Main Input should be used with line-level signals, goes directly to the master section, and is only affected by controls within the master section. The main output provides a full-range, line-level output signal, which contains a sum of all signals from the mixer section, as well as any signal present on the main input.
text_image
MAIN OUT MAIN IN Full-RangeIntroduction
natural_image
Technical line drawing of a speaker or audio device casing with fan and speaker components (no text or symbols)
| Mode | Linked | Link-Back | Standby | Pairing | Stereo Grouping | Grouped |
| Standalone | ON ON, blinks 1x every 2 seconds. | Flashes 1x every 2 seconds | Flashes 2x per second | N/A | ||
| Stereo Primary | N/A | ON, blinks 1x every 2 seconds. | Flashes 2x every 2 seconds | Flashes 3x per second | Double flash | O N |
| Stereo Secondary | N/A | N/A | N/A | N/A | Double flash | Slow flash |
text_image
Act/Limit/Clip MASTER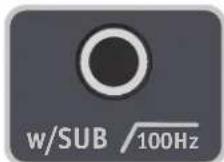
text_image
LIVE CLUB MON MODEtext_image
MAIN OUT MAIN IN Full-RangeNX
| Specifications | ||
| Model | NX8P NX12P | |
| Power (watts) | 1000W program / 2600W peak 1450W | program / 4850W peak |
| Max SPL (dB) | 123 Peak 128 Peak | |
| Frequency Response (Hz +/- 3dB) | 65 – 20K 50 – 20K | |
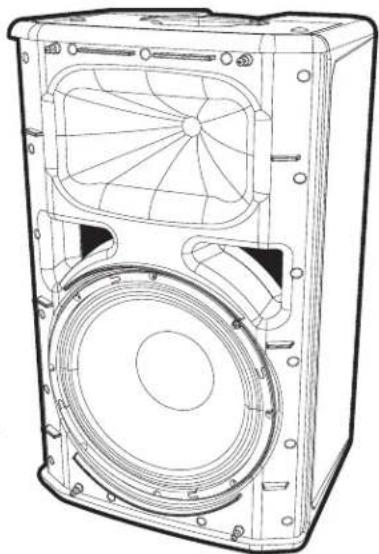
| Speaker Configuration - LF | 8-inch 12-inch | |
| Speaker Configuration - HF | 1-inch Exit Compression Driver 1-inch Exit Com | pression Driver |
| Channel 1 Input | XLR / 1⁄4-inch Combi-jack | XLR / 1⁄4-inch Combi-jack |
| Channel 1 Controls | Level, Input Type, High-Pass Level, In | put Type, High-Pass |
| Channel 2 Input | XLR / 1⁄4-inch Combi-jack | XLR / 1⁄4-inch Combi-jack |
| Channel 2 Controls | Level, Input Type, High-Pass Level, In | put Type, High-Pass |
| Channel 3 Input | 1/8-inch TRS Stereo Jack, BluetoothTM | 1/8-inch TRS Stereo Jack, BluetoothTM |
| Channel 3 Controls | Level Level | |
| Master Controls | Master Level, With Sub, Mode | Master Level, With Sub, Mode |
| Main In/Out (type / configuration) | XLR (Male and Female), Buffered Main Output XLR | (Male and Female), Buffered Main Output |
| LED Indicators | Channel Activity/Clip, Channel Input Type, Channel High-Pass Filter, Master Activity/Limit/Clip, With Sub, Master Mode, BluetoothTM Status | Channel Activity/Clip, Channel Input Type, Channel High-Pass Filter, Master Activity/Limit/Clip, With Sub, Master Mode, BluetoothTM Status |
| Flying Hardware | 2 x Top, 1 x Pullback | 2 x Top, 1 x Pullback |
| M8 Threading | M8 Threading | |
| Bar Handles | 1 x Top | 1 x Side / 1 x Top |
| Pole Mount Adapter (1 3/8-inch/3.5cm) | 1 Bottom 1 Bottom | |
| Enclosure Materials | Polypropylene Cabinet Pol | ypropylene Cabinet |
| Grille | Powdered Coated Perforated Steel Powdered Coated Perforated Steel | |
| Dimensions (inches) | 11.14L x 12.17W x 18.39H | 12.68L x 15.20W x 25.28H |
| Dimensions (cm) | 28.3L x 30.9W x 46.7H | 32.2L x 38.6W x 64.2H |
| Weight (kg's / lbs) | 12.6 / 27.7 | 20.6 / 45.3 |
| Specifications subject to change without notice | ||
| Model | NX8P NX12P | |
| Puissance Nominale (watts) | 1000W programme / 2600W pointe | 1450W programme / 4850W pointe |
| Pression Sonore Max (dB) | 123 Peak 128 Pointe | |
| Bande Passante Fréquence (Hz +/- 3dB) | 65 – 20K 50 – 20K | |
| Configuration Haut-Parlour - BF | 8-pouce | 12-pouce |
| Configuration Haut-Parlour - HF | 1-pouce Exit Compression Driver | 1-pouce Exit Compression Driver |
| Entrée Canal 1 | XLR / 1⁄4-pouce Combi-jack | XLR / 1⁄4-pouce Combi-jackput Type, High-Pass |
| Commandes Canal 1 | Level, Input Type, High-Pass Level, In | |
| Entrée Canal 2 | XLR / 1⁄4-pouce Combi-jack | XLR / 1⁄4-pouce Combi-jackput Type, High-Pass |
| Commandes Canal 2 | Level, Input Type, High-Pass Level, In | |
| Entrée Canal 3 | 1/8-inch TRS Stereo Jack, BluetoothTM | 1/8-pouce TRS Stereo Jack, BluetoothTM |
| Commandes Canal 3 | Level Level | |
| Commande de Volume Principale | Master Level, w/Sub, Mode | Master Level, w/Sub, Mode(Male and Female), Buffered Main Output |
| Link Entrée/Sortie (type / configuration) | XLR (Male and Female), Buffered Main Output XLR | |
| DEL indicatrices | Channel Activity/Clip, Channel Input Type, Channel High-PassFilter, Master Activity/Limit/Clip, With Sub, Master Mode,BluetoothTM Statut | Channel Activity/Clip, Channel Input Type, Channel High-PassFilter, Master Activity/Limit/Clip, With Sub, Master Mode,BluetoothTM Statut |
| Matériel volant | 2 x Top, 1 x retraitM8 Enfilage | 2 x Top, 1 x retraitM8 Enfilage |
| Poignées de barre | 1 x Haut | 1 x Côté / 1 x Haut |
| Adaptateur de montage sur poteau (1 3/8-inch/3.5cm) | 1 Bas | 1 Bas |
| Enclosure Materials | Armoire en polypropylène | Armoire en polypropylène |
| Grille | Acier perforé enduit de poudre | Acier perforé enduit de poudre |
| Dimensions (PLH xL arrière, pouces) | 11.14L x 12.17W x 18.39H | 12.68L x 15.20W x 25.28H |
| Dimensions (PLH xL arrière, cm) | 28.3L x 30.9W x 46.7H | 32.2L x 38.6W x 64.2H |
| Poids (livres / kg) | 12.6 / 27.7 | 20.6 / 45.3 |
flowchart
graph TD
    A["Speaker"] --> B["PwR Amp"]
    C["Tweater"] --> D["PwR Amp"]
    B --> E["Lift"]
    D --> F["Lift"]
    E --> G["Amplifier"]
    F --> H["Amplifier"]
    G --> I["Level"]
    H --> J["Level"]
    I --> K["On/100Hz"]
    J --> L["On/100Hz"]
    K --> M["On/100Hz"]
    L --> N["On/100Hz"]
    M --> O["W/SUB"]
    N --> P["On/100Hz"]
    O --> Q["On/100Hz"]
    P --> R["On/100Hz"]
    Q --> S["On/100Hz"]
    R --> T["On/100Hz"]
    S --> U["On/100Hz"]
    T --> V["On/100Hz"]
    U --> W["On/100Hz"]
    V --> X["On/100Hz"]
    W --> Y["On/100Hz"]
    X --> Z["On/100Hz"]
    Y --> AA["On/100Hz"]
    Z --> AB["On/100Hz"]
    AA --> AC["On/100Hz"]
    AB --> AD["On/100Hz"]
    AC --> AE["On/100Hz"]
    AD --> AF["On/100Hz"]
    AE --> AG["On/100Hz"]
    AF --> AH["On/100Hz"]
    AG --> AI["On/100Hz"]
    AH --> AJ["On/100Hz"]
    AI --> AK["On/100Hz"]
    AJ --> AL["On/100Hz"]
    AK --> AM["On/100Hz"]
    AL --> AN["On/100Hz"]
    AM --> AO["On/100Hz"]
    AN --> AP["On/100Hz"]
    AO --> AQ["On/100Hz"]
    AP --> AR["On/100Hz"]
    AQ --> AS["On/100Hz"]
    AR --> AT["On/100Hz"]
    AS --> AU["On/100Hz"]
    AT --> AV["On/100Hz"]
    AU --> AW["On/100Hz"]
    AV --> AX["On/100Hz"]
    AW --> AY["On/100Hz"]
    AX --> AZ["On/100Hz"]
    AY --> BA["On/100Hz"]
    AZ --> BB["On/100Hz"]
DESIGNED BY YORKVILLE SOUND Block Diagram - NX Services
EYEBOLT INSTALLATION

1. DESCRIPTION
Yorkville plastic speaker cabinets are equipped with flying hardware for overhead suspension applications. Depending on the model, two or more internal fly points have been provided for rigging purposes.

IMPORTANT!!
THE RIGGING OF LOUDSPEAKER SYSTEMS IS AN EXTREMELY SERIOUS MATTER. OVERHEAD RIGGING REQUIRES EXTENSIVE EXPERIENCE, INCLUDING (BUT NOT LIMITED TO) CALCULATING WORKING LOAD LIMITS, HARDWARE INSTALLATION, AND PERIODIC SAFETY INSPECTION OF ALL HARDWARE AND CABINETRY. IF YOU LACK THESE QUALIFICATIONS, DO NOT ATTEMPT THE INSTALLATION YOURSELF, BUT INSTEAID USE A PROFESSIONAL STRUCTURAL RIGGER. IMPROPER INSTALLATION CAN RESULT IN BODILY INJURY OR DEATH. CONSULT A STRUCTURAL ENGINEER TO CALCULATE ADDED LOADS FOR A BUILDING. STRUCTURAL REINFORCEMENT MAY BE NECESSARY TO INSURE A SAFE INSTALLATION.
2. REQUIRED TOOLS
No.2 Drive Philips Screwdriver
Thread lock adhesive (Removable Type)
3. EYEBOLT INSTALLATION
a) Using a No.2 Drive Philips Screwdriver, remove the plastic cover screw from the top or bottom of the speaker enclosure to expose the tapped holes as shown below. Be sure to keep these handy to cover up the hole once the eyebolts are removed.

IMPORTANT!!
USE ONLY LOAD RATED FORGED EYEBOLTS.
b) Place a drop of thread-lock adhesive on the threads of the eyebolt and insert one into exposed hole. Tighten each eyebolt by hand until its fits snugly against the cabinet. Further tighten each eyebolt by rotating it another half turn. Be sure to insert eyebolts in the threaded hole directly in-line with the suspension cable. Always follow the eyebolt manufacturers installation and use instructions.
c) Suspend each cabinet according to working load calculations and practices recommended by the rigging hardware manufacturer.

IMPORTANT!!
YORKVILLE SOUND MAKES NO CLAIMS AS TO THE SAFETY OF THE ENCLOSURES OR RESULTANT INSTALLATION IF RECOMMENDED LOAD LIMITS AND HARDWARE INSTALLATION ARE NOT STRICTLY ADHERED TO.

text_image
crew and Eyebolt!4. WORKING LOAD LIMITS
Specified working load limits have been determined for the enclosure as follows:
| MODEL | CONFIGURATION | SAFETY DESIGN FACTOR | THREAD | WORKING LOAD LIMIT |
| NX8P | 2 top, 1 pullback M810x | weight of cabinet only | ||
| NX12P | 2 top, 1 pullback M8 | 10x | weight of cabinet only |
DOC flyware NX P 00-1v6 a • Mar 27, 2024
text_image
Two & Ten Year Warranty Two & TenUnlimited Warranty
Yorkville's two and ten-year unlimited warranty on this product is transferable and does not require registration with Yorkville Sound or your dealer. If this product should fail for any reason within two years of the original purchase date (ten years for the wooden enclosure), simply return it to your Yorkville dealer with original proof of purchase and it will be repaired free of charge. This includes all Yorkville products, except for the YSM Series studio monitors, Coliseum Mini Series and TX Series Loudspeakers.
Freight charges, consequential damages, weather damage, damage as a result of improper installation, damages due to exposure to extreme humidity, accident or natural disaster are excluded under the terms of this warranty. Warranty does not cover consumables such as vacuum tubes or par bulbs. See your Yorkville dealer for more details. Warranty valid only in Canada and the United States.
Garantie Illimitée
natural_image
World map composed of black dots forming a grid pattern, no text or labels present
text_image
YorkvilleWEB: www.yorkville.com
WORLD HEADQUARTERS
CANADA
Yorkville Sound Limited
550 Granite Court
Pickering, Ontario
L1W 3Y8 CANADA
Voice: 905-837-8481
Fax: 905-839-5776
U.S.A.
Yorkville Sound Inc.
4625 Witmer Industrial Estate
Niagara Falls, New York
14305, USA
Voice: 716-297-2920
Fax: 716-297-3689
Quality and Innovation Since 1963
Printed in Canada