TPB4503 - Electric hedge trimmer Anova - Free user manual and instructions
Find the device manual for free TPB4503 Anova in PDF.

| Product type | Cordless electric hedge trimmer |
| Brand | Anova |
| Model | TPB4503 |
| Working voltage | 25.2 V (DC) |
| Battery type | Lithium-ion rechargeable |
| Battery capacity | 4 Ah |
| Charging voltage | AC 110 V ~ 240 V |
| Charging time | 3 to 4 hours |
| Working time | 4 to 6 hours |
| Maximum cutting diameter | 45 mm |
| Working temperature | -10°C to 65°C |
| Weight | 1 kg |
| Double insulation | Yes |
| LCD screen | Yes |
| On/off switch | Yes |
| Overheat protection | Yes (automatic charge shutdown) |
| Package contents | Hedge trimmer, lithium battery, charger, tool kit and lubricant |
| Blade maintenance | Regular lubrication with suitable oil |
| Blade replacement | Possible (follow manual) |
| Warranty | Legal warranty according to country |
Frequently Asked Questions - TPB4503 Anova
User questions about TPB4503 Anova
0 question about this device. Answer the ones you know or ask your own.
Ask a new question about this device
Download the instructions for your Electric hedge trimmer in PDF format for free! Find your manual TPB4503 - Anova and take your electronic device back in hand. On this page are published all the documents necessary for the use of your device. TPB4503 by Anova.
USER MANUAL TPB4503 Anova
natural_image
Exterior view of a modern pruning tool (no visible text or symbols on the device body)ES
ANOVA®
natural_image
Product catalog image showing a pair of cleaning tools including a pair of pruning tools, battery pack, charging plug, and a compact case (no visible text or labels)4.2. Uso previsto
natural_image
Three black electrical connectors with wires, one connected to a power plug (no visible text or symbols)Advertencia
natural_image
Close-up of a hand holding a small object with a red arrow pointing to a lens (no text or symbols visible)10. CERTIFICADO CE
Directiva 2006/42/EC
2014/30/EU
natural_image
Exterior view of a modern pruning tool (no text or symbols visible on the instrument body)PT
ANOVA®
natural_image
Product catalog image showing a GAOYU cleaning tool, battery pack, charging plug, power adapter, and compact case (no visible text or symbols)4.2. Uso esperado
natural_image
Electrical power adapter with terminal block connected to a cable (no visible text or symbols)Aviso
natural_image
Close-up of a hand holding a small object with a red arrow pointing to the eye area (no text or symbols visible)natural_image
Close-up of a mechanical device with a curved blade and handle, no visible text or symbols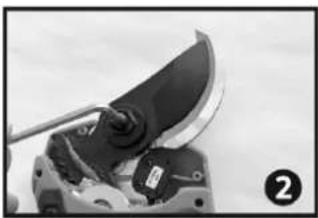
natural_image
Close-up of a mechanical device with a black blade and metal handle, no visible text or symbols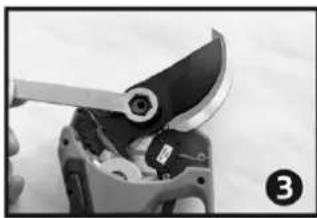
natural_image
Close-up of a hand using a tool to cut or apply a mechanical component (no visible text or symbols)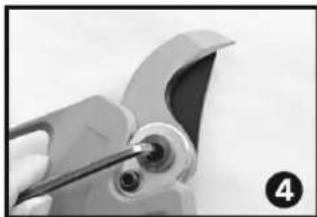
natural_image
Close-up of a hand using a tool to apply material to a curved mechanical part (no visible text or symbols)
natural_image
Close-up of mechanical pliers and tools on a plain background (no text or symbols visible)
natural_image
Close-up of a mechanical tool or robotic arm with curved blades and a circular head (no visible text or symbols)
natural_image
Close-up of a hand using a pliers to adjust a screwdriver (no text or symbols visible)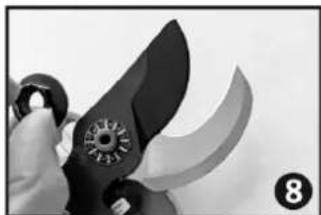
natural_image
Close-up of a hand holding a black metal pliers with a circular dial, no visible text or symbols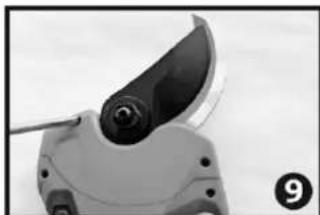
natural_image
Close-up of a mechanical device with a curved blade and central lens (no visible text or symbols)Aviso
natural_image
Exterior view of a modern pruning tool (no text or symbols visible on the device body)FR
ANOVA®
INFORMATIONS SUR CE MANUEL
natural_image
Three black electrical connectors with wires, one connected to a power plug (no visible text or symbols)Avertissement
natural_image
Close-up of a hand holding a small object with a red arrow pointing to a circular opening (no text or symbols visible)SOCIÉTÉ DE DISTRIBUTION
MILLASUR, SL
DÉCLARATION DE CONFORMITÉ CE
natural_image
Exterior view of a modern pruning tool (no text or symbols visible on the instrument body)IT
ANOVA®
natural_image
Electrical power adapter with two connected charging cables (no visible text or symbols)Avvertimento
natural_image
Close-up of a hand holding a small object with a red arrow pointing to a circular opening (no text or symbols visible)10. CERTIFICATO CE
Battery pruning shears
TPB4503
ANOVA
Instructions and user manual

natural_image
Exterior view of a modern pruning tool (no text or symbols visible on the instrument body)EN
ANOVA®
Anova would like to congratulate you for having chosen one of our products and guarantees the assistance and cooperation that has always distinguished our brand over time.
This machine is designed to last many years and to be of great use if used in accordance with the instructions contained in the user manual. We therefore recommend that you read this instruction manual carefully and follow all our recommendations.
For more information or questions, you can contact us through our web supports such as www.anova.es
INFORMATION ABOUT THIS MANUAL
Please pay attention to the information provided in this manual and on the appliance for your safety and the safety of others.
- This manual contains instructions for use and maintenance.
- Take this manual with you when you go to work on the machine.
- The contents are correct at the time of printing.
- They reserve the rights to make alterations at any time without affecting our legal responsibilities.
- This manual is considered an integral part of the product and must remain with it in case of loan or resale.
- Ask your dealer for a new manual in case of loss or damage.
READ THIS MANUAL CAREFULLY BEFORE USING THE MACHINE

To ensure that your machine provides the best results, please read the usage and safety regulations carefully before using it.
OTHER WARNINGS:
Incorrect use could cause damage to the machine or other objects.
Adaptation of the machine to new technical requirements could cause differences between the content of this manual and the product purchased.
Read and follow all instructions in this manual. Failure to follow these instructions could result in serious personal injury.
INDEX
1. SECURITY INSTRUCTIONS
1.1. General safety instructions
1.2. Safety indicators
2. TECHNICAL SPECIFICATIONS
3. PRODUCT DESCRIPTION
4. UNPACKING AND ASSEMBLY
5. INSTRUCTIONS FOR USE
5.1. Start up
5.2. Use tips
5.3. Battery charge
6. MAINTENANCE
6.1. Blade lubrication
6.2. Blade tension adjustment
6.3. Replacing blades
6.4. Scissor maintenance
6.5. Battery maintenance
7. WARRANTY
8. ENVIRONMENT
9. EXPLODED VIEW
10. CE CERTIFICATE
1. SECURITY INSTRUCTIONS
1.1. General safety instructions


- Read the instructions in their entirety.
- Battery charging should only be carried out in protected indoor locations.
- As it has double insulation, no ground connection is necessary when handling this tool.
- It is distributed with a safety charging transformer.
- If overheating occurs while charging the battery, the charging process will automatically be cut off.
- Do not dispose of chargers in household waste.
- Do not dispose of exhausted or damaged batteries in household waste.
▲ Important
Because we regularly improve our products, you may find slight differences between your machine and the descriptions contained in this manual. Changes may be made to the machine without prior notice and without obligation to update the manual, although essential safety and operating features will remain unchanged. Additionally, due to technical product updates, this document is subject to change without notice.
1.2. Safety indicators
1.2.1. Location
- Work in clean, clear areas. Work in bright areas. Dark or messy workplaces can cause accidents.
- Do not use the scissors in places with risk of fire, explosives or damp.
- Avoid distractions at work and invite any children or passersby to leave the work area to prevent them from entertaining you and thus avoid accidents.
1.2.2. Electricity
- The electrical plug on the battery and the plug on the scissors should fit easily; Do not connect any other plug instead.
- Do not expose the scissors/battery to rain/very humid environments. Water or other liquids may increase the risk of electric shock or damage to electrical devices.
- Do not force the connection cables; Do not use power cords as ropes or points to drag or hold the tool directly. Do not pull on the cable to unplug the connections. Keep the scissors and their cables away from heat sources, oils, sharp edges or moving parts. Do not use the charger if the power cord or plug is damaged. Damaged and twisted cords will increase the risk of electric shock.
1.2.3. Staff
- Stay alert: while using the scissors, be aware of the elements that may exist in your work area; Do not use the scissors if you are tired, or under the influence of medications or other substances that affect your abilities. Any distraction can cause serious harm.
- Use protective equipment such as safety glasses, dust mask, non-slip safety shoes and safety helmet. Use each item under its proper conditions of use to reduce the risk of accidents.
- Before connecting the pruning shears, remove any tools you used for adjustment or maintenance. Avoid contact of the scissors with parts that could cause accidents.
- While working, do not overstretch your arms and work in a stable and comfortable position; Do not handle the powered scissors directly with your hands. Make sure the work area is clear of other materials that could be damaged while pruning such as power cords, wires, etc. and maintain a balanced position to ensure a good reaction in the event of an accident or fall.
- Dress appropriately for the job to be performed: do not wear loose clothing or clothing that is at risk of getting caught in the scissors or other trees, causing discomfort or insecurity; Keep hair, clothing and sleeves away from the cutting area of the scissors.
1.2.4. General
- When you do not have any branches to be cut by the shears, release the trigger and keep the shears in its open position.
- When the branches are very hard, release the trigger and the blade will return to the open position to remove and attempt the cut in another area.
- If the battery does not charge normally, check whether the charger is suitable for the battery, and then check whether the charging voltage is suitable for the battery.
- If there is any electrical or mechanical damage, turn off the battery immediately.
- If the battery leaks; do not touch the liquid under any circumstances; If you come into contact with the liquid, wash immediately with plenty of water; If liquid gets into your eyes, see a doctor immediately and wash with plenty of water. Liquid escaping from batteries can cause burns.
2. TECHNICAL SPECIFICATIONS
| TPB4503 | |
| Working voltage | 25.2V (DC) |
| Battery | 25.2V 4Ah |
| Charging voltage | AC 110V~ 240V |
| Loading time | 3-4h |
| Working time | 4-6h |
| Cutting diameter | 45mm |
| Working temperatures | -10°C ~ 65°C |
| Weight | 1kg |
EN

Read all safety instructions carefully. You may suffer electric shock, fire, or burns if you do not follow safety instructions.
Do not use or directly expose the pruning shears to rain.
While working with the pruning shears, do not close or manipulate the cutting blades with your hands. Take special care to bring any part of your body close to sharp moving parts.
3. PRODUCT DESCRIPTION
3.1. Identification of machine components
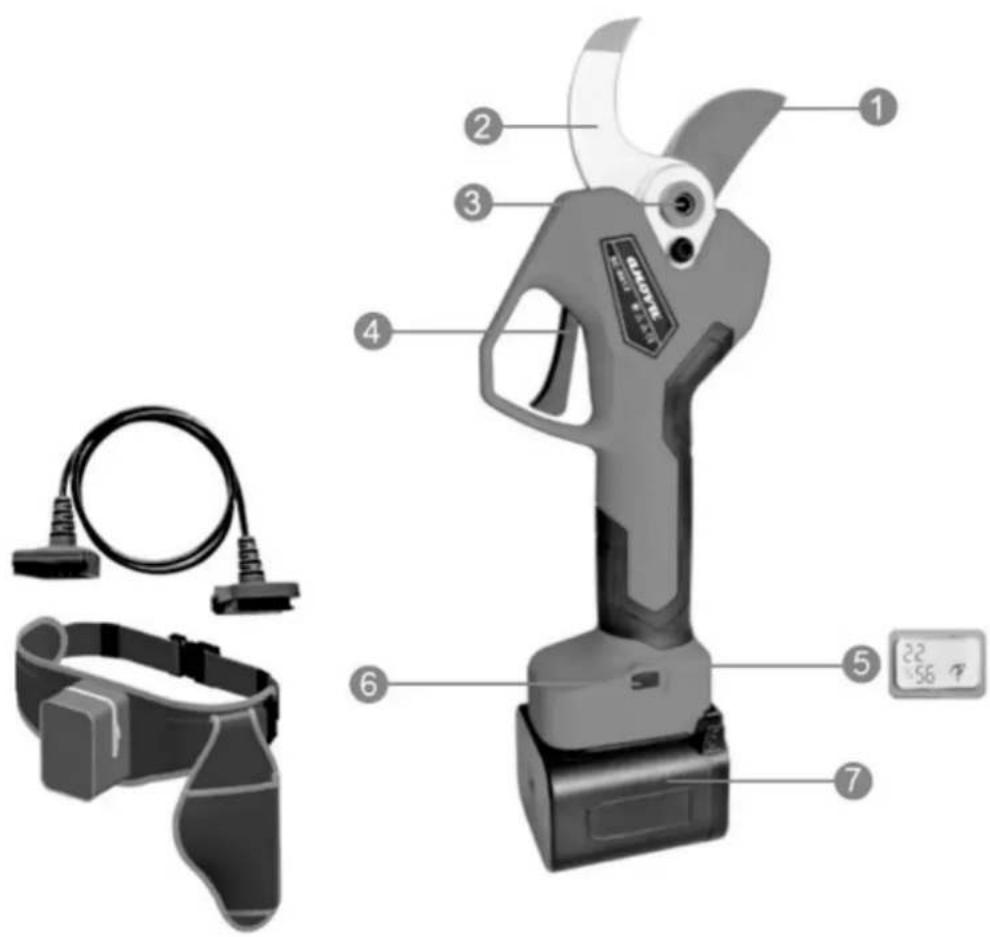
- Cutting blade
- Bedknife
- Gear
- Trigger actuation
5.LCD screen
6. On/off switch
7. Lithium battery
4. UNPACKING AND ASSEMBLY
4.1. Items in the box
The tool includes the following components in the supplied packaging:
- Pruning shears
- Lithium Battery
- Charger
- Tool and lubrication kit

4.2. Expected use
The pruning shears are a battery-powered tool and consist of a fixed blade, a movable cutting blade, a lithium battery, charger, tool kit and carrying case. The charging voltage ranges from 110V-240V AC.
The main application of this scissors is for pruning branches in fruit trees, treatment and maintenance of orchard or fruit plants such as vineyards or similar.
This tool achieves great work efficiency and saves a lot of time and effort compared to traditional manual pruning with mechanical scissors. Its efficiency is established between 8 and 10 times higher than manual pruning. The quality of the cut and its speed is also noticeably superior to traditional manual pruning.
5. INSTRUCTIONS FOR USE
5.1. Start up
- Remove the machine from the packaging. Install the lithium battery, turn on the power switch. You should hear two beeps; This means the battery is charged.
- Press the trigger continuously and quickly twice to start the machine.
- Progressive cutting: In the starting state, hold down the trigger and then press the power switch at the same time for 10 seconds. Changed the progressive cut-off when hearing the sound of two beeps.
- Aperture size adjustment:
a. Progressive mode: The opening size can be controlled at will. Slowly press the trigger and when the blade reaches the required opening size, hold the trigger still and the specified opening size can be changed upon hearing the sound of two beeps. Hold the trigger for 3 seconds and release to restore maximum aperture.
b. Normal mode: In the boot state, press the power switch for 0.1 seconds and release it. When you hear the sound of 2 beeps, pull the trigger and the opening will complete the change of 2.5cm, 3.2cm and 4.5cm in one cycle.
- Power off: Hold the trigger for 5 seconds, release the trigger when you hear the sound of two beeps, blade will close automatically. The power will be turned off automatically if the machine is not used for 10 minutes.
5.2. Use tips
After a long time of use, the machine's battery may increase in temperature, this is normal.
Add lubricating oil to the blade for proper maintenance. It is very important that you keep the scissors in good cleaning and care conditions.

Prune at the furthest part of the shoot to avoid loss of sap to the plant.
Do not prune branches too far back on the tree, as this will reduce the health of the plant. Leave a small section of the branch to avoid stressing the plant.
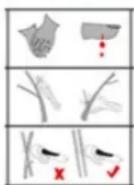
While working with the scissors, keep your hands away from the cutting blades and wear gloves or other appropriate protective equipment.
Remove diseased shoots and remove dry branches on the plant.
When pruning a tree, prune each branch separately and do not cut multiple branches at once.
5.3. Battery charge
The battery of the new product does not come fully charged. Before charging, insert the battery into the charger and plug the charger into a power outlet. The charger indicator light turns red, indicating that the
charger is charging; If the charger light is green, the battery is charged and ready to use.

natural_image
Three black electrical components with wires, no visible text or symbolsWarning
- Before charging, please turn off the switch; While charging, it is normal for the battery to increase in temperature slightly.
- If the batteries are not used for a long time, they should be recharged every 3 months to increase the service life.
- New or long-unused batteries will reach maximum capacity after 5 charge-discharge cycles.
- Do not charge the batteries repeatedly after several minutes of operation as this may reduce the working time and effectiveness of the batteries.
- Do not use damaged batteries or do not disassemble the charger or batteries.
- Do not expose batteries to fire or high temperatures. Risk of explosion.
- Do not charge batteries outdoors or in humid environments.
6. MAINTENANCE
6.1. Blade lubrication
Attention: Please disconnect the power of the scissors before operation.
Re-add lubricant before using the blades or if they were used for more than 4 hours:
- Drop 3-4 drops of lubricating oil at the refueling point (as shown in the picture).
- Cut the scissors several times to evenly distribute the lubricant.
6.2. Blade tension adjustment
Attention: Please disconnect the power of the scissors before operating them.
Keep the blades open and check for lateral oscillations. Side twisting is an abnormal state as it creates a gap between the two blades, causing the gear teeth to be unable to bite properly, which will damage the mechanical structure.

natural_image
Close-up of a hand holding a small white object with a red arrow pointing to a circular opening (no text or symbols visible)6.3. Replacing blades
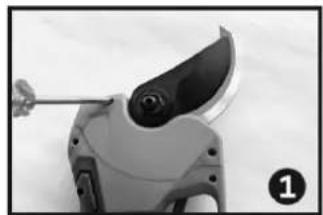
The power supply of the scissors must be disconnected before operation. Replace the blade step by step as below:
- Remove the screws with a screwdriver and open the cover, as shown in fig.1.
- Remove the screws and lock washer (note: left screw), as shown in fig. 2.
- Remove the blade nut, as shown in fig. 3.
EN
- Remove the screws (note: left side screws), as shown in fig. 4.
- Replace the blade and grease the gear, as shown in fig. 5.
- Install the blade and gear on the scissors, as shown in fig. 6.
- Lock the screws (note: left side screws), as shown in fig. 7.
- Install the plain bearings and locknuts, as shown in fig. 8.
- Install the lock washer and lock the screws, install the top cover and lock the screws, as shown in fig. 9.
natural_image
Close-up of a mechanical device with a handle and lever, no visible text or symbols
natural_image
Close-up of a mechanical device with a curved blade and lever, no visible text or symbols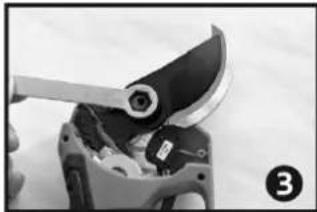
natural_image
Close-up of a hand using a tool to cut or adjust a mechanical component (no visible text or symbols)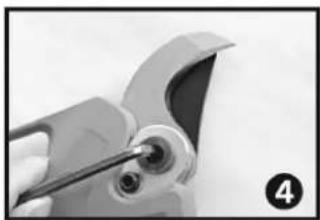
natural_image
Close-up of a hand using a tool to apply material to a mechanical component (no visible text or symbols)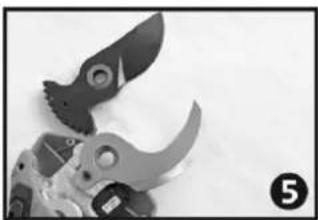
natural_image
Close-up of mechanical prongs and tools on a plain background (no text or symbols visible)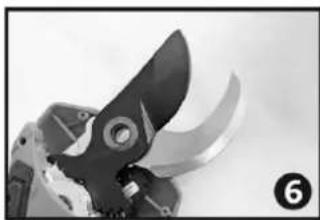
natural_image
Close-up of a mechanical tool or robotic arm with curved blades and a circular head (no visible text or symbols)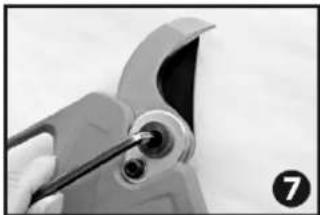
natural_image
Close-up of a hand using a tool to adjust a mechanical part (no visible text or symbols)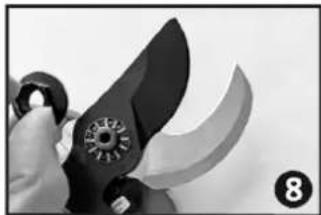
natural_image
Close-up of a hand holding a pair of scissors with a circular head and blade, no visible text or symbols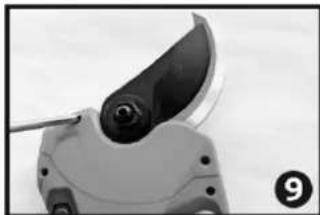
natural_image
Close-up of a mechanical device with a curved blade and circular opening (no visible text or symbols)Warning
The supporting blade and movable blade can be replaced independently; as a replacement, don't worry about too small aperture of the blade; After recovering power to the scissors, the normal opening size will automatically recover.
6.4. Scissor maintenance
- Do not cut branches outside the cutting range; Do not cut non-plant materials, such as metals and stones, etc. do not use clamps or similar to hold the scissors; Always replace the cutting blade if it is worn or damaged.
- Keep the cutting equipment clean, wipe the scissors, batteries and charger with a clean cloth (do not use corrosive detergents) and a soft brush or dry cloth to clean the dust on the upper scissors.
- Do not immerse the scissors, batteries and charger in water or other liquids;
- Use the equipment correctly; Stop using it when there is damage to the scissors, batteries and/or chargers.
- If the switch cannot turn the scissors on or off, please do not use the scissors. It will be dangerous to control the scissors without the switch properly. Always replace and repair the switch in this case before using the scissors again.
- Make sure the switch keeps the shears off when replacing accessories or storing the pruning shears. This preventive measure will reduce the risk of accidentally activating the scissors and causing injury to the user.
EN
- Turn off the pruning shears if not in use and store them out of the reach of children. It is dangerous to allow inexperienced persons and untrained users to operate pruning shears.
- When using pruning shears, respect the tool and the specific use for which it was designed. Consider the work environment and tasks to be performed; can cause risks and damage when using improperly functioning pruning shears.
- After use, remove the dirt from the moving blade and the supporting blade, add lubricating oil on the contact part, make the blade keep in good sharpness to extend its service life and for future uses.
6.5. Battery maintenance
- Do not charge the battery in temperatures below 0^ C or above 45^ C; this may damage the battery and charger.
- Make sure the battery switch is off before connecting the power cord; If it is open, it can create a problem when connecting to the scissors.
- Only use the charger assigned by the manufacturer to charge the battery; Battery fires or explosions may occur if chargers with inadequate wattage are used.
- When the battery is not in use, be sure to keep it away from metal objects such as paper clips, coins, keys, screws, etc. which may shorten the battery charge or cause unintentional discharge or fire hazard.
- Do not disassemble or rebuild the battery.
- Do not use damaged or short-circuited batteries.
- Do not place the battery on hot surfaces or heat sources; nor expose it directly to the sun.
- Do not place the battery near fire or in contact with water.
- Do not charge the battery near fire or under direct sun.
- Do not insert nails or other objects into the battery; Do not hit it with hammers or trample on it, nor throw the machine to the ground hastily.
- Do not use damaged or deformed batteries.
- Do not solder batteries directly.
- Do not reverse charge batteries; Do not use them antipolarly or discharge them excessively.
- Do not connect the battery to charging sockets or car cigarette lighter sockets.
- Do not use the battery in unsuitable or unapproved equipment.
- Do not connect the battery with other lithium batteries directly.
- Do not place the battery in containers with high temperature or high pressure, such as microwaves, etc.
- Do not use batteries that are leaking fluid.
- Do not allow children access to the battery.
- Do not use or place the battery directly under the sun (or in cars under direct sunlight); may cause overheating and cause a fire in the battery; or shorten its life cycle without further ado.
- Do not use the battery in places influenced by static energy (+64V)
- When using the battery for the first time, do not continue using it and return it to your sales center if: there is any type of corrosion, unpleasant odors are perceived or any other strange phenomenon occurs.
- If there is any leakage of the internal battery liquid on your skin or clothing, wash it immediately with plenty of water.
- If the scissors are to be stored for a long time, fully charge the battery before storing.
7. WARRANTY
If your product suffers from a manufacturing defect during the established warranty period, please contact or go to your point of sale directly with the necessary documentation.
Your purchase invoice should be kept as proof of the purchase date. Your tool must be returned to your dealer in acceptable, clean condition, in its original molded case, if applicable to the unit, accompanied by your applicable proof of purchase.
7.1. Warranty period
The legal warranty period of the product begins on the original date of purchase by the first initial buyer and its duration will be that established by the Royal Decree-Law on the protection of consumers and users against situations of social and economic vulnerability of the year. corresponding to the time of purchase of the product.
Some countries do not allow limitations on how long an implied warranty lasts or do not allow the exclusion or limitation of consequential or incidental damages, in which case the above limitation and exclusion may not apply to you. This warranty gives you specific legal rights, and you may also have other rights which vary from state to state or country to country.
7.2. Exclusions
This warranty does not cover product damage or performance problems caused by:
- Natural wear and tear.
- Misuse, neglect, careless operation or lack of maintenance.
- Defects caused by incorrect use, damage caused due to manipulations carried out by personnel not authorized by Anova or use of non-original spare parts.
- Defects of normal wear parts, such as bearings, brushes, cables, plugs or accessories such as drills, bits, saw blades, etc.
- Damage or defects resulting from abuse, accidents or alterations.
- Improper use and storage (explicit reference to the fact that the rules described in the operating instructions have not been followed).
- Customer-caused wear (e.g. broken saw blades, worn carbon brushes, etc.).
- Secondary wear and damage due to lack of maintenance, repair, lubricants (e.g. overheating damage due to blocked cooling slots, bearing damage as a result of dirt, frost damage, etc.)
- Damage as an obvious result of excessive use/overload.
- Damage caused by improper supplies (e.g. incorrect fuel)
- Load-induced failure of casing components or accessories due to abnormal stress
- Load-induced deformation of casing components or accessories due to abnormal stress.
- Damage resulting from the operation of supplies that overfill or leak due to improper storage, inappropriate cleaning agents or other damaging chemical components.
- Damage due to improper exposure to extreme temperatures (e.g., freeze fractures, thermal deformation of components, etc.)
- Damage from permanent exposure to ultraviolet radiation.
- Damage caused by inadequate maintenance.
- Any damage caused by failure to follow the instruction manual
EN
- Any product that has attempted to be repaired by an unqualified professional.
- Any product connected to an inadequate power source (amps, voltage, frequency).
- Any damage caused by external influences (water, chemicals, physical, shock) or foreign substances.
- Use of unsuitable accessories or parts.
- It does not include defects in normal wear parts, nor does it cover damage or defects resulting from abuse, accidents or alterations, nor transportation costs.
Additionally, the warranty is void if the product has been altered or modified, or if the trademark/serial number on the machine has been defaced or removed.
Routine maintenance, tune-up, adjustments or normal wear and tear are not covered under this warranty.
This manual does not cover all possible situations regarding warranty exclusions, for more information contact your nearest Anova dealer.
7.3. In case of incident
The guarantee must be correctly completed with all the requested information, and accompanied by the purchase invoice.
Anova reserves the right to reject any claim where the purchase cannot be verified or where it is clear that the product was not maintained properly (maintenance, clean ventilation slots, lubrication, carbon brushes regularly maintained, cleaning, storage, etc.).
Private use means personal domestic use by an end consumer. Instead, commercial use means all other uses, including uses for commercial, income-generating or rental purposes. Once the product has been used for commercial use, it will be considered a commercial product for the purposes of this warranty.
These are our standard warranty terms, but occasionally there may be additional warranty coverage not determined at the time of publication. For more information, contact your nearest official Anova distributor or visit www.millasur.com.
Warranty service is only available through official Anova dealers. You can locate your nearest distributor on our distributor map at www.anova.es.
8. ENVIRONMENT


Protect the environment. Recycle the oil used by this machine by taking it to a recycling center. Do not pour used oil into drains, land, rivers, lakes or seas.
Dispose of your machine in an environmentally friendly way. We should not dispose of machines with household waste. Its plastic and metal components can be classified according to their nature and recycled.
The materials used to package this machine are recyclable. Please do not throw the packaging into household waste. Dispose of these packaging at an official waste collection point.
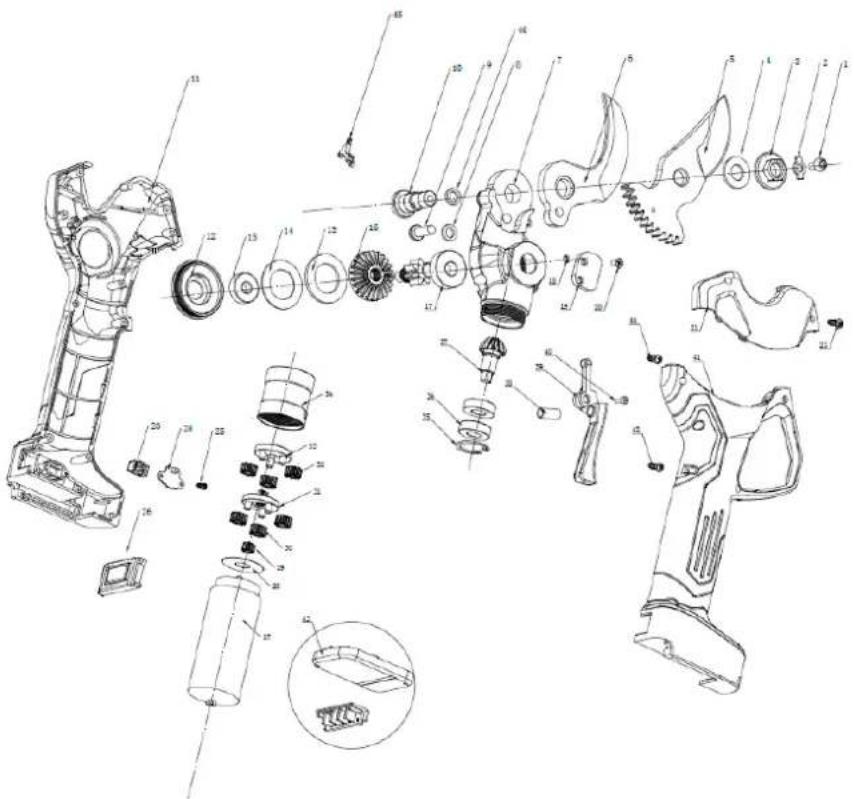
9. EXPLODED VIEW
TPB4503
DISTRIBUTION COMPANY
MILLASUR, SL
EC DECLARATION OF CONFORMITY
In compliance with the different CE directives, it is hereby confirmed that, due to its design and construction, and according to the CE mark printed by the manufacturer on it, the machine identified in this document complies with the relevant and fundamental health and safety requirements. of the aforementioned EC directives. This declaration validates the product to display the CE symbol.
In the event that the machine is modified and this modification is not approved by the manufacturer and communicated to the distributor, this declaration will lose its value and validity.
Machine name: PRUNING SCISSORS
Model: TPB4503
Recognized and approved standard to which it complies:
Directive 2006/42/EC
2014/30/EU
Tested according to regulations:
EN 62841-1:2015/A11:2022
PPP 58100C:2023
IEC 62841-1
IEC 62841-1:2014
EN IEC 55014-1:2021
EN IEC 55014-2:2021
Company seal
MILLASUR, S.L.U.
Rua Eduardo Pondal,23 - Pol.Emp..Siguelro
15688-Oroso-A Coruña
Tel.(+34) 981 69 64 65 - Fax (+34) 981 69 08 61
e-mail: millasur@millasur.com
CIF: B-15 749 922
10/02/2023
Akku-Gartenschere
TPB4503
anova®
natural_image
Exterior view of a modern pruning tool (no text or symbols visible on the device body)DE
ANOVA®
natural_image
Product catalog image showing a GASTV cleaning tool, battery pack, charging circuit, and storage case (no visible text or symbols)natural_image
Electrical power adapter with two connected components (no visible text or symbols)⚠ Warning
natural_image
Close-up of a hand holding a small object with a red arrow pointing to the eye area (no text or symbols visible)10. CE-ZERTIFIKAT
VERTRIEBSGESELLSCHAFT
MILLASUR, SL
RUA EDUARDO PONDAL, Nr. 23 PISIGÜEIRO
15688 OROSO - A CORUÑA
SPANIEN
CE
анова