
AHD601XLED - Basket AYA - Free user manual and instructions
Find the device manual for free AHD601XLED AYA in PDF.

| Product type | Range hood |
| Brand | AYA |
| Model | AHD601XLED |
| Dimensions (W x D x H) | 600 x 500 x 400-780 mm |
| Weight | 10 kg |
| Power supply | 220-240 V~ 50 Hz |
| Motor power | 125 W |
| Lighting power | 2 W (LED) |
| Total power | 127 W |
| Number of speeds | 3 |
| Maximum airflow | 520.3 m³/h |
| Max noise level | 66 dB(A) |
| Average illuminance | 80 lux |
| Filter type | Stainless steel grease filters (washable), optional charcoal filter (not included) |
| Grease filter maintenance | Clean every 2 months with hot water or in dishwasher (60°C) |
| Charcoal filter replacement | Every 4 months (ref. FCH001) |
| LED lighting | Not user-replaceable, contact after-sales service |
| Minimum distance to cooking surface | 65 cm for gas cooktop, 65-75 cm recommended |
| Ventilation type | Extraction or recirculation (with charcoal filter) |
| Energy efficiency class | C |
| Warranty | 2 years (according to current legislation) |
| Country of manufacture | China |
Frequently Asked Questions - AHD601XLED AYA
User questions about AHD601XLED AYA
0 question about this device. Answer the ones you know or ask your own.
Ask a new question about this device
Download the instructions for your Basket in PDF format for free! Find your manual AHD601XLED - AYA and take your electronic device back in hand. On this page are published all the documents necessary for the use of your device. AHD601XLED by AYA.
USER MANUAL AHD601XLED AYA
MANUEL D'UTILISATION AHD601XLED AHD901XLED
FR

natural_image
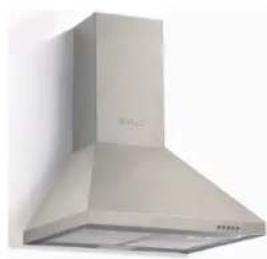
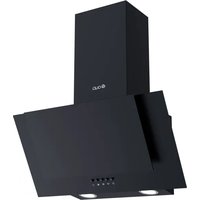
Exterior view of a stainless steel kitchen range hood (no text or symbols visible)
natural_image
Exterior view of a stainless steel industrial smoke hood (no text or symbols visible)Hotte décoration
Sommaire
natural_image
Line drawing of a kitchen range hood with labeled components (no text or symbols)schéma.12

schéma.13
MAINTENANCE
INSTRUCTIONS FOR USE AHD601XLED AHD901XLED
GB
natural_image
Exterior view of a stainless steel kitchen range hood (no text or symbols visible)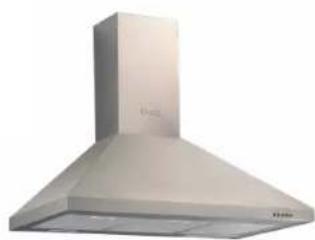
natural_image
Exterior view of a stainless steel industrial smoke hood (no text or symbols visible)Cooker hood
Table of contents
| Safety warning | -1- |
| Notice | -5- |
| Feature | -5- |
| Installation | -6- |
| Installation diagram | -11- |
| Speed adjustment | -12- |
| Maintenance | -13- |
| Abnormal situations and solutions | -19- |
| Technical specifications | -20- |
| Disposal of the appliance | -22- |

THIS PRODUCT IS FOR HOUSEHOLD USE ONLY!
Please read these instructions carefully before the first use of this product and save this manual for your future reference.
Safety warnings
- This appliance can be used by children aged from 8 years and above and persons with reduced physical, sensory or mental capabilities or lack of experience and knowledge if they have been given supervision or instruction concerning use of the appliance in a safe way and understand the hazards involved. Children shall not play with the appliance. Cleaning and user maintenance shall not be made by children without supervision.
- Check that the voltage of the wall socket in your home is same as the voltage shown on the rating label of this product.
-
If the supply cord is damaged, it must be replaced by the manufacturer, its service agent or similarly qualified persons to avoid a hazard.
Never let the children operate the machine. -
The cooker hood is for home use only, not suitable for barbecue, Roast shop and other commercial purpose.
- This appliance is equipped with an earth plug and should be inserted to a grounded socket.
- Please ask the technical person to do the assembling.
- The cooker hood and its filter mesh should be clean regularly in order to keep in good working order.
- CAUTION: Accessible parts may become hot when used with cooking appliances.
- Before cleaning, please switch the power off at the main supply.
- Clean the cooker hood according to the instruction manual and keep the cooker hood from the danger of burning.
- If there is any fault with the appliance, please call the service department to arrange a service engineer.
• Children should be supervised to ensure that they do not play with the appliance.
- This product is not intended to be operated by an external timer or a separate remote control.
- If the supply cord is damaged, or if the appliance has malfunctions or it has been damaged in any manner, please return the appliance to the manufacturer, its authorized service agent or similarly qualified persons for examination, repair or adjustment in order to avoid a hazard.
- Regarding the instructions for the method of fixing and how the appliance is to be fixed to its support, thanks to refer to the section "Installation".
- There shall be adequate ventilation of the room when the range hood is used at the same time as appliances burning gas or other fuels.
- There is a fire risk if cleaning is not carried out in accordance with the instructions.
Do not flambé under the range hood.
• The air must not be discharged into a flue that is used for exhausting fumes from appliances burning gas or other fuels
- When the range hood is located above a gas appliance, the minimum distance between the supporting surface for the cooking vessels on the hob and the lowest part of the range hood that distance must be at least 65 cm.
• Regulations concerning the discharge of air have to be fulfilled
- Regarding the instructions for the method and frequency of cleaning, thanks to refer to the section "Maintenance" in the manual.
- Regarding the instructions for the blub replacement and the type reference of the luminaire, thanks to refer to the section "Maintenance".
- Regarding the information for installation, for cleaning and for changing the light, thanks to refer to the below paragraph of the manual.
- For safety reason, please use only the same size of fixing or mounting screw which are recommended in this instruction manual.
- Warning: Failure to install the screws or fixing device in accordance with these instructions may result in electrical hazards.
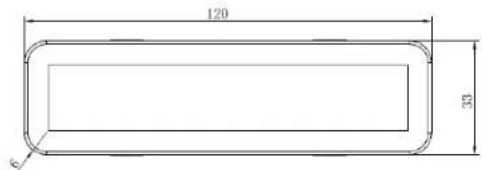
- ILCOS D code for this lamp is: DBS-2/65-H-120/33
Notice
- Thank you for choosing our cooker hood.
- The installation work must be undertaken by a qualified and competent fitter.
- The manufacturer disclaims all liability for any damage or injury caused as a result of not following instructions for installation contained in the following text. The cooker hood is used on 220-240V\~,50Hz.
Feature
- Please read this instruction manual carefully before the first use and save it for future reference.
-
The cooker hood uses high quality materials, and is made with a streamlined design.
-
Equipped with a large power low noise electric motor and centrifugal leaf, it produces strong suction, low noise, non stick grease filter and easy to clean.
-
Special wind tunnel construction and oil collector design, free dirt will be absorbed in a second.
Installation
If the model use as recirculation function:
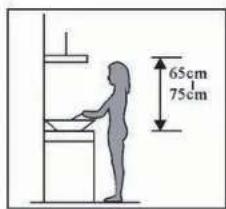
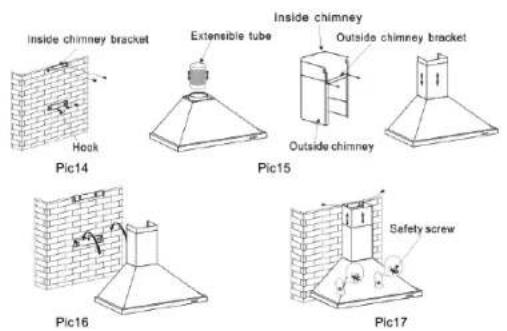
3.1 The cooker hoods should be placed at a distance of 65-75 cm from the cooking surface for best effort, see pic1.
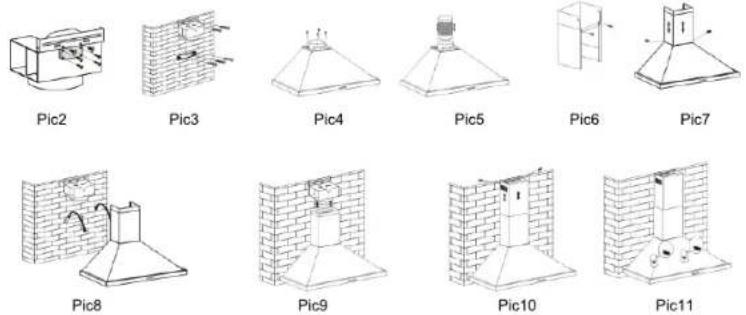
3.2 Fix the inner chimney bracket to the deflector by two
ST4*8mm screws. Fix the fixing board to the deflector by four ST3*12mm screws.
3.3 Install the hook on a suitable place once the installation height is fixed, and keep it in line. Install the deflector onto the wall by fixing the inner chimney bracket onto the wall. The fixed position of the inside chimney
Pic1
bracket is the position of the chimney.
3.4 Install the outlet on the top of the hood; put the extensible pipe on the outlet see pic4 and pic5.
3.5 Put the inside chimney into the outside chimney, fix the outside chimney bracket on the outside chimney, make sure that the inside chimney can be adjusted for the height freely.
3.6 Put the chimney to the hood, use two ST4*8mm to fix it.
3.7 Put the cook hood on the hook.
3.8 Pull up the extensible pipe and connect it to the bottom of the deflector.
3.9 Adjust the height of the inside chimney to the position of the inside chimney bracket, and fix it by two ST4*8mm screws.
Note: Two safety vents are positioned on the back casing, with diameter 6mm, fix them by screws finally.
For safety reason, please use only the same size of fixing or mounting screw which are recommended in this instruction manual.
Warning: Failure to install the screws or fixing
device in accordance with these instructions may result in electrical hazards.

Installing the carbon filter
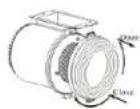
- Remove the filters see Pic.12
- The charcoal filters(pic.13)are located at either end of the motor. Turn the charcoal filters clockwise until they are screwed with the motor.
- Apply reverse procedure to uninstall the charcoal filter if you need to change them.
Warning: the charcoal cannot be washed or recycled. It should be changed at least every four months.
Note: Charcoal filters excluded purchase from us with item No. FCH001 if you need the recirculation function.

natural_image
Line drawing of a kitchen air conditioner unit with ventilation duct and door (no text or symbols)Pic12
Pic13
If the cooker hood use without recirculation function
3.1 The cooker hoods should be placed at a distance of 65-75 cm from the cooking surface for best effect. See Pic1.

Pic1
3.2 Install the hook on a suitable place once the installation height is fixed, and keep it in line. The fixed position of the inside chimney bracket is the place of chimney.
3.3 Fix the outside chimney bracket on the outside chimney, and be sure that the inside chimney can be adjusted the height in it freely as well as fixing the extensible pipe. Afterwards, install the extensible pipe and chimney on the cooker hood. See Pic15.
3.4 Put the cooker hood on the hook. See Pic16.
3.5 Adjust the height of the inside chimney to the position of the inside chimney bracket and fix on it by screw, after adjusting the position, fix the body with safety screw. See Pic17.
Note: The two safety vents are positioned on the back casing, with diameter of 6mm.
IMPORTANT:
- Before installation, please ensure the area is clean to avoid suction of the remaining bits of broken wood and dust.
- It cannot share the same air ventilation tube with other appliance such as gas tube, warmer tube, and hot wind tube.
- The bending of ventilation tube should be 120, parallel or above the start point and should be connected to the external wall.
- After installation, make sure that the extractor is level to avoid grease collection at one end.
INSTALLATION DIAGRAM
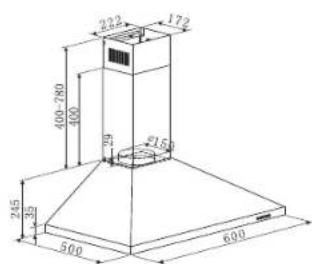
Model: AHD601XLED
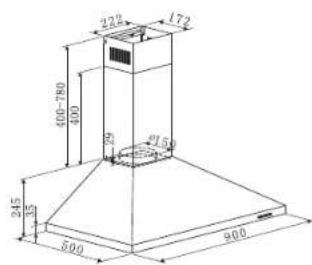
Model: AHD901XLED
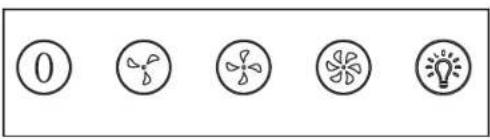
Speed adjustment
How to use the control panel(mechanical push button), see Pic.7:
- Press the button “①”, the motor is stopped then.
- Press the button “ ^6 ”, the motor is running at low speed.
- Press the button “ ^2 ”, the motor is running at medium speed.
- Press the button “❄”, the motor is running at high speed.
- Press the button “💡”, both lights start shining. Press the button again; the lights are switched off then.
Maintenance
7.1 The cleaning of the carbon grease filter mesh
The filter mesh is made of high-density stainless steel. Please do not use the corrosive detergent on it. Keeping this filter clean will keep the appliance running correctly. Please strictly follow the guidelines below.
Method 1: Put the mesh into 40-50 c clean water pour on detergent, and soak for 2-3 mins. Wear gloves and clean with a soft brush.
Please do not apply too much pressure as the mesh is delicate and will damage easy.
Method 2: If instructed to do so, it can be put into a dishwasher, set the temperature at around 60 degrees.
7.2 Notice of cleaning cooker hood
A. To protect the main body from corrosion over a long period of time, the cooker hood should be cleaned with hot water plus non corrosive detergent every two months.
B. Please do not use abrasive detergent for it will damage the body.
C. Keep the motor and other spare parts free from water, as this will cause damage to the appliance.
D. Before cleaning the appliance please remember to cut off power
E. The carbon filter shouldn't be exposed to heat.
F. Please don't tear open the fixed bar around the carbon filter.
G. If the plug or cord is damaged, please replace it with special soft cord.
LAMP REPLACEMENT
Important:

✿ The lamp must be replaced by the manufacturer, its service agent or similarly qualified persons.
Always switch off the electricity supply before carrying out any operations on the appliance. When handling lamp, make sure it has completely cooled down before any direct contact with hands.
When handling lamp hold with a cloth or gloves to ensure perspiration does not come in contact with the lamp as this can reduce the life of the lamp.
Note:
● Before changing the lights, make sure that the appliance is turned off and unplugged.
- Protect against danger when changing lights, such as wearing gloves.
- ILCOS D code for this lamp is: DBS-2/65-H-120/33
- LED modules -rectangle lamp
- Max wattage: 1×2W / 2×2 W
- Voltage range: 220-240V\~
- Dimensions:
LED light replacement

flowchart
graph LR
    A["LED"] <--> B["LED"]
LED lighting source
Replaceable by
professional
Warning: the LED light must not be replaced by the user! If the LED light is damaged, contact an authorized service representative for repairing.
The product contains a light source of energy efficiency class G.
Abnormal situations and solutions
| Fault | Cause | Solution |
| Light on, but motor does not work | The leaf blocked | Get rid of the blocking |
| The capacitor damaged | Replace capacitor | |
| The motor jammed bearing damaged | Replace motor | |
| The internal wire of motor off or a bad smell from the motor | Replace motor | |
| Light does not work, motor does not work | Beside the above mentioned, check the following: | |
| Light damaged | Replace lights | |
| Power cord looses | Connect the wires as per the electric | |
| Oil leakage | One way valve and the air ventilation entrance are not tightly sealed | Take down the one way valve and seal with glue |
| Leakage from the connection of U-shaped section and cover | Take U-shaped section down and seal with soap or paint | |
| Shake of the body | The leaf damaged and causes shaking | Replace the leaf |
| The motor is not tightly hanged | Lock the motor tightly | |
| The body is not tightly hanged | Fixed the body tightly | |
| Insufficient suction | The distance between the body and the gas top too long | Readjust the distance |
| Too much ventilation from open doors or windows | Choose a new place and resemble the machine | |
| The machine inclines | The fixing screw not tight enough | Tighten the hanging screw and make it horizontal |
| The hanging screw not tight enough | Tighten the hanging screw and make it horizontal | |
Technical specifications
| 60cm | 90cm | |
| Volatge/Frequency | 220-240V~50Hz | 220-240V~50Hz |
| Rated motor input power | 125W | 125W |
| Illumination | ≤slant 2W | ≤slant 2+2W |
| Rated input power | 127W | 129W |
The above table indicate the information for the cooker hood. The test result is done as per the relevant requirement of EU No 65/2014 and EU No 66 / 2014.
| Product Fiche | ||||
| Trade mark | @ aya | |||
| Symbol | Value | Unit | ||
| Model identification | AHD601XLEDAH | HD90 1XLED | ||
| Annual Energy Consumption | AEC_hood | 65,6 | 66,3 | kWh/a |
| Energy Efficiency class | - | Class C | Class C | - |
| Time increase factor | f | 1,5 | 1,5 | - |
| Fluid Dynamic Efficiency | FDE_hood | 14,1 | 14,8 | - |
| Fluid Dynamic Efficiency class | - | Class D | Class D | - |
| Energy Efficiency Index | EEI_hood | 81,2 | 81,8 | - |
| Measured airflow rate at the best efficiency | Q_E.P | 269,3 | 271,9 | m^3/h |
| Measured air pressure at best P efficiency point | B.E.P | 221 | 227 | Pa |
| Maximum air flow at highest setting | Q_max | 520,3 | 531,1 | m^3/h |
| Maximum air flow at lowest setting | Q_max | 320,8 | 325,0 | m^3/h |
| Air flow at working point at highest setting | - | 494,8 | 501,6 | m^3/h |
| Air flow at working point at bwest setting | - | 307,0 | 310,6 | m^3/h |
| Measured electric power input at W best efficiency p • int | _EFP | 117,1 | 115,7 | W |
| Nominal power of the lighting W system | I | 2 | 4 | W |
| Average illumination of the lighting system on the cooking surface | E_middle | 80 | 128 | lux |
| Measured power consumption in Ps standby mode | - | - | W | |
| Measured power consumption off Po mode | 0,00 | 0,00 | W | |
| Sound power level at highest setting | LWA | 66 | 66 | dB |
| Sound power level at lowest setting | LWA | 56 | 55 | dB |
| Lighting Efficiency | LE _hood | 40 | 32 | Lux/W |
| Lighting Efficiency class | - | Class A | Class A | - |
| Grease Filtering Efficiency | GFE _hood | 79,9 | 76,1 | - |
| Grease Filtering Efficiency class | - | Class C | Class C | - |
| Measurement Standard | EN 61591:1997 + A1:2006 + A2:2011 + A11:2014 + A12:2015 | |||
We decline liability for any damage or accident derived from any use of this product which is not in conformity with the instructions contained in this booklet.
DISPOSAL OF THE APPLIANCEE
ENVIRONMENTAL PROTECTION
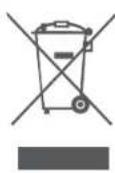
This product is marked with the symbol on the selective sorting of waste electronic equipment. This means that this product must not be disposed of with household waste but must be supported by a system of selective collection in accordance with Directive 2012/19/EU. It will then be recycled or dismantled to minimize impacts on the environment, electrical and electronic products are potentially dangerous for the environment and human health due to the presence of hazardous substances. For more information, please contact your local or regional authorities.
Note:
a. n order to reduce the environmental impact (e.g. energy use) of the cooking process, please be sure that your product is installed according to the user manual, keep the operation place ventilated, keep the extraction duct be direct and short as possible as it can be.
b. For the product with manual operation mode, we suggest switch the motor off within 10 minutes after finishing the cooking process.
c. Please be sure to dismantle related components according to the user manual when maintaining for non-destructive, protect the parts to make the re-installed work can be favoring and avoid damage.

LE TRI + FACILE


- MANUEL D'UTILISATION AHD601XLED AHD901XLED
- Sommaire
- MAINTENANCE
- Safety warnings
- Notice
- Feature
- If the model use as recirculation function:
- Installing the carbon filter
- If the cooker hood use without recirculation function
- IMPORTANT:
- Speed adjustment
- How to use the control panel(mechanical push button), see Pic.7:
- LAMP REPLACEMENT
- Note:
- LED light replacement
- DISPOSAL OF THE APPLIANCEE
- ENVIRONMENTAL PROTECTION
Brand : AYA
Model : AHD601XLED
Category : Basket