
VIGI NVR1004H-4P - VCR TP-LINK - Free user manual and instructions
Find the device manual for free VIGI NVR1004H-4P TP-LINK in PDF.

User questions about VIGI NVR1004H-4P TP-LINK
0 question about this device. Answer the ones you know or ask your own.
Ask a new question about this device
Download the instructions for your VCR in PDF format for free! Find your manual VIGI NVR1004H-4P - TP-LINK and take your electronic device back in hand. On this page are published all the documents necessary for the use of your device. VIGI NVR1004H-4P by TP-LINK.
USER MANUAL VIGI NVR1004H-4P TP-LINK
Install the hard drive and product by referring to Quick Start Guide included in the package.
Note: Some products can be placed directly on the desktop without the need of product installation.
Hardware Connection
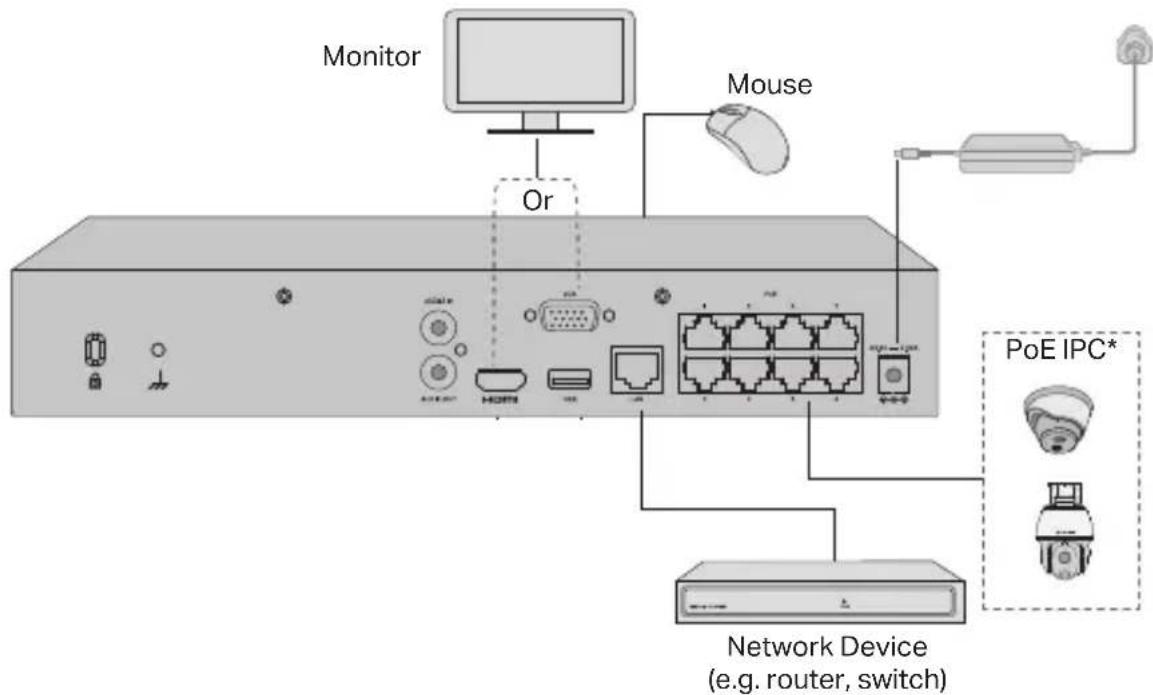
Follow the steps below to complete the hardware connection.
- Connect your monitor to the HDMI or VGA port according to the connection port it supports.
- Connect your monitor to a power source and turn it on.
- Connect the LAN port of the NVR to a network device with an Ethernet cable.
- Connect the provided USB Mouse to the USB Interface of the NVR.
- Connect the power adapter to the NVR.
*For PoE NVR, you can directly connect the PoE cameras to the PoE ports of the NVR for data transmission and power supply.
Cautions
- If you want to turn off the NVR after hard drive installation, click the Power button on the web UI of NVR. Do not unplug it directly.
- The input voltage should match with the device power requirements.
Configuration
NVR can add and manage cameras in batches.
* Here we use TP-Link cameras as an example. For other camera brands, please refer to their User Manuals to add the cameras.
Step 1. Connect your cameras to the same network as your NVR.
Step 2. Follow the instructions to finish Quick Setup.
-
Create a login password for the NVR and a preset password for your unset cameras.
-
Click Auto Initialize and the NVR will automatically find and add the cameras in your network.
Note: If you don't want to use Auto Initialize, click Manually Initialize and follow the Setup Wizard to add cameras in your network and complete the setup.
Step 3. Right click on the Live View screen to open the Main Menu for management.
Note: For more instructions, please refer to the NVR's User Guide.
(Optional) Step 4. Bind your NVR to a TP-Link ID for remote access and management. (Internet required)
Note: If you don't have a TP-Link ID, sign up first.
More Management Methods
■ VIGI Security Manager (Windows only)
You can use the VIGI Security Manager to view live video and modify NVR settings on your computer. Please Download it on your computer at https://www.tp-link.com/download-center/
■ VIGI App
The VIGI App provides a simple and intuitive way to remotely view live video, manage NVR, and get instant alerts.

or


Scan the QR code to download and install the VIGI app from the App Store or
Google Play.
■ Web Browser
Find the NVR's IP address on your router's client page. On your local computer, open a web browser and enter https://NVR's IP address (https://192.168.0.240 by default). Follow the web instructions to activate the NVR.
FAQ (Frequently Asked Questions)
Q1. What should I do if I forget the login password of my NVR?
A1. Click Forgot Password on the login page and then follow the instructions to reset the password.
A2. For steel shell products, remove the cover, then press and hold the Reset button inside the NVR for over 3 seconds, release the button when you hear a beep. The NVR will restore to the factory settings. Then follow Quick Setup to create a login password.
Q2. What can I do if my NVR fails to connect to the Internet?
A1. Check if the internet is working properly.
A2. Make sure your NVR is in the same network segment as your network devices.
For more details, please refer to the NVR's User Guide.
If you have more questions, please visit https://www.tp-link.com/support/faq/2850/.
or


https://www.tp-link.com/support/faq/2850/.
or


https://www.tp-link.com/support/faq/2850/.
Se tiver mais perguntas, visite https://www.tp-link.com/support/faq/2850/.
or


FAQ (Frequently Asked Questions)
https://www.tp-link.com/support/faq/2850/.
ハードドライブ & 製品の取り付け
or


or


or


or


https://www.tp-link.com/support/faq/2850/.
/https://www.tp-link.com/download-center
VIGI تطبيق
- Keep the device away from water, fire, humidity or hot environments.
- Do not attempt to disassemble, repair, or modify the device. If you need service, please contact us.
- Do not use damaged charger or USB cable to charge the device.
- Do not use any other chargers than those recommended.
- Adapter shall be installed near the equipment and shall be easily accessible.
- Use only power supplies which are provided by manufacturer and in the original packing of this product. If you have any questions, please don't hesitate to contact us.
- Avoid disposal of a battery into fire or a hot oven, or mechanically crushing or cutting of a battery, that can result in an explosion.
- Place the device with its bottom surface downward. Install it at stable places, and prevent it from falling.
- The plug on the power supply cord is used as the disconnect device, the socket-outlet shall be easily accessible.
- Adapter should be used indoors where the ambient temperature is lower than or equal to 40 °C.
| CAUTION!Risk of explosion if the battery is replaced by an incorrect type |
| CAUTION: Do not ingest battery, Chemical Burn HazardThis product contains a coin / button cell battery. If the coin / button cell battery is swallowed, it can cause severe internal burns in just 2 hours and can lead to death.Keep new and used batteries away from children.If the battery compartment does not close securely, stop using the product and keep it away from children.If you think batteries might have been swallowed or placed inside any part of the body, seek immediate medical attention. |
| CAUTION!Avoid replacement of a battery with an incorrect type that can defeat a safeguard.Avoid disposal of a battery into fire or a hot oven, or mechanically crushing or cutting of a battery, that can result in an explosion.Do not leave a battery in an extremely high temperature surrounding environment that can result in an explosion or the leakage of flammable liquid or gas.Do not leave a battery subjected to extremely low air pressure that may result in an explosion or the leakage of flammable liquid or gas. |
Please read and follow the above safety information when operating the device. We cannot guarantee that no accidents or damage will occur due to improper use of device. Please use this product with care and operate at your own risk.
TP-Link Limited Product Warranty
For TP-Link Branded Products Only. For the information about warranty period, policy and procedures, please visit http://www.tp-link.com/en/support.
THIS WARRANTY GIVES YOU SPECIFIC LEGAL RIGHTS, AND YOU MAY HAVE OTHER RIGHTS THAT VARY FROM STATE TO STATE (OR BY COUNTRY OR PROVINCE).
TO THE EXTENT ALLOWED BY LOCAL LAW, THIS WARRANTY AND THE REMEDIES SET FORTH ARE EXCLUSIVE AND IN LIEU OF ALL OTHER WARRANTIES, REMEDIES AND CONDITIONS.
TP-Link warrants the TP-Link branded hardware product contained in the original packaging against defects in materials and workmanship when used normally in according with TP-Link's guidelines for some period which depends on the local service from the date of original retail purchase by the end-user purchaser.
Deutsch
Sicherheitsinformation
TP-Link hereby declares that the device is in compliance with the essential requirements and other relevant provisions of directives 2014/30/EU, 2014/35/EU, 2009/125/EC, 2011/65/EU and (EU)2015/863.
The original EU declaration of conformity may be found at https://www.tp-link.com/en/support/ce/.
TP-Link hereby declares that the device is in compliance with the essential requirements and other relevant provisions of the Electromagnetic Compatibility Regulations 2016 and Electrical Equipment (Safety) Regulations 2016.
The original UK declaration of conformity may be found at https://www.tp-link.com/support/ukca/
Español
Brand : TP-LINK
Model : VIGI NVR1004H-4P
Category : VCR