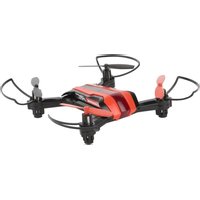
RC Micro Quadrocopter - Drone CARRERA - Free user manual and instructions
Find the device manual for free RC Micro Quadrocopter CARRERA in PDF.

User questions about RC Micro Quadrocopter CARRERA
0 question about this device. Answer the ones you know or ask your own.
Ask a new question about this device
Download the instructions for your Drone in PDF format for free! Find your manual RC Micro Quadrocopter - CARRERA and take your electronic device back in hand. On this page are published all the documents necessary for the use of your device. RC Micro Quadrocopter by CARRERA.
USER MANUAL RC Micro Quadrocopter CARRERA
Garpera B6 Migro D140000000
370502002
GB USA Assembly and operating instructions
Made in China, Dongguan
1
natural_image
3D model of a quadcopter drone with four propellers and control panels (no text or symbols visible)3,7V = 85mAh · 0,31Wh LiPo
natural_image
Two red and black propeller-shaped devices with attached cables (no text or symbols visible)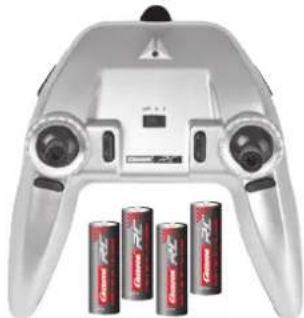
natural_image
Front view of a silver handheld game controller with four batteries in the foreground (no visible text or symbols)4x 1.5 V Micro AAA batteries
2a
text_image
Red-ChargingGreen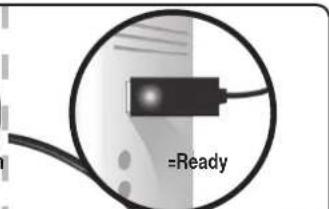
text_image
=Ready3
text_image
3 4x 1.5 V Micro AAA batteries 10 11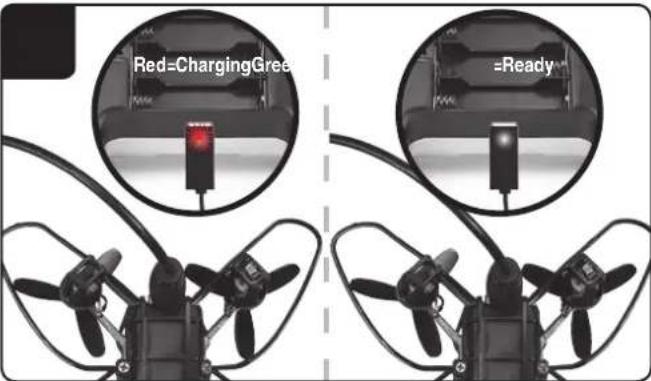
text_image
Red=ChargingGreen =Ready4a
natural_image
Drone with red triangular warning symbol and circular inset showing a camera (no text or symbols on the drone itself)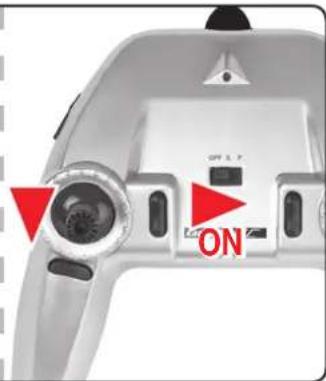
text_image
OFF 3.5 ON4b

text_image
4b 0°5
text_image
R1RL Caserell 7.16
text_image
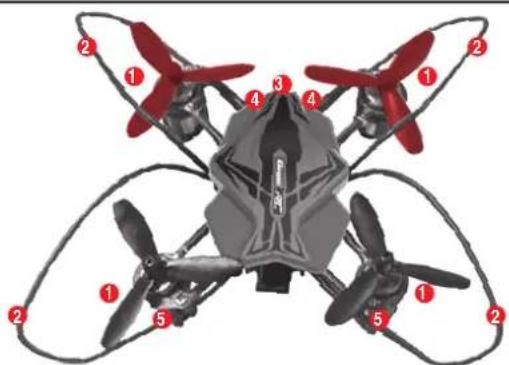
Diagram of a multi-blade helicopter with numbered propellers and fuselage components labeled 1 through 5.7

natural_image
Top-down view of a four-bladed drone with visible propellers and control panels (no text or symbols)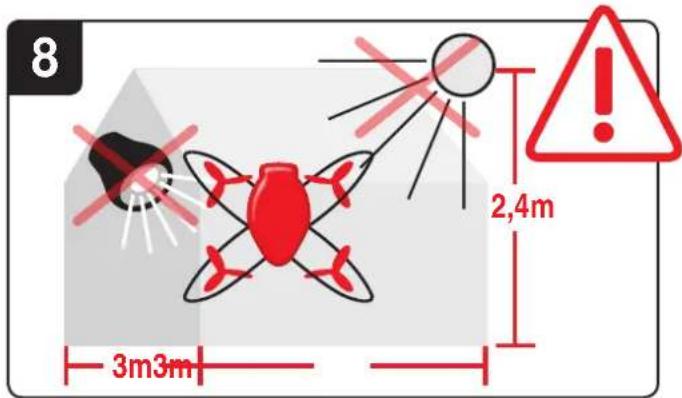
text_image
8 3m3m 2,4m
natural_image
Two drone models shown side by side: one with red directional arrows indicating orientation, the other with white frame and camera (no text or symbols)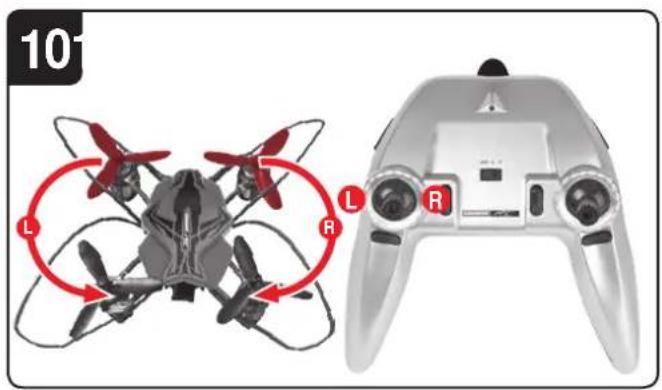
text_image
10 L R L R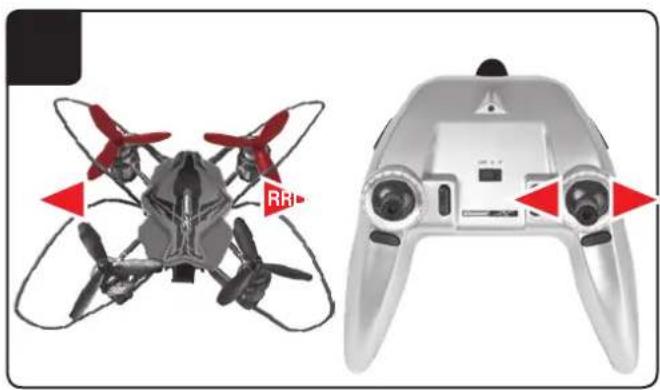
natural_image
Two drone components shown from top and side views: one with red directional arrows indicating rotation, the other with white frame (no text or symbols)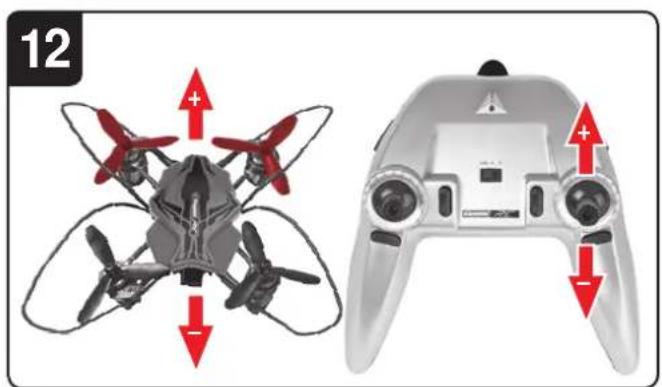
natural_image
Two drone components shown from front and side views: one with red directional arrows indicating rotation or movement, the other with white frame (no text or symbols)
text_image
13a 13b
natural_image
Two drone components shown from top and side views, one with red triangular indicators indicating rotation or movement (no text or symbols)
natural_image
Two drone components shown from top and side views, one with red directional arrows indicating rotation or movement (no text or symbols)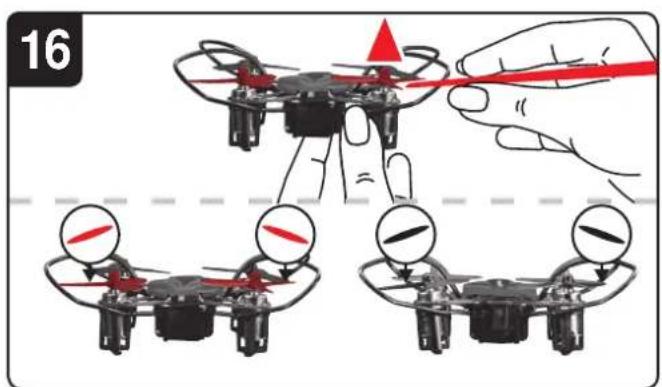
text_image
16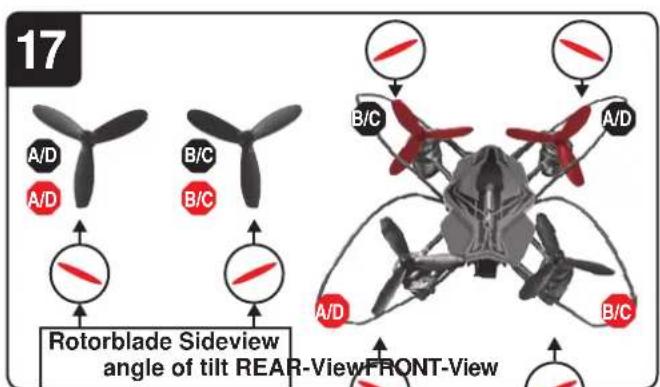
text_image
17 A/D B/C A/D B/C A/D B/C Rotorblade Sideview angle of tilt REAR-ViewFRONT-ViewSehr geehrter Kunde
Beginner Modus (Slow) Advanced Modus (Fast)
Congratulations! You bought a Carrera RC Quadrocopter which has been manufactured according to today's state-of-the-art technology. As it is our constant endeavour to develop and improve our products, we reserve the right to make modifications, either of a technical nature or with respect to features, materials and design, at any time, and without prior notice. For this reason, no claims will be accepted for any slight deviations in your product from the data and illustrations contained in these instructions. These operating and assembly instructions are an integral part of the product. Non-observance of these operating instructions and the safety instructions they contain will render the guarantee null and void. These instructions are to be kept for future reference and in the event that the product is passed on to a third party.
Guarantee conditions
Carrera products are technically advanced products which should be handled with care. It is important to follow the directions given in the operating instructions. All components have been subjected to careful inspection (technical modifications and alterations to the model for the purpose of product improvement are reserved).
Should any faults nevertheless occur, guarantee is assumed within the scope of the following conditions: In accordance with the following provisions, Stadlbauer Marketing + Vertrieb GmbH (hereinafter referred to as "manufacturer") warrants to the endconsumer (hereinafter referred to as "customer") that the Carrera RC-model-Quadrocopter (hereinafter referred to as "product") delivered to the customer shall be free from defects in material or workmanship for two years from the date of purchase (guarantee period). Such defects will, at the manufacturer's option, either be repaired by the manufacturer or fixed by delivering new or refurbished parts free of charge. The warranty does not cover failure due to normal wear and tear, (e.g. to batteries, rotor blades, cabin covering, gear wheels etc.), or damage as a result of improper handling/misuse or unauthorised interference. Any other customer's claims asserted against the manufacturer, especially action for damages, shall be excluded.
The contractual and statutory rights of the customer against the seller (supplementary performance, rescission of the contract, abatement, compensation) which exist with the product not having been free from defects at the time of the passing of risk, shall remain unaffected by this warranty.
Claims from this special warranty shall only be valid if:
- the defect reported has not arisen by damage caused by unintended use or misuse as specified in the instruction manual,
• the failure of the product is not due to normal wear and tear - the product does not show any signs resulting from repairs or other interferences carried out by workshops not having been authorised by the manufacturer,
- the product has only been operated with accessories authorised by the manufacturer and
- the product is sent in together with the original proof of purchase (invoice / receipt) and the completely filled in warranty card which has not been altered in any way.
Guarantee cards cannot be replaced.
Note for EU countries: Reference is hereby made to the seller's statutory guarantee obligation, to the extent that this guarantee obligation is not restricted by the product guarantee.
The manufacturer shall bear the costs for sending in and returning the product.
This warranty shall be valid to the extent aforementioned and under the above-named circumstances (including the submittal of the original proof of purchase also in case of resale) for any future owner of the product.
Declaration of conformity
Stadlbauer Marketing + Vertrieb GmbH hereby declares that this model including the controller conforms with the fundamental requirements of the following EC directives: EC Directives 2009/48 and 2004/108/EC regarding electromagnetic compatibility and the other relevant regulations of Directive 1999/5/EC (R&TTE).
The original declaration of conformity can be requested from carrera-rc.com.


Warning!

WARNING! This toy contains small parts which can be swallowed and is therefore not suitable for children under 3 years of age.
WARNING! Danger of pinching during operation! Remove all packaging materials and wire fastenings before handing the toy over to the child. For information and to answer any questions, please retain packaging, address and instructions in a safe place for future reference.
Adult supervisors note: please check that the toy has been assembled in accordance with the instructions. Assembly should be carried out under the supervision of an adult.
Only suitable for children over the age of 8!
This product is not intended for use by children without supervision of a parent. Flying the Quadrocopter requires skill and children must be trained under the direct supervision of an adult. Read the user's information together with your child Before the first use. Inappropriate use may result in severe injuries and/or damage to property.
It has to be operated with care and caution and requires both mechanical and mental skills. The operating instructions contain notes on safety and technical regulations as well as information on maintaining and operating the product. It is indispensable to read these instructions thoroughly before the first usage. Only this helps to avoid accidents with injuries and damage.
Only use the Quadrocopter in closed rooms which provide sufficient space and follow all instructions given in this manual.
Hands, hair and loose clothing, including other objects such as pens and screwdrivers must be kept away from the propeller (rotor). Do not touch the rotating rotor. Especially take care that your hands DO NOT get close to the rotor blades! WARNING: Risk of eye injuries. Do not fly near your face to avoid injuries.
As user of this product you are solely responsible for handling it safely in order to ensure that neither you nor other persons or their property suffer damages or are endangered.
- Never use your model with weak remote control batteries.
• This toy is only designed to be used in a home environment. - Avoid busy areas. Always make sure that there is enough space.
- Do not use your model on an open street or in
public areas in order not to endanger or hurt anyone.
- WARNING: Do not start up and fly when persons, a nimals or any obstructions are within the flying range of the Quadrocopter.
- Exactly observe the instructions and warnings for this product and for any possible additional equipment (battery charger, rechargeable batteries etc.) being used by you.
- Should the Quadrocopter come into contact with any living thing or solid object, immediately return the gas control to zero, in other words the left-hand joystick must be at the stop at the bottom of the slide!
- Make sure that all chemicals, small parts and electrical components are out of childrens' reach.
- Avoid any moisture as this might do damage to the electronics.
- There is a risk to suffer severe injury or even death if you put parts of your model into your mouth or lick them.
- Do not change or modify anything on the Quadrocopter.
If you do not agree to these terms please immediately return the complete Quadrocopter model in new and unused condition to the retailer.
Important information concerning Lithium Polymer rechargeable batteries
Lithium-Polymer (LiPo) rechargeable batteries are significantly more sensitive than traditional alkali- or NiMH-rechargeable batteries normally used with radio control units. Therefore the instructions and warnings have to be observed in detail. In case of improper use of LiPo rechargeable batteries there is a danger of fire. Always follow the manufacturers' instructions if you dispose of LiPo rechargeable batteries.
Regulations on disposal for waste electrical and electronic equipment (WEEE)
This symbol, showing refuse bins with a cross through them, denotes that empty batteries, rechargeable batteries, button cells, recharge-
able battery packs, equipment batteries, disused electrical equipment, etc. should not be disposed of in domestic refuse, as they are harmful to the environment and health. Please help to preserve environment and health and talk to your children about the correct disposal of used batteries and disused electrical equipment. Batteries and disused electrical equipment should be handed in to the usual collection points where they can be properly recycled.
Do not mix dissimilar battery types or employ new and used batteries together. Empty batteries should be removed from the product. Do not attempt to recharge non-rechargeable batteries.
WARNING!
The charger unit and the USB cable may be used by children eight (8) years and upwards and by persons with with restricted physical, sensory or mental faculties, inexperience or lack of knowledge provided they are supervised or have been adequately trained in the safe use of the unit and have a proper understanding of the dangers it poses. Children must not be allowed to treat the charger or the USB cable as a toy. Cleaning and user maintenance may only be carried out by children if they are over eight years old and supervised.
Children under eight years old must be kept away from the charger and the connecting cable. Never leave the battery unattended while it is charging. Exhausted batteries are to be removed from the toy. Rechargeable batteries should be removed from the product before charging. Supply terminal are not to be short-circuited. Only use the batteries recommended or equivalent types.
If in regular use the charger must be examined for damage to the cord, plug, covers and all other parts. If any signs of damage are found the charger may only be used again after repair work has been completed.
FCC statement
This device complies with Part 15 of the FCC Rules.
Operation is subject to the following two conditions:
(1) this device may not cause harmful interference, and
(2) this device must accept any interference received, including interference that may cause undesired operation.
Changes or modifications not expressly approved by the party responsible for compliance could void the user's authority to operate the equipment.
Guidelines and warnings for the use of LiPo rechargeable batteries
- You have to charge the attached 3.7 V 85mAh LiPo rechargeable battery in a safe place and at a safe distance to flammable material.
- Never leave the battery unattended while it is charging
• After a flight, the rechargeable battery has to cool down to the ambient air temperature before charging it. - You must always use the corresponding LiPo charging unit (USB cable / remote control). In case of non-compliance with these directions there is a danger of fire resulting in a health risk and/or damage to property. NEVER use any other battery charger.
- Should the rechargeable battery swell or deform while discharging or recharging, you have to immediately stop charging or discharging the battery. Take the battery out as quickly and carefully as possible and place it in a safe and open area offside any inflammable material and watch it for at least 15 minutes. In case you continue charging or discharging a battery which has already started to swell or deform there is a danger of fire! Even in case of slight deforming or ballooning the rechargeable battery has to be taken out of operation.
- Store the rechargeable battery at ambient temperature in a dry place.
- Always recharge the battery immediately after use to prevent its becoming deep discharged. Please make sure to allow a pause of about 20 minutes between finishing the flight and recharging the battery. Recharge the battery occasionally (suggested every 2-3 months). Failure to treat the battery as described above can lead to its becoming defective.
- When transporting or temporarily storing the rechargeable battery the temperature should be between 5 - 50^ . If possible, do not store the battery or the model in a car and do not expose it to direct sunlight. In case the battery is broiled it can be damaged or catch fire.
Note: If the battery voltage/output is low you will recognise that a considerable trim and/or controlling is necessary to avoid that the Quadrocopter starts trundling. This usually occurs before reaching a battery voltage of 3V and it is a good moment to end the flight.
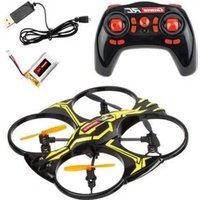
Contents of package

1 x Quadrocopter ntroller
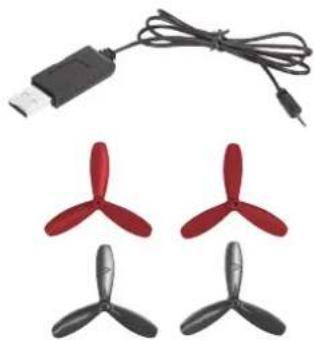
Tx USB charging cable
1 x Set of replacement parts
4 x 1.5 V Micro AAA batteries
(non-rechargeable)
Recharging the LiPo rechargeable battery
Make sure you only charge the LiPo rechargeable battery supplied with the LiPo charging unit also supplied (USB cable and remote control). If you try to charge the rechargeable battery with a different LiPo battery charger or any other battery charger, this might cause serious damage. Please carefully read the previous chapter with warnings and guidelines on the usage of rechargeable batteries before proceeding. Supply terminals are not to be short-circuited.
The rechargeable battery fitted in the Quadrocopter with its USB charging cable can be charged either from a USB port on a computer or directly from the remote control:

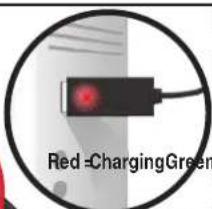
- Connect the USB charging cable with the USB port of a computer 2a or of the controller 2b. The LED on the USB charger cable lights green indicating that the charger unit is correctly connected to the computer or the controller. If you plug in a Quadrocopter with a discharged battery, the LED on the USB charging cable lights up red and shows that the Quadrocopter battery is being charged. The USB charging cable and the charging socket on the Quadrocopter are designed to make incorrect connection impossible.
- It takes about 30 minutes to recharge a discharged battery (but NOT a deep-discharged one). When the battery is fully charged, the LED display on the USB charger cable lights up green again.
Note: when supplied, the lipo-battery is already partially charged. So the first charging cycle may well take less time.
It is essential to follow the connection sequence given above! If you have the charger cable only connected to the quadrocopter, and not to a source of electricity, a green LED display indicates that there is still power in the battery. The green LED display does not necessarily indicate the battery is still adequately charged.
While charging, the power switch must be in the "OFF" position.
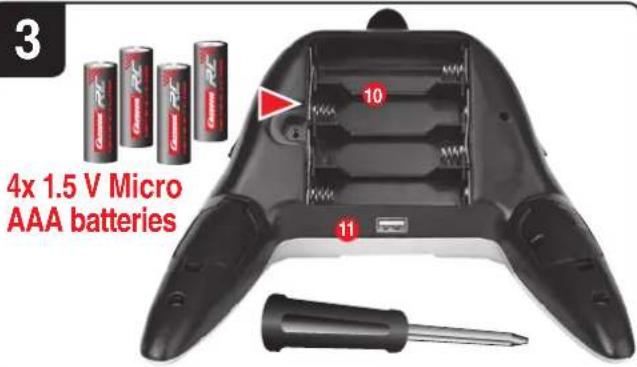
Inserting the batteries in the remote control
3
Open the battery compartment with a screwdriver and insert the batteries in the remote control. Please keep in mind the correct polarity. After having closed the compartment you can check all functions of the remote control with the help of the power-switch on the front.
With the power switch turned ON and functioning correctly, the top centre LED on the remote control will light up red.
When the control LED flashes rapidly, the batteries in the controller must be changed.
Frequency bind between model and remote control
The Carrera RC Quadrocopter and the remote control are frequency bound at purchase. If initially there are any problems with communication between the Carrera RC Quadrocopter and the remote control, please carry out a new frequency bind.
4a
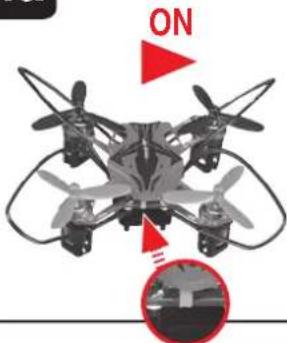
- Switch the model ON at the ON/OFF switch. LEDs on the quadrocopter light up continuously.
- Switch on the controller at the power switch.
- Push the left-hand joystick, i.e. the throttle lever, right to the top, then fully downwards into the zero position.
- The LEDs on the quadrocopter now flash rhythmically. The binding has now been successfully established. The LED on the controller now lights continuously.
4b
- WARNING! Immediately after switching it on, place the Quadrocopter on a flat and level surface. The gyro-system will then set itself automatically.
Range of functions of the remote control
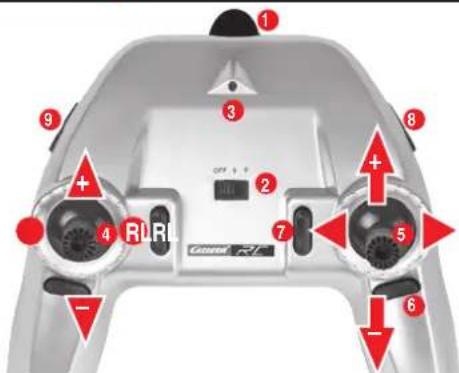
5
- Aerial wer switch (OFF / S / F)
Beginner mode (slow)
Advanced mode (fast)
- Control LED
- Gas
Circling
- Forwards / backwards right / left banking
- Trimmer for right / left banking
- Trimmer for forwards / backwards
- Shoulder button for looping function
- Shoulder button for roll over function
3
- Battery compartment
\$B port
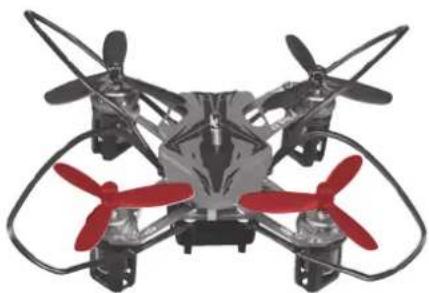
Description of the Quadrocopter
6
- Rotor system
or protection cage
-
ON-/OFF switch
-
Blue LED
- Green LED
7
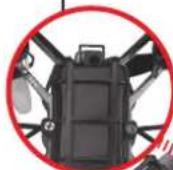
- Charging socket for the Li-Po battery
Choosing the flight area
8
When being prepared for the first flight you should choose a closed room which is as large as possible without any persons or obstacles. Due to its size and controllability, experienced pilots may be able to fly the Quadrocopter in relatively small rooms. For your first flights we strongly recommend you choose a room with a minimum floor space of 3 × 3 metres and 2.40 metres in height. After having trimmed your Quadrocopter for flight and made yourself familiar with the controller and its functions you may start flying in smaller and less open environments.
The Quadrocopter has been developed exclusively for use in enclosed rooms without direct sunlight or any strong spotlighting. There must be no persons or objects such as pillars between the controller and the Quadrocopter to obstruct direct connection.
Checklist for flight preparation
This checklist is not a substitute for the contents of the operating instructions. Although it can be used as a quick-start-guide, we strongly recommend you first to read the operating instructions in detail before you proceed.
- Check the contents of the package.
- Connect the charging unit to the source of power.
- Charge the lipo-battery as described in the section "Recharging the LiPo rechargeable battery".
- Fit four AAA batteries in the controller, making sure their polarity is correct.
- Look for a suitable environment for flying.
- Switch on the model at the ON/OFF switch.
- WARNING! Immediately after switching it on, place the Quadrocopter on a flat and level surface. The gyro-system will then set itself automatically.
- The LEDs on the Quadrocopter now light up continuously.
- Switch on the controller at the power switch. For „Beginner“ mode push the switch to position „S“; for „Advanced“ mode (WARNING! ONLY FOR EXPERIENCED PILOTS!) to „F“. Push the left-hand joystick, i.e. the throttle lever, right to the top, then fully downwards into the zero position.
- Allow the Quadrocopter a few moments until the system is correctly initialised and is ready for operation. The LED in the Quadrocopter now lights continuously. The LED on the controller now lights continuously.
- Repeat the above points as required, if you wish to fly more Quadrocopters at the same time.
- Check the control system.
- Make yourself familiar with the control system.
- Trim the Quadrocopter as necessary as described under 14 15, so that when hovering it no longer moves from the spot without a command from the controller.
• The Quadrocopter is now ready to be flown. - If the Quadrocopter displays no functions, retry the above binding procedure.
- Fly the model.
- Land the model.
- Switch the model off at the power switch
• Always switch off the remote control last.
Flying the 4-channel Quadrocopter
NOTE!
Take care particularly in the first few flights to move the lever on the controller very gently and not over-hurriedly. As a rule, only very small movements of the respective levers are necessary to carry out the desired control commands!
If you notice that the Quadrocopter moves forwards or to the side without your touching the respective lever, please adjust the trim of the Quadrocopter as described in (14 15) .
9
+/- Gas (up / down)
art or to fly higher, push the gas lever on the left cautiously forwards. To land or fly lower, push the gas lever on the left cautiously backwards.
10
To make the Quadrocopter circle to the left or the right on the spot, move the lever on the left cautiously to the left or the right.
11
To fly the Quadrocopter to the left or the right, push the lever on the right cautiously to the left or the right.
12
To fly the Quadrocopter forwards or backwards, push the lever on the right cautiously forwards or backwards.
Beginner mode (S) - ideal for beginners
The Quadrocopter reacts less sensitively to joystick movements.
Advanced mode (F)
The Quadrocopter reacts promptly to movements of the controller.
Looping function
WARNING! ONLY FOR EXPERIENCED PILOTS!
13a
When you press the left shoulder-button, the Quadrocopter performs a rearwards loop-the-loop. Before you do this, make sure you have ample room on all sides (about 2.5 m - 8').
Roll-over function
WARNING! ONLY FOR EXPERIENCED PILOTS!
13b
When you press the right shoulder-button, the Quadrocopter performs a roll-over from left to right. Before you do this, make sure you have ample room on all sides (about 2.5 m - 8°).
Trimming the Quadrocopter
14
When hovering, if the Quadrocopter flies to the left or right without you moving the lever for left / right movement, please proceed as follows:
If the Quadrocopter moves on its own fast or slow sideways to the left, press the lower right trimmer for right / left tilt in steps to the right. If the Quadrocopter moves right, press the trimmer for right / left tilt in steps to the left.
15
When hovering, if the Quadrocopter flies forwards or backwards without you moving the lever for forwards or backwards movement, please proceed as follows:
If the Quadrocopter moves on its own fast or slow forwards, press the upper right trimmer for forwards / backwards in steps downwards. If the Quadrocopter moves backwards, press the trimmer for forwards / backwards in steps upwards.
Changing the rotor blades
16
Use a smooth narrow object to help draw off a rotor blade if necessary. Make sure that you draw the rotor blade with great care vertically upwards, and hold the motor from below to stabilise it.
17
WARNING!
sure to note the marking and colour, also the tilt angle of the rotor blades!
Front left: red - marking "B/C"
Front right: red - marking "A/D"
Rear right: black – marking "B/C"
Rear left: black – marking "A/D"
Troubleshooting
Problem: Remote control does not work.
Cause: The ON/OFF-power switch is turned "OFF".
Solution: Turn the ON/OFF-power switch "ON".
Cause: The batteries have been wrongly inserted.
Solution: Check if the batteries have been correctly inserted.
Cause: The batteries do not have enough power.
Solution: Insert new batteries.
Problem: The Quadrocopter cannot be controlled with the remote control
Cause: The power switch on the reomote control is turned "OFF".
Solution: First turn the power switch on the remote control "ON".
Cause: The remote control is possibly not correctly frequency bound with the receiver on the Quadrocopter.
Solution: Please carry out the binding procedure as described in "Checklist for flight preparation".
Problem: The Quadrocopter does not lift.
Cause: The rotor blades rotate too slowly.
Solution: Push the throttle up.
Cause: The battery's power is not sufficient.
Solution: Charge the battery (see chapter "Charging the battery").
Problem: During flight, the Quadrocopter loses speed and height without any obvious reason.
Cause: The battery is too weak.
Solution: Charge the battery (see chapter "Charging the battery").
Problem: The quadrocopter only flies in a circle or turns over on starting.
Cause: Rotor blades incorrectly fitted or damaged.
Solution: Fit rotor blades / replace rotor blades as described in 16 17.
For the latest version of these operating instructions and information on replacement and spare parts available, please visit carrera-rc.com in the service area.
Errors and changes excepted
Colours / final design – changes excepted
Technical changes and design-related changes excepted
Pictograms = symbolic photos
Chère cliente ! Cher client !
Beginner-modus (Slow)
Advanced-modus (Fast)
- Controle-led
- Gas
Rotatie
- Vooruit/achteruit
Rechts/links hellen
- Blauwe led
- Groene led
7
Vooraan links: rood – marking 'B/C'
Vooraan rechts: rood – marking 'A/D'
-
ON/OFF-knapp
-
Blá LED
-
Grön LED
7
1 x Quadrocopter jain
1 x USB-latausjohto
Lade opp LiPo-akkumulator
Beginner modus (Slow)
Advanced modus (Fast)
- Kontroll LED-lampe
- Gass
sirkeldreining
- Frem/tilbake
“+”/”-” gass (opp/ned)”
1 Science Museum Road,
Tsimshatsui East
Kowloon Hong Kong
Phone ++852 2722 0620
Fax ++852 2367 0792
Internet www.carrera-rc.com
USA/CANADA/MEXICO
Carrera of America Inc.
2 Corporate Drive
Cranbury,
NJ08512,
USA
Phone ++1 609 409 8510
Fax ++1 609 409 8610
Email reception®
carrera-toys.com
Internet www.carrera-rc.com
BENELUX
Stadlbauer Marketing +
Vertrieb GmbH
Landsheerlaan 33
NL-6114 MP Susteren
Email service.benelux@
carrera-toys.com
Internet www.carrera-rc.com
FRANCE
Stadlbauer Marketing +
Vertrieb GmbH
21 B. Route Nationale
53-609 Wroclaw · Poland
Phone ++48 71 359 46 19
Fax ++48 71 359 46 21
Email jbojda@rekman.com.pl
SPAIN/PORTUGAL
Stadlbauer Iberia SLU
C/Fluvia, 97, 1º 1º
08019 Barcelona · Spain
Phone ++34 93 303 63 35
Email contacto@carrera-toys.com
Internet www.carrera-rc.com
CARRERA RC DISTRIBUTORS
AUSTRALIA
Zimbler Pty Ltd.
Heideberg Road
Ivanhoe, Victoria 3079
Australia
Phone ++6138481 1000
Fax ++61394972311
Email sales@zimbler.com.au
Internet www.zimbier.com.au
BULGARIA
Ivantchev Ltd.
78a, Maria Luiza Blvd.
BG-1202 Sofia
Phone ++359 283 22020
Fax ++359 283 22020
Email kivanchev@del.bg
CHINA
Shanghai Wowgame Commercial
Company Ltd.
Room 110, Tower 1,
German Centre, 88 Keyuan Road,
(Zhangjiang Hi-Tech Park).
Pudong, Shanghai, (Zip: 201203)
China
Phone ++86 21-53821692
Mobile ++86 15577449439
Email eddychan@wowgame.com.cn
Internet www.wowgame.com.cn
CZECH REPUBLIC
ConQuest entertainment a.s.
Hloubetinska 11
CI-198 00 Praha 9 - Hloubetin
Phone ++420 284 000 175
Fax ++420 284 000 101
Email radim.kalo@conquest.cz
Chun Lee (China) Industrial Limited
RM. 1801-5, 18/F.
King Palace Plaza,
52A Sha Tsui Road, Tsuen Wan,
N.T. Hong Kong
Email eddychan@yu-lee.com
Mobile ++ 852 9103 6679
INDIA
Karma Solutions
- Swastik Society, 2A,
Pace House · Vile Parle (W).
Mumbai - 400056
Maharashtra
India
Phone ++91 22 26104497
Fax ++91 22 26104497
Mobile ++91 9920075400
Email karmasolutions7@
gmail.com
Internet www.karma-toys.com
ISRAEL
TOP PLAY ISRAEL (T.P.I.) LTD
Simtat Atavor Str. 8A - Industrial Zone
Segola - Petach Tikva, post 49691
Israel
Phone ++972 3 9323767
Fax ++972 3 9086074
Mobile ++972 52 8338966
Email top-play@012.net.il
Internet www.TopPlay-toys.com
LEBANON
F. AOUAD
Pobox1565 Jounieh Lebanon
Twin Towers Building Blk A
Sarba High Way
Jounieh · Lebanon
Phone ++961 3 840505
Fax ++961 9 635473
Email fawad@dm.net.lb
NEW ZEALAND
F W Cave Ltd.
15 Old North Road
PO Box 278
Kumeu 0841
Auckland · New Zealand
Phone ++64 9 415 7766
Fax ++64 9 415 7099
Email sales@fwcave.co.nz
Internet www.fwcave.co.nz
ROMANIA
Seven Springrom srl.
Piata 22 Decembrei nr. 18
RO 610007 Piatra Neamt, jud. Neamt
Phone ++40-233-221117
Email office@seventoys.ro
Internet www.seventoys.ro
RUSSIA
Unitoys MSK Ltd.
Mnewniki Street 7, Building 2
RU-123308, Moscow
Phone ++7 495 276 0286
Fax ++7 499 946 4616
Email office@unitoys.ru
Internet www.unitoys.ru
SERBIA/MONTENEGRO
Cool Play d.o.o.
Zivka Davidovica 13
Email office@coolplay.rs
SWITZERLAND
Waldmeier AG
Neustrasse 50
CH-4623 Neuendorf
Phone ++41 62 387 98 18
Fax ++41 62 387 98 20
Email info@waldmeier.ch
The Hobby Company Ltd.
Garforth Place, Knowlhill
Milton Keynes MK5 8PG·UK
Phone ++44 1908 209 480
Fax ++44 1908 235 900
Email enquiries@hobbyco.net
Internet www.hobbyco.net
UNITED ARAB EMIRATES
Toyworld Distributor
P.O. Box 289, Gibca Building
Al Wahda Street, Sharjah
United Arab Emirates
Phone ++971 6 533 7418
Fax ++971 6 533 6682
Email toyworld@faisalholding.net