Esprit Australe Ez - Speaker TRIANGLE - Free user manual and instructions
Find the device manual for free Esprit Australe Ez TRIANGLE in PDF.

User questions about Esprit Australe Ez TRIANGLE
0 question about this device. Answer the ones you know or ask your own.
Ask a new question about this device
Download the instructions for your Speaker in PDF format for free! Find your manual Esprit Australe Ez - TRIANGLE and take your electronic device back in hand. On this page are published all the documents necessary for the use of your device. Esprit Australe Ez by TRIANGLE.
USER MANUAL Esprit Australe Ez TRIANGLE
MANUFACTURE ELECTROACOUSTIQUE
ESPRIT Ez
natural_image
Line drawing of a multi-tiered speaker tower with circular speakers and control panel (no text or symbols)Mode d'emploi & Garantie / Owner's manual & Warranty

TRIANGLE
MANUFACTURE ELECTROACOUSTIQUE
Congratulations on purchasing your new Triangle products. We want you to enjoy your purchase to the fullest. The first step is an easy registration of your products. By doing this, you will benefit from helpful tips, products support and special offers and 5 Years extended warranty.
1- Online Registration
Register your product easily online at the following address:
http://register.trianglehifi.com/
2- Warranty Card
You can also register your product and validate your warranty by filling the warranty card and send it to:
TRIANGLE DISTRIBUTION FRANCE
41 Rue Borie
33300 Bordeaux France
Your TRIANGLE loudspeaker is warranted for 5 years. This warranty is valid for a period of 2 years on amplifier of subwoofer. This warranty takes effect from the date of purchase and covers any manufacturing defect or damage your loudspeaker could suffer as a result of these very same defects. This warranty is granted solely to the first user of the product, and is not transmittable in the case of resale. To validate your warranty, you will need to register online or mail the warranty coupon to TRIANGLE. Please note, this warranty is voided if any fault arises from ill-treatment or careless handling of the product.
Sont exclus de la garantie / The following are not guaranteed:
Garantie / Warranty (p. 5)
User Manual - English (p. 16)
- Technical information (p. 15)
- Pedestal assembly for Ez range (p. 16)
- Unpacking & connecting (p. 20)
- Stereo & Home Cinema positionning p. 21)
- Choosing the amplifier (p. 23)
natural_image
Line drawing of a tall rectangular electronic device with three circular cutouts and a base platform (no text or symbols)text_image
Technical diagram of a mechanical assembly with numbered components and mounting holestext_image
Technical diagram of a table with four labeled components and a dashed line indicating a reference or alignment point.natural_image
Simple line drawing of a table with six circular components and a numbered label (1) pointing to one corner, no text or symbols present.natural_image
Simple line drawing of a rectangular plate with four circular holes and a small triangular symbol at the bottom (no text or labels)X4X4 X1X1X4
natural_image
Line drawing of a vertical cylindrical device with three circular cutouts and a speaker grille, placed on a flat base (no text or symbols)text_image
Technical diagram of a mechanical assembly with numbered parts and labeled featuresnatural_image
Line drawing of a simple electrical cabinet with circular components and a vertical panel (no text or symbols)text_image
5mm 5mm 25mmtext_image
Technical diagram showing a mechanical component with labeled parts and a screw assembly, including numbered annotations.text_image
Diagram of a room layout with numbered sound equipment and display units, likely for audio or audio experiment setup.MANUFACTURE ELECTROACOUSTIQUE
ESPRIT Ez
natural_image
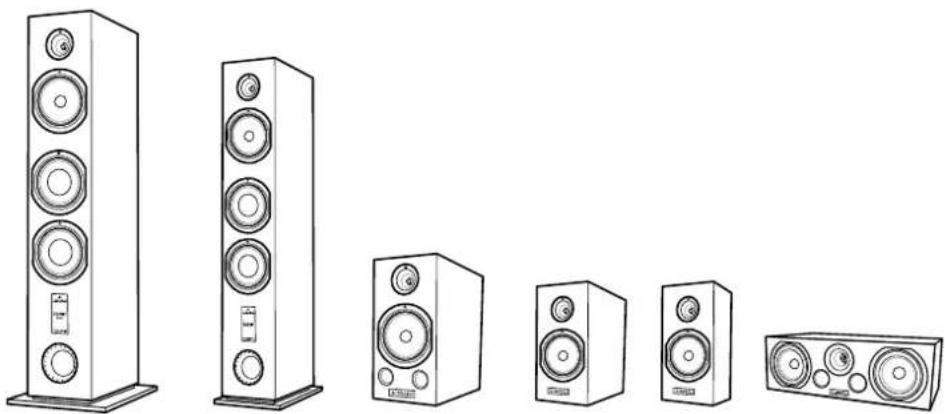
Line drawing of a multi-tiered speaker system with no text or symbols| Spécifications TechniquesTechnical Specifications | Antal Ez | Gaïa Ez | Comete Ez | Titus EZ | Heyda Ez | Voce EZ |
| Type | Bass reflex | Bass reflex | Bass reflex | Bass reflex | Clos / Sealed | Bass reflex |
| Nombres de volesSystem Format | 3 3 2 | 2 | 2 | 2 | ||
| SensibilitéSensitivity (dB/W/m) | 92 | 89,5 | 90 | 90 | 90 | 91 |
| Bande passanteFrenquency Response (+/-3dB Hz-KHz) | 40-22 | 47-22 | 49-22 | 55-22 | 75-22 | 60-22 |
| Puissance admissiblePower handling (W Rms) | 120 | 90 | 80 | 60 | 60 | 80 |
| Impédance minimumMinimal impedance (ohms) | 3 | 3,3 | 4,2 | 3,8 | 3,8 | 5,3 |
| Dimensions ébénisterie (WxDxH mm)External Dimensions (WxDxH inch) | 200 x 345 x 10907,87 x 13,59 x 42,91 | 168 x 276 x 9626,61 x 10,87 x 37,58 | 200 x 324 x 4007,87 x 13,76 x 15,75 | 168 x 267 x 3056,21 x 10,51 x 12 | 169 x 161 x 3056,21 x 6,34 x 12 | 510 x 290 x 16820,08 x 11,42 x 6,21 |
| Dimensions ébénisterie avec pied (W*D*H mm)External Dimensions with pedestal (WxDxH inch) | 300 x 400 x 111511,81 x 15,75 x 43,9 | 230 x 315 x 9809,06 x 12,4 x 38,58 | 200 x 324 x 4087,87 x 12,76 x 16,06 | 168 x 267 x 3136,21 x 10,51 x 12,32 | - | 510 x 290 x 17620,08 x 11,42 x 6,93 |
| Poids de l'enceinte (Kg)Net Weight (lbs) | 2759,4 | 18,139,82 | 9,320,46 | 5,912,98 | 4,5510,01 | 9,520,9 |
| Poids avec le packaging (Kg)Gross Weight (lbs) | 31,870 | 21,246,64 | 20,620,46 | 13,529,7 | 10,322,66 | 10,823,76 |
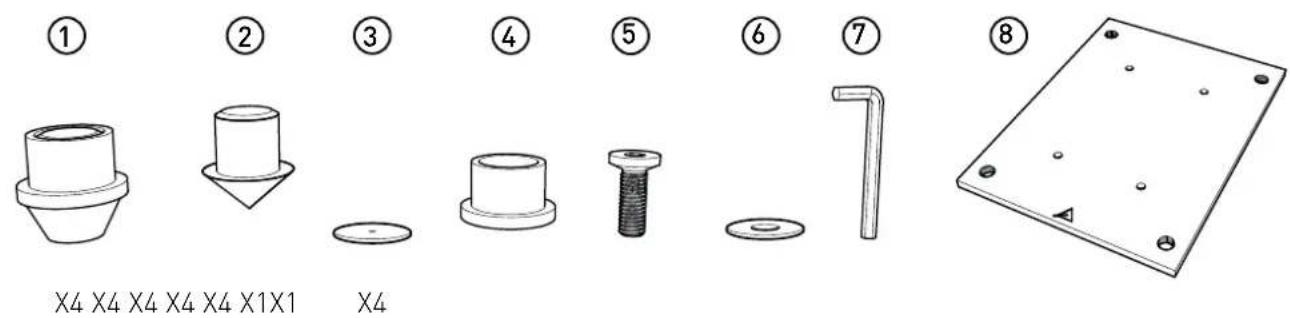
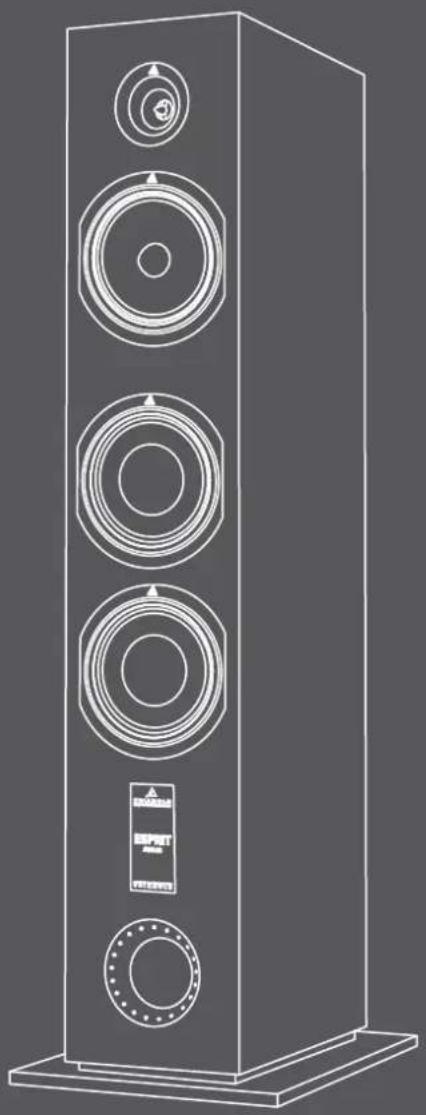
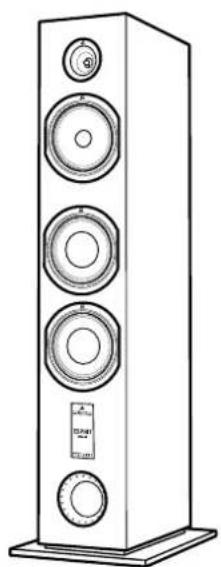
Pedestal assembly
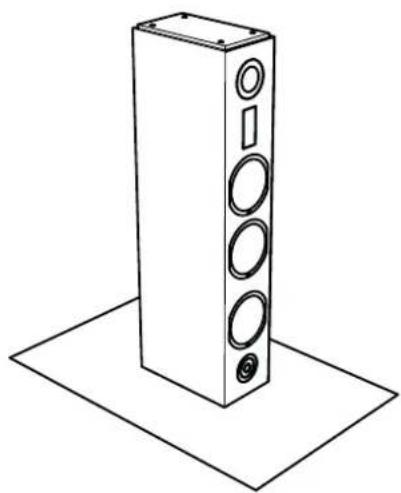
natural_image
Isometric line drawing of a tall rectangular electronic device with three circular cutouts and a base platform (no text or symbols)Step 1- Stand the speaker on the top
(be sure to place it on a non-abrasive surface)

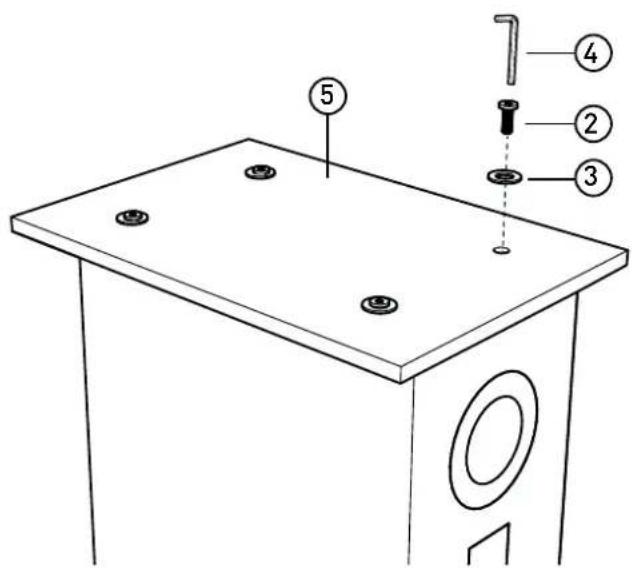
text_image
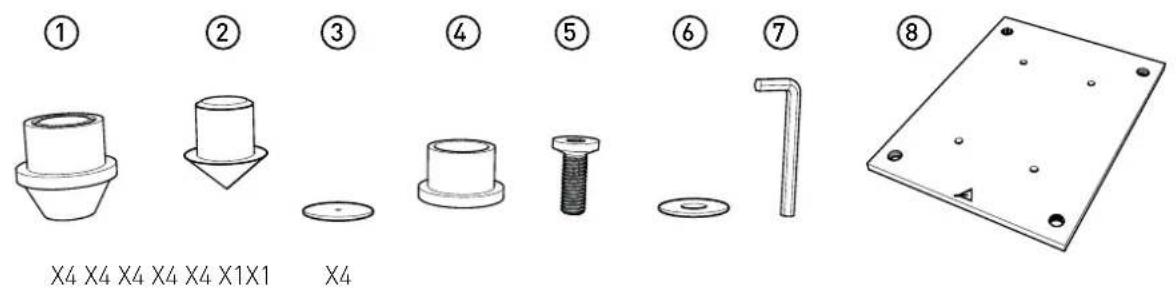
Technical diagram of a mechanical assembly with numbered components and mounting holesStep 2- Secure the pedestal by using the screws and key supplied.
Spike assembly according to your floor
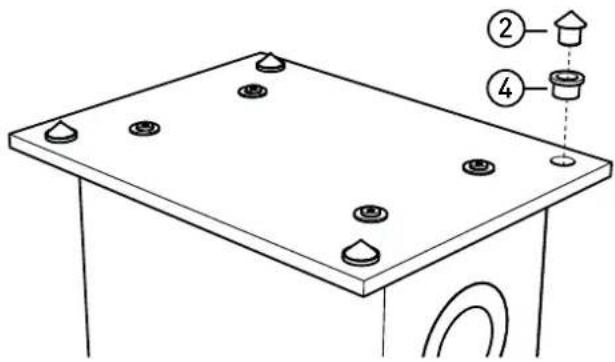
text_image
Technical diagram of a table with four circular components and numbered annotations (②, ④) pointing to specific parts.Metal spike
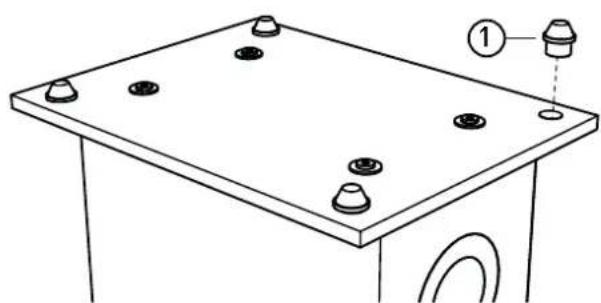
natural_image
Line drawing of a table with six circular components and a numbered label (1) pointing to one corner, no text or symbols present.Rubber spike
Rigid surface(wood floor)Soft ground (carpet, rug
Or
②
③
Step 1- Place the rubber insert in the pedestal ④
Step 2- Placethe metal spike in the rubber insert ②
Step 3- Place the counter spike under the spikes ③ to protect your surface.
Step 1- Mount the rubber insert①
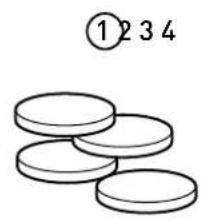
text_image
①234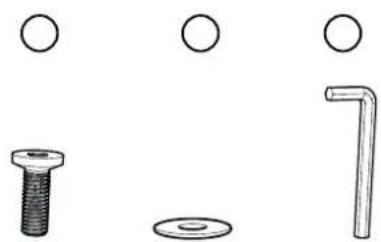
natural_image
Illustration of three different types of metal fixtures: a bolt, a washer, and a bent pipe (no text or symbols present)
natural_image
Simple line drawing of a rectangular plate with four circular holes and a small triangular symbol at the bottom (no text or labels)X4X4 X1X1X1
Pedestal assembly

natural_image
Line drawing of a tall rectangular electronic device with three circular cutouts and a base platform (no text or symbols)Step 1- Stand the speaker on the top
(be sure to place it on a non-abrasive surface)
text_image
Technical diagram of a workbench with numbered parts and mounting holes, likely for assembly or repair instructions.Step 2- Secure the pedestal by using the screws and key supplied.
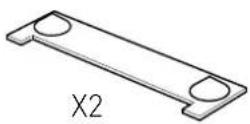
Rubber feet assembly
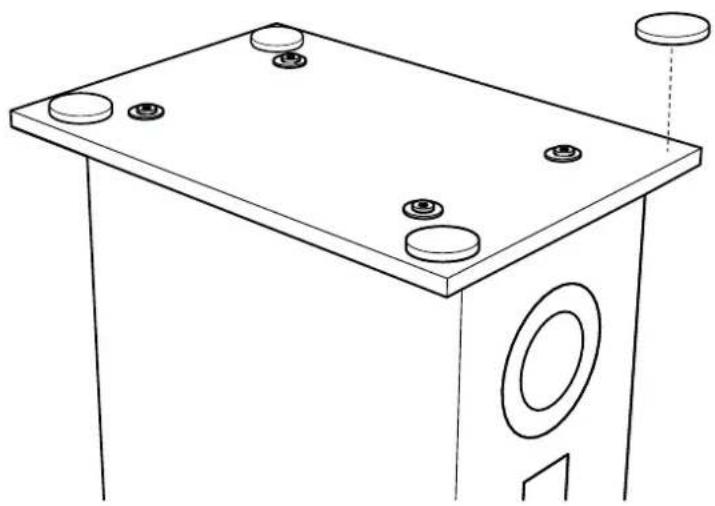
natural_image
Line drawing of a mechanical setup with a rectangular base and circular components, no text or symbols present.Titus & Comete Ez feet assembly
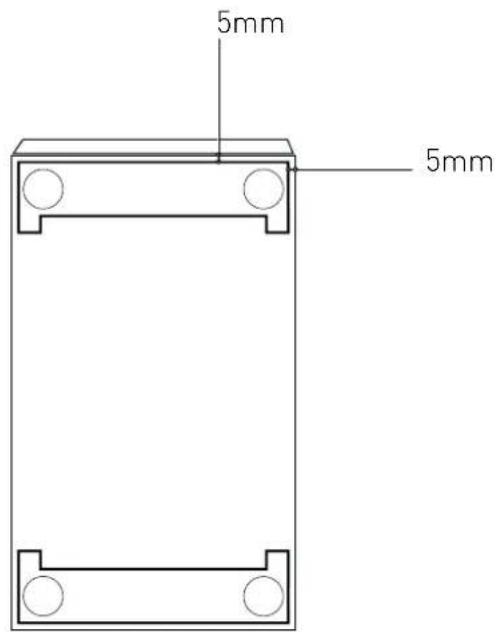
text_image
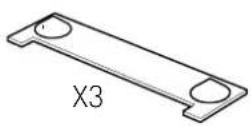
5mm 5mmVoce Ez feet assembly

text_image
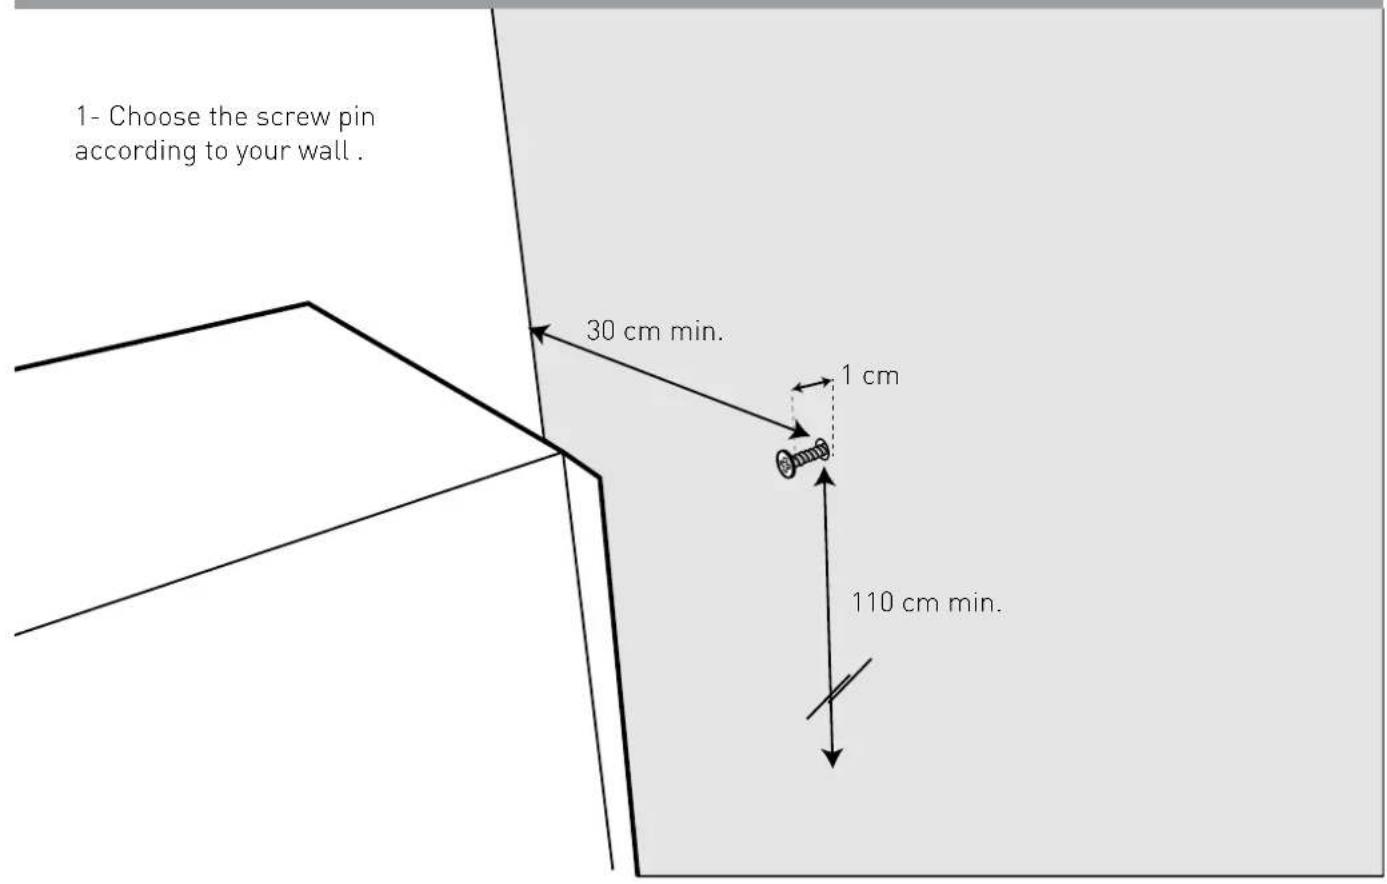
5mm 5mm 25mmHeyda wall mount procedure
text_image
1- Choose the screw pin according to your wall . 30 cm min. 1 cm 110 cm min.2- Rig up the speaker
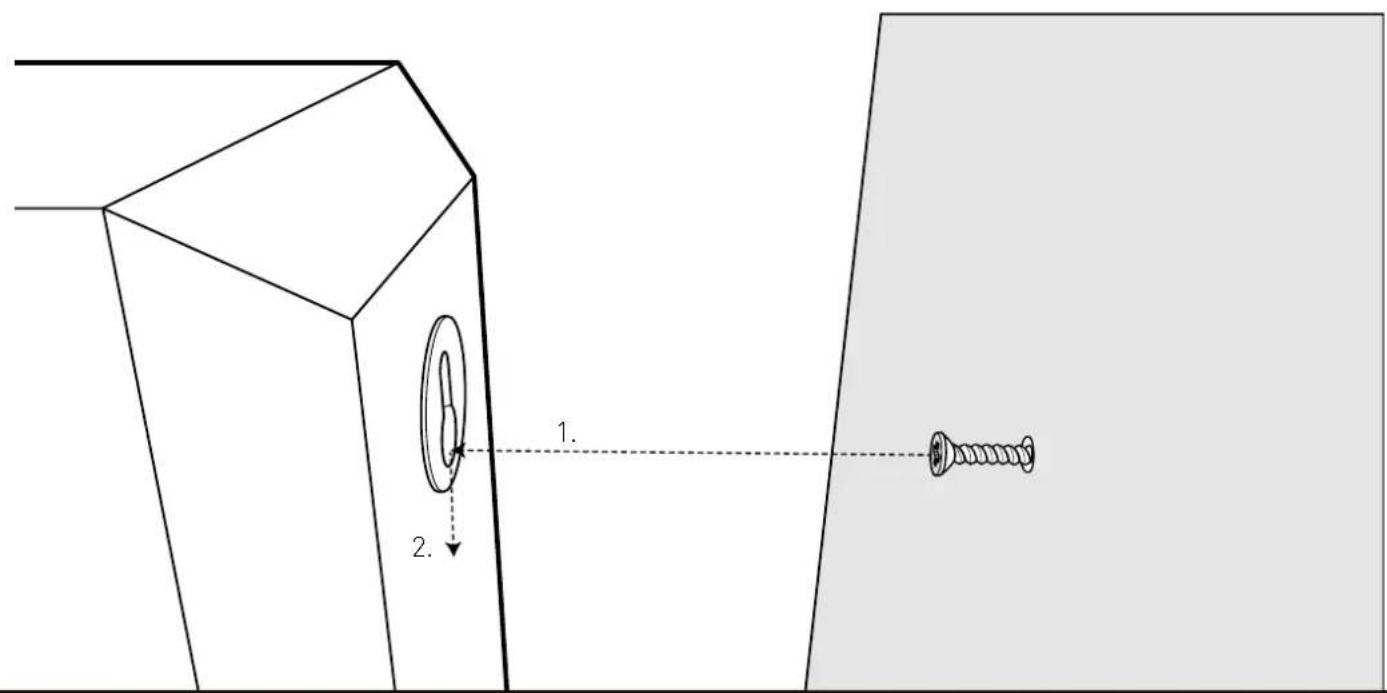
text_image
Technical diagram showing a mechanical component with labeled parts and a screw, illustrating assembly or alignment.Unpacking
Open the box and remove all staples, then carefully take the speaker out of the box. When unpacking, if you notice any defects on any of the drivers or the cabinet, you should contact your dealer.
Before disposing the packaging, check that nothing is left inside.
Connections
For optimal sound reproduction, we suggest that you choose a loudspeaker cable of high quality to connect your amplifier to your TRIANGLE loudspeakers. TRIANGLE's high definition OFC cable will guarantee an excellent result. You should use cables of the same length for the left and right channels and take special care to respect the + and - polarity for each channel.
ATTENTION:
If one of the speakers is placed next to a television, colour settings may be affected by the speaker's magnetism. Keep a minimum distance of 1 m.
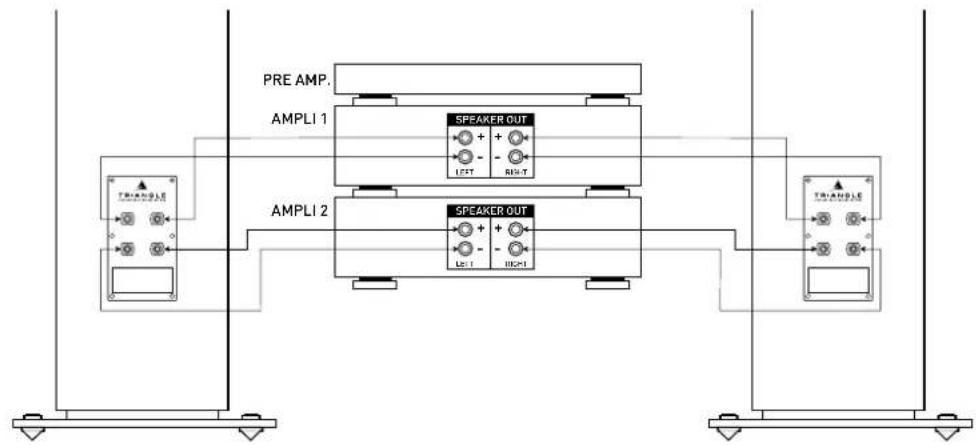
Bi-amplification and bi-wiring for Antal Ez.
For those wishing to improve their listening system further, it is possible to use bi-amplification or bi-wiring.

With bi-amplification, interference between the woofers and other drivers is totally eliminated, as each one is driven by its own amplifier. It is compulsory to use identical amplifiers to conserve the uniformity of the loudspeaker.
To do this, remove the terminal jumpers and use two stereo amplifiers. On the speakers, the upper terminals are the signal inputs for midrange and treble. The lower terminals are the signal inputs for bass. Use one amplifier to feed the bass, and the second for the midrange and treble (see the diagram below).

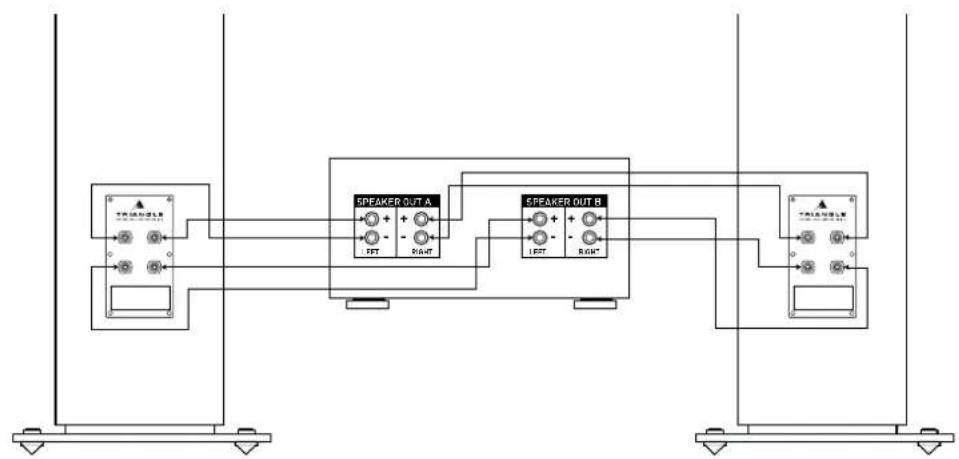
Instead of two amplifiers, you can use a single amplifier if it is equipped with two sets of speakers A and B. Both sets should be selected. This is bi-wiring and not bi-amplification.
A
flowchart
graph TD
    A["PRE AMP."] --> B["AMPLI 1"]
    B --> C["SPEAKER OUT"]
    C --> D["AMP 2"]
    D --> E["SPEAKER OUT"]
    E --> F["AMP 2"]
    F --> G["TRAVOLAS"]
    style A fill:#f9f,stroke:#333
    style B fill:#ccf,stroke:#333
    style C fill:#cfc,stroke:#333
    style D fill:#fcc,stroke:#333
    style E fill:#cff,stroke:#333
    style F fill:#ffc,stroke:#333
    style G fill:#fcc,stroke:#333
B
flowchart
graph TD
    A["Speaker OUT A"] -->|LEFT + Right| B["Speaker OUT B"]
    A -->|LEFT - Right| B
    C["Speaker OUT A"] -->|LEFT + Right| B
    D["Speaker OUT B"] -->|LEFT + Right| B
    E["Speaker OUT A"] -->|THAOUT| F["Output"]
    G["Speaker OUT B"] -->|THAOUT| F
    style A fill:#f9f,stroke:#333
    style C fill:#f9f,stroke:#333
    style D fill:#f9f,stroke:#333
    style E fill:#f9f,stroke:#333
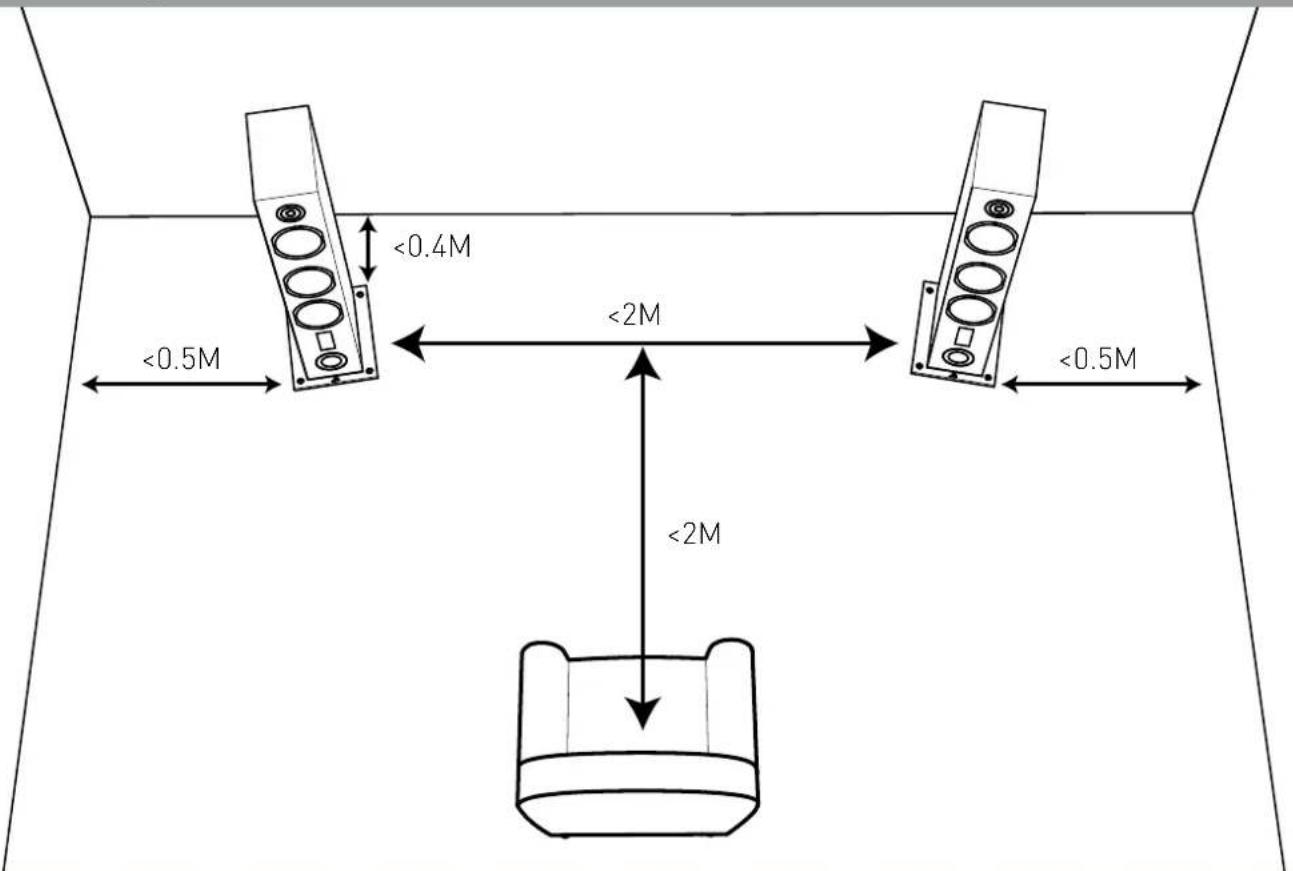
Positioning for stereo
text_image
<0.4M <0.5M <2M <2M <0.5MWhen positioning your loudspeakers, apply the following rules:
- Avoid rooms with too much reverberation, such as tiled rooms without carpets or curtains.
- Your listening position should not be too close to the loudspeakers, leave a minimum of 2m.
- The distance between the speakers should be a minimum of 2m for a good stereo effect.
- If possible, place the speakers so that sound is «diffused» lengthwise within the room.
- Avoid placing the speaker in corners; they should be at least 40 cm away from the back wall and at least 50cm from the sidewalls. Generally, a position close to the rear wall increases the response in the low frequencies (and reduces the imaging) and contrariwise, a position far from the back wall reproduces a wide and deep sound image.
Carry out several test positions to find the best room set-up.
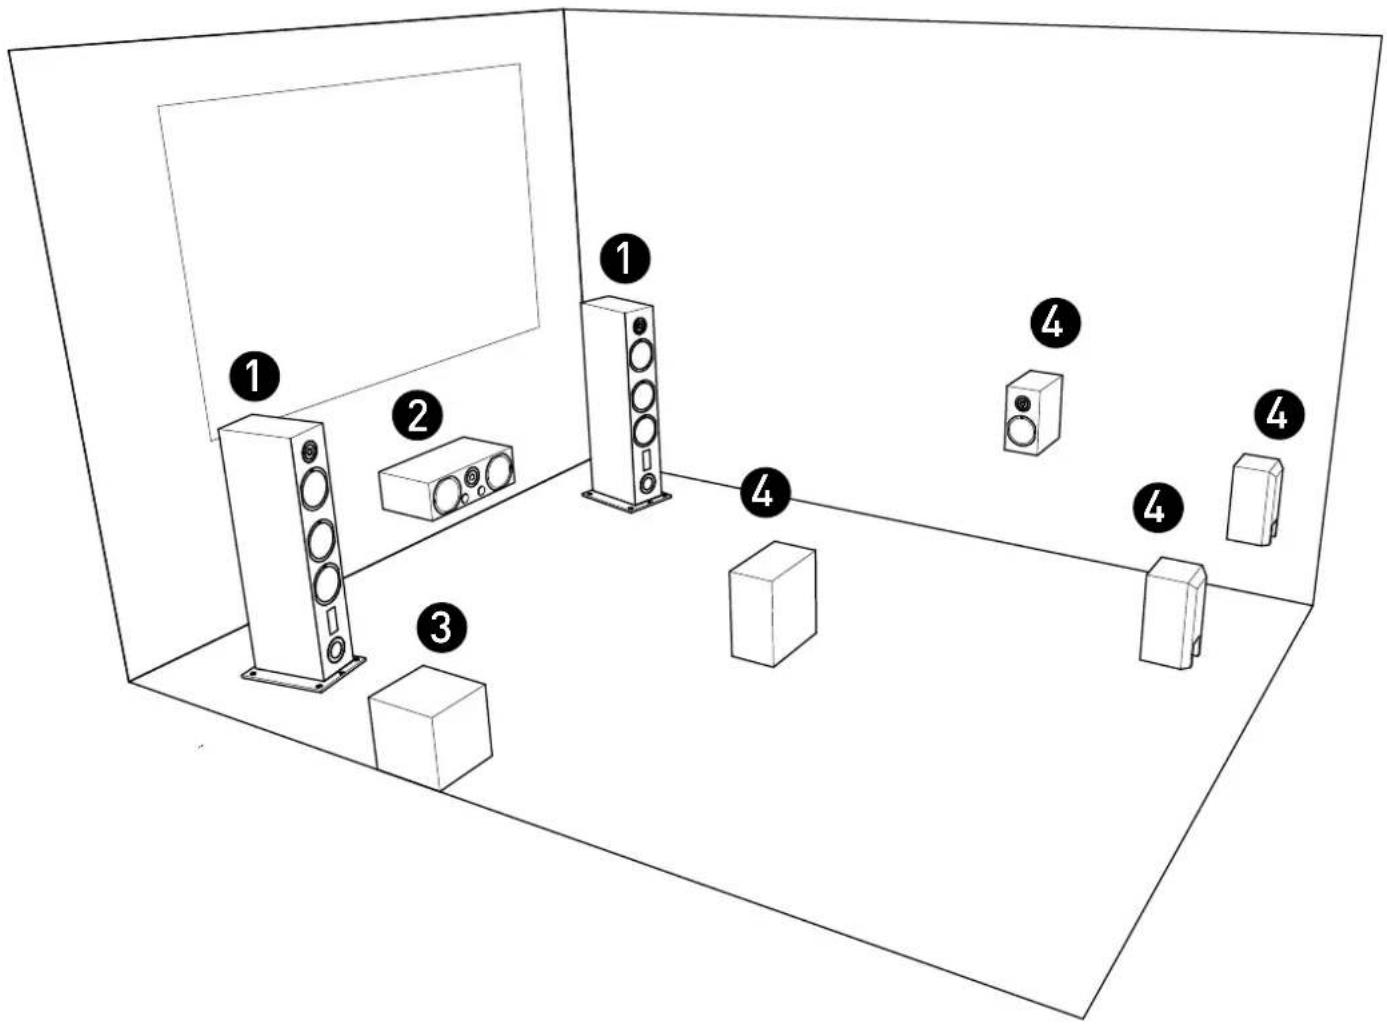
Positioning for Home Cinema
A typical home cinema installation includes:
- Two main speakers, left and right (Antal Ez / Gaïa Ez)
- A centre speaker (Voce Ez)
- One or several subwoofers
- Surround speakers (Comete Ez / Titus Ez / Heyda Ez)
• 5:1 signal: 2 rear speakers
• 6:1 signal: 3 rear speakers
• 7:1 signal: 4 rear speakers
To place the main speakers in the best position, follow the same rules as for a stereo installation (see previous paragraph on stereo positioning).
- The centre speaker should be placed along the line formed by the two main speakers.
- For home cinema setups a subwoofer is highly recommended in order to reproduce the special bass effects channel featured on supports such as DVD audio or video. The positioning of the subwoofer is not critical if you select a crossover frequency below 80Hz. Above this frequency, it is better to move the subwoofer closer to the main speakers. The best position being in between the two main speakers. Ensure that it is not placed in the corner of the room to avoid creating unpleasant resonances.
- We recommend that you place the rear speakers at between 1.5 and 2m of height. Their role is to reproduce surround sound; the listener should not be able to locate them and they should not be placed at ear level. TRIANGLE's rear speakers are supplied with special wall mount accessories. Ensure that you take into account the weight of the speaker when fixing it onto the wall. You will find further instructions for configuring your installation in your A/V amplifier owner's manual.
text_image
Diagram of a room layout with numbered labels indicating different speaker positions or devices, likely for educational or audio testing purposes.Choosing the Amplifier
For optimal results, it is important to choose a good quality amplifier with sufficient power. It is preferable to use a powerful amplifier within reasonable limits, with less risk of distortion, than demanding too much from a less powerful amplifier, which will ultimately clip and seriously risk damaging your loudspeakers. Finally, remember that a volume dial set at medium position does not mean that the amplifier is at «medium» power. It mainly depends on input sensitivity and source output level.
For further information concerning your system, please consult our website:
http://www.trianglehifi.com/

TRIANGLE
MANUFACTURE ELECTROACOUSTIQUE
ESPRIT Ez
natural_image
Line drawing of a multi-tiered speaker tower with multiple speakers and control buttons (no text or symbols)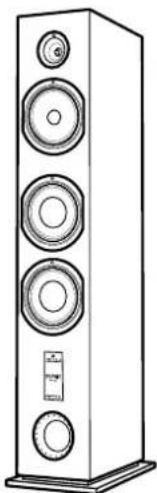
natural_image
Line drawing of a multi-tiered speaker tower with multiple speakers and a control panel (no text or symbols)
Antal Ez