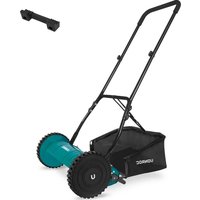
LM508XX - Lawn mower Vonroc - Free user manual and instructions
Find the device manual for free LM508XX Vonroc in PDF.


| Product type | Manual lawn mower |
| Brand | Vonroc |
| Model | LM508XX |
| Cutting width | 400 mm |
| Adjustable cutting height | 15, 25, 31, 35 mm |
| Grass bag capacity | 18 L |
| Weight | 6.9 kg |
| Number of blades | 5 |
| Blade type | Cylinder |
| Bedknife adjustment | Yes, via adjustment nuts |
| Intended use | Domestic lawns, private gardens |
| Assembly required | Yes, by an adult |
| Chassis material | Steel (estimated) |
| Foldable handle | Yes, for wall storage |
| Wall mount included | Yes |
| Safety | Keep people and animals >10 m away; do not use in rain; do not touch blades |
| Cleaning | Damp cloth and mild soap; no solvents |
| Storage | Dry place, out of reach of children |
| Warranty | Parts and labor (legal duration) |
| Spare parts | Use only original Vonroc parts |
Frequently Asked Questions - LM508XX Vonroc
User questions about LM508XX Vonroc
0 question about this device. Answer the ones you know or ask your own.
Ask a new question about this device
Download the instructions for your Lawn mower in PDF format for free! Find your manual LM508XX - Vonroc and take your electronic device back in hand. On this page are published all the documents necessary for the use of your device. LM508XX by Vonroc.
USER MANUAL LM508XX Vonroc
EN Original Instructions
D
E

natural_image
Line drawing of a manual lawn mower with a bucket handle (no text or symbols)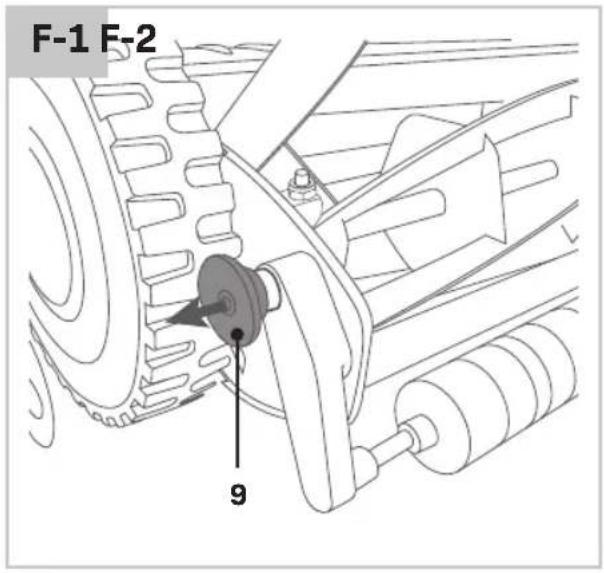
natural_image
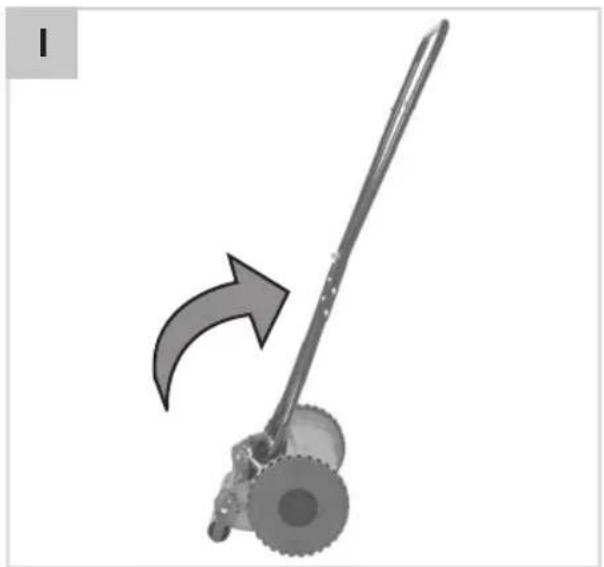
Mechanical tool with a curved arrow indicating motion or change, no text or symbols present
1. SAFETY INSTRUCTIONS
Read the enclosed safety warnings, the additional safety warnings and the instructions. Failure to follow the safety warnings and the instructions may result in electric shock, fire and/or serious injury. Save the safety warnings and the instructions for future reference.
The following symbols are used in the user manual or on the product:

Read the user manual.

Denotes risk of personal injury, loss of life or damage to the tool in case of non-observance of the instructions in this manual.

Caution: Do not touch rotating blades. Sharp blade(s). Beware of severing toes or fingers. Keep bystanders, especially children and pets, at a distance greater than 10m.

Take care when the blades are rotating. Do not put your hands or feet into openings when the machine is running.

Do not use in the rain or leave the mower outdoors while it is raining.

Risk of flying objects.

Keep bystanders away from the work area.

Carefully check the area where the tool is to be used for wildlife and pets. Wildlife and pets may be injured while the machine is in operation. Thoroughly check the working area and remove any stones, sticks, wires, bones and foreign objects. When sing the machine, ensure that no wildlife, pets or small tree stumps are hidden in the dense grass.
SPECIFIC SAFETY INSTRUCTIONS
- Adult assembly required. Due to the presence of small parts during assembly, keep out of reach of children until assembly is complete.
- Read all instructions before assembly and use.
- Assemble strictly in accordance with the instruction.
- Double check to the ensure that all parts of the package contents are intact.
- Never use the mower while people, especially children or pets, are nearby.
- Do not operate the mower when barefoot or wearing open sandals. Always walk never run.
- Thoroughly inspect the area where the mower is to be used and remove all objects, which may be thrown by the machine.
- Working on banks can be dangerous.
- Always be sure of your footing on slopes. Do not mow excessively steep slopes. Mow across the face of slopes, never up and down. Exercise extreme caution when changing direction on slopes.
- Use extreme caution when stepping back or pulling the machine towards you.
- Never mow by pulling the mower towards you.
- Keep all nuts, bolts and screws tightened. Always ensure that the equipment is in a safe working condition.
- Replace worn or damaged parts immediately.
- Keep hands and feet clear of the rotating blades.
- Use caution when adjusting the blades.
2. MACHINE INFORMATION
Intended use
This product is designed for lawnmowing in domestic environments. The lawn mower is intended for private gardens at home. The lawn mower may not be used to trim bushes, hedges or shrubs, to cut scaling vegetation, planted roofs, or balcony-grown grass, to clean (vacuum) dirt and debris off walkways, or to chop up tree or hedge clippings. Moreover, the lawn mower may not be used as a power cultivator to level out high areas such as molehills. The equipment is to be used only for its prescribed purpose. Any other use is deemed to be a case of misuse.
| Model No. LM507XX | |
| Cutting width 300 mm | |
| No. of Cylinder Blades 5 | |
| Cutting height 15-25-31-35 mm | |
| Grass box capacity 14 L | |
| Weight 6.0 kg |
| Model No. LM508XX | |
| Cutting width 400 mm | |
| No. of Cylinder Blades 5 | |
| Cutting height 15-25-31-35 mm | |
| Grass box capacity 18 L | |
| Weight 6.9 kg |
DESCRIPTION
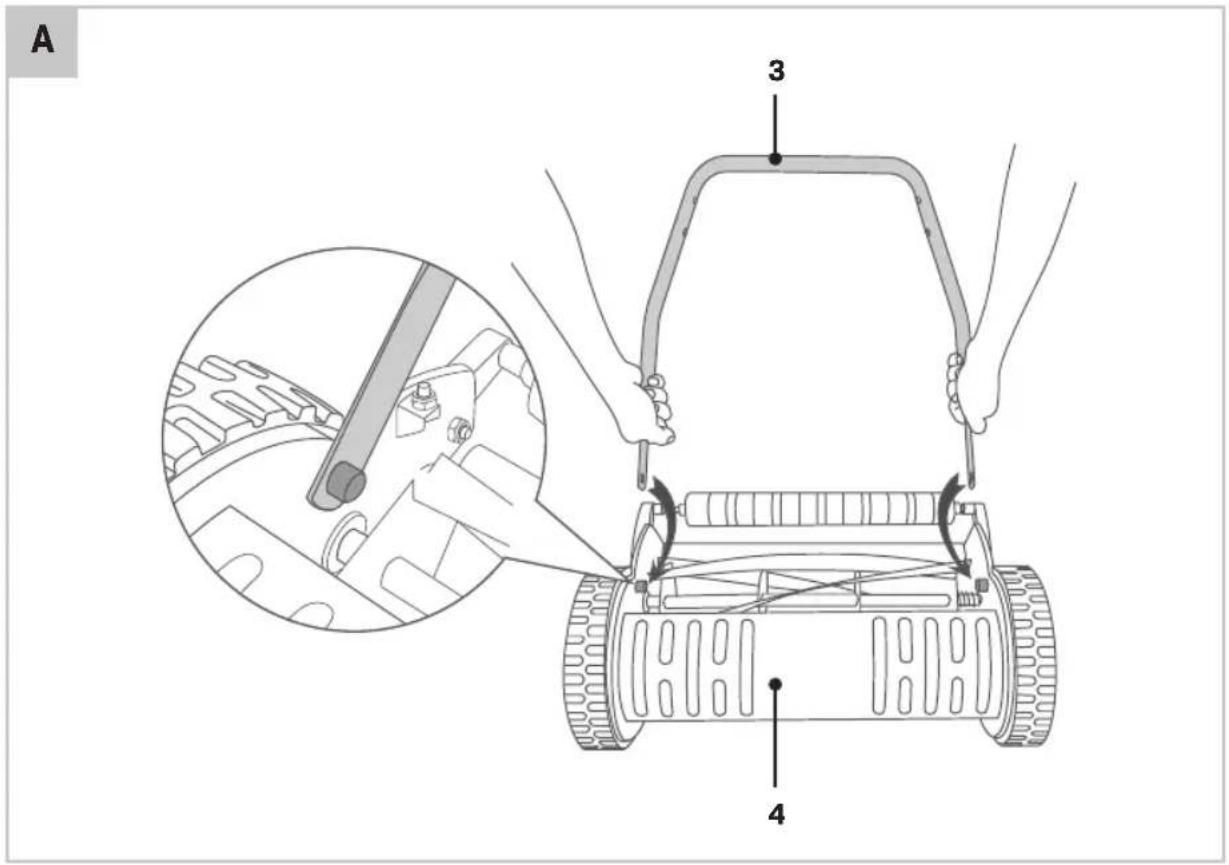
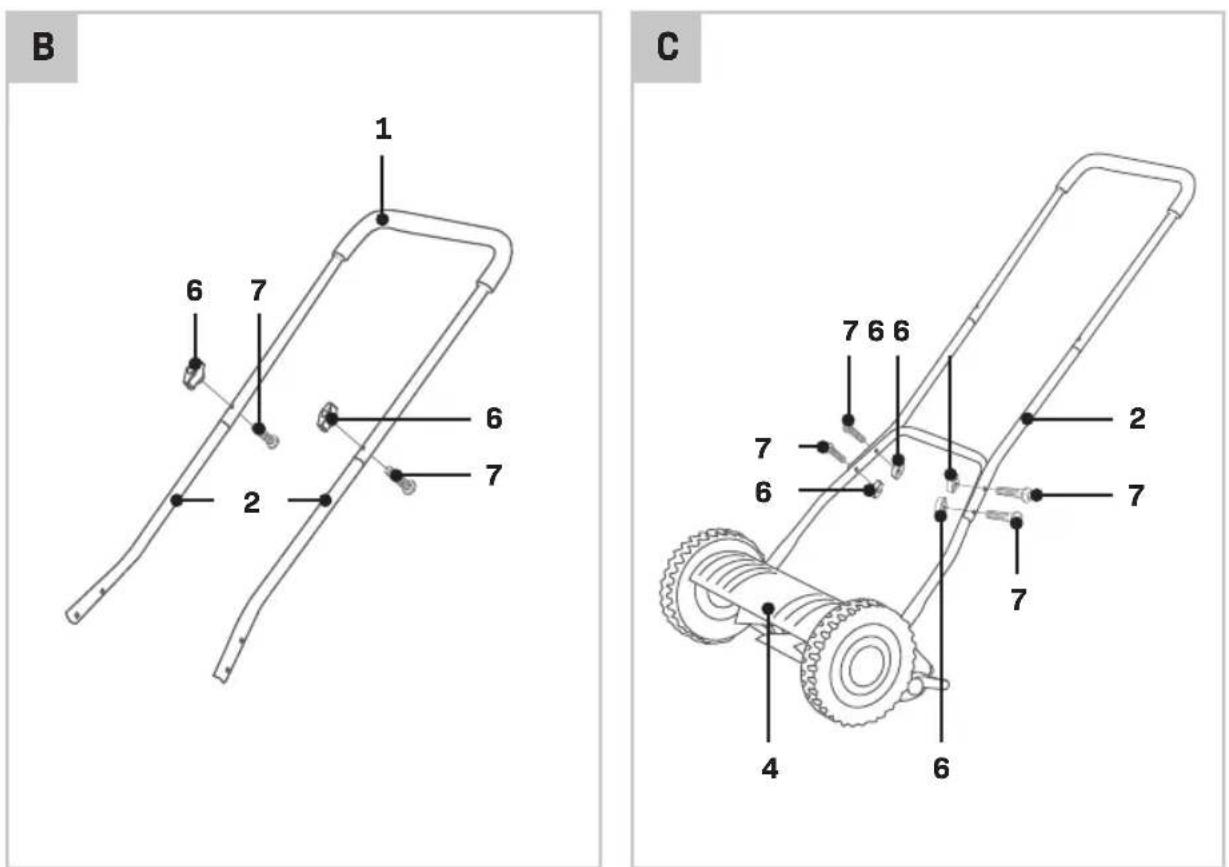
- Upper handle
- Middle handle bar
- Lower handle
- Mower
- Grass catcher
- Knob
- Bolt
- Wall bracket with screws
- Spring-loaded pin
- Counterblade adjustment nut
11.Blade - Counterblade
- Roller
14.Beltbuckle
3. ASSEMBLY
Study each figure and identify the components required with reference to the figure ‘package contents’ and the contents table above.
Attaching the handle (Fig. A, B, C, E)
- Attach lower handle (3) to the mower (4). First attach one side of the handle and gently push the other hole of the lower handle onto the notch on the mower, as shown on figure A.
- Mount the middle handle bars (2) to the upper handle (1), using the bolts (7) and knobs (6), as shown on figure B.
-
Now mount the assembled upper and middle handle onto the lower handle, using the bolts (7) and knobs (6), as shown on figure C.
-
A properly assembled lawn mower can be seen on figure E.
Assembling the grass catcher
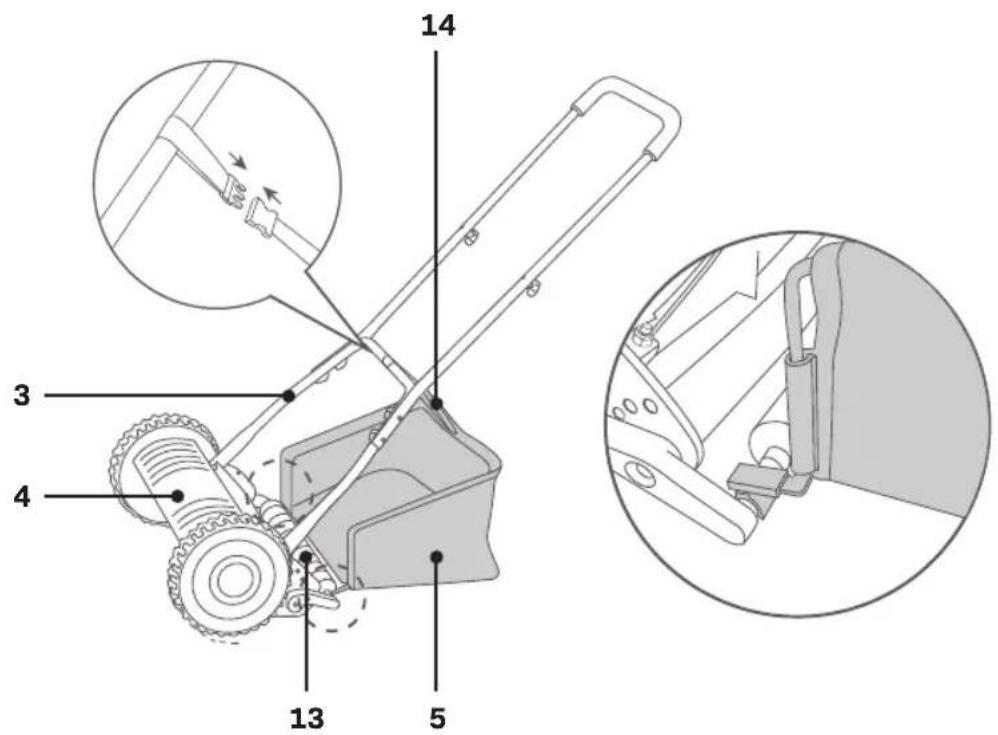
- Ensure the metal bar frame is pre-assembled properly into the grass catcher (5).
- Snap the plastic clamps on the side of the grass catcher (5) onto the side bars of the metal frame.
- Snap the plastic clamps on the bottom of the grass catcher (5) onto the lower bar of the metal frame.
Attaching the grass catcher to the lawn mower (Fig. D)
- Attach the assembled grass catcher (5) to the roller (13), as shown on figure D.
- Secure the grass catcher (5) to the mower by attaching the belt buckle (14) to the lower handle bar (3), as shown on figure D.
4. OPERATION
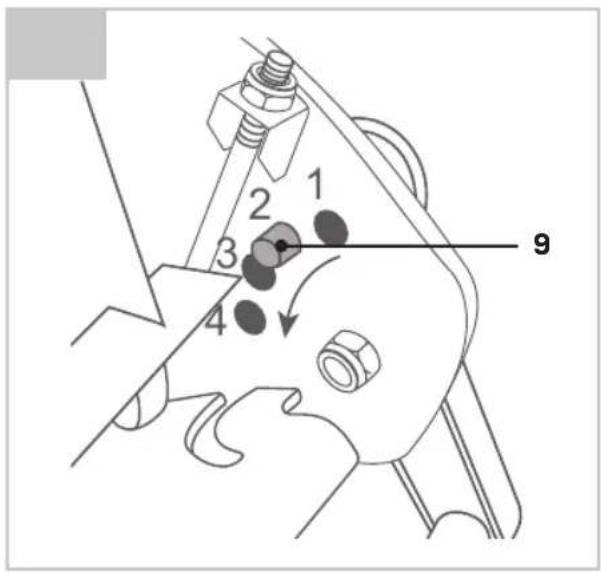
Adjusting the cutting height (Fig. F)
The cutting height can be set on respectively 15-25-31-35 mm height. To adjust the cutting height:
- Pull the spring-loaded pins (9) outwards on both sides of the mower (4).
- Adjust to the desired cutting height, which is indicated on the mower.
- Now release the spring-loaded pins (9), ensuring that they are properly seated into the destined holes in the mower housing. Note: both sides must always be set to the same height.
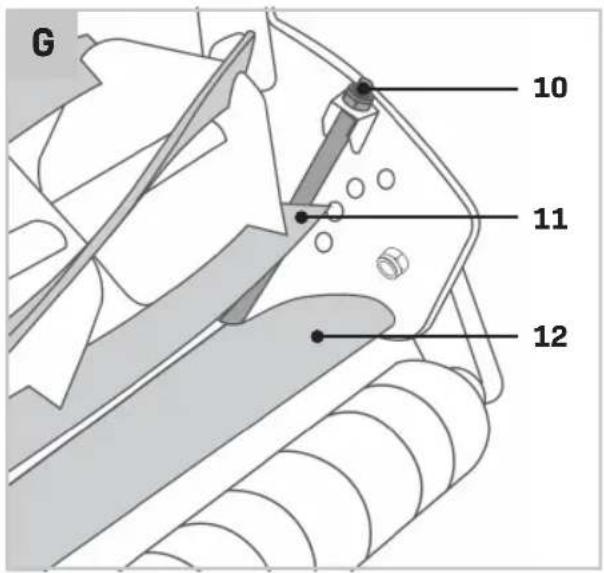
Re-adjusting the blade mechanism (Fig. G)
Always wear gloves when handling or working near the sharp blades.
The cutting mechanism is carefully adjusted at the factory. Readjustment might be required, for example after prolonged use. Only readjust if one or more of the following conditions are met:
- The cutting results appear rough and uneven and some blades of grass are not cut (the distance between the counter blade and mower spindle is too large);
- Heavy resistance when pushing the mower or even impossible to push;
- The mower blade mechanism makes loud noises or does not rotate because it rubs or catches against the counter blade.
To readjust the blade mechanism:
- First check the counterblade (12) and mower blade (11) for notches/dents. It might be necessary to remove these with a grindstone.
- To reduce the distance between the counterblade (12) and the mower blade (11), turn the counterblade adjustment nut (10) clockwise. Turn the counterblade adjustment nut (10) counterclockwise to increase the distance.
- Adjust both counterblade adjustment nuts (10) until the mower blade (11) lightly brushes the entire length of the counterblade (12).
- Insert a piece of paper (e.g. A4 paper) between the counterblade (12) and the mower blade (11).
- Now lightly tighten both counterblade adjustment nuts (10) clockwise a little at a time until the mower blade (11) cuts the paper evenly across the whole blade length.
Note: the blade (11) and counter-blade (12) act like a pair of shears.
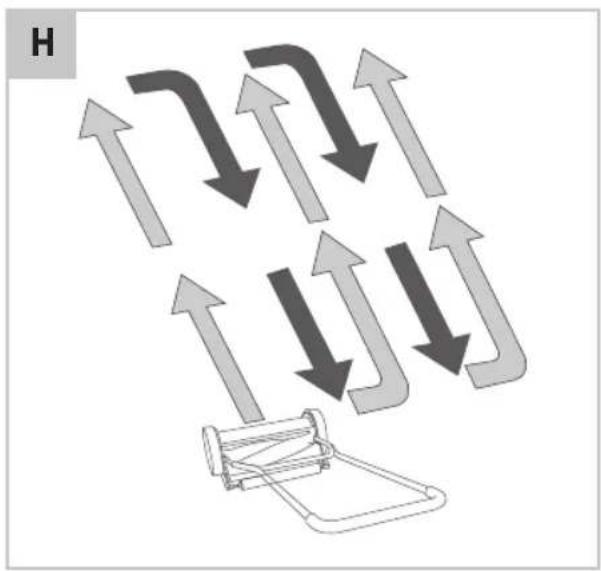
Proper use (Fig. H)
- For best results, place the lawnmower on the edge of the lawn and mow in the forward direction. Then turn at the end of each run and mow in the opposite direction, slightly overlapping the previously cut strip. Also refer to figure H.
- Make sure that the lawn is clear of stones, sticks, wire or other objects that could damage the product or its product.
- Do not cut wet grass because it tends to stick to the underbody of the product, preventing the proper discharge of grass clippings, and it could also cause you to slip and fall.
- Never cut off more than one-third of the total length of the grass for a healthy lawn. In the autumn, lawns should only be cut as long as there is growth.
- Circle around flower beds. When reaching a flower bed in the middle of the lawn, cut a row or two around the circumference of the bed.
- Pay special attention when changing direction.
- Always mow along inclines (not up and down). You can prevent the lawn mower from slipping down by holding a position at an angle upwards.
- Select the cutting height according to the length of the grass. Make several passes to prevent that too much grass is cut at one time.
- Empty the grass box regularly.
Storage (Fig. I, J)
Store the machine in a secure, dry place out of the reach of children. Do not place other objects on top of the machine.
- To store the lawn mower, fold the handle forwards as shown on figure I.
- A wall bracket (8) is included with the delivery to mount the folded lawn mower onto a wall when preferred. Use the provided screws to mount the wall bracket. Use appropriate wall plugs if necessary.
5. MAINTENANCE
Your mower has been designed to operate over a long period of time with minimum of maintenance. Continuous satisfactory operation depends upon proper mower care and regular cleaning.
- Keep the mower clean and dry.
- Regularly use a blunt scraper to remove grass and dirt from the mower
- To clean the mower, use only mild soap and a damp cloth. Never let any liquid get inside the tool and never immerse any part of the tool into liquid. Do not use any abrasive or solvent - based cleaner.
Stop the blade(s) if the machine has to be tilted for transportation when crossing surfaces other than grass, and when transporting the machine to and from the area to be used.
Replace worn or damaged parts for safety. Use only genuine replacement parts and accessories.
WARRANTY
VONROC products are developed to the highest quality standards and are guaranteed free of defects in both materials and workmanship for the period lawfully stipulated starting from the date of original purchase. Should the product develop any failure during this period due to defective material and/or workmanship then contact VONROC directly.
The following circumstances are excluded from this guarantee:
- Repairs and or alterations have been made or attempted to the machine by unauthorized service centers;
- Normal wear and tear;
- The tool has been abused, misused or improperly maintained;
- Non-original spare parts have been used.
This constitutes the sole warranty made by company either expressed or implied. There are no other warranties expressed or implied which extend beyond the face hereof, herein, including the implied warranties of merchantability and fitness for a particular purpose. In no event shall VONROC be liable for any incidental or consequential damages. The dealers remedies shall be limited to repair or replacement of nonconforming units or parts.
The product and the user manual are subject to change. Specifications can be changed without further notice.
2. INFORMATIE OVER HET APPARAAT
Bedoeld gebruik

- SAFETY INSTRUCTIONS
- SPECIFIC SAFETY INSTRUCTIONS
- MACHINE INFORMATION
- Intended use
- DESCRIPTION
- ASSEMBLY
- Attaching the handle (Fig. A, B, C, E)
- Assembling the grass catcher
- Attaching the grass catcher to the lawn mower (Fig. D)
- OPERATION
- Adjusting the cutting height (Fig. F)
- Re-adjusting the blade mechanism (Fig. G)
- Proper use (Fig. H)
- Storage (Fig. I, J)
- MAINTENANCE
- WARRANTY
- INFORMATIE OVER HET APPARAAT
- Bedoeld gebruik
Brand : Vonroc
Model : LM508XX
Category : Lawn mower