
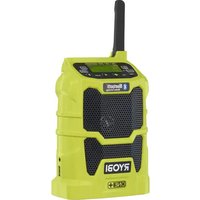
One+ PCL601 - Radio RYOBI - Free user manual and instructions
Find the device manual for free One+ PCL601 RYOBI in PDF.

| Product Type | Hybrid Stereo Radio |
| Brand | RYOBI |
| Model | One+ PCL601 |
| Power Supply | 18 V Li-ion battery (ONE+) or 120 V~, 60 Hz mains |
| Operating Modes | FM, Bluetooth |
| USB Charging Port | Dedicated, up to 2 A |
| Display | LED Display |
| Equalizer | Bass+, Treble+, Hi-Fi, Voice |
| FM Presets | 10 stations |
| Bluetooth Connection | Range of about 10 m (without obstacles) |
| Speaker Connection | INTERCONNECT button (primary/secondary mode) |
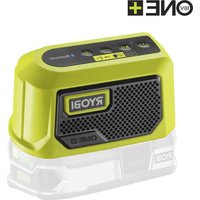
| Storage System | LINK compatible (tool box, wall rail) |
| Double Insulation | Yes, Class II |
| Auto Power Off | After 30 minutes of inactivity |
| Maintenance | Clean with a dry cloth; do not use solvents |
| Spare Parts and Repairs | RYOBI authorized center, phone 1-800-525-2579 |
Frequently Asked Questions - One+ PCL601 RYOBI
User questions about One+ PCL601 RYOBI
0 question about this device. Answer the ones you know or ask your own.
Ask a new question about this device
Download the instructions for your Radio in PDF format for free! Find your manual One+ PCL601 - RYOBI and take your electronic device back in hand. On this page are published all the documents necessary for the use of your device. One+ PCL601 by RYOBI.
USER MANUAL One+ PCL601 RYOBI
WARNING: To reduce the risk
of injury, the user must read and understand the operator's manual before using this product.
SAVE THIS MANUAL FOR FUTURE REFERENCE
TABLE DES MATIÈRES
****************************************************************************************
IMPORTANT SAFETY INSTRUCTIONS

WARNING!
READ THESE INSTRUCTIONS. Failure to follow all instructions listed below, may result in electric shock, re and/or serious personal injury.
KEEP THESE INSTRUCTIONS HEED ALL WARNINGS FOLLOW ALL INSTRUCTIONS
■ Do not use this apparatus near water.
■ Clean only with dry cloth.
- Do not block any ventilation openings. Install in accordance with the manufacturer's instructions.
- Do not install near any heat sources such as radiators, heat registers, stoves, or other apparatus (including amplifiers) that produce heat.
■ Only use attachments/accessories specified by the manufacturer.
- Know your product. Read operator's manual carefully. Learn its applications and limitations, as well as the specific potential hazards related to this product. Following this rule will reduce the risk of electric shock, re, or serious injury.
■ Do not operate products in explosive atmospheres, such as in the presence of flammable liquids, gases, or dust. Products create sparks which may ignite the dust or fumes.
ELECTRICAL SAFETY
A battery operated product with integral batteries or a separate battery pack must be recharged only with the specified charger for the battery. A charger that may be suitable for one type of battery may create a risk of Ire when used with another battery.
■ Use battery operated product only with specifically designated battery pack. Use of any other batteries may create a risk of re.
■ Use this product only with batteries and chargers listed in tool/appliance/battery pack/charger correlation supplement 987000-432.
■ Do not defeat the safety purpose of the polarized or grounding-type plug. A polarized plug has two blades with one wider than the other. A grounding type plug has two blades and a third grounding prong. The wide blade or the third prong are provided for your safety. If the provided plug does not it into your outlet, consult an electrician for replacement of the obsolete outlet.
■ Protect the power cord from being walked on or pinched particularly at plugs, convenience receptacles, and the point where they exit from the apparatus.
■ Unplug this apparatus during lightning storms or when unused for long periods of time.
■ WARNING: To reduce the risk of re or electric shock, do not expose this apparatus to rain or moisture. Apparatus shall not be exposed to dripping or splashing and no objects filled with liquids, such as vases, shall be placed on the apparatus.
PERSONAL SAFETY
■ Do not use on a ladder or unstable support. Stable footing on a solid surface enables better control of the product in unexpected situations.
■ Do not use the radio to listen to music or other audio programs while operating machinery. Doing so may cause distractions that could result in serious personal injury.
■ This radio is capable of producing sound levels that can be dangerous to long-term hearing. Listening to music at high volume for any period of time may cause noise-induced hearing loss. The higher the volume, the less time required before your hearing may be affected.
PRODUCT USE AND CARE
■ When battery pack is not in use, keep it away from other metal objects like: paper clips, coins, keys, nails, screws, or other small metal objects that can make a connection from one terminal to another. Shorting the battery terminals together may cause sparks, burns, or a re.
- Keep the radio and its handle dry, clean and free from oil and grease. Always use a clean cloth when cleaning. Never use brake fluids, gasoline, petroleum-based products, or any strong solvents to clean the radio. Following this rule will reduce the risk of loss of control and deterioration of the enclosure plastic.
■ Battery products do not have to be plugged into an electrical outlet; therefore, they are always in operating condition. Be aware of possible hazards when not using your battery product or when changing accessories. Following this rule will reduce the risk of electric shock, Ire, or serious personal injury.
■ Do not place battery products or their batteries near fire or heat. This will reduce the risk of explosion and possibly injury.
IMPORTANT SAFETY INSTRUCTIONS
■ Do not crush, drop or damage battery pack. Do not use a battery pack or charger that has been dropped or received a sharp blow. A damaged battery is subject to explosion. Properly dispose of a dropped or damaged battery immediately.
■ Batteries can explode in the presence of a source of ignition, such as a pilot light. To reduce the risk of serious personal injury, never use any cordless product in the presence of open flame. An exploded battery can propel debris and chemicals. If exposed, flush with water immediately.
■ Do not charge battery product in a damp or wet location. Following this rule will reduce the risk of electric shock.
■ Under extreme usage or temperature conditions, battery leakage may occur. If liquid comes in contact with your skin, wash immediately with soap and water. If liquid gets into your eyes, flush them with clean water for at least 10 minutes, then seek immediate medical attention. Following this rule will reduce the risk of serious personal injury.
■ To reduce the risk of personal injury and electric shock, the product should not be played with or placed where small children can reach it.
SERVICE
■ Product service must be performed only by qualified repair personnel. Service or maintenance performed by unqualified personnel may result in a risk of injury.
■ When servicing a product, use only identical replacement parts. Follow instructions in the Maintenance section of this manual. Use of unauthorized parts or failure to follow Maintenance Instructions may create a risk of shock or injury.
■ Refer all servicing to qualified service personnel. Servicing is required when the apparatus has been damaged in any way, such as power-supply cord or plug is damaged, liquid has been spilled or objects have fallen into the apparatus, the apparatus has been exposed to rain or moisture, does not operate normally, or has been dropped.
Save these instructions. Refer to them frequently and use them to instruct others who may use this product. If you loan someone this product, loan them these instructions also.
BLUETOOTH® LICENSE STATEMENT
The BLUETOOTH ^® word mark and logos are registered trademarks owned by Bluetooth SIG, Inc. and any use of such marks by RYOBI _™ is under license. Other trademarks and trade names are those of their respective owners.
FCC COMPLIANCE

WARNING:
Changes or modifications to this product not expressly approved by the party responsible for compliance could void the user's authority to operate the equipment.
This device complies with part 15 of the FCC rules. Operation is subject to the following two conditions: (1) this device may not cause harmful interference, and (2) this device must accept any interference received, including interference that may cause undesired operation.
NOTE: The grantee is not responsible for any changes or modifications not expressly approved by the party responsible for compliance. Such modifications could void the user's authority to operate the equipment.
NOTE: This equipment has been tested and found to comply with the limits for a Class B digital device, pursuant to part 15 of the FCC Rules. These limits are designed to provide reasonable protection against harmful interference in a residential installation. This equipment generates, uses and can radiate radio frequency energy and, if not installed and used in accordance with the instructions, may cause harmful interference to radio communications. However, there is no guarantee that interference will not occur in a particular installation. If this equipment does cause harmful interference to radio or television reception, which can be determined by turning the equipment off and on, the user is encouraged to try to correct the interference by one or more of the following measures:
■ Reorient or relocate the receiving antenna.
■ Increase the separation between the equipment and receiver.
■ Connect the equipment into an outlet on a circuit different from that to which the receiver is connected.
- Consult the dealer or an experienced radio/TV technician for help.
This device complies with Industry Canada license-exempt RSS standard(s). Operation is subject to the following two conditions: (1) this device may not cause interference, and (2) this device must accept any interference, including interference that may cause undesired operation of the device.
Under Industry Canada regulations, this radio transmitter may only operate using an antenna of a type and maximum (or lesser) gain approved for the transmitter by Industry Canada. To reduce potential radio interference to other users, the antenna type and its gain should be so chosen that the equivalent isotropically radiated power (e.i.r.p.) is not more than that necessary for successful communication.
This equipment complies with FCC radiation exposure limits set forth for an uncontrolled environment. This equipment should be installed and operated with minimum distance of 20 cm between the radiator and your body. This transmitter must not be co-located or operating in conjunction with any other antenna or transmitter.
SUPPLIER'S DECLARATION OF CONFORMITY
RYOBI ONE+ 18V LINK HYBRID STEREO Model: PCL601
The responsible party declares that this device complies with Part 15 of the FCC Rules. Operation is subject to the following two conditions: (1) this device may not cause harmful interference, and (2) this device must accept any interference received, including interference that may cause undesired operation.
| Responsible Party: | Techtronic Cordless GP |
| Address: 115 Innovation Way, Anderson, SC 29621 | |
| Telephone: (864) 360-3359 | |
| Printed Name/Title: Corey Veloz / Director Regulatory | |
| Signature: | |
SYMBOLS
| The following signal words and meanings are intended to explain the levels of risk associated with this product. | ||
| SYMBOL | SIGNAL | MEANING |
 | DANGER: | Indicates a hazardous situation, which, if not avoided, will result in death or serious injury. |
 | WARNING: | Indicates a hazardous situation, which, if not avoided, could result in death or serious injury. |
 | CAUTION: | Indicates a hazardous situation, that, if not avoided, may result in minor or moderate injury. |
| NOTICE: | (Without Safety Alert Symbol) Indicates information considered important, but not related to a potential injury (e.g. messages relating to property damage). | |
| Some of the following symbols may be used on this product. Please study them and learn their meaning. Proper interpretation of these symbols will allow you to operate the product better and safer. SYMBOL NAME DESIGNATION/EXPLANATION | ||
 | Safety Alert Indicates a potential | personal injury hazard. |
 | Read Operator's Manual | To reduce the risk of injury, user must read and understand operator's manual before using this product. |
 | Eye Protection | Always wear eye protection with side shields marked to comply with ANSI Z87.1. |
 | Electric Shock Alert | Indicates uninsulated material within the product that may cause electrical shock. Do not remove product covering. |
 | Wet Conditions Alert Do not expose to rain or use in damp locations. | |
 | Recycle Symbol | This product uses lithium-ion (Li-ion) batteries. Local, state or federal laws may prohibit disposal of batteries in ordinary trash. Consult your local waste authority for information regarding available recycling and/or disposal options. |
| V Volts Voltage | ||
| A Amperes Current | ||
| Hz Hertz Frequency (cycles per second) | ||
| W Watt Power | ||
| min Minutes | Time | |
| --- | Direct Current | Type or a characteristic of current |
| ~ | Alternating Current | Type of current |
| ☐ | Class II Tool | Double-insulated construction |
ELECTRICAL
DOUBLE INSULATION
Double insulation is a concept in safety in electric power tools, which eliminates the need for the usual three-wire grounded power cord. All exposed metal parts are isolated from the internal metal motor components with protecting insulation. Double insulated tools do not need to be grounded.

WARNING:
The double insulated system is intended to protect the user from shock resulting from a break in the tool's internal insulation. Observe all normal safety precautions to avoid electrical shock.
NOTE: Servicing of a product with double insulation requires extreme care and knowledge of the system and should be performed only by a qualified service technician. For service, we suggest you return the product to your nearest authorized service center for repair. Always use original factory replacement parts when servicing.
ELECTRICAL CONNECTION
This product should be connected to a power supply that is 120 volts, AC only (normal household current), 60 Hz. Do not operate this product on direct current (DC) through the power cord. A substantial voltage drop will cause a loss of power. If the product does not operate when plugged into an outlet, double-check the power supply.
EXTENSION CORDS
When using a power tool at a considerable distance from a power source, be sure to use an extension cord that has the capacity to handle the current the product will draw. An undersized cord will cause a drop in line voltage, resulting in overheating and loss of power. Use the chart to determine the minimum wire size required in an extension cord. Only round jacketed cords listed by Underwriter's Laboratories (UL) should be used.
When working outdoors with a product, use an extension cord that is designed for outside use. This type of cord is designated with "W-A" or "W" on the cord's jacket.
Before using any extension cord, inspect it for loose or exposed wires and cut or worn insulation.
**Ampere rating (on product data plate)
0-2.0 2.1-3.4 3.5-5.0 5.1-7.0 7.1-12.0 12.1-16.0
Cord Length Wire Size (A.W.G.)
| 25' | 16 | 16 | 16 | 16 | 14 | 14 |
| 50' | 16 | 16 | 16 | 14 | 14 | 12 |
| 100' | 16 | 16 | 14 | 12 | 10 | — |
**Used on 12 gauge - 20 amp circuit.
NOTE: AWG = American Wire Gauge

WARNING:
Keep the extension cord clear of the working area. Position the cord so that it will not get caught on lumber, tools, or other obstructions while you are working with this product. Failure to do so can result in serious personal injury.

WARNING:
Check extension cords before each use. If damaged replace immediately. Never use a product with a damaged cord since touching the damaged area could cause electrical shock resulting in serious injury.
ASSEMBLY

WARNING:
Do not use this product if it is not completely assembled or if any parts appear to be missing or damaged. Use of a product that is not properly and completely assembled or with damaged or missing parts could result in serious injury.

WARNING:
Do not attempt to modify this product or create accessories or attachments not recommended for use with this product. Any such alterations or modification is misuse and could result in a hazardous condition leading to possible serious personal injury.
OPERATION

WARNING:
Do not allow familiarity with this product to make you careless. Remember that a careless fraction of a second is sufficient to inflict serious injury.

WARNING:
Always remove the battery pack from the product and disconnect from the power supply when you are assembling parts, cleaning, or when not in use. Removing battery pack or unplugging extension cord will prevent accidental starting that could cause serious personal injury.

WARNING:
This radio is capable of producing sound levels that can be dangerous to long-term hearing. Listening to music at high volume for any period of time can cause noise-induced hearing loss. The higher the volume, the less time required before your hearing could be affected.
NOTICE:
Always refer to the manual for any device recommended for use as an attachment or accessory. Proper use of any device, when attached to the radio, is the sole responsibility of the operator. Improper use may damage the device or the product.
APPLICATIONS
You may use this product for the following purposes:
■ Listening to FM radio and BLUETOOTAudio devices; charging USB-capable devices.

WARNING:
Battery products are always in operating condition. Therefore, the switch should always be in the OFF position when not in use or carrying at your side.
INSTALLING/REMOVING BATTERY PACK
See Figure 1, page 10.
To install:
■ Insert the battery pack.
■ Make sure the latches on each side of the battery pack snap in place and that battery pack is secured in the product before beginning operation.
To remove:
■ Depress the latches on each side of the battery pack.
For complete charging instructions, see the operator's manuals for your battery pack and charger.
INSTALLING/REMOVING POWER CORD
See Figure 2, page 10.
■ Push the ON/OFF button to turn the product OFF.
- Insert the female end of the power cord into the product as shown.
■ Connect the male end of the power cord to the power source.
■ Make sure the power cord is secured before beginning operation.
LCD DISPLAY
See Figure 3, page 11.
NOTE: The illustrations of the LCD display shown in this manual are only examples of the frequencies you may see on your product and are not the exact frequencies that you may choose to listen to.
When the product is not connected to a power supply, the LCD display will remain off. If the product is connected to a power supply and in the ON position, LEDs will light the display. You can view the frequency and settings in use on the LCD display.
NOTE: Always disconnect battery packs after use to prevent draining the battery pack.
TURNING THE PRODUCT ON/OFF
See Figure 3, page 11.
Press the power knob to turn the product ON or OFF.
NOTE: You may need to keep the power knob pressed for up to 3 seconds before the product will start.
To help preserve battery power, the product will automatically turn off after 30 minutes. To restart the product, you must press the power knob on the product.
ADJUSTING THE VOLUME
See Figure 3, page 11.
When the product is turned ON, it will return to the default volume setting.
NOTE: If the 18V battery is removed from the product or has no charge, the product will return to the default volume setting.
■ To increase the volume: turn the power knob clockwise.
■ To decrease the volume: turn the power knob counterclockwise.
NOTICE:
Do not use the product at maximum volume for an extended period of time with the bass and treble at maximum levels. It could cause damage to the speakers and/or amplifiers in your product.
OPERATION
MODE SELECTION
See Figure 3, page 11.
Press the MODE button to cycle through available modes.
■ FM mode
■ BLUETOOTH listening to audio from BLUETOOTH® capable devices.
The product will return to the last mode that was used when properly turned off. In the event all power is lost to the product, it will default to the FM mode, unless BLUETOOTH ^® was used when last properly turned off.
There are four equalizer settings to choose from:
■ BASS+ enhances the low notes and makes the bass more powerful.
■ TREBLE+ enhances the high notes and makes speech clearer.
■ HI-FI refers to a high-quality reproduction of sound.
■ VOICE enhances podcast listening.
To change equalizer settings:
■ Hold the MODE button.
■ Tap the TUNE/SEEK forward or backward arrow buttons to cycle through the settings.
FM TUNING
See Figure 3, page 11.
The TUNE/SEEK left and right arrow buttons are used to tune to the desired radio frequency. The selected frequency is displayed on the LCD.
■ Briefly press either button (not press and hold) to tune one frequency step at a time.
■ To SEEK, press and hold desired arrow button for 1 second to tune to the next frequency with clear reception.
STORING A PRESET IN MEMORY
See Figure 3, page 11.
The memory feature saves up to 10 frequencies as presets in the product's memory.
To store a frequency in memory:
■ Tune to the frequency you want to save.
■ Press and hold the PRESET button. A memory location number will blink on and off.
■ Press the TUNE/SEEK button to select a memory location.
■ Press the PRESET button to store the frequency in the selected memory location.
To recall a preset frequency:
■ Press the PRESET button and quickly release to cycle through stored frequencies.
CONNECTING TO THE SPEAKER SYSTEM
See Figure 3, page 11.
The INTERCONNECT button works two ways:
■ Press the INTERCONNECT button. Once the product is connected to BLUETOOTH® or in the FM mode “Primary” will show on the LCD display. Compatible speakers will be able to sync with the product.
■ Press the INTERCONNECT button when the product is not connected to BLUETOOTH® and “Secondary” will show in the LCD display. The product will begin searching for compatible speakers.
USB DEDICATED CHARGING PORT
See Figure 4, page 11.
The USB dedicated charging port provides charging power of up to 2 Amps for your cell phone, tablet, MP player or other USB devices.
NOTICE:
Attempting to charge devices rated more than 2 Amps could damage the USB dedicated charging port and/or the device.
■ Connect one end of a USB cable (not provided) to your USB device.
■ Connect the other end of the USB cable (not provided) to the USB dedicated charging port to begin charging the device.
NOTE: The USB dedicated charging port provides power only; it does not provide any communication capabilities.
■ When the product is operating on battery power, the USB dedicated charging port will continue to function for approximately 1 hour after turning the product OFF. If the product remains inactive after this time, charging will stop. Turn the product on to resume operation.
USING A BLUETOOTH® ENABLED DEVICE (NOT INCLUDED) WITH THE STEREO
See Figure 5, page 11.
■ When the product is switched to BLUETOOTHode, the product will search for a BLUETOOTH® signal and "bt" flashes in the LCD display.
NOTE: The product will automatically attempt to connect to the last device it was paired to. If a connection cannot be established within five seconds, the product will make itself available to other BLUETOOTH® enabled devices.
OPERATION
■ Devices enabled for BLUETOOTHust be in range of the signal and set to search/scan in order to pair with the product.
- Select "RYOBI LINK STEREO" from your device's list of available BLUETOOTH® signals to pair the device and the stereo. No password or PIN is required for connection.
- When the device has successfully paired with the product, the "bt" will stop flashing and turn solid.
NOTE: When a device is paired to the product, information for connecting to the device is saved in the product's memory.
■ When streaming audio from a BLUETO T enabled device, press the left or right button to go to the previous or next track. Briefly press and release the PLAY/PAUSE button to cycle between pausing and playing the audio.
NOTE: These controls may not be supported by the BLUETOOTH® device and/or application you are using.
■ To disconnect the BLUETOOTH enabled device, press and hold the PLAY/PAUSE button. When the device is disconnected, "bt" will begin flashing on the LCD display and the product begins searching for a BLUETOOTH signal.
MAINTENANCE

WARNING:
Always remove the battery pack from the product and disconnect from the power supply when you are assembling parts, cleaning, or when not in use. Removing battery pack or unplugging extension cord will prevent accidental starting that could cause serious personal injury.

WARNING:
When servicing, use only identical replacement parts. Use of any other part could create a hazard or cause product damage.
GENERAL MAINTENANCE
Avoid using solvents when cleaning plastic parts. Most plastics are susceptible to damage from various types of commercial solvents and can be damaged by their use. Use clean cloths to remove dirt, dust, oil, grease, etc.
LINK STORAGE
See Figure 6, page 13.
Remove the battery and store in a secure location out of the reach of children.

WARNING:
Hold the product close to your body. Keep your knees bent and lift with your legs, not your back. Ignoring these precautions can result in back injury.
LINK tool box storage:
■ Carefully lift the product and position the product with the face plate down onto two raised octagonal patterns on the LINK tool box and click in place.
■ Push the LINK release button on the side of the product to remove.
LINK wall rail storage:
■ Carefully lift the product and position the product with the face plate up onto two of the raised octagonal patterns on the LINK wall rail.
■ IMPORTANT! To ensure the product is seated properly, check that the holes on the face plate of the product are lined up with the corresponding holes in the LINK wall rail.
■ Push the LINK release button and lift to remove.
Refer to the LINK wall rails operator's manual for further instructions.
NOTE: ILLUSTRATIONS START ON PAGE 11 AFTER FRENCH AND SPANISH LANGUAGE SECTIONS.
INSTRUCTIONS IMPORTANTES CONCERNANTLA SÉCURITÉ

AVERTISSEMENT!
CONFORMITÉ AUX NORMES DE LA FEDERAL COMMUNICATIONS COMMISSION (FCC)

AVERTISSEMENT :
This device complies with Industry Canada license-exempt RSS standard(s). Operation is subject to the following two conditions: (1) this device may not cause interference, and (2) this device must accept any interference, including interference that may cause undesired operation of the device.
A - LCD display (LCD afficheur numérique, LCD pantalla digital)
B - POWER knob (bouton d'alimentation, perilla de encendido)
C - PLAY/PAUSE button (bouton lecture/pause, botón reproducir/pausar)
D - TUNE/SEEK buttons (boutons de syntoniser/rechercher, botóns de sintonizar/buscar)
E - MODE button (buton mode, botón modo)
F - PRESET button (buton préréglage, botón preconfigurado)
G - INTERCONNECT button (buton interconnexion, botón interconexión)
natural_image
Technical line drawing of a multi-tiered mechanical tool stack with handle and wheels (no text or symbols)NOTES/NOTAS

OPERATOR'S MANUAL/ONE+ 18V HYBRID LINK STEREO
MANUEL D'UTILISATION / STÉRÉO HYBRIDE LINK ONE+ DE 18 V MANUAL DEL OPERADOR / ESTÉREO HÍBRIDO ONE+ LINK DE 18 V
PCL601
This equipment complies with the FCC/IC RF radiation exposure limits set forth for an uncontrolled environment. It should be operated with a minimum distance of 20cm between the radiator and any part of your body.
To request service, purchase replacement parts,
locate an Authorized Service Center or obtain Customer or Technical Support:
Visit www.ryobitools.com or call 1-800-525-2579
If any parts or accessories are damaged or missing, do not return this product to the store.
Call 1-800-525-2579 for immediate service.
Please obtain your model and serial number from the product data plate.
This product is covered under a 3-year limited Warranty. Proof of purchase is required.
MODEL NUMBER* ____ SERIAL NUMBER ____
*Model number on product may have additional letters at the end. These letters designate manufacturing information and should be provided when calling for service.
RYOBI is a trademark of Ryobi Limited and is used pursuant to a license granted by Ryobi Limited.

- TABLE DES MATIÈRES
- IMPORTANT SAFETY INSTRUCTIONS
- WARNING!
- KEEP THESE INSTRUCTIONS HEED ALL WARNINGS FOLLOW ALL INSTRUCTIONS
- ELECTRICAL SAFETY
- PERSONAL SAFETY
- PRODUCT USE AND CARE
- SERVICE
- BLUETOOTH® LICENSE STATEMENT
- FCC COMPLIANCE
- WARNING:
- SUPPLIER'S DECLARATION OF CONFORMITY
- SYMBOLS
- ELECTRICAL
- DOUBLE INSULATION
- ELECTRICAL CONNECTION
- EXTENSION CORDS
- ASSEMBLY
- OPERATION
- NOTICE:
- APPLICATIONS
- INSTALLING/REMOVING BATTERY PACK
- To install:
- To remove:
- INSTALLING/REMOVING POWER CORD
- LCD DISPLAY
- TURNING THE PRODUCT ON/OFF
- ADJUSTING THE VOLUME
- MODE SELECTION
- FM TUNING
- STORING A PRESET IN MEMORY
- CONNECTING TO THE SPEAKER SYSTEM
- USB DEDICATED CHARGING PORT
- USING A BLUETOOTH® ENABLED DEVICE (NOT INCLUDED) WITH THE STEREO
- MAINTENANCE
- GENERAL MAINTENANCE
- LINK STORAGE
- LINK tool box storage:
- LINK wall rail storage:
- NOTE: ILLUSTRATIONS START ON PAGE 11 AFTER FRENCH AND SPANISH LANGUAGE SECTIONS.
- INSTRUCTIONS IMPORTANTES CONCERNANTLA SÉCURITÉ
- AVERTISSEMENT!
- CONFORMITÉ AUX NORMES DE LA FEDERAL COMMUNICATIONS COMMISSION (FCC)
- AVERTISSEMENT :
- NOTES/NOTAS
- OPERATOR'S MANUAL/ONE+ 18V HYBRID LINK STEREO
- MANUEL D'UTILISATION / STÉRÉO HYBRIDE LINK ONE+ DE 18 V MANUAL DEL OPERADOR / ESTÉREO HÍBRIDO ONE+ LINK DE 18 V
- PCL601
Brand : RYOBI
Model : One+ PCL601
Category : Radio