
POWXJSS2 - Grinder PowerPlus - Free user manual and instructions
Find the device manual for free POWXJSS2 PowerPlus in PDF.

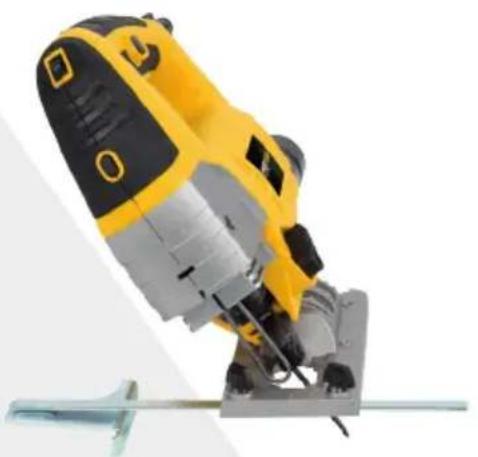
| Product type | Jigsaw |
| Brand | PowerPlus |
| Model | POWXJSS2 |
| Power | 810 W |
| Power supply | Mains (230 V ~ 50 Hz) |
| Variable speed | Yes, electronic speed regulator |
| Cutting capacity | Wood, metal, plastics |
| Bevel cutting angles | 0° to 45° (left and right) |
| Pendulum function | 4 positions (0 to III) |
| Laser | Class 2 laser beam (EN 60825-1:2007) |
| LED light | Yes, integrated |
| Dust extraction | Vacuum cleaner connection via socket |
| Sound pressure level (LpA) | 91 dB(A) (K=3) |
| Sound power level (LwA) | 102 dB(A) (K=3) |
| Vibrations (aw) | 4.3 m/s² (K=1.5 m/s²) |
| Double insulation | Class II – no earth connection required |
| Weight | Approximately 2.0 kg |
| Dimensions (L x W x H) | Approximately 250 x 80 x 200 mm |
| Warranty | 36 months |
| Included accessories | 4 wood blades, 2 metal blades, dust extraction socket, side guide, hex key |
Frequently Asked Questions - POWXJSS2 PowerPlus
User questions about POWXJSS2 PowerPlus
0 question about this device. Answer the ones you know or ask your own.
Ask a new question about this device
Download the instructions for your Grinder in PDF format for free! Find your manual POWXJSS2 - PowerPlus and take your electronic device back in hand. On this page are published all the documents necessary for the use of your device. POWXJSS2 by PowerPlus.
USER MANUAL POWXJSS2 PowerPlus
natural_image
Yellow PowerPlus power tool with black handle and silver base, displayed against a plain background (no text or symbols visible on the device itself)
natural_image
Red and black plastic tray holding multiple dental implants (no visible text or labels)natural_image
Yellow PowerPlus power tool with black and silver casing, mounted on a metal base (no visible text or symbols)
| NL | NEDERLANDS | VERTAALDE VERSIE VAN DE ORIGINELE HANDLEIDING |
| FR | FRANÇAIS | TRADUCTION DU MODE D'EMPLOI D'ORIGINE |
| EN | ENGLISH | ORIGINAL INSTRUCTION MANUAL |
| DE | DEUTSCH | ÜBERSETZUNG DER ORIGINAL-BETRIEBSANLEITUNG |
| ES | ESPAÑOL | TRADUCCIÓN DEL MANUAL DE INSTRUCCIONES ORIGINAL |
| IT | ITALIANO | TRADUZIONE DEL MANUALE DI ISTRUZIONI ORIGINALE |
| PT | PORTUGUÊS | TRADUÇÃO DO MANUAL DE INSTRUÇÕES ORIGINAL |
| NO | NORSK | OVERSETTELSE AV ORIGINAL BRUKERVEILEDNING |
| DA | DANSK | OVERSÆTTELSE AF DEN ORIGINALE BRUGSVEJLEDNING |
| SV | SVENSKA | ÖVERSÄTTNING AV DEN URSPRUNGLIGA BRUKSANVISNINGEN |
| FI | SUOMI | ALKUPERÄISEN OHJEKIRJAN KÄÄNNÕS |
| EL | Ελληνικά | Μετάφραση του πρωτότυπου εγχειριδίου οδηγιών |
| HR | HRVATSKI | PRIJEVOD ORIGINALNOG PRIRUČNIKA S UPUTAMA ZA RAD |
| SR | SRPSKI | PREVOD ORIGINALNOG UPUTSTVA ZA UPOTREBU |
| CS | ČESKY | PŘEKLAD ORIGINÁLNÍHO NÁVODU K POUŽITÍ |
| SK | SLOVENČINA | PREKLAD NÁVODU NA POUŽÍVANIE Z ORIGINÁLU |
| RO | ROMÂNÃ | TRADUCEREA MANUALULUI DE INSTRUCTIUNI ORIGINALE |
| PL | POLSKI | TŁUMACZENIE ORYGINALNEJ INSTRUKCJI OBSŁUGI |
| HU | MAGYAR | AZ EREDETI KEZELÉSI UTASÍTÁS FORDÍTÁSA |
| RU | РУССКИЙ | ОРИГИНАЛЬНАЯ ИНСТРУКЦИЯ ПО ЭКСПЛУАТАЦИИ |
| BG | БЪЛГАРСКИ | ПРЕВОД НА ОРИГИНАЛНОТО РЪКОВОДСТВО |
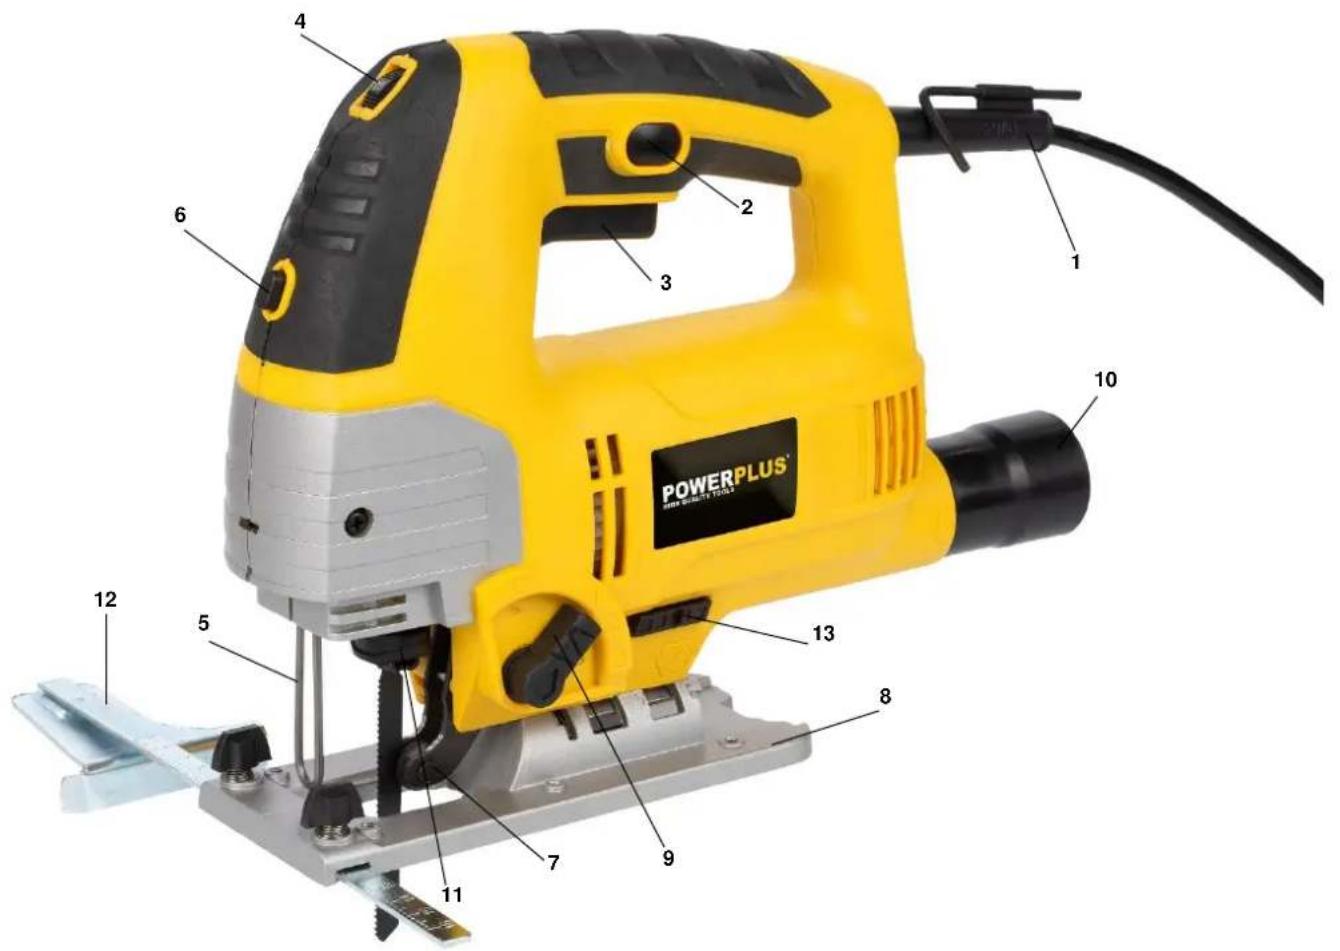
Fig. 1
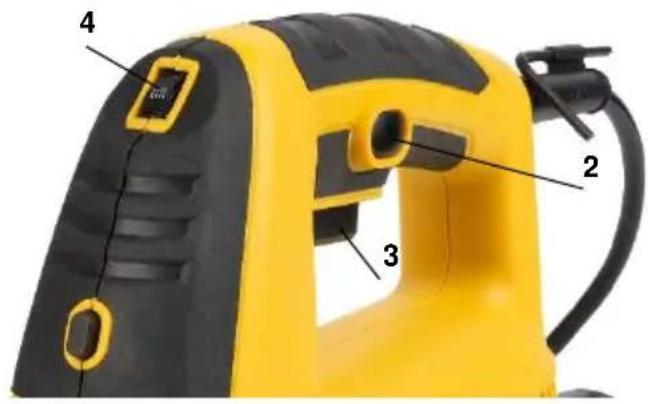
Fig. 2

natural_image
Yellow manual power tool with black handle and metal blade, being handled by a hand (no visible text or symbols)
natural_image
Close-up of hands using a yellow power tool to adjust or install a screwdriver (no visible text or symbols)Fig. 3
natural_image
Close-up of a hand using a yellow power tool to adjust or install a mechanical component (no visible text or symbols)
natural_image
Yellow and gray electric drill bit with a flat blade, shown against a white background (no text or symbols visible)Fig. 4
natural_image
Yellow PowerPlus power tool with black handle and gray base, mounted on a metal frame (no visible text or symbols)Fig. 5
natural_image
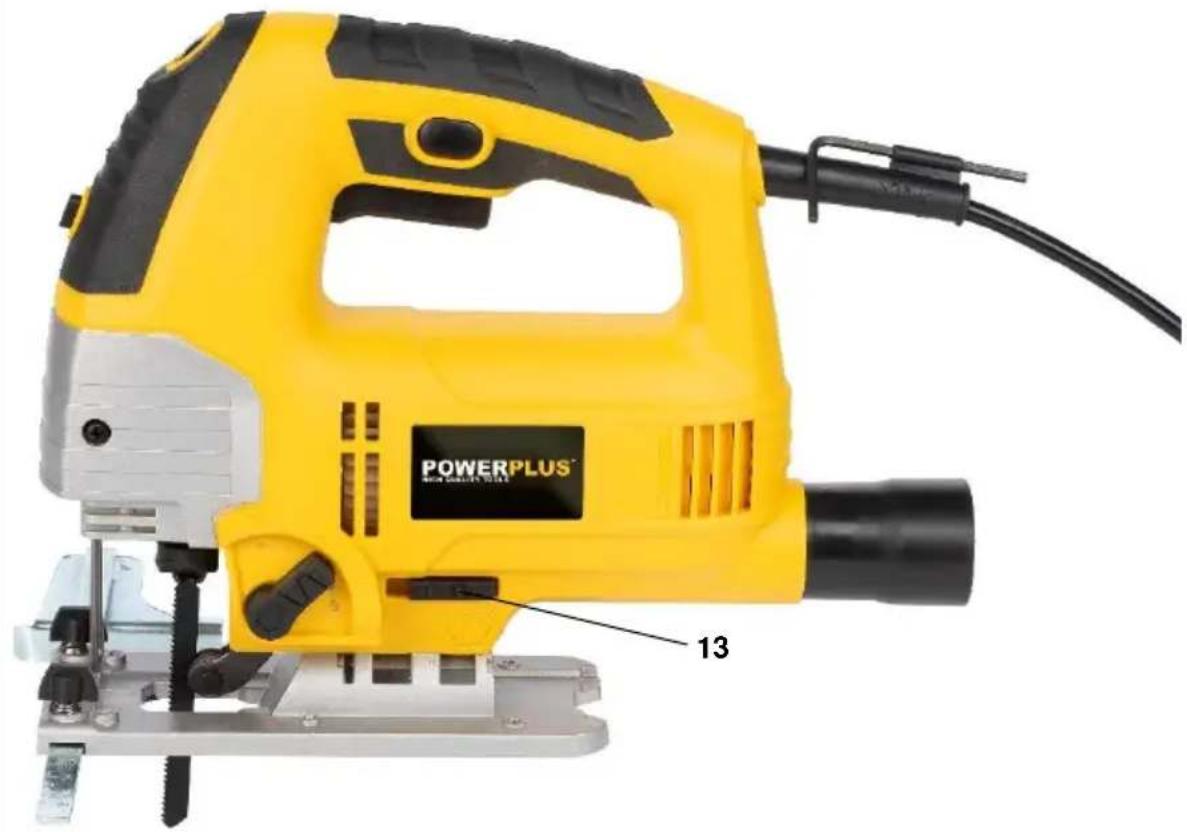
Yellow PowerPLUS power tool with black handle and labeled component 13 (no text or symbols on the device itself)2 BESCHRIJVING (FIG. A)
10/11/2021, Lier - Belgium
| Rated voltage | 230-240V |
| Rated frequency | 50Hz |
| Rated power | 810W |
| Rotation speed | 0-3000min ^-1 |
| Protection class | II |
| Cable length | 3 |
| Pendular positiond | 4 |
| Electronic speed control | Yes |
| Adjustable base | Yes |
| Cutting depth steel | 8mm |
| Cutting depth wood | 80mm |
| Cutting depth plastic | 80mm |
| Electric motor type | Brushed |
| Connection type | T&U-shaped |
| Quick blade change | yes |
| Soft grip | Yes |
| Dust blowing switch | Yes |
| Base material | Steel |
9 BRUIT
10/11/2021, Lier - Belgium
1 APPLICATION....2
2 DESCRIPTION (FIG A) 2
3 PACKAGE CONTENT LIST....2
4 SYMBOLS 2
5 GENERAL SAFETY AND ACCIDENT PREVENTION REGULATIONS....3
5.1 Work area 3
5.2 Electrical safety....3
5.3 Personal safety 3
5.4 Power tool use and care....4
5.5 Service....4
6 ADDITIONAL SAFETY INSTRUCTIONS FOR LASERS......4
7 OPERATING INSTRUCTIONS ....5
7.1 Starting up (Fig. 1)....5
7.1.1 Instant response operation ....5
7.1.2 Continuous operation....5
7.1.3 Electronic speed control setting....5
7.2 Changing the saw blade (Fig. 2)....5
7.3 Adjusting the base (Fig. 3)....5
7.4 Dust extraction....5
7.5 Using the laser and LED-light (Fig. 4)....5
7.6 Transfer switch for wind direction (Fig. 5)....6
7.7 Use of pendulum....6
8 TECHNICAL DATA 6
9 NOISE....7
10 WARRANTY....7
11 ENVIRONMENT 7
12 DECLARATION OF CONFORMITY 8
JIG SAW 810W POWX0361
1 APPLICATION
The power tool is intended for sawing wood, metal and plastics. Not suitable for professional use.

Warning! Please read and understand this operating manual before use and keep it for your future reference.
2 DESCRIPTION (FIG A)
- Power cable
- Locking button
- On/Off switch
- Speed regulator
- Inspection guard
- ON/Off switch laser/LED light
- Guide roller
- Adjustable base
- Pendulum switch (4 positions)
- Dust extractor socket
- Quick release blade clamp
- Edge guide
- Wind direction transfer switch
3 PACKAGE CONTENT LIST
■ Remove all packing materials
■ Remove remaining packaging and transit supports (if existing)
- Check the completeness of the packing content
- Check the appliance, the power cord, the power plug and all accessories for transportation damages.
- Keep the packaging materials as far as possible till the end of the warranty period. Dispose it into your local waste disposal system afterwards.

WARNING Packing materials are no toys! Children must not play with plastic bags! Danger of suffocation!
- Jig saw 810W
- 1 x Guide bar
- 1 x Dust extractor socket
- 1 x Instruction Manual
- 4 x Saw for wood
- 1 x hex key
- 2 x Saw for metal

When parts are missing or damaged, please contact your dealer.
4 SYMBOLS
In this manual and/or on the machine the following symbols are used:
 | Denotes risk of personal injury or damage to the tool. |  | Wear eye protection |
 | Read manual before use |  | Wear gloves |
 | In accordance with essential requirements of the European directive(s) |  | Laser beam warning |
 | "Class II - The machine is double insulated; Earthing wire is therefore not necessary | ||
5 GENERAL SAFETY AND ACCIDENT PREVENTION REGULATIONS
Warning!
Read all safety warnings and all instructions. Failure to follow all warnings and instructions may result in electric shock, fire and/or serious injury. Save all warnings and instructions for future reference. The term "power tool" in the warnings refers to your mains operated (corded) power tool or battery operated (cordless) power tool.
5.1 Work area
- Keep work area clean and well lit. Cluttered and dark areas invite accidents.
- Do not operate power tools in explosive atmospheres, such as in the presence of flammable liquids, gases or dust. Power tools create sparks which may ignite the dust or fumes.
- Keep children and bystanders away while operating a power tool. Distractions can cause you to lose control.
5.2 Electrical safety

Always check that the power supply corresponds to the voltage on the rating plate.
- Power tool plugs must match the outlet. Never modify the plug in any way. Do not use any adapter plugs with earthed (grounded) power tools. Unmodified plugs and matching outlets will reduce risk of electric shock.
- Avoid body contact with earthed or grounded surfaces such as pipes, radiators, ranges and refrigerators. There is an increased risk of electric shock if your body is earthed or grounded.
- Do not expose power tools to rain or wet conditions. Water entering a power tool will increase the risk of electric shock.
- Do not abuse the cord. Never use the cord for carrying, pulling or unplugging the power tool. Keep cord away from heat, oil, sharp edges or moving parts. Damaged or entangled cords increase the risk of electric shock.
- When operating a power tool outdoors, use an extension cord suitable for outdoor use. Use of a cord suitable for outdoor use reduces the risk of electric shock.
- If operating a power tool in a damp location is unavoidable, use a residual current device (RCD) protected supply. Use of an RCD reduces the risk of electric shock.
5.3 Personal safety
- Stay alert, watch what you are doing and use common sense when operating a power tool. Do not use a power tool while you are tired or under the influence of drugs, alcohol or medication. A moment of inattention while operating power tools may result in serious personal injury.
- Use safety equipment. Always wear eye protection. Safety equipment such as dust mask, non-skid safety shoes, hard hat, or hearing protection used whenever conditions require will reduce personal injuries.
- Avoid accidental starting. Ensure the switch is in the off position before plugging in. Carrying power tools with your finger on the switch or plugging in power tools that have the switch on invites accidents.
- Remove any adjusting key or wrench before turning the power tool on. A wrench or a key left attached to a rotating part of the power tool may result in personal injury.
- Do not overreach. Keep proper footing and balance at all times. This enables better control of the power tool in unexpected situations.
- Dress properly. Do not wear loose clothing or jewellery. Keep your hair, clothing and gloves away from moving parts. Loose clothes, jewellery or long hair can be caught in moving parts.
- If devices are provided for the connection of dust extraction and collection facilities, ensure these are connected and properly used. Use of these devices can reduce dust related hazards.
5.4 Power tool use and care
- Do not force the power tool. Use the correct power tool for your application. The correct power tool will do the job better and safer at the rate for which it was designed.
- Do not use the power tool if the switch does not turn it on and off. Any power tool that cannot be controlled with the switch is dangerous and must be repaired.
- Disconnect the plug from the power source before making any adjustments, changing accessories, or storing power tools. Such preventive safety measures reduce the risk of starting the power tool accidentally.
- Store idle power tools out of the reach of children and do not allow persons unfamiliar with the power tool or these instructions to operate the power tool. Power tools are dangerous in the hands of untrained users.
- Maintain power tools. Check for misalignment or sticking of moving parts, breakage of parts and any other condition that may affect the power tool's operation. If damaged, have the power tool repaired before use. Many accidents are caused by poorly maintained power tools.
- Keep cutting tools sharp and clean. Properly maintained cutting tools with sharp cutting edges are less likely to stick and are easier to control.
- Use the power tool, accessories and tool bits etc., in accordance with these instructions and in the manner intended for the particular type of power tool, taking into account the working conditions and the work to be performed. Use of the power tool for operations different from intended could lead to a hazardous situation.
5.5 Service
- Have your power tool serviced by a qualified repair person using only identical replacement parts. This will ensure that the safety of the power tool is maintained.
6 ADDITIONAL SAFETY INSTRUCTIONS FOR LASERS
Warning!
The laser beam potentially causes severe eye damage. Never look or stare directly into the laser beam.
During use, do not point the laser beam at people, directly or indirectly through reflecting surfaces.
- This laser complies with class 2 according to EN 60825-1:2007. The unit includes no servicing components. Do not open the housing for any reason. If the unit is damaged, have the damage repaired by an authorized repair agent
7 OPERATING INSTRUCTIONS
7.1 Starting up (Fig. 1)
7.1.1 Instant response operation
Switching on: Press the On/Off switch.
Switching off: Release the On/Off switch
7.1.2 Continuous operation
Switching on: Press the On/Off switch, keep pressed and lock with the locking button Switching off: Press the On/Off switch and release
7.1.3 Electronic speed control setting
Using the speed regulator (4) on the top, you can pre-set any speed. Turn the speed regulator (4) to a higher number for a higher speed and turn it to a lower number for a lower speed. The ideal cutting rate depends on the specific material and working conditions.
The general standards for setting the cutting speed for power tools apply here.
■ Steel: slowest cutting speed
- Aluminium, plastic, hardwood: medium cutting speed.
■ Soft wood: high cutting speed.
When processing metals you should use suitable lubricants/coolants to protect the saw blade – just a little oil for steel, and spirit or petroleum for aluminium, as required. For plastic material water is normally sufficient as the coolant/lubricant.
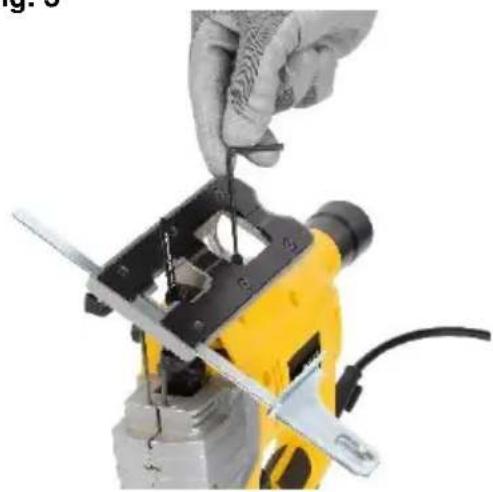
7.2 Changing the saw blade (Fig. 2)
Push the blade holder with the blade clamp all the way to the front and than slide the blade (with the teeth to the front) into the guide groove.
7.3 Adjusting the base (Fig. 3)
Loosen the base plate by pulling the lever for angle cutting adjustment which located on the underside of the tool
Move the base plate forward and tilt it until the desired angle is obtained the angle can be between 0^ and 45^ (left and right).
Move the base plate back to ensure the slot of base plate is engaged with gear casing.
Press the lever for angle cutting adjustment to lock position (original position) and ensure it firmly.
For accurate cut it is necessary to make a trial cut, measure the work and reset the angle until the correct setting is achieved.
7.4 Dust extraction
The jigsaw is equipped with a dust extractor socket. You can connect your vacuum cleaner to the socket at the rear of the jigsaw. If you require a special adapter, please contact the manufacturer of your vacuum cleaner.
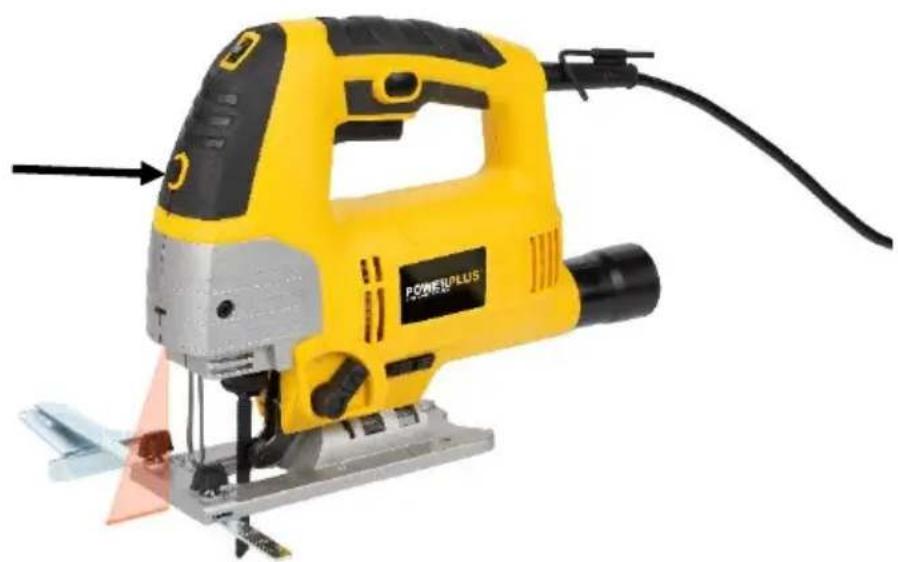
7.5 Using the laser and LED-light (Fig. 4)
You can use LED-light to enlighten the approximity of the cutting position.
The laser beam projects a red cutting line on the workpiece.
- Switch the laser on by means of the on/off switch (6).
- Place the machine on the workpiece with the saw marking above the start of the cutting line.
- Check that the laser line aligns with the cutting line as marked on the workpiece.
-
Switch on the machine.
-
Follow the "Instructions for use" to perform a cut.
■ After use, switch off the laser.
7.6 Transfer switch for wind direction (Fig. 5)
Slide the transfer switch forward to change the wind direction forward as the arrow shows on the above Fig. 9 that avoid sawdust cover previously marked line on the work-piece which it's convenient for moving the tool forward along previously marked line.
7.7 Use of pendulum
| Position | Cutting action | Applications |
| 0 | Straight line cutting action | For cutting mild steel, stainless steel and plastics. For clean cuts in wood and plywood. |
| I | Small orbit cutting action | For cutting mild steel, aluminum and hard wood. |
| II | Medium orbit cutting action | For cutting wood and plywood. For fast cutting in aluminum and mild steel. |
| III | Large orbit cutting action | For fast cutting in wood and plywood. |
8 TECHNICAL DATA
| Rated voltage | 230-240V |
| Rated frequency | 50Hz |
| Rated power | 810W |
| Rotation speed | 0-3000min ^-1 |
| Protection class | II |
| Cable length | 3m |
| Pendular positiond | 4 |
| Electronic speed control | Yes |
| Adjustable base | Yes |
| Cutting depth steel | 8mm |
| Cutting depth wood | 80mm |
| Cutting depth plastic | 80mm |
| Electric motor type | Brushed |
| Connection type | T&U-shaped |
| Quick blade change | yes |
| BMC | Yes |
| Soft grip | Yes |
| Dust blowing switch | Yes |
| LED worklight | Yes |
| High precision laser | yes |
9 NOISE
Noise emission values measured according to relevant standard. (K=3)
Acoustic pressure level LpA
91 dB(A)
Acoustic power level LwA
102 dB(A)

ATTENTION! Wear hearing protection when sound pressure is over 85 dB(A).
aw (Vibration)
4.3m/s²
K = 1,5 ~m / s^2
10 WARRANTY
- This product is warranted for a 36-month period effective from the date of purchase by the first user.
- This warranty covers all material or production flaws excluding : batteries, chargers, defective parts subject to normal wear & tear such as bearings, brushes, cables, and plugs, or accessories such as drills, drill bits, saw blades, etc. ; damage or defects resulting from maltreatment, accidents or alterations; nor the cost of transportation.
- Damage and/or defects resulting from inappropriate use also do not fall under the warranty provisions.
- We also disclaim all liability for any bodily injury resulting from inappropriate use of the tool.
- Repairs may only be carried out by an authorised customer service centre for Powerplus tools.
- You can always obtain more information at the number 00 32 3 292 92 90.
- Any transportation costs shall always be borne by the customer, unless agreed otherwise in writing.
- At the same time, no claim can be made on the warranty if the damage of the device is the result of negligent maintenance or overload.
- Definitely excluded from the warranty is damage resulting from fluid permeation, excessive dust penetration, intentional damage (on purpose or by gross carelessness), inappropriate usage (use for purposes for which the device is not suitable), incompetent usage (e.g. not following the instructions given in the manual), inexpert assembly, lightning strike, erroneous net voltage. This list is not exhaustive.
- Acceptance of claims under warranty can never lead to the prolongation of the warranty period nor commencement of a new warranty period in case of a device replacement.
- Devices or parts which are replaced under the warranty therefore remain the property of Varo NV.
- We reserve the right to reject a claim whenever the purchase cannot be verified or when it is clear that the product has not been properly maintained. (Clean ventilation slots, carbon brushes serviced regularly, etc.).
- Your purchase receipt must be kept as proof of date of purchase.
- Your appliance must be returned undismantled to your dealer in an acceptably clean state, (in its original blow-moulded case if applicable to the unit), accompanied by proof of purchase.
11 ENVIRONMENT
Should your machine need replacement after extended use, do not put it in the domestic waste but dispose of it in an environmentally safe way.
Waste electrical products should not be disposed of with household waste. Please recycle where facilities exist. Check with your Local Authority or retailer for recycling advice.
VARO N.V. - Vic. Van Rompuy N.V. Joseph Van Instraat 9 - BE2500 Lier - BELGIUM, declares that,
Product : Jig Saw Trade mark : POWERplus Model : POWX0361
is in conformity with the essential requirements and other relevant provisions of the applicable European Directives, based on the application of European harmonized standards. Any unauthorized modification of the apparatus voids this declaration.
European Directives (including, if applicable, their amendments up to the date of signature);
2011/65/EU 2006/42/EC 2014/30/EU
European harmonized standards (including, if applicable, their amendments up to the date of signature);
EN62841-1:2015
EN62841-2-11:2016
EN IEC 55014-1:2021
EN IEC 55014-2:2021
EN IEC 61000-3-2:2019
EN61000-3-3:2013
Keeper of the Technical Documentation : Philippe Vankerkhove, VARO – Vic. Van Rompuy N.V.
The undersigned acts on behalf of the company CEO,,
natural_image
Simple hand-drawn sketch of a rounded rectangular shape with no text or symbolsPhilippe Vankerkhove Regulatory Affairs – Compliance Manager 10/11/2021, Lier - Belgium
natural_image
Simple line drawing of a rounded rectangular shape with a small arrow on top (no text or symbols)Philippe Vankerkhove
10/11/2021, Lier - Belgium
Apagado: Libere el interruptor de encendido/apagado (on/off).
10/11/2021, Lier - Belgium
natural_image
Simple hand-drawn sketch of a rounded rectangle with no text or symbolsPhilippe Vankerkhove
Regulatory Affairs – Compliance Manager
10/11/2021, Lier - Belgium
natural_image
Simple line drawing of a rounded rectangle with a small circle on top (no text or symbols)Philippe Vankerkhove
10/11/2021, Lier - Belgium
natural_image
Simple hand-drawn sketch of a rounded rectangle with an arrow, no text or symbols presentPhilippe Vankerkhove
Regulatoriske saker - Samsvarsleder
10/11/2021, Lier - Belgium
1 ANVENDELSE 2
2 BESKRIVELSE (FIG. A) 2
3 MEDF∅LGENDE INDHOLD 2
4 SYMBOLER....2
5 ALMINDELIGE SIKKERHEDSANVISNINGER ....3
5.1 Arbejdsområde....3
5.2 Elektrisk sikkerhed ....3
5.3 Personlig sikkerhed....3
5.4 Omhyggelig håndtering og anvendelse af el-værktøjer 4
5.5 Service....4
6 SUPPLERENDE SIKKERHEDSFORSKRIFTER FOR LASERE ....4
7 BETJENINGSANVISNINGER....5
7.1 Opstart (Fig. 1)....5
7.1.1 Momentan reaktionsvirkning 5
7.1.2 Kontinuerlig drift....5
7.1.3 Indstilling af elektronisk hastighed....5
7.2 Udskiftning af savklingen (Fig. 2) ....5
7.3 Justering af sålen (fig. 3)....5
7.4 Støvudsugning....5
7.5 Brug af laser og LED-lys (Fig. 4)....5
7.6 Transfer switchen for at ændre vindretningen (Fig. 5)....6
7.7 Brug af pendulet 6
8 TEKNISKE DATA....6
9 ST∅J....7
10 GARANTI....7
11 MILJ∅ 7
12 KONFORMITETSERKLÆRING....8
STIKSAV 810W POWX0361
1 ANVENDELSE
natural_image
Simple hand-drawn sketch of a rounded rectangular shape with no text or symbolsPhilippe Vankerkhove
Regulatory Affairs (afdelingen for juridiske anliggender)
10/11/2021, Lier - Belgium
3 FÖRPACKNINGSINNEHÅLL
natural_image
Simple hand-drawn sketch of a rounded rectangular shape with no text or symbolsPhilippe Vankerkhove
10/11/2021, Lier - Belgium
10/11/2021, Lier - Belgium
1 PRIMJENA 2
2 OPIS (SL. A) 2
3 POPIS SADRŽAJA PAKETA 2
4 SIMBOLI 3
5 OPĆA UPOZORENJA O ELEKTRIČNIM ALATIMA....3
5.1 Područje za rad ....3
5.2 Električna sigurnost....3
5.3 Osobna sigurnost 4
5.4 Korištenje i održavanje električnog alata ....4
5.5 Servis....4
6 DODATNE SIGURNOSNE UPUTE ZA LASERE....5
7 UPUTE ZA UPORABU....5
7.1 Pokretanje (Sl. 1)....5
7.1.1 Isprekidani rad 5
7.1.2 Trajni rad 5
7.1.3 Elektronički regulator brzine vrtnje: 5
7.2 Zamjena lista ubodne pile (Sl. 2)....5
7.3 Prilagodba postolja (Sl. 3)....5
7.4 Izvlačenje prašine 6
7.5 Upotreba laserskog i LED svjetla(SI. 4)....6
7.6 Sklopka za promjenu smjera strujanja zraka (Sl. 5)....6
7.7 KORIŠTENJE NJIHALA 6
8 TEHNIČKI PODACI....6
9 BUKA....7
10 JAMSTVO....7
11 OKOLIŠ 8
12 IZJAVA O SUKLADNOSTI 8
UBODNA PILA 810W
POWX0361
1 PRIMJENA
Alat je namijenjen piljenju drva, metala i plastike. Nije prikladno za profesionalnu uporabu.

UPOZORENJE! Pažljivo pročitajte ovaj priručnik prije korištenja alata, upoznajte se snjim i spremite ga za buduće potrebe. Ako ovaj alat dajete drugome, dajte ga zajedno s ovim uputama.
2 OPIS (SL. A)
natural_image
Simple line drawing of a rounded rectangular shape with a small arrow on top (no text or symbols)Philippe Vankerkhove
10/11/2021, Lier - Belgium
1 PRIMENA 2
2 OPIS (SL. A) 2
3 SPISAK SADRŽAJA PAKOVANJA 2
4 SIMBOLI 3
5 OPŠTA BEZBEDNOSNA UPUTSTVA ZA ELEKTRIČNE ALATE .3
5.1 Radna oblast 3
5.2 Električna bezbednost....3
5.3 Lična bezbednost....4
5.4 Korišćenje i održavanje električnog alata ....4
5.5 Servisiranje 5
6 DODATNE BEZBEDNOSNE NAPOMENE ZA LASERE....5
7 RUKOVANJE 5
7.1 Pokretanje (Sl. 1)....5
7.1.1 Trenutno aktiviranje....5
7.1.2 Neprekidan rad 5
7.1.3 Elektronsko podešavanje kontrole brzine 5
7.2 Zamena lista testere (SI. 2)....5
7.3 Podešavanje postolja (Sl. 3)....6
7.4 Uklanjanje prašine 6
7.5 Upotreba lasera i LED sijalice (Sl. 4)....6
7.6 Prekidač za promenu pravca vazduha (Sl. 5)....6
7.7 Upotreba klatna....6
8 TEHNIČKI PODACI 7
9 BUKA....7
10 GARANCIJA....8
11 ŽIVOTNA SREDINA 8
12 IZJAVA O USKLAĐENOSTI....9
UBODNA TESTERA 810W
POWX0361
1 PRIMENA
10/11/2021, Lier - Belgium
10/11/2021, Lier - Belgium
1 POUŽÍVANIE 2
2 POPIS (OBR. A) 2
3 OBSAH BALENIA....2
4 SYMBOLY 3
5 VŠEOBECNÉ BEZPEČNOSTNÉ VAROVANIA PRE ELEKTRICKÉ NÁRADIE....3
5.1 Pracovná plocha ....3
5.2 Elektrická bezpečnost'......3
5.3 Osobná bezpečnost......4
5.4 Používanie elektrického náradia a starostlivost' oň....4
5.5 Servis....5
6 DOPLNKOVÉ BEZPEČNOSTNÉ POKYNY PRE LASERE......5
7 PREVÁDZKA....5
7.1 Spustenie (Obr. 1)....5
7.1.1 Prevádzka s okamžitou reakciou....5
7.1.2 Nepretržitá prevádzka....5
7.1.3 Nastavenie elektronického ovládania rýchlosti 5
7.2 Výmena pílového listu (Obr. 2)......5
7.3 Nastavenie základne (Obr. 3)....6
7.4 Vysávanie prachu....6
7.5 Použivanie lasera a LED svetla (Obr. 4)....6
7.6 Prepínač smeru fúkania vzduchu (Obr. 5)....6
7.7 Používanie kyvadlového gombíka 6
8 TECHNICKÉ ÚDAJE....7
9 HLUK 7
10 ZÁRUKA....8
11 ŽIVOTNÉ PROSTREDI 8
12 VYHLÁSENIE O ZHODE 9
LUPIENKOVÁ PÍLA 810 W POWX0361
1 POUŽÍVANIE
10/11/2021, Lier - Belgium
1 UPORABA....2
2 OPIS (SLIKA A)....2
3 SEZNAM VSEBINE PAKETA....2
4 SIMBOLI 2
5 SPLOŠNA VARNOSTNA OPOZORILA ZA ELEKTRIČNO
ORODJE....3
5.1 Delovno mesto....3
5.2 Električna varnost....3
5.3 Osebna varnost....3
5.4 Uporaba in nega električnega orodja....4
5.5 Servisiranje ....4
6 DODATNA VARNOSTNA NAVODILA ZA UPORABO LASERJA . 5
7 NAVODILA ZA UPRAVLJANJE....5
7.1 Zagon (slika 1)....5
7.1.1 Delovanje s hipnim odzivom....5
7.1.2 Neprekinjeno delovanje....5
7.1.3 Elektronsko uravnavanje hitrosti....5
7.2 Menjava žaginega lista (slika 2) 5
7.3 Nastavitev osnovne plošče (slika 3)....5
7.4 Odvajanje prahu....6
7.5 Uporaba laserja in lučke LED (slika 4)....6
7.6 Stikalo za spremembo smeri pihanja (slika 5)....6
7.7 Uporaba nihala....6
8 TEHNIČNI PODATKI....6
9 HRUP 7
10 GARANCIJA....7
11 OKOLJE 8
12 IZJAVA O SKLADNOSTI....8
VBODNA ŽAGA 810 W POWX0361
1 UPORABA
Električno orodje je namenjeno žaganju lesa, kovine in plastike. Ni primerna za profesionalno uporabo.

natural_image
Simple line drawing of a rounded rectangular shape with a small circular mark on the top right corner (no text or symbols)Philippe Vankerkhove
Oddelek za regulativne zadeve – vodja za skladnost
10/11/2021, Lier - Belgium
1 DOMENII DE UTILIZARE 2
2 DESCRIERE (FIG. A)....2
3 CONTINUTUL PACHETULUI 2
4 SIMBOLURI ....3
5 REGLEMENTĂRI GENERALE DE SIGURANȚĂ ȘI PREVENIRE A ACCIDENTELOR....3
10/11/2021, Lier - Belgium
10/11/2021, Lier - Belgium
10/11/2021, Lier - Belgium
natural_image
Simple line drawing of a rounded rectangular shape with a small mark on the top right corner (no text or symbols)Philippe Vankerkhove
10/11/2021, Lier - Belgium
natural_image
Yellow and gray electric shaver with visible blades and mounting base (no text or symbols)
WWW.VARO.COM
DESIGNED AND MARKETED BY VARO
©copyright by varo
VARO - VIC. VAN ROMPUY nv
JOSEPH VAN INSTRAAT 9 - 2500 LIER - BELGIUM
OFFICES:


- BESCHRIJVING (FIG. A)
- BRUIT
- JIG SAW 810W POWX0361
- APPLICATION
- DESCRIPTION (FIG A)
- PACKAGE CONTENT LIST
- SYMBOLS
- GENERAL SAFETY AND ACCIDENT PREVENTION REGULATIONS
- Warning!
- Work area
- Electrical safety
- Always check that the power supply corresponds to the voltage on the rating plate.
- Personal safety
- Power tool use and care
- Service
- ADDITIONAL SAFETY INSTRUCTIONS FOR LASERS
- OPERATING INSTRUCTIONS
- Starting up (Fig. 1)
- Instant response operation
- Continuous operation
- Electronic speed control setting
- Changing the saw blade (Fig. 2)
- Adjusting the base (Fig. 3)
- Dust extraction
- Using the laser and LED-light (Fig. 4)
- Transfer switch for wind direction (Fig. 5)
- NOISE
- WARRANTY
- ENVIRONMENT
- STIKSAV 810W POWX0361
- ANVENDELSE
- FÖRPACKNINGSINNEHÅLL
- UBODNA PILA 810W
- POWX0361
- PRIMJENA
- OPIS (SL. A)
- UBODNA TESTERA 810W
- PRIMENA
- LUPIENKOVÁ PÍLA 810 W POWX0361
- POUŽÍVANIE
- VBODNA ŽAGA 810 W POWX0361
- UPORABA
Brand : PowerPlus
Model : POWXJSS2
Category : Grinder