TWIST A54 - Grinder Profitec - Free user manual and instructions
Find the device manual for free TWIST A54 Profitec in PDF.


User questions about TWIST A54 Profitec
0 question about this device. Answer the ones you know or ask your own.
Ask a new question about this device
Download the instructions for your Grinder in PDF format for free! Find your manual TWIST A54 - Profitec and take your electronic device back in hand. On this page are published all the documents necessary for the use of your device. TWIST A54 by Profitec.
USER MANUAL TWIST A54 Profitec
Dear coffee enthusiasts,
With the TWIST A54 you have purchased an espresso coffee grinder of the highest quality.
We thank you for your choice and wish you a lot of pleasure with your grinder.
Please read the instruction manual carefully before using your new grinder.
If you have any further questions or if you require any further information, please contact your local specialized dealer before starting up the grinder. Please keep the instruction manual within reach for future reference.
| ! | Caution! Important notices on safety for the user. Pay attention to these notices to avoid injuries. |
| i | Attention! Important notice for the correct use of the machine. |
Symboles utilisés
- INCLUDED with DELIVERY 15
- GENERAL ADVICE 15
2.1 General safety notes 15
2.2 Proper use 15 - MACHINE DESCRIPTION 16
3.1Grind parts 16
3.2 Technical data 16 - OPERATION 17
4.1 Operation 17
4.2 Adjusting the grind size 17 - display Overview 18
5.1 Menu navigation 18 - PROGRAMMING & grinding 19
6.1 Select mode 19
6.2 Barista mode 19
6.3 Single dose mode 19
6.4 Programming portions 20
6.4.1 Single shot 20
6.4.6 Double shot 21
6.4.6 Single dose 21
7.Information mode 21
7.1 Displaying the number of grindings 21
7.2 Reset display 21 -
Preset 22
-
CLEANING 22
9.1 Cleaning the grinding mechanism 22
9.2 Cleaning of the housing and the bean hopper 22
9.3 Cleaning of the burrs 22 - TIPS AND TROUBLESHOOTING 23
- Disposal 23
- MAINTENANCE 23
SOMMAIRE FRANÇAIS
1 Grinding with bean hopper and lid
1 Coffee collection tray
1 Instruction manual
2. GENERAL ADVICE
2.1 General safety notes


- Make sure that the local main power supply voltage corresponds to the information given on the type plate on the front panel of the coffee grinder.
- Carry out the installation of the grinder according to the instructions.
- Plug the grinder into a grounded socket only and do not leave it unattended.
- Unplug the coffee grinder when not in use.
- Always disconnect the machine from the power supply before cleaning, carrying out maintenance work or replacing individual parts.
- Do not roll or bend the power cord.
- If the power cable is damaged, it must be repaired immediately by a qualified technician in order to exclude or avoid any danger.
- Do not use an extension cord/do not use a multiple socket.
- Place the grinder on an even and stable surface.
- Never place the grinder on hot surfaces.
- Never submerse the grinder into water; do not operate the grinder with wet hands.
- Do not spill liquid on the power plug of the grinder or on the socket.
- The grinder should only be used by experienced adults.
- The grinder is not intended for use by persons (including children) with reduced physical, sensory or mental capabilities, or lack of experience and knowledge, unless they have been given supervision or instruction concerning the use of the appliance by a person responsible for their safety.
- Children should be supervised to ensure that they do not play with the appliance.
- Do not expose the grinder to inclement weather (frost, snow, rain) and do not use it outdoors.
- Keep the packing out of reach of children.
- Use original spare parts only.
- Do not exceed the maximum allowable continuous grinding time of 1 minutes. Afterwards, allow the grinder to cool down before the next operation.
If you have any further questions or require any further information, please contact your specialised dealer before starting up the coffee grinder.
Our machines comply with the relevant safety regulations.
Any repairs or changes of components must be carried out by an authorised specialty dealer. In case of non-observance the manufacturer does not assume liability and is not liable to recourse.
See page 1 for your specialised dealer's contact details. Authorized service points, also outside Europe, can be found in the dealer search on our website: www.profitec-espresso.com.
2.2 Proper use
The TWIST A54 has to be used for whole, unground, roasted, cleaned coffee beans only, please also do not use caramelised coffee.
Using the grinder for any other than the above mentioned purposes is strictly prohibited. The manufacturer cannot be held responsible for damages due to unsuitable use of the grinder and is not liable for recourse.

This appliance is intended to be used in households and similar applications such as:
- staff kitchen areas in shops, offices and other working environments
farmhouses - by clients in hotels, motels and other residential type environments
- bed and breakfast type environments
3. MACHINE DESCRIPTION
3.1Grinder parts
TWIST A54
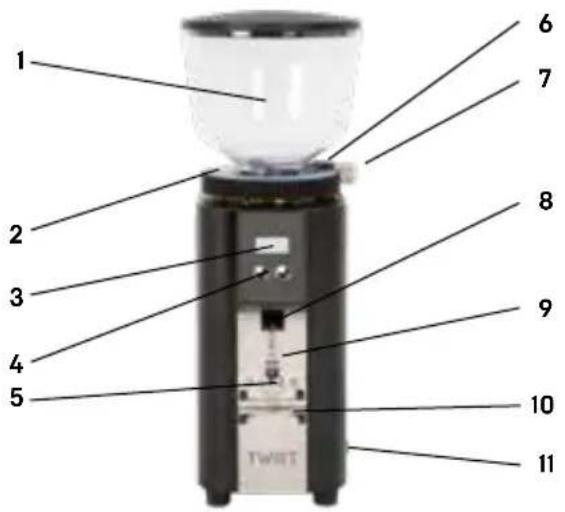
- Bean hopper with lid
- Grind level indicator
- Display
- Control buttons (left and right)
- Push button to start grinding
- Slide lock for bean hopper
- Grind level adjustment
- Spout
- Adjustable portafilter holder [top]
- Portafilter holder (bottom)
- On/Off switch
3.2 Technical data
Housing: Polished stainless steel / anthracite powder coated
Grinder: Aluminum
Burrs: Steel, 54 mm
Bean hopper capacity: approx. 250 g
RPM: 1400 rpm
Voltage: Frequency:
EU: 230 V EU: 50 Hz
UK: 230 V UK: 50 Hz
Australia: 230 V Australia: 50 Hz
New Zealand: 230 V New Zealand: 50 Hz
US: 120 V US: 60 Hz
Japan: 100 V Japan: 60 Hz
Motor output 235W
Grind cycles: T-On: 10 sec. T-Off: 80 sec.
Weight: 5.26 kg
Dimensions: [W x D x T]: 130 x 170 x 357 mm
4. OPERATION
Preparation
| Before starting to operate the grinder make sure ·that the grinder is switched off ·the electrical cord is not plugged | |
| ·Place the grinder on an even, water-resistant and stable surface. ·Never place the grinder on hot surfaces. ·Make sure that the local main power supply voltage corresponds to the information given on the type plate on the bottom of the grinder. ·Plug the grinder into a grounded socket only and do not leave it on unattended. ·Do not roll or bend the power cord. ·Do not use an extension cord / do not use a multiple socket |
4.1 Operation
How to operate your TWIST A54:
- Place the bean hopper on top. Leave about a centimetre of space to open the the slide lock. Then press the bean hopper down.
- Fill the bean hopper with roasted coffee-/espresso beans.
- Open the slide lock.
- Plug the electrical cord into an outlet and switch on the grinder.
- The grinder is now operational.
| i | Important Never fill the bean hopper with ground coffee. Never place a finger or other items in the coffee bean container, nor the spout. |
| ! | Emergency Stop Operation: The grinder may be stopped immediately by pressing the On/Off switch |
4.2 Adjusting the grind size
| Grind size adjustment should be made while the grinder is operating. |
- Make sure that the hopper is filled with coffee beans and the slide lock is open.
- Turn the grinder on.
- Perform a trial grind by shortly activating the push button.
- In case the grind size is
too coarse, turn the grind level adjuster clockwise (numbers on the scale are going down).
to fine, turn the grind level adjuster counter-clockwise (numbers on the scale are going up).
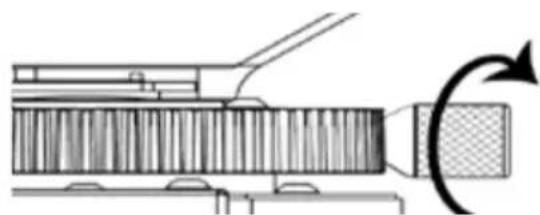
Grind size becomes finer.
- Please use only small 12 steps to adjust the grind size.
5. DISPLAY OVERVIEW
| MAKE COFFEE YOURS | Welcome sign after switching on |
| 7.0° | 1 cup & grinding time |
| 11.5° | 2 cups & grinding time |
| Select mode: selection between 1 cup (left button) and 2 cups (right button) | |
| Barista mode: Grinding starts upon touching the push button (Ix for a single shot and 2x short times for a double shot) | |
| Single dose mode | |
| Information mode | |
| 000024 000259 r.l.xx | Indication of the number of grindings (Software version at the bottom right) |
| Reset: Reset the grinding information | |
| Screen saver: If the grinder is not used for 10 minutes, either one or two cups appear moving across the display. |
5.1 Menu navigation
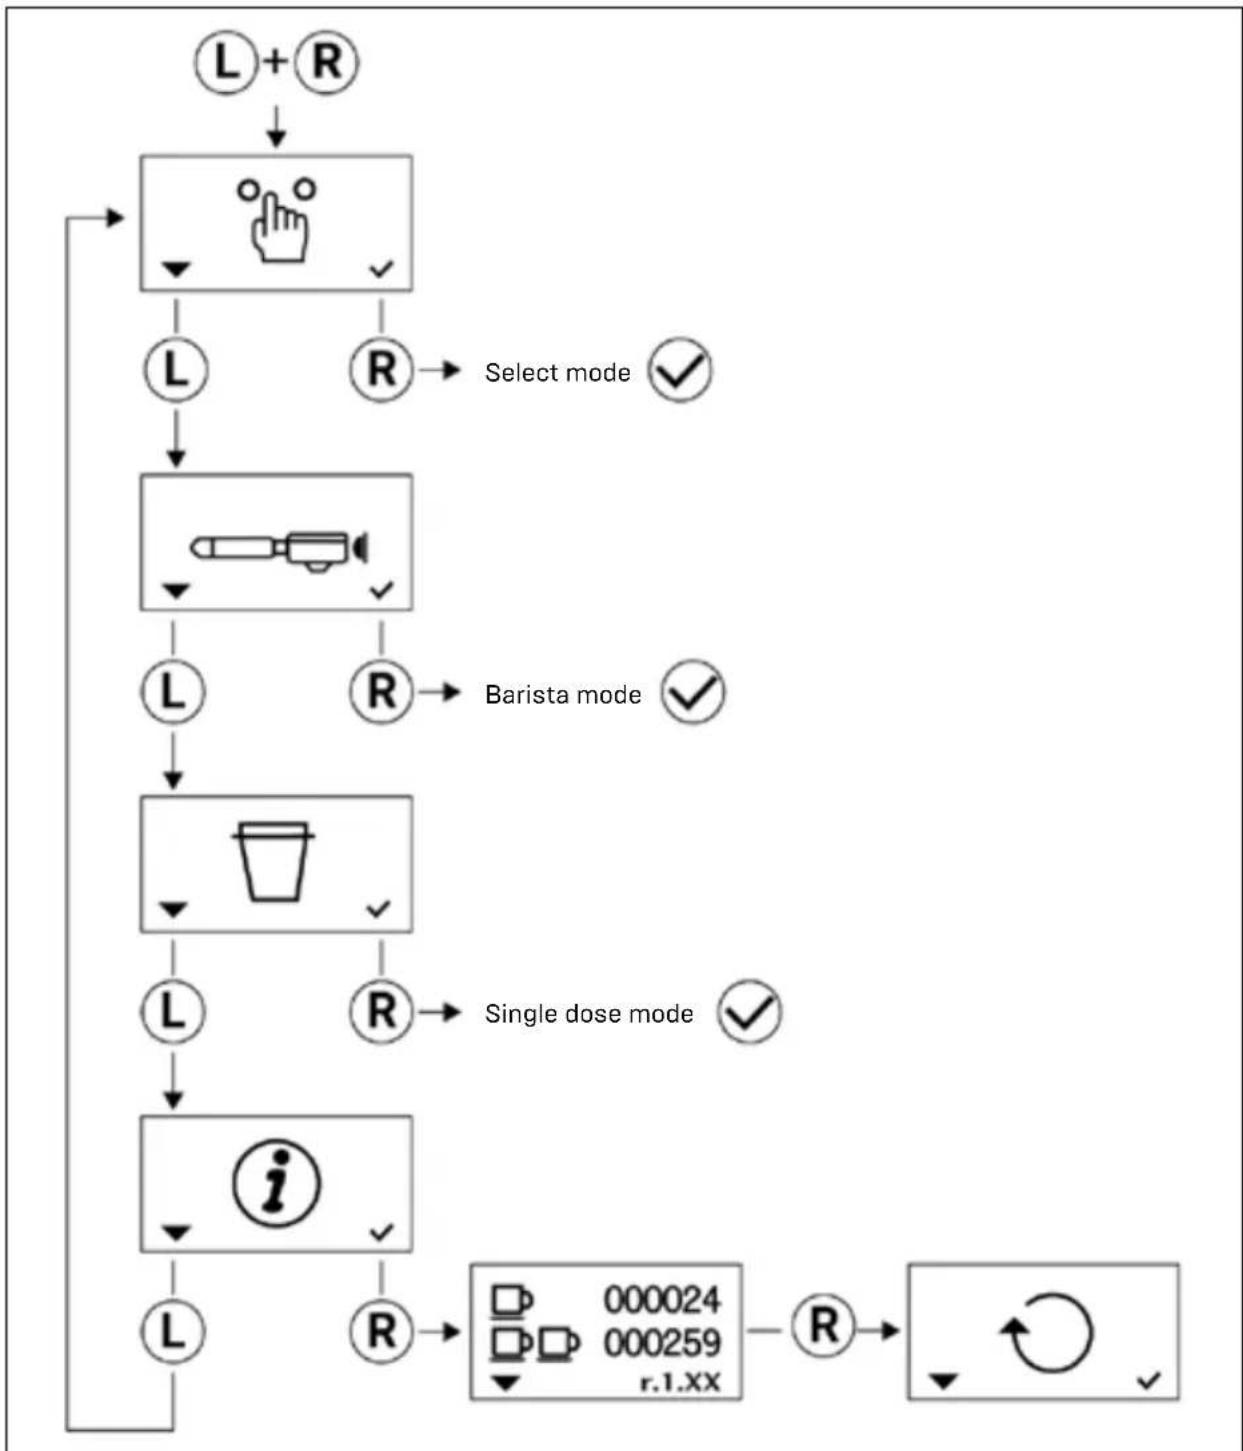
The menu is accessed by pressing and holding the left button and the right button simultaneously. The left button can then be used to switch through menu items, the right button is used to confirm the selected menu item.
After 5 seconds, changes will be saved and the selected mode is active.
6. PROGRAMMING & GRINDING
6.1 Select mode
Select mode is activated at delivery. The left button is programmed for one portion, with a grinding time of 7 seconds, and the right button is programmed for two portions, with a grinding time of 11.5 seconds.
Switch between the respective times using the buttons below the display,
Left button: I portion
Right buttons: 2 portions
The push button works as a start-pause/stop button for the dose shown on the display. The display indicates the remaining grinding time (by counting down).
You can pause grinding by pressing the push button. The remaining time will be displayed for 5 seconds. If the user presses the push button again within 5 seconds, the grinding is continued until finished or paused again. Afterwards the grinder jumps back to the selected dose and is ready to grind again immediately. If the paused grinding process is not continued within 5 seconds, the grinder jumps back to the selected dose and is ready to grind again.

Only in select mode, a bar is displayed at the bottom left for single cup and at the bottom right for double cup. This indicates that the select mode is currently active and "NOT" the barista mode.
To change these grinding times, see 6.4.1 and 6.4.2.
6.2 Barista mode
In this mode, you can change between different lcup & 2 cup doses quickly: Just press the push button once for a single shot and twice for a double shot. To stop grinding press the push button three times.
For manual grinding keep the push button pressed down for as long as you would like to grind.
Afterwards the grinder is ready to grind again immediately.
Spontaneous selection of different doses:
1 push: Single shot (1 portion)
2 pushes: Double shot (2 portions)
3 pushes: stop
To change grind times, see 6.4.1 and 6.4.2.
6.3 Single dose mode
In this mode, you can grind by pressing the push button once. The grinder then grinds for a defined "single dose" time (default 30s).
The push button is working as a start button. Pressing the push button will start the grinding process for the defined "single dose" time while the display counts down. To stop the grinding process, push the push button again.
To change grind times, see 6.4.3.
6.4 Programming portions
6.4.1 Single shot

- To programme a single shot, the portion for one cup, press the left button for 3 seconds.
- The time next to the cup on the display starts flashing.
- "-" appears at the bottom left and "+" at the bottom right of the display.
- Press the left button quickly to reduce the grinding time or the right button to increase the time again
- After a short wait, the menu will be exited automatically. The newly programmed grinding time is now saved.
6.4.6 Double shot

- To programme a double shot, the portion for two cups, press the right button for 3 seconds.
- The time next to the cups on the display starts flashing.
- "-" appears at the bottom left and "+" at the bottom right of the display.
- Press the left button quickly to reduce the grinding time or the right button to increase the time again
- After a short wait, the menu will be exited automatically. The newly programmed grinding time is now saved.
6.4.6 Single dose

- First activate the "Single dose mode" in the menu by pressing both buttons simultaneously and then navigate through the menu with the left button until the dosing cup appears on the display. Confirm with the right button.
- Press and hold either the left or the right button for 3 seconds.
- The time next to the dosing cup on the display starts flashing.
- "-" appears at the bottom left and "+" at the bottom right of the display.
- Now enter a grinding time between 20 and 60 seconds in steps of 10.
- After a short wait, the menu will be exited automatically. The newly programmed grinding time is now saved.
7. INFORMATION MODE
7.1 Displaying the number of grindings

- Activate the „information mode" in the menu by pressing both buttons simultaneously. Navigate through the menu with the left button until the „i" appears on the display. Confirm with the right button.
- The total number of grindings will no be displayed.
- In addition, you will find the current software version displayed in the bottom right corner.
7.2 Reset display

- In order to reset the display as well as the number of grindings, activate the information mode by pressing both buttons simultaneously and then navigate through the menu with the left button until the g_i^j appears on the display. Confirm the mode with the right button.
- Press the left button to enter the „Reset area". Now confirm by pressing the right button, the number of grindings will be set to zero.
8. PRESET
To restore factory settings, press and hold the right button while switching the grinder off and on again.
9. CLEANING

To be able to open or close the slide lock easily, the bean container must be approx. one centimetre away from the grind level indicator.
We do recommend cleaning the grinder on a regular basis in order to keep the grinding mechanism functioning properly and to receive even results. Furthermore, cleaning will prevent old coffee residues in the grinding mechanism from affecting aroma and taste.
9.1 Cleaning the grinding mechanism
Please use a grinder cleaner available at your specialty dealer to clean the grinder. Clean the grinder according to the instructions.
9.2 Cleaning of the housing and the bean hopper
Occasionally clean both the housing and the tray with a damp cloth. You should clean the bean hopper with a damp cloth prior to refilling the hopper in order to remove coffee oil residues. These residues can lead to a negative effect on flavour and taste.
9.3 Cleaning of the burrs

Note that it may be difficult to unscrew the burr bracket due to the fine threads. There is a risk of injury.
Please make sure that no coffee grounds remain in the threads to ensure everything can be screwed back together again properly.
- Close the bean hopper with the lid and grind the remaining beans still in the hopper. Unplug the grinder.
- Remove the bean hopper. Please note that the lock slide has to be closed.
- Loosen the screws of the grinder dial with an Allen key (2.5mm).
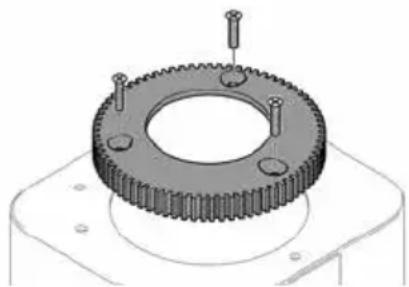
- Remove the grinder dial.
- Unscrew the bracket of the upper burr. Please note that this may require some force.
- Clean the burrs and the threads with a brush. You may use a vacuum cleaner as well.
- Make sure, before replacing the individual parts, that all components are clean. Please make sure that no coffee grounds remain in the threads to ensure everything can be screwed back together again properly.
- For a faster re-assembly, turn the upper grinding disk by hand onto the lower grinding disk until they touch. From this position, back off for about 1/2-3/4 turns. Now reassemble the sprocket.
- Readjust the preferred grind level while the grinder is in use.
10. TIPS AND TROUBLESHOOTING
In case coffee beans should get jammed in the grinder, proceed as follows:
- Adjust the grind to a coarser setting. Turn the grind adjuster counter-clockwise by two full turns.
- Press the portafilter against the push button and grind. The stuck beans should now come loose.
- Re-adjust the grind setting.
In case the coffee spout of your grinder is clogged due to too fine a grind setting (depending on temperature, humidity, fat and oil content of the respective coffee), please take the following steps to solve the problem:
- Switch the grinder off, switch remains in "off" position. Unplug the power chord.
- Close the slide lock of the bean hopper, so that no further beans can drop into the grinding area of the grinder.
- Insert a suitable tool into the spout of the grinder (e.g. an espresso spoon, the shaft of the grinder brush) and entirely clean out the grounds which have plugged the spout.
- The grounds may have collected in the corners of the spout as well and should be cleaned out accordingly.
-
Remember or make a note of the current grind setting. Increase the grind setting by one number, so the beans remaining in the grinding section can now pass through without resistance.
-
Plug the power chord of the grinder back in and turn on the grinder.
- Start the grinding process as usual by activating the grind switch. The remaining coffee grounds should now come out of the spout easily. Manually clean the entire spout with a suitable tool again (unplug the power cord). Activate the grind switch until no further grounds come out. If need be, manually clean the spout again.
- Open the slide lock of the bean hopper.
- Re-calibrate the grind setting with the grinding time as preferred during the next few grinds. A coarser grind can be compensated for by using more ground coffee or by tamping harder.
In case the grind setting of your grinder should change by itself after many grinding procedures, it is most likely due to vibrations during grinding that have caused the bracket of the grind level adjuster to become loose. In that case, please proceed as follows to correct the problem:
- Switch the grinder off and unplug the power cord.
- Loosen both screws [2.5mm Allen wrench], that are, or were, holding the grind adjustment bracket.
- Position the bracket as closely to the gear wheel as possible and tighten both screws again.
11. DISPOSAL
WEEE Reg.-no.: DE97592029
This product complies with EU Directive 2012/19/EU and is registered according to WEEE (Waste Electrical and Electronic Equipment).
12. MAINTENANCE
Any repairs or changes of single components must be carried out by an authorised specialty dealer. If your burrs have to be replaced (usually after grinding 400-500 kg of coffee), please also contact your authorised specialty dealer.
1. CONTENU DE LA LIVRAISON
Cycles de meulage: T-On: 10 sec. T-Off: 80 sec.
Poids: 5.26 kg
Dimensions: [L × P × T] : 130 × 170 × 357 mm