EZHTL 482WN - Fridge ZEROWATT - Free user manual and instructions
Find the device manual for free EZHTL 482WN ZEROWATT in PDF.

User questions about EZHTL 482WN ZEROWATT
0 question about this device. Answer the ones you know or ask your own.
Ask a new question about this device
Download the instructions for your Fridge in PDF format for free! Find your manual EZHTL 482WN - ZEROWATT and take your electronic device back in hand. On this page are published all the documents necessary for the use of your device. EZHTL 482WN by ZEROWATT.
USER MANUAL EZHTL 482WN ZEROWATT
Chladnička....28-39 SK
Thank you for purchasing this product.
Before using your refrigerator, please carefully read this instruction manual in order to maximize its performance. Store all documentation for subsequent usage or other owners. This product solely for household use or similar applications such as:
- the kitchen area for personnel in shops, offices and other working environments
-on farms, by clientele of hotels, hotels and other environments of a residential type
-at bed and breakfasts (B & B)
- For catering services and similar applications not for retail sale.
This appliance must be used only for purposes of storage of food, any other use is considered dangerous and the manufacturer will not be responsible for any omissions. Also, it is recommended that you take note of the warranty conditions.
SAFETY INFORMATION
The refrigerator contains a refrigerant gas (R600a: isobutene) and insulating gas (cyclopentane), with high compatibility with the environment, that are, however, inflammable.
We recommend that you follow the following regulations so as to avoid situations dangerous to you:
Before performing any operation, unplug the power cord from the power socket.
- The refrigeration system positioned behind and inside the appliance contains refrigerant. Therefore, avoid damaging the tubes.
- If in the refrigeration system a leak is noted, do not touch the wall outlet and do not use open flames. Open the window and let air into the room. Then call a service center to ask for repair.
- Do not scrape with a knife or sharp object to remove frost or ice that occurs. With these, the refrigerant circuit can be damaged, the spill from which can cause a fire or damage your eyes.
- Do not install the appliance in humid, oily or dusty places, nor expose it to direct sunlight and to water.
•Do not install the appliance near heaters or inflammable materials. - Do not use extension cords or adapters.
- Do not excessively pull or fold the power cord or touch the plug with wet hands.
- Do not damage the plug and/or the power cord; this could cause electrical shocks or fires.
- It is recommended to keep the plug clean, any excessive dust
residues on the plug can be the cause fire.
- Do not use mechanical devices or other equipment to hasten the defrosting process.
- Absolutely avoid the use of open flame or electrical equipment, such as heaters, steam cleaners, candles, oil lamps and the like in order to speed up the defrosting phase.
- Do not use or store inflammable sprays, such as spray paint, near the appliance, it could cause an explosion or fire.
- Do not use electrical appliances inside the food storage compartments, unless they are of the type recommended by the manufacturer.
- Do not place or store inflammable and highly volatile materials such as ether, petrol, LPG, propane gas, aerosol spray cans, adhesives, pure alcohol, etc. These materials may cause an explosion.
- Do not store medicine or research materials in the appliance. When the material that requires a strict control of storage temperatures is to be stored, it is possible that it will deteriorate or an uncontrolled reaction may occur that can cause risks.
- Maintain the ventilation openings in the appliance enclosure or in the built-in structure, free of obstruction.
- Do not place objects and/or containers filled with water on the top of the appliance.
- Do not perform repairs on this appliance. All interventions must be performed solely by qualified personnel.
- This appliance can be used by children aged from 8 years and above and by persons with reduced physical, sensory or mental capabilities or with a lack of experience and knowledge; provided that they have been given adequate supervision or instruction concerning how to use the appliance in a safe way and understand the hazards involved.
- Children should not play with the appliance. Cleaning and user maintenance should not be made by children without supervision
“FOR appliances without a 4-star compartment: this refrigerating appliance is not suitable for freezing foodstuffs”
“FOR a free standing appliance: this refrigerating appliance is not intended to be used as a built-in appliance”
SCRAPPING OLD APPLIANCE
This appliance is marked according to the European directive 2012/19/EU on Waste Electrical and Electronic Equipment (WEEE).
WEEE contains both polluting substances (which can cause negative consequences for the environment) and basic components (which can be re-used). It is important to have
WEEE subjected to specific treatments, in order to remove and dispose properly all pollutants, and recover and recycle all materials. Individuals can play an important role in ensuring that WEEE does not become an environmental issue; it is essential to follow some basic rules:
- WEEE should not be treated as household waste;
- WEEE should be handed over to the relevant collection points managed by the municipality or by registered companies. In many countries, for large WEEE, home collection could be present.
In many countries, when you buy a new appliance, the old one may be returned to the retailer who has to collect it free of charge on a one-to-one basis, as long as the equipment is of equivalent type and has the same functions as the supplied equipment.
CE Conformity
By placing the European safet for this product.

mark on this product, we are confirming compliance to all relevant and environmental requirements which are applicable in legislation
ENERGY SAVINGS
For better energy savings, we suggest:
- Installing the appliance away from heat sources and not exposed to direct sunlight and in a well ventilated room.
- Avoid putting hot food into the refrigerator to avoid increasing the internal temperature and therefore causing continuous functioning of the compressor.
- Do not excessively stuff foods so as to ensure proper air circulation.
- Defrost the appliance in case there is ice (see DEFROSTING) to facilitate the transfer of cold.
- In case of absence of electrical energy, it is advisable to keep the refrigerator door closed.
- Open or keep the doors of the appliance open as little as possible
- Avoid adjusting the thermostat to temperatures too cold.
- Remove dust present on the rear of the appliance (see CLEANING).
- Total no frost Audy( with display on door): remove all the baskets in freezer compartment;
- Total no frost (with internal user interface for fridge and knob for freezer): remove other baskets in freezer compartment but keep bottom drawer in its position.
- Frost free model: remove other baskets in freezer compartment but keep bottom drawer in its position.
- All normal static models: remove all drawers in freezer compartment.
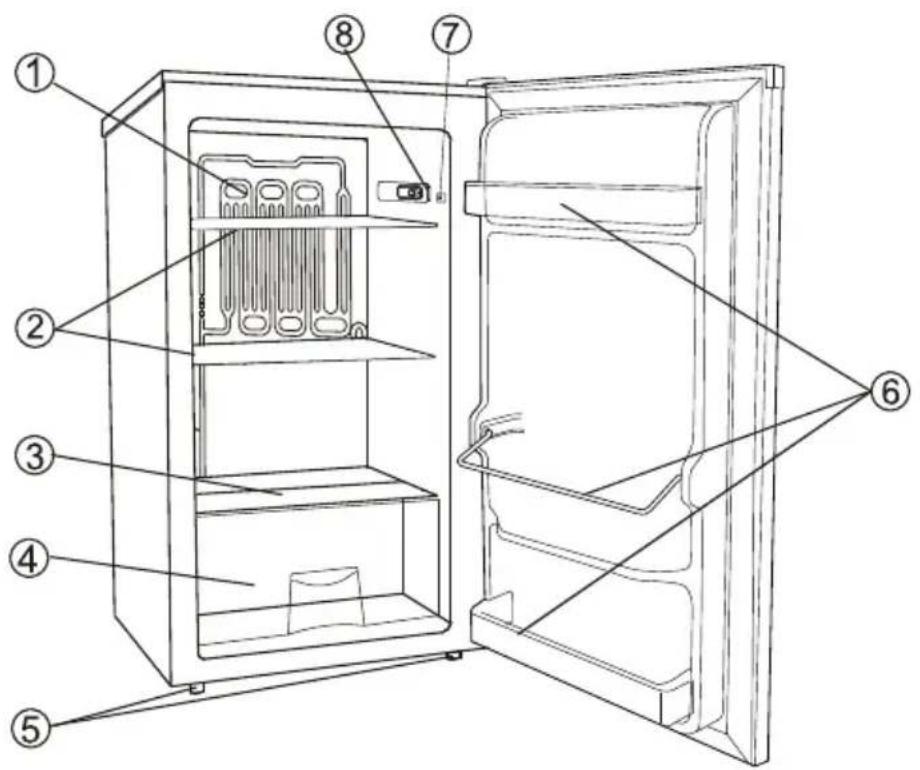
PARTS AND FEATURES
text_image
Labeled diagram of an refrigerator interior showing numbered components for identification① Evaporator
② Shelves of refrigerator chamber
③ Glass cover
④ Crisper box
⑤ Leveling Legs
⑥ Bottle Racks
⑦ Door Switch
⑧ Temperature Control Knob
The most energy-saving configuration requires drawers, food box and shelves to be positioned in the product, please refer to the above pictures.
Well Ventilating
There is need of good ventilation around the refrigerator for easy dissipation of heat, high efficiency of refrigeration and low power consumption. For this purpose, sufficient clear space should be needed around the refrigerator. Its back is at least 100mm away from the wall, its sides at least have a space of 100mm separately and the height from over its top is not less than 200mm. A clear space should be left to open its doors to 160°
Power Supply
The refrigerator is only applied with power supply of single phase alternating current of (220-240)V\~/50Hz;230V\~/60Hz. If fluctuation of voltage in the district user is of so large that the voltage exceeds the above scope, for safety sake, be sure to apply a.c. automatic voltage regulator to the refrigerator. The refrigerator must employ a special power socket instead of common one with other electric appliances. Its plug must match the socket with ground wire.
Power Line Cord
The cord should be neither lengthened nor folded into coil during operation. Moreover, it is forbid den that cord is kept close onto the compressor at the back of the refrigerator, the surface temperature of which is quite high when operating.
Touching with it would deactivate the insulation or cause leakage for electricity.
Protection from Moisture
Avoiding placing the refrigerator in a place where heavy moisture is present so as to minimize possibility of rusty for its metal parts. Still more, the refrigerator is forbidden to be directly sprayed by water, otherwise, poor insulation and current leakage would occur.
Protection from Heat
The refrigerator should be far away from any heat source or direct sunshine.
Fixing Stable
Floor on which refrigerator will be placed must be flat and solid. It should not be laid on any soft material such as foam plastic, etc. If the refrigerator is not on the same level, adjust the screws suitably. The refrigerator should not be placed near anything which may echo.
Keep Away from Danger
It is inadvisable that the refrigerator is placed near any volatilizable or combustible such as gas, petrol, alcohol, lacquer and banana oil, etc. The above-mentioned objects can not be stored in the refrigerator.
Moving
When fixed or moved, the refrigerator can not be set horizontally or declined to more than 45° or upside-down.
POSITIONING
Install the appliance at a location where the ambient temperature corresponds to the climate class indicated on the rating plate of the appliance:
-
- Extended temperate (SN): 'this refrigerating appliance is intended to be used at ambient temperatures ranging from 10 °C to 32 °C'
-
- Temperate (N): 'this refrigerating appliance is intended to be used at ambient temperatures ranging from 16 °C to 32 °C'
-
- Subtropical (ST): 'this refrigerating appliance is intended to be used at ambient temperatures ranging from 16 °C to 38 °C'
-
- Tropical (T): 'this refrigerating appliance is intended to be used at ambient temperatures ranging from 16 °C to 43 °C'
Position different food in different compartments according to be below table
| Refrigerator compartments | Type of food |
| Door or balconies of fridge compartment | ·Foods with natural preservatives, such as jams,juices, drinks, condiments.·Do not store perishable foods. |
| Crisper drawer (salad drawer) | ·Fruits, herbs and vegetables should be placed separately in the crisper bin.·Do not store bananas, onions, potatoes, garlic in the refrigerator. |
| Fridge shelf – middle | ·Dairy products, eggs |
| Fridge shelf – top | ·Foods that do not need cooking, such as ready-to-eat foods, deli meats, leftovers. |
- It's suggested to set the temperature at 4^ in the fridge compartment, and, whether possible, at -18^ in the freezer compartment.
- For most food categories, the longest storage time in the fridge compartment is achieved with colder temperatures. Since some particular products (as fresh fruits and vegetables) may be damaged with colder temperatures, it is suggested to keep them in the crisper drawers, whenever present. If not present, maintain an average setting of the thermostat.
- For frozen food, refer to the storage time written on the food packaging. This storage time is achieved whenever the setting respects the reference temperatures of the compartment (one-star -6^ , two stars -12^ , three stars -18^ )
Temperature setting recommendation
| Temperature Setting Recommendation | ||
| Environment Temperature | Freezer compartment | Fridge compartment |
| Summer | / | 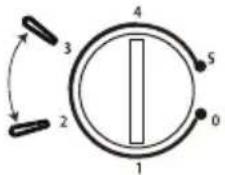 |
| Set on 2~3 | ||
| Normal | / | 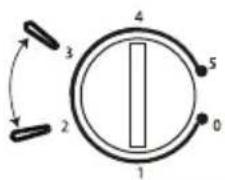 |
| Set on 2~3 | ||
| WinGwī | / | 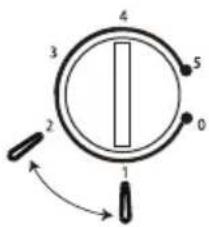 |
| Swāon 1~2 | ||
• Information above give users recommendation of temperature setting.
Reversing the Door Swing
Tools required: Phillips style screwdriver / Flat bladed screwdriver / Hexagonal spanner

- Ensure the unit is unplugged and empty.
- Adjust the two levelling feet to their highest position.
- To take the door off it is necessary to tilt the unit backwards. You should rest the unit on something solid so that it will not slip during the door reversing process.
- All parts removed must be saved to do the reinstallation of the door.
-
Do not lay the unit flat as this may damage the coolant system.
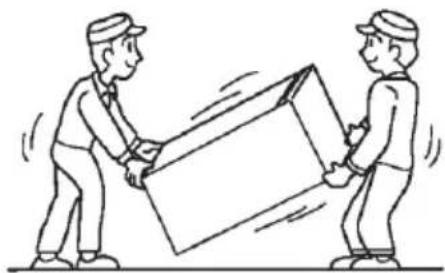
• We recommend that 2 people handle the unit during assembly. -
Tilt the unit slightly towards the rear and prop it securely. Two people are required to tilt the unit during the door reversal process.
natural_image
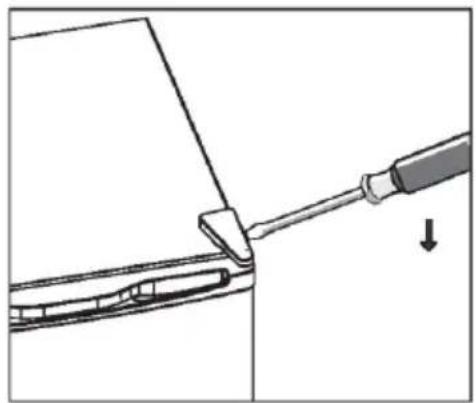
Illustration of two people exchanging a large box, no text or symbols present- Remove the top right hinge cover.
natural_image
Diagram showing a tool interacting with a mechanical component, with an arrow indicating direction (no text or symbols present)Reversing the door swing
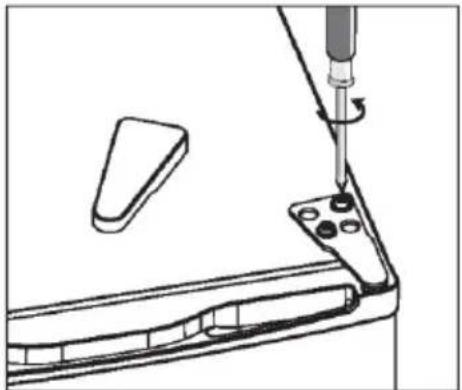
- Undo the screws. Then remove the hinge bracket.
natural_image
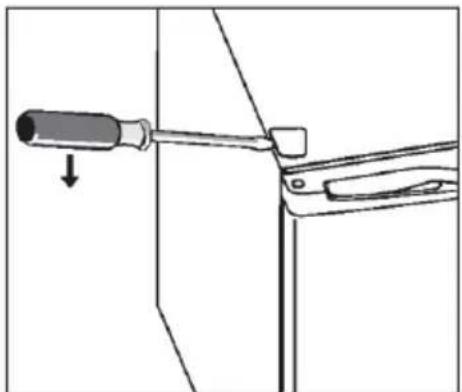
Technical line drawing of a mechanical assembly with a tool inserted, showing part details and a bracket (no text or symbols)- Remove the top left screw cover.
natural_image
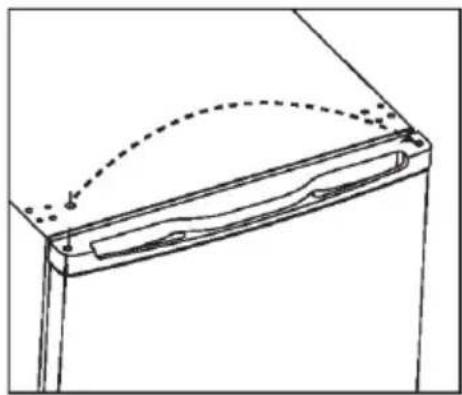
Diagram of a tool being inserted into a bracket, showing a screwdriver and clamped parts (no text or symbols)- Move the core cover from left side to right side. And then lift the door and place it on a padded surface to prevent it from scratching.
natural_image
Technical line drawing of a door frame with dashed curved lines indicating motion or alignment (no text or symbols)- Remove the screws and bottom hinge. Then remove the adjustable feet from both side.

natural_image
Technical line drawing of a mechanical clamp or bracket assembly (no text or symbols)Reversing the door swing
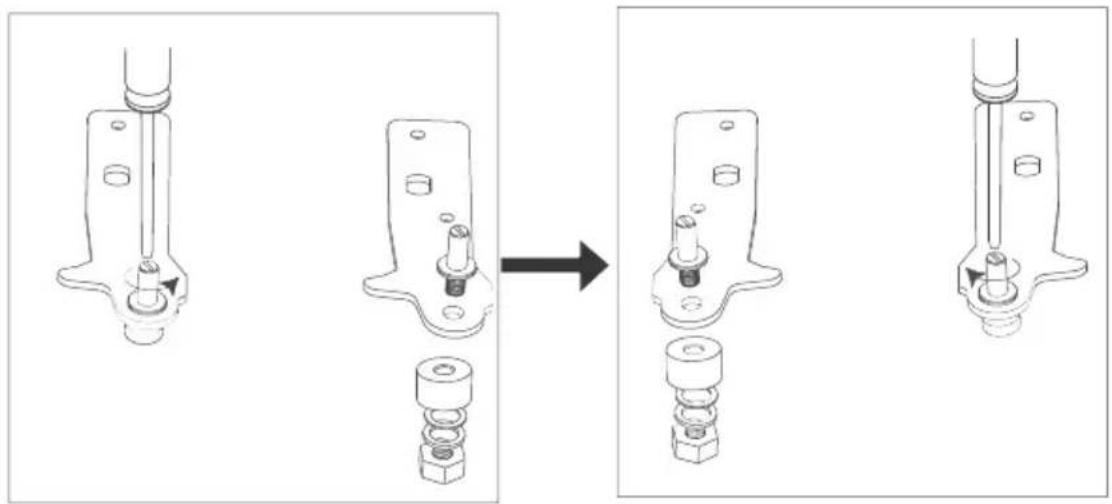
- Unscrew and remove the bottom hinge pin, turn the bracket over and replace it.
natural_image
Mechanical assembly diagram showing a shaft and bolt assembly before and after modification (no text or labels)- Refit the bracket fitting the bottom hinge pin. Replace both adjustable feet.
natural_image
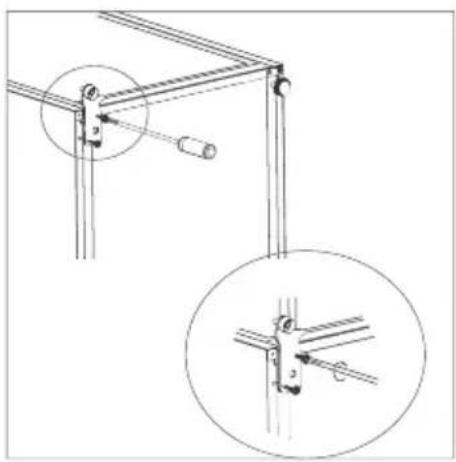
Technical line drawing of a mechanical linkage assembly with two circular insets showing close-up views (no text or symbols)-
Place the door back on. Ensure the door is aligned horizontally and vertically so that the seals are closed on all sides before finally tightening the top hinge.
-
Insert the hinge bracket and screw it to the top of the unit.
-
Use a spanner to tighten it if necessary.
natural_image
Technical line drawing of a mechanical assembly with a tool inserted, showing no text or symbolsReversing the door swing
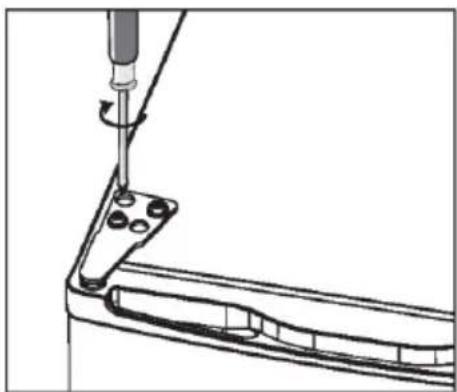
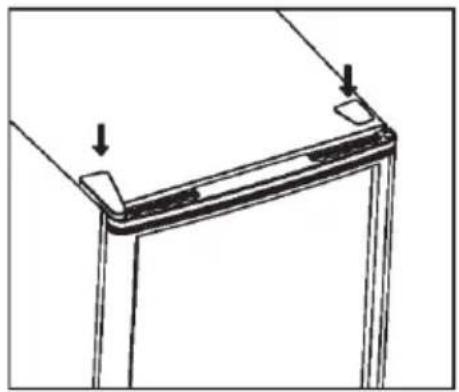
- Put the hinge cover and the screw cover back.
natural_image
Simple line drawing of a door frame with two arrows pointing to the top panel (no text or symbols)- With the door closed, check that the door is aligned horizontally and vertically and that the seals are closed on all sides before finally tightening the bottom hinge. Re-adjust the leveling feet as needed.
natural_image
Simple line drawing of a rectangular box with a lid (no text or symbols)Cautions
★ It must be checked that the voltage used should be the same as the rated voltage before the refrigerator is used.
★ Water contained in food or getting into air inside the refrigerator by opening doors may form a layer of frost inside, It will weaken the refrigerator when the frost is thick, Defrosting on evaporator is operated manually. When the biggest thickness of the frost layer on the evaporator increase to 4mm, it must be turn off the power supply to defrost. The defrost water flow into the water collection pan through the drain port and evaporate by the heat of compressor.
★ If the supply cord of this appliance is damaged, it must only be replaced by a repair shop appointed by the manufacturer, because special purpose tools are required.
★ It is dangerous to alter the specifications or attempt to modify this products in any way
When you change the light bulb or when the refrigerator is not in use for long periods, disconnect it from the electricity supply..
★ Wait for 5 minutes before restart the unit after the power supply blackout..
Maintenance
★ The refrigerator should be cleaned and maintained once a month.
When performing maintenance, make absolutely sure that the power plug is first disconnected from the power outlet.
★ Wipe the inner and outer surface of the refrigerator and its accessories with wet cloth. If they are too dirty, scrub them with neutral detergent, and then clean them with water and dry them with clean cloth. After this, a small quantify of glass wax is recommended to polish the refrigerator surface with a flannelette.
For cleaning, don't use hot water, diluent, petrol, alcohol, kerosene, washing powder, cleanser, aikailinous detergent, acid, Chemical cloth, etc. So as not to damage the lacquer coat and plastics. It is forbidden than the refrigerator is directly sprayed with water. Otherwise, it would cause rusty or weaken the insulation.
★ Be careful to upkeep the sealing rubber bars of the doors. They should always be cleaned.
★ If the plastic parts in refrigerator remain contaminated for a long time by oil (animal or vegetable), they will be easy aged and possibly cracked. The drain pan gets dirty very easily if it is not cleaned regularly, bad odours will be produced, get into the habit of cleaning this pan regularly.
- When the refrigerator does not work
Check if there is a power failure.
Check if the power plug is plugged into the power outlet.
Check that the fuse has not blown.
- When the refrigerator is cooling excessively
The temperature control dial may be set too high.
If you place foodstuffs containing a lot of moisture directly under the cool air outlets, they will freeze easily. This does not indicate a malfunction.
- When the refrigerator is not cooling sufficiently
The food may be packed too tightly together which will block the flow of cool air.
You may have put something hot or a lot of foodstuffs into the refrigerator.
The door may not have been closed properly.
The door gaskets may be damaged.
The refrigerator may not be ventilated.
There may be insufficient clearance between the refrigerator and the surfaces. Immediately both sides and above.
The temperature control dial may not be set properly.
- When the defrosting water overflows inside the refrigerator and onto the floor.
Check that the drain pipe and the drain hose are not clogged.
Check that the drain pan is housed properly.
Whether the thickness of the frost layer was thicker than 4mm when you make the refrigerator defrost.
- When condensation form on the outside of the refrigerator.
Condensation may form on the outside when the humidity is high such as during a wet season. This is the same result as the condensation formed when chilled water is poured into a glass. It does not, therefore, indicate a failure, wipe dry with a dry cloth.
- When you hear a sound like water flowing.
A sound like water flowing is the refrigerant flowing. It does not Indicate a malfunction.
- When the cabinet's side panel heats up
The side panel of the cabinet will heat up when the door is opened or closed frequently, when starting the unit and when the unit operates in summer with high ambient outside temperature, In such case, do not touch the panel, it results from the dissipation of the heat from inside the cabinet, and it does not mean that something is wrong with the refrigerator.
*For the detailed technical specifications, please refer to the nameplate at the back of the refrigerator..
*Specifications are subject to change without prior notice.
GUARANTEE
Minimum guarantee is: 2 years for EU Countries, 3 years for Turkey, 1 year for UK, 1 year for Russia, 3 years for Sweden, 2 years for Serbia, 5 years for Norway, 1 year for Morocco, 6 months for Algeria, Tunisia no legal warranty required.
AVAILABILITY OF SPARE PARTS
"Thermostats, temperature sensors, printed circuit boards and light sources are available for a minimum period of seven years after placing the last unit of the model on the market. Door handles, door hinges, trays and baskets for a minimum period of seven years and door gaskets for a minimum period of 10 year, after placing the last unit of the model on the market".
For further information about the product, please consult https:// eprel.ec.europa.eu/ or scan the QR on the energy label supplied with the appliance
To contact the technical assistance, visit our website: https://corporate.haier-europe.com/en/
Under the section "website", choose the brand of your product and your country. You will be redirected to the specific website where you can find the telephone number and form to contact the technical assistance.
Coldest Area Than The Refrigerator
This symbol below indicates the location of the coldest area of the refrigerator.
This area is bounded near the fan and above it by the icon or shelf positioned at the same level.
To maintain temperatures in this area, be careful not to move this shelf.
INSTALLING THE TEMPERATURE GAUGE
To help you set up your fridge correctly, it features a temperature gauge that allows you to
monitor the average temperature in the coldest area.WARNING: This ad is only intended for use with the refrigerator. Be careful not to use it in another refrigerator (in fact the coldest area is not the same) or for another use.
Temperature control in the coldest area
Once the installation of the temperature gauge is complete, it is possible
You can periodically check that the temperature of the coldest zone is correct.
If necessary, adjust the thermostat accordingly. The internal temperature of the refrigerator is influenced by several factors such as: B. the ambient temperature in the room, the amount of food stored and the frequency with which the door is opened. Consider these factors when setting the temperature.
Be careful to properly store food in the refrigerator and especially in the coldest area. Make sure the temperature display indicates "OK".

text_image
OKIf "OK" does not appear, the temperature of the zone is too high. Set the thermostat to a higher position. Wait at least 12 hours before resetting the thermostat. After loading fresh food into the appliance or opening the door again (or for a long time), it is normal for the "OK" indicator not to appear on the temperature display.
text_image
Labeled diagram of an refrigerator interior showing numbered components for identificationnatural_image
Illustration of two workers exchanging a large cardboard box (no text or symbols present)natural_image
Diagram showing a tool interacting with a mechanical component, with an arrow indicating direction (no text or symbols present)natural_image
Technical line drawing of a mechanical assembly with a tool inserted, showing part details and a small component (no text or symbols)natural_image
Diagram of a screwdriver inserted into a bracket with a downward arrow indicating force (no text or symbols present)natural_image
Technical line drawing of a mechanical component with dashed curved line indicating motion or alignment (no text or symbols)natural_image
Technical line drawing of a mechanical clamp or bracket assembly (no text or symbols)natural_image
Mechanical assembly diagram showing a valve mechanism before and after assembly, with no visible text or symbols.natural_image
Technical line drawing of a mechanical linkage assembly with two views (top and side), no text or symbols present.natural_image
Technical line drawing of a mechanical assembly with a tool inserted, showing no text or symbolsnatural_image
Simple line drawing of a door frame with two arrows indicating direction (no text or symbols)natural_image
Simple line drawing of a rectangular box with a lid (no text or symbols)5.Manutenzione
text_image
Labeled diagram of an open refrigerator showing internal components and numbered partsnatural_image
Two workers exchanging a large cardboard box, no text or symbols present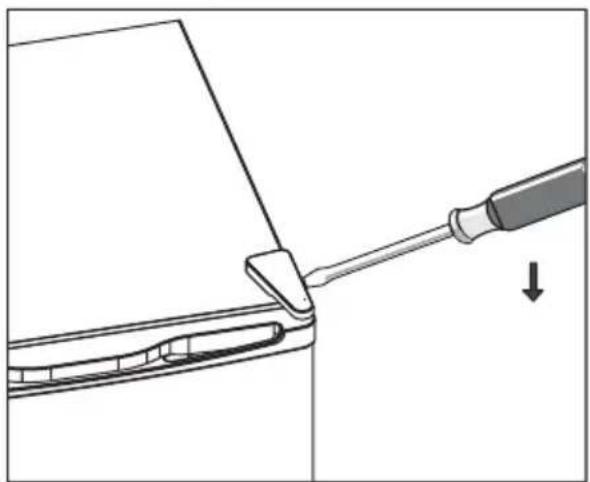
natural_image
Diagram showing a tool interacting with a mechanical component, with an arrow indicating direction (no text or symbols present)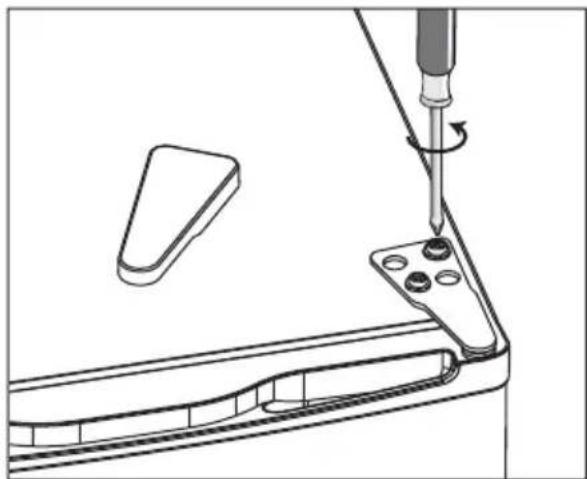
natural_image
Technical line drawing of a mechanical assembly with a screwdriver inserted, showing no text or symbolsZMENA SMERU OTVÁRANIA DVIEROK
natural_image
Mechanical assembly diagram showing a valve mechanism before and after modification, with no visible text or symbols.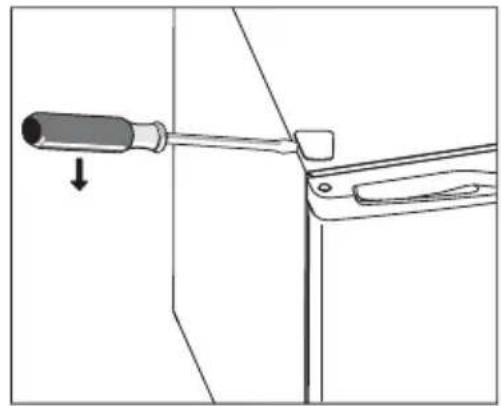
natural_image
Diagram of a screwdriver holding a tool, with an arrow indicating the direction (no text or symbols present)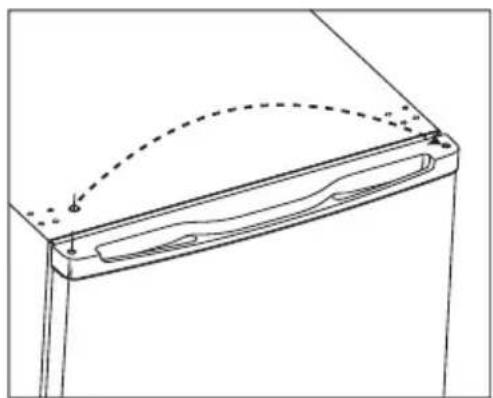
natural_image
Technical line drawing of a mechanical component with dashed curved arrow indicating motion (no text or symbols)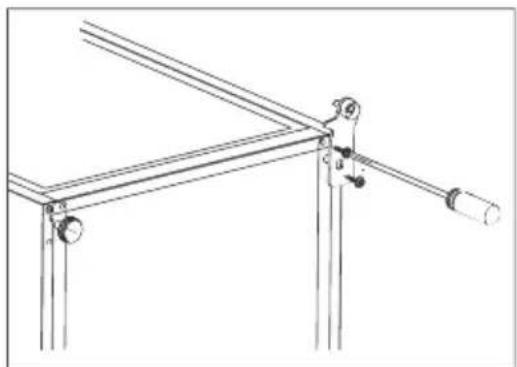
natural_image
Pure mechanical linkage diagram without any text, numbers, or symbolsZMENA SMERU OTVÁRANIA DVIEROK
natural_image
Technical line drawing of a mechanical linkage system with two views (one showing a pin, one showing a pin with a weight) and no text or symbols present.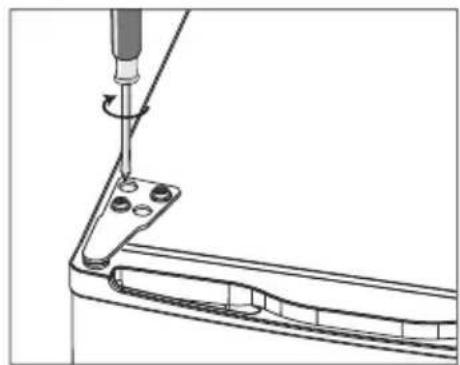
natural_image
Technical line drawing of a mechanical assembly with a screwdriver inserted, showing no text or symbols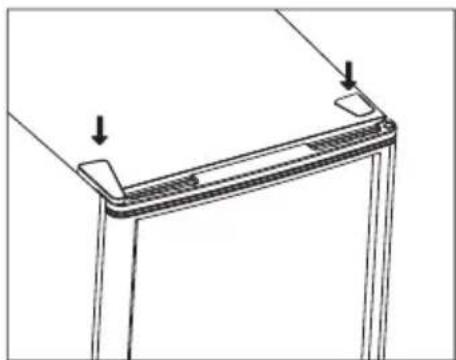
natural_image
Technical line drawing of a mechanical component with two arrows indicating assembly or force direction (no text or symbols present)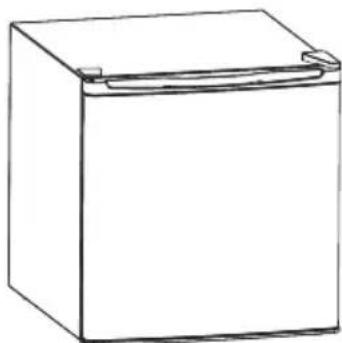
natural_image
Simple line drawing of a rectangular box with a lid (no text or symbols)UPOZORNENIA
text_image
Labeled diagram of an open refrigerator showing internal components and numbered partsnatural_image
Illustration of two workers exchanging a large box, no text or symbols presentnatural_image
Diagram of a tool interacting with a mechanical component, showing a tool tip and a downward arrow (no text or symbols)natural_image
Technical line drawing of a mechanical assembly with a tool inserted, showing part details and a small component (no text or symbols)natural_image
Diagram of a screwdriver inserted into a mechanical clamp (no text or symbols)natural_image
Technical line drawing of a mechanical component with dashed curved line indicating motion or alignment (no text or symbols)natural_image
Mechanical assembly diagram showing a valve mechanism before and after assembly, with no visible text or symbols.natural_image
Technical line drawing of a mechanical linkage system with two views (one showing a pin, one showing a bracket), no text or symbols present.natural_image
Technical line drawing of a mechanical assembly with a tool inserted, showing no text or symbolsnatural_image
Simple line drawing of a door frame with two arrows pointing to the top panel (no text or symbols)natural_image
Simple line drawing of a rectangular box with a lid (no text or symbols)Mises en garde
natural_image
Simple circular shape with no text, numbers, or symbolstext_image
Labeled diagram of an open refrigerator interior showing numbered components for identification.natural_image
Illustration of two people exchanging a large box, no text or symbols presentnatural_image
Diagram showing a tool interacting with a mechanical component, with an arrow indicating direction (no text or symbols present)natural_image
Technical line drawing of a mechanical assembly with a tool inserted, showing part details and a bracket (no text or symbols)natural_image
Diagram of a screwdriver inserted into a mechanical component with a downward arrow indicating force (no text or symbols present)natural_image
Technical line drawing of a mechanical component with dashed arc indicating motion (no text or symbols)natural_image
Technical line drawing of a mechanical clamp or bracket assembly (no text or symbols)natural_image
Mechanical assembly diagram showing a valve mechanism before and after assembly, with no visible text or symbols.text_image
Technical diagram showing mechanical linkage with labeled components and magnified detail viewnatural_image
Technical line drawing of a mechanical assembly with a tool inserted, showing no text or symbolsnatural_image
Diagram of a door frame with two arrows indicating direction of movement or force (no text or symbols present)natural_image
Simple line drawing of a rectangular box with a lid (no text or symbols)Upozornění
text_image
Labeled diagram of an refrigerator interior showing numbered components for identificationnatural_image
Illustration of two workers exchanging a large box, no text or symbols presentnatural_image
Diagram showing a tool interacting with a mechanical component, with an arrow indicating direction (no text or symbols present)natural_image
Technical line drawing of a mechanical assembly with a tool and component (no text or symbols)
natural_image
Diagram of a tool interacting with a bracket, showing a screwdriver and handle (no text or symbols)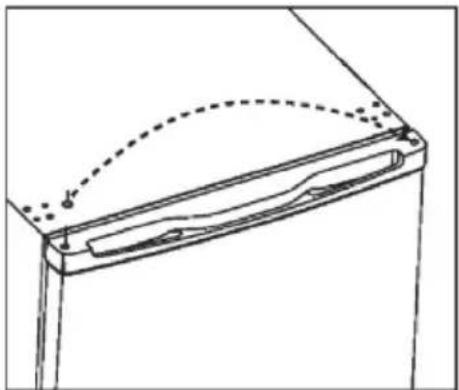
natural_image
Technical line drawing of a mechanical component with dashed arc indicating motion (no text or symbols)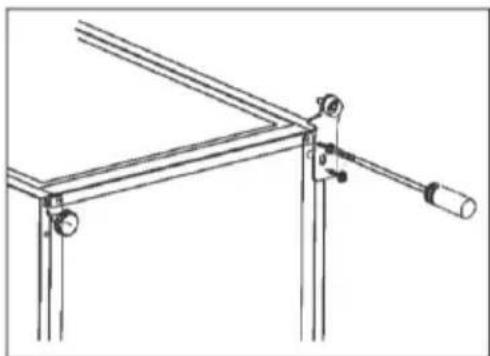
natural_image
Technical line drawing of a mechanical clamp or bracket assembly (no text or symbols)natural_image
Mechanical assembly diagram showing a valve mechanism before and after assembly, with no visible text or symbols.natural_image
Technical line drawing of a mechanical linkage assembly with two circular inset views showing detailed detail (no text or symbols)natural_image
Technical line drawing of a mechanical assembly with a tool inserted, showing no text or symbolsnatural_image
Technical line drawing of a mechanical component with mounting holes and a base, showing no text or symbols.natural_image
Simple line drawing of a rectangular box with lid (no text or symbols)Figyelem!
text_image
Labeled diagram of an open refrigerator showing internal components and numbered partsnatural_image
Two workers in uniform pulling a large box together (no text or symbols visible)natural_image
Diagram showing a tool interacting with a mechanical component, with an arrow indicating direction (no text or symbols present)natural_image
Technical line drawing of a mechanical assembly with a tool and component (no text or symbols)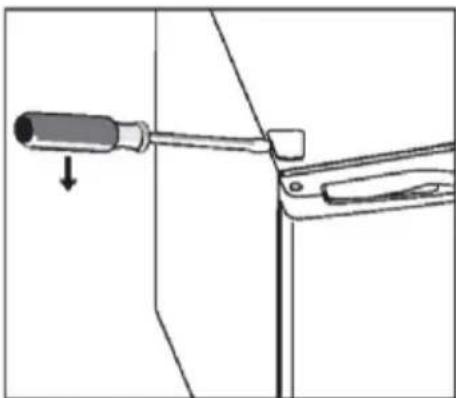
natural_image
Diagram of a tool interacting with a bracket, showing a screwdriver and handle (no text or symbols)
natural_image
Technical line drawing of a mechanical component with dashed arc indicating motion or alignment (no text or symbols)