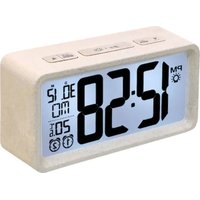
WQ 296 - Alarm clock radio Techno Line - Free user manual and instructions
Find the device manual for free WQ 296 Techno Line in PDF.


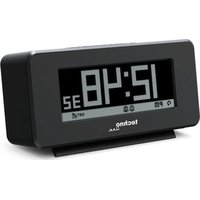
| Product type | Radio alarm clock |
| Brand | Techno Line |
| Model | WQ 296 |
| Power supply | 2 AAA batteries (alkaline recommended) |
| Display | Backlit LCD |
| Time display | 12H/24H |
| Calendar | Date, month, day (multiple languages) |
| Indoor temperature | °C/°F |
| Number of alarms | 2 |
| Snooze function (repeat) | Yes, adjustable from 5 to 60 min |
| Nightlight function | Yes, programmable (5/6/7 hours) |
| Backlight | Temporary activation (5 seconds) |
| Day languages | Several available (selectable) |
| Dimensions | Approximately 15 x 8 x 5 cm (estimate) |
| Weight | Approximately 200 g (estimate) |
| Care | Soft cloth and soapy water |
| Precautions | Do not expose to moisture, shocks, direct sunlight |
| Battery safety | Use only alkaline batteries, observe polarity |
| Repairability | Remove batteries to reset |
| Intended use | Indoor only |
Frequently Asked Questions - WQ 296 Techno Line
User questions about WQ 296 Techno Line
0 question about this device. Answer the ones you know or ask your own.
Ask a new question about this device
Download the instructions for your Alarm clock radio in PDF format for free! Find your manual WQ 296 - Techno Line and take your electronic device back in hand. On this page are published all the documents necessary for the use of your device. WQ 296 by Techno Line.
USER MANUAL WQ 296 Techno Line
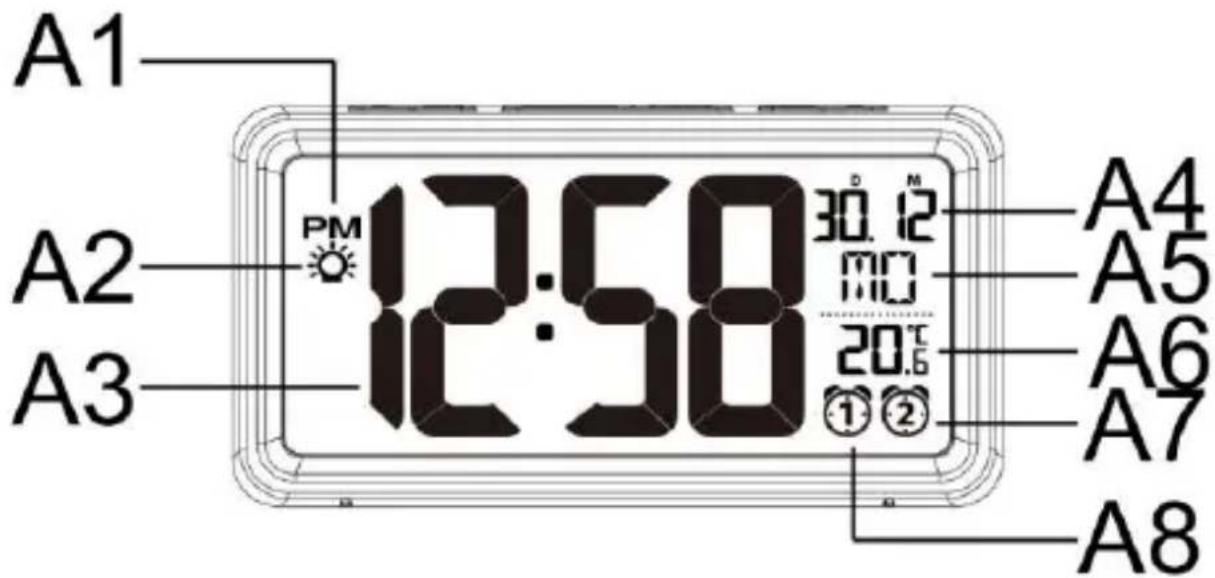
A7 - Alarm 2 Symbol A8 - Alarm 1 Symbol
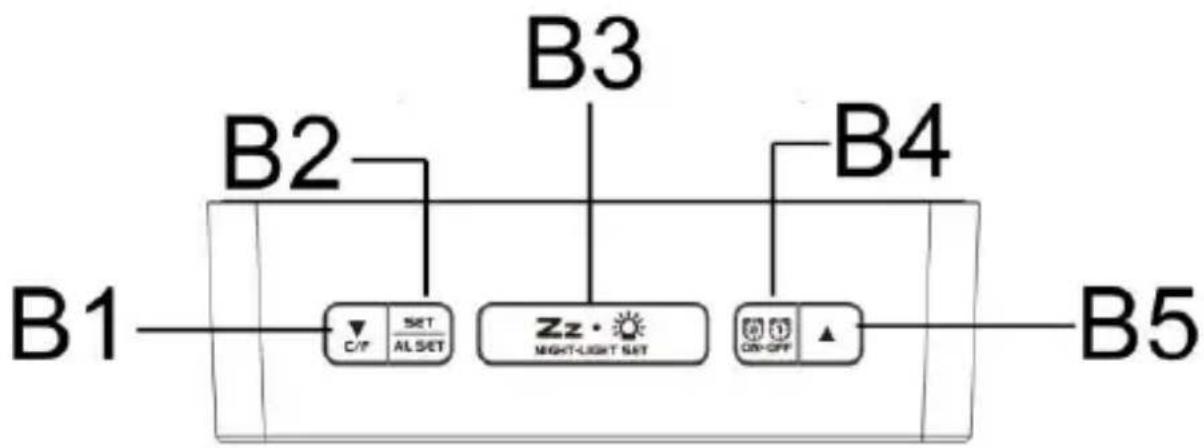
B1 - Down / °C/°F Taste B2 - Set / Alarm set Taste
B3-Snoopze/LightTaste B4-Alarm1-2on/offTaste
B5 - Up Taste
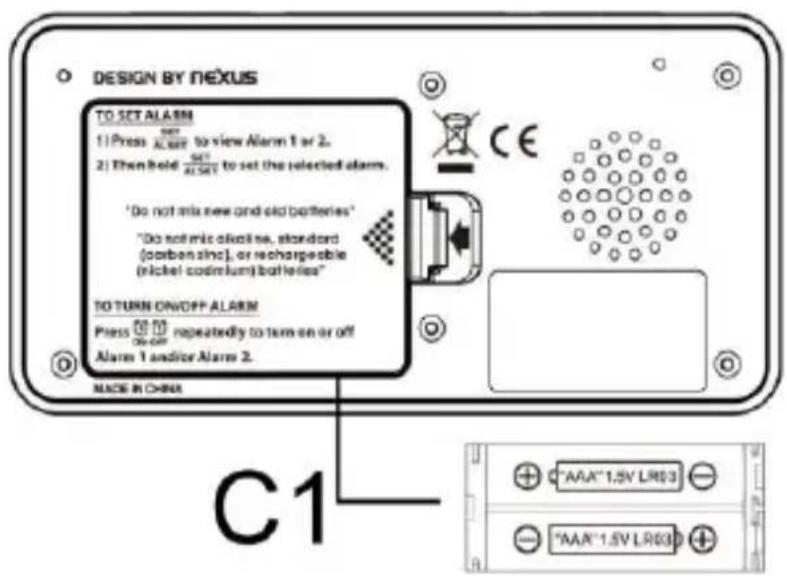
C1 - Batteriefach
INSTALLATION
$$ E N = E n g l i s c h $$
$$ \mathbf {S P} = \text {S p a n i s c h} $$
$$ I T = I t a l i e n i s c h $$
$$ D A = \text {D a n i s c h} $$
$$ F R = \text {F r a n z o s i s c h} $$
$$ G E = D e u t \text {s c h} $$
$$ D U = N i e d e r l a n d i s c h $$
SET
PFLEGE IHRES PRODUKTES
INSTRUCTION MANUAL WQ 296
OVERVIEW
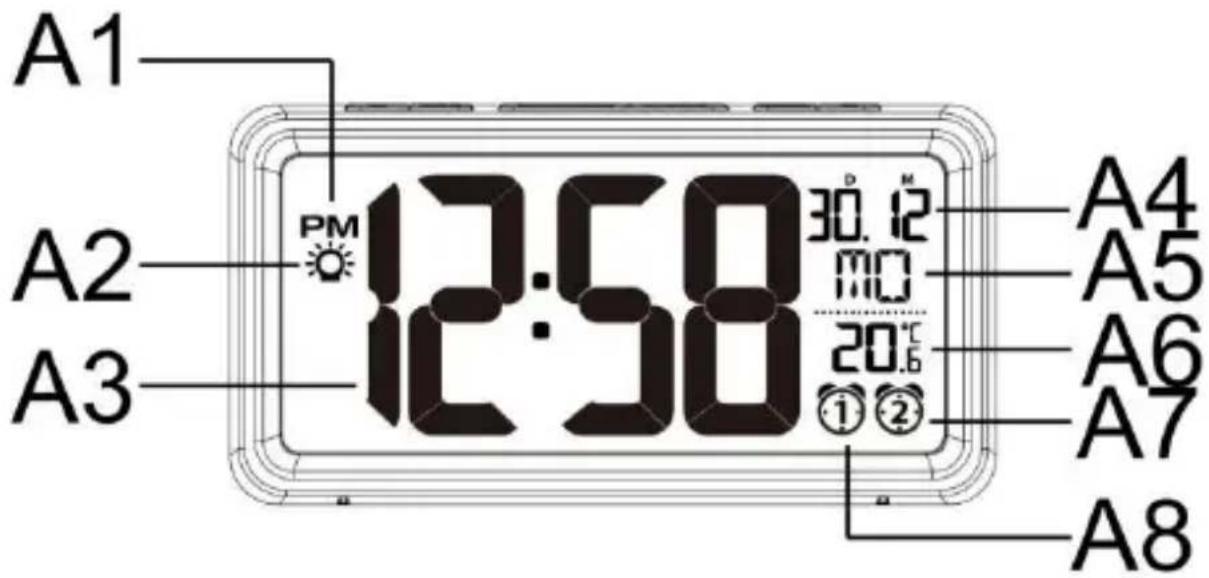
A1 - PM display A2 - Night light on icon
A3 - Time display A4 - Date / month
A5-Weekday A6-Indoor temperature
A7 - Alarm 2 A8 - Alarm 1
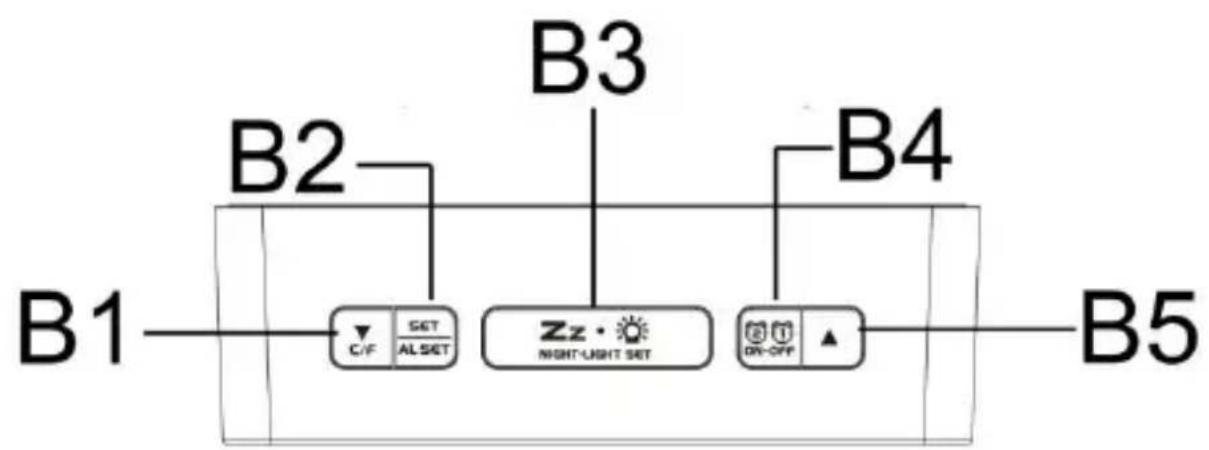
B1-Down/°C/°F button B2-Set/Alarm set button
B3-Snoopze/Light button B4-Alarm 1-2 on/off button
B5 - Up button
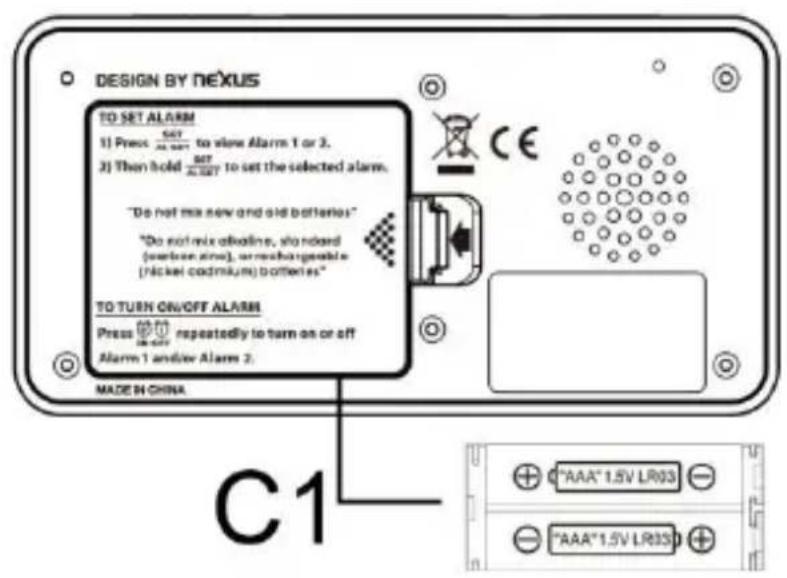
C1 - Battery cover
INSTALLATION
- Place your clock face down on a flat and soft surface.
- Remove the battery cover at the back of the clock.
- Insert 2 x new AAA batteries (not included) into the battery compartment by observing the correct "+" and "-" polarity.
- Replace the battery cover.
Remarks:
- Alkaline batteries are recommended for optimal usage of this clock.
- Do not mix old and new batteries.
- Do not mix alkaline, standard or rechargeable batteries.
When the battery life is short, the back light and night light may not function as normal.
TIME SETTINGS
- Press and hold ALSET until the hour digit "0" flash. Press or to set the hours. Press and hold or will accelerate setting in fast speed.
SET 2. Press ALsE T once again, the minute digits "00" flash. Press or to set the minutes. Press and hold or will accelerate setting in fast speed.
SET
- Press ALSET once again, “24Hr” flash, press ▲ or ▼ to select 24Hr ⇌12Hr. In 12Hr mode, PM will appear on the display to indicate afternoon time. There is no AM indicator.
SET
- Press ALsET once again, "2014" flashes and Y r appears. Press A or to set the years.
SET
- Press again, the month digit “1” flash. Press or to set the month.
SET
- Press OK again, the date digit “1” flash. Press or set the date.
SET
- Press OK again, the “ D1 M 1” flash. Press ▲ or ▼ to select Month-Date or Date-Month display.
SET
- Then press ALSET once again, EN flash. Press or to select the language of day of week.
$$ E N = E n g l i s h $$
$$ \mathrm {S P} = \text {S p a n i s h} $$
$$ I T = I t a l i a n $$
$$ D A = \text {D a n i s h} $$
$$ F R = F r e n c h $$
$$ G E = \text {G e r m a n} $$
$$ D U = D u t c h $$
SET
- Press ALSET once again, 05 flash and S N appears. Press ▲ or ▼ to set snooze duration (from 5 min. to 60 min.)
SET
- Press to confirm. You clock will return to normal time display (or if no key is pressed for approx. 10 seconds.)
TO SET ALARM 1
SET
-
At normal time display, press AL SET once, 6:00 and A1 appears.
-
Press and hold until Alarm's 1 hour digit "6" flash. Then press or to set alarm 1's hours.
Press and hold or to accelerate setting in fast speed.
- Press SET ALSET once again, Alarm's 1-minute digit "00" flash. Then press or to set alarm 1's minutes.
- Press AOBGE to confirm. Your clock will return to normal time display (or if no key is pressed for approx. 10 seconds)
TO SET ALARM 2
- At normal time display, press SET ALSET twice, 6:00 and A2 appears.
- Press and hold Alarm 2's hour digits flash. Then press or to set Alarm 2's hours. Press and hold or to accelerate setting in fast speed.
- Press ALSET once again, Alarm 2's minute digits "00" flash. Then press or set Alarm 2's minutes.
- Press again to confirm. Your clock will return to normal time display (or if no key is pressed for approx. 10 seconds)
TO TURN ON OR OFF ALARM 1 AND 2
- At normal time display, press once to activate Alarm 1, appears.

-
Press once again to activate Alarm 2, appears.
-
Press again to activate both Alarm 1 and 2, both and appear.


- Press ON-OFF again to deactivate both alarms (both 1 and disappear).

TO STOP AND RESET THE ALARM TO COME ON THE NEXT DAY
When alarm 1 or 2 is sounding, the related alarm icon flashes. Press the
once to stop the alarm and reset it to come on the following day.
After that both and/or remains on the display.
TO ACTIVATE THE SNOOZE FUNCTION
When alarm is sounding, press once the alarm will be silenced and come on again after the set snooze duration.
Note: if your second alarm activates while the first alarm is sounding or it is in the snooze mode, the second alarm overrides the first alarm (the first alarm is reset to come on the next day).
The clock has a night light function which illuminates the LCD display for you to view time in a dark environment.
- At normal time display mode, press and hold until the appear and "OFF" flash. Then press or to select night
- Press Zz· once again, “0:00” flash, then press ▲ or ▼ to select Night Light starting hours.
- Press Zz·O once again, “6 Hr” appears, then press ▲ or ▼ to select Night Light on duration 5 Hr / 6 Hr / 7 Hr
- Press once again to confirm. Your clock will return to normal time display (or if no key is pressed for approx. 10 seconds)
Note:
For best readability at night, please place the clock below your line at night.
If the set time for starting the night light function is before the current time, the night light function is only switched on the next time the time is reached.
^ C / F
Simply press select degree Celsius or Fahrenheit temperature readout.
TO USE BACKLIGHT
At normal time display mode, press NIGHT-LIGHT SET once to activate the backlight for 5 seconds.
TROUBLE SHOOTING
If your clock displays irrelevant time or does not function properly, which maybe caused by electro-static discharge or other interference, open the battery cover, take out the batteries a few seconds and reinstall them by observing the correct +/- polarity. Your unit will be reset to default settings and you need to set it again.
CARE OF YOUR PRODUCT
- Place your unit on a stable surface, away from sources of direct sunlight or excessive heat or moisture.
- Protect your furniture when placing your units on a natural wood and lacquered finish by using a cloth or protective material between it and the furniture.
- Clean your unit with a soft cloth moistened only with mild soap and water. Stronger agents such as Benzine, thinner or similar materials can damage the surface of the unit. Make sure the unit is unplugged before cleaning.
- Do not mix old and new batteries. Do not mix alkaline, standard (carbon-zinc), or rechargeable (nickel-cadmium) batteries.
- If the unit is not to be used for a prolonged period, such as a month or longer, remove the batteries to prevent possible corrosion. Should the battery compartment become corroded or dirty, clean the compartment thoroughly and replace the batteries.
PRECAUTIONS
- This main unit is intended to be used only indoors.
- Do not subject the unit to excessive force or shock.
- Do not expose the unit to extreme temperatures, direct sunlight, dust or humidity.
- Do not immerse in water.
- Avoid contact with any corrosive materials.
- Do not dispose this unit in a fire as it may explode.
- Do not open the inner back case or tamper with any components of this unit.
BATTERY SAFETY WARNINGS
- Use only alkaline batteries, not rechargeable batteries.
-
Install batteries correctly by matching the polarities (+/-) .
-
Always replace a complete set of batteries.
- Never mix used and new batteries.
- Remove exhausted batteries immediately.
- Remove batteries when not in use.
- Do not recharge and do not dispose of batteries in fire as the batteries may explode.
- Ensure batteries are stored away from metal objects as contact may cause a short circuit.
- Avoid exposing batteries to extreme temperature or humidity or direct sunlight.
- Keep all batteries out of reach from children. They are a choking hazard.
Use the product only for its intended purpose!
Consideration of duty according to the battery law

Old batteries do not belong to domestic waste because they could cause damages of health and environment.
You can return used batteries free of charge to your dealer and collection points. As end-user you are
committed by law to bring back needed batteries to distributors and other collecting points!
Consideration of duty according to the law of electrical devices

This symbol means that you must dispose of electrical devices separated from the General household waste when it reaches the end of its useful life. Take your unit to your local waste collection point or recycling centre. This applies to all countries of the European Union, and to
other European countries with a separate waste collection system.
MANUEL D'INSTRUCTIONS WQ 296
FR1
VUE D'ENSEMBLE
A1 - Affichage PM
A3 - Affichage de l'heure
A5 - Jour de la semaine
A7 - Alarme 2
B1 - Down/°C/°F
B3 - Snooze/Light
B5 - Up
B2 - Set/Alarm set
B4 - Alarm 1-2 on/off
$$ E N = a n g l a i s $$
$$ \mathbf {S P} = \text {e s p a g n o l} $$
$$ I T = i t a l i e n $$
$$ D A = d a n o i s $$
$$ F R = \text {f r a n c a i s} $$
$$ G E = a l l e m a n d $$
$$ D U = n e r l a n d a i s $$
$$ E N = E n g e l s $$
$$ \mathbf {S P} = \mathbf {S p a a n s} $$
$$ I T = I t a i a n s $$
$$ D A = D e e n s $$
$$ F R = F r a n s $$
$$ G E = D u i t s $$
$$ D U = N e d e r l a n d s $$
SET
C1 - Coperchio battery
INSTALLAZIONE
$$ E N = I n g l e s e $$
$$ S P = S p a g n o l o $$
$$ I T = I t a l i a n o $$
$$ D A = D a n e s e $$
$$ F R = F r a n c e s e $$
$$ G E = T e d e s c o $$
$$ I T = I t a l s k y $$
$$ F R = F r a n c o u z s k y $$
$$ D U = N i z o z e m s k y $$
$$ \mathbf {S P} = \check {\mathbf {S}} \text {p a n e l s k y} $$
$$ D A = D \text {a n s k y} $$
$$ G E = N e m e c k y $$
SET
$$ I T = w \text {l o s k i} $$
$$ F R = f r a n c u s k i $$
$$ D U = n i d e r l a n d z k i $$
$$ \mathbf {S P} = \text {h i s z p a n s k i} $$
$$ D A = d u n s k i $$
$$ G E = n i e m i e c k i $$
- INSTALLATION
- SET
- PFLEGE IHRES PRODUKTES
- OVERVIEW
- TIME SETTINGS
- TO SET ALARM 1
- TO SET ALARM 2
- TO TURN ON OR OFF ALARM 1 AND 2
- TO STOP AND RESET THE ALARM TO COME ON THE NEXT DAY
- TO ACTIVATE THE SNOOZE FUNCTION
- Note:
- TO USE BACKLIGHT
- TROUBLE SHOOTING
- CARE OF YOUR PRODUCT
- PRECAUTIONS
- BATTERY SAFETY WARNINGS
- Consideration of duty according to the battery law
- Consideration of duty according to the law of electrical devices
- VUE D'ENSEMBLE
- INSTALLAZIONE
Brand : Techno Line
Model : WQ 296
Category : Alarm clock radio