Airboost - Compressor Xblitz - Free user manual and instructions
Find the device manual for free Airboost Xblitz in PDF.

| Product Type | Portable Cordless Compressor |
| Brand | Xblitz |
| Model | Airboost |
| Dimensions | 98 x 98 x 133 mm |
| Weight | 750 g |
| Power Supply | Li-Ion 4500 mAh battery (rechargeable via USB-C 5V 2A) or 12V DC cigarette lighter socket |
| Power | 120 W |
| Maximum Pressure | 10.3 bar / 150 psi / 10.5 kg/cm² / 999 kPa |
| Air Flow | 25 L/min |
| Power Cable Length | 4 m (with cigarette lighter socket) |
| Air Hose Length | 60 cm |
| Charging Time | About 2 hours |
| Battery Life | About 10 minutes of continuous operation |
| Maximum Continuous Operation Time | 15 minutes (then 10 minutes cooling required) |
| Automatic Shut-off | Yes, when target pressure is reached |
| Pressure Units | bar, psi, kg/cm², kPa (selectable) |
| Main Functions | Inflation of tires (car, SUV, bike), mattresses, balls; car/SUV preset pressures; color LED indicator |
| Included Accessories | Small and large air nozzles, ball valve adapter, bicycle valve adapters (x2), USB-C/A cable, cigarette lighter socket |
| Maintenance & Cleaning | Clean the housing with a soft sponge or cloth; avoid solvents |
| Safety | Do not use near flammable gases or liquids; do not leave unattended; do not use for more than 15 minutes continuously |
| Warranty | 24 months |
| General Information | Electronic pressure gauge with LED display; metal cylinder and piston (22 mm); sound level ≤73 dB |
Frequently Asked Questions - Airboost Xblitz
User questions about Airboost Xblitz
0 question about this device. Answer the ones you know or ask your own.
Ask a new question about this device
Download the instructions for your Compressor in PDF format for free! Find your manual Airboost - Xblitz and take your electronic device back in hand. On this page are published all the documents necessary for the use of your device. Airboost by Xblitz.
USER MANUAL Airboost Xblitz
natural_image
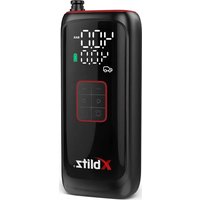
Black Xblitz brand electronic device with green-lit ports and control knob (no visible text or symbols on body)Table of contents
Spis treści
natural_image
Illustration of a handheld electric shaver with a circular icon labeled 'D' (no text or symbols on the device itself)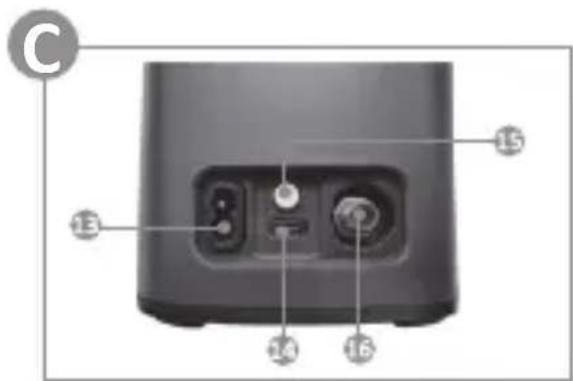
natural_image
Close-up of a hand holding a small object with a pen, next to a device component (no visible text or symbols)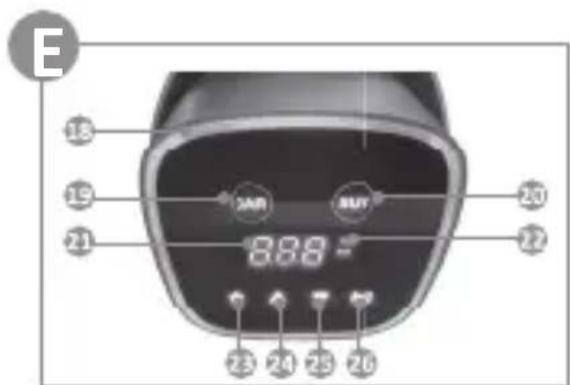
natural_image
Close-up of a hand holding a small object with a string, possibly a tool or tool, in a kitchen setting (no visible text or symbols)PL
INSTRUKCJA OBSŁUGI
Thank you for purchasing the Xblitz AIRBOOST portable compressor. The device will enable you to quickly inflate various types of vehicle tyres, mattresses, balls and control the pressure at any time thanks to the manometer. The compressor is equipped with a built-in rechargeable battery or can be powered via the 12V car lighter socket.
Please read the enclosed instructions and precautions before use to avoid product damage or danger.
01. PRODUCT DESCRIPTION
SEE FIGS. A-E
- Handle
- Xblitz AIRBOOST
- Battery LED indicator
- Small air nozzle
- Large air nozzle
- Ball valve adapter
- Bike valve adapter x2
- Cigarette lighter socket plug
- Power plug
- Connection valve
- Pressure hose
- USB-C/A cable
- Power connector
-
USB-C connector
-
POWER button
- Pressure hose connection
- Clamping lever
- LED signalling ring
- CAR settings button
- SUV settings button
- Display
- Pressure unit indicator
- Change unit button
- Increase pressure button
- Pressure relief button
- Start/Stop
02. ACTION
SEE FIGS. A-G
1. Charging the battery
Before using the device wirelessly for the first time, it is necessary to charge the built-in battery. To do this, connect the supplied USB-C cable with one side to the device and the other to a power adapter or other device (e.g. computer, powerbank, etc. with 5V 2A). The battery charge level can be monitored by means of the LED indicator (3).
ATTENTION: it is only possible to use one power source for the compressor: a USB-C or 12V charger. Do not connect two power sources at the same time, as you risk damaging the equipment.
2. First use
Place the product on a horizontal surface that is not flammable. Depending on the object to be inflated, you can use the connection valve (10) directly or together with one of the included valve adapters (4-7). For objects that are already pressurised (e.g. a partially inflated car tyre), it is recommended to switch on the product before connecting the valve (10) to the tyre. The maximum time for continuous operation of the device is 15 minutes, to prevent overheating and damage after this time it should be allowed to cool down for a minimum of 10 minutes.
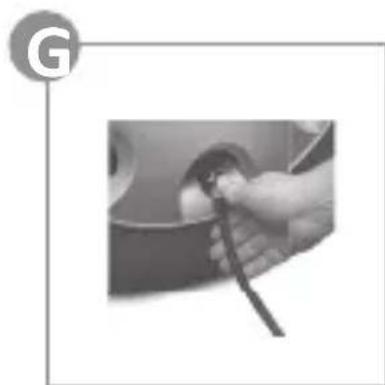
3. Power supply from 12V cigarette lighter socket
The compressor has the option of an alternative power supply for a discharged battery, for example, via the 12V cigarette lighter socket. Insert the power plug (9) into the unit's power connector (13), then connect the cigarette lighter socket plug (8) into the 12V car socket.
NOTE: Before use, check the cigarette lighter socket to ensure that your vehicle is fitted with the correct fuse rating. When using the alternative power supply, start the engine to protect the vehicle battery.
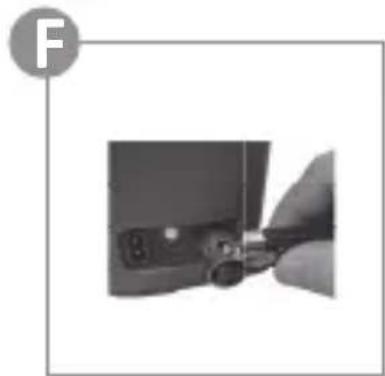
- Installation and removal of the pressure hose and adapters
Open the connection valves (10) on both sides of the pressure hose (11) so that the levers are in the position shown in figure D, then place one of the open valves in the compressor on the pressure hose connection (16) as in figure F. Now close the valve by pushing the clamping lever (17) downwards. Follow the same procedure when using the adapters (4-7). Depending on the object to be pumped, select a suitable adapter and press it into one end of the connection valve and then tighten the lever. When disassembling, first pull back the clamping lever of the connection valve and then remove the valve and adapter from the inflatable object.
NOTE: The pressure should be appropriately matched to the items being pumped so as not to cause breakage.
NOTE: Air may escape from the pumped item valve when removing the connecting valve. Remember not to remove the connecting valve too quickly, additional pressure may need to be added to compensate for escaping air.
5. Switching on/off
Press the POWER button (15) to switch the device on, pressing the button again will switch it off.
6. Change of pressure units
To change the unit between bar, psi, kg/cm ^2 and kPa briefly press the unit change button (23) until the required unit is displayed on the pressure unit indicator (22).
7. Pumping
When pumping with a user-set pressure, set the desired pressure value using the pressure increase and decrease buttons (24-25), then the value on the display will return to the current pressure value, to start pumping press the start/stop button (26) - the pressure on the display will increase to the set value. When the preset pressure level is reached, the compressor will automatically terminate the pumping process; it is always possible to terminate the process manually by pressing the start/stop button (26).
ATTENTION: When pumping, the air hose and the connection valve get hot, be careful when disconnecting the hose.
8. CAR/SUV pumping
The unit is automatically equipped with two pre-set target pressures: Car - 2.40 and SUV - 2.80 (bar) - normal ambient temperature, Car - 2.30 and SUV - 2.60 (bar) - high ambient temperature and Car - 2.50 and SUV - 3.00 (bar) - low ambient temperature. Please note that these are indicative values only, the actual tyre pressure varies from vehicle to vehicle so we recommend that you check your vehicle manual to find the correct tyre pressure values. Press the car settings button (19) or the SUV settings button (20). The set pressure will appear on the display (21) after
setting the desired value, the display will return the current pressure value. Press the start/stop button (26) to start the inflation process, the pressure shown on the display will now increase to the set pressure, the inflation process will end automatically as soon as the set target pressure is reached, it is always possible to end the process manually by pressing the start/stop button (26).
9. LED signalling ring
The panel illumination changes when the pressure (bar) is:
• <2.1 - the colour yellow is displayed
• 2.1≤&≤2.6 - the colour green is displayed
• 2.6<&≤3.1 - the colour orange is displayed
• >3.1 - the colour red is displayed
03. CONSERVATION
- Always disconnect the 12V plug from the cigarette lighter socket before carrying out any maintenance work.
- Regularly clean the compressor housing with a soft sponge/rag preferably after each use.
- Ensure that the vents are always free of dust and dirt.
- Remove very stubborn dirt with a dampened soft soapy cloth. Do not use any solvents such as petrol, alcohol, ammonia etc. Chemicals will damage the synthetic components.
04. TECHNICAL SPECIFICATIONS
Power supply: 12V DC cigarette lighter socket / Battery: Li-Ion 4500mAh
Power: 120W
Nominal current: 10A (Max. 15A)
Maximum pressure: 10.3bar/150psi/10.5kg/cm²/999kPa
Air flow: 25 l/min
Power cable: 4m. terminated with cigarette lighter plug
Battery charging time: \~2h
Battery operating time: \~10min
Air cable: 60cm
Connector: car valve + extra tips
Auto STOP
Max. continuous running time: 15min
Metal cylinder and piston: 22mm
Electronic manometer with LED display
Intelligent colour indication
Input: USB-C 5V 2A
Volume: ≤73dB
Dimensions: 98x98x133mm
05. PRECAUTIONS
- The product is not a toy. Keep it out of the reach of children and keep children at a safe distance - at least 2 metres - when the device is in operation.
- This product is intended for short term use (max. 15min). Continuous use may lead to damage, for longer use it should be cooled min. 10min before the next use.
- The storage temperature of the product should not be lower than -10 °C or higher than 45 °C. Exposure to excessive heat or cold will damage the built-in battery and shorten the life of the product.
- This product has a built-in lithium-ion battery, please dispose of it properly and do not dispose of it in the rubbish. Lithium-ion batteries may cause an ignition risk if exposed to heat, fire, water or impact. Avoid placing and using the product near heat sources, prolonged exposure to sunlight and rain, and in a contaminated environment such as sand, dust and mud.
- Do not use the compressor near flammable gases and liquids, the product has a built-in DC motor that can generate sparks during operation.
- If unusual sounds are heard during pumping or the temperature of the unit is too high, switch off the unit immediately.
- Leaving the product in standby mode or in disuse for long periods of time may damage or shorten the life of the battery. Charging at least once every three months and storing in a dry place out of the reach of children is recommended.
- Before setting the pressure value, check and ensure that the correct unit of measurement is selected to avoid explosions or other incidents caused by too low or too high pressure.
- Do not leave a running appliance unattended.
06. WARRANTY/COMPLAINT CARD
The product comes with a 24-month warranty. Warranty conditions can be found at: https://xblitz.pl/gwarancja/
Claims should be made using the claim form found at:
Details, contact and service address can be found at: www.xblitz.pl.
Technical specifications and kit contents are subject to change without notice, we apologise for any inconvenience.
DE
BEDIENUNGSANLEITUNG
Current nominal: 10A (Max. 15A)
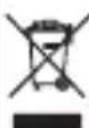
The crossed out trash can symbol indicates that unusable electrical or electronic devices, its accessories (such as power supplies, cords) or components (for example batteries, if included) cannot be disposed of alongside with household waste. In order to dispose of the devices or its components (for example, batteries) deliver the device to the collection point, where it will be accepted free of Disposal is subject to the recast version of the WEEE Directive 19/ EU) and the Directive on batteries and accumulators (2006/66 / paper disposal of the device prevents degradation of the natural ment. Information about the collection points of the facilities is by the competent local authorities. Incorrect disposal of waste is to penalties provided for by the law in force in the given area.
DE
KGK TREND sp. z o.o.
ul. Ujastek 5b, 31-752 Kraków, Polska.
Wyprodukowano w PRC
Manufacturer:
KGK TREND sp. z o. o.
Ujastek 5b, 31-752 Cracow, Poland.
Made in PRC