HBM-686XNF - Fridge HAIER - Free user manual and instructions
Find the device manual for free HBM-686XNF HAIER in PDF.

User questions about HBM-686XNF HAIER
0 question about this device. Answer the ones you know or ask your own.
Ask a new question about this device
Download the instructions for your Fridge in PDF format for free! Find your manual HBM-686XNF - HAIER and take your electronic device back in hand. On this page are published all the documents necessary for the use of your device. HBM-686XNF by HAIER.
USER MANUAL HBM-686XNF HAIER
Thanks for purchasing a Haier Product
Please read these instructions carefully before using this appliance. The instructions contain important information which will help you get the best out of the appliance and ensure safe and proper installation, use and maintenance.
Keep this manual in a convenient place so you can always refer to it for the safe and proper use of the appliance.
If you sell the appliance, give it away, or leave it behind when you move house, make sure you also pass on this manual so that the new owner can become familiar with the appliance and safety warnings.
Accessories
Check the accessories and literature in accordance with this list:
1x User Manual
1x Warranty Card
1x Energy Label
1x Decorative Cover of Right Door
1x Left Door Hinge Cover
INDEX
Cautions.... 3
Door Reversibility.... 9
Before Use.... 13
Functions.... 16
Maintenance.... 22
Trouble-Shooting.... 24
After-Sale Service 26
Legend

Yes

No

Attention

Caution
Disposal
The presence of this symbol on the product, accessories or materials that goes with this information indicates that at the end of its useful life the product or its electronic accessories (ex. charger, headset, USB cable) should be disposed with other household waste.
natural_image
Symbol of a trash bin crossed with no text or numbers, representing waste sorting or anti-smoking (no text present)To prevent possible damage to the environment or human health from uncontrolled waste disposal, please separate these items from other types of waste and recycle them. This will promote the sustainable reuse of material resources.
Household users should contact either the retailer where they purchased the product or the relevant local authorities to find out how they can take this item for environmentally safe recycling and safe.
Business users should contact their supplier and check the conditions of the purchase. This product and its electronic accessories should be mixed with other commercial waste.
CAUTIONS
Before using the appliance for the first time
Intended use: This appliance has been designed exclusively for use in dry-interior households. Every other use is improper and may lead to injuries, whereby the liability of the manufacturer will cease.
Things to do...
√ Make sure that the plug is not trapped under the refrigerator.
√ Hold the plug, not the cable, when unplugging the refrigerator.
√ Take care not to roll over the power cord or damage it w moving the refrigerator away from the wall.
√ Take care that the plug is not damaged, if it is, if possible switch off the power supply and carefully unplug it and consult an authorized service agent for replacement.
√ Make sure that there is no gas or other inflammable gas leaking in the vicinity of the refrigerator. In the case of this occurring, turn off the valve of the leaking gas; open doors and windows but do not plug or unplug the power cords of the refrigerator or any other appliance.
Unplug the refrigerator for cleaning or maintenance or because of lamp replacement.
√ Open the doors by the handle, caution the gap between the doors can be very narrow, so avoid trapping your fingers.
√ When unplugging the refrigerator allow at least 5 minutes before restarting, as frequent starting be damage the compressor.
Leave the ventilation openings free of obstruction.
√ When discarding the refrigerator, to avoid the accidental trapping of children, please remove the refrigerator doors, door seals and shelves and put them in an appropriate place.
√ The refrigerator should be placed in a well-ventilated place not far from a drink water source. Ensure a space of at least 20 cm above and 10 cm around the refrigerator.
√ The appliance must be positioned so that the plug remains accessible.
text_image
OK! NO!Things not to do...
✗ The refrigerator is operated by a 220-240 VAC/50 Hz power supply. Plug the refrigerator to incorrect voltage, fluctuation may cause the refrigerator to fail to start, or damage to the temperature control, or the compressor, or there may be abnormal noise when the compressor is operating. In such a case, an automatic regulator should be mounted.
A dedicate socket with reliable grounding/earth must be provided for the refrigerator. The refrigerator's power cable is fitted with 3-cord (grounding /
CAUTIONS
earth) plug that fits a standard 3-cord (grounded/earthed) socket. Never cut off or dismount the third pin (grounding/ earth). After the refrigerator is installed, the plug should be accessible.
✗ Never store inflammables, explosives or corrosive materials in the refrigerator.
Do not store medicines, bacteria or chemical agents in the refrigerator. This refrigerator is a household appliance. It is not recommended to place materials that require strict temperature.
Do not store or use gasoline or other inflammable materials in the vicinity of the refrigerator to avoid a fire.
Do not place unstable articles (heavy objects, containers filled with liquids) on the top of the refrigerator, to avoid personal injury caused by falling or electric shock caused by contact with water.
Do not swing from the door or bottle racks on the door. The door may be pulled away from vertical, the bottle rack, may be
pulled away, or the refrigerator may topple.
✗ Do not step on the freezer storage compartment door, shelves or cabinet when filling with or removing food and drinks.
Do not touch the inside surface of the freezer storage compartment when in operation, especially with wet hands as your hands may freeze onto the surface.
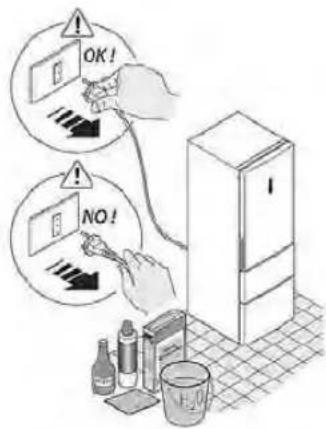
To ensure the refrigerator's electrical insulation, do not spray or flush the refrigerator with water when cleaning, nor place the refrigerator in a damp area or a location where it may be splashed with water. Clean and dry water splashes and stains with a soft clean cloth.
✗ Disassembly and alteration of the refrigerator must be authorized. Any sharp or rough movement of the refrigerator may damage the cooling pipes. Property loss or personal injury may result. Repair of the refrigerator must be performed by professional personnel.
✗ Never store bottled beer or beverages in the freezer, as these will burst during freezing.
Do not place the refrigerator in direct sunlight or in a place where it is exposed to heat from stoves, heaters or other appliances.
Do not leave refrigerator's doors open without the presence of an adult, and not let children get in the refrigerator.
Do not let infants or children to climb into the freezer drawer.
✗ Do not use electrical appliances inside the refrigerator, unless you are the type recommended by the manufacturer.
✗ Do not damage the refrigerant circuit. Do not use a hair dryer to dry the inside of the refrigerator. Do not place lighted candles in the refrigerator to remove odors.
text_image
Max 10kg!CAUTIONS
✗ Do not spray volatile materials such as insecticide on any surface of the appliance.
✗ Open or close the refrigerator doors only when there are no children standing within the range of door movement.
✗ This appliance is not intended for use by persons (including children) with reduced physical, sensory or mental capabilities, or lack of experience and knowledge, unless they have been given supervision or instruction concerning use of the appliance by a person responsible for their safety.
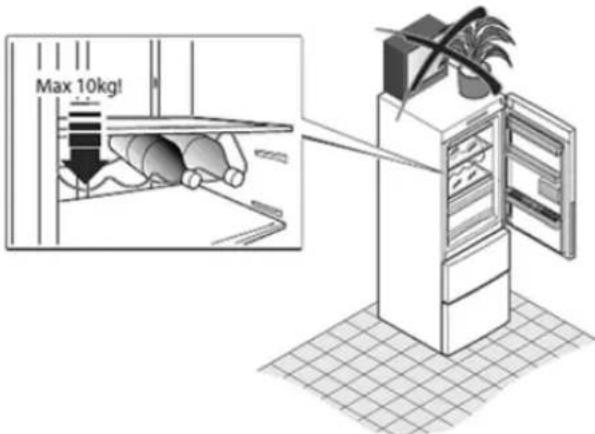
✗ Do not store too much food in the freezer storage comportment to avoid longer operation time of the compressor or falling food. It is recommended not to exceed the load line of the drawers. The total weight of the food should not exceed 30 kg. To prevent the food from failing on the ground, do not pull open the freezer drawer too strongly or at an angle.
✗ Do not use mechanical devices or other means to accelerate the defrosting process, other than those recommended by the manufacturer.
✗ In case of any problem with the light of refrigerator, please contact with our customer service department for handling, and users cannot replace it by themselves.
Fridge storage tips
Hot foods must be cooled to room temperature before storing in the refrigerator.
Wash or clean the food and dry any water droplets on it before placing in the refrigerator.
Food to be stored should be properly sealed. This will prevent moisture in the food from evaporating and prevent them from spoiling.
Sort storage of food. Food to be stored should be sorted according to their category. Food consumed daily should be placed on the front part of the shelves. This can avoid unnecessary delays in door opening as well as expiration of the storage period because you forgot to eat it.
Do not store excess quantities of food. Food should be stored with spaces in between them. This allows cold air to flow smoothly and therefore obtain better storage results.

natural_image
Illustration of various cooking ingredients including a bottle, spray bottle, container, and cup with water (no text or symbols)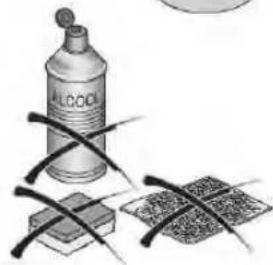
natural_image
Illustration of a spray bottle and two crossed tubes with a grid of rectangular samples (no text or symbols)CAUTIONS

Do not place the food too near to the inner walls. Do not store foods with high moisture content touching the inner walls. Otherwise the food may freeze to the walls. Place food a little away from the inner walls.

Avoiding food (especially oil food) touching the inner liner directly, as some oils can damage the inner liner. So it's better to clean the oily contamination whenever it is found.

For turnip radish and other similar vegetables, please cut off their leaves before storage so as to prevent the nutrition from being absorbed by the leaves.
Defrost frozen food in the fridge storage compartment. In this way you can use the frozen food to decrease the temperature in the compartment and save energy.

Some vegetables, for example, onion, garlic, ginger, water chestnut, and other rhizomatic foods, can be stored for long periods at normal temperature. There is no need to store them in the refrigerator.

The metabolism of vegetable marrow, melons, pawpaw, banana, pineapple can be quickened in the refrigerator, so it is not suitable to store them in the fridge storage compartment. But storing green fruits in the refrigerator for certain periods can promote its maturing.

Hot food should not be stored in the refrigerator until it has cooled down to room temperature.

Food cut into small portions will freeze faster and be easier to defrost and cook. The recommended weight for each portion is less than 2.5kg.

It's better to pack food before putting it in the freezer. The outside of the packing must be dry to avoid bags sticking together. Packing materials should be odor-free, airtight, non-poisonous and nontoxic.

In order to avoid expiration of storage period, please note the freezing date, time limit and name of the food on the packing according to the storage periods of different foods.

Only take the required amount of food from the freezer. Defrosted food cannot be refrozen unless it is first cooked; otherwise it may be less edible.

Do not load excessive quantities of fresh food in the freezer. It is better to refer to the cooling capacity of the refrigerator.
Energy Saving Tips

Install the appliance in a cool, dry room with adequate ventilation and never block any vents or grilles on the appliance.

Allow warm food to cool down before placing it in the appliance.

Put frozen food in the refrigerator to thaw. You can then use the low temperatures of the frozen products to cool food in the refrigerator.
CAUTIONS
Do not keep the door of the appliance open for too long when putting food in or taking food out. The shorter time, for which the door is open, the less ice will form in the freezer.
Clean the rear of the refrigerator regularly. Dust increases energy consumption.
Do not set temperature colder than necessary.
Ensure sufficient air exhaust at the refrigerator base and at the back wall of the refrigerator.
Do not cover air vent openings.
Allow clearance to the right, left, back and top when installing. This will help reduce power consumption and keep your energy bills lower.
UK Only 13A Plug Connection
If your refrigerator is connected to the mains supply using a 3 pin 13 amp plug, the voltage rating is 220-240 volts and should be protected by a 3 amp fuse in the plug.
Should the fuse require replacement for any reason, the fuse must be replaced with a fuse rated at 3 amps and manufactured and approved to BS1362.
If the mains plug is unsuitable for the socket outlet in your home or is removed for any other reason, then the cut off plug should have its fuse removed and be disposed of safely to prevent the hazard of electric shock.
There is a danger of electric shock if the cut off plug is inserted into any 13 amp socket outlet.
How to wire a UK 13 amp plug.
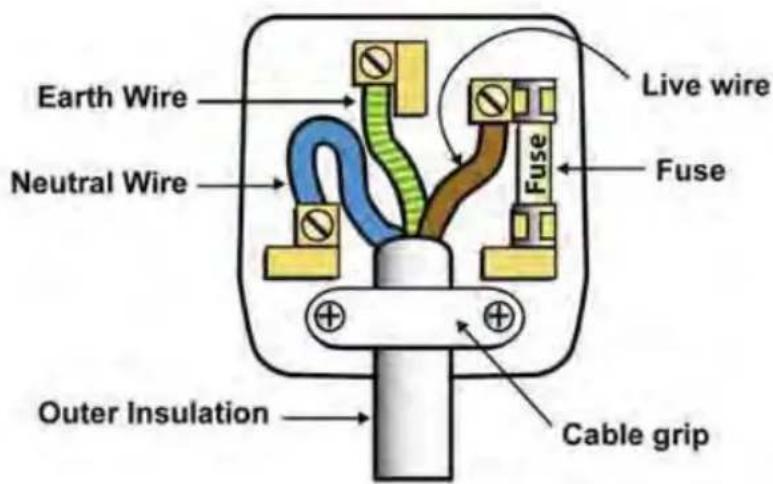
text_image
Earth Wire Neutral Wire Outer Insulation Live wire Fuse Fuse Cable gripCAUTIONS
Important
The wires in the mains lead on a TV are color coded in accordance with the following code.
| Green and yellow | Earth |
| Blue | Neutral |
| Brown | Live |
Double insulated appliances
If the colors do not correspond with the markings identifying the terminals in your plug, proceed as follows.
your plug, proceed as follows.
The green and yellow wire must be connected to the terminal in the plug which is marked with the letter E or with the earth symbol or coloured green and yellow.
The blue wire must be connected to the terminal marked N or coloured Blue or Black. The brown wire must be connected to the terminal marked L or coloured Brown or Red.
DOOR REVERSIBILITY
Door Reversibility
Before reversing the door, please be prepared below tools and material: straight screwdriver, cross screwdriver, spanner and the components included in the poly bag:
Decorative Cover of Right Door x1

natural_image
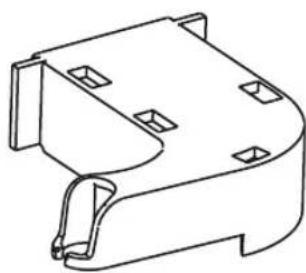
Technical line drawing of a mechanical bracket or panel (no text or symbols)Left Door Hinge Cover x 1
natural_image
Technical line drawing of a mechanical component with mounting holes and a curved base (no text or symbols)- Please unwarp and take off plastic cover by straight screwdriver after opening the door. Please be careful of the wire inside.
natural_image
Technical line drawing of a window frame with a screwdriver inserted (no text or symbols)
natural_image
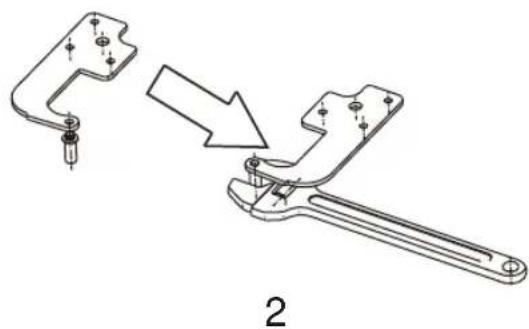
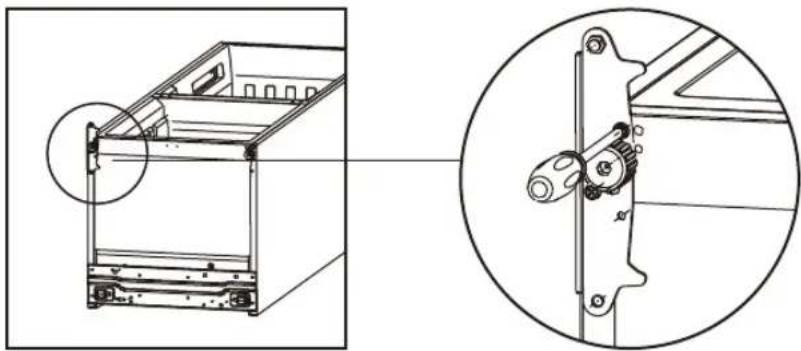
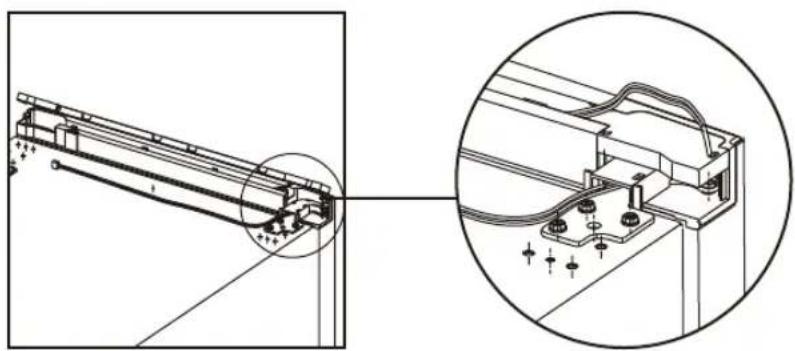
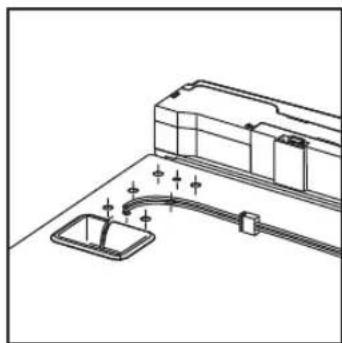
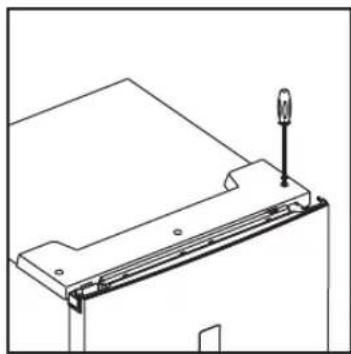
Technical line drawing of a structural joint or bracket (no text or symbols)- Close the door, take out the screw from the top cover by cross screwdriver. Take off front top cover and hinge cover, unplug the terminal, then take out the screw from the hinge. Make sure door are closed when operation.
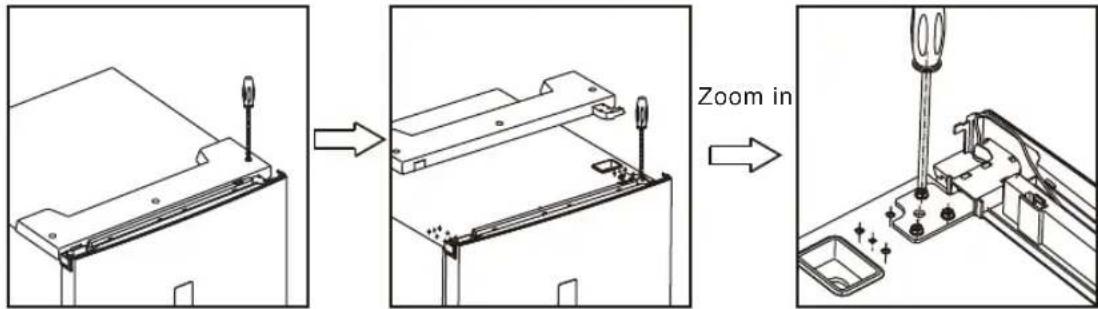
text_image
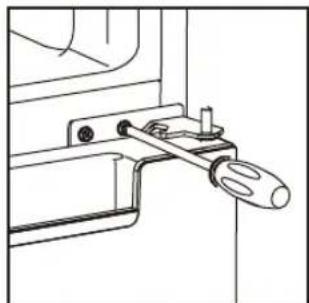
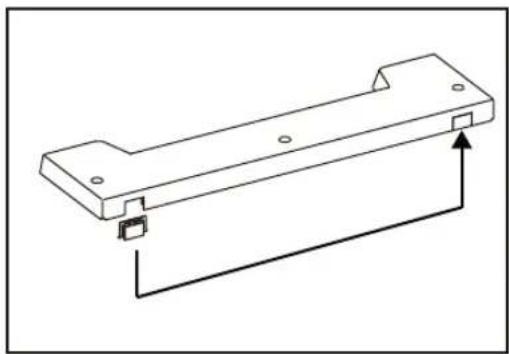
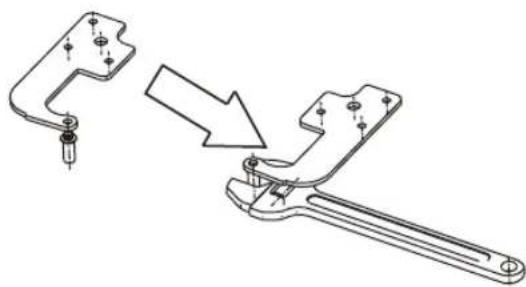
Technical diagram showing assembly steps of a mechanical component with labeled zoom and assembly details- Take off the upper door, take out the screw from the middle hinge by cross screwdriver, then take off the lower door.
natural_image
Technical line drawing of a mechanical clamp or lever assembly (no text or symbols)DOOR REVERSIBILITY
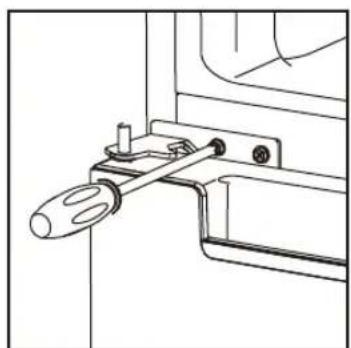
- Laying down the refrigerator, take out the adjusting feet as below, then take off the lower hinge by cross screw driver.
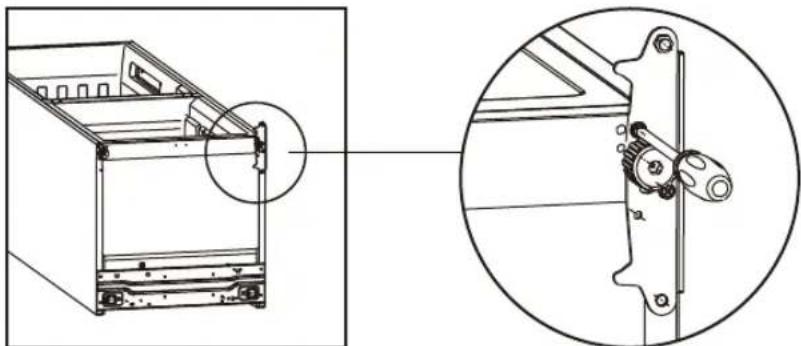
natural_image
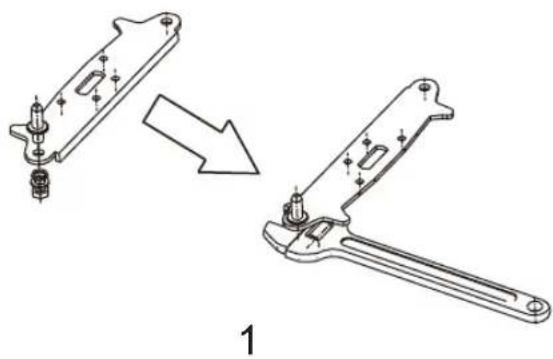
Technical line drawing of a mechanical assembly with an inset close-up showing a bracket and mounting bracket (no text or symbols)- Adjusting the hinge core position of the lower hinge and upper hinge to opposite position
natural_image
Technical line drawing of a mechanical clamp or bracket assembly, showing a disassembly process (no text or symbols present)
natural_image
Technical illustration of a mechanical clamp tool with a downward arrow indicating process (no text or symbols present)- Install the lower hinge under to the refrigerator like below, screwing in the adjusting feet, make sure the position in horizon.
natural_image
Technical line drawing of a mechanical assembly with an inset close-up showing a pin mechanism (no text or symbols)- Install the lower door, adjust and fix the middle hinge onto the cabinet.
natural_image
Technical line drawing of a mechanical clamp or bracket assembly (no text or symbols)DOOR REVERSIBILITY
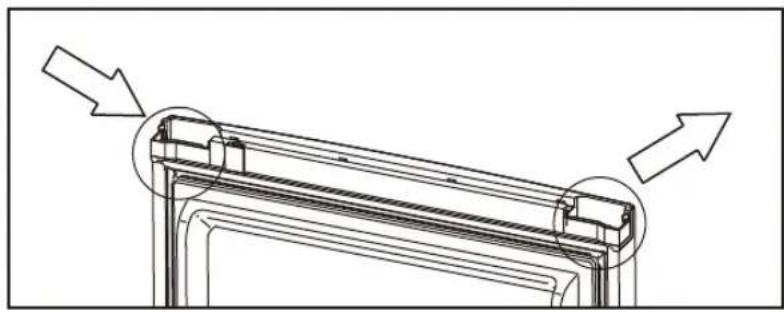
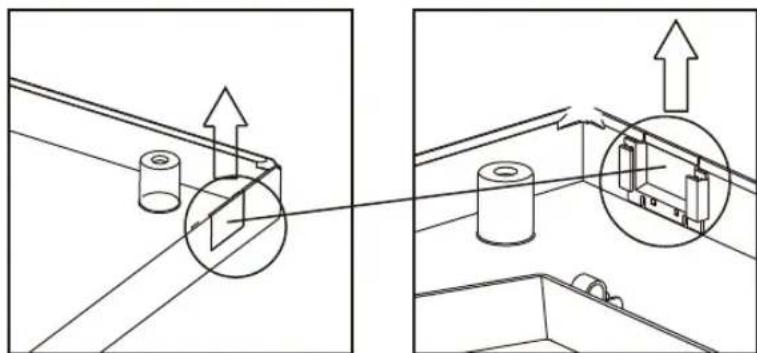
- Using the Decorative Cover of Right Door from poly bag to cover the insert and take out the other side one accordingly. In the meanwhile change the wire to another side.
natural_image
Technical line drawing of a mechanical component with directional arrows indicating movement (no text or symbols)- Install the upper door, and then fix the upper door hinge onto the cabinet.
natural_image
Technical line drawing of a mechanical assembly with a screwdriver inserted, showing mounting holes and fasteners (no text or symbols)- Install the plastic cover and Left Door Hinge Cover from poly bag onto the product, settle the wire (see diagram)
natural_image
Technical line drawing of a mechanical assembly with an inset close-up showing detail (no text or symbols)- Fix the plastic cover and connect the terminal.
natural_image
Line drawing of a kitchen sink with a piping system and a wall-mounted cabinet (no text or symbols)DOOR REVERSIBILITY
- Change the Decorative Cover from one to another side.
natural_image
Technical line drawing of a mechanical bracket with mounting holes and a curved arrow indicating direction (no text or symbols)Follow the instruction to take out of the decorative cover, be careful not to ruin the cover.
natural_image
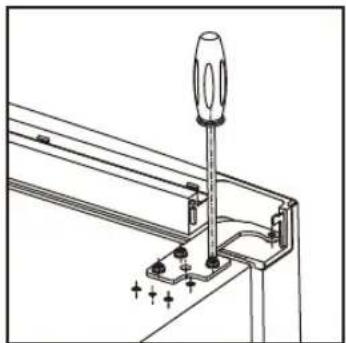
Technical diagram showing two mechanical assembly states with cylindrical components and directional arrows (no text or labels)- Lastly, using the screw to fix the top cover.
natural_image
Technical line drawing of a mechanical assembly with a screw and mounting bracket (no text or symbols)BEFORE USE
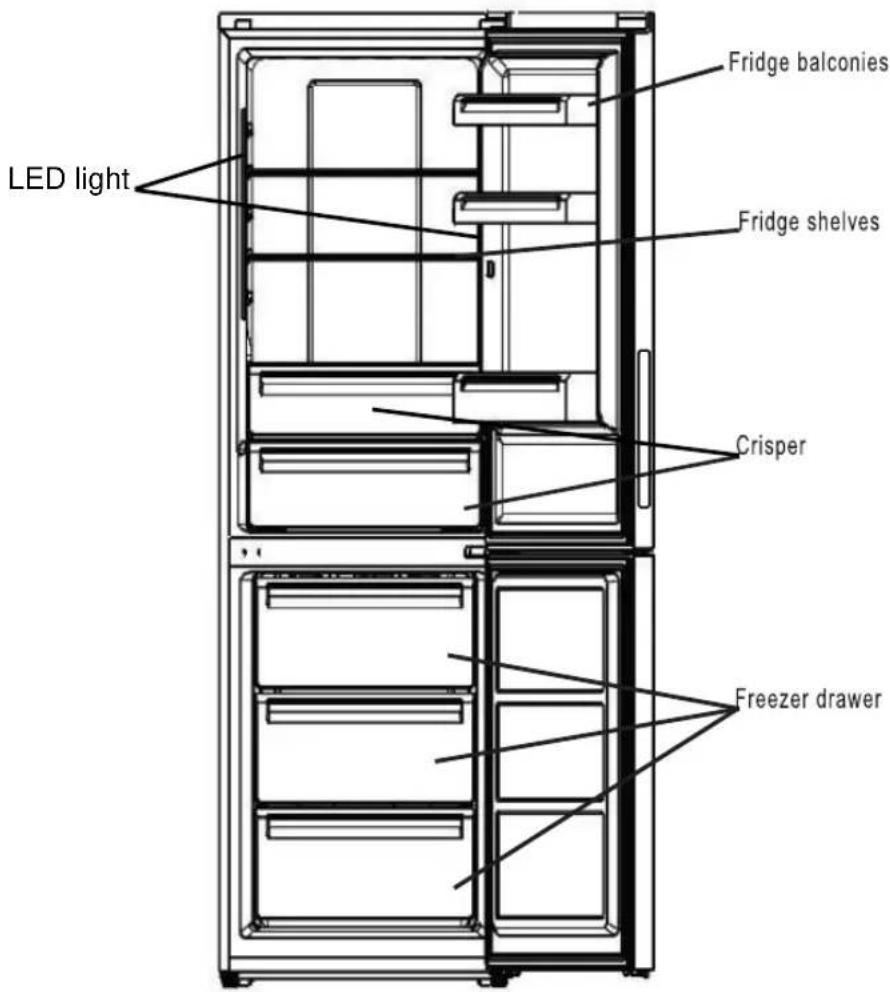
Description
This diagram may be slightly different from the layout of the refrigerator you have just purchased.
text_image
LED light Fridge balconies Fridge shelves Crisper Freezer drawerHBM-686WNF
HBM-686SNF
HBM-686BW
HBM-686XNF
HBM-687WNF
HBM-687SNF
HBM-687BNF
HBM-687XNF
BEFORE USE
Placing Environment

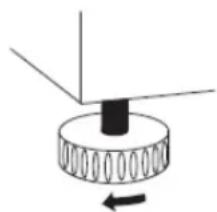
Level the cabinet. The refrigerator should be placed on a fla If the refrigerator is placed on an uneven surface, flat strong materials must be used. Never use the foam packing mater the refrigerator is slightly unstable, you can lengthen or sho feet of the refrigerator by turning them clockwise or anticlock
natural_image
Simple diagram of a mechanical component with a rotating shaft and base, no text or symbols present.
Never place the refrigerator in a damp area or location where it may be splashed with water. Clean and dry any water splashes and stains with soft cloth.

Do not store too much food in the freezer storage compartment to avoid long operation time of the compressor of cooling food. It is recommended not to exceed the load line of the drawers. The total weight of the food should not exceed 30kg. To prevent the food from falling on the ground, do not pull open the freezer drawer too quickly or allow it to tip or tilt.

The refrigerator with a water connection should be placed in a well-ventilated place not far from a drink water source. A space of at least 20cm and 10cm must be kept above and around the refrigerator.

Keep ventilation openings, in the appliance enclosure or in built-in structure, clear of obstruction.
The sides of the cabinet get warm, this is normal operation
Preparation prior to use
Remove all package parts
Please also remove the foam base and the adhesive tape fixing accessories.
Check accompanying accessories and documents
Check the items inside the package box against the Packing List. Please inquire with the purchase shop if there is any discrepancy within 5 days of purchase.
Move the refrigerator into a proper locatio n
See section "Placing Environment"
It is advisable to clean the cabinet before use
Please clean the inside and outside of the refrigerator with water before putting into any food on it.
Idle Standing

After the appliance has been leveled and cleaned, let it remain idle for at least 6 hours before switching it on so as to ensure normal running operation.
Connection to power supply
When the refrigerator is connected to power supply, the fridge temperature and the freezer temperature are automatically set to 5 °C and -18 °C respectively.
Loading the refrigerator with food
Load the refrigerator with food after it has been operating for a period and the inside is cool enough.
Control panel
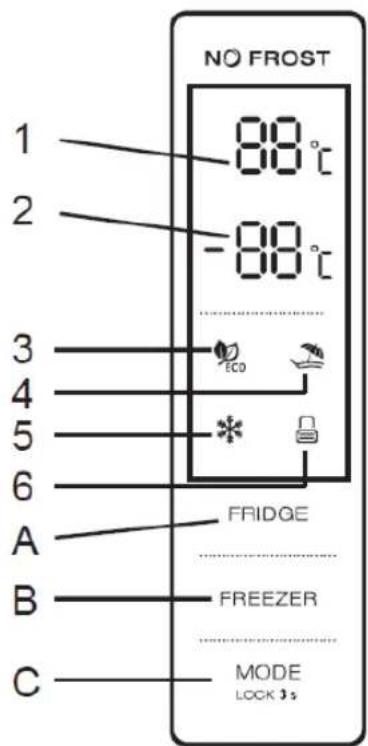
text_image
NO FROST 1 88°C 2 -88°C 3 ECO 4 5 * 6 FRIDGE A FREEZER B MODE C LOCK 3 sKey operation
A. Temperature control of fridge compartment
B. Temperature control of freezer compartment
C. Mode/ Locking / Unlocking
LED display
- Temperature of fridge compartment
- Temperature of freezer compartment
- ECO mode
- Holiday mode
- Super Freezing mode
- Locking / Unlocking
Power on
a) When the product is powered on first time, all LED lights on the control panel will be lit up for 3 seconds. Then it will run according to the setting when it was powered off last time. The control panel will be automatically locked after 25 seconds without any key operation. Then, 30 seconds later, all light on the control panel will be switched off.
b) Both preset temperatures of fridge compartment and freezer compartment would show on the display.
FUNCTIONS
Display
- The panel will be lit up for 2 minutes once the door of fridge compartment or freezer compartment is opened.
- The panel will be lit up by any key operation, whereas, the light would be out 2 minutes after the last operation.
- Display during normal operation Temperature display of fridge compartment: Indicating the temperature of the current setting. Temperature display of freezer compartment: Indicating the temperature of the current setting.
Illustration of the key
Mode/ Locking / Unlocking
- Mode change
By touching key C consecutively, the running mode of the refrigerator will be changed in a circle of "ECO mode", "Holiday mode", "Super Freezing mode", "User-defined mode". A 5 seconds flicker means the selection of temperature is settled.
Note: "User-defined mode" is the setting made by key A and B.
- Press to Enter/Exit Locking Mode
Unlocking: when all keys of display board are locked, please press key C for 3 seconds and all the keys would be unlocked after a beep.
Locking: when all keys of display board are unlocked, please press key C for 3 seconds and all the keys would be locked after a beep.
Press Button
There is a short beep after pressing button each time. All buttons will be valid only under unlock mode.
Temperature Control of the Fridge Compartment
a) Temperature control of the fridge compartment:
This key is workable both in User-defined mode as well as Super Frezing mode. Press key A to enter the temperature setting of the fridge compartment, then the key flickers. By touching the key consecutively, the temperature would change in a circle of "2, 3, 4, 5, 6, 7, 8, OFF". After the chosen temperature flickers for 5 seconds, it means the selection of temperature is settled.
b) Stop cooling fridge compartment
Press the key A consecutively, and choose "OFF", namely the fridge compartment would stop refrigeration.
Temperature Control of the Freezer Compartment
Key B is workable both in User-defined mode as well as Holiday mode. Press key B to enter the temperature control of freezer compartment, then the key flickers. By touching the key consecutively, the temperature would change in a circle from -16 to -22, after which a 5 seconds flicker means the selection of temperature is settled.
FUNCTIONS
Lock Function
No operation during last 25 seconds will lock the display automatically.
ECO Mode
Enter ECO mode
Press key C repeatedly to choose ECO mode. After ECO icon keeps flickering for 5 seconds, the appliance goes into ECO mode.
Under ECO mode
Setting temperature is 5 °C in fridge compartment and -18 °C in freezer compartment.
Key A and B will be in vain. When you press key A and B, ECO icon will flicker three times with an alarm.
Exit ECO mode
Press key C repeatedly to choose other Mode, the appliance will exit ECO mode after 5 seconds.
Holiday Mode
Enter Holiday mode
Press key C repeatedly to choose Holiday mode. After the icon keeps flickering for 5 seconds, the appliance goes into Holiday mode.
Under Holiday mode
Setting temperature of fridge compartment will be fixed at 17^ C, Key A will be in vain, and Holiday icon will flash three times with an alarm when you push key A.
Exit Holiday mode
Press key C repeatedly to choose other mode, the appliance will exit Holiday mode after 5 seconds.
Super Freezing Mode
Enter Super Freezing mode
Press key C to choose Super Freezing mode. After Super Freezing icon keeps flickering for 5 seconds, the appliance goes into Super Freezing mode.
Under Super Freezing mode
Setting of freezer compartment is nonadjustable. Key B will be in vain, while Super
Freezing icon will flicker three times with an alarm when you press it.
Exit Super Freezing mode
Press key C repeatedly to choose other mode, the appliance will exit Super Freezing mode after 5 seconds.
Super Freezing mode will last about 50 hours. 50 hours later, Super Freezing mode will be reverted automatically to the one before entering Super Freezing mode.
FUNCTIONS
About the fridge storage compartment
Please put the food to be stored for short period or for daily consumption in the fridge storage compartment.
Although the average temperature in most areas in the fridge storage compartment can be regulated between 0 °C and 10 °C, extended period of food storage is not recommended. The fridge storage compartment should only be used for short-term storage.

natural_image
Bowl of fresh vegetables including bell peppers, tomatoes, and lettuce with a lemon slice (no text or symbols visible)Adjusting shelf height
The shelf can be relocated to accommodate food size or height. To adjust the height of a shelf, remove it first in this way: uplift its front edge and then pull it out.
To install the shelf, put the lugs on both sides of the shelf on the supporting ribs and push it to the most rearward position.
Disassemble of the bottle guard (when it is available)
To take out a bottle guard, uplift the bottle guards in direction and grip both sides and pull it out in direction. After cleaning, install it with the operation in the reversed direction.
FUNCTIONS
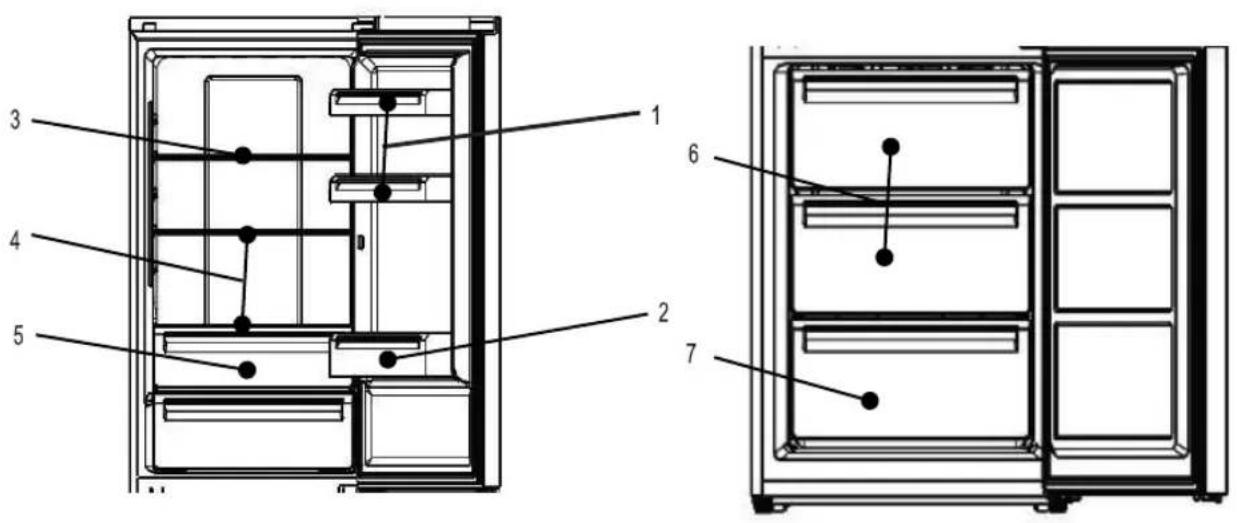
Recommended storage for various food
As cold air circulates inside the refrigerator, there is temperature difference inside the fridge storage compartment. Different foods should be placed in different areas according to their properties.
text_image
Technical diagram of a refrigerator with numbered components and internal layout, showing front and side views.- Eggs, butter, cheese and etc.
- Drinks, canned food and etc.
- Beverages, canned food, cake, etc.
- Milk, cheese, etc.
- Fruit, vegetables, salad, etc.
- Frozen food, ice cream etc.
- Frozen food, ice cream etc.
Large items of frozen food can be stored after removing the internal drawers and keep freezer shelf in its positions.
FUNCTIONS
Replace LED lights
The product is equipped with LED light, please contact after sales service in case of replacement.
The "OK" Sticker
The "OK" temperature monitor can be used to determine temperatures below +4 °C. Gradually reduce the temperature if the sticker does not indicate "OK".
Note: When the appliance is switched on, it may take 12 hours until the correct temperatures are reached.

text_image
OK Correct setting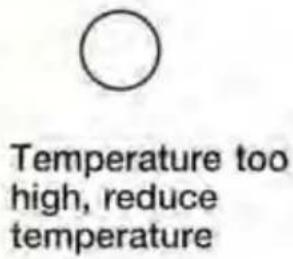
text_image
Temperature too high, reduce temperatureMore storage volume
For an efficient use of energy, except the lowest position basket in fridge or freezer, other basket(s) are allowed to remove for storing high quantities of food.

Do not block the air vent inside the freezer and keep 15mm free distance for it, and do not put food on the freezer sensor and keep 15mm free distance for it.
Defrosting and cleaning
Defrosting the freezer
The freezer defrosts automatically. No manual operation is needed.
Cleaning
The refrigerator should be cleaned regularly to prevent bad stored food odors.
For safety, unplug the power cord before cleaning the refrigerator.
Clean the refrigerator with a soft cloth or sponge with warm water (mild detergent may be added).
Clear away droplets on the refrigerator surfaces with a dry soft cloth.
Always keep the door gasket clean.
The refrigerator is very heavy. When you are moving it for cleaning or repairs, take care not to damage the floor. Keep the refrigerator upright during moving. Do not move the refrigerator by rocking it to avoid damage to the floor.
Do not spray or flush the refrigerator with water to avoid impact on its electrical insulation property.
Do not clean with hard brush, wire brush, detergent powder, gasoline, amyl acetate, acetone and similar organic solutions, acid or alkaline solutions. Please clean with special refrigerator detergent to avoid damage or warm water and a mild detergent.
Do not touch the cold metal parts with wet hands; otherwise your skin may stick on the cold metal parts.
When cleaning, do not clean the cold glass shelves with warm water. Otherwise the glass may break due to sudden temperature change and cause personal injury or property loss.
Measures on power interruption
Even in summer, food may be stored in the refrigerator for a few hours after a power interruption. If a power interruption occurs, please call the power company to ask about the interruption duration.
Do not put additional food into the refrigerator during a power interruption and try to open the door as few times as possible.
If prior notice of a power interruption is given and the interruption duration is over 24 hours, make some ice and put it in a container in the top of the fridge storage compartment.
As temperature in the refrigerator will rise during a power interruption or other failures, the storage period and edible quality of food will be reduced.
MAINTENANCE
Stopping use
If the refrigerator will not be used for an extended period, please unplug the power cord, disconnect the water source, and clean it with the method described above.
Keep the refrigerator door open to prevent any food remaining in the compartment from producing bad odors.
To ensure the service life of the refrigerator, it is recommended that the refrigerator not be turned off unless it is necessary.
Before leaving for a holiday or vacation
If leaving on an extended vacation, please disconnect the power and water source. Remove any food; wait for the frost to melt. Afterwards, clean and dry the interior, and keep the door open to prevent any food remaining in the compartment from producing bad odors. If the room temperature is expected drop below 0^ C, please ask a qualified service person to drain the water in the water supply system. Otherwise serious property loss may be caused due to overflow of water if the water pipe or joint breaks.
Moving the refrigerator
Unplug the refrigerator.
Remove all food.
Secure the shelves and crisper in the fridge storage compartment as well as the shelves and other movable parts in the freezer with adhesive tape. Close the door and secure with adhesive tape.
Do not tilt the refrigerator more than 45 degrees (angle to vertical) to avoid damaging the refrigerating System.
Do not move the refrigerator by its handle to avoid property damage or personal injury.

ver place the refrigerating horizontally down.
TROUBLE-SHOOTING
Before calling for service, please read the following troubleshooting table first. This can save both your time and money. The table contains common problems except those caused by defects in workmanship or material of the refrigerator.
| Problem | Cause | Solution |
| Refrigerator Operation | ||
| The compressor does not work | × The refrigerator is in the defrosting cycle.× The refrigerator is not plugged into a power outlet. | √This is normal for an automatic defrosting refrigerator.√Verify the plug is plugged in the socket firmly. |
| The refrigerator runs frequently or runs for too long period | × The indoor or outdoor temperature is high.× The refrigerator has been powered off for a period of time.× The automatic icemaker is operating.× The door is opened too frequently or for long period.× The door of the fridge/freezer storage compartment is not tightly closed.× The temperature setting for the freezer storage compartment is too low.× The door gasket of the fridge/ freezer storage compartment is dirty, worn, cracked or mismatched.× The condenser is dirty. | √In this case, it is normal for the refrigerator to run longer.√Normally, it takes 8 to 12 hours for the refrigerator to totally cool down.√Ice-making process makes the refrigerator to run longer.√Warm air enters the refrigerator and causes it to start frequently. Please do not open the door too frequently.√Ensure the refrigerator is located on a level ground and there is no food or container jarring the door. See “door/drawer opening/closing” in section “Problem”√Set the temperature higher until a satisfactory refrigerator temperature is obtained. It takes 24 hours for the refrigerator temperature to become stable.√Clean or replace the door gasket. A leakage gap of door gasket can cause a longer running time of the refrigerator in order to maintain desired temperature.√Clean the condenser. |
TROUBLE-SHOOTING
| Too High | ||
| Too high temperature in the fridge / freezer storage compartment | × The door is opened too frequently or for too long each time.× Temperature is set too high.× The door is not closed tightly.× The condenser is dirty. | √Warm air will enter the refrigerator whenever the door is opened. Try to open the door as less frequently as possible.√Reset the temperature.√See “Door/drawer opening/closing in section “Problem”.√Clean the condenser. |
| The temperature in the freezer is too high while the temperature in the fridge storage compartment is OK | × The freezer temperature is set too high. | √Set the freezer temperature lower. It takes 24 hours for the temperature of the refrigerator to become stable. |
| Water/moisture/frost on outside surface of the refrigerator | ||
| Moisture accumulates on the refrigerator's outside surface or between two doors | × Damp climate.× The refrigerator door is not closed tightly. This causes condensation of the cold air in the refrigerator and the warm air outside it. | √This is normal in damp climate. The moisture will decrease when the humidity drops.See “Door/drawer opening/closing” in section√“Problem”. |
| Bad odors in the | ||
| The inside of the refrigerator is dirty | × The inside of the refrigerator needs cleaning× Food of strong odor is stored in the refrigerator | √Clean the internal of the refrigerator.√Wrap the food tightly. |
| If you hear | ||
| Beeps | × The fridge storage compartment door is open.× The temperature in the freezer is too high. | √Close the door or silence the alarm manually.√The alarm is normal when it is first started due to relatively higher temperature. You can silence the alarm manually. |
| Abnormal sound | × The refrigerator is not located on a level place.× The refrigerator touches some object around it. | √Adjust the feet to level the refrigerator.√Remove objects around it. |
| Slight sound similar to that of flowing water | × This is the sound of the refrigerating system | √Normal |
| Heating of cabinet | × The anti-condensation system is working. | √This prevents condensation and is normal. |
AFTER-SALE SERVICE
After checking the trouble-shooting part, the problem is not solved. Please check the Warranty Card included in the product.
Identification and serial number plate
If the appliance is faulty or does not operate, consult the “Troubleshooting” chapter at the back of this handbook. If the problem is not resolved, call the Assistance Centre, specifying the data on the Identification and serial number plate: This plate is located inside the refrigeration compartment.

The identification and serial number plate provides important information about the appliance and must not be tampered with or removed.
natural_image
Symbol of a trash bin crossed with a diagonal line, representing no waste or discharge (no text or numbers present)natural_image
Illustration of various chemical products including a bottle, spray bottle, container, and paint tube (no text or symbols)Warnhinweise
natural_image
Technical line drawing of a 3D mechanical part with flanged ends and internal ribs (no text or symbols)
natural_image
Technical line drawing of a mechanical bracket or housing component (no text or symbols)natural_image
Technical line drawing of a structural frame with a screw and pin (no text or symbols)
natural_image
Technical line drawing of a structural joint or bracket (no text or symbols)text_image
Technical diagram showing assembly steps of a mechanical device with labeled zoom and component detailsnatural_image
Technical line drawing of a mechanical clamp or lever assembly (no text or symbols)natural_image
Technical line drawing of a mechanical assembly with an inset close-up showing a bracket detail (no text or symbols)natural_image
Technical illustration of a mechanical clamp or bracket assembly, showing a disassembly process (no text or symbols present)
natural_image
Technical illustration of a mechanical clamp or bracket assembly with a downward arrow indicating process (no text or symbols present)natural_image
Technical line drawing of a mechanical assembly with an inset close-up showing a component detail (no text or symbols)natural_image
Line drawing of a mechanical clamp or bracket assembly (no text or symbols)natural_image
Technical line drawing of a mechanical component with directional arrows indicating movement (no text or symbols)natural_image
Technical line drawing of a mechanical assembly with a screwdriver inserted, showing mounting holes and fasteners (no text or symbols)natural_image
Technical line drawing of a mechanical assembly with an inset close-up showing detail (no text or symbols)natural_image
Line drawing of a kitchen sink with a drain and piping (no text or symbols)natural_image
Technical line drawing of a mechanical bracket with mounting holes and a curved arrow indicating direction (no text or symbols)natural_image
Technical diagram showing two views of a mechanical assembly with arrows indicating direction (no text or symbols present)natural_image
Technical line drawing of a mechanical assembly with mounting bracket and screw mount (no text or symbols)Vor der Nutzung
Beschreibung
natural_image
Fresh salad arrangement on a plate with lettuce, cherry tomatoes, and bell peppers (no text or symbols visible)text_image
Technical diagram of a refrigerator with numbered components and internal layout, showing front and side views.natural_image
Symbol of a trash bin crossed with a diagonal line, representing no waste or restriction (no text present)natural_image
Illustration of various chemical products including a bottle, cap, and containers with no visible text or symbolsAVERTISSEMENTS
natural_image
Technical line drawing of a mechanical bracket or panel (no text or symbols)
natural_image
Technical line drawing of a mechanical bracket or housing component (no text or symbols)natural_image
Technical line drawing showing two views of a mechanical component with a screw and mounting bracket (no text or symbols)text_image
Technical diagram illustrating a mechanical assembly process with zoomed-in detail and component positioningnatural_image
Technical line drawing of a mechanical clamp or lever assembly (no text or symbols)REVERSIBLITE DE LA PORTE
natural_image
Technical line drawing of a mechanical assembly with an inset close-up showing a component detail (no text or symbols)natural_image
Technical line drawing of a mechanical clamp or bracket assembly, showing disassembly from a housing component to a handle (no text or symbols present)
natural_image
Technical line drawing of a mechanical clamp or bracket assembly, showing a disassembly process (no text or symbols present)natural_image
Technical line drawing of a mechanical assembly with an inset close-up showing a pin adjustment (no text or symbols)natural_image
Line drawing of a mechanical clamp or bracket assembly (no text or symbols)REVERSIBLITE DE LA PORTE
natural_image
Technical line drawing of a mechanical component with directional arrows indicating movement (no text or symbols)natural_image
Technical line drawing of a mechanical assembly with a screwdriver inserted, showing mounting holes and a bracket (no text or symbols)natural_image
Technical line drawing of a mechanical assembly with an inset close-up showing detail (no text or symbols)natural_image
Isometric line drawing of a kitchen sink with a piping system and wall-mounted appliances (no text or symbols)REVERSIBLITE DE LA PORTE
natural_image
Technical line drawing of a mechanical bracket with mounting holes and a directional arrow indicating movement (no text or symbols)natural_image
Technical diagram showing two views of a mechanical assembly with arrows indicating motion or force direction (no text or symbols present)natural_image
Technical line drawing of a mechanical assembly with a screw and mounting bracket (no text or symbols)Description
Mode Super Congélation
natural_image
Fresh salad arrangement with lettuce, cherry tomatoes, bell peppers, and lemon slices (no text or symbols)natural_image
Symbol of a trash bin crossed with a diagonal line, representing no waste or restriction (no text present)natural_image
Illustration of various household items including a bottle, spray bottle, container, and cleaning tools (no text or symbols)Avvertenze
natural_image
Technical line drawing of a 3D mechanical bracket or panel (no text or symbols)
natural_image
Technical line drawing of a mechanical bracket or housing component (no text or symbols)natural_image
Technical line drawing of a structural component with a screw-like feature (no text or symbols)
natural_image
Technical line drawing of a structural joint or bracket (no text or symbols)text_image
Technical diagram illustrating a mechanical assembly process with zoomed-in detail and component positioningnatural_image
Technical line drawing of a mechanical clamp or lever assembly (no text or symbols)LA REVERSIBILITA DELLA PORTA
natural_image
Technical line drawing of a mechanical assembly with an inset close-up showing a bracket detail (no text or symbols)natural_image
Technical line drawing of a mechanical clamp or bracket assembly, showing a disassembly process (no text or symbols present)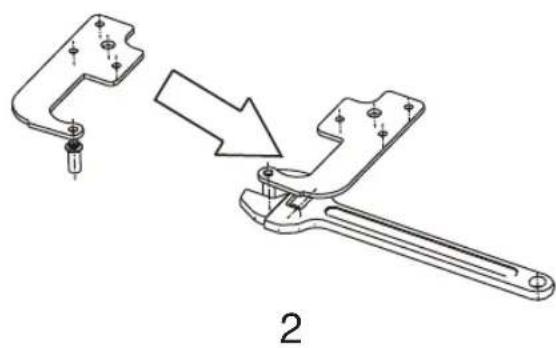
natural_image
Technical line drawing of a mechanical clamp or bracket assembly, showing a disassembly process (no text or symbols present)natural_image
Technical line drawing of a mechanical assembly with cross-sectional and top views (no text or symbols)natural_image
Technical line drawing of a mechanical clamp or lever assembly (no text or symbols)LA REVERSIBILITA DELLA PORTA
natural_image
Technical line drawing of a mechanical component with directional arrows indicating movement (no text or symbols)natural_image
Technical line drawing of a mechanical assembly with a screwdriver inserted, showing mounting holes and fasteners (no text or symbols)natural_image
Technical line drawing of a mechanical assembly with an inset close-up showing detail (no text or symbols)natural_image
Isometric line drawing of a kitchen sink with faucet and wall-mounted appliance (no text or symbols)LA REVERSIBILITA DELLA PORTA
natural_image
Technical line drawing of a mechanical bracket with mounting holes and a directional arrow indicating motion (no text or symbols)natural_image
Technical diagram showing two views of a mechanical assembly with cylindrical components and directional arrows (no text or symbols)natural_image
Technical line drawing of a mechanical assembly with mounting bracket and screw mount (no text or symbols)Prima dell'utilizzo
Descrizione
natural_image
Fresh salad arrangement with lettuce, cherry tomatoes, parsley, bell peppers, onion, and lemon on a plate (no text or symbols)text_image
Technical diagram of a refrigerator interior with numbered components labeled 1 through 5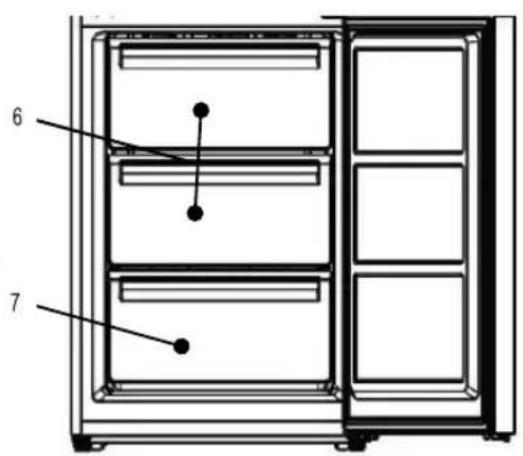
text_image
6 7natural_image
Symbol of a trash bin crossed with no text or labelsnatural_image
Illustration of various chemical and laboratory equipment including bottles, containers, a bucket with H₂O, and a gas cylinder (no text or symbols present)PRECAUCIONES
natural_image
Technical line drawing of a mechanical bracket or panel (no text or symbols)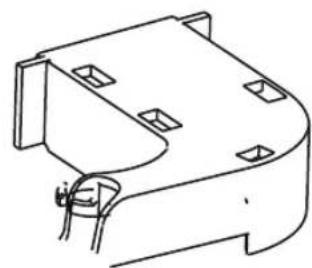
natural_image
Technical line drawing of a mechanical component with mounting holes and a curved base (no text or symbols)natural_image
Technical line drawing of a mechanical bracket or panel assembly with a screw-like component inserted (no text or symbols)
natural_image
Technical line drawing of a structural joint or bracket (no text or symbols)text_image
Technical diagram showing assembly steps of a device with screwdriver, including zoomed-in view and component positioningnatural_image
Technical line drawing of a mechanical clamp or lever assembly (no text or symbols)PUERTAS REVERSIBLES
natural_image
Technical line drawing of a mechanical assembly with an inset close-up showing a bracket detail (no text or symbols)natural_image
Technical line drawing of a mechanical component before and after assembly (no text or symbols)1
natural_image
Technical line drawing of a mechanical clamp or bracket assembly with a downward arrow indicating a process (no text or symbols present)2
natural_image
Technical line drawing of a mechanical assembly with an inset close-up showing a component detail (no text or symbols)natural_image
Line drawing of a mechanical lever assembly (no text or symbols)PUERTAS REVERSIBLES
natural_image
Technical line drawing of a mechanical component with directional arrows indicating movement (no text or symbols)natural_image
Technical line drawing of a mechanical assembly with a screwdriver inserted into a bracket (no text or symbols)natural_image
Technical diagram of a mechanical assembly with cross-sectional view (no text or symbols)natural_image
Isometric line drawing of a kitchen sink with a piping system and wall-mounted appliances (no text or symbols)PUERTAS REVERSIBLES
natural_image
Technical line drawing of a mechanical bracket with mounting holes and a curved arrow indicating direction (no text or symbols)natural_image
Technical diagram showing two views of a mechanical assembly with cylindrical components and directional arrows (no text or labels)natural_image
Technical line drawing of a mechanical assembly with mounting bracket and screw mount (no text or symbols)Descripción
natural_image
Fresh salad arrangement on a plate with lettuce, cherry tomatoes, and bell peppers (no text or symbols visible)natural_image
Symbol of a trash bin crossed with a diagonal line, representing no waste or discharge (no text or labels)natural_image
Illustration of various laboratory glassware including bottles, containers, a beaker with water, and a chemical reaction setup (no text or symbols)Waarschuwingen
natural_image
Technical line drawing of a 3D mechanical part with flanged ends and internal ribs (no text or symbols)Linker Deur Scharnier Cover x 1
natural_image
Technical line drawing of a mechanical bracket or housing component (no text or symbols)natural_image
Technical line drawing of a structural component with a screw and bracket (no text or symbols)
natural_image
Technical line drawing of a structural joint or bracket (no text or symbols)text_image
Technical diagram illustrating a mechanical assembly process with zoomed-in detail and component positioningnatural_image
Technical line drawing of a mechanical clamp or lever assembly (no text or symbols)Deur omkeerbaarheid
natural_image
Technical line drawing of a mechanical assembly with an inset close-up showing a component detail (no text or symbols)natural_image
Technical line drawing of a mechanical component before and after assembly, showing a disassembled part with mounting holes (no text or symbols)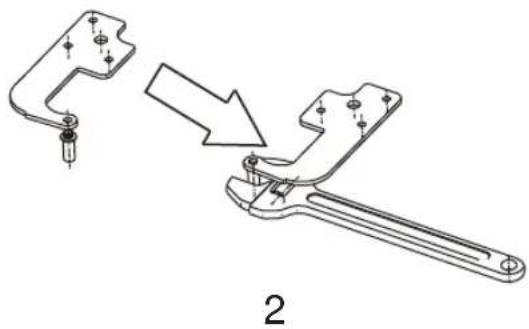
natural_image
Technical line drawing of a mechanical clamp or bracket assembly, showing a disassembly process with no text or symbolsnatural_image
Technical line drawing of a mechanical assembly with an inset close-up showing a component detail (no text or symbols)natural_image
Line drawing of a mechanical clamp or bracket assembly (no text or symbols)Deur omkeerbaarheid
natural_image
Technical line drawing of a mechanical component with directional arrows indicating movement (no text or symbols)natural_image
Technical line drawing of a mechanical assembly with a screwdriver inserted, showing mounting holes and fasteners (no text or symbols)natural_image
Technical diagram showing a mechanical assembly with an inset close-up of a bracket detail (no text or symbols present)natural_image
Line drawing of a kitchen sink with faucet and wall-mounted appliances (no text or symbols)Deur omkeerbaarheid
natural_image
Technical line drawing of a mechanical bracket with mounting holes and a curved arrow indicating direction (no text or symbols)natural_image
Technical diagram showing two views of a mechanical assembly with cylindrical components and directional arrows (no text or symbols)natural_image
Technical line drawing of a mechanical assembly with a screw and bracket (no text or symbols)VÓÓR GEBRUIK
Beschrijving
natural_image
Fresh salad arrangement with lettuce, cherry tomatoes, bell peppers, and lemon slices (no text or symbols)natural_image
Symbol of a trash bin crossed with a diagonal line, representing no waste or discharge (no text or labels)natural_image
Illustration of various chemical products including bottles, containers, a bucket, and a coiled tube (no text or symbols)Środki ostrożności
natural_image
Technical line drawing of a 3D mechanical bracket or panel (no text or symbols)natural_image
Technical line drawing of a mechanical bracket or housing component (no text or symbols)natural_image
Technical line drawing of a mechanical bracket or panel assembly (no text or symbols)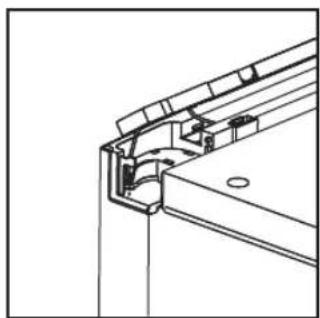
natural_image
Technical line drawing of a structural joint or bracket (no text or symbols)text_image
Technical diagram showing assembly steps of a device with labeled components and zoomed-in detail viewnatural_image
Technical line drawing of a mechanical clamp or lever assembly (no text or symbols)natural_image
Technical line drawing of a mechanical assembly with an inset close-up showing a bracket detail (no text or symbols)natural_image
Technical illustration of a mechanical clamp assembly before and after disassembly, showing part details (no text or symbols)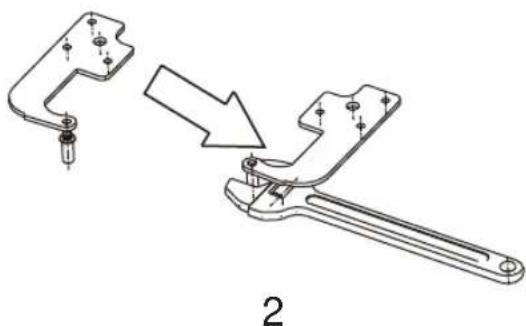
natural_image
Technical line drawing of a mechanical clamp or bracket assembly with a downward arrow indicating process (no text or symbols present)natural_image
Technical line drawing of a mechanical assembly with an inset close-up showing a component detail (no text or symbols)natural_image
Line drawing of a mechanical lever assembly (no text or symbols)natural_image
Technical line drawing of a mechanical component with directional arrows indicating movement (no text or symbols)natural_image
Technical line drawing of a mechanical assembly with a screwdriver inserted into a bracket (no text or symbols)natural_image
Technical line drawing of a mechanical assembly with cross-sectional view (no text or symbols)natural_image
Line drawing of a kitchen sink with a drain and piping system (no text or symbols)natural_image
Technical line drawing of a mechanical bracket with mounting holes and a directional arrow indicating motion (no text or symbols)natural_image
Technical diagram showing two views of a mechanical assembly with cylindrical components and directional arrows (no text or symbols)natural_image
Technical line drawing of a mechanical assembly with a lever and mounting bracket (no text or symbols)natural_image
Fresh salad arrangement with lettuce, cherry tomatoes, bell peppers, and lemon slices (no text or symbols)text_image
Technical diagram of a refrigerator with numbered components and internal layout, showing front and side views.natural_image
Symbol of a trash bin crossed with a diagonal line, representing waste or disposal (no text or numbers present)natural_image
Illustration of various chemical products including a bottle, spray bottle, container, and cleaning tools (no text or symbols)natural_image
Technical line drawing of a 3D structural component (no text or symbols)natural_image
Technical line drawing of a mechanical bracket component (no text or symbols)natural_image
Technical line drawing of a mechanical bracket with a screwdriver inserted (no text or symbols)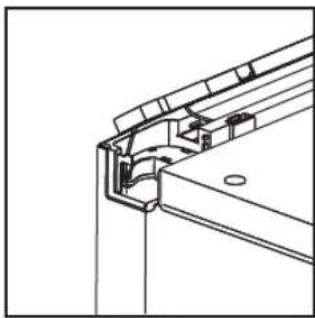
natural_image
Technical line drawing of a structural joint or bracket (no text or symbols)text_image
Technical diagram showing assembly steps of a device with labeled components and zoomed-in detail viewnatural_image
Technical line drawing of a mechanical clamp or bracket assembly (no text or symbols)natural_image
Technical line drawing of a mechanical assembly with an inset close-up showing a gear mechanism (no text or symbols)natural_image
Technical illustration of a mechanical clamp or bracket assembly before and after disassembly, showing no text or symbols