
U442-DOCK22-B - USB hub Tripp Lite - Free user manual and instructions
Find the device manual for free U442-DOCK22-B Tripp Lite in PDF.

| Product Type | USB Docking Station (USB hub with dual display) |
| Brand | Tripp Lite |
| Model | U442-DOCK22-B |
| Host Interface | USB 3.0 (female Type B) |
| USB Downstream Ports | 2x USB 3.0 (including 1 with BC 1.2 charging up to 1.5 A) + 4x USB 2.0 |
| Video Outputs | 2x HDMI (max 2560×1440 @ 60 Hz single display, 1080p @ 60 Hz dual display) |
| Ethernet Port | RJ45 Gigabit (10/100/1000 Mbps), supports IEEE 802.3az, WoL, VLAN, Auto-MDIX |
| Audio | 3.5 mm combo microphone/headphone jack (2.1 channel) |
| Power | External power adapter (input 100-240 V AC, output 5 V DC, 4 A) |
| Power Consumption | Active: 14.43 W; Standby: 1.95 W |
| Compatible Operating Systems | Windows 11, 10, 8.1, 8, 7, Vista, XP (32-bit); macOS 11.x.x (latest version) |
| Minimum System Requirements | 1.6 GHz processor (2 GHz dual-core for DVD playback on second display), 1 GB RAM, 30 MB disk space, USB 3.0 port |
| Housing Material | ABS plastic |
| Weight | 0.37 kg (0.8 lb) |
| Operating Temperature Range | 0 to 40 °C |
| Storage Temperature Range | -20 to 70 °C |
| Relative Humidity | 20% to 80% (non-condensing) |
| Certifications | CE, FCC |
| Warranty | 1-year limited |
| Package Contents | Docking station, USB 3.0 cable (USB-B to USB-A + USB-C adapter, 1.8 m), power adapter with cord (1.5 m), user manual |
| Optional Accessories | High-speed HDMI cables (P568), HDMI to DVI adapter (P566), USB A/B cables (U022, UR022, U322), 3.5 mm audio cable (P312) |
| Maintenance and Cleaning | Disconnect the device before cleaning; use a soft, dry cloth. Do not use liquids or aerosols. |
| Safety | Do not expose to moisture, heat sources, or impact. Use only the supplied adapter. |
| Spare Parts and Repairability | No user-serviceable parts. In case of failure, contact Tripp Lite support. |
Frequently Asked Questions - U442-DOCK22-B Tripp Lite
User questions about U442-DOCK22-B Tripp Lite
0 question about this device. Answer the ones you know or ask your own.
Ask a new question about this device
Download the instructions for your USB hub in PDF format for free! Find your manual U442-DOCK22-B - Tripp Lite and take your electronic device back in hand. On this page are published all the documents necessary for the use of your device. U442-DOCK22-B by Tripp Lite.
USER MANUAL U442-DOCK22-B Tripp Lite
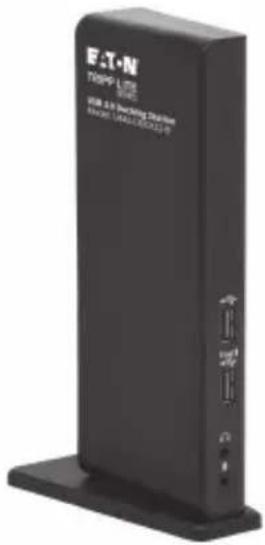
Dual-Display Docking Station, HDMI Ports (x2), USB Ports (x6), GbE
Model:
U442-DOCK22-B
Purchased product may differ from image.
Español 29
Français 57
Deutsch 85
Italiano 113
Product Features
• USB 3.0 ports that are 10 times faster than USB 2.0 and support data transfer rates of up to 5 Gbps
- Backward compatibility with USB 2.0 and 1.1
- Two HDMI ports for connecting external monitors
- A DVI monitor can be connected to the HDMI port using an HDMI-to-DVI adapter, such as Tripp Lite's P566-Series
• Dual-display video resolutions of up to 1080p @ 60 Hz
- Automatically resumes operation from hibernation and suspend modes
• Gigabit Ethernet port supports true 10/100/1000 Mbps network speeds
• IEEE 802.3az (Energy Efficient Ethernet) compliant
• Supports full-duplex and half-duplex operations
• Supports IPv4 and IPv6 pack Checksum Offload Engine (COE) to reduce CPU loading
• Supports Wake-on-LAN (WoL), VLAN tagging and Auto-MDIX
- Two USB 3.0 and four USB 2.0 hub ports for connecting additional USB peripherals
• One USB 3.0 port supports USB Battery Charging (BC) specification 1.2, allowing it to provide 1.5 amps of power for faster charging of mobile devices
• 3.5 mm mini stereo jacks for connecting speaker and microphone
- Compatible with Windows 11, 10, XP, Vista, 7, 8 and 8.1 as well as Apple macOS 11.x.x (Latest Mac version)
System Requirements
- Windows 11, 10, XP (32-bit), Vista (32- and 64-bit), 7 (32- and 64-bit), 8 (32- and 64-bit) or 8.1 (32- and 64-bit), Apple macOS 11.x.x (latest Mac version)
• Available USB port (USB 3.0 required for USB 3.0 speeds)
• DVI* or HDMI monitor
• 1.6 GHz Single Core processor (DVD playback on the add-on monitor requires a 2.0 GHz Dual Core processor) - 1 GB RAM
• 30 MB of available disk space
* Requires an HDMI-to-DVI adapter, such as P566-Series
Package Contents
• U442-DOCK22-B Dual-Display Docking Station
• USB 3.0 Cable (USB-B to USB-A with USB-C Adapter, 6 ft.)
- External power supply with 5 ft. power cord (Input: 100–240V, 50/60 Hz, 0.8A; Output: 5V 4A)
- Owner's Manual
Optional Accessories
• P312-Series 3.5 mm Mini Stereo Audio Cables
• P566-Series HDMI-to-DVI Adapter Cables
• P568-Series High-Speed HDMI Cables
• U022-Series USB 2.0 A/B Device Cables
• UR022-Series Reversible USB 2.0 A/B Device Cables
• U322-Series USB 3.0 A/B Device Cables
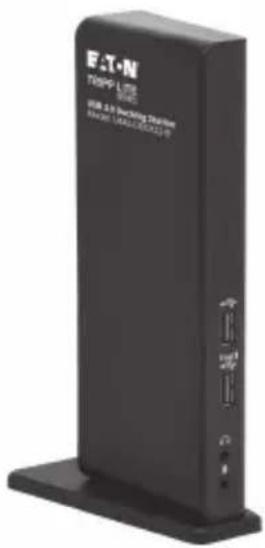
Product Overview
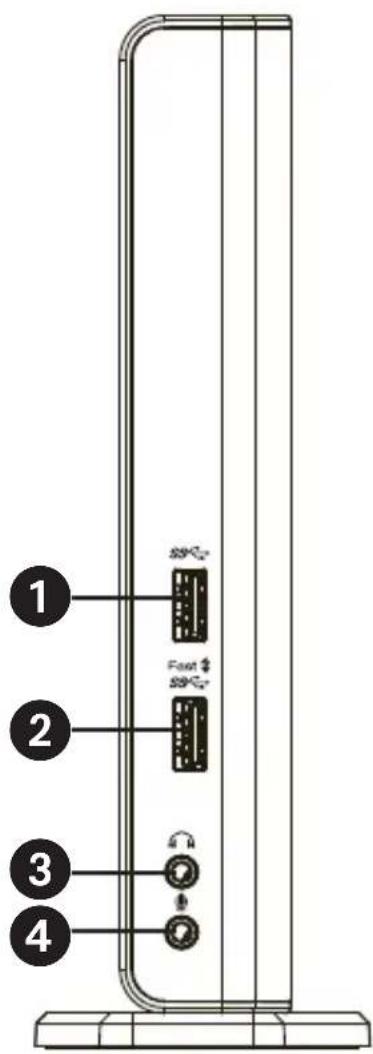
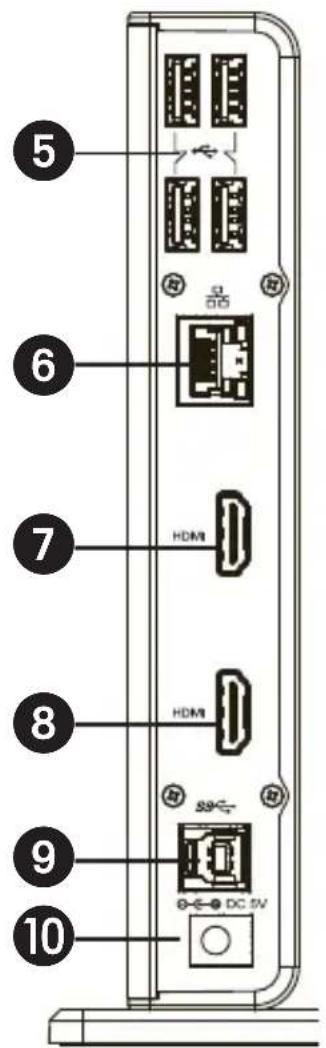
| Item Description | |
| 1 USB 3.0 Port Connect to | USB 3.0 devices |
| 2 USB 3.0 Port | Connect to USB 3.0 device with BC 1.2 charging |
| 3 Speaker Jack Connect to a speaker or earphones | |
| 4 MIC Jack Connect to a microphone | |
| 5 USB 2.0 Ports Connect to a USB 2.0 device | |
| 6 RJ45 Port Connect to an Ethernet network | |
| 7 HDMI Connector Connect to an HDMI or DVI display* | |
| 8 HDMI Connector Connect to an HDMI or DVI display* | |
| 9 USB 3.0 Port (Type B) Connect to a computer | |
| 10 Power Jack Connect to the power adapter | |
*Requires an HDMI-to-DVI adapter
Product Overview
Product Overview
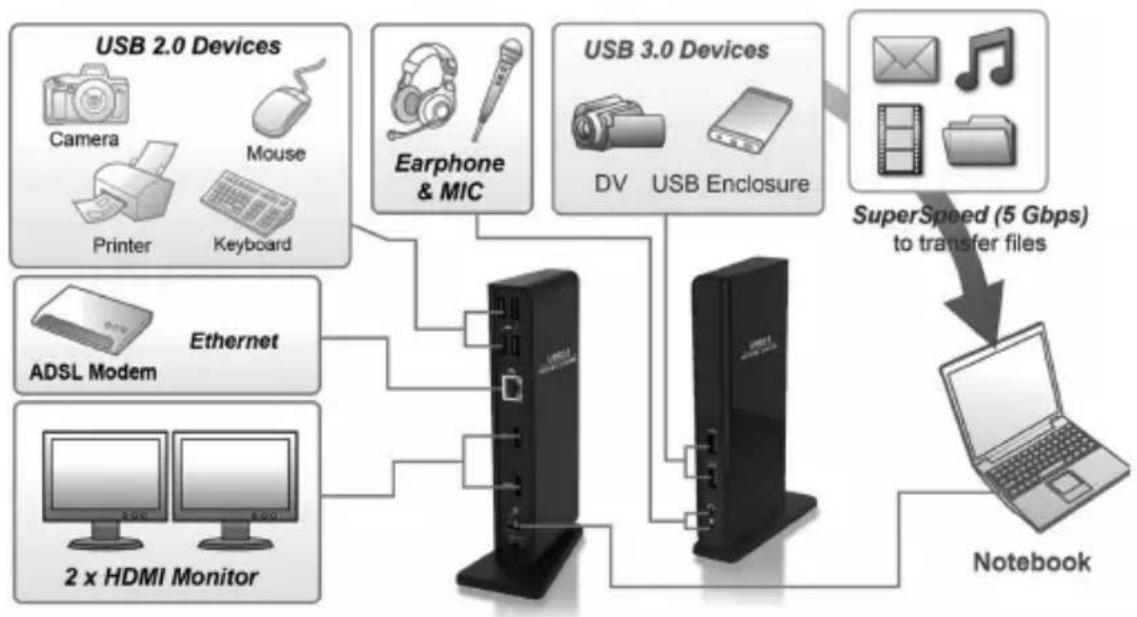
Connection Diagram:
flowchart
graph TD
    A["USB 2.0 Devices"] --> B["Ethernet"]
    C["USB 3.0 Devices"] --> D["Notebook"]
    B --> E["ADSL Modem"]
    B --> F["2 x HDMI Monitor"]
    D --> G["Computer"]
    D --> H["Computer"]
    D --> I["Computer"]
    D --> J["Computer"]
    B --> K["Printer"]
    B --> L["Keyboard"]
    B --> M["Camera"]
    B --> N["Mouse"]
    B --> O["Earphone & MIC"]
    B --> P["DV"]
    B --> Q["USB Enclosure"]
    D --> R["SuperSpeed (5 Gbps) to transfer files"]
Installation
Notes:
- DisplayLink drivers are required for this device when using Windows OS. The drivers can be downloaded and installed from www.displaylink.com/downloads.
- The following strings and screenshots may vary slightly in each operating system. The driver version is subject to change without notice.
Windows
- Click "Install" to execute the installation procedure.
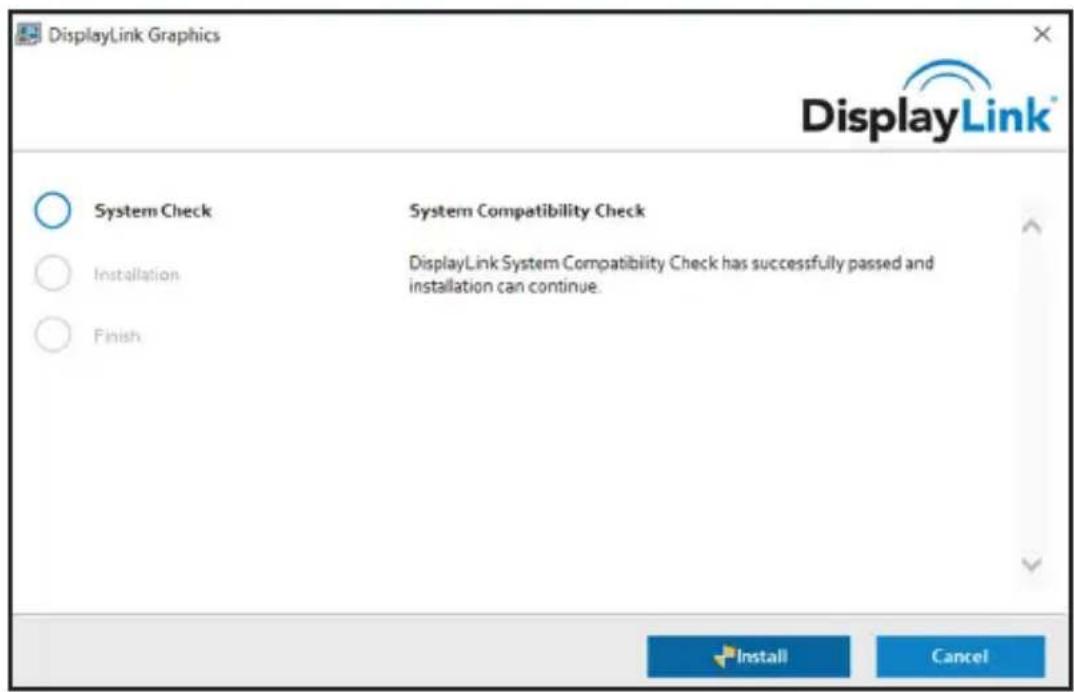
- Be patient while the installation is in progress.
- Connect the Docking Station to a computer after driver installation is complete.
Installation
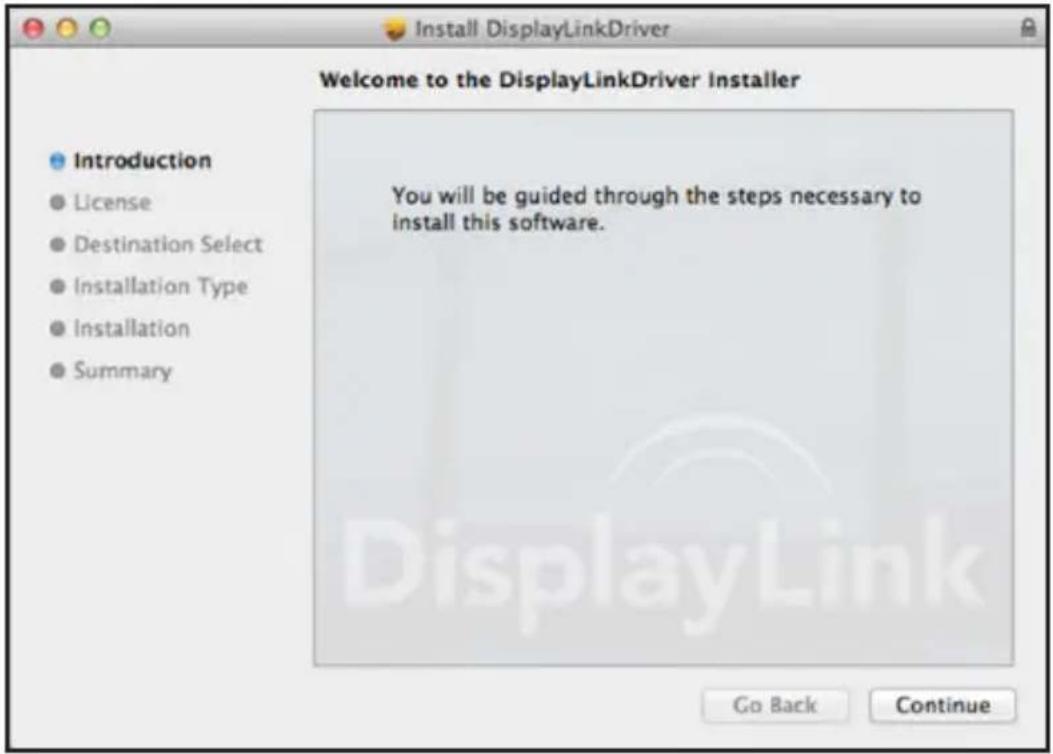
macOS
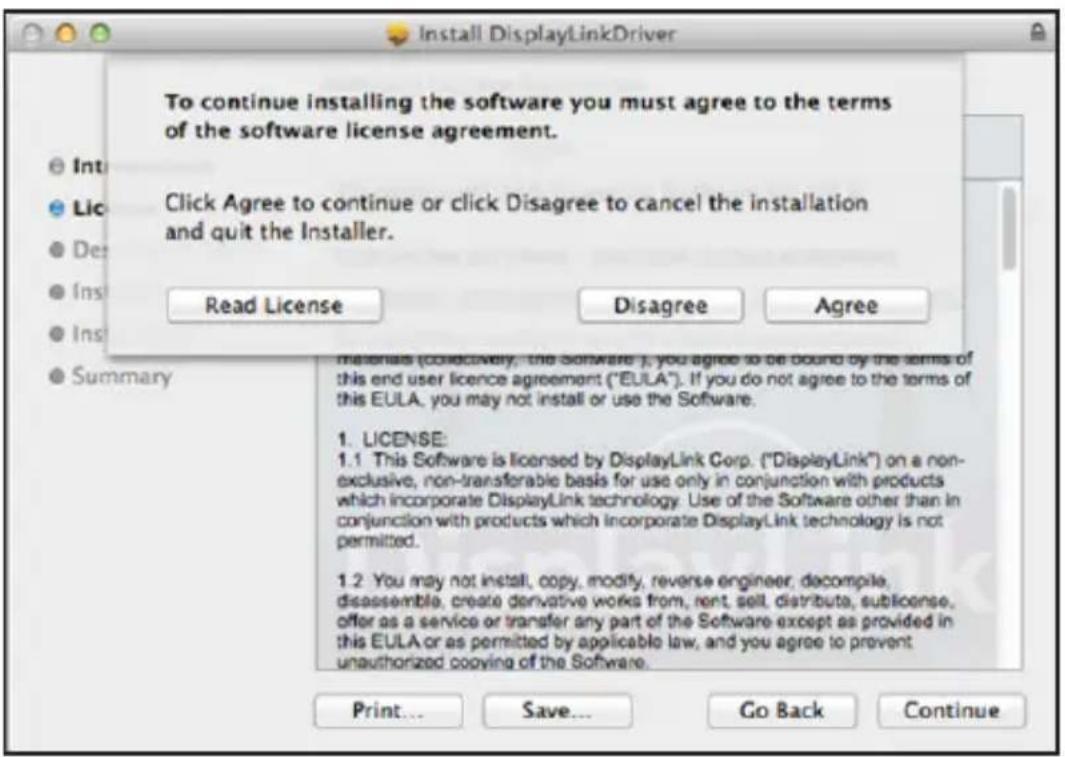
- Locate and double-click the .dmg file to start the installation, and click "Continue."
Installation
2. Click Continue > Agree.

Installation
- Click Install > Continue Installation.
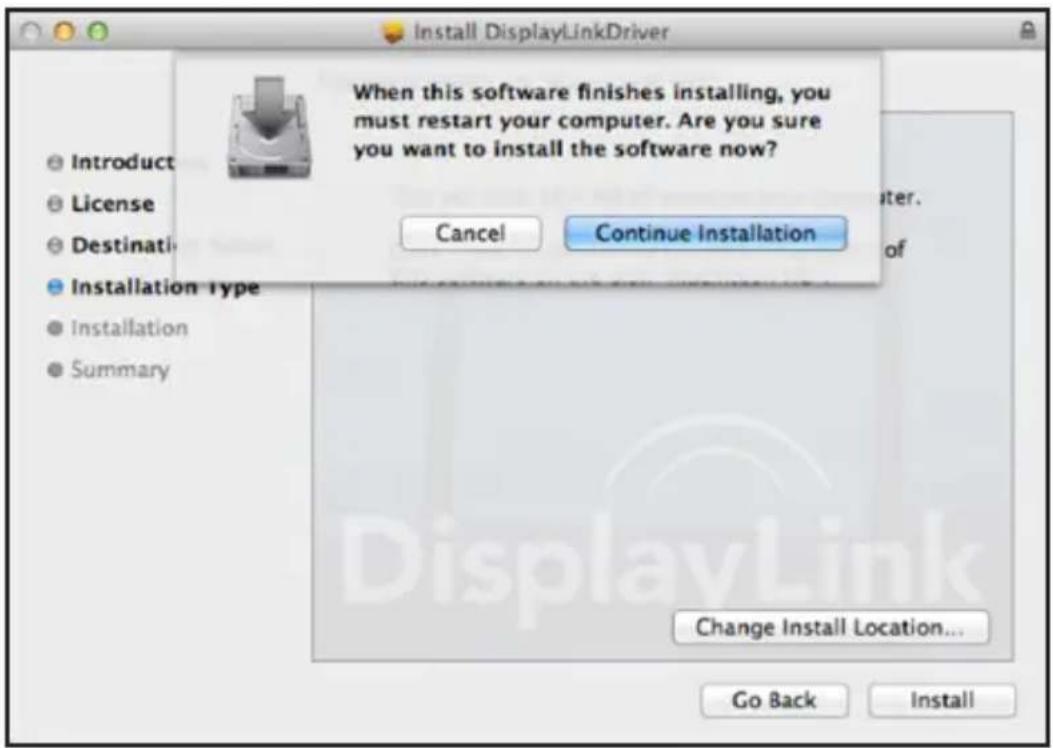
- Be patient while the installation in progress.
Installation
- Click "Restart" to complete the installation.
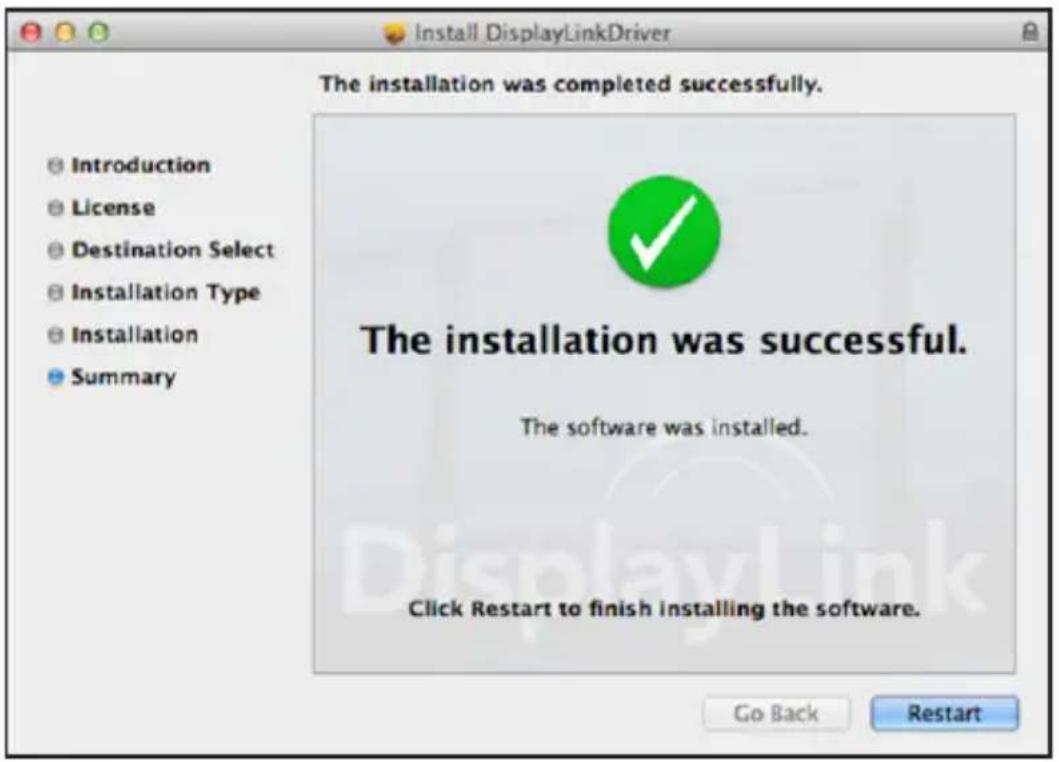
- Connect the docking station to a computer after the driver installation is completed.
Verifying the Installation
When the installation is complete, follow the steps below to verify if the device is installed properly.
Windows
- Access Device Manager.
Settings > Devices > Connected Devices
- In the Device Manager window, a device named Dual Display Docking Station should be listed.
Note: If there is a “?” or “!” mark next to the item, the device is not properly installed. Delete the item, unplug the device and repeat the installation steps.
macOS
- Access the Hardware list.
Click the Apple icon at the top left corner of the screen.
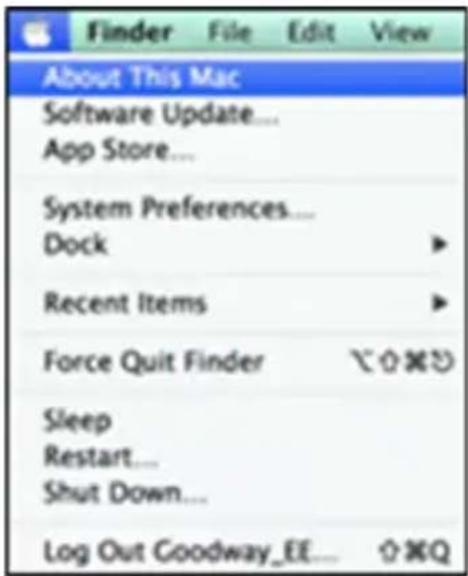
Verifying the Installation
- Click About this Mac > More info... > System Report.
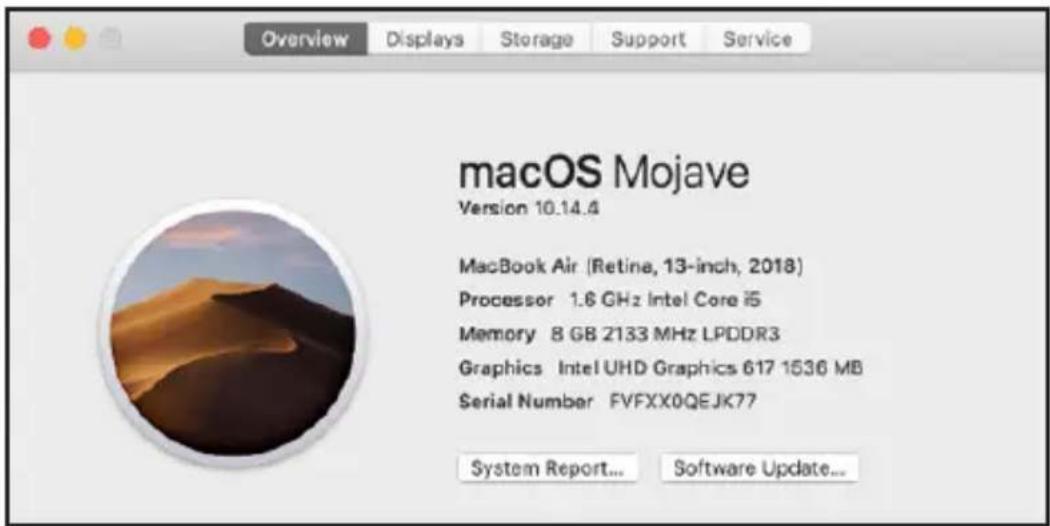
- In the System Report window, a device named Dual Display Docking Station should be listed.
Display Configuration
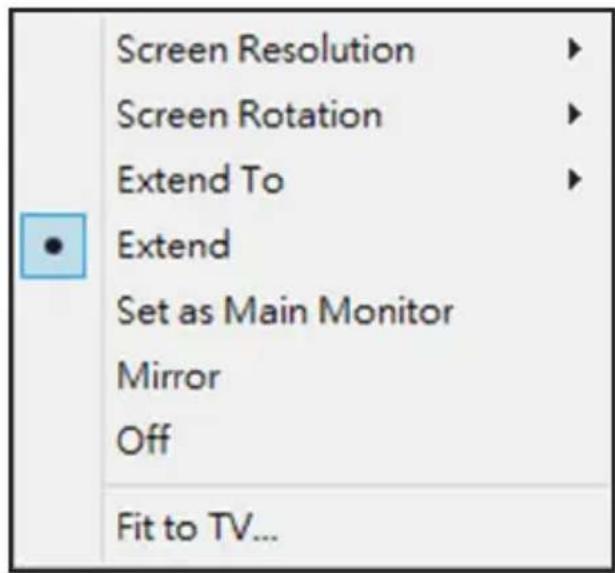
Utility Settings:
The supplied utility allows configuring the display mode, screen rotation, screen resolution and physical arrangement of your monitors.
- Click the utility icon in Windows System Tray.
Note: If you cannot find the icon in Windows System Tray, click the arrow icon to bring up the icon list to find it.
- Select a preferred option, then click it.
Display Configuration
Description of the Settings:
| Options Description | |
| DisplayLink Manager Enable the Windows screen resolution page | |
| Check for Updates... Check the latest driver and download if available | |
| Display Setting Submenu | |
| Screen Resolution Click | to select an available resolution. Note that this function is invalid in mirror mode, as the resolution is de ned as the resolution of the primary monitor |
| Screen Rotation Rotate | the screen according to the desired orientation |
| Extend To The cursor can extend to desired screen via left/right/above/below movement | |
| Extend Extend the screen according to the desired orientation | |
| Set as Main Monitor Set this screen to the main screen | |
| Notebook Monitor O Switch the add-on monitor to the main display and turn o the screen of the laptop. Note: This function works only when one add-on monitor is connected. This option will also only appear on the laptop screen. | |
| Mirror Duplicate the primary monitor to the monitor connected with the adapter | |
| O Turn o the monitor | |
Display Configuration
| Display Setting Submenu | |
| Fit to TV Adjust the size | of Windows Desktop on the TV.Note: This function works only when one add-on monitor is connected. This option will also only work in extended mode. The add-on monitor will change to extended mode if selecting this option while in mirror mode. |
| Audio Setup Enable the | Windows audio con guration page(this function works only in specific modes) |
| Video Setup Enable the | Windows screen resolution page |
Multi-Monitor Configuration:
Extra HDMI monitors can be connected through the docking station if one monitor is already connected to the PC directly. Once the extra monitors are connected, the dock can be configured to use either “mirror mode” or “extended mode” or be set as the primary display.
Display Configuration
Windows OS
In desktop mode, right-click the desktop and select Display settings.
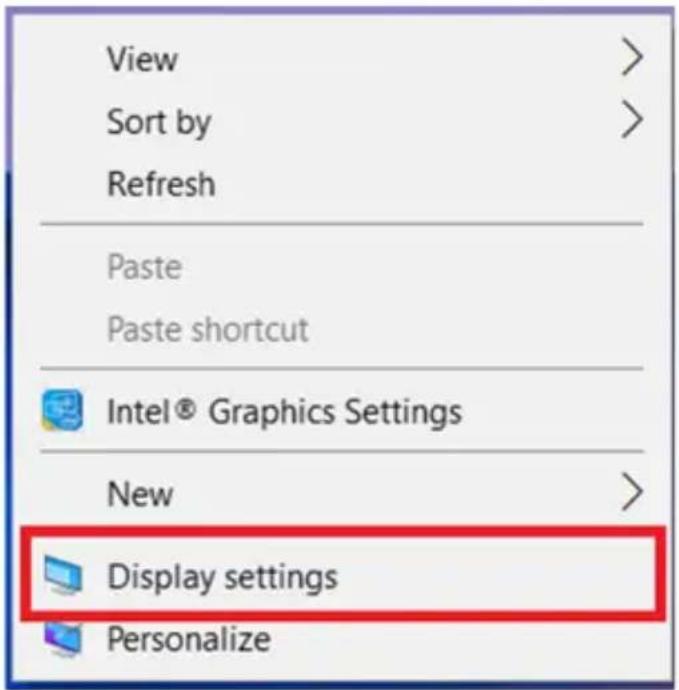
Alternatively, click the utility icon in the Windows System Tray, and then select DisplayLink Manager or Video Setup.
Display Configuration
Extended Mode
- Refer to the Multi-Monitor Configuration section to open the configuration page.
- Select the preferred monitor at the top of the page.
- Check the Multiple Displays > Extend these displays.
- Click "Apply" to confirm and close the settings screen.
Display Configuration
- Once the setting is complete, simply drag and drop the application icons or the opened windows to the add-on monitor. However, some applications may not support displaying on the extended desktop.
Mirror Mode
- Refer to the Multi-Monitor Configuration section to open the configuration page.
- Select the preferred monitor at the top of the page.
- Check the Multiple Displays > Extend these displays.
- Click "Apply" to confirm and close the settings screen.
Set the Primary Monitor
- Refer to the Multi-Monitor Configuration section to open the configuration page.
- Select the preferred monitor at the top of the page.
- Check the box of Make this my main display.
Note: For some computers, you may need to disable the main display by unchecking the box of Extend the desktop onto this monitor or Extend my Windows desktop onto this monitor. - Click Apply to confirm and exit.
Display Configuration
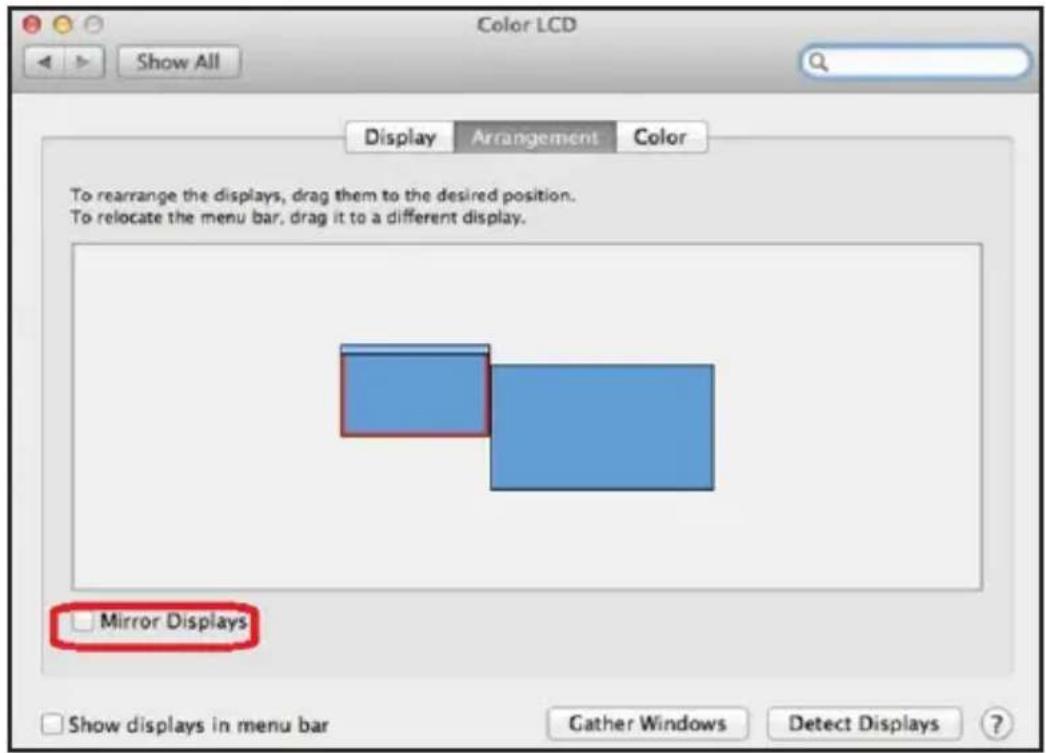
macOS
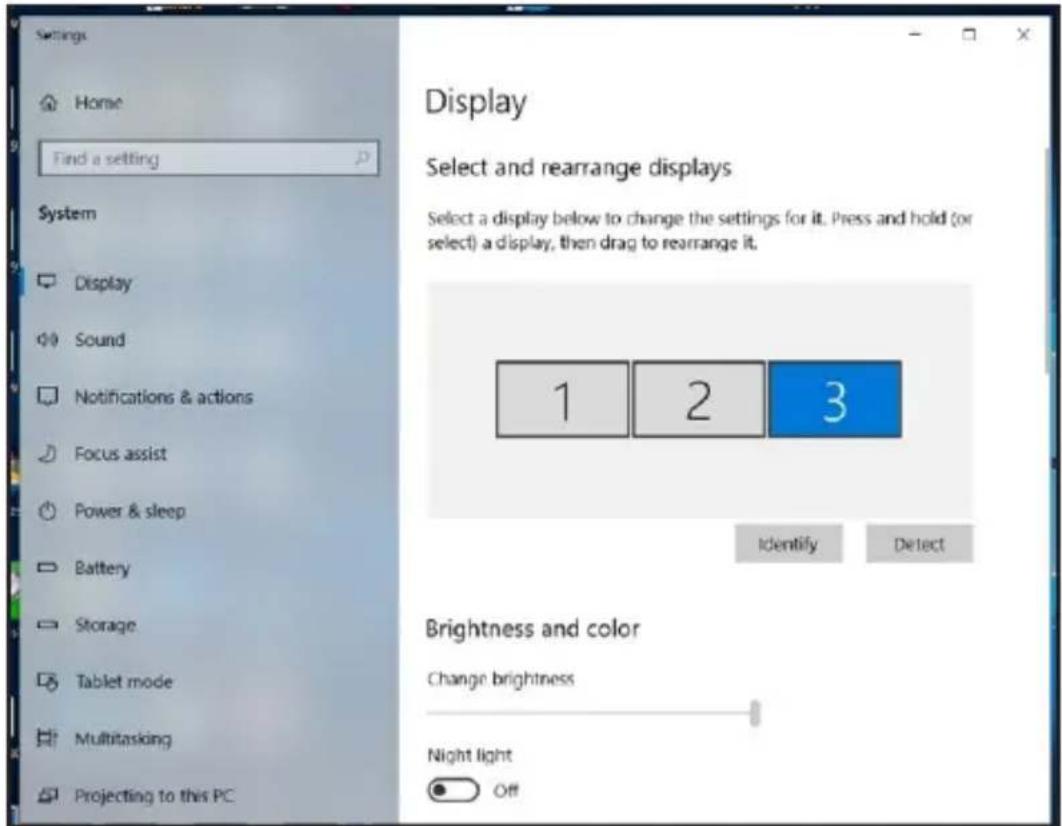
- Click the Apple icon at the upper left corner of the screen and select System Preferences from the drop-down list.

Display Configuration
- To switch to Mirror Mode, check the box in front of Mirror Displays.
Audio Configuration
When the docking station is connected to a computer, the audio configuration may be changed to USB (Multimedia) Audio Device automatically (this setting depends on models). If it does not work, follow the steps below to set up.
- Open the Control Panel, then select the hardware and sound icon.
- Click Sound > Manage audio devices, then select USB Audio Device.

Troubleshooting
1. The cursor has disappeared
If the status remains in the extended mode but the docking station is disconnected, the desktop will still extend to the add-on monitor. The cursor may not be found on the primary monitor. If it happens, connect the add-on monitor through the docking station again or keep moving the mouse.
2. Video playback in extended mode
If the video or DVD playback quality is poor or low performance in extended mode, play it back on the primary monitor instead of the add-on monitor.
3. In Extended Mode, the add-on monitor has a black border around the desktop
This happens when the resolutions used by the add-on monitor are greater than the resolutions used by the primary monitor. To solve the problem, configure the add-on monitor to use the same resolution as the primary monitor.
4. The add-on monitor is flickering
This is usually caused by a low refresh rate.
Mirror Mode – Increase the refresh rate of the main monitor. This will in turn increase the refresh rate of the add-on monitor, stopping the flickering.
Extended Mode – Increase the refresh rate of the add-on monitor.
Troubleshooting
5. The video does not display properly in Full-Screen Mode.
Try the following tips to improve the smoothness of video playback:
a. Reduce the resolution of the display.
b. Use the adapter in Extended Mode.
c. Terminate any other CPU-intensive applications running on the computer.
d. Some media players require DirectX hardware support to correctly operate. Try a different media player that requires less DirectX support.
e. Drag the media player to the add-on screen and close the player. Restart the player and it should open on the add-on monitor. Now try playing the media file again.
f. Reduce the hardware acceleration level of the primary display (NOT the add-on monitor) to levels 1, 2 or 3, then restart the media player. The hardware acceleration can be found by right-clicking on the desktop and clicking "Properties > Settings > Advanced > Troubleshoot."
g. The video playback may be unusual when the add-on monitor is mirroring the primary display and there is another extended screen connected to the computer. The extended screen must be disabled before the content will be cloned correctly to the add-on monitor.
Specifications
| Host Interface USB 3.0 | ||
| Connector Video Output | HDMI (x2) | |
| Host Upstream Link USB-B (Female) | ||
| HUB Downstream Link USB-A (Female) | ||
| Audio Port 3.5 mm Stereo Mini-Jack 2.1 | ||
| Ethernet Port RJ45 | ||
| Power DC Power Jack | ||
| Video Resolution HDMI Single Display: | 2560 x 1440 @ 60 Hz Dual Display up to 1080p @ 60 Hz | |
| Supported Colors 16-bit and 32-bit Color | ||
| Audio 2.1 Channel | ||
| Ethernet 10/100/1000 Mbps | ||
| Power Power Mode Self-Powered | ||
| Power Adapter Input: AC 100-240V | ||
| Output: DC 5V 4A Operating Power: 14.43W Suspend Mode Power: 1.95W | ||
| Supported Operating Systems | Windows 11, 10, XP (32-bit), Vista (32- and 64-bit), 7 (32- and 64-bit), 8 (32- and 64-bit), 8.1 (32- and 64-bit) and Apple 11.x.x (latest Mac version) | |
Specifications
| Physical Properties | Housing: ABS Plastic |
| Weight: 0.8 lb. (0.37 kg) | |
| Storage Temperature Range | -4° to 158°F (-20° to 70°C) |
| Operating Temperature Range | 32° to 104°F (0° to 40°C) |
| Relative Humidity 20 to 80% RH, Non-Condensing | |
| Compliance CE, FCC | |
Warranty
1-Year Limited Warranty
We warrant our products to be free from defects in materials and workmanship for a period of one (1) year from the date of initial purchase. Our obligation under this warranty is limited to repairing or replacing (at its sole option) any such defective products. Visit Tripplite.Eaton.com/support/product-returns before sending any equipment back for repair. This warranty does not apply to equipment which has been damaged by accident, negligence or misapplication or has been altered or modified in any way.
EXCEPT AS PROVIDED HEREIN, WE MAKE NO WARRANTIES, EXPRESS OR IMPLIED, INCLUDING WARRANTIES OF MERCHANTABILITY AND FITNESS FOR A PARTICULAR PURPOSE. Some states do not permit limitation or exclusion of implied warranties; therefore, the aforesaid limitation(s) or exclusion(s) may not apply to the purchaser. EXCEPT AS PROVIDED ABOVE, IN NO EVENT WILL EATON BE LIABLE FOR DIRECT, INDIRECT, SPECIAL, INCIDENTAL OR CONSEQUENTIAL DAMAGES ARISING OUT OF THE USE OF THIS PRODUCT, EVEN IF ADVISED OF THE POSSIBILITY OF SUCH DAMAGE. Specifically, we are not liable for any costs, such as lost profits or revenue, loss of equipment, loss of use of equipment, loss of software, loss of data, costs of substitutes, claims by third parties, or otherwise.
Warranty
FCC Notice, Class B
This device complies with part 15 of the FCC Rules. Operation is subject to the following two conditions: (1) This device may not cause harmful interference, and (2) this device must accept any interference received, including interference that may cause undesired operation.
Note: This equipment has been tested and found to comply with the limits for a Class B digital device, pursuant to part 15 of the FCC Rules. These limits are designed to provide reasonable protection against harmful interference in a residential installation. This equipment generates, uses and can radiate radio frequency energy and, if not installed and used in accordance with the instructions, may cause harmful interference to radio communications. However, there is no guarantee that interference will not occur in a particular installation. If this equipment does cause harmful interference to radio or television reception, which can be determined by turning the equipment off and on, the user is encouraged to try to correct the interference by one or more of the following measures:
- Reorient or relocate the receiving antenna.
- Increase the separation between the equipment and receiver.
- Connect the equipment into an outlet on a circuit different from that to which the receiver is connected.
- Consult the dealer or an experienced radio/TV technician for help.
Any changes or modifications to this equipment not expressly approved by Eaton could void the user's authority to operate this equipment.
WEEE Compliance Information for Customers and Recyclers (European Union)
Under the Waste Electrical and Electronic Equipment (WEEE) Directive and implementing regulations, when customers buy new electrical and electronic equipment from Eaton, they are entitled to:
- Send old equipment for recycling on a one-for-one, like-for-like basis (this varies depending on the country)
- Send the new equipment back for recycling when this ultimately becomes waste
Warranty
Use of this equipment in life support applications where failure of this equipment can reasonably be expected to cause the failure of the life support equipment or to significantly affect its safety or effectiveness is not recommended.
Eaton has a policy of continuous improvement. Specifications are subject to change without notice. Photos and illustrations may differ slightly from actual products.

Powering Business Worldwide
Eaton
1000 Eaton Boulevard
Cleveland, OH 44122
United States
Eaton.com
© 2023 Eaton
All Rights Reserved
Publication No. 23-07-725
933F5C_RevA
August 2023
Eaton is a registered trademark.
All trademarks are property of their respective owners.
Instalación
2. Haga clic en Continuar y Aceptar.
Instalación
Powering Business Worldwide
Eaton
1000 Boulevard Eaton
Cleveland, OH 44122
Estados Unidos
Eaton.com
© 2023 Eaton
Installation
Installation
Configuration audio
Dépannage
Powering Business Worldwide
Eaton
1000 Eaton Boulevard
Cleveland, OH 44122
États-Unis
Eaton.com
© 2023 Eaton
Dual Display Docking Station, HDMI-Anschlüsse (2 x), USB-Anschlüsse (6 x), GbE
Modell:
U442-DOCK22-B
Installation
Installation
Audio-Konfiguration
Fehlerbehebung
Powering Business Worldwide
Eaton
1000 Eaton Boulevard
Cleveland, OH 44122
Vereinigte Staaten
Eaton.com
© 2023 Eaton
Installazione
Installazione
Powering Business Worldwide
Eaton
1000 Eaton Boulevard
Cleveland, OH 44122
Stati Uniti
Eaton.com
© 2023 Eaton
- Dual-Display Docking Station, HDMI Ports (x2), USB Ports (x6), GbE
- Product Features
- System Requirements
- Package Contents
- Optional Accessories
- Product Overview
- Installation
- Notes:
- Windows
- macOS
- Click Continue > Agree.
- Verifying the Installation
- Display Configuration
- Utility Settings:
- Multi-Monitor Configuration:
- Windows OS
- Extended Mode
- Mirror Mode
- Set the Primary Monitor
- Audio Configuration
- Troubleshooting
- The cursor has disappeared
- Video playback in extended mode
- In Extended Mode, the add-on monitor has a black border around the desktop
- The add-on monitor is flickering
- The video does not display properly in Full-Screen Mode.
- Warranty
- 1-Year Limited Warranty
- FCC Notice, Class B
- WEEE Compliance Information for Customers and Recyclers (European Union)
- Instalación
- Haga clic en Continuar y Aceptar.
- Configuration audio
- Dépannage
- Audio-Konfiguration
- Fehlerbehebung
- Installazione
Brand : Tripp Lite
Model : U442-DOCK22-B
Category : USB hub