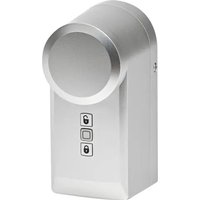
HmIP-DLD-S - Smart Home Homematic IP - Free user manual and instructions
Find the device manual for free HmIP-DLD-S Homematic IP in PDF.


| Product Type | Motorized lock for cylinder doors |
| Brand | Homematic IP |
| Model | HmIP-DLD-S |
| Dimensions (W x H x D) | 56 x 118 x 63 mm |
| Weight (with batteries) | 328 g |
| Power supply | 3 x 1.5 V LR6/Mignon/AA batteries or 3 x 1.2 V NiMH HR6 rechargeable batteries |
| Typical battery life | 1/2 year |
| Protection type | IP20 |
| Ambient temperature | 5 to 35 °C |
| Radio frequency band | 868.0 - 868.60 MHz / 869.4 - 869.65 MHz |
| Free field range | 200 m |
| Main functions | Motorized unlocking, locking and opening; control via smartphone (Homematic IP app), remote control, buttons on the device, emergency knob and voice control (Alexa, Google Assistant) |
| Service modes | Manual and automatic (weekly schedule) |
| Delivery contents | 1 lock mechanism, 1 mounting plate, 1 hex key, 2 wood screws 3.0 x 20 mm, 3 LR6/AA batteries, 1 instruction manual |
| Mounting | On cylinders with internal projection of 8 to 15 mm; requires a standard cylinder lock with emergency function |
| Care and cleaning | Clean with a soft, dry, lint-free cloth; moisten slightly with warm water if necessary; no solvent-based products |
| Safety | Indoor use only; do not open the device; keep out of reach of children; cylinder with emergency function mandatory |
| Repairability | User-replaceable batteries; no other repairable parts; maintenance by qualified personnel |
| Approval | CE, compliant with Directive 2014/53/EU |
Frequently Asked Questions - HmIP-DLD-S Homematic IP
User questions about HmIP-DLD-S Homematic IP
0 question about this device. Answer the ones you know or ask your own.
Ask a new question about this device
Download the instructions for your Smart Home in PDF format for free! Find your manual HmIP-DLD-S - Homematic IP and take your electronic device back in hand. On this page are published all the documents necessary for the use of your device. HmIP-DLD-S by Homematic IP.
USER MANUAL HmIP-DLD-S Homematic IP
natural_image
Three modern home security lockers with black buttons and open buttons, displayed against a blue background (no text or symbols on the devices themselves)EN Installation and operating manual
natural_image
Line drawing of a handheld device with a circular top and handle, showing a blue circular arrow indicating rotation (no text or symbols)natural_image
Line drawing of a hand pressing a button on a handheld device (no text or symbols)natural_image
Diagram of a door lock mechanism with a hand valve and key inserted into the lock (no text or symbols present)
natural_image
Mechanical component diagram showing a bracket and a curved tool with blue rotation arrow (no text or symbols)natural_image
Diagram of a door handle with a lock and a mechanical component, no text or symbols presentnatural_image
Diagram showing a mechanical clamp or bracket assembly with a magnified inset highlighting the internal components (no text or symbols present)natural_image
Technical illustration of a door handle and connector with mounting bracket (no text or symbols)natural_image
Diagram of a door handle with a lock mechanism and blue arrow indicating motion (no text or symbols)natural_image
Diagram of a door handle mechanism with directional arrows indicating movement (no text or symbols)natural_image
Diagram of a handheld device with internal components and a blue arrow indicating direction (no text or symbols)1 Package contents...... 20
2 Information about this manual.... 20
3 Hazard information 20
4 Function and device overview....21
5 General system information 22
6 Start-up....22
6.1 Requirements on the door and the lock cylinder....22
6.2 Pairing 24
7 Mounting 25
7.1 Mounting on the door lock cylinder 26
8 Operation 27
8.1 Operation via smartphone 27
8.1.1 Operating modes....27
8.2 Device operation....28
8.3 Emergency operation 28
9 Replacing batteries 29
10 Troubleshooting.... 30
10.1 Low battery 30
10.2 Command not confirmed 30
10.3 Duty Cycle 30
10.4 Error codes and flashing sequences 31
11 Restoring factory settings 32
12 Maintenance and cleaning....32
13 General information about radio operation 33
14 Disposal....33
15 Technical specifications.... 34
1 Package contents
1x Door Lock Drive
1x Mounting plate
1x Allen key
2x Wood screws 3.0 x 20 mm
3x 1.5 V LR6/mignon/AA batteries
1x Operating manual
2 Information about this manual
Please read this manual carefully before operating your Homematic IP components. Keep the manual so you can refer to it at a later date if you need to. If you hand over the device to other persons for use, please hand over this manual as well.
Symbols used:

Attention!
This indicates a hazard.

Note. This section contains important additional information!
3 Hazard information

Do not open the device. It does not contain any parts that need to be maintained by the user. In the event of an error, please have the device checked by an expert.

Do not use the device if there are signs of damage to the housing or operating elements, for example, or if it demonstrates a malfunction. If you have any doubts, have the device checked by an expert.

For safety and licensing reasons (CE), unauthorized change and/or modification of the device is not permitted.

The device may only be operated indoors and must be protected from the effects of moisture, dust, vibrations, solar or other methods of heat radiation, cold and mechanical loads.

The device is not a toy: do not allow children to play with it. Do not leave packaging material lying around. Plastic films/bags, pieces of polystyrene, etc. can be dangerous in the hands of a child.

Use only lock cylinders with emergency and hazard functionality, which can be locked and unlocked from the outside using a second key, whether or not a key is inserted on the inside.

Always carry the key for the respective lock with you or store it in a safe location that can be reached also in case of a fault.

Take care during installation that you do not trap your fingers in the key reel! If inserted, please remove the batteries before installation.

We accept no liability for damage to property or personal injury caused by improper use or failure to observe the hazard warnings. In such cases, all warranty claims are void. We accept no liability for any consequential damage.

The device must only be operated within residential buildings.

Using the device for any purpose other than that described in this operating manual does not fall within the scope of intended use and will invalidate any warranty or liability.

eQ-3 AG is liable for the lock itself within the scope of product liability but not for damage in operation, e.g. calling the locksmith or other work.
4 Function and device overview
The Homematic IP Door Lock Drive offers convenient, motor-driven unlocking, locking and opening of cylinder lock doors. The key inserted into the door lock is turned via the door lock drive so that the locking and unlocking mechanism of the door moves in exactly the same way as when normally closing with a key. The device can be used on all doors with a standard cylinder lock.
Locking and unlocking is conveniently carried out from inside and outside using a smartphone with the free Homematic IP app or via a Homematic IP device, such as a Homematic IP Remote Control.
Configuration and current status display are carried out also via app. Furthermore, reliable access control as well as comfortable, time-controlled closing of doors using flexible week programs and individual access profiles is possible.
From the inside, the door lock drive can also be operated directly on the device via two buttons or the rotary wheel for emergency situations.
The device is battery-operated. Therefore, power connection close to the door is not necessary.
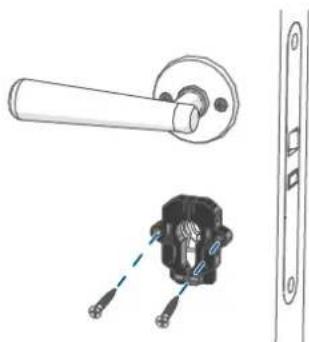
The door leaf is not damaged during installation. However, additional fixing holes are provided for screwing to the inner door fitting / door leaf.
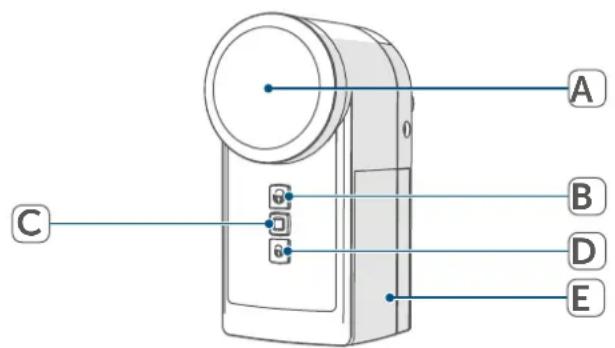
Device overview:
(A) Rotary wheel for emergency operation
(B) Button "unlock"
(C) System button (pairing button and LED)
(D) Button "lock"
(E) Battery compartment cover
5 General system information
This device is part of the Homematic IP smart home system and works with the Homematic IP protocol. All devices of the system can be configured comfortably and individually with the user interface of the Central Control Unit CCU3 or flexibly via the Homematic IP smartphone app in connection with the Homematic IP cloud. All available functions provided by the system in combination with other components are described in the Homematic IP Wired Installation Guide. All current technical documents and updates are provided at www.homematic-ip.com.
6 Start-up
6.1 Requirements on the door and the lock cylinder

Please read this entire section before starting to mount the device.
Door requirements
The door lock drive can only be used on doors with locks and bolts that move easily and do not jam.

Doors with locks that can only be operated by pushing, pulling, lifting, lowering or twisting the door are not suitable for operation with the lock!

Note, especially with wooden doors, that weather can cause the door to warp, which can in turn make the door unsuitable for locking and unlocking operation with the lock at times. The door lock drive cannot handle the forces that are required by a warped door on the door latch.
Make sure that the door can be locked and unlocked smoothly and easily under all climatic conditions before implementing the drive. This can be tested by locking and unlocking the door lock with the key and without using the door handle. Set the door hinges and/or the striking plate in the door frame so that locking and unlocking is smooth and easy with the key as described previously.
In order to use the door opening function, the door seals must be intact and designed so that the door will open on its own after completely unlatching the lock because of the expansion of the door seal.
Lock cylinder requirements
The door lock drive mounted directly on the cylinder lock (F) of the door; when the appropriate key is inserted, the drive causes the cylinder to move. Accordingly, the cylinder lock must be dimensioned so that it juts out on the inside of the door by 8 – 15 mm more than the handle fitting.
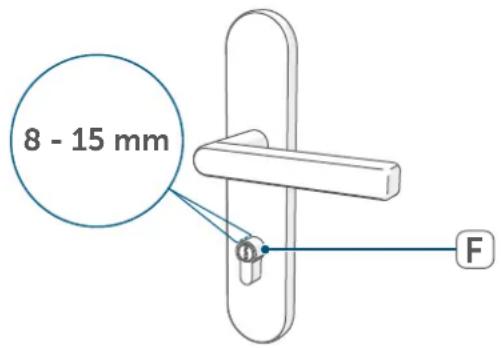
Determine the dimensions of the required lock cylinder.
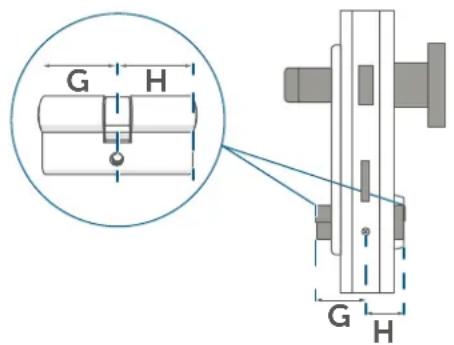
When selecting the lock cylinder, the inner dimension (G) and outer dimension (H) of the cylinder are significant.
It is always measured from the outsides of the lock cylinder including door fitting to the fixing screw (l).
Once you have determined the inside and outside dimensions of your lock cylinder, check whether the inside dimension overlaps by 8 – 15 mm for the installation of the door lock drive.
If this is not the case, add 8 – 15 mm to the inside dimension (ideal 10 mm) to find the appropriate standard size.
Example:
You measure an outside dimension of 40 mm and an inside dimension of 40 mm. Therefore, the cylinder is a 40/40 cylinder. In order to use the lock actuator, you therefore need the next standard size, a 40/50 cylinder. The cylinder will then protrude inside by 10 mm.

If necessary, please replace your lock cylinder by a new one if it does not fulfil the installation requirements. Make sure that you only use locking cylinders with emergency and danger functions in which the key is turned synchronously on the inside. This is necessary so that the position can be transmitted correctly.
6.2 Pairing

Please read this entire section before starting the pairing procedure.

First set up your Homematic IP Access Point via the Homematic IP apptoenableoperation of other Homematic IP devices within your system. For further information, please refer to the operating manual of the Access Point.

You can connect the device either to the Homematic IP Access Point or the Central Control Unit CCU3. For detailed information, refer to the WebUI manual on our home-page at www.homematic-ip.com.
To integrate the device into your system and to enable control via the Homematic IP app, you must pair the device to your Homematic IP Access Point first.
To pair the temperature and humidity sensor, please proceed as follows:
- Open the Homematic IP app on your smartphone.
- Select the menu item "Pair device".
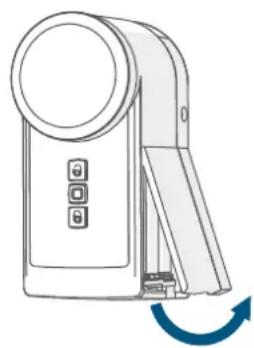
- Remove the battery compartment cover (E) on the right side of the device by pulling the cover off using the notches at the bottom of the device.
natural_image
Line drawing of a handheld device with a blue circular top and directional arrow indicating rotation (no text or symbols)- Remove the insulation strip from the battery compartment of the device.
- pairing mode remains activated for 3 minutes.

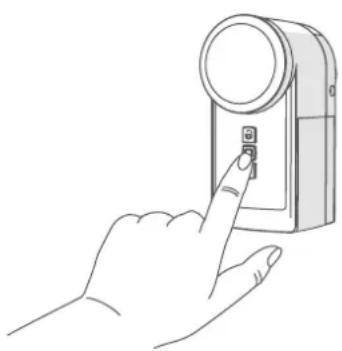
You can manually start the pair mode for another 3 minutes by pressing the system button (C) shortly.
natural_image
Line drawing of a hand holding a camera with a button (no text or symbols)Your device will automatically appear in the Homematic IP App.
- To confirm, enter the last four digits of the device number (SGTIN) in your app or scan the QR code. See the sticker supplied or attached to the battery compartment of the device.
The app automatically asks if the device has already been mounted or not. If the device has not yet been mounted, the installation wizard starts in the app with a step-by-step instruction for mounting on the door lock cylinder. The installation instructions can also be found in section (see „7 Mounting“ on page 25).
As soon as the installation has been completed, the pairing process is continued and the settings of the installation position are queried:
- Wait until paring is completed.
- If pairing was successful, the LED (C) lights up green. The device is now ready for use.
- If the LED lights up red, please try again.
- Allocate the device to a room and give the device a name.
7 Mounting

Please read this entire section before starting to mount the device.
As soon as you put the door lock drive into operation for the first time, a query opens in the app during the paring process asking whether the installation wizard should be started. The installa-
tion wizard will guide you through the single installation steps, as illustrated below.
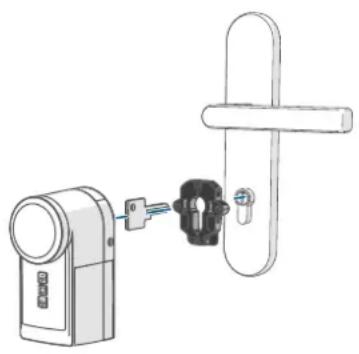
Your door lock has to be installed on the cylinder lock using the black mounting plate while the key is inserted. Please also refer to the information in section (see „6.1 Requirements on the door and the lock cylinder“ on page 22).
natural_image
Diagram of a door lock mechanism with a hand valve and key inserted into the lock (no text or symbols present)
You can open the installation wizard at any time via the Homematic IPapp.

Please note that the function "open" has to be carried out after the initial start-up to make sure that the lock actuator can allocate its current position.
7.1 Mounting on the door lock cylinder
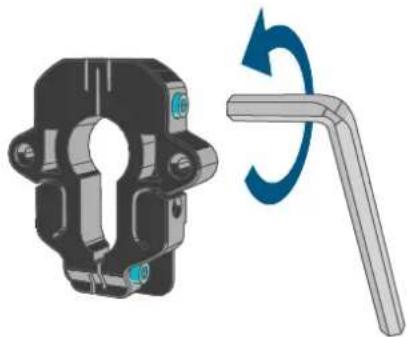
- Remove the screws on the left and right side of the device using the supplied Allen key. Remove the black mounting plate on the back side of the device.
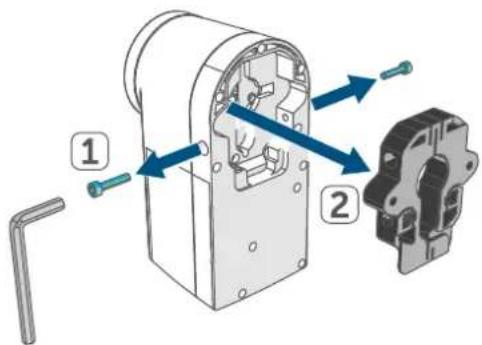
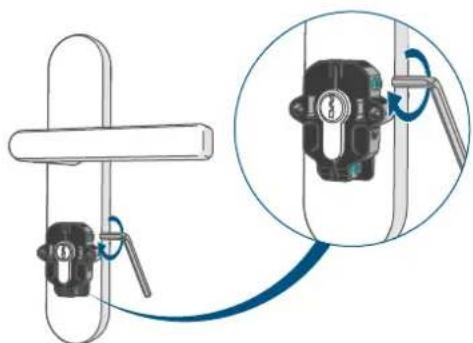
- Loosen the two screws of the mounting plate using the supplied Allen key in case it does not fit to the cylinder lock of your door.
natural_image
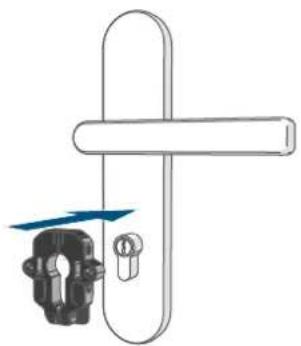
Mechanical component with a U-shaped bracket and a right-angle tool, showing rotational motion (no text or symbols)- Place the mounting plate onto the cylinder lock.
natural_image
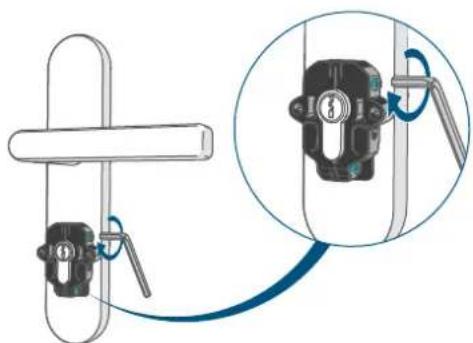
Diagram of a door handle with a key inserted, showing no text or symbols- Tighten the screws.
natural_image
Diagram showing a mechanical clamp or bracket assembly with a magnified inset highlighting the internal components (no text or symbols present)i Alternatively, the two screws supplied can be used to screw the mounting plate to the door leaf.
natural_image
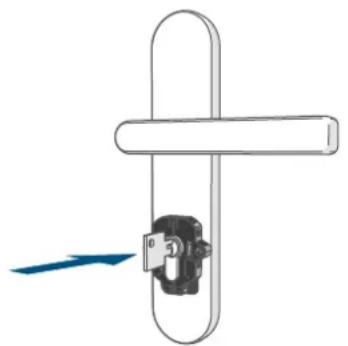
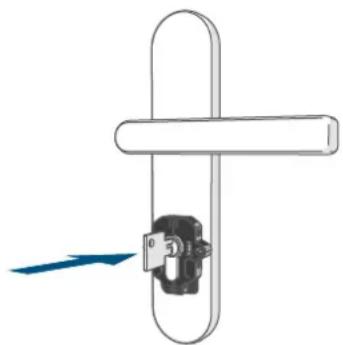
Technical illustration of a door handle and connector with mounting bracket (no text or symbols)- Insert the key into the cylinder lock.
- Select the position in which the key can be pulled out and the lock is unlocked.
natural_image
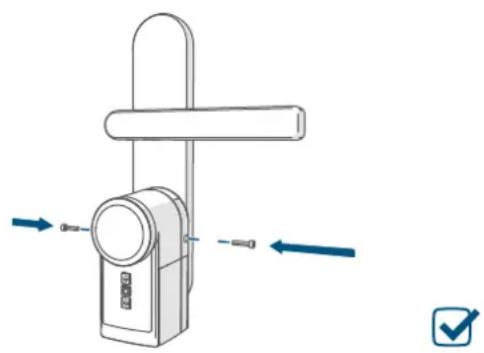
Pure diagram of a door handle with a lock and directional arrow, no text or symbols present- Guide the device over the key and push it completely onto the mounting plate.
- Fasten the device using the two screws that were screwed out in the beginning.
natural_image
Diagram of a handheld device with directional arrows indicating movement or force (no text or symbols)- In the app, define on which side of the door your device is installed if you are looking at the door from the inside.
- In the app, define in which position the key can be pulled out.
- Also, define the number of turns that are necessary in order to completely lock the door.
The device is fully mounted and the pairing procedure is completed in the app.
8 Operation
The door lock drive is operated via the Homematic IP smartphone app, via connected Homematic IP devices (such as a key ring remote control) or directly on the device using the "unlock" or "lock" buttons or the rotary wheel. The device can also be controlled via voice control with Amazon Alexa or Google Assistant.
Additional control options are available in conjunction with the Smart Home Central Control Unit CCU3 or third-party solutions.
8.1 Operation via smartphone
With the Homematic IP smartphone app the door lock drive can be controlled and configured with up to 8 connected smartphones. You can also operate up to 8 lock actuators with one smartphone app.
8.1.1 Operating modes
Manual operation
In manual operation, the door lock drive is only controlled after manual operation by the user. After operation, the device remains in its last status (locked or unlocked). If the function "open" has been selected, the device remains in the status "unlocked".
The week program is switched off in manual mode and the door is not automatically locked or unlocked during this time.
Automatic mode
The door is locked automatically during a previously set period of time. The time period can be individually defined via the week program of the door lock drive.

Further information on configu-ring and controlling the door lock drive via the Homematic IP app can be found in the Homematic IP user guide at www.homematic-ip.com.
8.2 Device operation
Unlock
The lock bolt moves to the unlocked position. Upon completion of the procedure, an audio signal is emitted on the lock actuator. To unlock the door manually with the device, please proceed as follows:
- Press the button "Unlock" (B) at the door lock one time briefly.

After replacing the batteries or changing the device settings, open the door once by pressing and holding the "Unlock" button (B) so that the lock status is correctly reported again.
Open
The lock bolt is retracted so that the door is opened. Upon completion of the procedure, an audio signal is emitted on the lock actuator.
To open the door manually via the device, proceed as follows:
- Press the button "Unlock" (B) at the door lock drive once long.
Lock
The lock bolt moves to the locking position. Upon completion of the procedure, an audio signal is emitted on the device. To lock the door manually with the device, please proceed as follows:
- Press the button "Lock" (D) on the door lock drive one time briefly.
8.3 Emergency operation
The lock can be unlocked/locked manually in the following two ways:
From inside with the rotary wheel:
In standby mode, the door lock drive is disengaged, i.e. the gearbox is free-wheeling. By turning of the rotary wheel (A) the door lock drive can be unlocked or locked and the door can also be opened. The door lock drive must be in idle status (motor not moving).
From outside with a key:
The lock can be locked, unlocked or opened also from outside, if a lock cylinder with emergency and hazard function is used. The door lock drive must be in idle status (motor not moving) in this case.

Do not tighten the screws that fasten the door lock drive to the mounting plate too tight, since it might jam the drive and make opening from outside difficult.
9 Replacing batteries
If the symbol for empty batteries ( ) appears in the app, replace the used batteries by three new 1.5 V LR6/ mignon/AA batteries or NiMH batteries of type 1.2 V HR6/mignon/AA. You must observe the correct battery polarity.
To replace the batteries of the device, please proceed as follows:
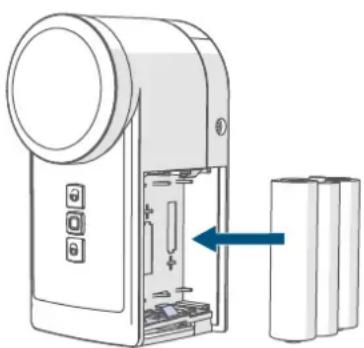
- Remove the battery compartment cover (E) on the right side of the door lock drive (→siehe Abbildung), by pulling the cover off using the notches at the bottom of the device.
- Remove the used batteries.
- Insert three new 1.5 V LR6/ mignon/AA batteries or NiMH batteries of type 1.2 V HR6/mignon/AA into the compartment, making sure they are the right way around. The device LED (C) LED shortly flashes orange and the green. In addition, the device emits a short audio signal.
natural_image
Diagram of a portable electronic device with a blue arrow pointing to its internal components, shown in line without any text or symbols.- Reattach the battery compartment cover and latch it into place.
- Pay attention to the flashing signals of the LED (C) after inserting the batteries (see „10.4 Error codes and flashing sequences“ on page 31).
Once the batteries have been inserted, the device will perform a self-test (approx. 2 seconds). Afterwards, initialisation is carried out. The test display will indicate that initialisation is complete: orange and green lighting. Open the door by pressing and holding the unlock button (B) to detect the lock status.
i Remove or change used batteries immediately to prevent the batteries from leaking.
i Always replace all batteries in the device and use batteries of the same type/from the same manufacturer only.
If the battery voltage is getting low it is displayed via the app. Furthermore, the device emits an audio signal and the device LED (C) flashes orange after every basic function actuated. Change the batteries in this case. The settings will not be lost.
Contact with batteries that are dead or damaged can cause skin irritation. Use protective gloves in this case.
If not used for any length of time (e.g. when in storage), remove the batteries to avoid damages caused by leaking, etc.

Caution! There is a risk of explosion if the battery is not replaced correctly. Replace only with the same or equivalent type. Never recharge non-rechargeable batteries (except NiMH batteries type HR6). Do not throw the batteries into a fire. Do not expose batteries to excessive heat. Do not short-circuit batteries. Doing so will present a risk of explosion.
10 Troubleshooting
10.1 Low battery
Provided that the voltage value permits it, the device will remain ready for operation also if the battery voltage is low. Depending on the particular load, it may be possible to drive repeatedly, once the batteries have been allowed a brief recovery period.
If the voltage drops too far during activity, the empty battery symbol (☐) and the corresponding error code will be displayed in the app (see „10.4 Error codes and flashing sequences“ on page 31). In this case, replace the empty batteries by three new batteries or fully charged batteries (see „9 Replacing batteries“ on page 29).
10.2 Command not confirmed
If at least one receiver does not confirm a command, the device LED lights up red at the end of the failed transmission process. The failed transmission may be caused by radio interference (see „13 General information about radio operation“ on page 33).
This may be caused be the following:
- Receiver cannot be reached.
- Receiver is unable to execute the command (load failure, mechanical blockade, etc.).
- Receiver is defective.
10.3 Duty Cycle
The duty cycle is a legally regulated limit of the transmission time of devices in the 868 MHz range. The aim of this regulation is to safeguard the operation of all devices working in the 868 MHz range.
In the 868 MHz frequency range we use, the maximum transmission time of any device is 1% of an hour (i.e. 36 seconds in an hour). Devices must cease transmission when they reach the 1% limit until this time restriction comes to an end. Homematic IP devices are designed and produced with 100% conformity to this regulation.
During normal operation, the duty cycle is not usually reached. However, repeated and radio-intensive pair processes mean that it may be reached in isolated instances during start-up or initial installation of a system. If the duty cycle is exceeded, this is indicated by one long flashing of the device LED, and may manifest itself in the device temporarily working incorrectly. The device starts working correctly again after a short period (max. 1 hour).
10.4 Error codes and flashing sequences
| Flashing code Meaning Solution | ||
| Short orange flashing (every 10 s) | Pair mode active | Please enter the last four numbers of the device serial number to confirm (see „6.2 Pairing" on page 24). |
| Short orange light (after driving)+ 3x short signal sound | Batteries empty | Replace the batteries (see „9 Replacing batteries" on page 29). |
| 1x long red lighting+ long signal sound | Operation failed (for example, blocking) | Try again and check for correct mounting of the device |
| 6x long red flashing Device | defective | Have a look at your app for error message or contact your retailer. |
| 1x red lighting+ long signal sound | System button was not pressed within 3 minutes during the pairing process. | Restart the pairing process. Follow the instructions in the app and confirm the pairing process by pressing the system button. |
11 Restoring factory settings

The factory settings of the device can be restored. If you do this, you will lose all your settings.
To restore the factory settings of the device, proceed as follows:
- Remove the battery compartment cover (E) (→siehe Abbildung).
- Remove one of the batteries.
- Re-insert the battery making sure that it is right way around. Simultaneously, press and hold down the system button (C) for 4 seconds until the device LED (C) starts to flash quickly orange.
- Release the button again.
- Press and hold down again for 4s, until the device LED (C) lights up green.
- Release the system button to finish the procedure.
The device will perform a restart.
12 Maintenance and cleaning

The device does not require you to carry out any maintenance other than replacing the battery when necessary. Enlist the help of an expert to carry out any maintenance or repairs.
Clean the device using a soft, lint-free cloth that is clean and dry. You may dampen the cloth a little with lukewarm water in order to remove more stubborn marks. Do not use any detergents containing solvents, as they could corrode the plastic housing and label.

Check that your product is safe from a technical point of view (that the housing is not damaged, for example) on a regular basis. If you have reason to believe that it is no longer safe to operate the device, put it out of service. Remove the battery pack to safeguard the device against unintentional operation.
Safe operation may no longer be possible if the device:
• shows signs of external damage,
- no longer functions,
- has been stored under unfavourable conditions or
- has been exposed to severe transport conditions.

If not used for any length of time (e.g. when in storage), remove the batteries to avoid damages caused by leaking, etc.
13 General information about radio operation
Radio transmission is performed on a non-exclusive transmission path, which means that there is a possibility of interference occurring. Interference can also be caused by switching operations, electrical motors or defective electrical devices.

The range of transmission within buildings can differ greatly from that available in the open air. Besides the transmitting power and the reception characteristics of the receiver, environmental factors such as humidity in the vicinity have an important role to play, as do on-site structural/screening conditions.
eQ-3 AG, Maiburger Straße 29, 26789 Leer, Germany hereby declares that the radio equipment type Homematic IP HmIP-DLD, HmIP-DLD-A, HmIP-DLD-S is compliant with Directive 2014/53/EU. The full text of the EU declaration of conformity is available at the following internet address:
www.homematic-ip.com
14 Disposal
Instructions for disposal

This symbol means that the device and the batteries or accumulators must not be disposed of with
household waste, the residual waste bin or the yellow bin or yellow bag. For the protection of health and the environment, you must take the product, all electronic parts included in the
scope of delivery, and the batteries to a municipal collection point for old electrical and electronic equipment to ensure their correct disposal. Distributors of electrical and electronic equipment or batteries must also take back obsolete equipment or batteries free of charge.
By disposing of it separately, you are making a valuable contribution to the reuse, recycling and other methods of recovery of old devices and old batteries.
You must separate any old batteries and accumulators of old electrical and electronic devices from the old device if they are not enclosed by the old device before handing it over to a collection point and to dispose of them separately at the local collection points.
Please also remember that you, the end user, are responsible for deleting personal data on any old electrical and electronic equipment before disposing of it.
Information about conformity
CE The CE mark is a free trademark that is intended exclusively for the authorities and does not imply any assurance of properties.

For technical support, please contact your retailer.
15 Technical specifications
Device short name: HmIP-DLD, HmIP-DLD-A, HmIP-DLD-S
Supply voltage: 3x 1.5 V LR6/mignon/AA
or 3x 1,2 V HR6/mignon/AA
Battery life: 1/2 year (typ.)
Degree of protection: IP20
Degree of pollution: 2
Ambient temperature: 5 to 35 °C
Dimensions (W x H x D): 56 x 118 x 63 mm
Weight: 328 g (incl. batteries)
Radio frequency band: 868.0-868.60 MHz
869.4-869.65 MHz
Maximum radiated power: 10 dBm
Receiver category: SRD category 2
Typ. open area RF range:
200 m
Duty cycle:
< 1 % per h/< 10 % per h
Construction of the regulation
and control unit:
independently mounted electronic regulation and control device
Method of operation:
Type 1
Software class:
Class A
Subject to technical changes.
Table des matières
natural_image
Line drawing of a handheld device with a blue circular top and directional arrow indicating rotation (no text or symbols)natural_image
Line drawing of a hand pressing a button on a device (no text or symbols)natural_image
Diagram of a door lock mechanism with a hand valve and key inserted into the lock (no text or symbols present)
natural_image
Mechanical component diagram showing a bracket and a right-hand tool with a blue curved arrow indicating rotation (no text or symbols)natural_image
Diagram of a door handle with a key inserted, showing no text or symbols- Resserrez les vis.
natural_image
Diagram showing a mechanical clamp or bracket assembly with a magnified inset highlighting a key inserted into a vertical pipe (no text or symbols present)
natural_image
Technical line drawing of a door handle and connector with a close-up view of the internal component (no text or symbols)natural_image
Pure mechanical diagram showing a lever and lock mechanism without any text or symbolsnatural_image
Diagram of a mechanical device with directional arrows indicating movement or force (no text or symbols)natural_image
Diagram of a handheld device with internal components and a blue arrow indicating a location or operation (no text or symbols present)natural_image
Line drawing of a handheld device with a blue circular top and directional arrow indicating rotation (no text or symbols)natural_image
Line drawing of a hand holding a handheld device with a circular lens and a square button (no text or symbols)natural_image
Diagram of a door lock mechanism with a hand valve and key inserted into a lock (no text or symbols)
natural_image
Mechanical component with a curved arrow indicating rotational motion (no text or symbols)natural_image
Diagram of a door handle with a key inserted, showing no text or symbolsnatural_image
Diagram showing a hand holding a lock with a magnified inset illustrating the internal components (no text or symbols present)
natural_image
Technical line drawing of a door handle and connector with mounting bracket (no text or symbols)natural_image
Pure mechanical diagram showing a lever and lock mechanism without any text or symbolsnatural_image
Diagram of a mechanical device with directional arrows indicating movement or force (no text or symbols present)
natural_image
Diagram of a handheld device with internal components and battery pack, showing no text or symbolsnatural_image
Line drawing of a handheld device with a blue circular button and directional arrow (no text or symbols)natural_image
Line drawing of a hand pressing a button on a handheld device (no text or symbols)natural_image
Diagram of a door lock mechanism with a hand valve and lock component (no text or symbols)
natural_image
Mechanical component with a blue circular arrow indicating rotational motion (no text or symbols)natural_image
Diagram of a door handle with a key inserted, showing no text or symbolsnatural_image
Diagram showing a door handle and lock mechanism with a magnified inset illustrating the mechanism (no text or symbols present)
natural_image
Technical line drawing of a door handle and connector with screwdriver (no text or symbols)natural_image
Diagram of a door handle with a lock and directional arrow indicating motion (no text or symbols)natural_image
Diagram of a door lock mechanism with directional arrows indicating movement (no text or symbols)natural_image
Diagram of a portable electronic device with a blue arrow pointing to its internal components, alongside two cylindrical batteries (no text or symbols present)natural_image
Line drawing of a handheld device with a blue circular top and directional arrow indicating rotation (no text or symbols)natural_image
Line drawing of a hand pressing a button on a device (no text or symbols)natural_image
Diagram of a door lock mechanism with a door handle and key inserted (no text or symbols)
natural_image
Mechanical component with a circular arrow indicating rotational motion (no text or symbols)natural_image
Diagram of a door handle with a key inserted into a lock, showing no text or symbols©
natural_image
Diagram showing a mechanical clamp or bracket assembly with a magnified inset highlighting the internal components (no text or symbols present)
natural_image
Technical illustration of a door handle and connector with mounting holes (no text or symbols)- Steek de sleutel in de slotcilinder.
natural_image
Diagram of a door handle with a lock mechanism and directional arrow (no text or symbols)natural_image
Technical line drawing of a mechanical device with directional arrows indicating movement (no text or symbols)8.1 Bediening via smartphone
natural_image
Diagram of a handheld device with internal components and battery pack, showing no text or symbolsFree download of the Homematic IPapp!


Download on the
App Store


GET IT ON
Google Play
Bevollmächtigter des Herstellers: Manufacturer's authorised representative

eQ-3 AG
Maiburger Straße 29
26789 Leer / GERMANY
www.eQ-3.de
- Package contents
- Information about this manual
- Symbols used:
- Attention!
- Hazard information
- Function and device overview
- Device overview:
- General system information
- Start-up
- Requirements on the door and the lock cylinder
- Door requirements
- Lock cylinder requirements
- Example:
- Pairing
- Mounting
- Mounting on the door lock cylinder
- Operation
- Operation via smartphone
- Operating modes
- Manual operation
- Automatic mode
- Device operation
- Unlock
- Open
- Lock
- Emergency operation
- From inside with the rotary wheel:
- From outside with a key:
- Replacing batteries
- Troubleshooting
- Low battery
- Command not confirmed
- Duty Cycle
- Restoring factory settings
- Maintenance and cleaning
- General information about radio operation
- Disposal
- Technical specifications
- Table des matières
- Bediening via smartphone
Brand : Homematic IP
Model : HmIP-DLD-S
Category : Smart Home