
EIT-7422 DD B - Cooker EDESA - Free user manual and instructions
Find the device manual for free EIT-7422 DD B EDESA in PDF.

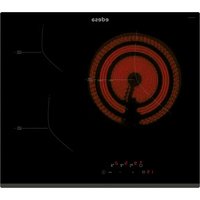
| Product type | Induction hob with integrated hood |
| Brand | Edesa |
| Model | EIT-7422 DD B |
| Category | Induction hob and extractor hood |
| Dimensions (W x D) | Approx. 77 x 52 cm (standard estimate) |
| Weight | Approx. 12 kg (estimate) |
| Power supply | 220-240 V~ 50/60 Hz |
| Total nominal power | 7335 W |
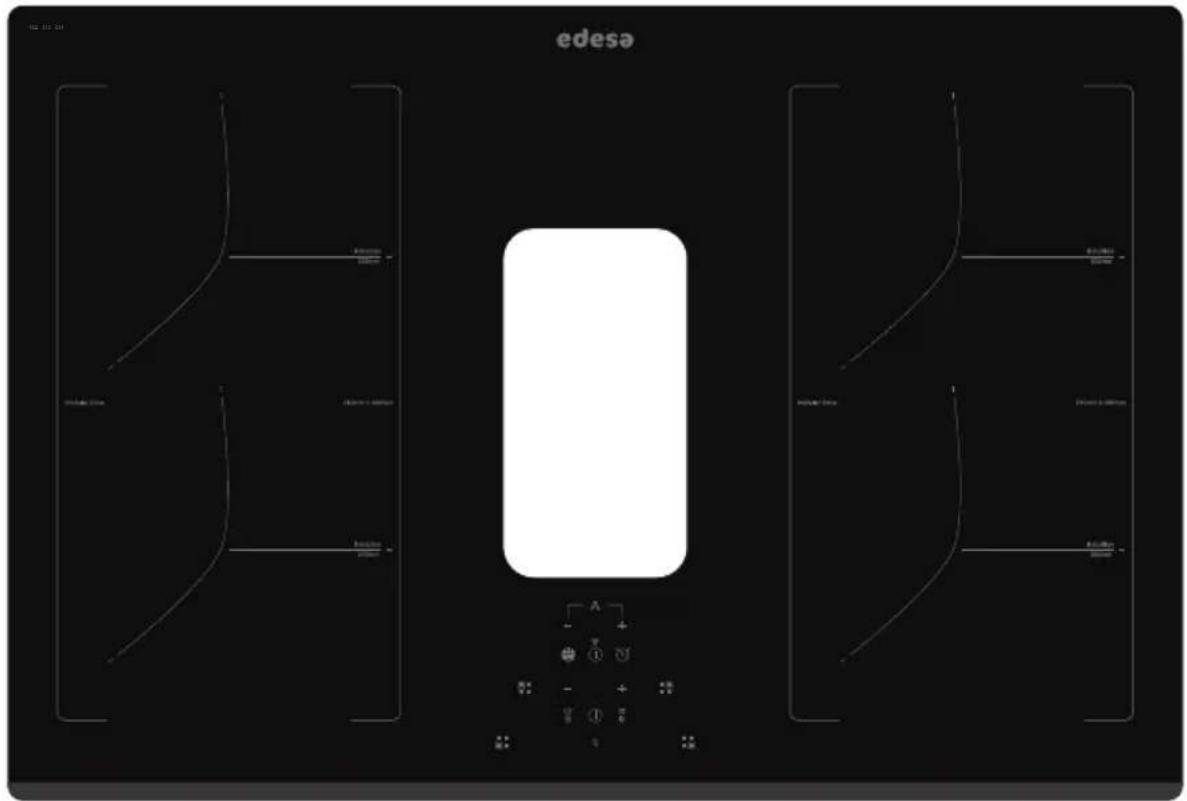
| Cooking zones | 4 induction zones with flexible zone |
| Main functions | Booster, keep warm, pause, timer, child lock, automatic shutdown, overheating protection, small object detection, hood with automatic mode and filter change reminder |
| Surface material | Glass-ceramic |
| Hood noise level | Not specified (standard estimate: 60-70 dB) |
| Hood type | Integrated, recirculation or extraction (check installation) |
| Filters | Washable metal grease filter and activated charcoal filter (replace every 3 months) |
| Maintenance and cleaning | Clean the surface with a scraper and suitable product; wash grease filters in hot water with mild detergent |
| Safety | Child lock, automatic shutdown, overheating protection, pan detection, automatic cut-off when pan is removed |
| Spare parts | Contact authorized after-sales service |
| Repairability | Repairability index not specified (estimate: 5/10 if parts available) |
| General information | Manual available in several languages; installation by a qualified professional; compliance with electrical and ventilation standards |
Frequently Asked Questions - EIT-7422 DD B EDESA
User questions about EIT-7422 DD B EDESA
0 question about this device. Answer the ones you know or ask your own.
Ask a new question about this device
Download the instructions for your Cooker in PDF format for free! Find your manual EIT-7422 DD B - EDESA and take your electronic device back in hand. On this page are published all the documents necessary for the use of your device. EIT-7422 DD B by EDESA.
USER MANUAL EIT-7422 DD B EDESA
natural_image
Abstract illustration of a waveform above a device panel with three rectangular panels and dots, no text or symbols present.ES Manual de instrucciones
EN Instruction manual
PT Manual de instruções
FR Manuel d'instructions
DE Bedienungs- und Wartungsanleitungen
EIT-7422 DD B /A

[01]x1
natural_image
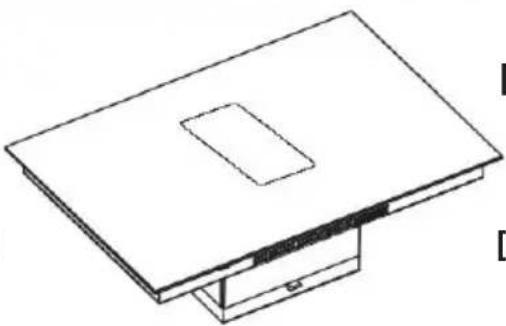
Isometric line drawing of a rectangular electronic device with a recessed top and base (no text or symbols)[02]x1

[03]x1
[04]x2
Not included
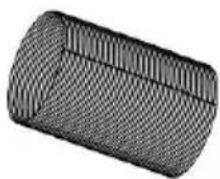
natural_image
3D wireframe model of a cylindrical object with ribbed texture (no text or symbols)VENT PACK(∅150)

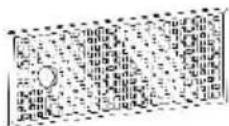
natural_image
Technical line drawing of a rectangular electronic component with a circular top and textured base (no text or symbols)RECIRC KIT 1
3
4

natural_image
Diagram of a mechanical device with a downward arrow indicating force or movement, no text or symbols present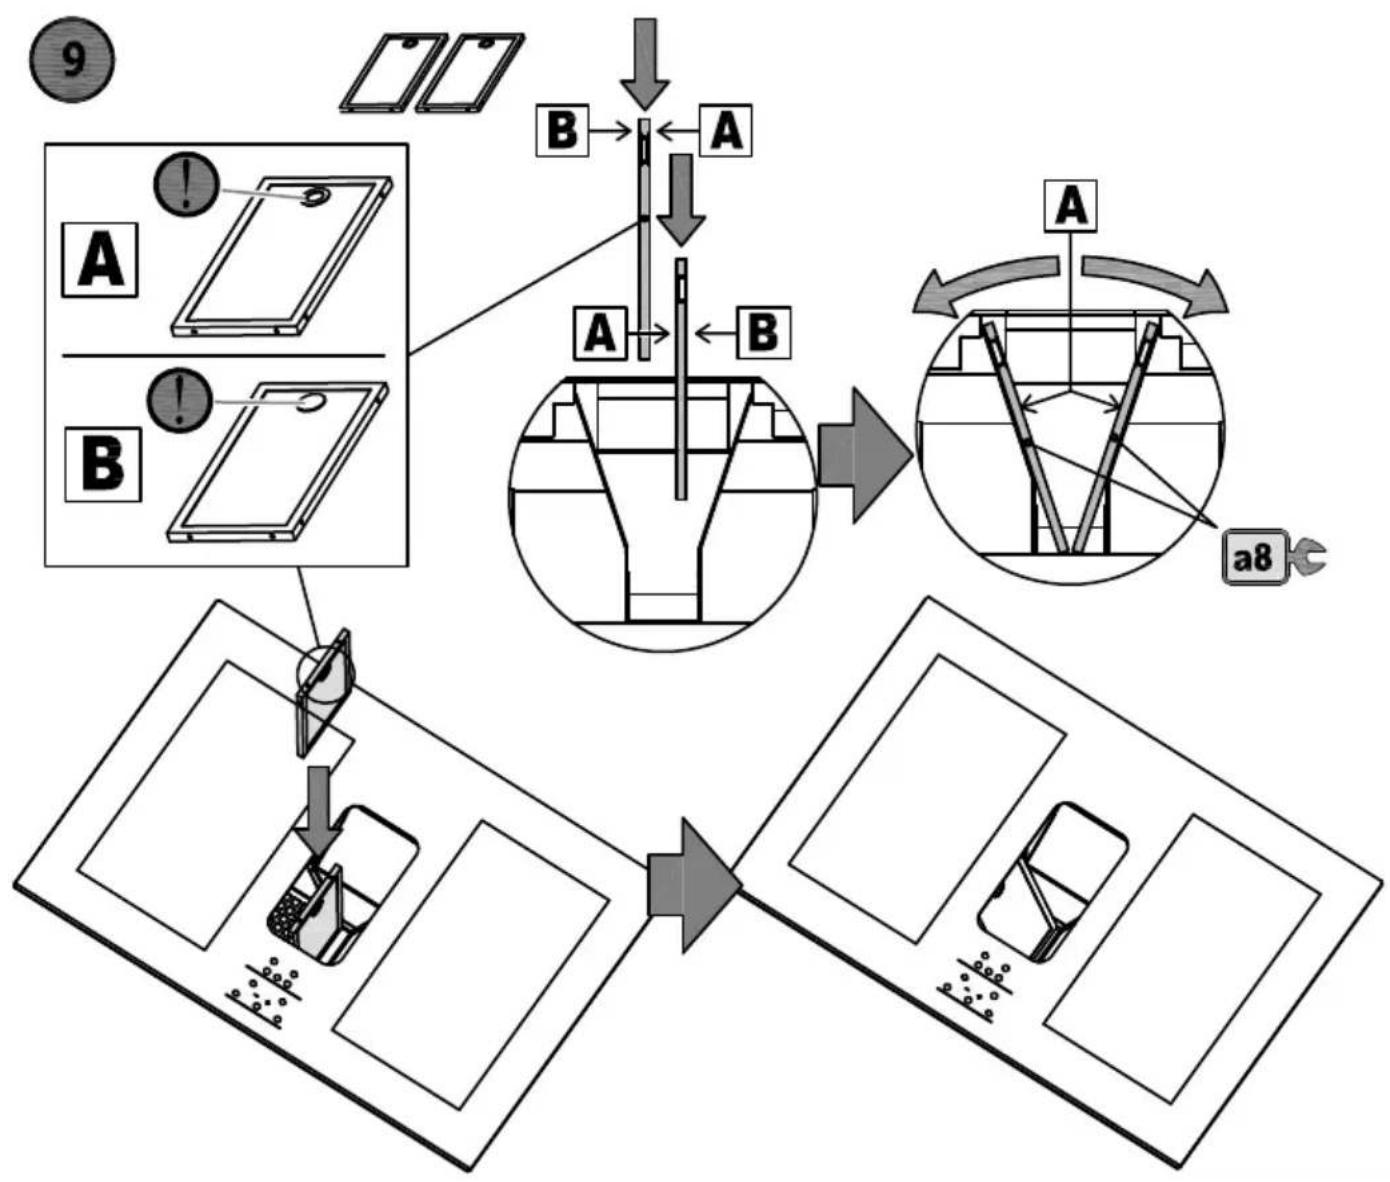
flowchart
graph TD
    A["Device 9"] --> B["Switch to screen"]
    B --> C["Access to screen"]
    C --> D["Application to screen"]
    D --> E["Output to screen"]

    subgraph Section 1
        F["Device 1"] --> G["Switch to screen"]
        H["Device 2"] --> I["Switch to screen"]
        J["Device 3"] --> K["Switch to screen"]
        L["Device 4"] --> M["Switch to screen"]
        N["Device 5"] --> O["Switch to screen"]
        P["Device 6"] --> Q["Switch to screen"]
        R["Device 7"] --> S["Switch to screen"]
        T["Device 8"] --> U["Switch to screen"]
    end

    subgraph Section 2
        V["Device 1"] --> W["Switch to screen"]
        X["Device 2"] --> Y["Switch to screen"]
        Z["Device 3"] --> AA["Switch to screen"]
        AB["Device 4"] --> AC["Switch to screen"]
        AD["Device 5"] --> AE["Switch to screen"]
        AF["Device 6"] --> AG["Switch to screen"]
        AH["Device 7"] --> AI["Switch to screen"]
        AJ["Device 8"] --> AK["Switch to screen"]
    end

    subgraph Section 3
        L["Device 1"] --> M["Switch to screen"]
        N["Device 2"] --> O["Switch to screen"]
        P["Device 3"] --> Q["Switch to screen"]
        R["Device 4"] --> S["Switch to screen"]
        S --> T["Switch to screen"]
        U["Device 5"] --> V
        V --> W
        W --> X
        X --> Y
        Y --> Z
        Z --> AA
        AA --> AB
        AB --> AC
        AC --> AD
        AD --> AE
        AE --> AF
    end

    style Section 1 fill:#f9f,stroke:#333
    style Section 2 fill:#ccf,stroke:#333
natural_image
Illustration showing a kitchen appliance being lifted by wires, next to a washing machine (no text or symbols)EN - Cleaning the grease filter
10
natural_image
Technical line drawing of a mechanical assembly with internal components and a separate inset view (no text or symbols)
Product Overview Top View
14
natural_image
Illustration of a cooking pot with an 'X' symbol above it and two upward arrows below (no text or symbols on the pot itself)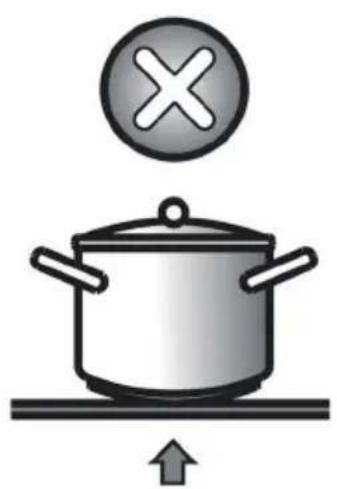
natural_image
Illustration of a cooking pot with a cross symbol above it and an upward arrow below (no text or symbols)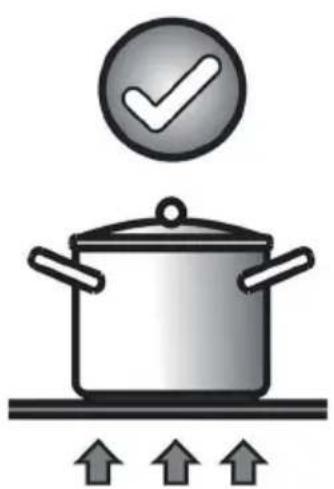
natural_image
Illustration of a cooking pot with a checkmark above it and three upward arrows below (no text or symbols)15

natural_image
Illustration of a paintbrush applying paint to a surface with scattered particles (no text or symbols)
Only for ducted option.
natural_image
Technical line drawing of a mechanical device with internal components and a magnified inset showing a close-up of the component (no text or symbols)
Only for recirculation option.
natural_image
Line drawing of a hand pressing down on a vertical line above a cooking pot (no text or symbols)Esto significa que:
THIS APPLIANCE IS CONCEIVED FOR DOMESTIC USE ONLY. THE MANUFACTURER SHALL NOT IN ANY WAY BE HELD RESPONSIBLE FOR WHATEVER INJURIES OR DAMAGES ARE CAUSED BY INCORRECT INSTALLATION OR BY UNSUITABLE, WRONG OR ABSURD USE.
The manufacturer declares that this product meets all the essential requirements for low voltage electrical material set out in European directive 2014/35/EU and for electromagnetic compatibility as required by European directive 2014/30/EU.
PRECAUTIONS
- When the hob is in use keep all magnetizable objects away (credit cards, floppy disks, calculators and so on).
- Do not use any alluminium foil or place any foodstuffs wrapped in alluminium foil directly on the hob - do not place any metal objects such as knives, forks, spoons and lids on the hob surface as they will heat up.
- When cooking in a non-stick pan without-seasoning, do not exceed 1-2 minutes' pre-heating time.
- When cooking food that may easily stick, start at a low power output level and then slowly increase while regularly stirring.
- After cooking is finished, switch off using the control provided (turn down to "0"), and do not rely on the pan sensor.
- If the surface of the hob is damage immediately disconnect the appliance from the mains to prevent the possibility of electric shock.
- Never use a steam cleaner to clean the hob.
- The appliance and accessible parts may be hot during operation.
- Take care to avoid touching the heating
elements.
- Children less than 8 years of age should be kept at a safe distance unless continuously supervised.
- This appliance may be used by children aged 8 or over and by persons with reduced physical, sensory or mental capabilities or lack of experience and knowledge, if they are supervised and have received suitable instructions on safe use of the appliance and understand the dangers involved. Children must not play with the appliance. User maintenance and cleaning should not be carried out by children except under constant supervision.
- Cooking with grease or oil may be dangerous and cause a fire if left unattended. NEVER try to extinguish a fire with water. Rather, disconnect the appliance and then cover the flames with a cover or sheet, for example.
- The cooking process has to be supervised. A short term cooking process has to be supervised continuously.
- Unattended cooking on a hob with fat or oil can be dangerous and may result in a fire.
- Fire hazard: do not store elements on cooking surfaces.
- Only counter top protectors designed for use with the cooking appliance and listed in the manufacturer's instructions should be used as suitable protection for the counter top incorporated in the appliance. Use of unsuitable protectors may cause accidents.
- WARNING: Accessible parts will become hot when in use. To avoid burns and scalds children should be kept away.
Insert in the fixed wiring a mean for disconnection from the supply mains having a contact separation in all poles that provide full disconnection under overvoltage category III conditions, in accordance with the wiring rules. The plug or omnipolar switch must be easily reached on the installed equipment.
This appliance is not intended to be used via an external timer or a remote control system. The manufacturers decline any responsibility in the event of non-compliance with what is described above and the accident prevention norms not being respected and followed.
The producer is not responsible for any failure to observe the instructions given in this manual and current safety regulations for the correct use of the equipment.
Reserves the right to make any modifications to the equipment or this manual without prior notice.
Contact our official distributor should you require technical assistance or additional information on our products.
To avoid all risk, if the power cable becomes damaged, it must only be replaced by the manufacturer, by an authorised service centre, or by a qualified electrician.
OPERATING PRINCIPLE (Fig. 11)
It exploits the electromagnetic properties of most cooking vessels.
The coil (inductor) which produces the electromagnetic field is operated and controlled by the electronic circuit.
The heat is transmitted to food by the cooking vessel itself.
The cooking process takes place as described below.
- loss of heat is minimum (high efficiency)
- the system stops automatically when the vessel is removed or even just lifted from the hob
- the electronic circuit guarantees maximum flexibility and fine adjustments.
1 Vessel
2 Induced current
3 Magnetic field
4 Inductor
5 Electronic circuit
6 Power supply
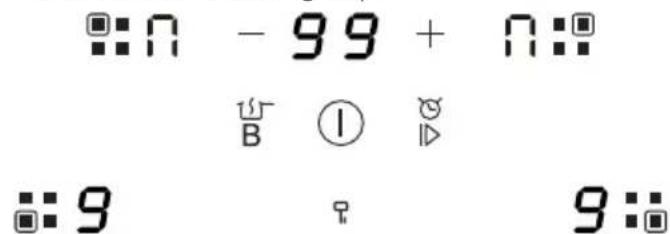
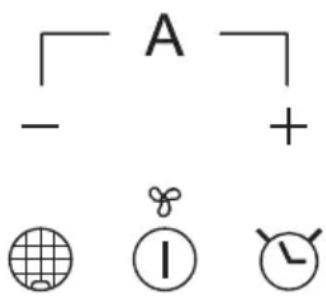
User's Instructions (Fig. 13)
| Reference | Description |
| A | Zone select key |
| B | Child lock key |
| C | ON/OFF key |
| D B | Boost control key/Keep warm key |
| E | Timer key/Pause key ( For induction hob ) |
| F | Power/Timer regulating key(reduce) |
| G + | Power/Timer regulating key(increase) |
| H | Filter screen change reminder function key |
| I | Delay shutdown function button key |
| J A - + | Auto mode combination key |
Power consumption
| Heating Zone | Max.Power (220-240V~ 50/60Hz) |
| 1500/2000 W (Booster) | |
| 2000/2800 W (Booster) | |
| Cooker hood | 135 W |
| 1500/2000 W (Booster) | |
| 2000/2800 W (Booster) | |
| Total Rating Power | 7335 W |
Installation
All operations relative to installation (electric connection) should be carried out by skilled personnel in conformity with the rules in force. As for the specific instructions see part pertaining to installer.
Using your induction hob
To start cooking

-
Touch the ON/OFF key ① for 3 seconds. After power on, the buzzer beeps once, all displays show “-”, indicating that the induction hob has entered the state of standby mode.
-
Place a suitable pan on the cooking zone that you want to use.
- Make sure the bottom of the pan and the surface of the cooking zone are clean and dry.
- According to the heating zone where the pan is placed, select a relevant zone by pressing "☐" key, the symbol 0. selected will stay fully.

- Select the power level by pressing the key(G)+ or key(F)—.
- The Power level will start at 5. Pressing the Key(G) + will count up the power levels from 5 to 9 in numerical order. Pressing the Key(F) — will take the power straight from 9 to 0.
- If you don't choose a power setting within 1 minute, the induction hob will automatically switch off. You will need to start again at step 1.
- You can modify the power setting at any time during cooking.
Using the Keep warm Function
- Touch the cooking zone selection button that you want to use Keep Warm, an indicator next to the key will flash.
- Touch the button key(D) ^1 and hold for 3 seconds, the cooking zone indicator will display “☐”
- If you want to cancel the keep warm, select the cooking zone you want to operate, and then touch the button key(D)' and hold for 3 seconds. The cooking zone will be off.
Using the Pause Function
alternately with the power If the display hashes
setting
This means that:
- You have not placed a pan on the correct cooking zone or,
- The pan you're using is not suitable for induction cookingor,
- The pan is too small or not properly centered on the cooking zone.
No heating takes place unless there is a suitable pan on the cooking zone.
The display will automatically turn off after 1 minute if no suitable pan placed on it or no any other operation.
When you have finished cooking
- Touching the relevant zone select key(A) □□. that you want to switch off.
- Press the key (F)— to decrease the power to "0" level, and the heating will stop.
- Beware of hot surfaces indicator light "H" will show which cooking zone is hot to touch. It will disappear when the surface has cooled down to a safe temperature. It can also be used as an energy saving function if you want to heat further pans, use the hotplate that is still hot.
Using the Boost function
Active boost function
- Select the heating zone by touching the zone select key (A) □ □ □.
- Touching the boost control key(D) 15B^- , the zone indicator show “P” and the power reach Max.
Cancel the Boost function
- Touching the relevant zone select key(A) that you want to cancel.
- Touching the key(F) — to cancel the Boost function, then the cooking zone will revert to level 9.
- The function can work in any cooking zone.
- The cooking zone returns to level 9 after 5 minutes.
The helps have a handy restart function to pause and restart the cooking process if you're interrupted.
- When the hob is on and working, press the pause key(E) and hold for 3 seconds, all burner will stop working, and all LED indicator will show the symbol “=” .
- Press the pause key(E) ▶ and hold for 3 seconds again, all setting will restart at the previous setting.
Using Child Lock Function
- You can lock the controls to prevent unintended use (for example children accidentally turning the cooking zones on).
- When the controls are locked, all the controls except the OFF control are disabled.
To lock the controls
Touch the key lock control for 3 seconds. The timer indicator will show "Lo"
To unlock the controls
- Make sure the Induction hob is turned on.
- Touch and hold the keylock control for 3 seconds.
- You can now start using your Induction hob.
When the hob is in the lock mode, all the controls are disable except OFF, you can always turn the hob off with the OFF control in an emergency, but you shall unlock the hob first in the next operation.
Over-Temperature Protection
A temperature sensor equipped can monitor the temperature inside the Induction hob. When an excessive temperature is monitored, the Induction hob will stop operation automatically.
Detection of Small Articles
When an unsuitable size or non-magnetic pan (e.g. aluminium), or some other small item (e.g. knife, fork, key) has been left on the hob, the hob automatically go on to standby in 1 minute. The fan will keep cooling down the induction hob for a further 1 minute.
Auto Shutdown Protection
Auto shut down is a safety protection function for your induction hob. It shut down automatically if ever you forget to turn off your cooking. The default working times for various power levels are shown in the below table: .
| Power level | 1~3 | 4~6 7 | ~8 | 9 |
| Default working timer (min) | 360 | 180 | 120 | 90 |
When the pot is removed, the induction hob can stop heating immediately and the hob automatically switch off after 2 minutes.

People with a heart pace maker should suit with their doctor before using this unit.
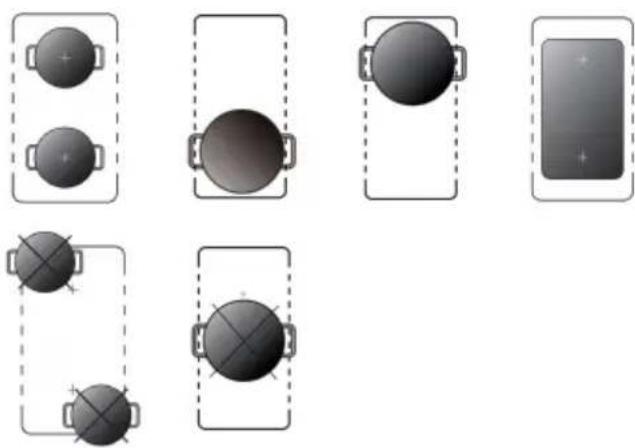
FLEXIBLE AREA
- This area can be used as a single zone, accordingly to the cooking needs anytime.
- Flexible area is made of two independent inductors that can be controlled separately. When working as a single zone, a cookware is moved from one zone to the other one within the flexible area keeping the same power level of the zone where the cookware originally was placed, and the part that is not covered by cookware is automatically switched off.
- Important: Make sure to place the cookwares centered on the single cooking zone. The ideal recipe is an oval or rectangular saucepan, or a saucepan. Examples of good pot placement and bad pot placement.
natural_image
Diagram showing various geometric shapes and connection points, no text or symbols present-
To activate the flexible area as a single big zone, press the zone selected key □ and □ at the same time hold 3 seconds for the left group or press the zone selected key □ and □ at the same time hold 3 seconds for the right group.
-
The flexible zone indicator above to the power lever lever indicator will be light up.
-
If the pot is moved from the front to the rear part (or vice versa), the flexible area detects automatically the new position, keeping the same power.
-
To inactivate the flexible area, press the zone selected key ☐ and ☐ at the same time hold 3 seconds for the left group or press the zone selected key ☐ and ☐ at the same time hold 3 seconds for the right group.
Using the Timer
You can use the timer in two different ways:
- You can use it as a minute minder. In this case, the timer will not turn any cooking zone off when the set time is up.
- You can set it to turn one cooking zone off after the set time is up.
- You can set the timer for up to 99 minutes.
Using the Timer as a Minute Minder If you are not selecting any cooking zone
- Make sure the cooktop is turned on. Note: you can use the minute minder even if you're not selecting any cooking zone.
- Touch the Timer key(E) ☑. The minder indicator will start flashing "10", and you can set the timer at this point.
- Set the time by touching the "-" or "+" control of the timer Hint: Touch the "-" or "+" control of the timer once to decrease or increase by 1 minute. Touch and hold the "-" or "+" control of the timer to decrease or increase by 10 minutes. Touching the "-" and "+" together, the timer is cancelled, and the timer indicator will turn off.
- When the time is set, it will begin to count down immediately. The display will show the remaining time.
- Buzzer will bips for 30 seconds and the timer indicator will turn off when the setting time finished.
Setting the timer to turn one or more cooking zones off
If the timer is set on one zone:
- Select the relevant cooking zone which is working by touching the zone select key (A) ☐.
- Pressing the Timer key(E) ☑, the timing indicator flashes, and you can set the timer at this point.
- Using the "+" and "-" buttons, you can realize the setting of timing from 1 to 99 minutes. Hint: Touch the "-" or "+" control of the timer once will decrease or increase by 1 minute. Touch and hold the "-" or "+" control of the timer will decrease or increase by 10 minutes. Touching the "-" and "+" together, the timer is cancelled, and the timer indicator will turn off.
- When the time is set, it will begin to count down immediately. The display will show the remaining time and the timer indicator flash for 5 seconds.
NOTE: The red dot next to power level indicator will illuminate indicating that zone is selected.

- When cooking timer expires, the corresponding cooking zone will be switch off automatically. Other cooking zone will keep operating if they are turned on previously.
- when using "the timer as an alarm" and "the timer to switch off the zones" together, the display will show the remaining time of alarm as first priority. Press cooking zone to show the remaining time of switch off timer.
Using your Cooker Hood
- Touch the ON/OFF key (C) for 3 seconds. After power on, the buzzer beeps once, all displays show “-”, indicating that the cooker hood has entered the state of standby mode.

- Select the power level by pressing the "+" key (G) + or "-" key(F)—.
-
The power level will start at 0. Pressing the “+” key (G) will count up the power levels from 0.1.2.3.4.5 to P in numerical order.
-
If you don't choose a heat setting within 1 minute, the cooker hood will automatically switch off. You will need to start again at step 1.
- You can modify the setting at any time during cooking.
Using the Filter screen change reminder function
At the end of each running cycle, the control panel chip should record the running time and accumulate it.
When the range hood cumulative working hours working time of the more than 50 hours of motor, Filter screen change reminder function is activated, the digital tube display "two horizontal" (such as machine still continue to work, the "two horizontal" alternating with gear), the lights light up and start flashing red continuously, until the user presses the Filter screen change reminder function key(H) , the screen to remind the digital tube stop show "two horizontal" and return to normal, according to the gear mesh remind button close touch control function at the same time, the control board chip cumulative timing to zero, and to the cumulative effect in the next start timing.
Using the Delay shutdown function
- When the fan motor is on and the Delay shutdown function button key(I) 🕒 is pressed the icon will flash and the display will show the current fan speed, the delay shutdown function indicator lights up.
- The chosen speed level will remain in use for five minutes before dropping down to the next lowest speed. This speed will remain in operation for two minutes before dropping down again. This will be repeated every two minutes unless the speed is already at level 1 and then the fan will turn off.
- Press the Delay shutdown function button key(I) and hold for 3 seconds, it will cancel Delay shutdown function.
- In the process of turning on the delayed shutdown mode and running, if the gear is adjusted by operating the key (G) + or key(F) — , the above delay shutdown process will be reperformed at the final adjustment gear.
Using the Auto mode combination
- Under the condition of the whole machine running, click the key(G) + and key(F) — 3 seconds at the same time.
- After 3 seconds, the digital tube of the Cooker Hood displays "A" and flashes 5 seconds. After 5 seconds, the digital tube of the Cooker hood stops flashing. At this point, the Cooker hood enters AUTOmode, and the working gear of the Cooker hood is automatically adjusted according to the opening status of the induction cooker. in automatic mode, the nixie tube maintains the display "A" and no longer displays the rest of the gears.
| speed level of hood | Power level of Hob |
| Speed 1 | This speed will be selected when there are no more than two cooking zones in use, and the combined output is 8 or less. For example, zone 1 is on 2, and zone 2 is on 5. |
| Speed 3 | This speed will be selected when there are no more than three cooking zones in use, and the combined output is between 9 and 24. For example, zone 1 is on 7, zone 2 is on 6 and zone 3 is on Boost (10). |
| Speed 5 | If the power levels of different burners are more than 24 Or all burners on with power levels no more than 35. |
| Speed P – Boost | This speed will be selected when all four cooking zones are in use, and the combined output is greater than 35. For example, zone 1 is on 9, zone 2 is on 9, zone 3 is on 9 and zone 4 is on Boost (10). |
Exit automatic mode combination
In the Cooker Hood of automatic mode, click the key (G) and — key(F) 3 seconds at the same time. then the nixie tube of the Cooker Hood displays "8", flashes 5 seconds, stops flashing after 5 seconds, the nixie tube switches to display the current working gear of the Cooker Hood, and the Cooker Hood exits the automatic mode successfully.
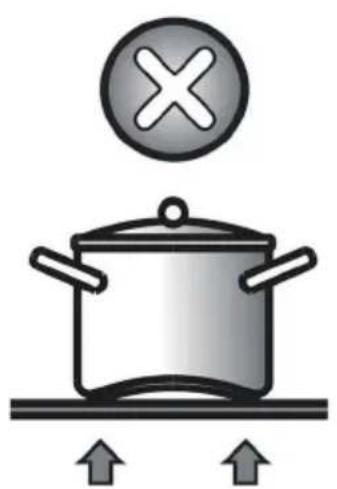
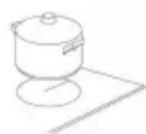
Cooking vessels (Fig. 14)
- a magnet-attracting vessel may be a suitable vessel for induction cooking
- prefer vessels which are especially declared to be suitable for induction cooking
- flat- and thickbottomed vessels
- a vessel with the same diameter as zones ensures the maximum exploitation of power
- a smaller vessel reduces power exploitation, but does not cause any energy loss. We would anyhow not recommend the use of vessels with diameters smaller than 10 cm.
- stainless-steel vessels with multi-layer or ferritic stainless-steel bottoms when specifically suited for induction cooking
- cast-iron preferably enamel-bottomed vessels to avoid scratching the pyroceram surface
- we do not recommend the use of any glass, ceramic, earthenware, alluminium, copper or non-magnetic (austenitic) stainlesssteel vessels.
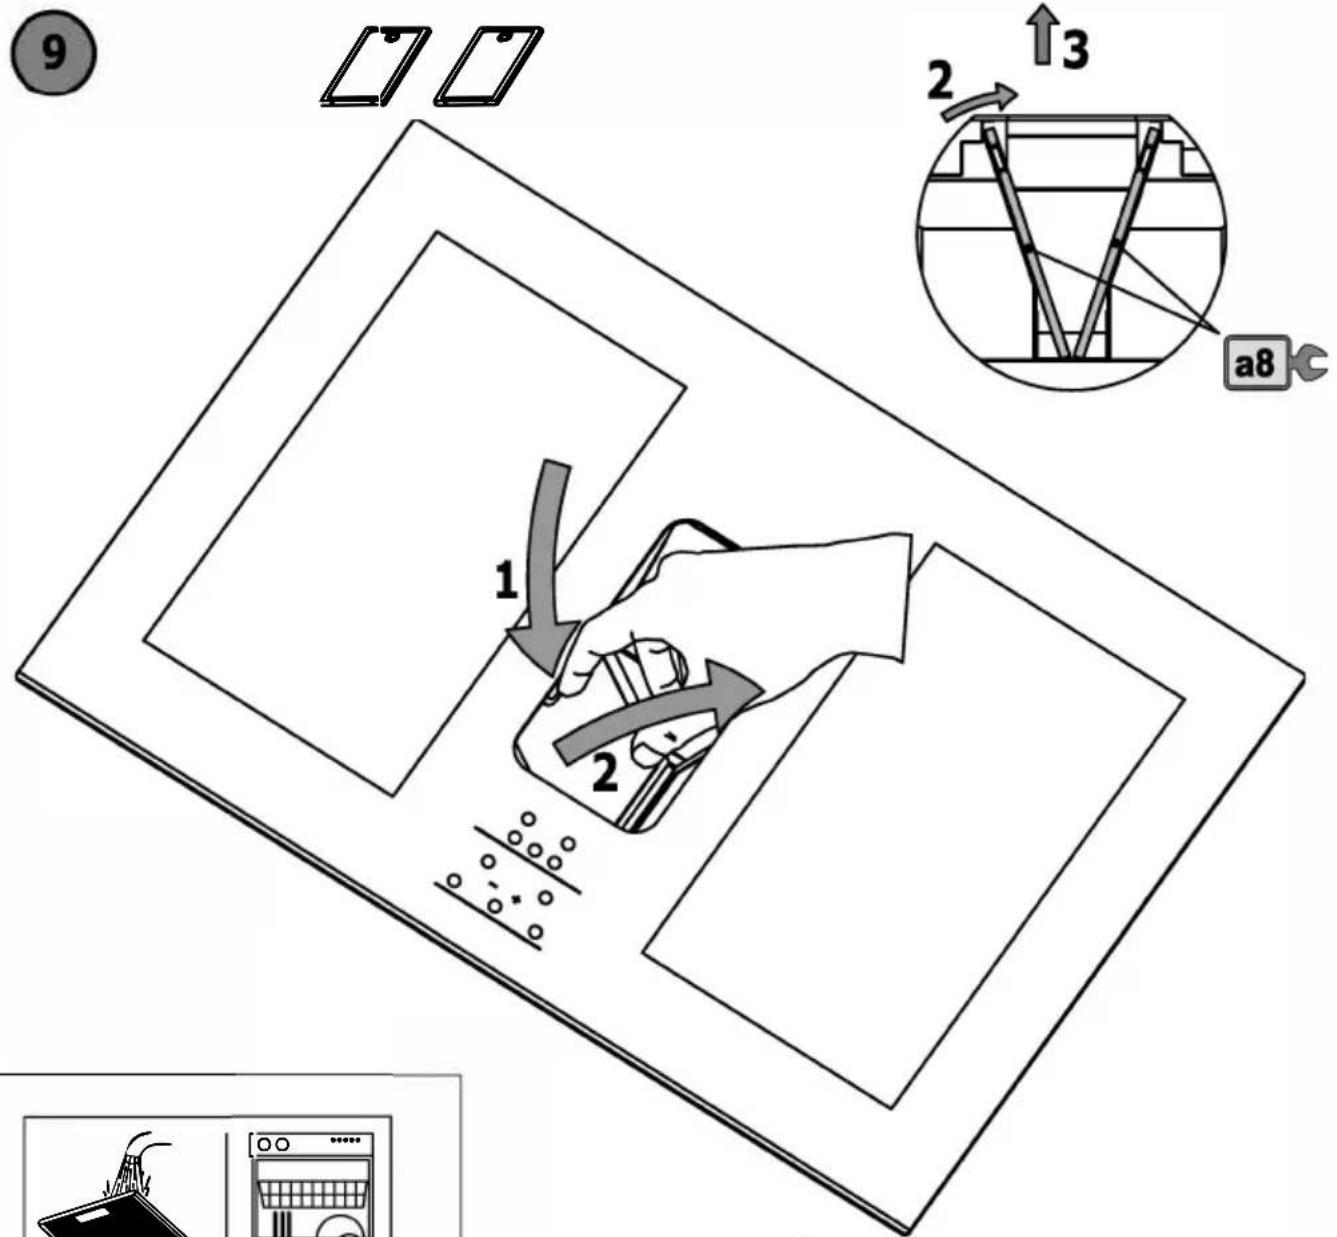
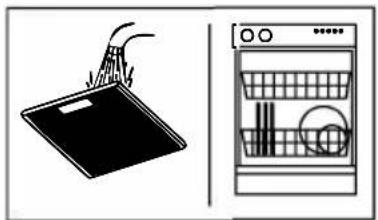
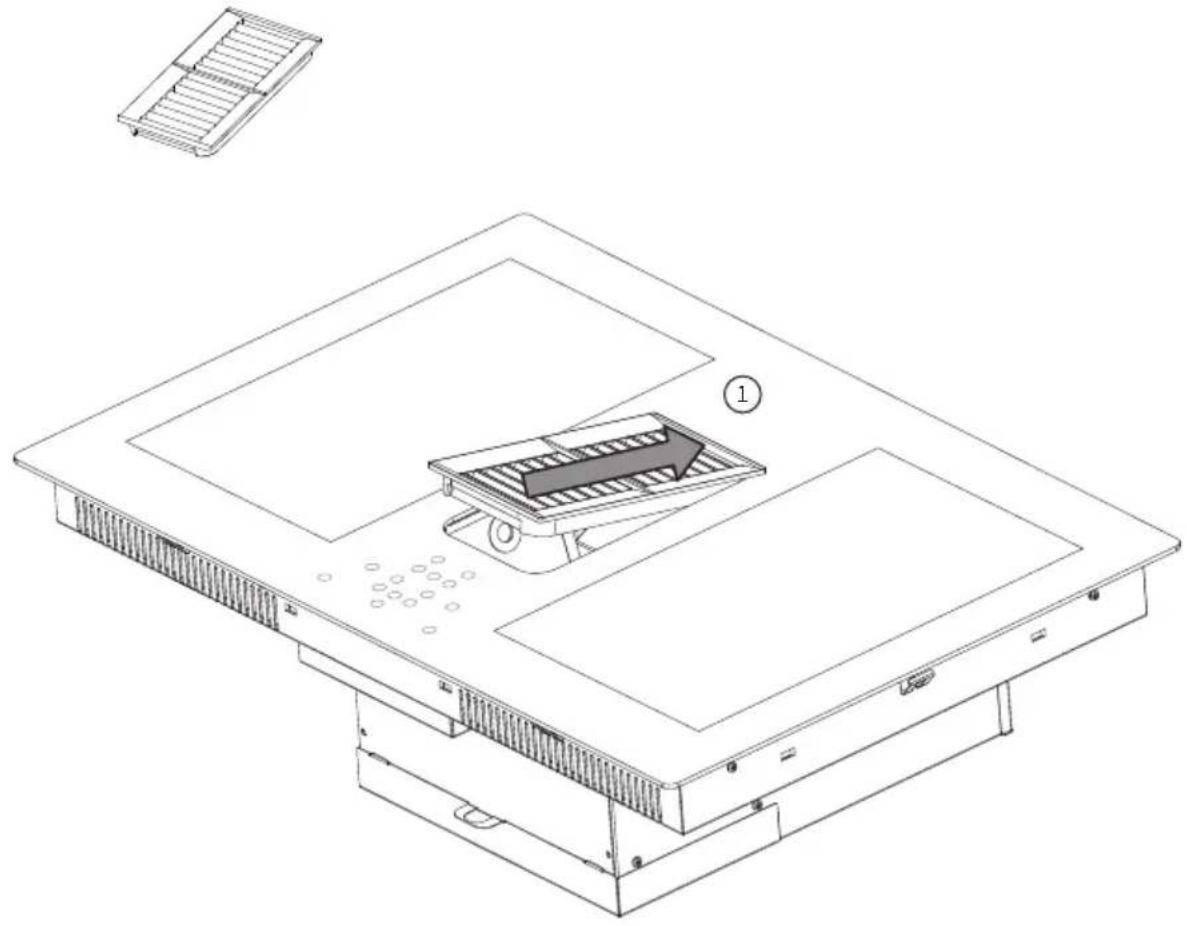
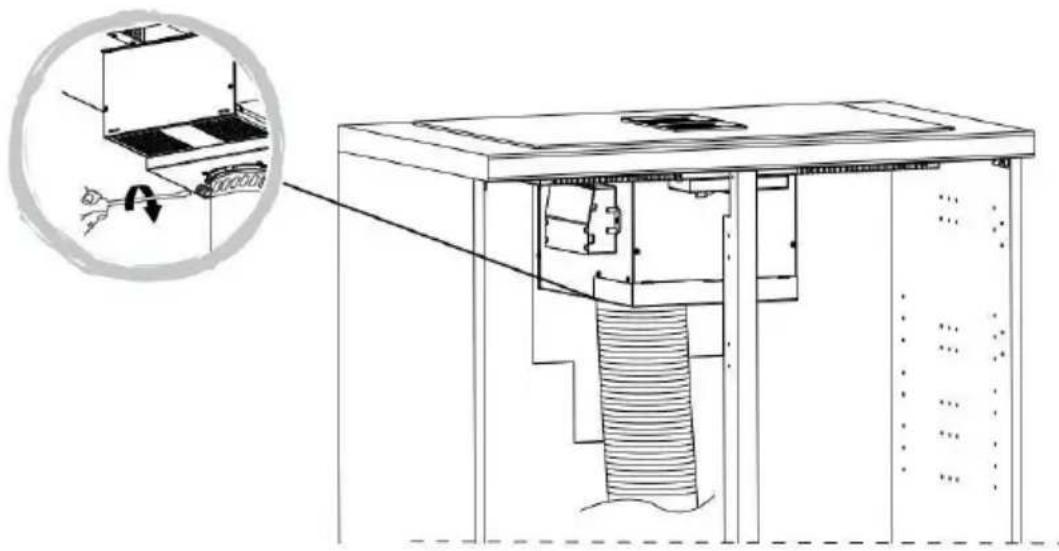
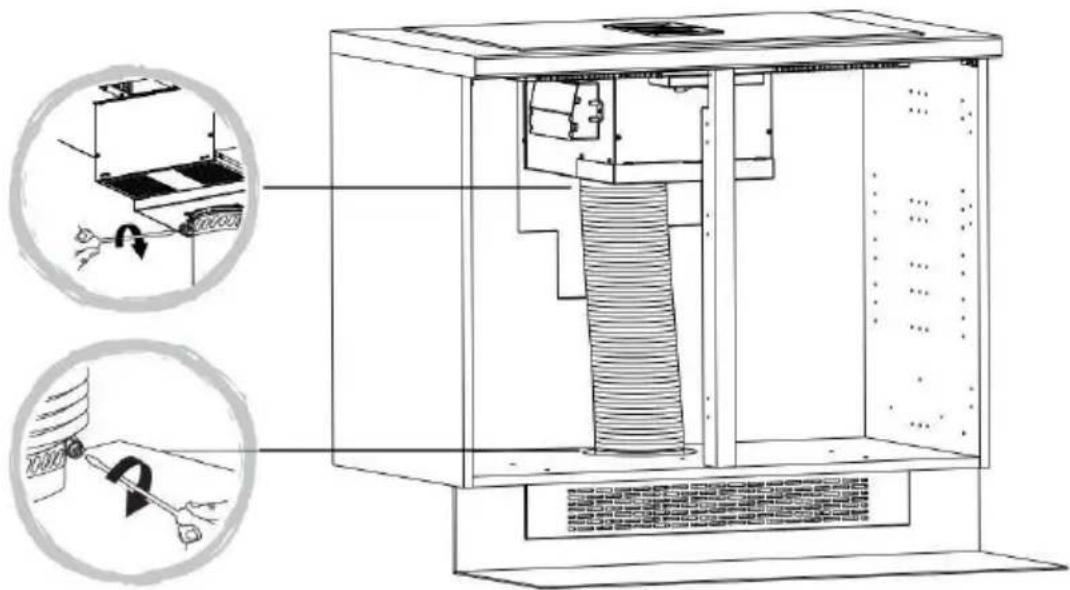
Maintenance (Fig. 7,8,9,10,15)
By means of a scraper immediately remove any alluminium foil bits, food spills, grease splashes, sugar marks and other high sugar content food from the surface in order to avoid damaging the hob.
Subsequently clean the surface with some towel and appropriate product, rinse with water and dry by means of a clean cloth. Under no circumstance should sponges or abrasive cloths be used; also avoid using aggressive chemical detergents such as oven sprays and spot removers.
Grease filters: to avoid fires, clean thoroughly once a month or whenever the display pilot light indicates as such. To do so, remove the filters and wash with hot water and detergent. If using a dishwasher, position the filters vertically to prevent solid remains from depositing on them. do not use polish to clean or shine
Activated charcoal filters: replace the every 3 months.
Important: increase the filter cleaning/replacement frequency if the hood is used for more than 2 hours a day. Always use genuine filters from the manufacturer.
Installer's Instructions
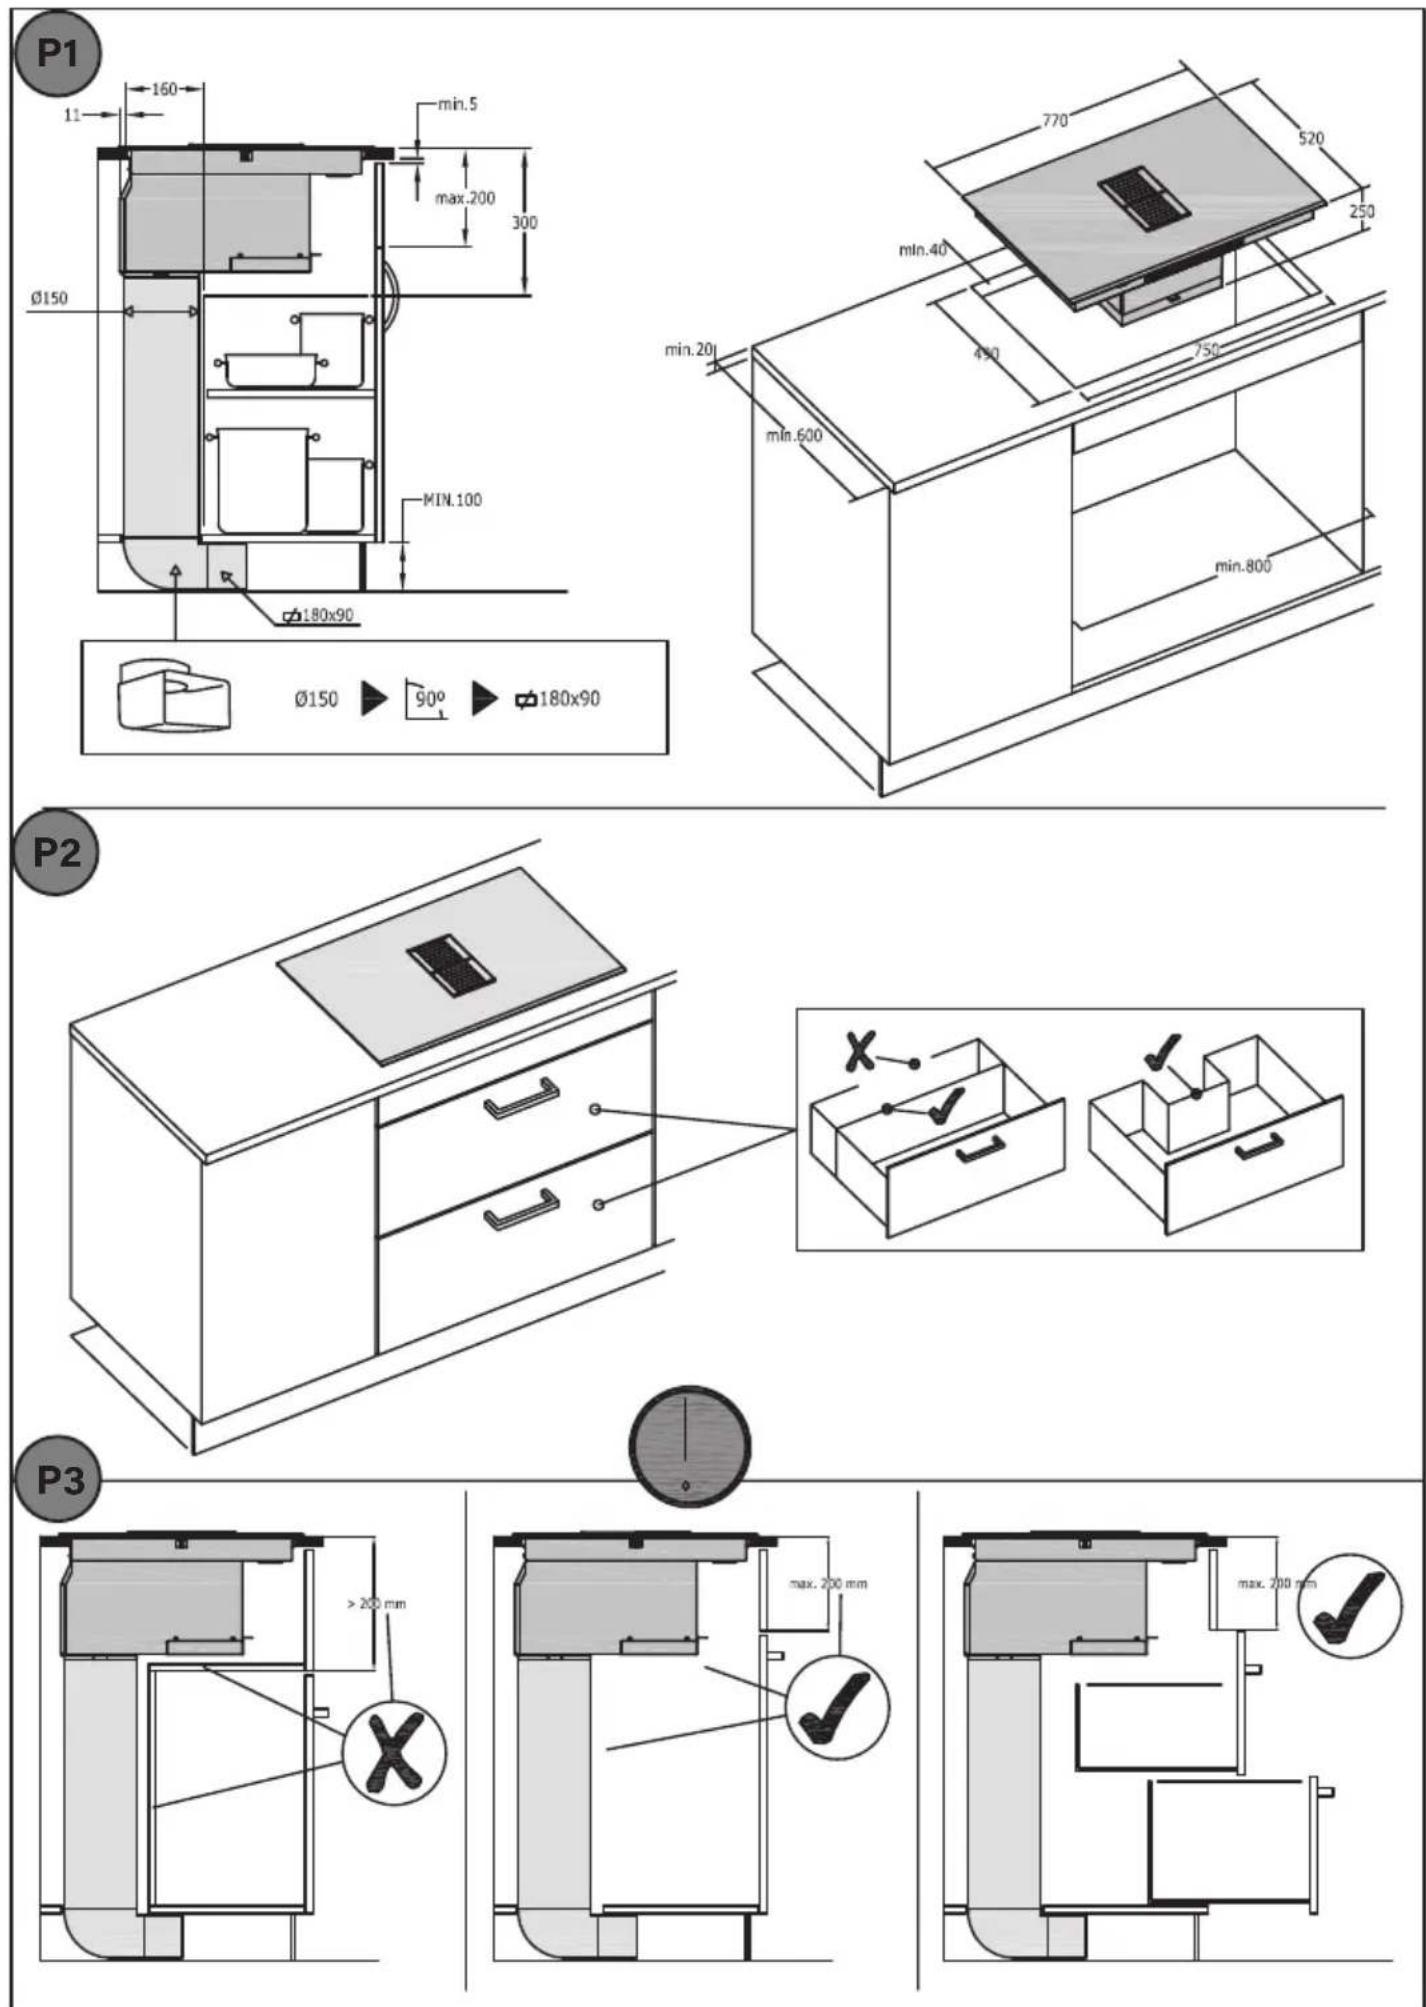
Installation (Fig. P1, P2, P3)
These Instructions are for the qualified technician, as a guide to installation, adjustment and maintenance, according to the laws and standards in force. These operations must always be carried out when the appliance has been disconnected from the electric system.
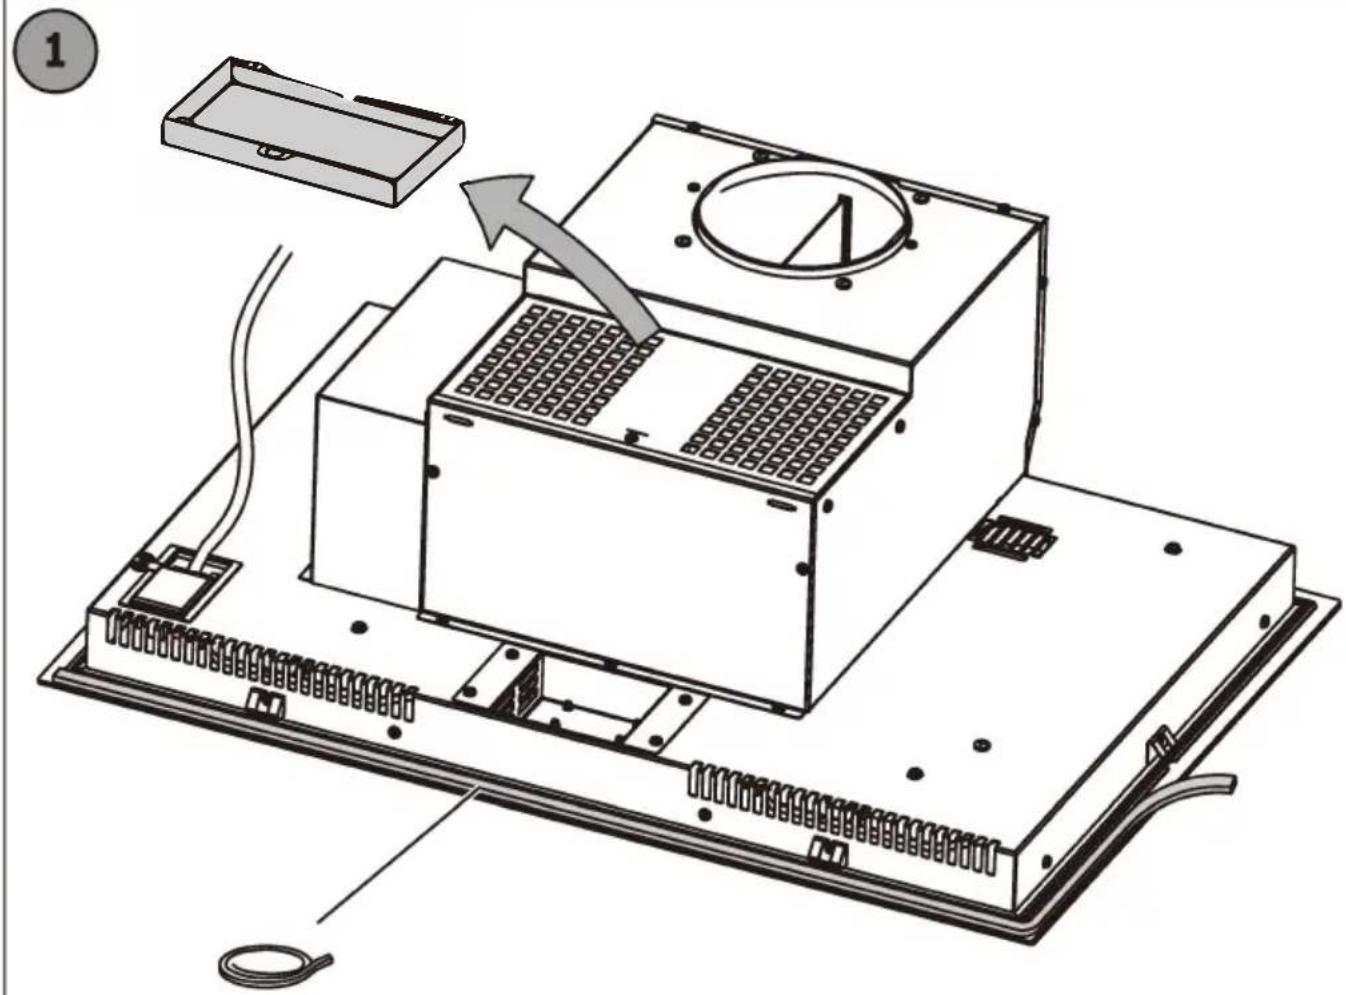
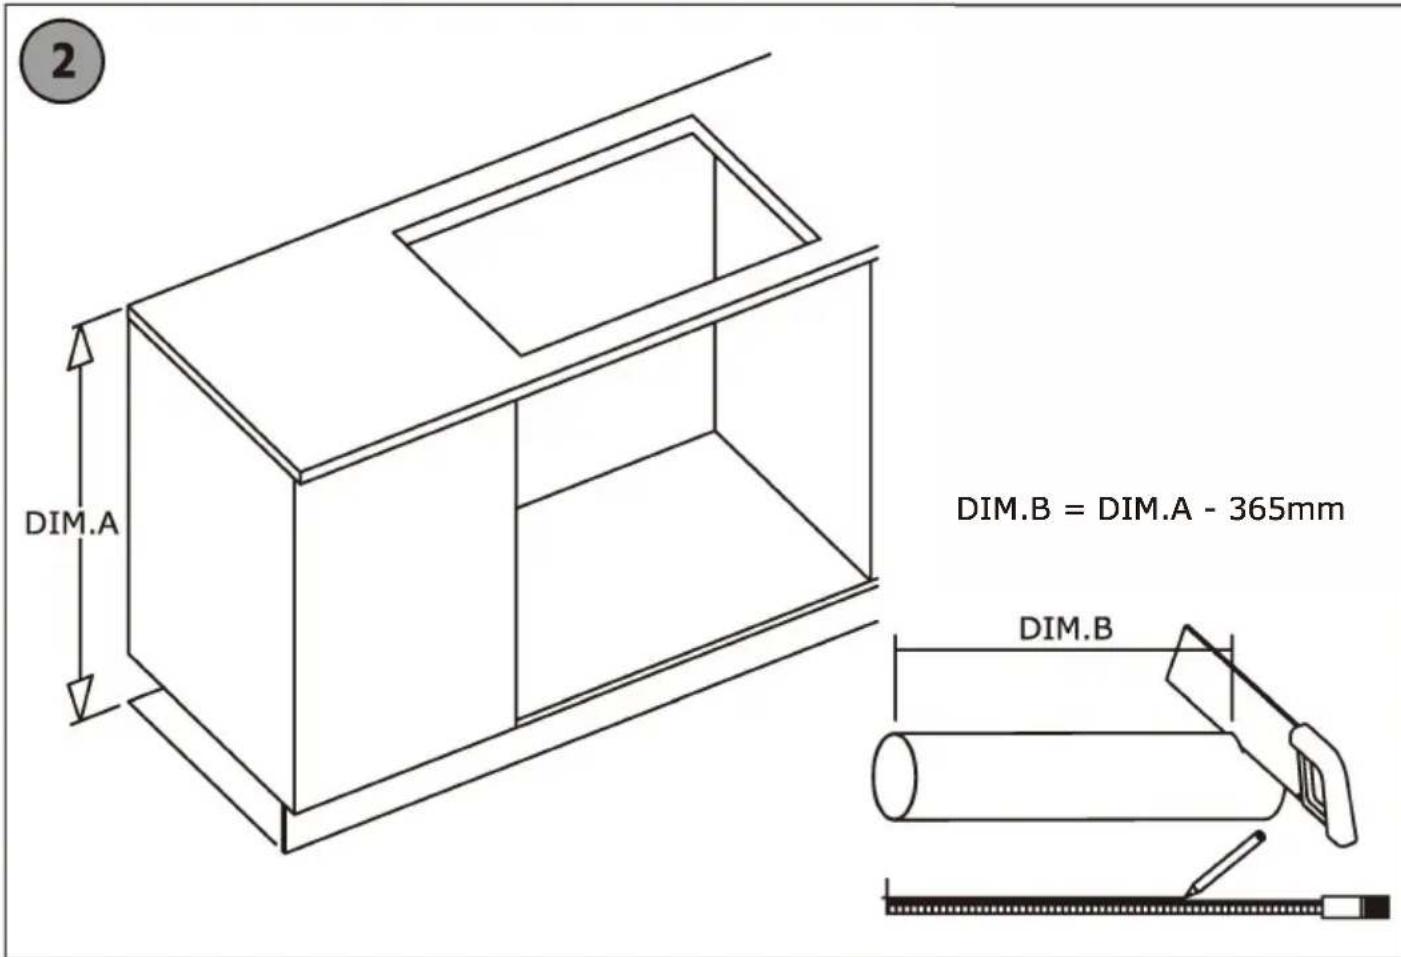
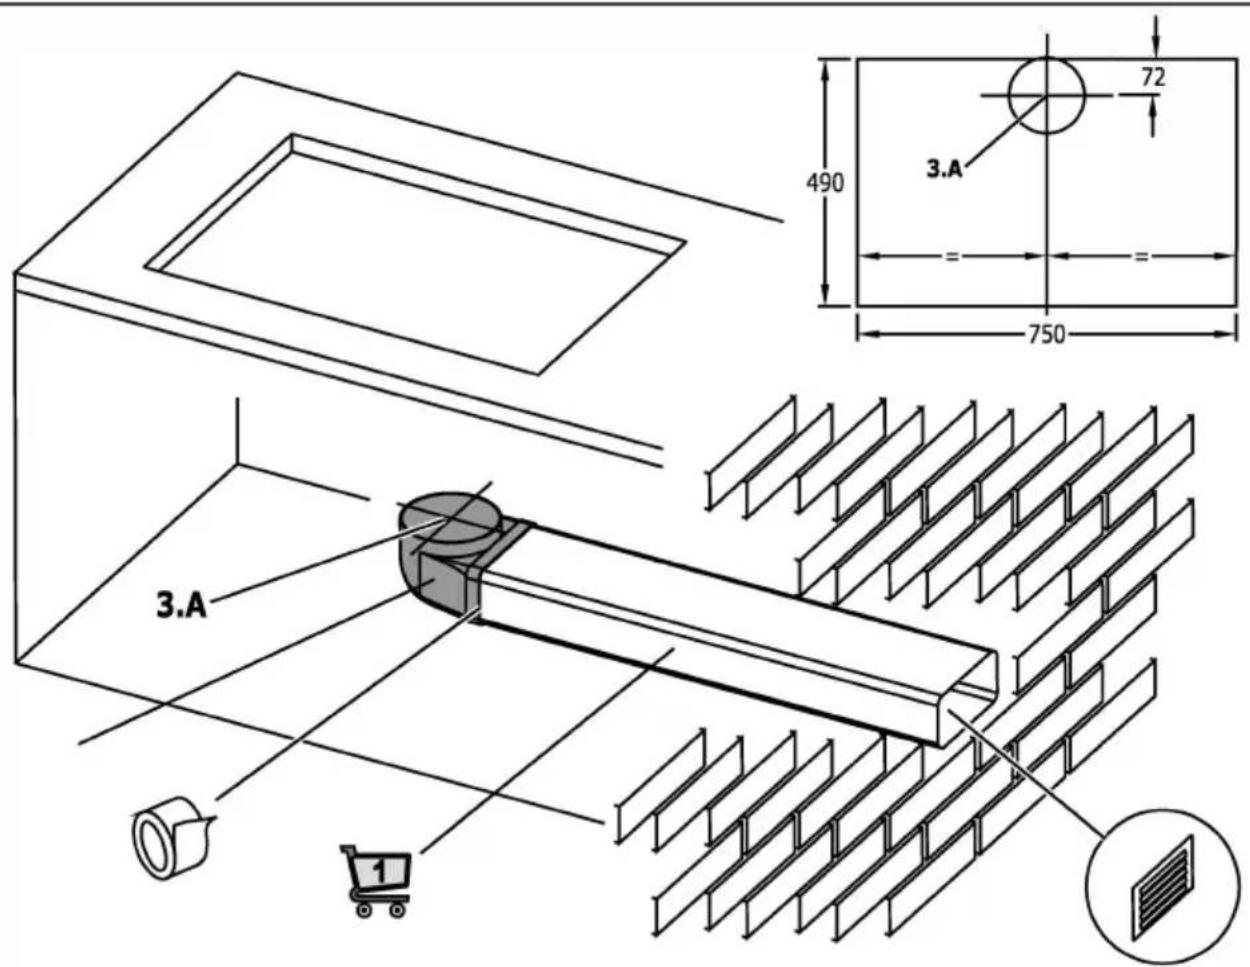
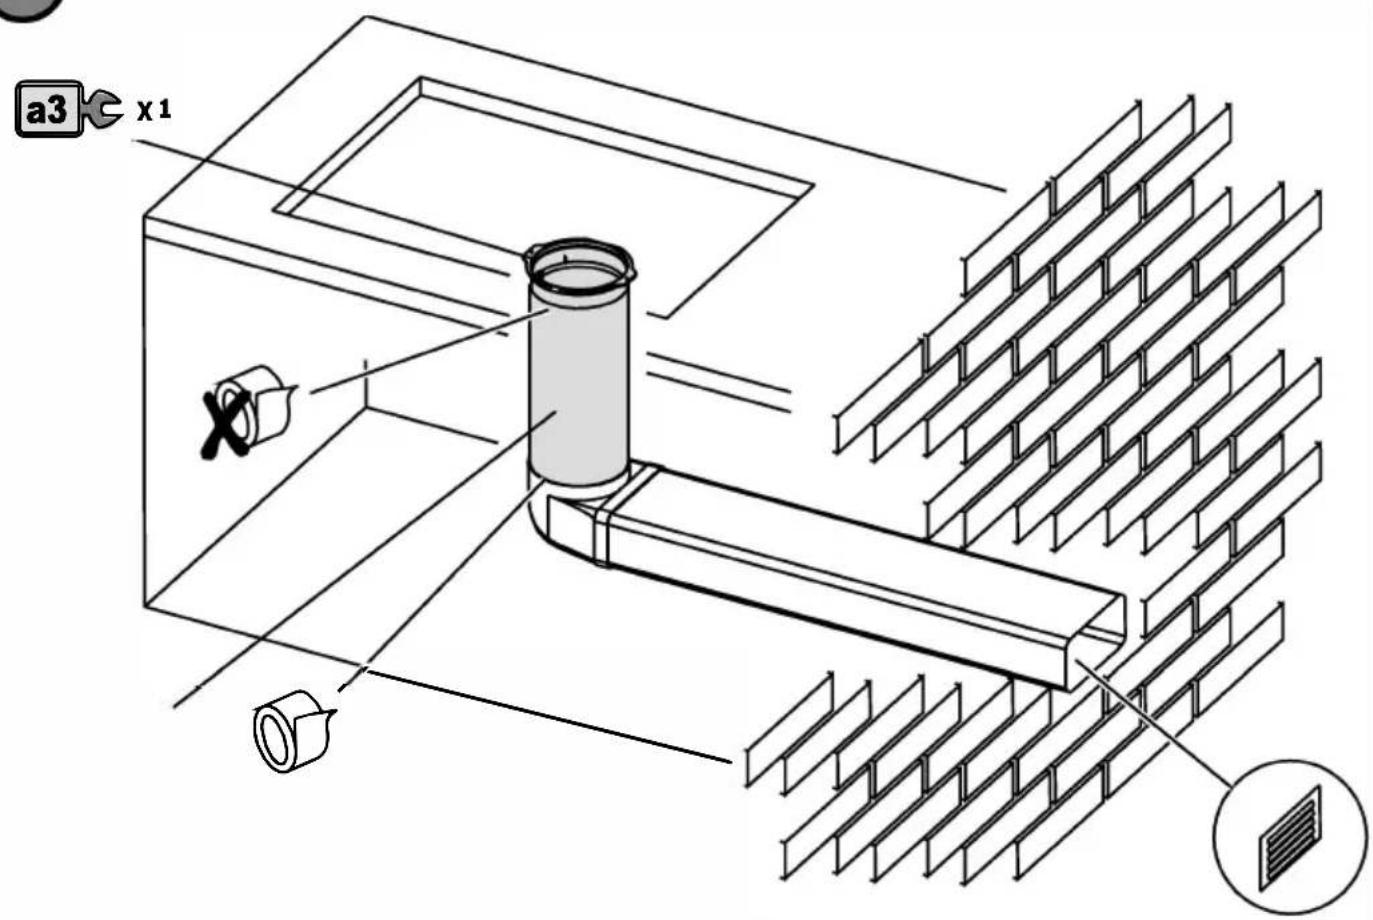
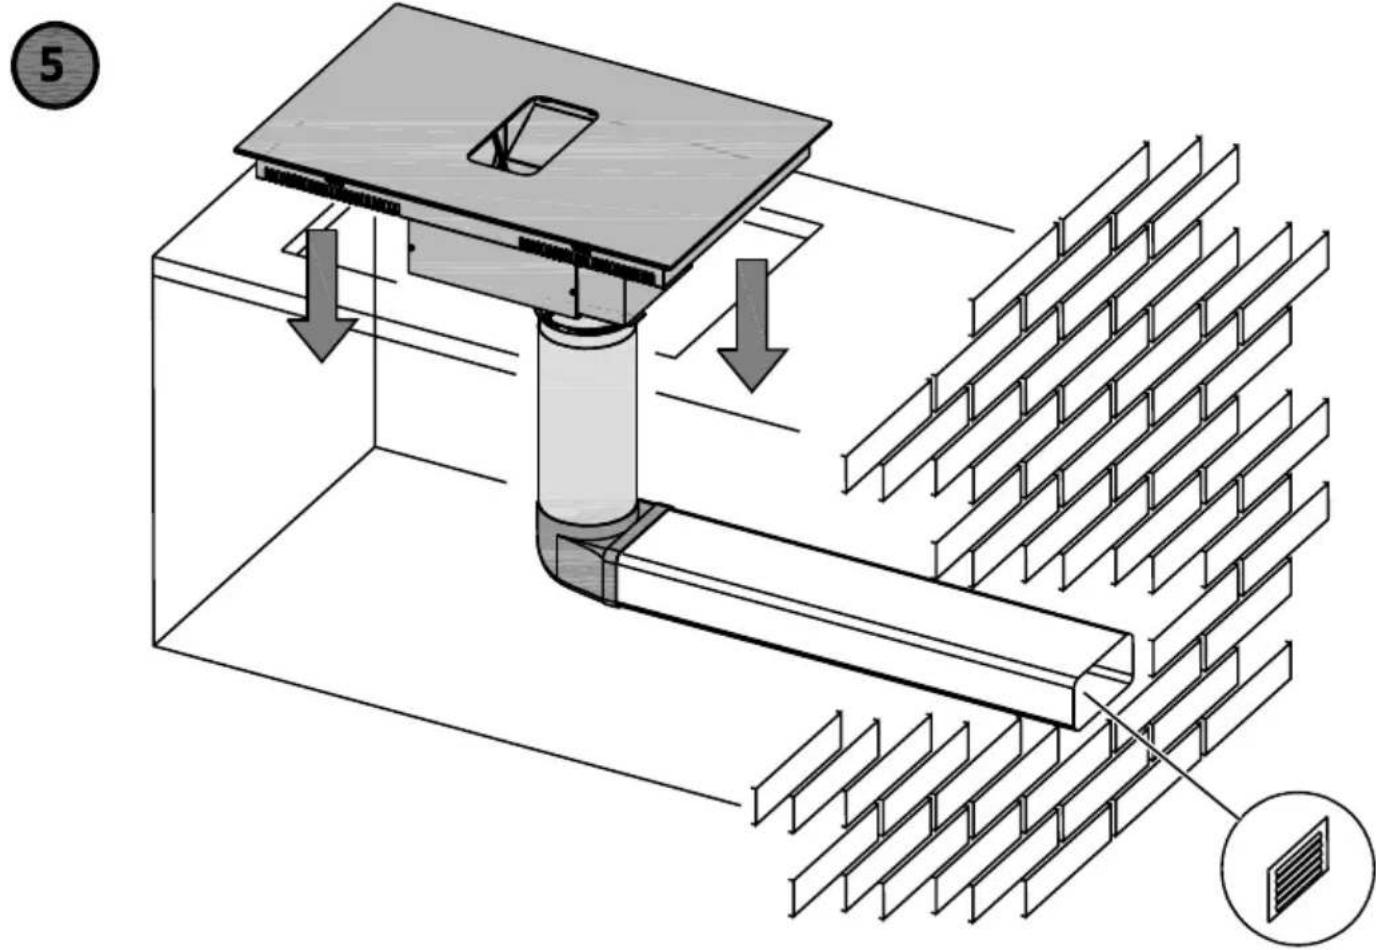
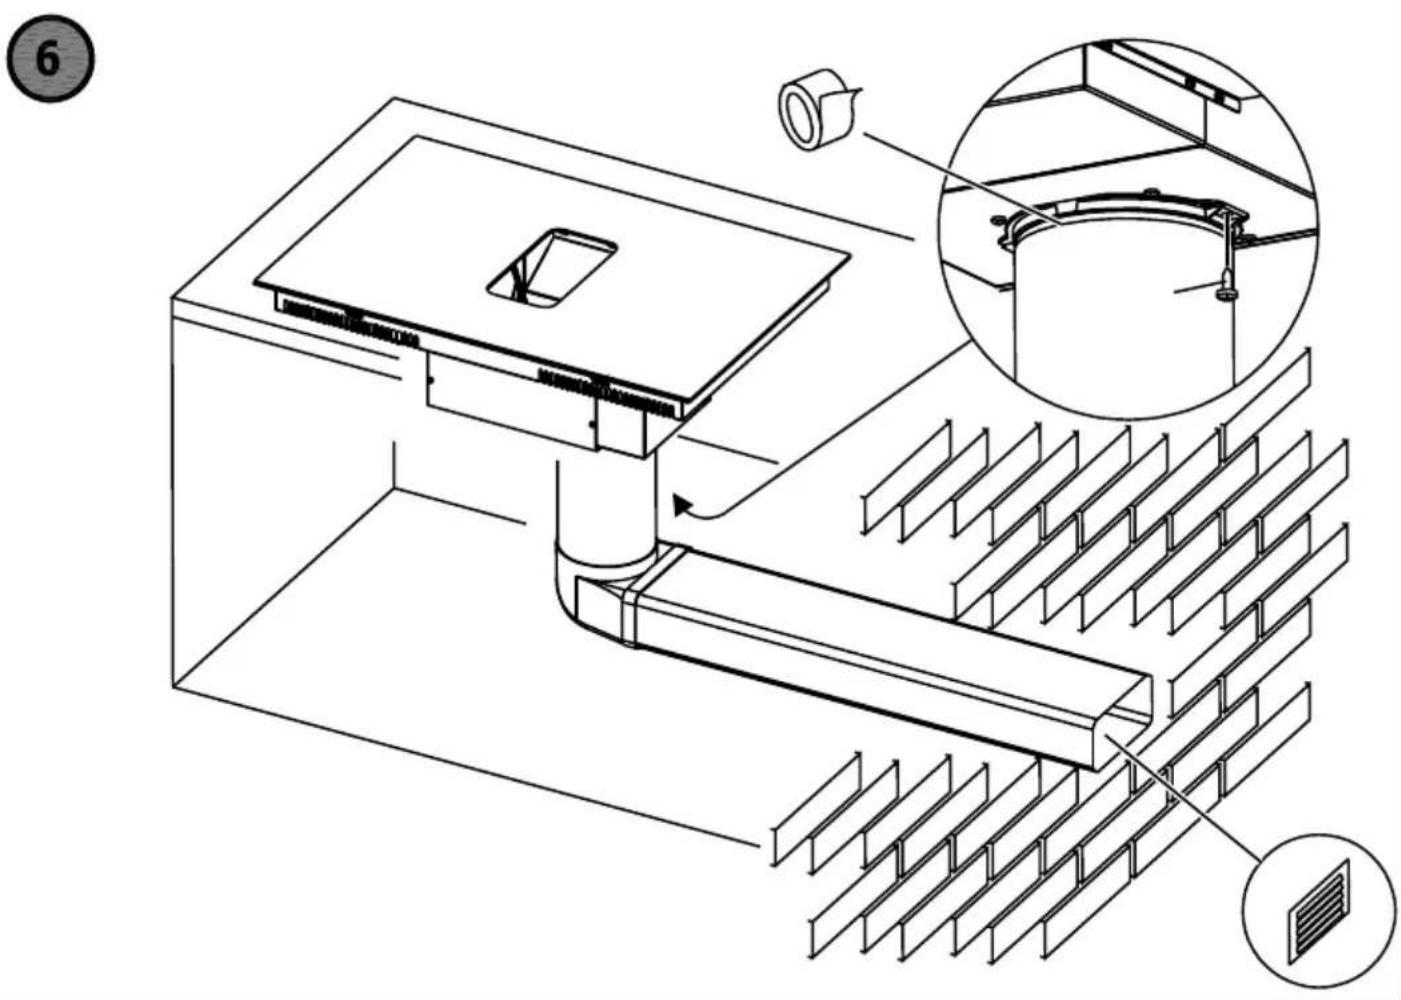
Positioning (Fig. 1,2,3,4,5,6)
The fixture is especially designed for fitting into a work-top as shown in the corresponding figure.
Place the supplied sealing agent along the hob perimeter.
It's forbidden to install the hob over an oven.
Electrical connection (Fig. 16)
Prior to carrying out the electrical connection, please ensure that:
- the plant characteristics are such as to follow what is indicated on the matrix plate placed at the bottom of the working area;
- that the plant is fitted with an efficient earth connection, following the standards and law provisions in force.
The earth connection is compulsory in terms of the law.
Should there be no cable and/or plug on the equipment, use suitable absorption material for the working temperature as well, as indicated on the matrix plate. Under no circumstance must the cable reach a temperature above 50^ C of the ambient temperature.
ESTE PRODUTO FOI CONCEBIDO PARA UMA UTILIZAÇÃO DE TIPO DOMÉSTICA. O FABRICANTE DECLINA TODAS AS RESPONSABILIDADES NO CASO DE EVENTUAIS DANOS A COISAS OU PESSOAS DERIVADOS DE UMA INSTALAÇÃO INCORRETA OU DE USO IMPRÓPRIO, ERRÔNEO OU ABSURDO.
natural_image
Line drawing of a hand pressing down on a pipe above a cooking pot (no text or symbols)natural_image
Diagram showing five different configurations of circular objects with handles, arranged in a grid-like layout (no text or labels)da panela.
natural_image
Line drawing of a cooking pot and a hand holding a pointer above it (no text or symbols)natural_image
Diagram showing five different configurations of circular objects with handles, arranged in a grid-like layout (no text or labels)natural_image
Line drawing of a hand pressing down on a cooking pot (no text or symbols)natural_image
Diagram showing six different configurations of circular objects with rectangular outlines, no text or symbols present.natural_image
Abstract wavy line pattern with a small fish-like shape on the right side (no text or symbols)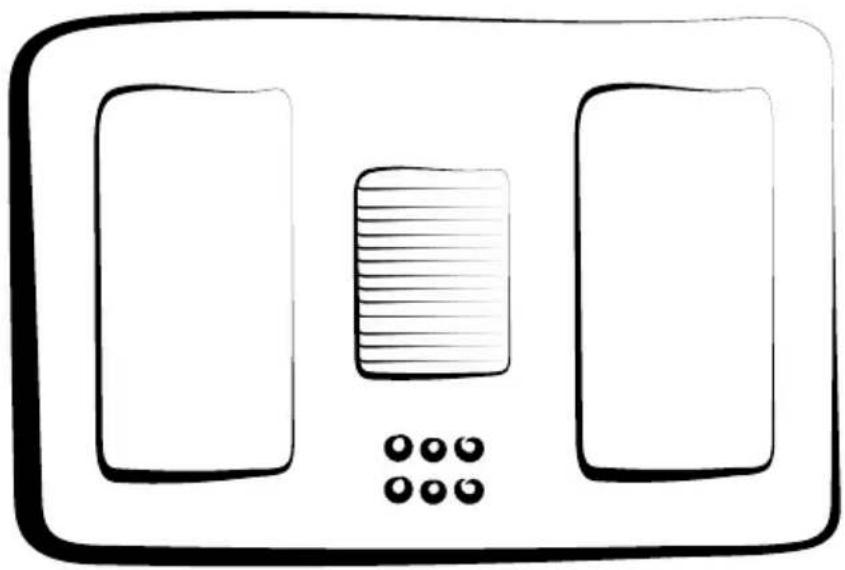
natural_image
Simple line drawing of a device with two rectangular panels and a central screen, no text or symbols present.CNA group
This page will not be printed
版本号:20220916 V1.1

- EIT-7422 DD B /A
- Product Overview Top View
- #
- PRECAUTIONS
- OPERATING PRINCIPLE (Fig. 11)
- Installation
- Using your induction hob
- Using the Keep warm Function
- Using the Pause Function
- alternately with the power If the display hashes
- setting
- When you have finished cooking
- Using the Boost function
- Active boost function
- Cancel the Boost function
- Using Child Lock Function
- To lock the controls
- To unlock the controls
- Over-Temperature Protection
- Detection of Small Articles
- Auto Shutdown Protection
- FLEXIBLE AREA
- Using the Timer
- Using the Timer as a Minute Minder If you are not selecting any cooking zone
- Setting the timer to turn one or more cooking zones off
- If the timer is set on one zone:
- Using the Filter screen change reminder function
- Using the Delay shutdown function
- Using the Auto mode combination
- Exit automatic mode combination
- Cooking vessels (Fig. 14)
- Maintenance (Fig. 7,8,9,10,15)
- Installer's Instructions
- Installation (Fig. P1, P2, P3)
- Positioning (Fig. 1,2,3,4,5,6)
- Electrical connection (Fig. 16)
- I #
- ① ②
- CNA group
- This page will not be printed
Brand : EDESA
Model : EIT-7422 DD B
Category : Cooker