301783 - Built-in kit Aplic - Free user manual and instructions
Find the device manual for free 301783 Aplic in PDF.


| Product Type | Bluetooth Hands-Free Car Kit |
| Bluetooth Version | 4.1 (A2DP, AVRCP, HSP, HFP) |
| Bluetooth Frequency | 2402-2480 MHz |
| Transmission Power | 2.53 dBm |
| Maximum Range | 10 meters |
| Battery Type | Lithium-ion 3.7 V / 180 mAh |
| Standby Time | Up to 120 hours |
| Talk Time | Up to 6 hours |
| Charging Time | Up to 2 hours |
| Connectivity | MicroUSB port for charging |
| Main Functions | Hands-free calling, music playback, volume control, call rejection, voice dialing (via phone) |
| Multipoint Connection | Up to 2 devices simultaneously |
| Built-in Speaker | Yes, for listening to music |
| Mounting | Magnet on back, sun visor clip included |
| LED Indicator | Blue/red for connection and charging status |
| Operating Temperature | Indoor dry use, avoid extreme temperatures |
| Care and Cleaning | Wipe with a soft, dry cloth. Do not use abrasive products. |
| Safety | Do not open, do not expose to moisture, do not short-circuit |
| Package Contents | Hands-free kit, microUSB cable, mounting clip, user manual |
| General Information | Brand: Aplic, Model: 301783, Category: In-car kit (Bluetooth hands-free) |
Frequently Asked Questions - 301783 Aplic
User questions about 301783 Aplic
0 question about this device. Answer the ones you know or ask your own.
Ask a new question about this device
Download the instructions for your Built-in kit in PDF format for free! Find your manual 301783 - Aplic and take your electronic device back in hand. On this page are published all the documents necessary for the use of your device. 301783 by Aplic.
USER MANUAL 301783 Aplic
natural_image
Blue abstract logo shape resembling a stylized letter 'Q' or partial circle (no text or symbols)aplic
HANDS-FREE EQUIPMENT M
Thank you for choosing an aplic product. Please read the following user manual carefully to have an enjoyable experience with your purchased product.
1 Scope of supply
- Bluetooth Hands-free device
- microUSB charging cable
- Holder clip
- User manual
2 Technical data
| Bluetooth version V4 | 1 (supports A2DP / AVRCP / HSP / HFP) |
| Frequency BT 2402~2 | 480MHz |
| transmission power 2 | .53dBm |
| Standby time | up to 120 hours |
| Charging time up to 2 | hours |
| Talk time up to 6 hours | |
| Range up to 10m | |
| Battery type 3.7V / 180mAh | |
| Features • Multipoint | connection (up to two devices at the same time)• integrated speaker (music playback is possible)• Holder magnet |
3 Product details
4 Initial use
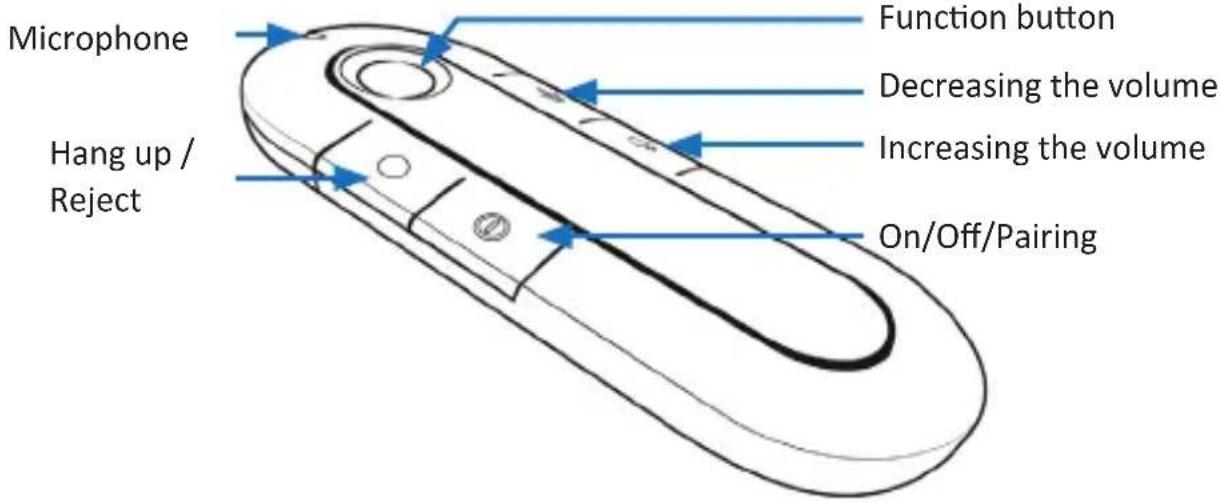
Take the product out of the package and remove all the packaging material. Charge the Bluetooth hands-free device fully before using it for the first time. The microUSB charging port is at the bottom. You can attach the hands-free device to the sun shield by attaching the supplied holder clip to the magnet on the back of the device and then fixing the holder clip to the sun shield. You can also attach it to any metallic object or other surfaces using the magnetic holder. Press the "On/Off/ Pairing" button for about three seconds till it switches on. The hands-free device is automatically connected, for example with the last-connected Smartphone. The next chapter shows how to connect a Bluetooth-enabled device.
5 Establishing a connection via Bluetooth
Ensure that the hands-free device is switched off initially. Press and hold the On/Off/Pairing button for about 6 seconds till the LED indicator starts to flash in red and blue alternately. Enable the Bluetooth on the device that you want to connect with the hands-free device. Carry out a search now and connect to "aplic-301783". Enter "0000" at this point if you are prompted for a security code.
Note: The Bluetooth pairing mode is disabled for security reasons if connection is not established even after several minutes. Please carry out the steps mentioned above once again if the pairing was not successful.
Please proceed as follows to connect your hands-free unit to two devices at the same time: Initially connect your first Bluetooth-enabled device as usual with the
hands-free unit. Then put the hands-free unit in pairing mode once again. To do this, switch off the unit by pressing the "On/Off/Pairing" button for about five seconds. Press and hold the "On/Off/Pairing" button again for about six seconds, to switch on the device and pairing mode again. Connect the second Bluetooth-enabled device with the hands-free unit. Once the pairing process is completed, you can connect with your first paired device as usual. It is detected as the primary device. It always has priority. If it is disabled, then you can also make phone calls or play music using the second device.
6 Button functions
| Button / action Function | |
| Pressing the On/Off/Pairing button for 6 seconds | Device switches on and immediately starts the pairing mode |
| Pressing the On/Off/ Pairing button for about 3 seconds | The device switches on (if it was previously switched off)The device switches off (if it was previously switched on) |
| Pressing the hang up/ reject button | Incoming call is rejectedOngoing call is terminated |
| Pressing the function key • Accepts a callPlaying/pausing the music playbackRedialling (press twice) | |
| Pressing/Pressing and holding the volume decrease button | Reducing the volume (press)Previous track (press and hold during music playback) |
| Pressing/Pressing and holding the volume increase button | Increasing the volume (press)Next track (press and hold during music playback) |
7 Status LED
| Status LED Meaning | |
| Alternate flashing of blue/red Pairing mode | |
| Blue flashing (once in about 2 seconds) | Device is connected |
| Blue flashing (once in about 6 seconds) | Device not connected, device switched on |
| Red LED is glowing (charging process) | Charging process |
| Blue LED is glowing (charging process) | Charging process complete |

Attention!
8 Safety instructions and liability disclaimer
Never try to open the device to carry out repairs or conversions. Avoid contact with mains voltages. Do not short-circuit the product. The device is not certified for use in the open air; only use it in dry conditions. Protect it from high humidity, water and snow. Keep it away from high temperatures. Do not subject the device to sudden changes in temperature or heavy vibration as this might damage electronic components. Examine the device for damage before using it. The unit should not be used if it has received an impact or has been damaged in any other way. Please observe national regulations and restrictions. Do not use the device for purposes other than those described in the instructions. This product is not a toy. Keep it out of the reach of children or mentally impaired persons. Any repair or alteration to the device not carried out by the original supplier, will invalidate the warranty or guarantee. The product may only be used by persons who have read and understood these instructions. The device specifications may change without any separate prior notice to this effect.

9 Disposal instructions
Electrical and electronic devices may only be disposed of in accordance with the European WEEE Directive and not with household rubbish. Components must be disposed of or recycled separately as dangerous, toxic elements can inflict sustained damage on the environment if they are disposed of incorrectly. As a consumer, you are bound by the Electrical and Electronic Devices Act (ElektroG) to return electrical and electronic goods free of charge at the end of their useful life to the manufacturer, the place of purchase or to specially set up, public collection points. The details in each case are governed by national law. The symbol on the product, the operating instructions and/or the packaging refers to these regulations. By separating materials in this way, recycling and disposing of old devices, you are making an important contribution towards protecting our environment.

10 Instructions on the disposal of batteries
With regard to the sale of batteries or the supply of devices containing batteries, the supplier is obliged to draw the customer's attention to the following: As the end user, the customer has a statutory obligation to return used batteries. He can return old batteries stocked or previously stocked by the supplier in the form of new batteries to the supplier's despatch warehouse (despatch address) free of charge. The symbols shown on the batteries have the following meanings: Pb = battery contains more than 0.004 percent by mass of lead, Cd = battery contains more than 0.002 percent by mass of cadmium, Hg = battery contains more than 0.0005 percent by mass of quicksilver.

The symbol of the rubbish bin with a cross through it indicates that the battery may not be put in household waste.

WEEE guideline: 2012/19/EU WEEE register number: DE 67896761
WD Plus GmbH, herewith declares that this product 301783/20160922SZ127 conforms to the principle requirements and other relevant stipulations of Directive 2014/53/EU. The complete Declaration of Conformity can be obtained from: WD Plus GmbH, Wohlenbergstraße 16, 30179 Hanover, or at the following Internet address: downloads.ganzeinfach.de
Brand : Aplic
Model : 301783
Category : Built-in kit