
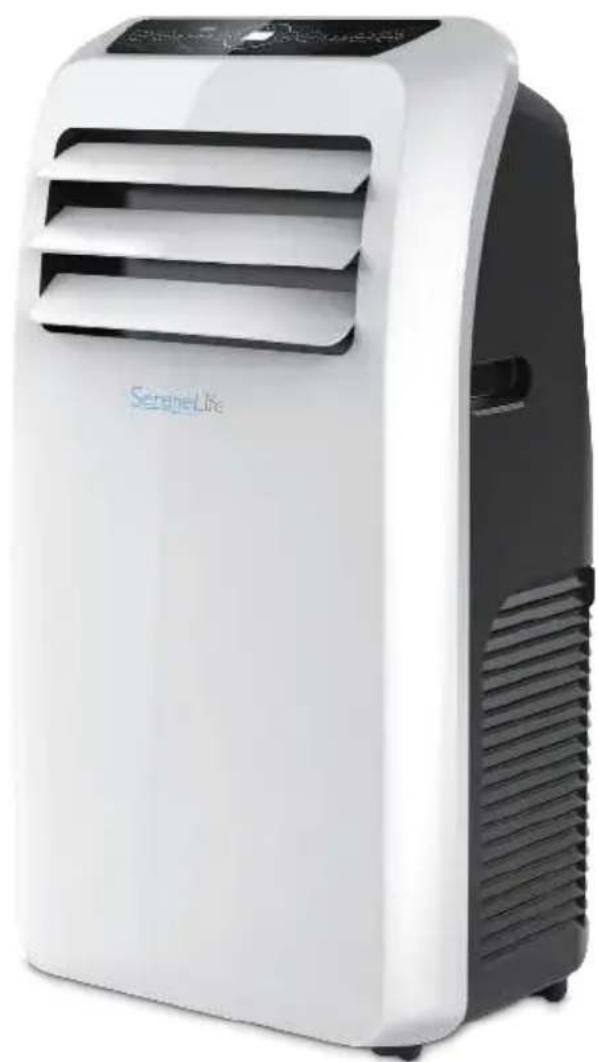
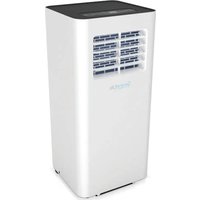
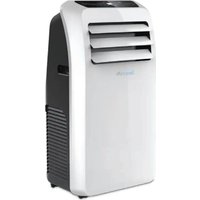
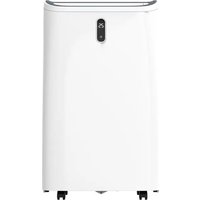
SLACHT9 - Air Conditioning SereneLife - Free user manual and instructions
Find the device manual for free SLACHT9 SereneLife in PDF.

| Product Type | Reversible portable air conditioner (heat/cool) |
| Brand | SereneLife |
| Model | SLACHT9 |
| Cooling Capacity (ASHRAE) | 9,000 BTU |
| Heating Power | 1,100 W |
| Coverage Area | Up to 28 m² (300 ft²) |
| Operating Modes | Cooling, Heating, Fan, Dehumidification |
| Dehumidification | 0.9 L/h |
| Noise Level | 65 dB(A) |
| Fan Speeds | Low, Medium, High |
| Programmable Timer | Up to 24 hours |
| Power Supply | 220-240 V ~ 50 Hz |
| Dimensions (W × D × H) | 44.1 × 34.0 × 81.5 cm |
| Housing Material | Engineering ABS |
| Refrigerant | R290 (245 g) |
| Remote Control | Included (AAA batteries provided) |
| Power Cord | 1.3 m (4.3 ft) |
| Air Filter | Removable and washable |
| Window Installation Kit | Included (sealing plate and exhaust hose) |
| Casters | Yes |
| Filter Cleaning | Every 2 weeks (vacuum or warm water) |
| Safety | Unplug before maintenance; do not use if cord is damaged |
| Repairability | Repair by qualified technician only |
Frequently Asked Questions - SLACHT9 SereneLife
User questions about SLACHT9 SereneLife
0 question about this device. Answer the ones you know or ask your own.
Ask a new question about this device
Download the instructions for your Air Conditioning in PDF format for free! Find your manual SLACHT9 - SereneLife and take your electronic device back in hand. On this page are published all the documents necessary for the use of your device. SLACHT9 by SereneLife.
USER MANUAL SLACHT9 SereneLife
Compact Home AC Cooling and Heating Unit with Built-in Dehumidifier & Fan Modes, Includes Window Mount Kit (9,000BTU)
CONTENT
Important Safety Tips
Precautions. 3
Product Introduction
Main Parts and Components. 7
Control Panel and Remote Controller. 9
Product Operation
Placement and Installation. 10
Operation Method. 11
Clean and Maintenance
Drainage Method. 12
Maintenance. 13
Common Failures and Diagnosis
Intelligent Error Detection. 14
Fuse Parameters. 14
Troubleshooting. 14
Features and Technical Specifications 15
Important Safety Tips
Precautions
Please read the Manual carefully before operating the machine:
- This machine is for household use only.
- This machine is for indoor use only. Please place it in dry environment.
- Check power cord frequently. If power cord, plug or A/C is damaged, please don't operate. Cable should not scatter at places where power cord may be pulled out or people may be stumbled.
- The A/C should be away from heat source and avoid direct sunlight.
- Turn off the A/C before unplugging.
- Turn off and unplug the A/C before removing or cleaning it, or replacing its parts or when it is not used.
- Clean the A/C according to the Manual.
- Voltage of the A/C should meet requirements. Any damage incurred by incorrect power isn't included in the warranty.
Children are not allowed to play with the A/C.
This appliance is not intended for use by children, unless they have been given supervision or instruction concerning use of the appliance by a person responsible for their safety.
- Don't insert your fingers or any hard object to wind guide bar of the air outlet.
- Don't place the A/C at any place with water or other liquid. Prevent water or liquid from entering the A/C.
- Don't repair the A/C by yourself. Any possible hazard incurred by maintenance of laypeople will violate the warranty. If the supply cord is damaged, it must be replaced by professional maintenance personnel.
- Please use the accessories provided by the A/C manufacturer; otherwise, the A/C may be damaged.
- Cleaning and user maintenance shall not be made by children without supervision.
SAFETY INSTRUCTIONS
IMPORTANT!
AIR CONDITIONERS MUST ALWAYS BE STORED AND TRANSPORTED UPRIGHT, OTHERWISE IRREPARABLE DAMAGE MAY BE CAUSED TO THE COMPRESSOR; IF IN DOUBT WE SUGGEST WAITING AT LEAST 24 HOURS

FOLLOWING INSTALLATION BEFORE STARTING THE UNIT.
- Carefully read the instructions before installing and/or operating the unit.
- This appliance is for indoor use only.
- This unit must be only connected to a 220 - 240V / 50Hz earthed outlet.
- Installation must be in accordance with regulations of the country where the unit is used.
- If you are in any doubt about the suitability of your electrical supply have it checked and, if necessary, modified by a qualified electrician.
- This air conditioner has been tested and is safe to use. However, as with any electrical appliance - use it with care.
- Disconnect the power from the appliance before dismantling, assembling or cleaning.
- Avoid touching any moving parts of the appliance.
- Never insert fingers, pencils or any other objects though the guard.
- This appliance is not intended for use by persons (including children) with reduce physical, sensory or mental capabilities. It is also not intended for use by those with a lack of experience and knowledge, unless they have been given supervision or instruction concerning the use of the appliance by a person responsible for their safety.
- Do not leave children unsupervised with this appliance.
- Do not clean the unit by spraying it or immersing it in water.
- Never connect the unit to an electrical outlet using an extension cord. If an outlet is not available, one should be installed by a qualified electircian.
-
Do not operate the unit unless it has been fully installed following the guidance provided within this manual.
-
Never operate this appliance if the cord or plug is damaged. Ensure the power cord is not stretched or exposed to sharp objects/edges.
- A damaged supply cord should be replaced by the manufacturer or a qualified electrician in order to avoid a hazard.
- Any service other than regular cleaning or filter replacement should be performed by an authorized service representative. Failure to comply could result in a voided warranty.
- Do not use the appliance for any purpose other than its intended use.
- Avoid restarting the air conditioner unless 3 minutes have passed since being turned off. This prevents damage to the compressor.
- Never use the main plug as a switch to start and turn off the air conditioner. Use the provided ON/OFF button located on the control panel.
- The appliance should not be installed in laundry or wet rooms.
- The appliance must be installed in a room without sources of ignition (for example: open flames, an operating gas appliance or an operating electric heater).
- The unit must be installed on a solid vertical wall by a competent person.
The electricity supply must only be connected after installation is complete.
R290 refrigerant gas complies with European environmental directives.
R290 has a low GWP (Global Warming Potential) of 3. - The air conditioner contains about 245g of R290 refrigerant gas.
- Do not install or store in an unventilated space with an area smaller than 12m^2 per unit. The room must be such as to prevent stagnation of possible leaks of refrigerant gas as there could be a danger of fire or explosion hazard should the refrigerant come into contact with electric heaters, stoves or other sources of ignition.
- If the appliance is installed, used or stored in an unventilated room, the room must be such as to prevent stagnation of possible leaks or refrigerant gas as there could be a danger of fire or explosion should the refrigerant come into contact with electric heaters, stoves or other sources of ignition.
- Refrigerant gas may be odourless.
-
Do not use the product and contact he retailer for advice, if damage has occurred to the unit which may have compromised the refrigerant system.
-
Any repairs or maintenance must only be carried out on the unit by a suitably qualified engineer. Before opening and servicing the unit the authorized engineer must be in possession of a copy of the manufacturer's service manual and must follow the safety information contained within it to ensure all hazards are minimized.
- The refrigerant system should not be perforated or punctured.
NOTE: Some pictures and information may vary from the final product. This is due to continual product improvement.
Special Warning:
- Place the A/C on even ground and install it vertically, so as to ensure normal operation of the compressor.
- The A/C should be at least 50cm away from surrounding objects. Keep air inlet and outlet smooth.
- Don't use the A/C beside gasoline or any other inflammable liquid.
- Don't use spraying agent and other solvent or inflammable substances near the A/C; otherwise, its plastic may deform and electric parts may be damaged.
Power
- The plug should be in good condition and can't be damaged. Don't replace the plug with power plug.
- In order to run the A/C, plug the power cord first, and then press the power key.
- Place unit in upright position for 2 hours before turning on for first time.
Product Introduction
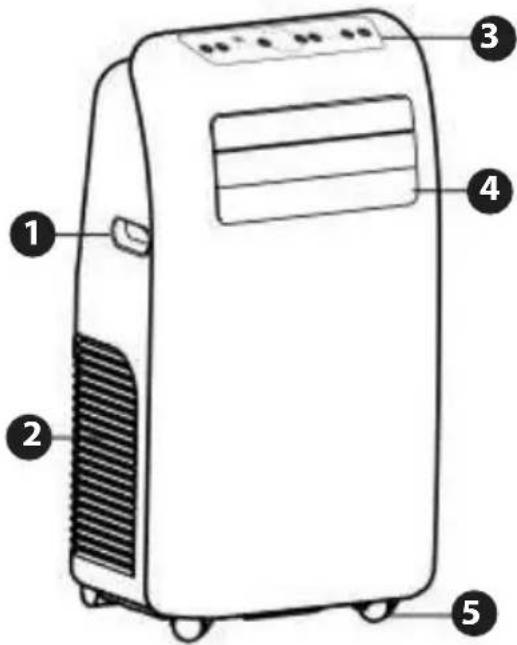
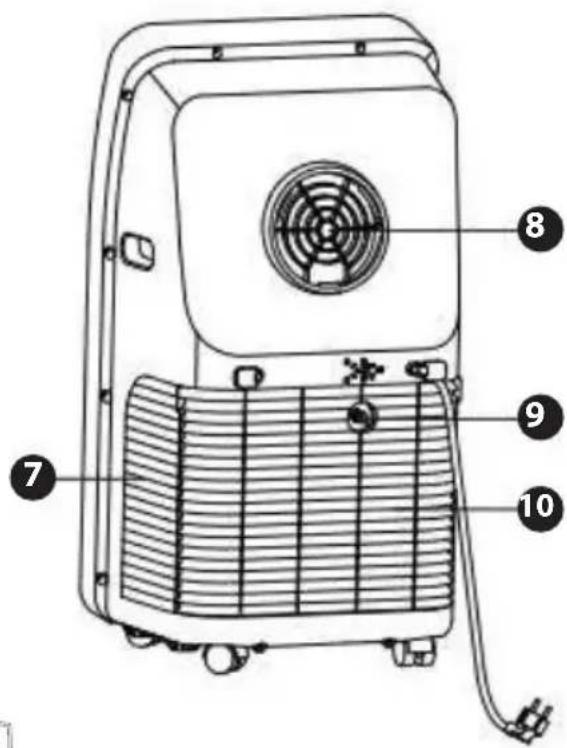
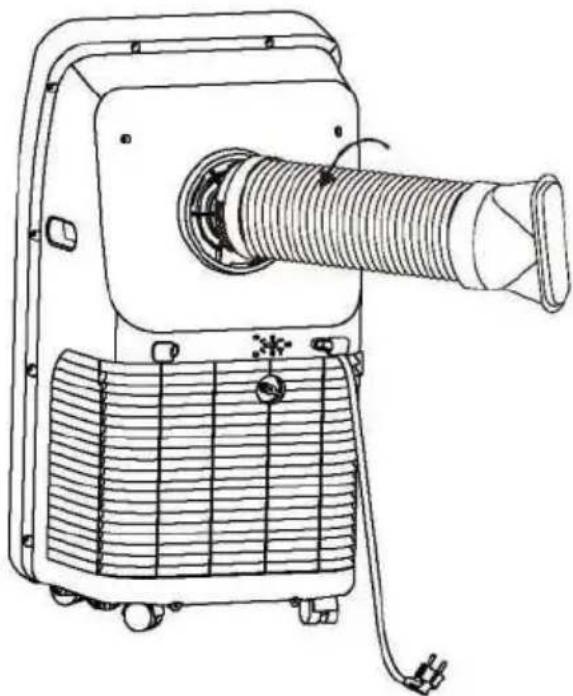
MAIN PARTS AND COMPONENTS
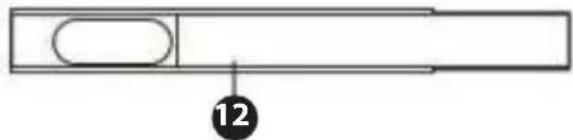
- Handle
- Air inlet (L)
- Control panel
- Wind guide vent
- Caster
- Remote controller
- Air inlet (R)
- Air outlet
- Dehumidification drainage nozzle
- Air inlet grille
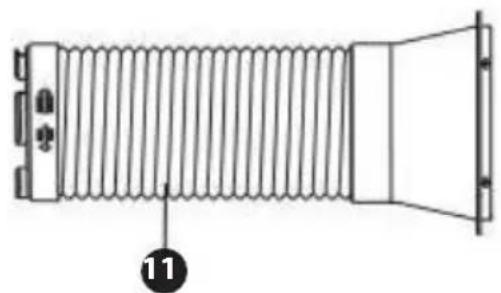
- Exhaust duct assembly
- Window sealing plate assembly
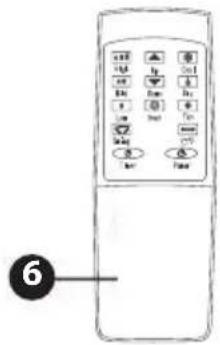
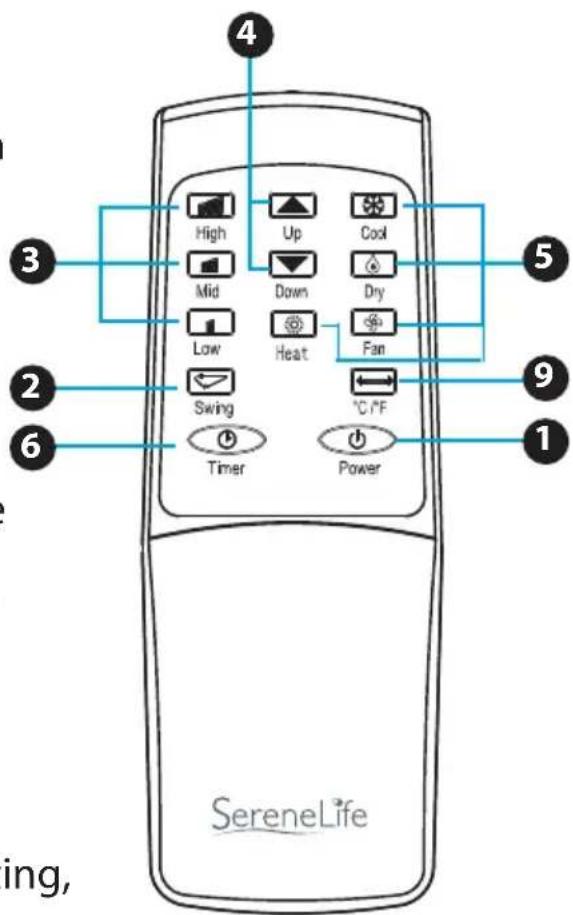
Control Panel and Remote Controller
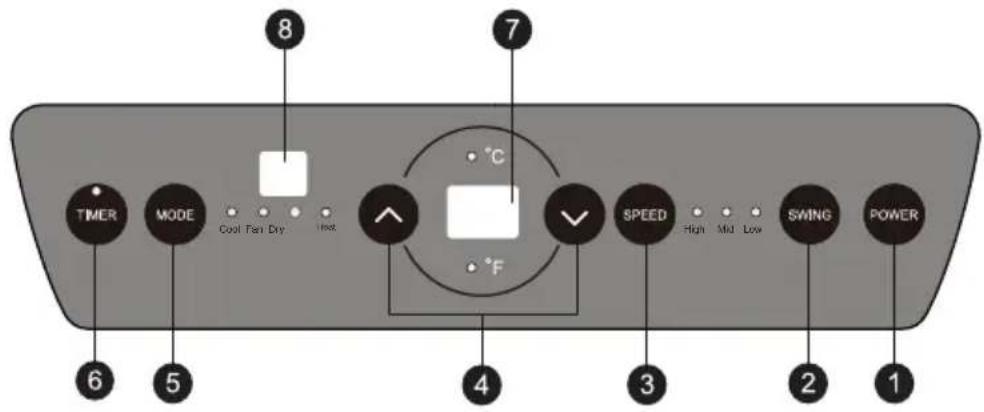
Cooling and Heating Model
1. Power key
Press the key to turn ON/OFF the A/C.
2. Swing key
Press this key at any time after turning on the A/C to swing the wind guide bar automatically.
3. Speed key
Press the key to choose high/middle /low gear wind speed.
4. Temperature/ Time Adjusting key
Press the key at cooling mode to increase /reduce the setting temperature; press it at timing mode to adjust timing ON/OFF time; press Up and Down keys simultaneously to switch Fahrenheit and Centigrade degree temperature.
5. Mode key
Press the key to choose cooling, fan, heating, dehumidification
6. Timer key
Press the key at standby mode to set ON time. Press this key at ON mode to set OFF time.
7. Temperature/ Time Display Window
This window displays the adjusted temperature and time.
8. Remote controller receiving window
This window is used to receive signal of the remote controller.
9. ^ C/^ F switching key: Press the key to switch ^ C and ^ F
Product Operation Placement and Installation
Placement
- Place it at even and dry place, and keep it at least 50cm . away from its surrounding object.
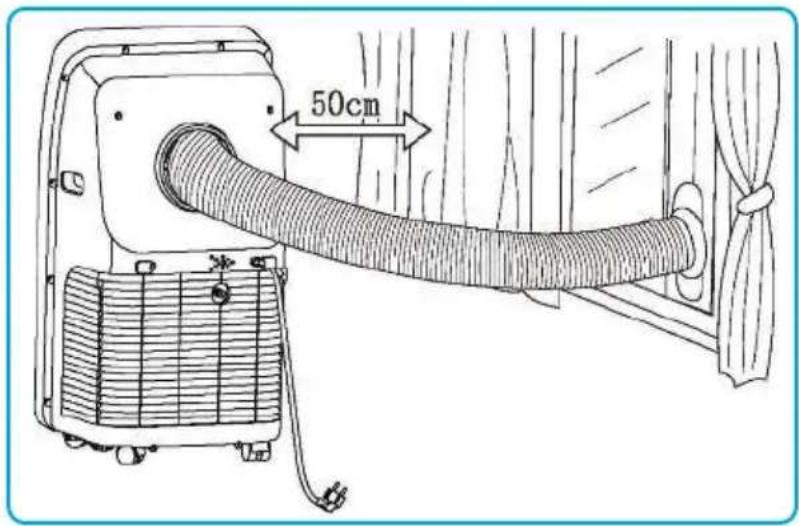
Installation
- Screw the exhaust duct assembly in the air outlet behind the panel (counterclockwise).
- Insert the air exhaust hose into the window sealing plate, adjust opening width of window so that the window can match with the sealing plate properly; length of the sealing plate is adjustable.
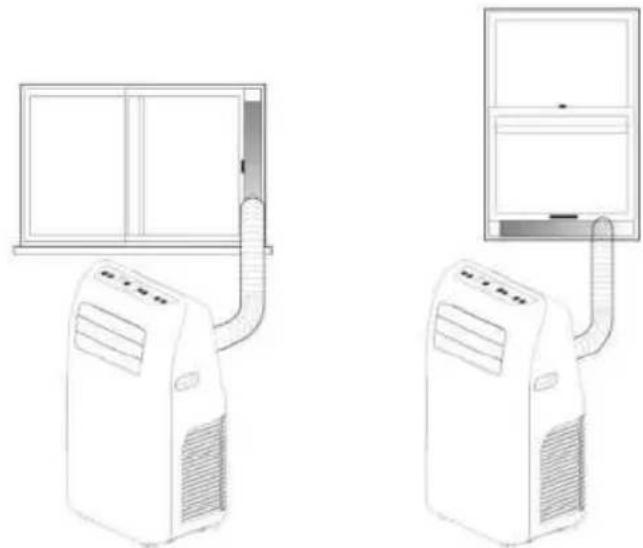
Incorrect Installation
- It's important to keep the exhaust duct smooth. Incorrect installation will affect work of the A/C.
- Prevent the exhaust duct from sharp bending.
- Ensure air can flow smoothly in the duct.
Warning:
The exhaust duct is designed especially for this model. Don't replace or lengthen it; otherwise, it will result in failure.

Notice:
Max. developed length of the exhaust duct is 1,500mm. It's better to shorten it while in use and keep it horizontal while installation.
OPERATION METHOD
Cooling Mode
- When the A/C enters cooling mode automatically or cooling mode is selected after power ON, the cooling indicator lamp lights up.
- Press Up/Down key to adjust setting temperature (16^ 30^)(60^ 86^) .
- Press Speed key to choose High/Mid/Low speed.
Heating Mode
- When the A/C enters heating mode automatically or heating mode is selected after power ON, the heating indicator lamp lights up.
- Press Up/Down key to adjust setting temperature (16^ 30^)(60^ 86^) .
- Press Speed key to choose High/Mid/Low speed.
Fan Mode
- When pressing mode key or choosing Fan mode by pressing the remote controller, the wind indicator lamp lights up.
- Press Speed key to choose High/Mid/Low speed.
- Temperature can't be set.
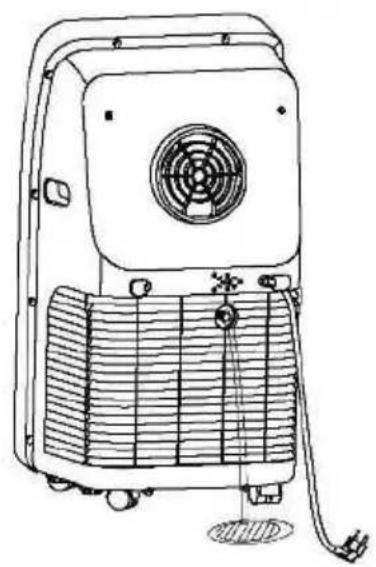
Dehumidification Mode
- When pressing mode key or choosing dehumidification mode by pressing the remote controller, the dehumidification indicator lamp lights up.
- Remove the dehumidification water wedge, insert water manifold, place the other end of the water manifold into the water vessel or drainage passage, as shown in the right figure.
- After entering the dehumidification mode, if room tempearture e ≥ 17^ ( 62^ ), the compressor is ON. Then control as follows: when room temperature e ≤ 15^ ( 59^ ), the compressor is OFF; when temperature increases to room temperature e ≥ 17^ ( 62^ ), the compressor will start again (in order to protect the compressor, it will be restarted 3min later).
- In dehumidification mode, the fan is defaulted to run at low speed, and wind speed can't be adjusted.
- Temperature can't be set.
Timer Mode
- In standby state, press the Timer key to set ON time. Press Up and Down keys to set ON time (1~24H), and the timer indicator lamp lights up.
- In ON state, pressure the timer key to set OFF time. Press Up and Down keys to set OFF time (1~24H), and the timer indicator lamp lights up.
Clean and Maintenance
DRAINAGE METHOD
This product is equipped with automatic water vaporization system. The condenser is cooled with the circulating of condensing water, so as to improve cooling efficiency and save energy.
- If the internal vessel is full of water, the display screen will display "FL", and the compressor stops working automatically. After power off, unscrew the water cover, pull out the water plug to drain off water, and it will become normal after being restarted.
MAINTENANCE
Notice: In order to avoid electric shock, please turn off the A/C and unplug before maintenance or repair.
CLEANING
- Unplug before cleaning.
- Wipe with soft semi-dry cloth. Don't use chemical reagent, such as benzene, alcohol and gasoline etc; otherwise surface of the A/C and even the whole A/C will be damaged.
- Prevent water from spattering in the A/C.
FILTER SCREEN
- Vacuum the filter screen once every two weeks. If it is blocked by dust, efficiency of the A/C will be reduced.
- Take out the air inlet grille and pull out the filter screen at both sides according to the direction shown in the following figures. Use vacuum to remove lint from filters.
- Put the filter screen into the warm water (about 40^ or 104^ ) added with neutral detergent, dry it at a shady place after cleaning.
SEASONAL CLEANING
If the A/C will not be used for a long time:
- Pull out the water plug to drain.
- Run the A/C in fan mode for 2 ~H till the inside is dry.
- Turn off the A/C and unplug.
- Wash the filter screen and reassemble it.
- Dismantle the exhaust duct and keep it properly.
- Cover the A/C with a plastic bag and place it at a dry place.
Common Failures and Diagnosis
Intelligent Error Detection
| Error-detecting code | Multi-functional defection |
| E1 Error of the coil's temperature sensor | |
| E2 Error of indoor temperature sensor | |
| E4 | Anti-freezing protection: temperature of the coil is too low and the whole A/C is off. When temperature excesses 8°C or 46.4°F, the protection is released and previous working state is recovered. |
FUSE PARAMETERS
Voltage: 250VAC Current: 3.15A
Troubleshooting
In case of any of the following trouble, please contact professional maintenance personnel in time.
| TROUBLE CAUSE SOLUTION | ||
| The A/Cdoesn't work | No display | Reset circuit breaker on AC cord |
| The display panel displays “FL” | Restart the A/C after power off and draining, then it will become normal | |
| Time OFF function is started | The A/C can be restarted 3 minutes after being turning off. | |
| The A/C starts frequently | Direct sunlight | Draw the curtain |
| Doors and windows keep open; there are lots of people or heat source in room | Close doors and windows, remove heat source | |
| Filter screen is very dirty | Clean or replace it | |
| Air inlet or air outlet is blocked | Remove the stem | |
| Big noise of the A/C | The A/C is placed unevenly | Place it at even and firm ground, avoid shaking |
| The compressor doesn't work | Its delay protection is started | Wait for 3min., turn on after temperature decreases |
Notice: When there is any abnormal to the A/C, turn it off and unplug, and then contact professional maintenance personnel.
The above technical parameters are subject to change without notice.
Do not dispose of electrical appliances as unsorted municipal waste, use separate collection facilities.
Contact you local government for information regarding the collection systems available.
If electrical appliances are disposed of in landyills or dumps, hazardous substances can leak into the groundwater and get into the food chain, damaging your health and well-being. When replacing old appliances with new ones, the retailer is legally obligated to take back your old appliance for disposals at least free of charge.
SLACHT9EU-SLACHT9UK
Portable Air Conditioner
Compact Home AC Cooling and Heating Unit with Built-in Dehumidifier & Fan Modes, Includes Window Mount Kit (12,000 BTU)
Features:
- Lightweight & Portable AC Unit
- Compact Freestanding Room Air Conditioner
(4) Operation Modes: AC Cool / Heat / Dehumidifier / Fan - Hassle-Free, Quick Setup Heating & Cooling
Simple Electric Air Circulator Function - Temp Control Air Circulator Function
Automatic Swing Mode: Moving Wind Vents for Air Circulation - Convenient Wide-Area Climate Control Room AC Coverage
- Touch Button Control Panel with Digital LED Display
Time, Temperature & Fan Speed Adjustment Settings - Includes Universal Window Mount AC Exhaust Kit
- Removable & Washable Air Filter Screen
Modern Style, Sleek Body Housing - Energy Efficient: Low Power Consumption
Low Noise Level Motor - Rolling Wheels for Easy Portability
Used for Home, Office, School & Business Rooms
What's in the Box:
- AC Unit
- Exhaust Hose
Window Installation Plate - Digital Remote Control
Technical Specs:
Cooling Capacity (ASHRAE): 9,000 BTU
Heating Power: 1100 Watt
- Coverage Area: Cools & Heats Rooms Up to 300^+ Square Feet
- Rated Power: Cooling: 1100Watt
Air Flow: 360 Cubic Meters / Hour
- Operating Modes: Cool / Heat / Fan / Dry (Dehumidifier)
- Moisture Removal / Dehumidifier: 0.9 Liters / Hour
- Operating Noise Level: 65 dB(A)
Fan Speed Settings: Low/Medium/High
- Temperature Unit Selectable: ^ F/^ C (Fahrenheit / Celsius)
- Adjustable Timer Settings: Up to 24 Hours
- Construction Material: Engineered ABS Housing
- Battery Operated Remote Control, Requires (2) x 'AAA' Batteries, Included
Power Cable Length: 4.3^ ft.
Power Supply: 220V
- Dimensions (L x W x H): 44.1 x 34.0 x 81.5cm/17.4" x 13.4" x 32.1" inches

WARNING:
This product can expose you to a chemical or group of chemicals, which may include "Acrylonitrile" which is known in the state of California to cause cancer, birth defects, or other reproductive harm. For more info, go to https://www.p65 warnings.ca.gov/.
serenelife
serenelife

SPA

SLAHT9EU-SLACHT9UK
Métrode operation 11
Clean and Maintenance
Placement and Installation
Placement
https://www.p65 warnings.ca.gov/.
serenelife
SLACHT9EU-SLACHT9UK
Akilli Hata Tespiti 14
Sigorta Parametreleri 14
Sorun Giderme 14
- CONTENT
- Important Safety Tips
- Product Introduction
- Product Operation
- Clean and Maintenance
- Common Failures and Diagnosis
- Precautions
- Please read the Manual carefully before operating the machine:
- SAFETY INSTRUCTIONS
- IMPORTANT!
- Special Warning:
- Power
- MAIN PARTS AND COMPONENTS
- Control Panel and Remote Controller
- Power key
- Swing key
- Speed key
- Temperature/ Time Adjusting key
- Mode key
- Timer key
- Temperature/ Time Display Window
- Remote controller receiving window
- ^ ° C/^ ° F switching key: Press the key to switch ^ ° C and ^ ° F
- Product Operation Placement and Installation
- Placement
- Installation
- Incorrect Installation
- Warning:
- Notice:
- OPERATION METHOD
- Cooling Mode
- Heating Mode
- Fan Mode
- Dehumidification Mode
- Timer Mode
- DRAINAGE METHOD
- MAINTENANCE
- CLEANING
- FILTER SCREEN
- SEASONAL CLEANING
- Intelligent Error Detection
- FUSE PARAMETERS
- Troubleshooting
- SLACHT9EU-SLACHT9UK
- Portable Air Conditioner
- Compact Home AC Cooling and Heating Unit with Built-in Dehumidifier & Fan Modes, Includes Window Mount Kit (12,000 BTU)
- Features:
- What's in the Box:
- Technical Specs:
- serenelife
- SLAHT9EU-SLACHT9UK
- Placement and Installation
Brand : SereneLife
Model : SLACHT9
Category : Air Conditioning