SSM1007 - Saw Ferm - Free user manual and instructions
Find the device manual for free SSM1007 Ferm in PDF.


| Product type | Fret saw (precision jigsaw) |
| Brand | Ferm |
| Model | SSM1007 |
| Power supply | 230 V~, 50 Hz |
| Power | 120 W |
| No-load speed | 400 - 1600 min⁻¹ |
| Blade length | 125 mm |
| Max. cutting depth (90°) | 50 mm |
| Max. cutting depth (45°) | 23 mm |
| Cutting length / max. working depth | 406 mm |
| Weight | 10.4 kg |
| Sound pressure level Lpa (no load) | 78 dB(A) K=3 dB |
| Sound power level Lwa (with load) | 91 dB(A) K=3 dB |
| Table tilt | 0° to 45° |
| Variable speed | Yes, via rotary knob |
| Operating mode | Continuous or with foot pedal |
| Included equipment | Foot pedal, table extension, workpiece support, sawdust blower, universal blade adapters |
| Intended use | Wood, synthetic materials, non-ferrous metals (max. 50 mm thickness) |
| Maintenance | Regular cleaning with a soft cloth and soapy water; no solvents |
| Safety | Safety glasses and dust mask recommended; protective cover; grounding mandatory |
| Warranty | See attached warranty certificate |
| Environment | Do not dispose of with household waste – recycle according to WEEE directive |
| Repairability | Replacement of power cable by a specialist workshop |
Frequently Asked Questions - SSM1007 Ferm
User questions about SSM1007 Ferm
0 question about this device. Answer the ones you know or ask your own.
Ask a new question about this device
Download the instructions for your Saw in PDF format for free! Find your manual SSM1007 - Ferm and take your electronic device back in hand. On this page are published all the documents necessary for the use of your device. SSM1007 by Ferm.
USER MANUAL SSM1007 Ferm
natural_image
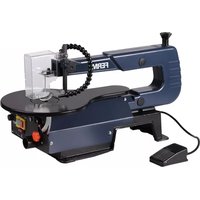
Blue FERM2 milling machine with attached control panel and power cord (no visible text or symbols)SSM1007
EN Original instructions 04
DE Übersetzung der Originalbetriebsanleitung 09
NL Vertaling van de oorspronkelijke gebruiksaanwijzing 13
FR Traduction de la notice originale 18
ES Traducción del manual original 22
PT Tradução do manual original 27
IT Traduzione delle istruzioni originali 31
SV Översättning av bruksanvisning i original
FI Alkuperäisten ohjeiden käännös 40
DA Oversættelse af den originale brugsanvisning 44
HU Eredeti használati utasítás fordítása 48
CS Překlad původního návodu k používání 52
SK Preklad pôvodného návodu na použitie 56
SL Prevod izvirnih navodil 60
PL Tłumaczenie instrukcji oryginalnej 64
LT Originalios instrukcijos vertimas 68
LV Instrukciju tulkojums no oriğinälvalodas 72
RO Traducere a instructiunilor originale 76
EL Μετάφραση του πρωτοτύπου των οδηγιών χρήσης 80
MK Превод на оригиналниот инструкции 85
natural_image
Mechanical assembly diagram showing a bracket being inserted into a workpiece with a tool, labeled Fig. C (no text or symbols on the diagram itself)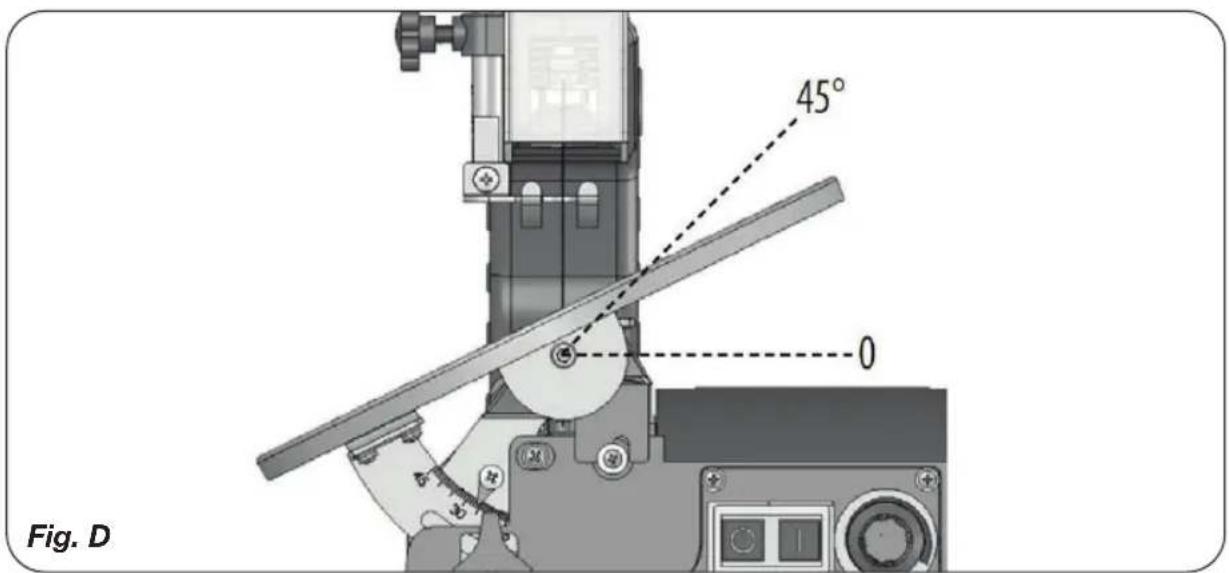
natural_image
Mechanical assembly diagram showing a motor and gear mechanism with directional arrows (no text or symbols)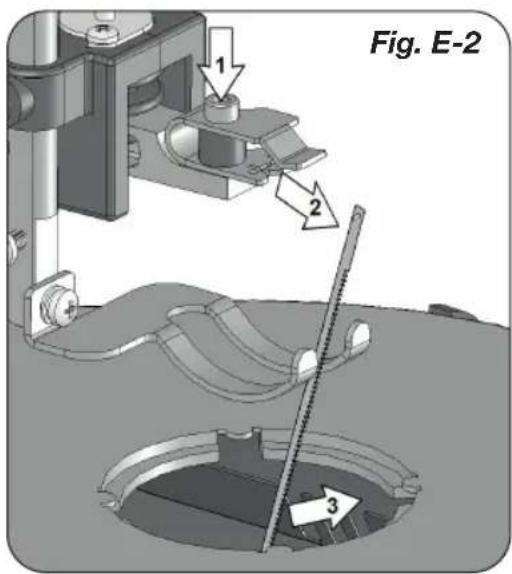
natural_image
Mechanical sewing machine needle stitching on a wooden surface, with an inset showing a close-up of a mechanical component (no text or symbols visible)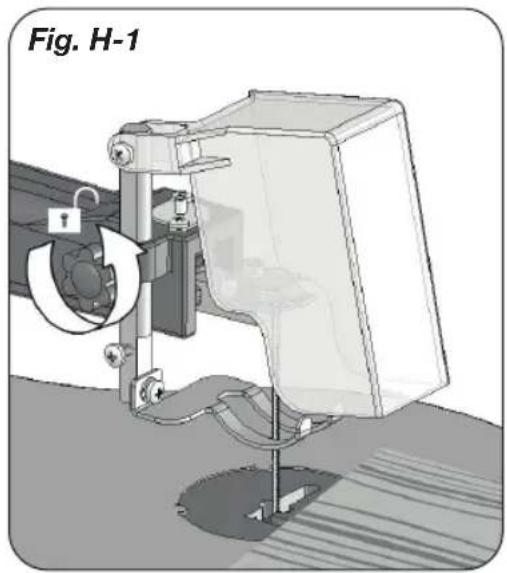
natural_image
Mechanical assembly diagram labeled Fig. H-1 showing a device with a lock and gear mechanism (no text or symbols on the diagram itself)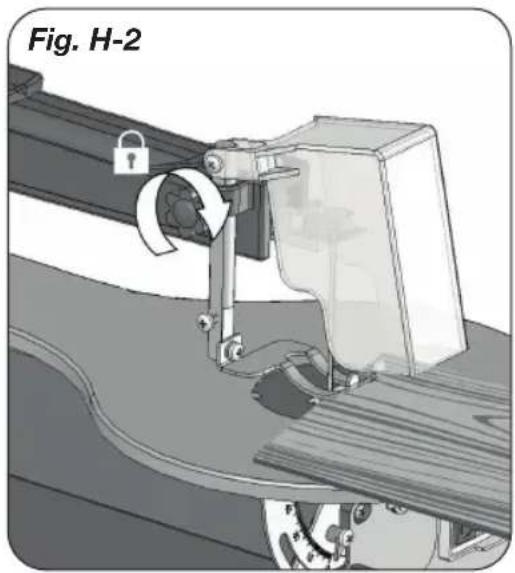
natural_image
Mechanical assembly diagram labeled Fig. H-2 showing a lock mechanism interacting with a motor or conveyor (no text or symbols on the diagram itself)SCROLL SAW SSM1007
Thank you for buying this Ferm product. By doing so you now have an excellent product, delivered by one of Europe's leading suppliers. All products delivered to you by Ferm are manu factured according to the highest standards of performance and safety. As part of our philosophy we also provide an excellent customer service, backed by our comprehensive warranty. We hope you will enjoy using this product for many years to come.
1.SAFETYINSTRUCTIONS
Explanation of the symbols

Read the operating instructions carefully before using this device. Familiarise yourself with its functions and basic operation. Service the device as per the instructions to ensure that it always functions properly. The operating instructions and the accompanying documentation must be kept in the vicinity of the device.

Denotes risk of personal injury, loss of life or damage to the tool in case of non observance of the instructions in this manual.

Denotes risk of electric shock.

Wear ear and eye protection.
Specific safety instructions
- Wear safety goggles and a dust mask.
- This scroll saw machine is for indoor use only.
- Ensure that the teeth of the saw point downwards prior to using the machine.
- If teeth of the saw blade are missing or are damaged, then the saw blade must be replaced immediately.
- Use the scroll saw machine on a stable and flat surface.
-
Never exert pressure on the sides of the saw blade because it may break.
-
Check wooden work pieces for possible protruding nails etc. and remove these.
- Do not touch the sawing surface with your hands.
- Never leave the sawing machine unattended while it is running.
- Do not remove any wood debris etc, in the vicinity of the saw with your hands while it is running. Turn the machine off before removing the wood debris.
Immediately switch off the machine when
- Interruption in the mains plug, mains lead or mains lead damage.
- Defect switch.
- Smoke or stench of scorched isolation.
Electrical safety
When using electric machines always observe the safety regulations applicable in your country to reduce the risk of fire, electric shock and personal injury. Read the following safety instructions and also the enclosed safety instructions.

Always check that the power supply corresponds to the voltage on the rating plate.
Mains connection
Only use earthed sockets with earthing wire connected per the regulations.
Using extension cables
Only use an approved extension cable, correspon ding to the machine power use. The wires must have a minimum cross section of 1.5 mm2. If the cable is on a reel, it must be fully laid out.
2. MACHINE INFORMATION
Intended use
This scroll saw is great for making toys, puzzles, games, fretwork and jewelry. Because of its cutting capacity it is a handy do-it-yourself tool. It cuts wood up to 50 mm thick as well as plastics and non-ferrous metals.
Technical specifications
Voltage 230 V \~
Frequency 50 Hz
Power input 120 W
No-load speed 400 - 1600 min -1
Blade length 125mm
Max. Cutting depth at 90° 50mm
Max. Cutting depth at 45° 23mm
Max. Cutting length/working depth 406mm
Weight 10.4kg
Sound pressure ( L_PA ) 78 dB(A) K=3dB
Acoustic power ( L_WA ) 91 dB(A) K=3dB
Description
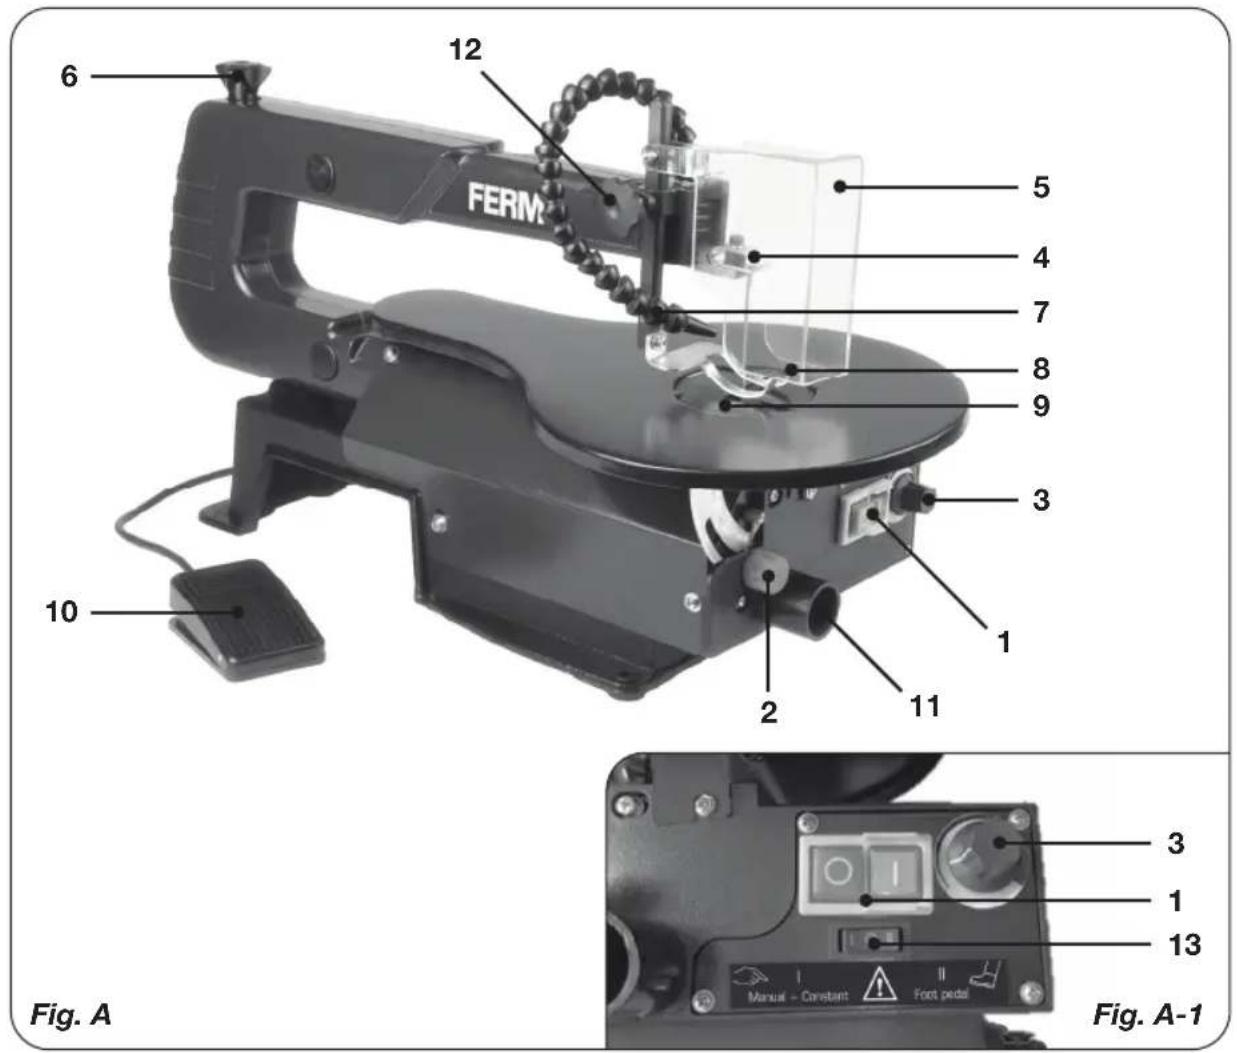
The numbers in the following text refer to the pictures on page 2 - 4.
Fig. A
- On/off switch
- Angle adjustment knob
- Speed adjustment knob
- Saw blade holder
- Protective cover
- Spanner
- Dust blow pipe
- Workpiece holder
- Table inlay
- Foot pedal switch
- Connection vacuum cleaner
- Locking knob
- Operation switch
3. ASSEMBLY

Before assembly, always switch off the machine and remove the mains plug from the mains.
Install of a stationary machine
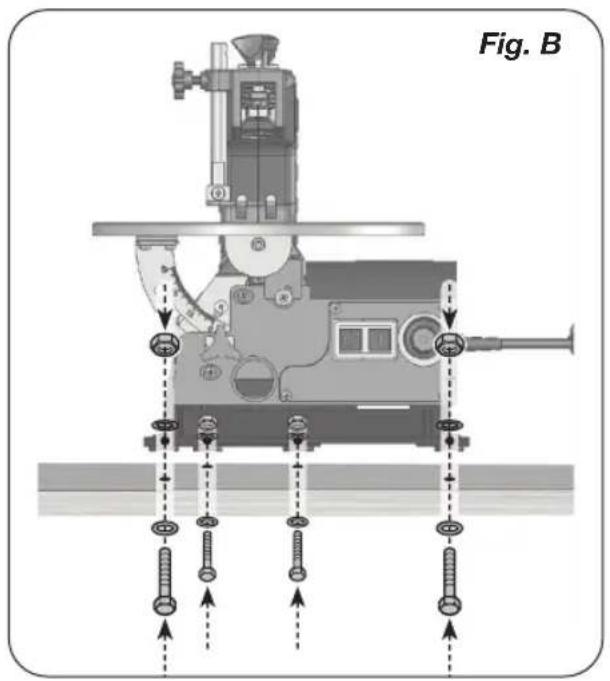
Fig. B
This machine is a stationary machine and for safety reasons we recommend the machine to be firmly installed and not used for mobile applications.
The machine can be mounted to a workbench as shown on Fig. B. The machine must be mounted on the same 4 points that the rubber feet are assembled. Each of the 4 points must be secured with a bolt, washer and nut. The necessary tools and small parts for assembling the saw on a workbench are not supplied with the saw.
Installing the protective cover
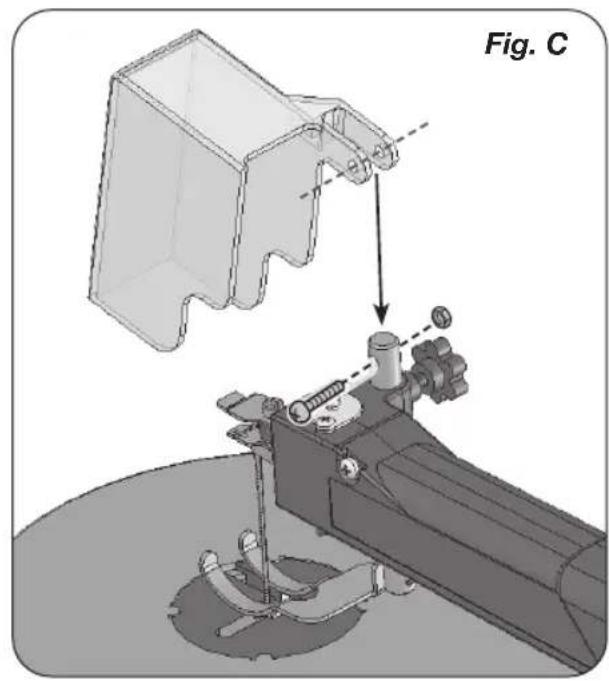
Fig. C
Before commissioning the machine, the protective cover (5) must be installed.
- Mount the protective cover on the metal part as shown on Fig. C
- Insert the screw as shown on Fig. C
- Screw the nut tightly.
4. OPERATION

Always observe the safety instructions and obey the relevant regulations.
Switching on/off
Fig. A1
Place the machine onto a flat and solid surface. Place the Foot pedal switch (10) on the ground. The machine can be switched on/off when the pedal is actuated. A foot pedal switch for switching on/off is practical, especially for internal cuttings, since your hands are kept free and you can fully concentrate on the work piece under the scroll saw. The foot pedal switch cannot influence the speed (see below Speed Adjustment).

Beware of unintentional actuation of the foot pedal switch.

Caution! Always choose the preferred operation mode with the Operation switch (13) before using the machine. The machine will not start in 'O' mode.
Continuous operating mode
- Use the Operation switch (13) to choose for 'I' continuous operation.
- Connect the scroll saw to the mains.
- Start the machine by pushing the green ON-switch (1).
Push the red OFF-switch (1) to turn the machine off.
Foot pedal operating mode
- Use the Operation switch (13) to choose for 'II' foot pedal operation.
- Connect the scroll saw to the mains.
- Push the green ON-switch (1).
- Start the machine by pushing the Foot pedal switch (10) with your foot.
To stop the machine, release the Foot pedal switch (10). Push the red OFF-switch (1) to turn the machine off.
Tilting the table
Fig. A, D
The scroll saw table can be tilted from 0 to 45°. To do so:
- Untighten the Angle adjustment knob (2) by turning it anti-clockwise.
- Manually tilt the table until the desired angle has been reached (see the graduated scale on the machine).
- Retighten the Angle adjustment knob (2) by turning it clockwise.
Removing the saw blade
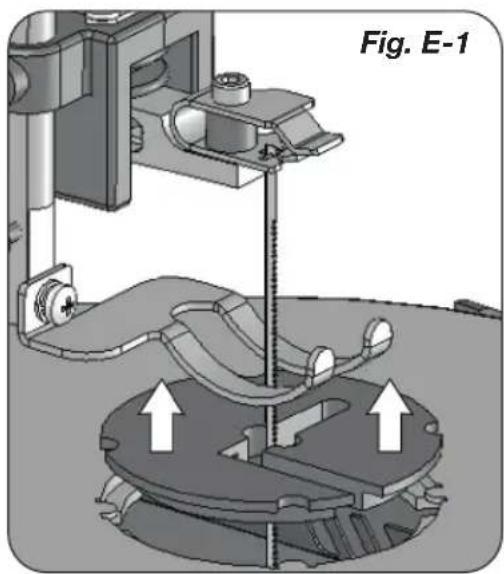
Fig. E

Always disconnect the machine from the main power supply before carrying out any maintenance work.
- Untighten the Spanner (6) by turning it clockwise until the spring is slack.
- Pull the Table inlay (9) upwards out of the saw table to achieve a clear view of the blade, as shown on fig. E1.
- Carefully push down the upper saw-blade holder and slightly lift the blade in order to facilitate its removal, as shown on fig. E2.
- Allow the blade to drop down slightly and push it forward, in order to loosen it from the lower holder.
Installing the saw blade
Fig. E

Always disconnect the machine from the main power supply before carrying out any maintenance work.

Use universal saw blades from any better DIY shop or machine shop.
- Select the correct blade for the kind of wood to be cut.
- Untighten the Spanner (6) by turning it clockwise until the spring is slack.
-
Pull the Table inlay (9) upwards out of the saw table to achieve a clear view of the blade, as shown on fig. E1.
-
Push the saw blade through the slot, with the teeth pointing downwards. Make sure that the bolt of the saw blade (or saw-blade adapter) slides into the lower saw blade holder.
- Pull the saw blade up, so that the upper bolt (or saw-blade adapter) slides into the upper holder.
- Push the Table inlay (9) downwards into the saw table.
- Retighten the Spanner (6) by turning it anti-clockwise until the saw blade has the required tension.
- Remove all tools and other objects from the saw table. Activate the current and allow the saw blade to run before starting to saw. The saw blade should run quietly.
Adjusting the saw blade position
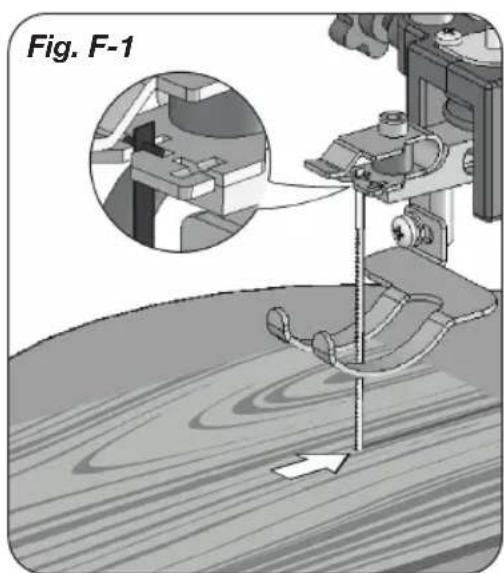
Fig. F
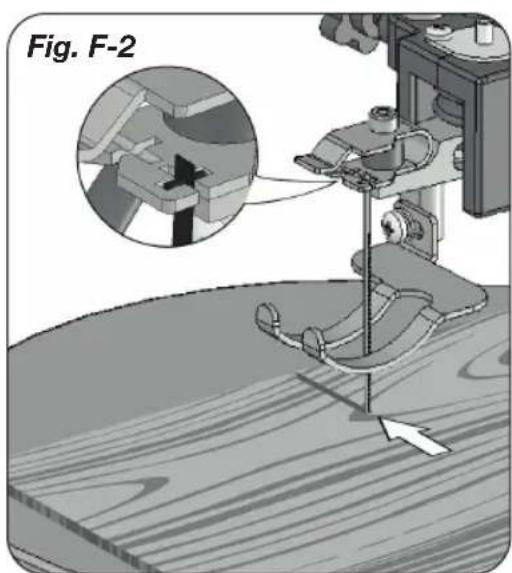
The saw blade can be mounted in two different positions: regular frontal position as shown on Fig. F1 and in sideways position as shown on Fig. F2. When using the sideways position, even longer workpieces ca be sawed with ease.
Adapters for universal saw blades
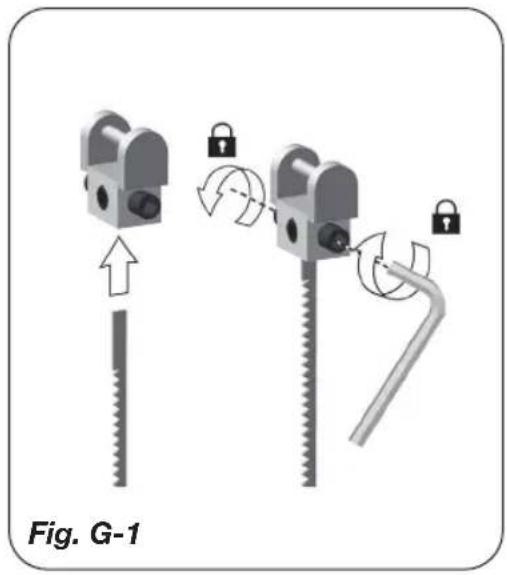
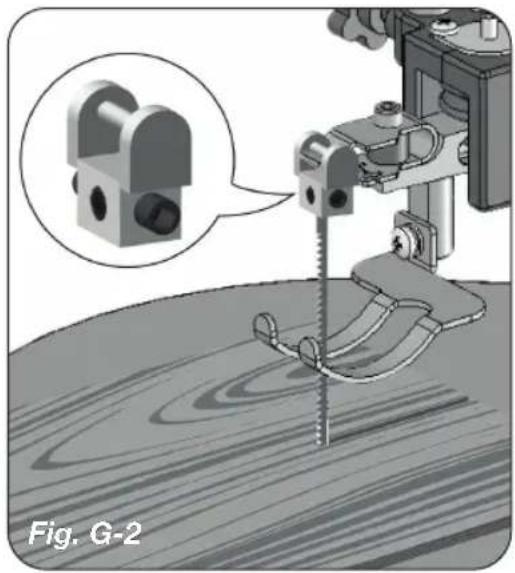
Fig. G
The enclosed adapters should only be used with universal (= without pins on the end) saw blades
- Unscrew the Allen screws on the adapter anticlockwise as shown on fig. G1
- Slide the universal saw into the gap between the Allen screws
- Tighten the Allen screws clockwise so the saw is clamped
- Install the saw blade (see INSTALLING THE SAW BLADE) on the saw blade holders as shown on fig. G2
Workpiece holder
Fig. A, H
The workpiece holder (8) is used to hold the workpiece to the saw table, preventing the workpiece from moving up and down due to the movement of the blade. The workpiece holder must be adjusted in height depending on the thickness of the workpiece.
- Untighten the Locking knob (12) by turning it anti-clockwise.
- Adjust the height of the Workpiece holder (8) to the desired height.
- Retighten the Locking knob (12) by turning it clockwise.
Speed Adjustment
Fig. A
The required speed can be adjusted by using the Speed adjustment knob (3). Also during running the rotational speed can be adjusted.
- To increase the speed, turn the Speed adjustment knob (3) clockwise.
- To decrease the speed, turn the Speed adjustment knob (3) anti-clockwise.
The required speeds depends on the material and can be determined by practical testing.
Sawdust blower
Fig. A
The sawdust blower keeps the workpiece clean for more accurate scroll cuts. For best results, always direct air flow from the dust blow pipe at the blade and workpiece. To adjust, simply bend to desired position.
5. MAINTENANCE

Always disconnect the machine from the main power supply before carrying out any maintenance work.
The machine is designed to function faultlessly for a long period and with a minimum of maintenance. Extend its lifespan by regularly cleaning the machine and treating it correctly.
Cleaning
Regularly clean the machine with a soft cloth, preferably after each use. Keep the ventilator slot free of dust and other deposits. Remove any tenacious deposits with a soft cloth moistened with soap. Do not use solvents (petrol, alcohol, ammonia, etc.) as they will damage the plastic parts.
Replacing the mains connection cable
The mains connection cable may only be replaced by a special cable in a specialised workshop.
Replacing cables or plugs
Dispose of old cables or plugs immediately after replacing them. It is dangerous to connect the plug of a loose cable to a wall socket.
ENVIRONMENT

Faulty and/or discarded electrical or electronic apparatus have to be collected at the appropriate recycling locations.
Only for EC countries
Do not dispose of power tools into domestic waste. According to the European Guideline 2012/19/EU for Waste Electrical and Electronic Equipment and its implementation into national right, power tools that are no longer usable must be collected separately and disposed of in an environmentally friendly way.
The product and the user manual are subject to change. Specifications can be changed without further notice.
WARRANTY
Read the warranty conditions on the separately supplied warranty card.
DEKUPIERSÄGEMASCHINE SSM1007
The product and the user manual are subject to change. Specifications can be changed without further notice.
GARANTI
DECLARATION OF CONFORMITY SSM1007 - SCROLL SAW MACHINE
(EN) We declare under our sole responsibility that this product is in conformity with directive 2011/65/EU of the European parliament and of the council of 8 June on the restriction of the use of certain hazardous substances in electrical and electronic equipment is in conformity and accordance with the following standards and regulations:
(DE) Der Hersteller erklärt eigenverantwortlich, dass dieses Produkt der Direktive 2011/65/EU des Europäischen Parlaments und des Rats vom 8. Juni 2011 über die Einschränkung der Anwendung von bestimmten gefährlichen Stoffen in elektrischen und elektronischen Geräten entspricht. den folgenden Standards und Vorschriften entspricht:
(NL) Wij verklaren onder onze volledige verantwoordelijkheid dat dit product voldoet aan de conform Richtlijn 2011/85/EU van het Europees Parlement en de Raad van 8 juni 2011 betreffende beperking van het gebruik van bepaalde gevaarlijke stoffen in elektrische en elektronische apparatuur en in overeenstem ming is met de volgende standaarden en reguleringen:
(FR) Nous déclarons sous notre seule responsabilité que ce produit est conforme aux standards et directives suivants: est conforme à la Directive 2011/65/EU du Parlement Européen et du Conseil du 8 juin 2011 concernant la limitation d'usage de certaines substances dangereuses dans l'équipement électrique et électronique.
(ES) Declaramos bajo nuestra exclusiva responsabilidad que este producto cumple con las siguientes normas y estándares de funcionamiento: se encuentra conforme con la Directiva 2011/65/UE del Parlamento Europeo y del Consejo de 8 de junio de 2011 sobre la restricción del uso de determinadas sustancias peligrosas en los equipos eléctricos y electrónicos.
(PT) Declaramos por nossa total responsabilida-de que este produto está em conformidade e cumpre as normas e regulamentações que se seguem: está em conformidade com a Directiva 2011/65/EU do Parlamento Europeu e com o Conselho de 8 de Junho de 2011 no que respeita à restrição de utilização de determinadas substâncias perigosas existentes em equipamento eléctrico e electrónico.
(IT) Dichiariamo, sotto la nostra responsabilità, che questo prodotto è conforme alle normative e ai regolamenti seguenti: è conforme alla Direttiva 2011/65/UE del Parlamento Europeo e del Consiglio dell'8 giugno 2011 sulla limitazione dell'uso di determinate sostanze pericolose nelle apparecchiature elettriche ed elettroniche.
(SV) Vi garanterar på eget ansvar att denna produkt uppfyller och följer följande standarder och bestämmelser: uppfyller direktiv 2011/65/EU från Europeiska parlamentet och EG-rådet från den 8 juni 2011 om begränsningen av användning av farliga substanser i elektrisk och elektronisk utrustning.
(FI) Vakuutamme yksinomaan omalla vastuullamme, että tämä tuote täyttää seuraavat standardit ja säädökset: täyttää Euroopan parlamentin ja neuvoston 8. kesäkuuta 2011 päivätyn direktiivin 2011/65/EU vaatimukset koskien vaarallisten aineiden käytön rajoitusta sähkö- ja elektronisissa laitteissa.
(NO) Vi erklærer under vårt eget ansvar at dette produktet er i samsvar med følgende standarder og regler: er i samsvar med EU-direktivet 2011/65/EU fra Europa-parlamentet og Europa-rådet, pr. 8 juni 2011, om begrensning i bruken av visse farlige stoffer i elektrisk og elektronisk utstyr.
(DA) Vi erklærer under eget ansvar, at dette produkt er i overensstemmelse med følgende standarder og bestemmelser: er i overensstemmelse med direktiv 2011/65/EU fra Europa-Parlamentet og Rådet af 8. juni 2011 om begrænsning af anvendelsen af visse farlige stoffer i elektrisk og elektronisk udstyr.
(HU) Felelősségünk teljes tudatában kijelentjük, hogy ez a termék teljes mértékben megfelel az alábbi szabványoknak és előírásoknak: je v souladu se směmici 2011/65/EU Evropského parlamentu a Rady EU 2016. června 2011, která se týká omezení použilí určitých nebezpečných látek v elektrických a elektronických zařízeních.
(CS) Na naši vlastní zodpovědnost prohlašujeme, že je tento výrobek v souladu s následujícímí standardy a nomami: Je v súlade s nomou 2011/65/EÚ Európskeho parlamentu a Rady z 8. júna 2011 týkajúcej sa obmedzenia používania určitých nebezpečných látok v elektrickom a elektronickom vybavení.
(SK) Výhlasujeme na našu výhradnú zodpovednosť, že tentovýrobok je v zhode a súlade s nasledujúcimi normami a predpísmí: Je v súlade s normou 2011/65/EÚ Európskeho parlamentu a Rady z 8. júna 2011 týkajúcej za obmedzenia používania určitých nebezpečných látok v elektrickom a elektronickom vybavení.
(SL) S polno odgovornostjo izjavljamo, da je ta izdelek v skladu in da odgovarja naslednjim standardom terpredpisom: je v skladu z direktivo 2011/65/EU Evropskega parlamenta in Sveta z dne 8. junij 2011 o omejevanju uporabe določenih nevarnih snovi v električni in elektronski opremi.
(PL) Deklarujemy na własną odpowiedzialność, że ten produkt spełnia wymogi zawarte w następujących normach i przepisach: jest zgodny z Dyrektywą 2011/65/UE Parla mentu Europejskiego i Rady z dnia 8 czerwca 2011 r. w sprawie ograniczenia stosowania niektórych niebezpiecznych substancji w sprzęcie elektrycznym i elektronicznym.
(LT) Prisiimdami visą atsakomybę deklaruojame, kad šis gaminys aitiinka žemiau paminėtus standartus arba nuostatus: aitiinka 2011 m. birželio 8 d. Europos Parlamento ir Tarybos direktyvą 2011/65/EB dėl tam tikrų pavojingų medžiagų naudojimo elektros ir elektroninėje įrangje apribojimo.
(LV) Ir atbilstoša Eiropas Parlamenta un Padomes 2011. gada 8. jūnija Direktīvai 2011/65/ES par dažu bīstamu vielu izmantošanas ierobežošanu elektriskās un elektroniskās iekārtās.
(ET) Apgalvojam ar visu atbildību, ka šis produkts ir saskaņā un atbilst sekojošiem standar tiem un nolikumiem: ir atbilstoša Eiropas Parlamenta un Padomes 2011. gada 8. jūnija Direktīvai 2011/65/ES par dažu bīstamu vielu izmantošanas ierobežošanu elektriskās un elektroniskās iekārtās.
(RO) Declarăm prin aceasta cu răspunderea deplină că produsul acesta este în conformitate cu următoarele standarde sau directive: este în conformitate cu Directiva 2011/65/UE a Parlamentului European și a Consiliului din 8 iunie 2011 cu privire la interzicerea utilizării anumitor substanțe periculoase la echipamentele electrice și electronice.
(HR) Izjavljujemo pod vlastitom odgovomoLsu da je strojem ukladan sa slijedešim standardima ili standardiziranim dokumentima i u skladu sa odredbama: usklađeno s Direktivom 2011/65/EU europskog parlamenta i vijeća izdanom 8. lipnja 2011. o ograničenju korištenja određenih opasnih tvari u električnoj i elektroničkoj opremi.
(SR) Pod punom odgovomošću izjavljujemo da je usaglašen sa sledećim standardima ili normama: usaglašen sa direktivom 2011/65/EU Evropskog parlamenta i Saveta od 8. juna.2011. godine za restrikciju upotrebe određenih opasnih materija u električnoj i elektronskoj opremi.
(BG) Ние декларираме на наша отговорност, че този продукт отговаря на съответствие с Директива 2011/65/EC на Европейския парламент и на Съвета от 8 юни 2011 г. относно ограничението на употребата на определени опасни вещества в електрическото и электронното оборудване, в съответствие с следните стандарти и наредби
(RU) Под свою ответственность заявляем, что данное изделие соответствует следующим стандартам и нормам: соответствует требованиям Директивы 2011/65/EU Европейского парламента и совета от 8 июня 2011 г. по ограничению использования определенных опасных веществ в электрическом и электронном оборудовании
(UK) На свою власну відповідальність заявляемо, що дане обладнання відповідає наступним стандартам і нормативам: задовольняє вимоги Директиви 2011/65/ЄС Європейського Парламенту та Ради від 8 червня 2011 року на обмеження використання деяких небезпечних речовин в електричному та електронному обладнанні.
(EL) Δηλώνουμε υπεύθυνα ότι το προϊόν αυτό συμφωνεί και τηρεί τους παρακάτω κανονισμούς και πρότυπα: συμμφωνέσται με την οδηγία 2011/65/EE του Ευρωπαϊκού Κοινοβουλίου και του Συμβουλίους της ιουνίου 2011 για τον περιορισμό τες χρήσης ορισμένων επικάνδυνων ουσιών σε ιλεκτρικό και ηλεκτρονικό εξοπλισμό.
(AR) إملياتلا تاعيچ وتلاو ريپاعلا عم قضاوتي جتنجلا اندنا اندجو لستهيلوىكىم علع نلخىن
(TR) Tek sorumlusu biz olarak bu ürünün aşağıdaki standart ve yönergelere uygun olduğunu beyan ederiz.
(MK) Изјавуваме со наша целосна одговорност дека производот е во согласност со Смерницата 2011/65/EU на Европскиот парламент и е во согласност според Советот од 9 јни за ограничување на користење на одредени опасни супстанции во електричната и електронската опрема и дека е според следните стандарди и регулативи:
EN61029-1, EN55014-1, EN55014-2, EN61000-3-2, EN61000-3-3
2006/42/EC, 2014/30/EU, 2011/65/EU, 2012/19/EU
Zwolle, 01-09-2020
H.G.F. Rosberg
C E O F e r m
Ferm • Lingenstraat 6 • 8028 PM • Zwolle The Netherlands


- SSM1007
- SCROLL SAW SSM1007
- 1.SAFETYINSTRUCTIONS
- Explanation of the symbols
- Specific safety instructions
- Immediately switch off the machine when
- Electrical safety
- Mains connection
- Using extension cables
- MACHINE INFORMATION
- Intended use
- Technical specifications
- Description
- Fig. A
- ASSEMBLY
- Install of a stationary machine
- Fig. B
- Installing the protective cover
- Fig. C
- OPERATION
- Switching on/off
- Fig. A1
- Continuous operating mode
- Foot pedal operating mode
- Tilting the table
- Fig. A, D
- Removing the saw blade
- Fig. E
- Installing the saw blade
- Adjusting the saw blade position
- Fig. F
- Adapters for universal saw blades
- Fig. G
- Workpiece holder
- Fig. A, H
- Speed Adjustment
- Sawdust blower
- MAINTENANCE
- Cleaning
- Replacing the mains connection cable
- Replacing cables or plugs
- ENVIRONMENT
- Only for EC countries
- WARRANTY
- DEKUPIERSÄGEMASCHINE SSM1007
- GARANTI
- DECLARATION OF CONFORMITY SSM1007 - SCROLL SAW MACHINE
Brand : Ferm
Model : SSM1007
Category : Saw