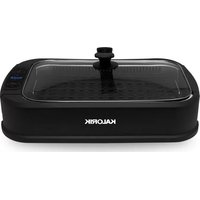
GR 45386 BK - Grill plate KALORIK - Free user manual and instructions
Find the device manual for free GR 45386 BK KALORIK in PDF.


| Product Type | Smokeless Grill Plate |
| Brand | Kalorik |
| Model | GR 45386 BK |
| Dimensions (approx.) | 50 x 30 x 20 cm |
| Weight (approx.) | 5 kg |
| Power Supply | 120 V, 60 Hz, 1500 W (estimated) |
| Temperature Range | 80 °C to 240 °C |
| Ventilation Function | Built-in removable electric fan to reduce smoke |
| Plate Coating | Non-stick |
| Control Type | Push buttons: On, Fan, +/- for temperature |
| Display | LED indicators: blue for standby, red for temperature reached |
| Included Accessories | Glass lid, drip tray, water/oil collector tray, handle with silicone seal |
| Removable dishwasher-safe parts | Cooking plate, drip tray, collector tray, glass lid |
| Base Cleaning | By hand with damp cloth and mild soap; do not immerse |
| Safety | Manual stop via On button; 3-pin grounded plug; do not use unattended |
| Warranty | 1 year (United States and Canada) |
| Usage | Household use only, indoor |
| Country of Origin | Not specified (estimated: China) |
Frequently Asked Questions - GR 45386 BK KALORIK
User questions about GR 45386 BK KALORIK
0 question about this device. Answer the ones you know or ask your own.
Ask a new question about this device
Download the instructions for your Grill plate in PDF format for free! Find your manual GR 45386 BK - KALORIK and take your electronic device back in hand. On this page are published all the documents necessary for the use of your device. GR 45386 BK by KALORIK.
USER MANUAL GR 45386 BK KALORIK
natural_image
Black KALORIK KALORIK cooktop appliance with digital display and control knob (no visible text or symbols on device body)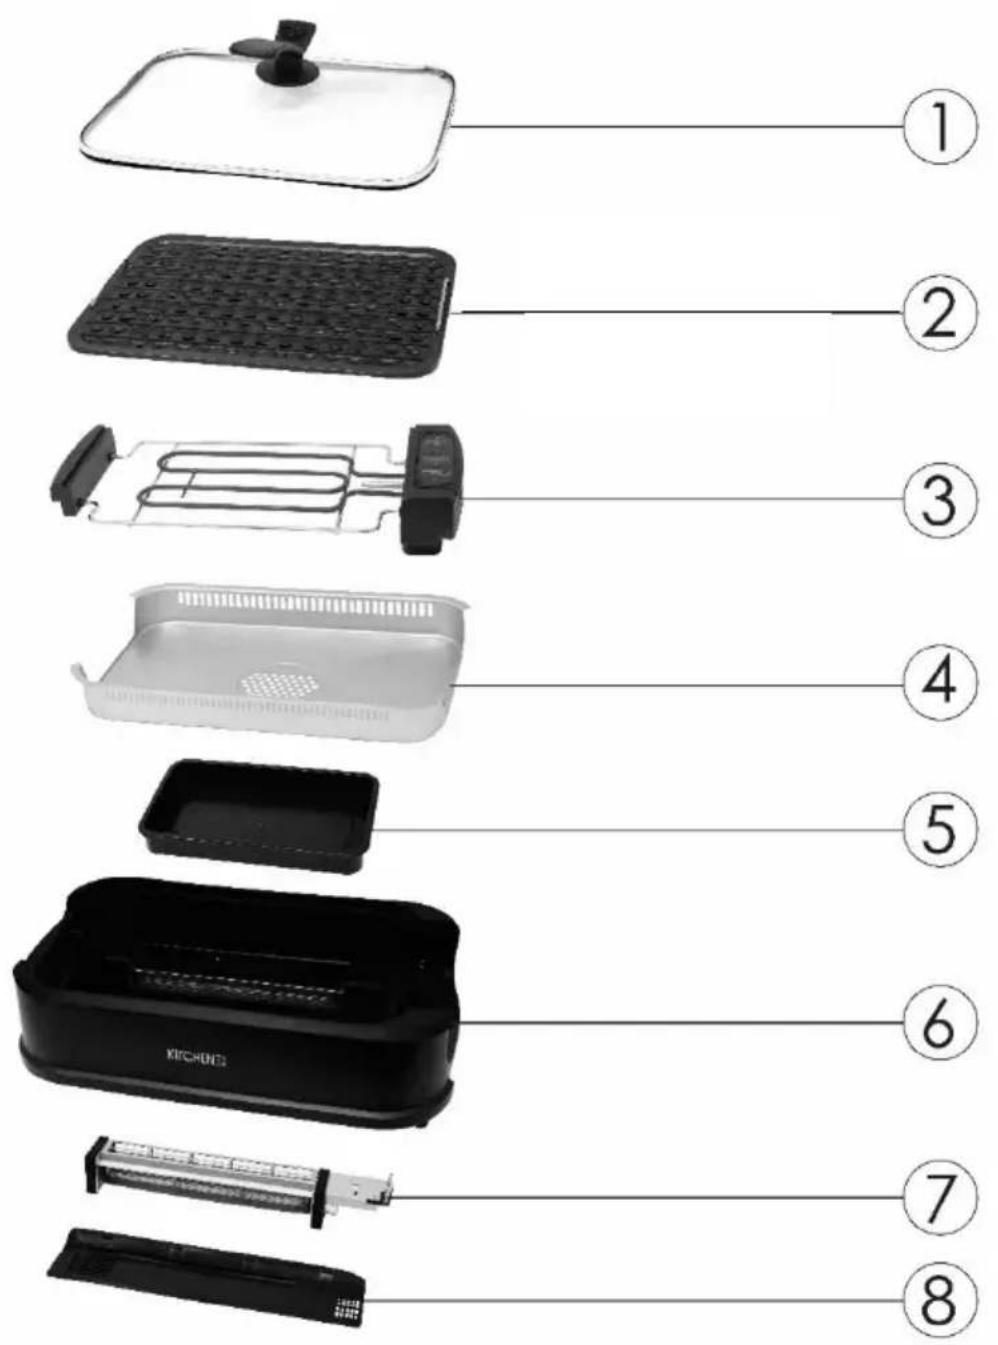
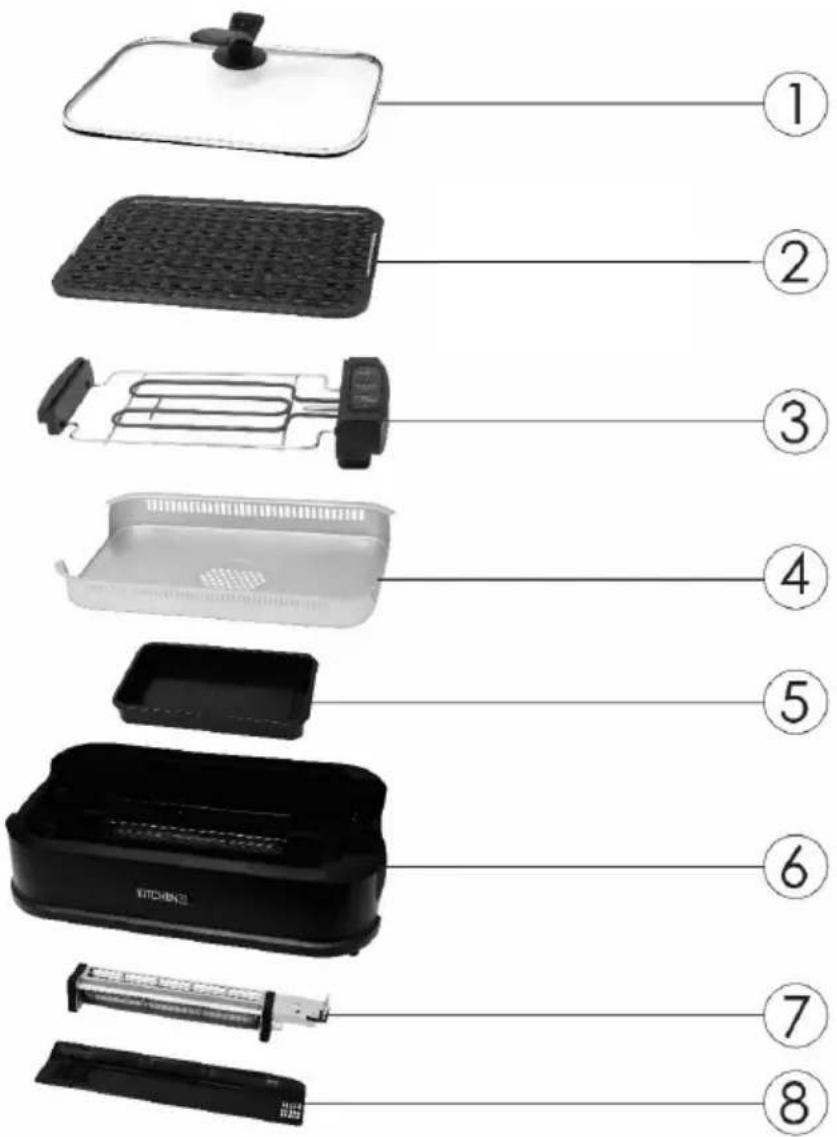
- Glass lid
- Nonstick grill plate
- Heating element with detachable cord
- Drip tray
-
Collection pan / water tray
-
Base unit
- Electric fan (removable)
- Snap-off fan cover
LID HANDLE ASSEMBLY
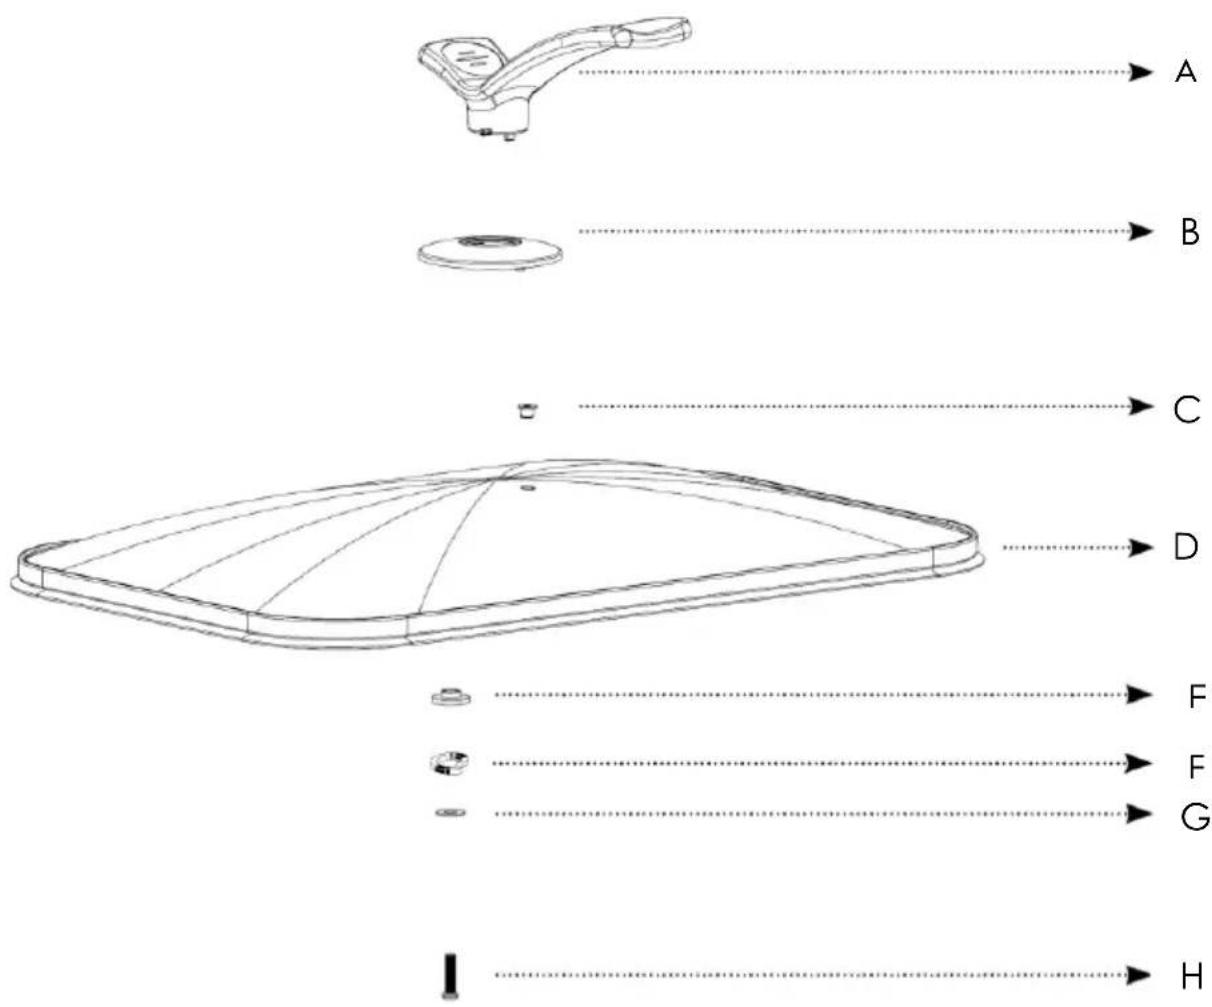
A. Handle
B. Handle base
C. Silicone gasket
D. Glass lid
E. Plastic washer
F. Spring washer
G. Metal washer
H. Screw
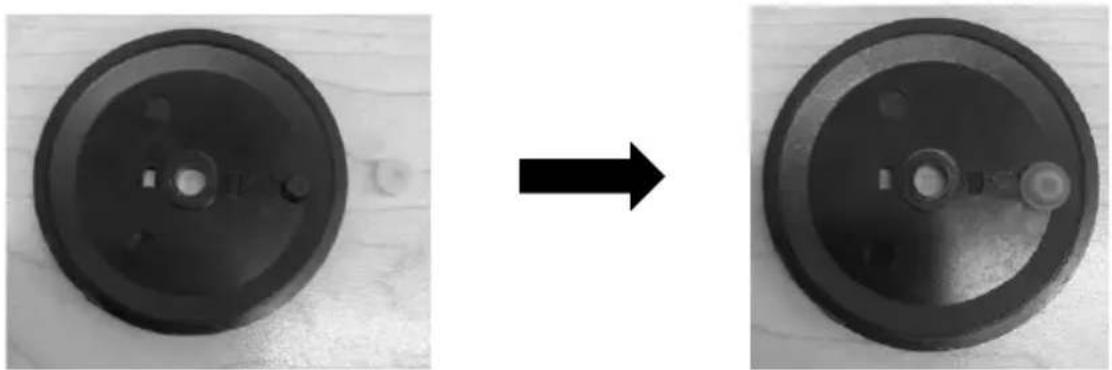
- Attach the Silicone Gasket under the Handle Base, as shown below.
natural_image
Two circular mechanical components with holes, one shown before and after transformation (no text or symbols)- Insert the Screw through the Metal Washer. Place the Spring Washer over the Metal Washer, then place the Plastic Washer over the Spring Washer.
- Insert the Screw and the washers through the bottom of the Glass Lid.
- Place the Handle Base on top of the Glass Lid. The Screw should go through the center of the Handle Base and the Silicon Gasket should be aligned to fit through the other hole on the lid.
- Thread the Handle onto the Screw and tighten using a Phillips-head screwdriver.
IMPORTANT SAFEGUARDS
When using electrical appliances, basic safety precautions should always be followed, including the following:
1. READ ALL INSTRUCTIONS BEFORE USE.
-
Never immerse the main unit housing, which contains electrical components and heating elements, in water. Do not rinse under the tap.
-
To avoid electrical shock, do not put liquid of any kind into the main unit housing containing the electrical components.
-
This appliance has a three-prong plug. This plug is intended to fit into a polarized outlet only one way. Do not attempt to modify the plug in any way.
-
Make sure the appliance is plugged into a wall socket.
-
While cooking, the internal temperature of the appliance reaches several hundred degrees Fahrenheit. To avoid personal injury, never place hands inside the appliance unless it is thoroughly cooled.
-
This appliance is not intended for use by persons with reduced physical, sensory, or mental capabilities or a lack of experience and knowledge unless they are under the supervision of a responsible person or have been given proper instruction in using the appliance. This appliance is not intended for use by children.
-
When cooking, do not place the appliance against a wall or against other appliances. Leave at least 5 inches free space on the back, sides and above the smokeless grill. Do not place anything on top of the appliance.
-
Do not use this appliance if the plug, the power cable, or the appliance itself is damaged in any way.
- If the power cord is damaged, you must have it replaced by the manufacturer, its service agent, or a similarly qualified person in order to avoid hazard.
- Do not place the appliance on stove top surfaces.
- Do not use outdoors.
- Keep the appliance and its power cable out of the reach of children when it is in operation or in the cooling process.
- Keep the power cord away from hot surfaces. Do not plug in the power cable or operate the appliance controls with wet hands.
- Never connect this appliance to an external timer switch or separate remote-control system.
- Do not operate the appliance on or near combustible materials, such as tablecloths and curtains.
- Do not use the smokeless grill for any purpose other than described in this manual.
- Never leave the appliance unattended while operating.
- WEAR OVEN MITTS when handling hot components or touching hot surfaces.
- Should the appliance emit black smoke, UNPLUG IMMEDIATELY and wait for smoking to stop before removing oven contents.
- Always operate the appliance on a horizontal surface that is level, stable, and noncombustible.
- This appliance is intended for normal household use only. It is not intended for use in commercial or retail environments.
- If the Smokeless Grill is used improperly or for professional or semiprofessional purposes or if it is not used according to the instructions in the user manual, the warranty becomes invalid and the manufacturer will not be held liable for damages.
- Always unplug the appliance after use.
- Let the appliance cool for approximately 30 mins. before handling, cleaning, or storing.
- The glass lid and handle get very hot. Always use oven mitts.
NOTE: This unit has been designed and engineered to reduce the smoke and visible vapors usually associated with grilling to a minimum. Delivers outdoor results indoors.
SAVE THESE INSTRUCTIONS
HOUSEHOLD USE ONLY
3-PRONG PLUG INSTRUCTIONS
For your personal safety, this appliance must be grounded. This appliance is equipped with a power supply cord having a 3-prong grounding plug. To minimize possible shock hazard, the cord must be plugged into a mating 3-prong, grounding type wall receptacle, grounded in accordance with the National Electrical Code ANSI/NFPA 70 latest edition and all local codes and ordinances. If a mating wall receptacle is not available, it is the personal responsibility and obligation of the customer to have a properly grounded, 3-prong, wall receptacle installed by a qualified electrician. Do not attempt to modify the plug in any way.
SHORT CORD INSTRUCTIONS
A short power supply cord is provided to reduce the hazards resulting from becoming entangled in or tripping over a longer cord.
KNOW YOUR SMOKELESS GRILL
Grill your favorite foods without any smoke with your new Smokeless Grill. Functioning as a traditional grill but designed with a built-in fan and a silicone-sealed lid, this unit reduces smoke and visible vapors usually associated with grilling to a minimum. The non-stick coated grill quickly heats up to a maximum temperature of 460^ F, while the removable drip tray collects excess grease for healthier grilling. The removable parts allow for easy cleaning: simply place the grill plate, drip tray, collection plate or glass lid in the dishwasher!
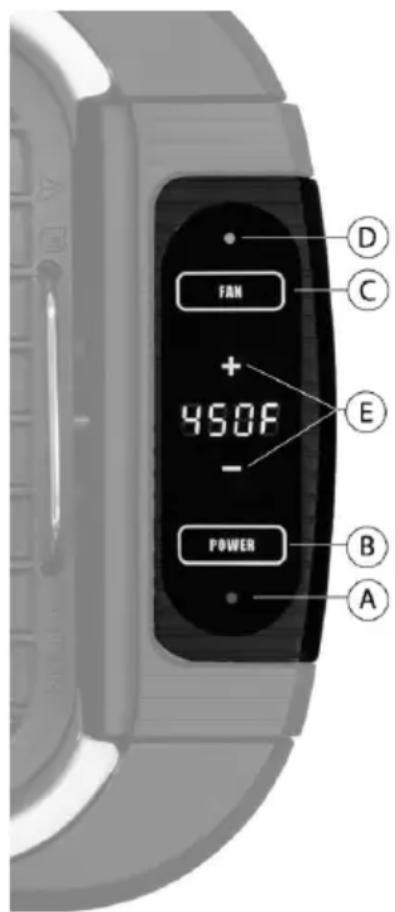
- Plug the power cord into an outlet. Blue LED Light (A) will blink on and off and one audible tone/beep is heard.
- Select Power Button (B), and LED (A) will continue to blink until a temperature selection is made.
- Select Fan Button (C). Fan will run and blue Fan LED (D) will light up and one audible tone/beep is heard.
NOTE: Fan should be kept running throughout the grilling process to prevent smoke.
- Use Temperature buttons + and - (E) to adjust cooking temperature from 180°F to 460°F.
NOTE: You may raise or lower the cooking temperature at any time during the cooking process. To keep food warm, set the temperature between 220^ F and 250^ F.
- Once the temperature is reached, the LED light below the Power button becomes a solid red.
-
When you are finished grilling, press the Power and Fan Buttons to shut down the Unit. Unplug the Power
-
Cord and allow unit to cool fully before disassembling for cleaning.
BEFORE THE FIRST USE
- Remove all packing materials, labels stickers and literature.
- Wipe the appliance with a damp cloth. Make sure to clean the grill plate, drip tray, and the collection pan/water tray before use (see "Cleaning and Maintenance").
- Do not wash or submerge heating element, electric fan, or appliance base in water or any other liquid.
- It is recommended to heat the grill for about 10 minutes without anything on its surfaces. This helps to eliminate any grease that may have adhered during manufacturing and to eliminate the "new" appliance smell.
- Ventilate the room during this period. When your grill is heated for the first time, it may emit slight smoke or odor. This is normal with many heating appliances. This does not affect the safety of your appliance.
OPERATING INSTRUCTIONS
- Place the appliance on a stable, heat-resistant surface. Keep away from flammable objects.
- Assemble the unit. Refer to the Parts & Accessories section to see the order of the items as they are assembled.
- Add about 2 cups water to the collection pan.
- Ensure that the drip tray is slid into the base of the appliance.
- Leave ample air space on all sides of the appliance to facilitate air flow.
- Plug the power cord into a dedicated outlet.
- If you are starting with a cold grill, you may preheat the grill using a medium or high heat setting for 4–6 mins.
- Prepare and season your food according to your favorite recipe. You may spray or wipe the grill plate's cooking surface with cooking oil.
- Select the cooking temperature using the + and - buttons, add the food, put the lid in place, and grill to your personal taste. Turn the food as needed.
Note: Cooking with the lid on the smokeless grill is recommended because it maintains the cooking temperature, seals in flavor, and prevents splatter.
- When done grilling, switch off the appliance and remove the plug from the wall outlet.
Caution! Never immerse or wash heating element, electric fan or base in water or any other liquids.
Caution! The glass lid and handle get very hot. Always handle hot components with oven mitts while cooking.
Caution! Wait for all components to cool thoroughly after use before disassembling.
REMOVING THE ELECTRIC FAN:
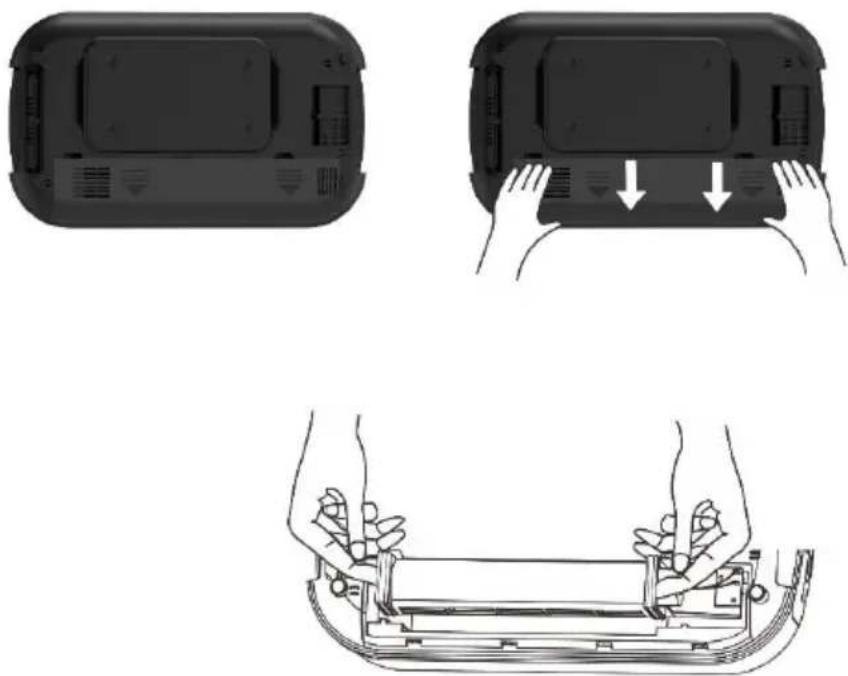
When you are thoroughly cleaning the base unit with water and detergents, always remove the electric fan. Turn over the base unit, slide and remove the fan cover by pulling away from the base. Lift the fan out of the base unit slowly and disconnect the two-prong connection into the base of the smokeless grill. When returning the fan to the base, make sure to insert the two-prong connection into the receptacle.
CAUTION: Unplug appliance before removing fan.
natural_image
Three-step diagram showing a device with labeled ports and hands, plus a close-up of hands installing a component (no text or symbols present)Electric Power
If the electrical circuit is overloaded with other appliances, your new unit may not operate properly. This unit should be operated on a dedicated electrical circuit.
Shut-Off
You can manually shut off the appliance by pressing the Power Button at any time during cooking.
- Be careful not to transfer germs from raw meat to cooked meat. Use separate utensils and platters for raw and cooked meat.
- Always marinade in a tightly covered nonmetal dish and turn the food occasionally. Be sure to refrigerate all meats while marinating.
- If leftover wet marinade is to be used as a sauce with the cooked food, be sure to place it in a small pan and heat to a rolling boil before serving to eliminate bacterial growth.
- Similar to a stove top frying pan, grease from high-fat foods, such as bacon or sausage, may splatter on the countertop. Protect the countertop as necessary.
- To prevent scratching the coating, use only nonmetallic utensils. Do not cut food on the grill plate using sharp utensils, such as forks or knives, that can scratch the cooking surface.
- Do not use steel wool or other metal pads. They could leave coarse scratches. Always rinse thoroughly and dry immediately with a soft towel.
GRILLING SUGGESTIONS
The table below shows some food that can be cooked on the grill along with suggested cooking times for each. Keep in mind that grilling times may vary depending on the type of food used, its size, thickness and current temperature, as well as personal preference.
| Food | Time | Food | Time |
| Vegetables | 8 -15 min | Fish Fillet | 12 -18 min |
| Corn on the Cob | 14 -16 min | Whole Fish | 15 -16 min |
| Vegetable Kebab | 5 -15 min | Chicken | 22 - 26 min |
| Meat Kebab | 16 -18 min | Pork (Bone-in) | 14 -16 min |
| Hot Dogs | 12 -16 min | Pork (Boneless) | 12 -15 min |
| Sausages | 16 -18 min | Beef (Bone-in) | 12 -16 min |
| Shrimp | 12 -14 min | Beef (Boneless) | 8 -15 min |
Caution: Consuming raw or undercooked meats, poultry, seafood, shellfish or eggs may increase your risk of foodborne illness.
TIPS
- Thaw food prior to grilling. For best results, do not attempt to grill frozen food and make sure any meat prepared is not too thick (approx. 0.5 in. / 1.5cm). This helps to keep the meat juicy.
- Tender meat is best suited for grilling. Meat will be more tender if marinated overnight.
- When basting food with marinade, use only a little oil and brush the marinade lightly onto the food to avoid excess smoke.
- Sausages tend to burst when grilled. To prevent this, cut the skin a few times lengthwise.
- When preparing kebabs, soak bamboo or wooden skewers in water to prevent them from getting scorched during grilling. Do not use metal skewers.
GET MORE OUT OF YOUR PRODUCT
Browse Chef-created recipes specifically made for your Kalorik product. Visit our website www.kalorik.com to see our extensive recipe library and start cooking. Sign up for the Kalorik email mailing list to receive special offers and recipes, and connect with us on social media for daily inspiration.
CAUTION! Wait for all components to cool thoroughly after use before disassembling. Always handle hot components with oven mitts while cooking or hot.
- Before cleaning, be sure to unplug the cord from the outlet. If necessary, wipe the cord with a damp cloth.
- Allow the appliance to cool completely before cleaning. The grill plate, drip tray, collection pan, and glass lid can be placed in the bottom rack of the dishwasher or washed by hand. The base unit can be cleaned by hand with a warm, damp cloth and mild liquid soap. For more thorough cleaning of the base unit, remove the electric fan.
- Always be sure to wash the smokeless grill surface after each use to remove any grease that may have accumulated. To keep grease from dripping outside of the base, always ensure that you are using your smokeless grill on a level surface and that the drip tray is completely clear of food particles.
- Use a damp cloth to clean the base. Do not use scouring pads or harsh cleaners on this unit. If necessary, use a nylon bristle brush or plastic scrubbing pad.
- If necessary, clean the glass sides with a cloth or paper towel using a vinegar solution (4-parts water, 1-part vinegar). Stubborn, caked-on food residue can be removed using a ceramic scraper on the glass surface.
- Reassemble the appliance.
NOTE: Any other servicing should be performed by an authorized service representative.
If your appliance is not working properly:
| Problem | Possible cause | Solution |
| Appliance is not turning on. | There is no power going into the appliance | Make sure the power cord is properly connected to the heating element.Make sure the power cord is plugged into an electrical socket. |
| Appliance is taking too long to heat or not heating enough. | The appliance may not be able to draw enough operating power from the outlet. | Switch the power cord to an outlet that has no other appliances attached to it. |
| Food is undercooked or overcooked | Temperature and time setting may need to be adjusted | Change the cooking time and temperature accordingly. |
| Electric fan is not working | Assembly may not be fully connected | Disassemble the appliance and reattach the fan component.Follow instructions in the removing the electric fan section. |
We suggest that you complete and return the enclosed Product Registration Card promptly to facilitate verification of the date of original purchase. However, return of the Product Registration Card is not a condition of these warranties. You can also fill out this warranty card online, at the following address: www.KALORIK.com
This KALORIK product is warranted in the U.S.A. and in Canada for 1 year from the date of purchase against defects in material and workmanship. This warranty is not transferable. Keep the original sales receipt. Proof of purchase is required to obtain warranty performance.
During this period, if the KALORIK product, upon inspection by KALORIK, is proven defective, it will be repaired or replaced, at Kalorik's option, without charge to the customer. If a replacement product is sent, it will carry the remaining warranty of the original product.
This warranty does not apply to any defect arising from a buyer's or user's misuse of the product, negligence, failure to follow KALORIK instructions noted in the user's manual, use on current or voltage other than that stamped on the product, wear and tear, alteration or repair not authorized by KALORIK, or use for commercial purposes. There is no warranty for glass parts, glass containers, filter basket, blades and agitators. There is also no warranty for parts lost by the user.
ANY WARRANTY OF MERCHANTABILITY OR FITNESS WITH RESPECT TO THIS PRODUCT IS ALSO LIMITED TO THE ONE YEAR LIMITED WARRANTY PERIOD.
Some states do not allow limitation on how long an implied warranty lasts or do not allow the exclusion of incidental or consequential damages, so the above limitations may not apply to you. This warranty gives you specific legal rights, and you may also have other rights which vary from state to state.
If the appliance should become defective within the warranty period and more than 30 days after date of purchase, do not return the appliance to the store: often, our Customer Service Representatives can help solve the problem without having the product serviced. If servicing is needed, a Representative can confirm whether the product is under warranty and direct you to the nearest service location.
If this is the case, send the product via your pre-paid postage back to Kalorik, along with proof of purchase and a return authorization number indicated on the outer package, given by our Customer Service Representatives. Send to the authorized KALORIK Service Center (please visit our website at www.KALORIK.com or call our Customer Service Department for the address of our authorized KALORIK Service Center).
When sending the product, please include a letter explaining the nature of the claimed defect.
If you have additional questions, please call our Customer Service Department (please see below for complete contact information), Monday through Thursday from 9:00am - 5:00pm (EST) and Friday from 9:00am - 4:00pm (EST). Please note hours are subject to change.
If you would like to write, please send your letter to:
KALORIK Customer Service Department
Team International Group of America Inc.
16175 NW 49th Avenue
Miami Gardens, FL 33014 USA
Or call:
Toll Free: +1 888-521-TEAM / +1 888-KALORIK
Only letters can be accepted at this address above. Shipments and packages that do not have a return authorization number will be refused.
A.
B. Base de la manija
C. Junta de silicona
D. Tapa de vidrio
natural_image
Two black circular mechanical components on a wooden surface, one being rotated and the other showing a change (no text or symbols)natural_image
Two views of a black electronic device showing front and side views with hand gestures (no text or symbols visible)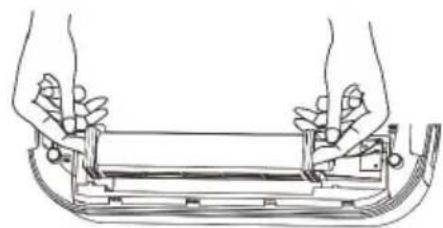
natural_image
Line drawing of hands holding a mechanical component (no text or symbols)CONSEJOS DE USO
Energía eléctrica
OBTENGA MÁS DE SU PRODUCTO
Team International Group of America Inc.
16175 NW 49 ^th Avenue
Miami Gardens, FL 33014 USA
O llame gratuitamente (U.S.A.) al +1 888-521-TEAM / +1 888-KALORIK
natural_image
Two black circular mechanical components on a wooden surface, one showing a hole and the other with a pin (no text or symbols visible)natural_image
Three-step diagram showing a device being handled, with hand positions and control buttons (no text or symbols)SUGGESTIONS DE CUISSON AU GRIL
Team International Group of America Inc.
16175 NW 49 ^th Ave.
Miami Gardens, FL 33014 USA
For questions please contact:
Team International Group of America Inc.
16175 NW 49th Avenue
Miami Gardens, FL 33014 USA
User manual content and recipes courtesy of Team International Group – Do not reproduce without consent of the authors - All rights reserved.

- LID HANDLE ASSEMBLY
- IMPORTANT SAFEGUARDS
- When using electrical appliances, basic safety precautions should always be followed, including the following:
- READ ALL INSTRUCTIONS BEFORE USE.
- SAVE THESE INSTRUCTIONS
- HOUSEHOLD USE ONLY
- 3-PRONG PLUG INSTRUCTIONS
- SHORT CORD INSTRUCTIONS
- KNOW YOUR SMOKELESS GRILL
- BEFORE THE FIRST USE
- OPERATING INSTRUCTIONS
- REMOVING THE ELECTRIC FAN:
- Electric Power
- Shut-Off
- GRILLING SUGGESTIONS
- TIPS
- GET MORE OUT OF YOUR PRODUCT
- CAUTION! Wait for all components to cool thoroughly after use before disassembling. Always handle hot components with oven mitts while cooking or hot.
- KALORIK Customer Service Department
- CONSEJOS DE USO
- Energía eléctrica
- OBTENGA MÁS DE SU PRODUCTO
- SUGGESTIONS DE CUISSON AU GRIL
Brand : KALORIK
Model : GR 45386 BK
Category : Grill plate