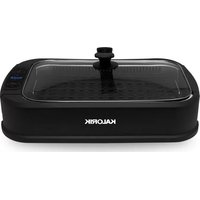
SM 47451 SS - Grill plate KALORIK - Free user manual and instructions
Find the device manual for free SM 47451 SS KALORIK in PDF.
User questions about SM 47451 SS KALORIK
0 question about this device. Answer the ones you know or ask your own.
Ask a new question about this device
Download the instructions for your Grill plate in PDF format for free! Find your manual SM 47451 SS - KALORIK and take your electronic device back in hand. On this page are published all the documents necessary for the use of your device. SM 47451 SS by KALORIK.
USER MANUAL SM 47451 SS KALORIK
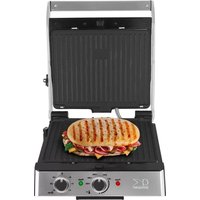
MULTI-PURPOSE WAFFLE, GRILL
AND SANDWICH MAKER
- Power indicator lights
- Cool touch handle
- Locking latch
-
Non-stick sandwich plate
-
Non-stick grill plate
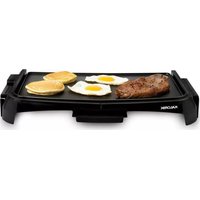
- Non-stick griddle plate
- Non-stick waffle maker plate
PRODUCT SPECIFICATIONS
| Model | Voltage | Wattage |
| SM 47451 SS | 120V, 60Hz | 800W |
When using electrical appliances, basic safety precautions should always be followed, including the following:
1. READ ALL INSTRUCTIONS BEFORE USE
- Check that the voltage in your home corresponds to that stated on the on the appliance before use.
- Do not touch hot surfaces. Use the handles and heat-proof gloves.
- To protect against electrical shock, do not immerse cord, plug, or the appliance in water or other liquid.
- Close supervision is necessary when the appliance is used by or near children. This appliance shall not be used by children.
- Keep appliance and its cord out of reach of children and pets. This product is not intended for use by children under 8 years of age, by persons with reduced physical, sensory or mental capabilities, or lacking experience or knowledge, unless they have been given supervision or instruction concerning the use of the product, by a person responsible for their safety. Extra caution is always necessary when using this product.
- Cleaning and maintenance are not to be performed by children without supervision.
- Connect appliance to a grounded socket.
- Unplug from outlet when not in use and before cleaning. To turn off the appliance, remove the plug from the wall outlet. Allow to cool before cleaning the appliance.
- Do not operate any appliance with a damaged cord or plug or after the appliance malfunctions or has been damaged in any manner. Return appliance to the nearest authorized service facility for examination, repair, or adjustment.
- The use of accessory attachments not recommended by the appliance manufacturer may cause fire, electric shock or serious personal injuries.
- Warning: surfaces get HOT during use. The temperature of plates and outside surfaces get very high during operation.
- Do not use outdoors.
- Do not let cord hang over edge of table or counter or touch hot surfaces. Do not place cord near or in a sink. Do not let cord come into contact with the hot surfaces of the appliance.
-
Do not place on or near a hot gas or electric burner, or in a heated oven.
-
Do not use the appliance for other than intended use.
- When using this appliance, provide adequate airspace above and on all sides for air circulation. On surfaces where heat may cause a problem, an insulated hot pad is recommended.
- Do not leave unit unattended during use.
- Always use the product on a clean, flat, hard, dry and heat resistant surface. There should be no material such as a tablecloth or plastic between the unit and surface. A fire may occur if the sandwich maker is covered or touching flammable material, including curtains, draperies, walls, and the like, when in operation.
- It is always necessary to keep this appliance clean as it comes in direct contact with food.
- Always preheat appliance before cooking with it.
- Be careful not to scratch the non-stick coating of the cooking plate, as you might get little pieces of this coating into the food. If scraping is necessary, unplug the appliance and use a wooden spatula or a heat resistant plastic one. Do not use sharp or abrasive utensils.
- Do not attempt to remove or exchange the cooking plates while the unit is plugged in or hot. Always use extreme caution when moving an appliance containing hot liquids or oil.
- This appliance should not be operated by means of an external timer or separate remote control system.
- DO NOT touch the cover during use. HOT SURFACE!
- Never impact this unit or drop from a high place.
SAVE THESE INSTRUCTIONS HOUSEHOLD USE ONLY
POLARIZED PLUG INSTRUCTIONS
This appliance is equipped with a polarized plug (one blade is wider than the other). To reduce the risk of electric shock, this plug will fit into the polarized outlet only one way. If the plug does not properly fit into the outlet at first, reverse it. If it still does not fit, contact a competent qualified electrician. Do not attempt to modify the plug in any way.
A short power supply cord is provided to reduce the hazards resulting from becoming entangled in, or tripping over a longer cord. Extension cords may be used if care is exercised in their use.
- The electrical rating of the extension cord should be at least that of the appliance. If the electrical rating of the extension cord is too low, it could overheat and burn.
- The resulting extended cord should be arranged so that it will not drape over the countertop or tabletop where it can be pulled on by children or tripped over.
BEFORE THE FIRST USE
- Before using the appliance for the first time, remove and peel off all promotional and packaging materials.
- Check that the cooking plates are clean and dust-free. Clean all cooking plates with a damp cloth or sponge and dry thoroughly.
- It is recommended to heat the sandwich maker for about 10 minutes without any foodstuff on its surfaces. This helps to eliminate any grease that may have adhered during manufacturing and to eliminate the "new" appliance smell.
- Ventilate the room during this period. When your grill is heated for the first time, it may emit slight smoke or odor due to residue of the protective coating. This is normal with many heating appliances and does not affect the safety of your appliance.
OPERATION
Your Kalorik 4-in-1 sandwich maker comes with 4 versatile removable cooking plates for various needs and uses. The product comes with a grilled cooking plate, a flat searing plate, a diagonal sandwich plate, and a waffle plate. Easily switch between one or the other by clicking on the small latch and exchanging the plates as needed. Make sure the unit is always turned off and cooled when removing the cooking plates.
- Place the unit on a flat, dry, and heat-resistant surface.
- Click in the cooking plates you want to use.
- Close the appliance and plug into the electrical outlet. The red power light will come on to indicate that the appliance is on.
- Lightly grease the plates with butter or oil.
- The green pilot light will turn on once the appliance is hot to indicate that the sandwich maker is ready for use.
- Place food on the heated plates and close the appliance, using the clamp in the front to tightly seal the sandwich maker, if desired.
- Note: You can use this sandwich maker open or closed, but firmly closing the sandwich maker will help provide more consistent and even grilling.
- When using the sandwich maker as a waffle maker, we suggest closing the lid and waiting until no more steam emanates from the waffle maker as an indication for doneness. This should take about 5-7 minutes. Add more time as necessary according to preparation and taste.
- For grilling meats and vegetables, we recommend slicing the meats to a 1"-1 ½" thickness, especially if clamping the sandwich maker.
- When using as a contact grill, make sure you have an even thickness across your food to have even results.
- Always drain excess marinade or liquids from foods before placing them on your plates—this will make cleanup a lot easier.
- For marinated foods, opt for marinates with a lower sugar content as they may otherwise burn faster than the food cooks.
Caution: during operation, the baking plates heat up. Use caution to avoid burns. Use oven mitts and heat-resistant wooden or plastic utensils!
Grilling a sandwich
-
Click the desired plates in place.
-
Plug in the unit to a grounded wall socket. The unit's red light will turn on to indicate the sandwich maker is heating.
-
Prepare your sandwich (you can also do this ahead of time) and wait for the sandwich maker to preheat. Try not to overload your sandwiches, as it will make it easier to close and more evenly cook the sandwich without losing any of that delicious filling!
-
Once the green pilot light turns on, you're ready to go! The sandwich maker has reached the optimal sandwich-grilling temperature.
-
For the best, toastiest results, lightly butter the outside of your bread before placing in the sandwich maker. Make sure your sandwich fillings don't spill out for best results (and easier cleanup).
-
With your sandwich on the bottom cooking plate, lower the top cooking plate and close the sandwich maker, using the clip to clamp it down tightly shut.
-
Cook for 3-5 minutes and check your sandwich for doneness. The cooking time will depend on the ingredients you use (type of bread, fillings) and personal preference. If you're unsure, its best to check and let cook more if necessary.
-
Use a non-metallic utensil to retrieve the sandwich (e.g. a wooden or silicone spatula). Do not use sharp utensils such as knives or forks to grab your toasted sandwich.
-
Once you're done toasting up your sandwiches, be sure to unplug the unit and let it cool completely before cleaning.
Making your sandwich exceptional:
- Bread matters. Using sandwich or artisanal bread will work best in this sandwich maker. Feel free to mix it up with focaccia, sourdough, or whole-wheat when making grilled sandwiches, just remember that the higher the sugar content (i.e. raisin breads, sweet breads, etc.), the faster the browning.
- Not all cheeses are equal. First, think of optimizing meltiness for the most satisfying stretch factor—cheeses like cheddar, American, provolone, mozzarella are all examples of what will help your grilled sandwich shine.
- Don't be afraid to experiment with different fillings or methods when making sandwiches. A grilled PB&J may be just what satisfies your craving, but you can switch it up with different nut butters and different jelly flavors.
- Spread all the way. Whether its mayo, jelly, or an interesting combination of the two, its best to create a light, even spread to the edges of the bread for the best results.
- Consider the balance, regarding both the bread you're using and how the cheese and other fillings will counterbalance in flavor. You can opt for a sharper cheddar and a milder bread or use a milder cheese for more flavorful breads like sourdough.
- Try to not add too many wet ingredients like tomato or fresh fruit as they may produce a soggy sandwich.
If you want to use moist fillings, try opting for a denser bread that won't absorb as much liquid.
- When grilling sandwiches with jelly and/or cheeses, be careful as you bite down as the fillings may remain hot longer than the bread.
- Since the plates are nonstick, you do not need to use butter or oil on the outside of the plates. A light spread of mayo, oil, or butter will help produce a golden-brown grilled sandwich.
Note: While the appliance is in use, the green pilot light will turn on and off as it maintains its temperature.
RECIPES
GRILLED CHEESE
- 4 slices bread
• 1 tablespoon butter, at room temperature
• 3 ounces of cheddar cheese, coarsely grated
- Preheat with the sandwich plates installed.
- Butter one side of each slice of bread. Place 4 slices on your work surface, buttered side down.
- Distribute the cheese evenly over the 2 of the slices.
- Place the remaining 2 bread slices on top, buttered side up.
- Place the assembled sandwiches on the lower sandwich plates. Close and cook to desired doneness.
CRISPY WAFFLE
• 1 3/4 cups all-purpose flour
• 2 teaspoons baking powder
• 1 teaspoon baking soda
• 1/2 teaspoon salt
• 1/3 cup baker's sugar
- 1 cup milk
- 1 cup water
-
3 eggs
• 1 tablespoon vanilla extract
• 1/2 teaspoon almond extract
• 1/2 cup vegetable oil -
Preheat with the waffle plates installed.
- Start with all ingredients at room temperature. Sift together flour, baking powder, baking soda, salt and sugar.
-
In separate bowl whisk together milk, water, eggs, vanilla extract, almond extract and oil.
-
Add wet ingredients to dry and whisk until batter is smooth. Allow batter to rest for 5 minutes, stir again.
-
Pour the batter on the lower waffle plates. Close and cook to desired doneness.
GARLIC-BUTTER STEAK
- 2 tablespoons butter, softened, divided
• 1 teaspoon minced fresh parsley
• 1/2 teaspoon minced garlic
-
Mix 1 tablespoon butter with parsley, garlic and soy sauce.
-
Sprinkle steak with salt and pepper.
-
Install the grill plates and preheat the appliance. Use the
• 1/4 teaspoon reduced-sodium soy sauce
- 1"-1 ½" thick steak
• 1/8 teaspoon salt
- 1/8 teaspoon pepper remaining butter to lightly coat the plates.
- Add steak to the lower grill plate and close. Cook until meat reaches desired doneness. Serve with garlic butter.
GET MORE OUT OF YOUR PRODUCT
Sign up for the Kalorik email mailing list on www.kalorik.com to receive special offers and recipes and connect with us on social media for daily inspiration.
CLEANING AND MAINTENANCE
- Before cleaning, unplug the appliance and wait for it to cool down completely in an open position.
- Wipe the outside with only a slightly moistened cloth or paper towel to remove any excess oil or grease.
- Remove the cooking plates from the unit by unlatching them.
- Use a wooden or plastic spatula to remove stuck-on food residue (like hardened cheese) from the cooking plates. Do not use a knife or sharp utensils to attempt to remove food residue.
- Clean the cooking plates with a moist, soft cloth or sponge.
- Do not clean the inside or outside of the unit with any abrasive scouring pads or steel wool as this will damage the finish.
- If there is any hard-to-remove batter residue baked onto the cooking plates, we would advise using vegetable oil to soften it, waiting 5 minutes before removing with a paper towel.
• DO NOT place in the dishwasher. - NEVER clean or rinse the appliance under running water.
- DO NOT IMMERSE THE SANDWICH MAKER IN WATER OR ANY OTHER LIQUID.
• Appliance can be stored vertically to save space.
Any other servicing should be performed by an authorized service representative.
We suggest that you complete and return the enclosed Product Registration Card promptly to facilitate verification of the date of original purchase. However, return of the Product Registration Card is not a condition of these warranties. You can also fill out this warranty card online, at the following address: www.KALORIK.com
This KALORIK product is warranted in the U.S.A. and in Canada for 1 year from the date of purchase against defects in material and workmanship. This warranty is not transferable. Keep the original sales receipt. Proof of purchase is required to obtain warranty performance.
During this period, if the KALORIK product, upon inspection by KALORIK, is proven defective, it will be repaired or replaced, at Kalorik's option, without charge to the customer. If a replacement product is sent, it will carry the remaining warranty of the original product.
This warranty does not apply to any defect arising from a buyer's or user's misuse of the product, negligence, failure to follow KALORIK instructions noted in the user's manual, use on current or voltage other than that stamped on the product, wear and tear, alteration or repair not authorized by KALORIK, or use for commercial purposes. There is no warranty for glass parts, glass containers, filter basket, blades and agitators, and accessories in general. There is also no warranty for parts lost by the user.
ANY WARRANTY OF MERCHANTABILITY OR FITNESS WITH RESPECT TO THIS PRODUCT IS ALSO LIMITED TO THE ONE YEAR LIMITED WARRANTY PERIOD.
Some states do not allow limitation on how long an implied warranty lasts or do not allow the exclusion of incidental or consequential damages, so the above limitations may not apply to you. This warranty gives you specific legal rights, and you may also have other rights which vary from state to state.
If the appliance should become defective within the warranty period and more than 30 days after date of purchase, do not return the
appliance to the store: often, our Customer Service Representatives can help solve the problem without having the product serviced. If servicing is needed, a Representative can confirm whether the product is under warranty and direct you to the nearest service location.
If this is the case, bring the product, or send it, postage prepaid by the user (all Kalorik customers are responsible for the initial shipment back to the warranty center), along with proof of purchase and a return authorization number indicated on the outer package, given by our Customer Service Representatives. Send to the authorized KALORIK Service Center (please visit our website at www.KALORIK.com or call our Customer Service Department for the address of our authorized KALORIK Service Center).
When sending the product, please include a letter explaining the nature of the claimed defect.
If you have additional questions, please call our Customer Service Department (please see below for complete contact information), Monday through Thursday from 9:00am - 5:00pm (EST) and Friday from 9:00am - 4:00pm (EST). Please note hours are subject to change.
If you would like to write, please send your letter to:
KALORIK Customer Service Department
Team International Group of America Inc.
16175 NW 49 ^th Avenue
Miami Gardens, FL 33014 USA
Or call:
Toll Free: +1 888-521-TEAM / +1 888-KALORIK
Only letters can be accepted at this address above. Shipments and packages that do not have a return authorization number will be refused.
OBTENGA MÁS DE SU PRODUCTO
Team International Group of America Inc.
16175 NW 49 ^th Avenue
Miami Gardens, FL 33014 USA
O llame gratuitamente (U.S.A.) al +1 888-521-TEAM / +1 888-KALORIK
text_image
KONORAY 1 2 3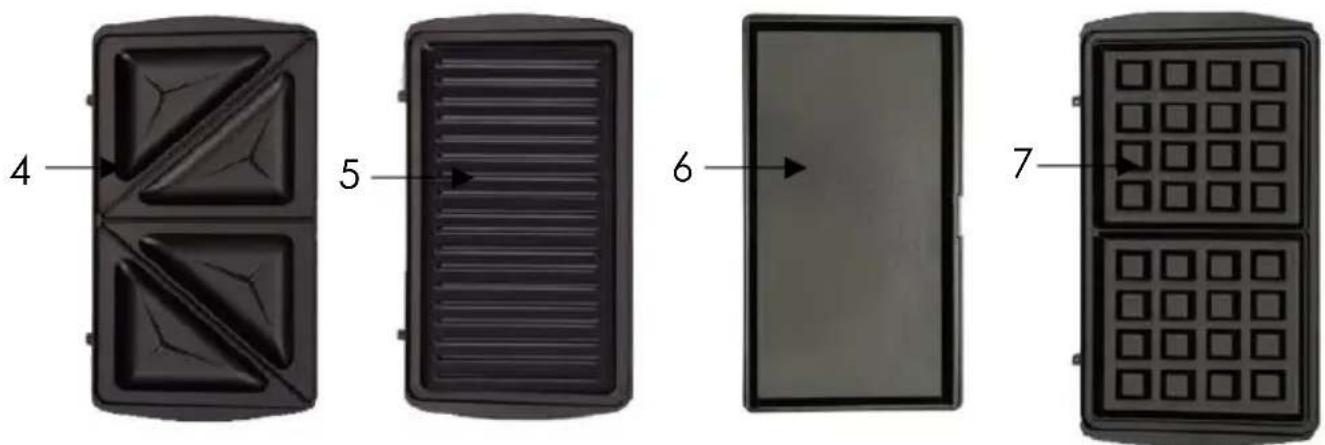
text_image
4 5 6 7Team International Group of America Inc.
16175 NW 49th Avenue
Miami Gardens, FL 33014 USA
For questions please contact:
Para preguntas contacte a:
Team International Group of America Inc.
16175 NW 49th Avenue
Miami Gardens, FL 33014 USA

text_image
1 AÑO GARANTIA GARANTIE 1 AÑ · 1 YEAR WARRANTYSM 47451
User manual content and recipes courtesy of Team International Group – Do not reproduce without consent of the authors - All rights reserved.
Where innovation finds a home™