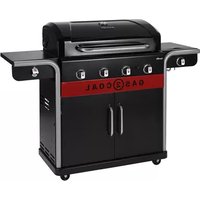
Gas2Coal 2.0 Line - Grill plate Char-Broil - Free user manual and instructions
Find the device manual for free Gas2Coal 2.0 Line Char-Broil in PDF.


| Brand | Char-Broil |
| Model | Gas2Coal 2.0 Line |
| Product type | Hybrid gas/charcoal grill plate |
| Category | Gas and charcoal barbecue |
| Power source | Gas (butane/propane) or charcoal |
| Gas type | Butane, Propane or their mixtures (I3+, I3B/P) |
| Gas pressure | 28-30 mbar (I3+), 37 mbar (I3B/P(30)), 50 mbar (I3B/P(50)) |
| Total heat output | 18.74 kW |
| Number of main burners | 4 |
| Side heating plate | 1 burner |
| Ignition | Electronic (1.5 V battery) or match |
| Cooking surface | Steel grates (not specified) |
| Charcoal tray included | Yes |
| Usage | Outdoor only |
| Storage | Dry place, sheltered from weather |
| Cleaning | After each use, avoid abrasive products on painted surfaces |
| Safety instructions | Leak test before first use, do not use indoors |
| Burner warranty | 5 years |
| Other parts warranty | 2 years |
| Spare parts available | Burners, grates, charcoal tray, heat tents |
| Cylinder type | LPG, max diameter 345 mm, max height 430 mm |
| Power supply | 1.5 V DC battery |
| Destination countries | European Union, Switzerland, Norway, etc. |
| Standards | EN16129 (regulator), EN1860-3 (firelighter) |
Frequently Asked Questions - Gas2Coal 2.0 Line Char-Broil
User questions about Gas2Coal 2.0 Line Char-Broil
0 question about this device. Answer the ones you know or ask your own.
Ask a new question about this device
Download the instructions for your Grill plate in PDF format for free! Find your manual Gas2Coal 2.0 Line - Char-Broil and take your electronic device back in hand. On this page are published all the documents necessary for the use of your device. Gas2Coal 2.0 Line by Char-Broil.
USER MANUAL Gas2Coal 2.0 Line Char-Broil
natural_image
Line drawing of a standard 3D model of a mounted electric grill with control knobs and doors (no text or symbols)GB Operating Instructions 3
Assembly Instructions 127

natural_image
Icon of a person reading a book inside a circle (no text or symbols)| GBDo not use the barbecue in a confined space and/or habitable space e.g. houses, tent, caravans, motor homes, boats. Danger of carbon monoxide poisoning fatality. | |
| FRN'utilisez pas le grill dans un espace confiné ou habitable, p. ex., dans une maison, une tente, une caravane, une caravane motorisée ou un bateau. Danger de mort par empoisonnement au monoxyde de carbone. | |
| DEDen Grill nicht in geschlossenen Räumen und/oder bewohnbaren Räumlichkeiten wiez. B. Häusern, Zelten, Wohnwagen, Wohnmobilen, Booten benutzen. Es besteht Todesgefahr durch Kohlenmonoxidvergiftung. | |
| ITNon utilizzare il barbecue in ambienti chiusi e/o locali abitabili, come abitazioni, tende, roulotte, case mobili, barche. Pericolo di avvelenamento da monossido di carbonio. | |
| NLGebruik de barecue niet in afgesloten en/of bewoonbare ruimtes, zoals bijvoorbeeld huizen, tenten, motorcaravans, campers en boten. Dodelijk gevaar voor koolmonoxidevergiftiging. | |
| SEAnvänd inte grillen i trånga utrymmen eller i boendeutrymmen, som till exempel hus, tält, husvagnar, husbilar, båtar. Risk för kolmonoxidförgiftning. | |
| FIAlå käytä grilliä suljetussa tilassa ja / tai asuttavassa tilassa, esim. taloissa, teltoissa, asuntovaunuissa, matkailuautoissa, veneissä. Vaarana hiilimonoksidista johtuva myrkytyskuolema. | |
| ESNo use la parrilla en un espacio confinado y/o espacio habitable, como p. ej. en casas, tiendas de camping, remolques, casas rodantes, botes, etc. Existe el peligro de muerte por envenenamiento con monóxido de carbono | |
| PTNão utilize o churrasco num espaço confinado e/ou habitado, por exemplo, casas, tendas, caravanas, autocaravanas, barcos. Perigo de morte por envenenamento com monóxido de carbono. | |
| DKBrug ikke grillen i et begrænset rum og/eller beboeligt rum f.eks. huse, telte, campingvogne, mobile huse, både. Fare for kulilteforgiftning. | |
| NOIkke bruk grillen i lukkede områder eller innendørs, som for eksempel i hus, telt, campingvogn, bobil eller båt. Fare for dødelig karbonmonoksidforgiftning. | |
| SKGril nikdy nepoužívajte v uzavretých priestoroch a/alebo obytných priestoroch ako dom, stan, karavan, obytný prives, lod'a pod. Möže dôjst'k ohrozeniu života v dôsledku otravy kysličníkom uhličitým. | |
| ISKkki nota grillið i lokuðu rými og/eða ibúðarhæfu rými t.d. húsi, tjaldi, hjólhýsi, bifreiðum eða bátum. Hætta á kolmónoxiðseitrun. | |
| CZNepoužívejte grill v uzavřených prostorech nebo obydlich, například v domě, ve stanu, karavanu, v obytných vozech, na lodích. Hrozí nebezpečí smrtelné otravy oxidem uhelnatým. | |
| ILاللهلا تالهلا تاللهلا تاللهلا تاللهلا تاللهلا تاللهلا تاللهلا تاللهلا تاللهلا تاللهلا تاللهلا تاللهلا تاللهلا تاللهلا تاللهلا تاللهلا تاللهلا تاللهلا تاللهلا تاللهلا تاللهلا تاللهلا تاللهلا تاللهلا تاللهلا تاللهلا تال�لا تال�لا تال�لا تال�لا تال�لا تال�لا تال�لا تال�لا تال�لا تال�لا تال�لا تال�لا تال�لا تال�لا تال�لا تال�لا تال�لا تال�لا تال�لا تال�لا تال�لا تال�لا تال�لا تال�لا تال�لا تال�لا تال�لا تال�لا تال�لا تال�لا تال�لا تال�لا تال�لا تال�لا تال�لا تال�لا تال�لا تال�لا تال�لا تال�لا تال�لا تال�لا تال�لا تال�لا تال�لا تال�لا تال�لا تال�لا تال�لا تال�لا تالуلا تال�لا تال�لا تال�لا تال�لا تال�لا تال�لا تال�لا تال�لا تال�لا تال�لا تال�لا تال�لا تال�لا تال�لا تال�لا تال�لا تال�لا تال�لا تال�لا تال�لا تال�لا تال�لا تال�لا تال�لا تال |
INSTALLER/ASSEMBLER:
Leave this manual with consumer.
CONSUMER:
Keep this manual for future reference.
Questions:
If you have questions during assembly or use of this appliance contact your local dealer.

DANGER

If you smell gas:
- Shut off gas to the appliance.
- Extinguish any open flames.
- Open lid.
- If odor continues, keep away from the appliance and immediately call your gas supplier or your fire department.

WARNING

- Do not store or use petrol or other flammable liquids in the vicinity of this or any other appliance.
- A gas cylinder not connected for use shall not be stored in the vicinity of this or any other appliance.

CAUTION

- Read and follow all safety statements, assembly instructions and use and care directions before attempting to assemble and cook.
- Some parts may contain sharp edges. Wearing protective gloves is recommended.
Grease Fires
- Putting out grease fires by closing the lid is not possible. Barbecues are well ventilated for safety reasons.
- Do not use water on a grease fire, Personal injury may result. If a persistent grease fire develops, turn knobs and gas cylinder off.
- If appliance has not been regularly cleaned, a grease fire can occur that may damage the product. Pay close attention while preheating or burning off food residue to insure that a grease fire does not develop. Follow instructions on general appliance cleaning and cleaning the burner assembly to prevent grease fires. The best way to prevent grease fires is regular cleaning of the appliance.
- Do not leave barbecue unattended while preheating or burning off food residue on HI. If barbecue has not been regularly cleaned, a grease fire can occur that may damage the product.

WARNING

For Safe Use of Your Appliance and to Avoid Serious Injury:
- USE OUTDOORS ONLY. NEVER USE INDOORS. Read the instructions before using the appliance.
Always follow these instructions.
- Do not move the appliance during use.
- Accessible parts may be very hot. Keep young children away. Do not let children operate or play near appliance.
• Turn off the gas supply at the cylinder after use. - This appliance must be kept away from flammable materials during use.
- Do not block holes in sides or back of appliance.
- Check burner flames regularly.
- Do not block venturi openings on burner.
- Use appliance only in well-ventilated space. NEVER use in enclosed space such as carport, garage, porch, covered patio, or under an overhead structure of any kind.
- DO NOT cover grates with aluminum foil or any other material. This will block burner ventilation and create a potentially dangerous condition resulting in property damage and/or personal injury.
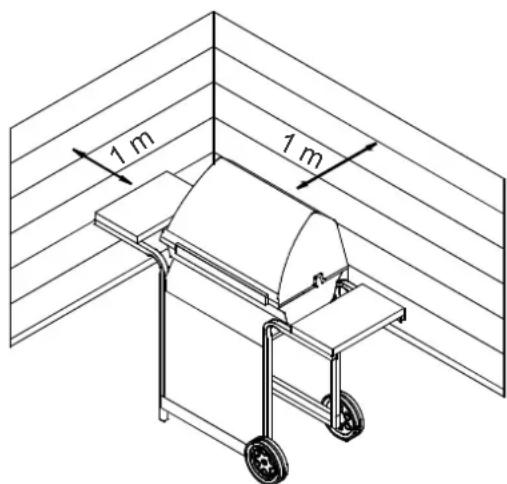
- Use appliance at least 1m from any wall or surface.
- Maintain 3m clearance to objects that can catch fire or sources of ignition such as pilot lights on water heaters, live electrical appliances, etc.
- NEVER attempt to light burner with lid closed. A buildup of non-ignited gas inside a closed appliance is hazardous.
- Always turn off gas at cylinder and disconnect regulator before moving gas cylinder from specified operating position.
- Never operate appliance with gas cylinder out of correct position specified.
- Do not modify the appliance. Any modifications is strictly prohibited. Sealed parts are not to be manipulated by the user. Do not disassemble injectors.
Safety Tips
- Before opening gas cylinder valve, check the regulator for tightness.
- When appliance is not in use, turn off all control knobs and gas.
- Use long-handled barbecue utensils and oven mitts to avoid burns and splatters. Use protective gloves when handling hot components.
- Maximum load for hot plate and side shelf is 4.5 Kg. Cooking vessel minimum dia 200mm and maximum dia. 260 mm.
- The grease cup (if equipped) must be inserted into appliance and emptied after each use. Do not remove grease cup until appliance has completely cooled.
- Be very careful when you open the lid, since hot steam may escape.
- Be very careful when children, the elderly, or pets are nearby.
- If you notice grease or other hot material dripping from appliance onto valve, hose or regulator, turn off gas supply at once. Determine the cause, correct it, then clean and inspect valve, hose, and regulator before continuing. Perform a leak test.
- Do not store objects or materials inside the appliance cart enclosure that would block the flow of combustion air to the underside of either the control panel or the firebox bowl.
- DO NOT disconnect or change gas container within 3m of an open flame or other ignition source.
Cylinder Placement
Cylinder of 6 kg or less may be placed on the ground under the side shelf or inside the appliance in place provided. Larger cylinders are to be placed under side shelf or behind the barbecue only. Cylinders placed in the appliance shall have a maximum diameter of 345mm and maximum height of 430mm. Cylinders placed on the ground shall not be placed under the hot plate.
Regulator Requirements
A regulator must be used with this appliance. Use only gas regulator supplied with your barbeque. If a regulator is not supplied then use only regulator certified according to EN16129 (Flow rate max. 1.5 kg/h) and approved for your country and gas specified in Technical Data. You must use a gas tank that is compatible with your regulator.
Hose Requirements
Use only approved hose which is certified to appropriate EN standard and does not exceed 1.5m length. For Finland, the hose length shall not exceed 1.2m.
Before each use, check to see if hoses are cut or worn. Make sure hose is not kinked. Make sure that when connected hose does not touch any warm surfaces. Replace damaged hoses before using appliance. Replace hose as required by national requirements.
The barbecue has to be installed on a secure level base prior to use.
Gas Lighting Instructions- Ignitor Lighting
- Do not lean over barbecue while lighting.
- Turn gas burner control valves to O(off).
- Open lid during lighting or re-lighting.
- Turn ON gas at LP cylinder.
- To ignite, push and turn IGNITION BURNER √ knob to ⬆ HIGH. Immediately, push and hold ELECTRONIC IGNITOR button until the burner lights.
- If ignition does NOT occur in 5 seconds, turn the burner controls off O, wait 5 minutes and repeat the lighting procedure.
- To ignite remaining burners, turn knob to the ⬆ HIGH position starting with the burners closest to IGNITION BURNER ➕ first.

If ignition does NOT occur in 5 seconds, turn the burner controls ○ off, wait 5 minutes and repeat the lighting procedure. If the burner does not ignite with the valve open, gas will continue to flow out of the burner and could accidentally ignite with risk of injury.
Match-Lighting
- Do not lean over barbecue while lighting.
- Turn gas burner control valves to O(off).
- Open lid during lighting or re-lighting.
- Turn ON gas at LP cylinder.
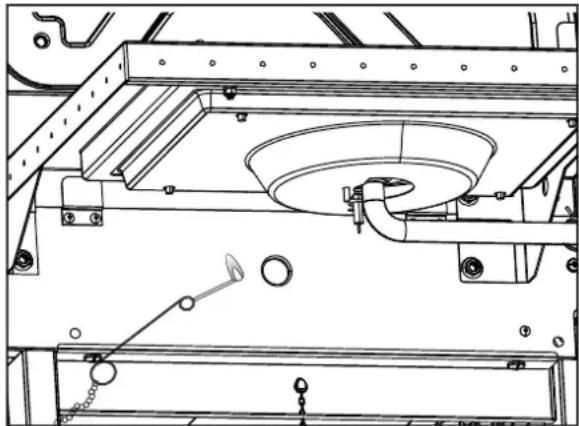
- Place match into match holder (hanging from side panel of barbecue). Light match; then light burner by placing match through the match light hole on side of barbecue. Immediately push in and turn burner knob to the 🔊 HIGH position. Be sure burner lights and stays lit.
- Light adjacent burners in sequence by pushing knobs in and turning to the 🔊 HIGH position.
natural_image
Technical line drawing of a mechanical assembly with no visible text or symbolsNOTE: Your barbecue may NOT be equipped with a Hot plate!
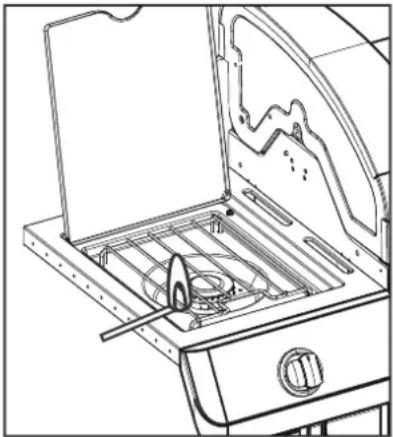
Hot plate Ignitor Lighting
- Do not lean over barbecue while lighting.
- Turn gas burner control valves to O(off).
- Open lid during lighting or re-lighting.
- Turn ON gas at LP cylinder.
- Turn hot plate knob to the 🔊 HIGH position, push and hold ELECTRONIC IGNITOR button.
- If hot plate does NOT light within 5 seconds, turn knob to O (off), wait 5 minutes, then repeat lighting procedure.
Hot plate Match Lighting
- Do not lean over barbecue while lighting.
- Turn gas burner control valves to O(off).
- Open lid during lighting or re-lighting.
- Turn ON gas at LP cylinder.
- Place lit match near burner. Immediately turn hot plate knob to the 🔊 HIGH position. Be sure burner lights and stays lit.
natural_image
Line drawing of an open oven with internal components and a handle (no text or symbols)Leak Testing Valves, Hose and Regulator
Leak test before first use, at least once a year, and every time the cylinder is changed or disconnected.
- Turn all appliance control knobs to ○.
- Be sure regulator is tightly connected to gas cylinder.
- Turn on Gas. If you hear a rushing sound, turn gas off immediately. There is a major leak at the connection. Correct before proceeding.
- Brush soapy solution (mixture of half soap and half water) onto hose connections.
- If growing bubbles appear, there is a leak. Turn off gas at cylinder immediately and check tightness of connections. If leak cannot be stopped do not try to repair. Call for replacement parts.
- Always turn off gas at cylinder after performing leak test.
IF APPLIANCE FAILS TO LIGHT
• Make sure gas is turned on at cylinder.
• Make sure there is gas in the cylinder.
• Does the ignitor make a sparking noise?
If yes check for spark at burner.
If no spark check for damaged or loose wires.
- If wires are OK check for cracked or broken electrode, replace if needed.
- If wire or electrodes are covered by cooking residue, clean electrode tip with alcohol wipe if needed.
• If needed replace wires.
• If no sound check battery.
• Make sure battery is installed correctly.
- Check for loose wire connection at module and switch.
• If ignitor continues to not work then use match.

CAUTION

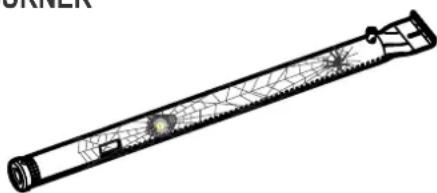
SPIDER ALERT!
SPIDER AND WEBS
INSIDE BURNER
natural_image
Technical line drawing of a cylindrical mechanical component with internal grid structure (no text or symbols)If your barbeque is getting hard to light or the flame is weak, check and clean the venturis and burners.
Spiders or small insects are known to create “flashback” problems by building nests and laying eggs in the barbeque’s venturi or burner obstructing the flow of gas. The backed-up gas can ignite behind the control panel. This flashback can damage your barbeque and cause injury. To prevent flashbacks and ensure good performance, the burner and venturi tube assembly should be removed and cleaned whenever the barbeque has been idle for an extended period of time.
Charcoal Lighting Instructions
- With a cold barbecue, remove cooking grates and heat tents.
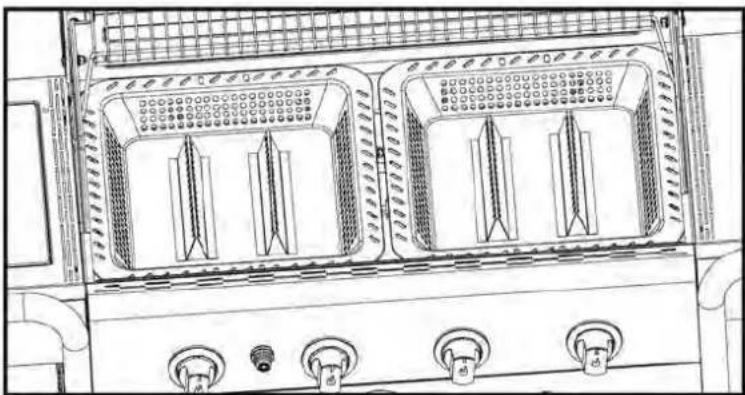
- Place charcoal tray in barbecue.
- Place single layer of charcoal in tray, 0.9kg (2lbs) maximum for each tray.
- Replace cooking grates.
- With lid open, ignite burners using Gas Lighting Instructions.
- Operate gas burners on HIGH for 15 minutes with lid closed.
- Turn controls knobs to Q(off).
- Open lid and wait 5 minutes, or until the charcoal turns white, before adding food.
- Do not cook before fuel has a coating of ash.
NOTE: The barbecue should be heated up and the fuel kept red hot for at least 30 minutes prior to your first cook.

WARNING
- Do not operate gas burners for more than 15 minutes when using charcoal.
- WARNING! Do not use spirit or petrol for lighting or relighting! Use only firelighters complying to EN1860-3!
- Never use lighter fluid, kerosene, gasoline or alcohol to light charcoal.
- Never use wood chunks or instant light in your barbecue.
- Start charcoal ONLY with charcoal tray properly placed in the firebox. See figure.
- Remove charcoal tray from firebox and store when using as a gas only barbecue.
- Do not operate gas burner with charcoal tray installed in the firebox without charcoal.

WARNING
CARBON MONOXIDE HAZARD: Burning charcoal inside can kill you. It gives off carbon monoxide, which has no odor. NEVER burn charcoal inside homes, vehicles, or tents.

WARNING

After a charcoal fire appears extinguished, unconsumed embers can retain heat for up to 24 hours, and if fresh air, can burst into flame unexpectedly. Any such embers outside the firebox of the barbecue pose a fire hazard and exposed to can ignite combustible surfaces such as wooden decks.
Cleaning Recommendations
• Clean up of the barbecue after each charcoal use is required.
- Make sure coals are completely extinguished and the unit has adequately cooled before cleaning.
- Removed charcoal tray and clean out all ashes.
Note: After use, the charcoal tray may discolor. This is normal during use.
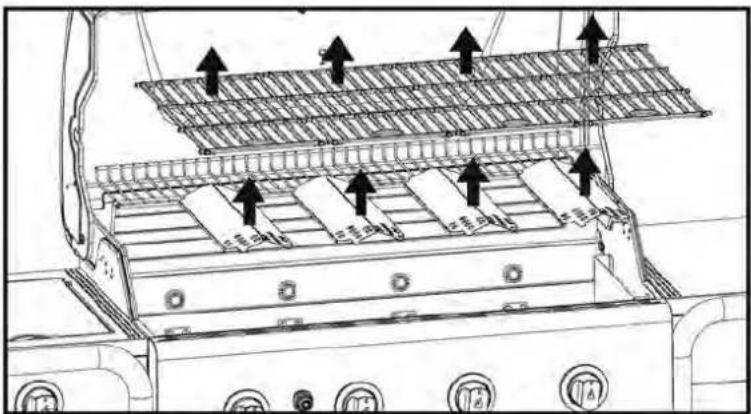
Remove Cooking Grates and Heat Tents
natural_image
Technical line drawing of a dual-chamber electric heater with cooling fans and three outlets (no text or symbols)Proper Charcoal Tray Placement
Cleaning the Burner Assembly
Follow these instructions to clean and/or replace parts of burner assembly or if you have trouble igniting barbecue.
- Turn gas off at control knobs and LP cylinder.
- Remove cooking grates and heat tents.
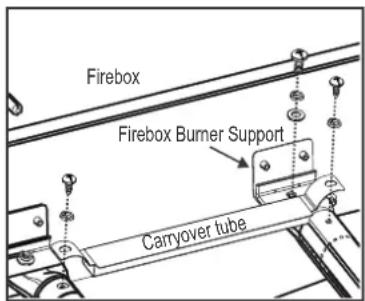
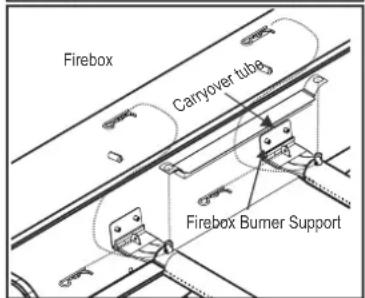
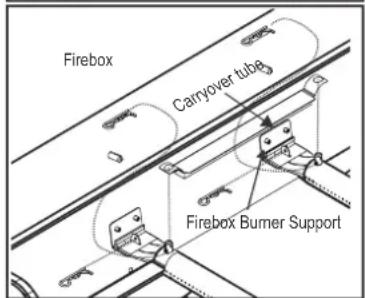
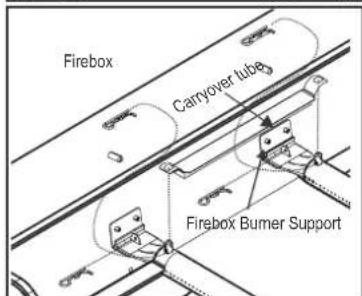
- Remove carryover tubes and hardware securing burners.
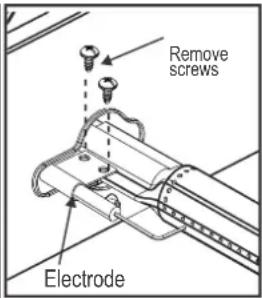
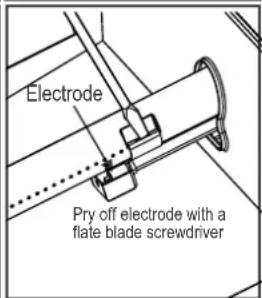
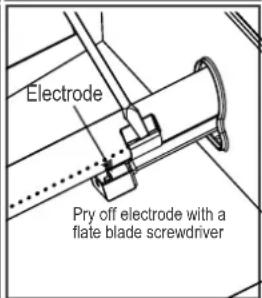
- Detach electrode from burner.
NOTE: Removal/Detachment method will depend on the burner configuration. See different configurations in illustrations below.
- Carefully lift each burner up and away from valve openings. We suggest three ways to clean the burner tubes. Use the one easiest for you.
A. Bend a stiff wire (a light weight coat hanger works well) into a small hook. Run the hook through each burner tube several times.

B. Use a narrow bottle brush with a flexible handle (do not use a brass wire brush). Run the brush through each burner tube several times.
C. Wear eye protection: Use an air hose to force air into the burner tube and out the burner ports. Check each port to make sure air comes out each hole.
- Wire brush entire outer surface of burner to remove food residue and dirt.
- Clean any blocked ports with a stiff wire such as an open paper clip.
- Check burner for damage due to normal wear and corrosion, some holes may become enlarged. If any large cracks or holes are found, replace burner.
VERY IMPORTANT: Burner tubes must reengage valve openings. See illustrations at right.
Correct burner-to-valve engagement
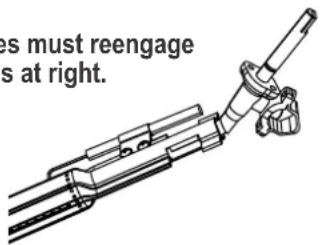
- Attach electrode to burner.
- Carefully replace burners.
- Attach burners to brackets on firebox.
- Reposition carryover tubes and attach to burners. Replace heat tents and cooking grates.
- Before cooking again on barbecue, perform a "Leak Test" and "Burner Flame Check".
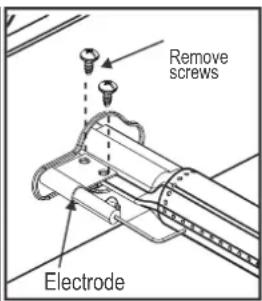
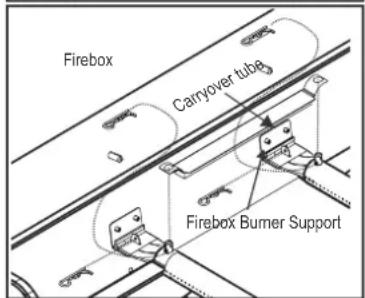
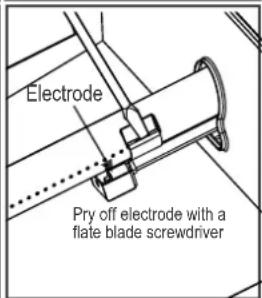
Storing Your Appliance
- Clean cooking grates.
- Store in dry location.
- When gas cylinder is connected to appliance, store outdoors in a well-ventilated space and out of reach of children.
- Cover appliance if stored outdoors.
- Store appliance indoors ONLY if gas cylinder is turned off and disconnected, removed from appliance and stored outdoors.
- When removing appliance from storage check for burner obstructions.
General Appliance Cleaning
- Clean appliance often, preferably after each cookout. If a bristle brush is used to clean any of the appliance cooking surfaces, ensure no loose bristles remain on cooking surfaces prior to barbecueing. It is not recommended to clean cooking surface while appliance is hot. Appliance should be cleaned at least once a year.
- Do not mistake brown or black accumulation of grease and smoke for paint. Interiors of gas barbecues are not painted at the factory (and should never be painted). Apply a strong solution of detergent and water or use a appliance cleaner with scrub brush on insides of appliance lid and bottom. Rinse and allow to completely air dry. Do not apply caustic appliance/oven cleaner to painted surfaces.
- Plastic parts: Wash with warm soapy water and wipe dry.
- Do not use citrisol, abrasive cleaners, degreasers or a concentrated appliance cleaner on plastic parts. Damage to and failure of parts can result.
- Porcelain surfaces: Because of glass-like composition, most residue can be wiped away with baking soda/water solution or specially formulated cleaner. Use nonabrasive scouring powder for stubborn stains.
- Painted surfaces: Wash with mild detergent or nonabrasive cleaner and warm soapy water. Wipe dry with a soft nonabrasive cloth.
- Stainless steel surfaces: To maintain your appliance's high quality appearance, wash with mild detergent and warm soapy water and wipe dry with a soft cloth after each use. Baked-on grease deposits may require the use of an abrasive plastic cleaning pad. Use only in direction of brushed finish to avoid damage. Do not use abrasive pad on areas with graphics.
- Cooking surfaces: If a bristle brush is used to clean any of the appliance cooking surfaces, ensure no loose bristles remain on cooking surfaces prior to barbecueing. It is not recommended to clean cooking surfaces while appliance is hot.
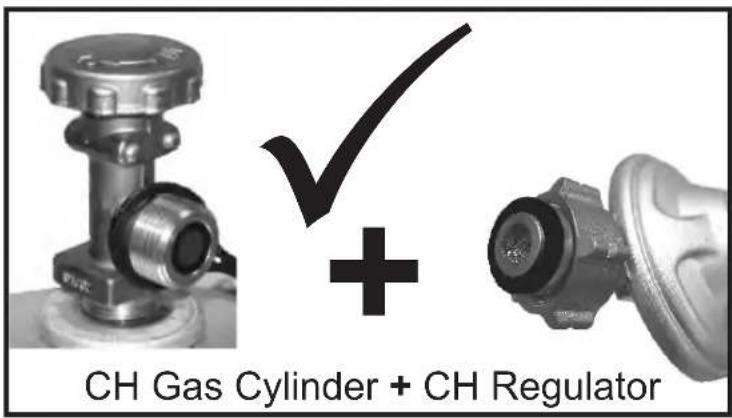
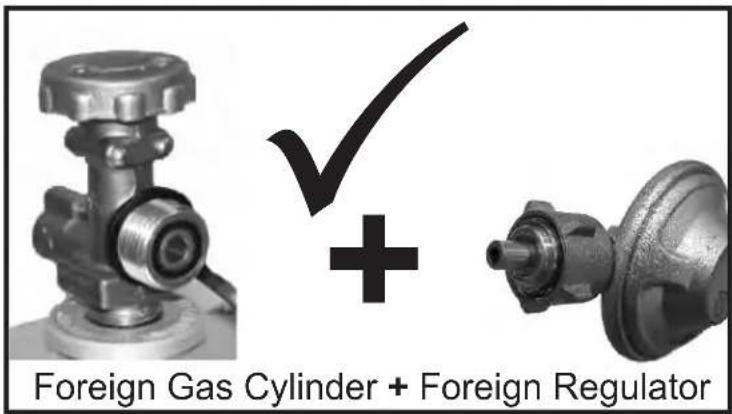
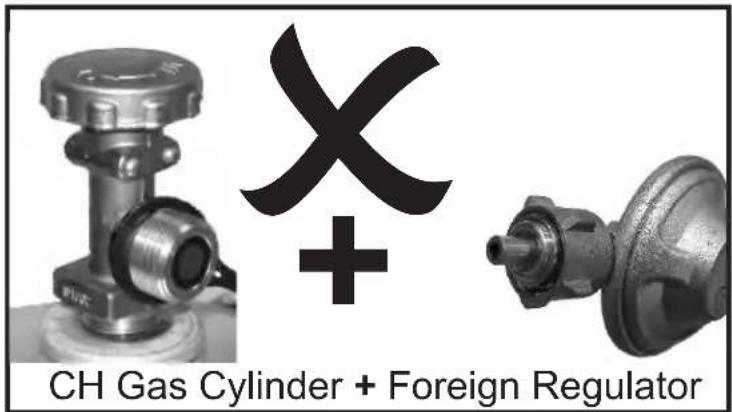
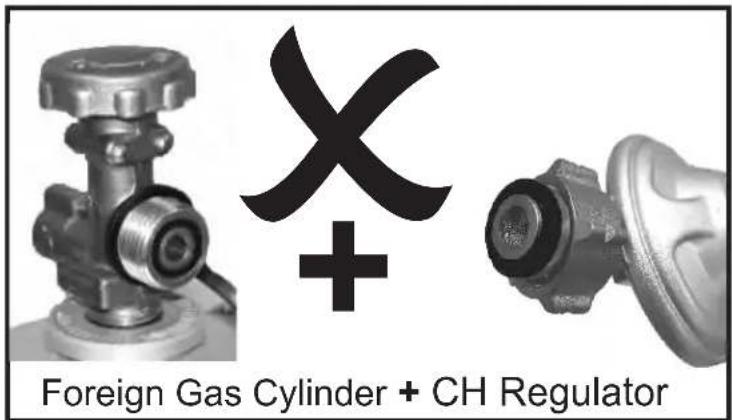
A regulator must be used with this appliance. Use only the gas regulator supplied with your barbeque. If a regulator is not supplied then use only a regulator certified according to EN16129 (Flow rate max. 1.5 kg/h) and approved for your country and gas specified in Technical Data.
For Switzerland Only
There is a danger of fire and explosion with gas appliances which are equipped with foreign pressure regulators and are not compatible with the gas tanks and gas regulators available in Switzerland
Due to the different sealing systems, it is impossible to properly seal the regulator to the gas tank. Gas will escape here and can be ignited by flame or sparks. A life-threatening explosion, and/or property damage can result. Swiss and German tanks and regulators cannot be intermixed.
For safety reason, please check your grill regulator and gas tank connection and make sure it follows in one of the allowed cases shown in the pictures.
Perform a leak check each time you connect your grill to the gas tank.
| TECHNICAL DATACHAR-BROIL, GmbH | ||||
| Appliance Name | Gas Barbeque/Gas Grill | |||
| Total Nominal Heat Input | 18,74 kW (1,364 g/h) | |||
| Gas Category | I3+(28-30/37) | I3B/P(30) | I3B/P(50) | |
| Model No. | 468301421, 468301421UK 468302421 | |||
| Gas Type | Butane | Propane | Butane, Propane or their mixtures | Butane, Propane or their mixtures |
| Gas Pressure | 28-30 mbar | 37 mbar | 28-30 mbar | 50 mbar |
| Injector Size (Dia. mm) | Barbecue: 0,99 x 4 pcs | Barbecue: 0,99 x 4 pcs | Barbecue: 0,85 x 4 pcs | |
| Hotplate:0,92 x 1 pcs | Hotplate:0,92 x 1 pcs | Hotplate:0,81 x 1 pcs | ||
| Destination Countries | GB, FR, BE, ES, IT, PT, CZ, SK, CH, CY, GR, IE, LT, LU, LV, SI | DK, NO, NL, SE, FI, IS, CZ, IT, SK, BG, CY, EE, HR, HU, LT, LU, LV, MT, RO, SI, TR | AT, DE, CH, LU, SK | |
| Electrical Supply | 1.5VDC Battery | |||
WARNING!
Most surfaces on this unit are hot when in use. Use extreme caution. Keep others away from unit Always wear protective clothing to prevent injury or burning..
Do not move this unit during operation.
Never substitute gasoline, kerosene or alcohol for charcoal starter. In this case, paraffin-based starter cubes can be substituted for charcoal starter. Never use charcoal starter fluid with an electric starter.
Do not use this unit on or near combustible surfaces or structures such as wood decks, dry leaves or grass, vinyl or wood siding, etc.
After a charcoal fire appears extinguished, unconsumed embers can retain heat for up to 24 hours, and if exposed to fresh air, can burst into flame unexpectedly. Any such embers outside the firebox of the barbecue pose a fire hazard and can ignite combustible surfaces such as wooden decks.
Failure to follow all manufacturer's instructions could result in serious personal injury and/or property damage.
CARBON MONOXIDE HAZARD
Burning charcoal inside can kill you. It gives off carbon monoxide, which has no odor. NEVER burn charcoal inside homes, vehicles, or tents.
Do not cook before the fuel has a coating ash.
WARNING! - this barbecue will become very hot, DO NOT move it during operation.
Do not use indoors.
WARNING! DO NOT use spirit or petrol for lighting or re-lighting! Use only firelighters complying to EN 1860-3!
WARNING! Keep children and pets away.
FAILURE TO READ AND FOLLOW INSTRUCTIONS FOR LIGHTING CHARCOAL MAY RESULT IN SERIOUS PERSONAL INJURY AND OR PROPERTY DAMAGE.
ALWAYS USE CAUTION WHEN HANDLING HOT COALS TO PREVENT INJURY.
ALWAYS LIGHT THE FIRE WITH THE BARBECUE LID OPEN.
INSTALLATEUR/ASSEMBLEUR :
natural_image
Technical line drawing of a mechanical assembly with no visible text or symbolsnatural_image
Technical line drawing of a mechanical device with internal components and mounting bracket (no text or symbols)natural_image
Technical line drawing of a cylindrical mechanical component with internal grid structure (no text or symbols)natural_image
Technical line drawing of a dual-chamber electric heater with cooling fans and three outlets (no text or symbols)natural_image
Technical line drawing of a mechanical assembly with no visible text or symbolsnatural_image
Line drawing of a gas stove interior with open door and internal components (no text or symbols)natural_image
Technical line drawing of a cylindrical mechanical component with internal grid structure (no text or symbols)natural_image
Technical line drawing of a mechanical assembly with no visible text or symbolsnatural_image
Line drawing of an open oven with internal components and a handle (no text or symbols)natural_image
Diagram of a cylindrical device with internal mesh structure and internal components (no text or symbols)natural_image
Technical line drawing of a dual-chamber electric heater with cooling fans and three outlets (no text or symbols)natural_image
Close-up of two metallic pipe fittings with a checkmark and plus sign, no visible text or symbolsnatural_image
Two metallic mechanical components with a checkmark and plus sign, no visible text or symbolsnatural_image
Technical line drawing of a mechanical assembly with no visible text or symbolsnatural_image
Line drawing of an open industrial machine with internal components and a handle (no text or symbols)Lektest Kleppen, Slang en Regelaar
natural_image
Technical line drawing of a cylindrical mechanical component with internal grid structure (no text or symbols)natural_image
Technical line drawing of a dual-chamber electric heater with cooling fans and three outlets (no text or symbols)natural_image
Technical line drawing of a mechanical assembly with no visible text or symbolsnatural_image
Line drawing of an open oven with internal grating and vent, no text or symbols presentnatural_image
Technical line drawing of a cylindrical mechanical component with internal grid structure (no text or symbols)natural_image
Technical line drawing of a dual-chamber electric heater with cooling fans and three outlets (no text or symbols)Follow these instructions to clean and/or replace parts of burner assembly or if you have trouble igniting barbecue.
After a charcoal fire appears extinguished, unconsumed embers can retain heat for up to 24 hours, and if exposed to fresh air, can burst into flame unexpectedly. Any such embers outside the firebox of the barbecue pose a fire hazard and can ignite combustible surfaces such as wooden decks.
natural_image
Technical line drawing of a mechanical assembly with no visible text or symbolsnatural_image
Line drawing of an open oven with internal components and a handle (no text or symbols)natural_image
Technical line drawing of a cylindrical mechanical component with internal grid structure (no text or symbols)Poista Cooking Säleiköt ja Heat Teltat

natural_image
Technical line drawing of a server rack with two front panels and three side outlets (no text or symbols)natural_image
Technical line drawing of a mechanical assembly with no visible text or symbolsnatural_image
Line drawing of an open oven with internal compartments and a handle (no text or symbols)natural_image
Technical line drawing of a cylindrical mechanical component with internal grid structure (no text or symbols)natural_image
Technical line drawing of a dual-chamber electric heater with cooling fans and three buttons (no text or symbols)natural_image
Technical line drawing of a mechanical assembly with no visible text or symbolsnatural_image
Line drawing of an open oven with internal grating and a handle (no text or symbols)natural_image
Technical line drawing of a cylindrical mechanical component with internal mesh structure (no text or symbols)natural_image
Technical line drawing of a server rack with two front panels and three side outlets (no text or symbols)Remova as grelhas de cozedura
natural_image
Technical line drawing of a mechanical assembly with no visible text or symbolsnatural_image
Line drawing of an open electric stove with internal components and a handle (no text or symbols)Lækagetestning af ventiler, slange og regulator
natural_image
Technical line drawing of a cylindrical mechanical component with internal grid structure (no text or symbols)natural_image
Technical line drawing of a dual-chamber electric heater with cooling fans and buttons (no text or symbols)Krav for regulatorer
natural_image
Technical line drawing of a mechanical assembly with no visible text or symbolsnatural_image
Line drawing of an open oven with internal components and a handle (no text or symbols)natural_image
Technical line drawing of a cylindrical mechanical component with internal grid structure (no text or symbols)natural_image
Technical line drawing of a dual-chamber computer tower with ventilation grilles and control knobs (no text or symbols)natural_image
Technical line drawing of a mechanical assembly with no visible text or symbolsnatural_image
Line drawing of an open electrical cabinet with internal components and a handle (no text or symbols)Skúška tesnosti ventilov, hadice a ovládača
natural_image
Technical line drawing of a cylindrical mechanical component with internal grid structure (no text or symbols)natural_image
Technical line drawing of a dual-chamber electronic device with mounting holes and ventilation grilles (no text or symbols)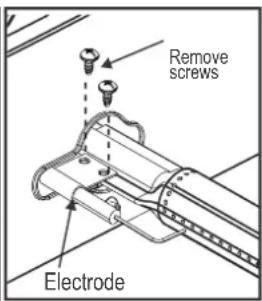
Skladovanie zariadenia
natural_image
Technical line drawing of a mechanical assembly with no visible text or symbolsnatural_image
Line drawing of an open oven with internal grating and a handle (no text or symbols)Lekapróf á lokum, slöngu og stilli
natural_image
Technical line drawing of a cylindrical mechanical component with internal grid structure (no text or symbols)Fjarlægja grillgrindur og Heat Tjöld

natural_image
Technical line drawing of a dual-chamber electric heater with cooling fins and mounting ports (no text or symbols)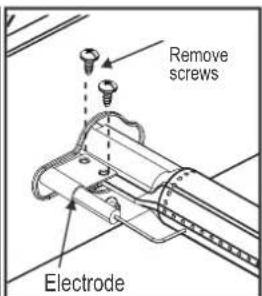
Geymsla á grillinu
natural_image
Technical line drawing of a mechanical assembly with no visible text or symbolsnatural_image
Line drawing of an open oven with internal grating and a handle (no text or symbols)natural_image
Technical line drawing of a computer tower case with two front panels and three side outlets (no text or symbols)natural_image
Isometric line drawing of a mechanical device with wheels and a curved top component, enclosed in a wall-lined enclosure (no text or symbols)natural_image
Technical line drawing of a mechanical assembly with no visible text or symbolsnatural_image
Technical line drawing of a cylindrical mechanical component with internal grid structure (no text or symbols)natural_image
Line drawing of an open refrigerator with internal compartments and a handle (no text or symbols)natural_image
Technical line drawing of a mechanical device with multiple panels and mounting holes, showing directional arrows indicating assembly or movement (no text or symbols present)natural_image
Technical line drawing of a server rack with two front panels and three side outlets (no text or symbols)Aprinderea grăsimilor
natural_image
Technical line drawing of a mechanical assembly with no visible text or symbolsnatural_image
Technical line drawing of a mechanical device with internal components and mounting bracket (no text or symbols)natural_image
Technical line drawing of a dual-chamber electronic device with mounting ports (no text or symbols)natural_image
Technical line drawing of a mechanical assembly with no visible text or symbolsnatural_image
Line drawing of an open oven with internal grating and a control panel (no text or symbols)natural_image
Technical line drawing of a dual-chamber electronic device with ports and connectors (no text or symbols)natural_image
Technical line drawing of a mechanical assembly with no visible text or symbolsnatural_image
Technical line drawing of an open industrial machine with internal components and a handle (no text or symbols)natural_image
Technical line drawing of a dual-chamber electronic device with ventilation grilles and ports (no text or symbols)natural_image
Technical line drawing of a mechanical assembly with no visible text or symbolsnatural_image
Technical line drawing of a mechanical device with internal components and mounting bracket (no text or symbols)Извадете скаRITE и покривалата на горелките
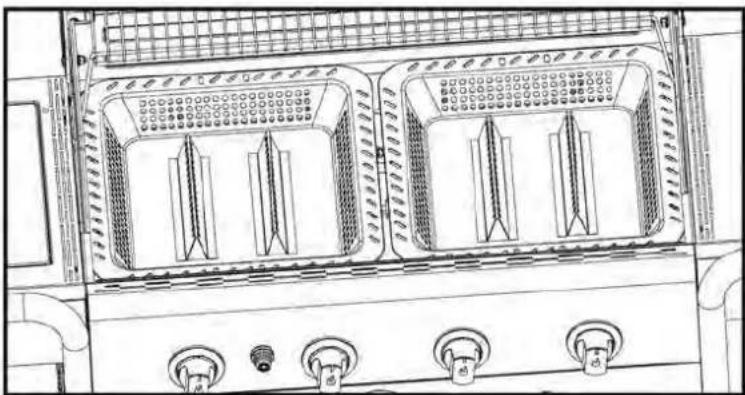
natural_image
Technical line drawing of a dual-chamber electric heater with cooling fans and three outlets (no text or symbols)natural_image
Technical line drawing of a mechanical assembly with no visible text or symbolsnatural_image
Line drawing of an open oven with internal components and a handle (no text or symbols)natural_image
Technical line drawing of a cylindrical mechanical component with internal gear-like structure (no text or symbols)Če se žar težko prižge ali je plamen šibek, preverite in očistite venturije in gorilnike.
Odstranite rešetke za kuhanje in toplotne šotore
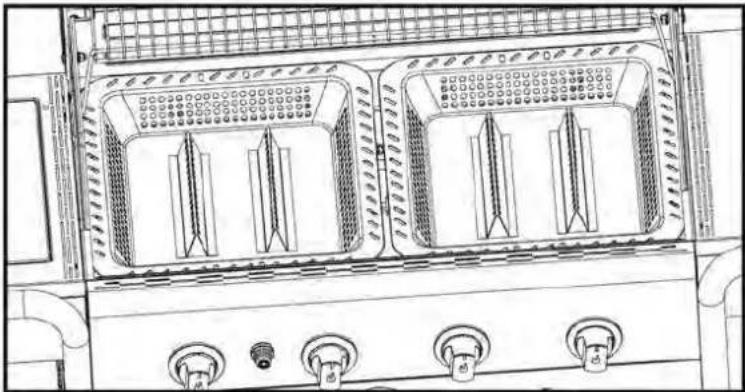
natural_image
Technical line drawing of a computer tower with two front panels and three side outlets (no text or symbols)| Key | Description | Picture | Qty |
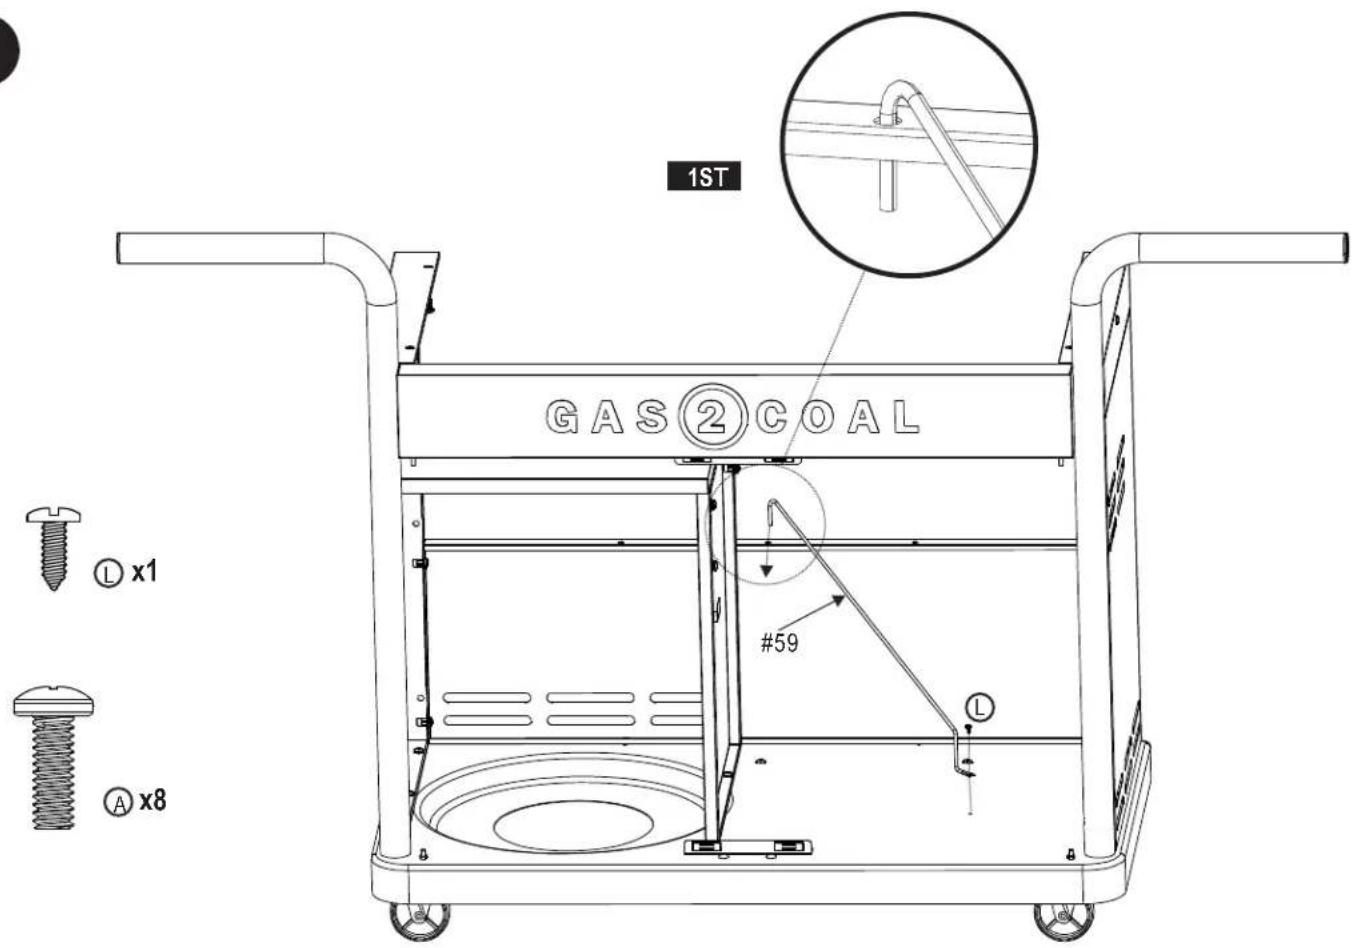
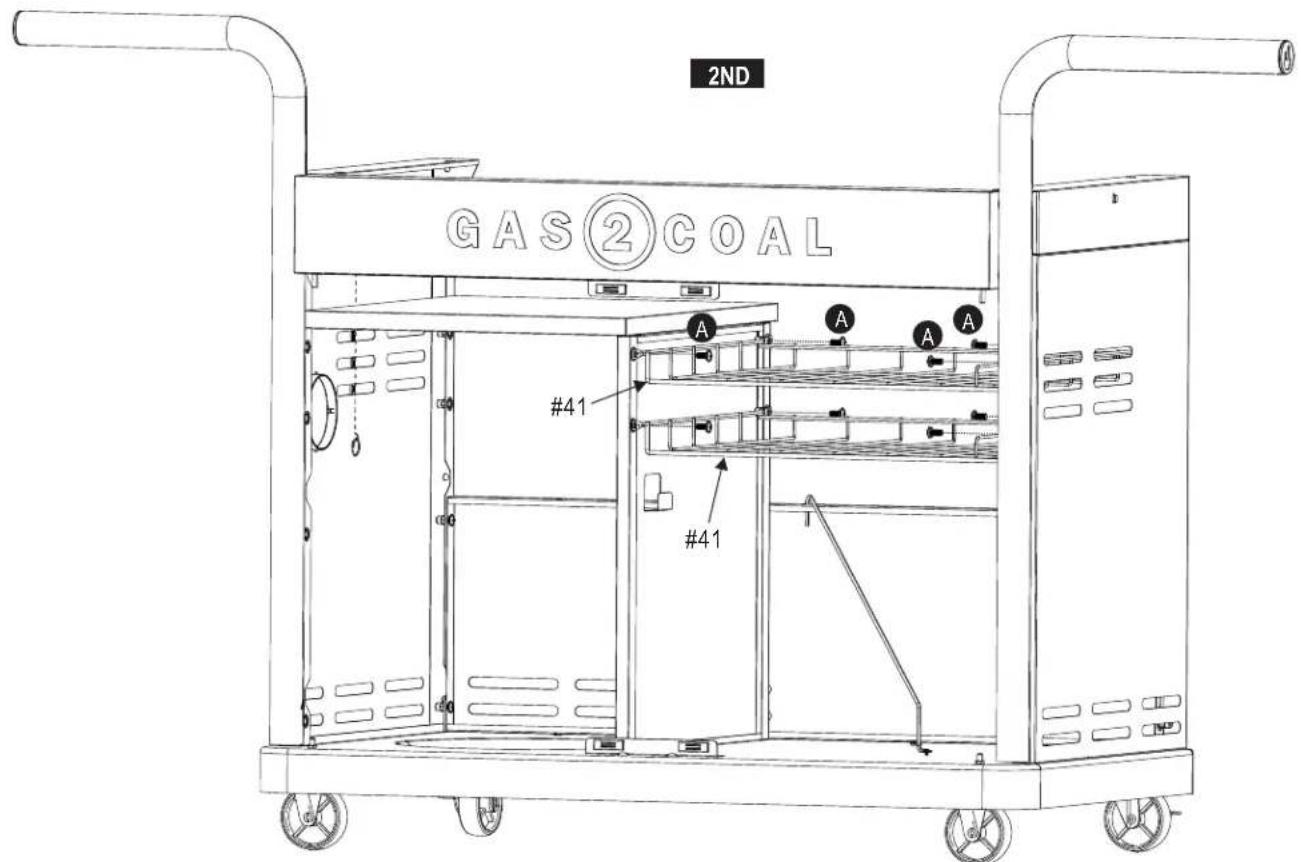
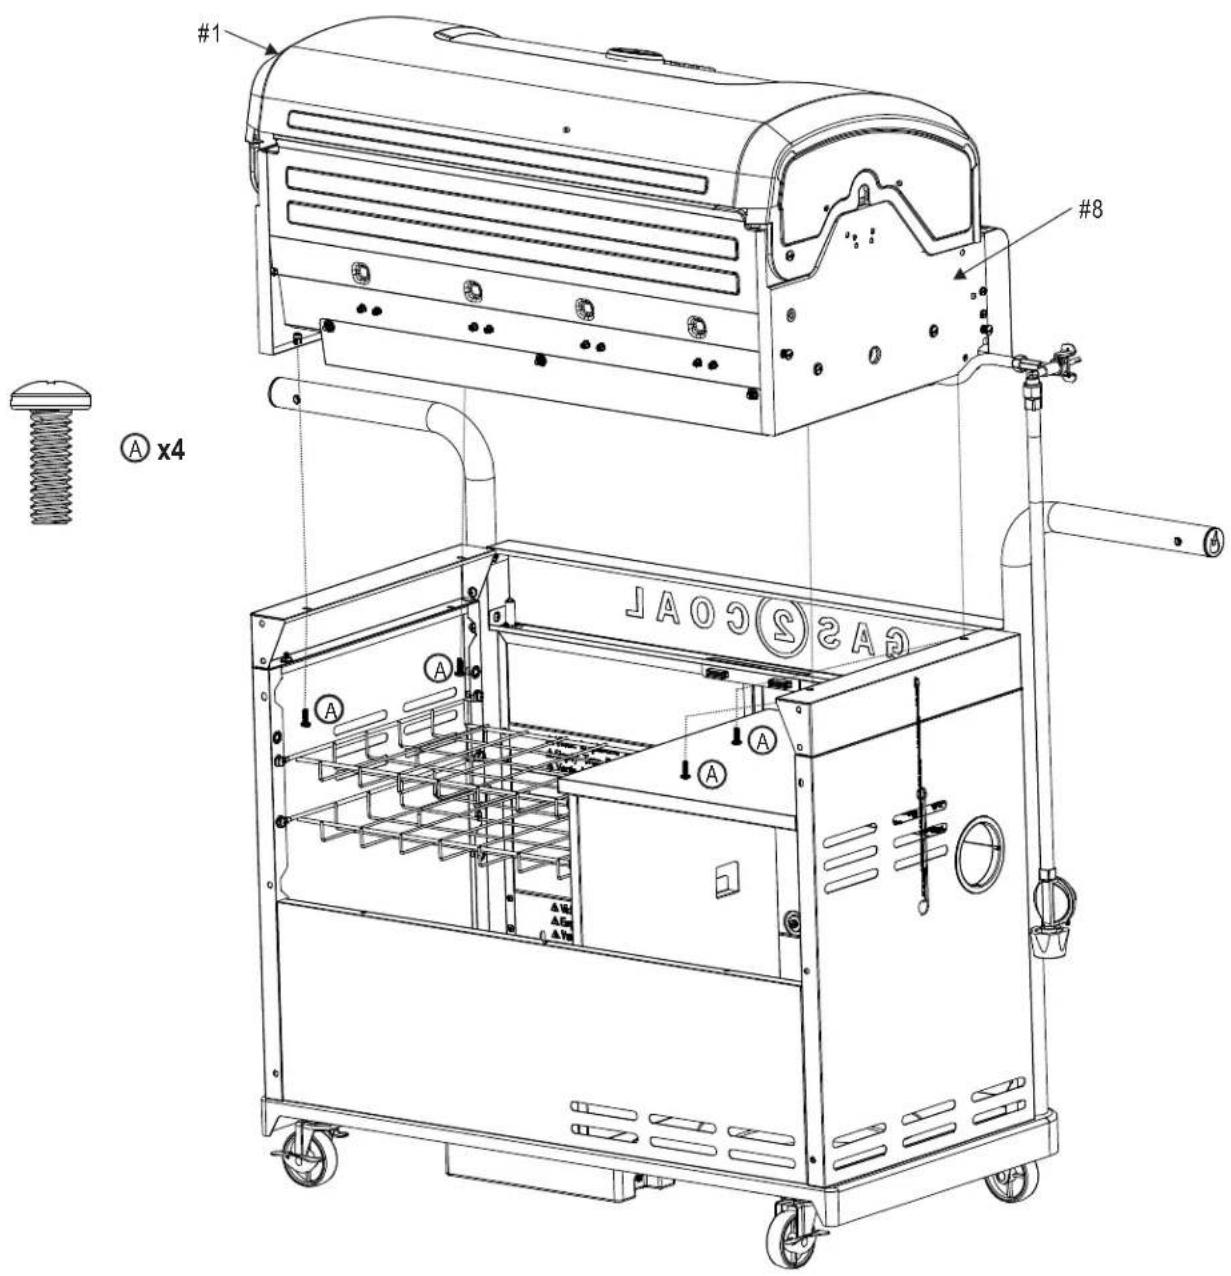
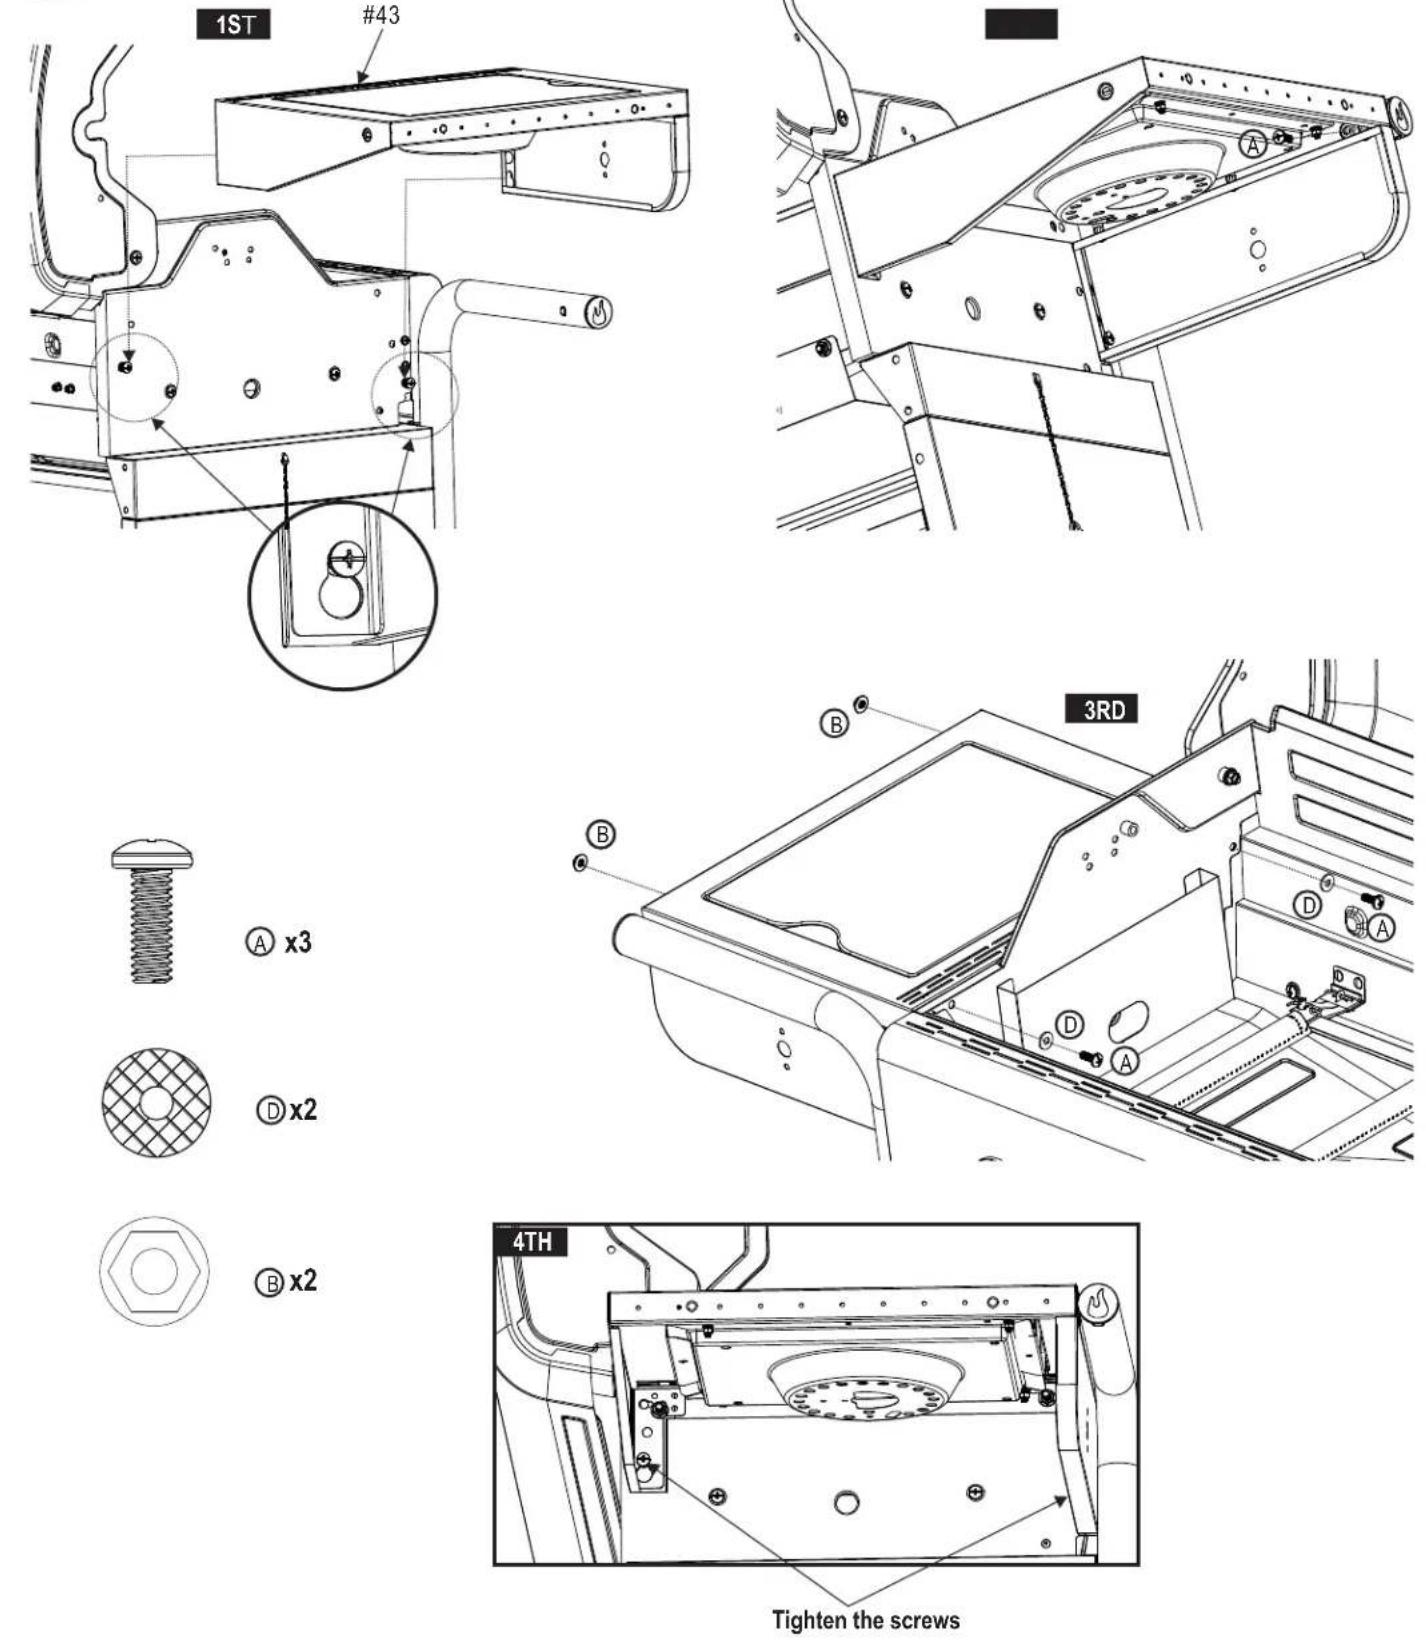
| A | 1/4-20x1/2" Machine Screw | 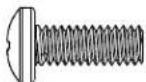 | 53 |
| B | 1/4-20 Flange Nut |  | 8 |
| C | 1/4-20x2" Machine Screw | 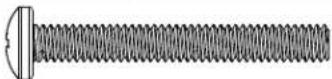 | 2 |
| D | 7x15 Fiber Washer |  | 4 |
| E | Caster pin | 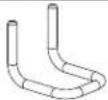 | 1 |
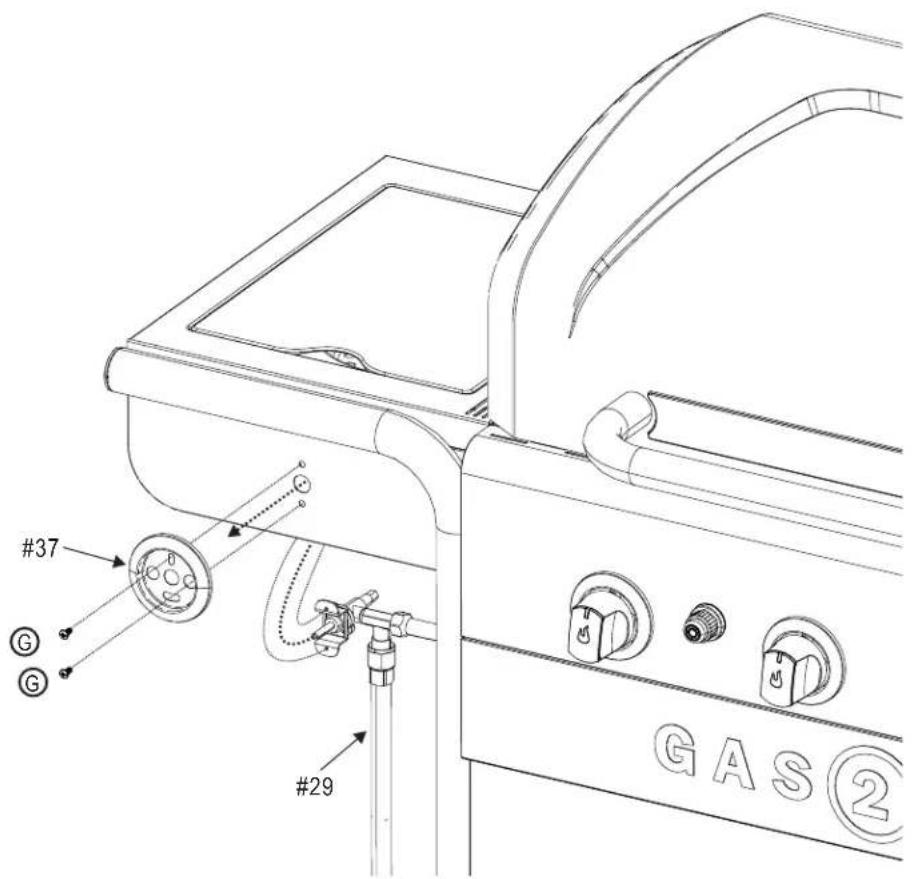
| G | #8-32x3/8" Machine Screw |  | 2 |
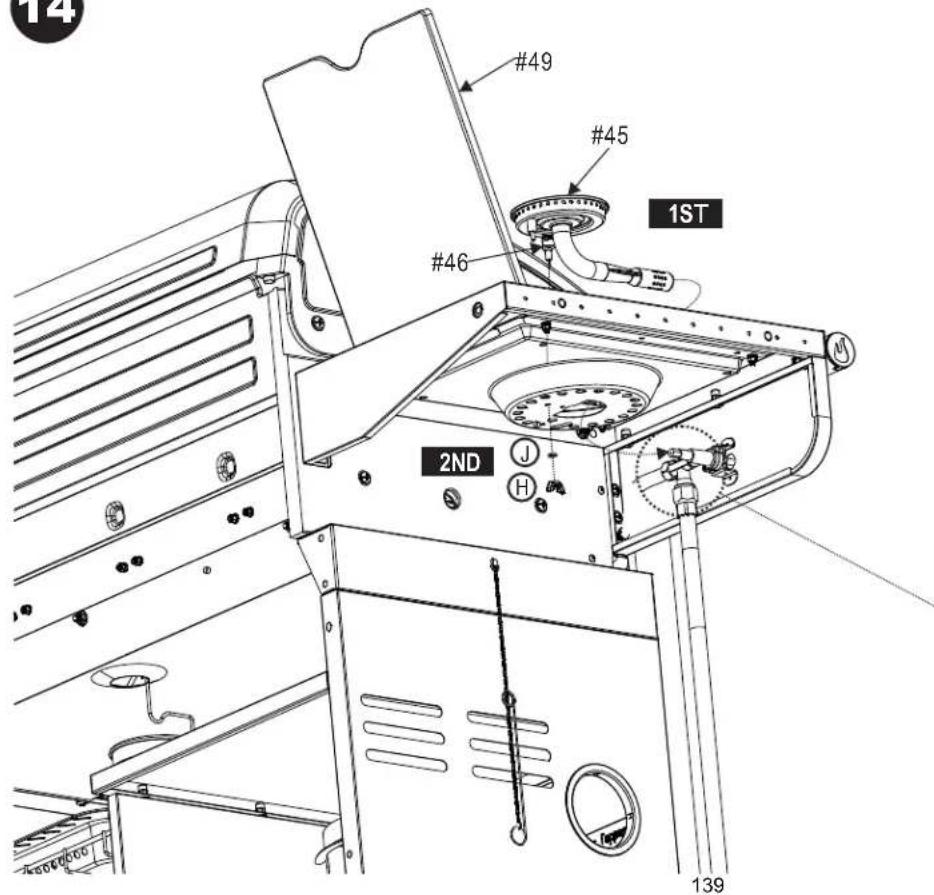
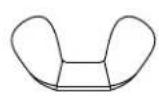
| H | Wing Nut | 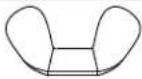 | 1 |
| J | 5mm Fiber Washer |  | 1 |
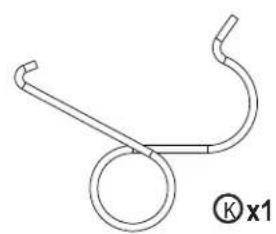
| K | Venturi Clip | 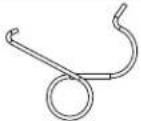 | 1 |
| L | #8x3/8" Sheet Metal Screw |  | 1 |
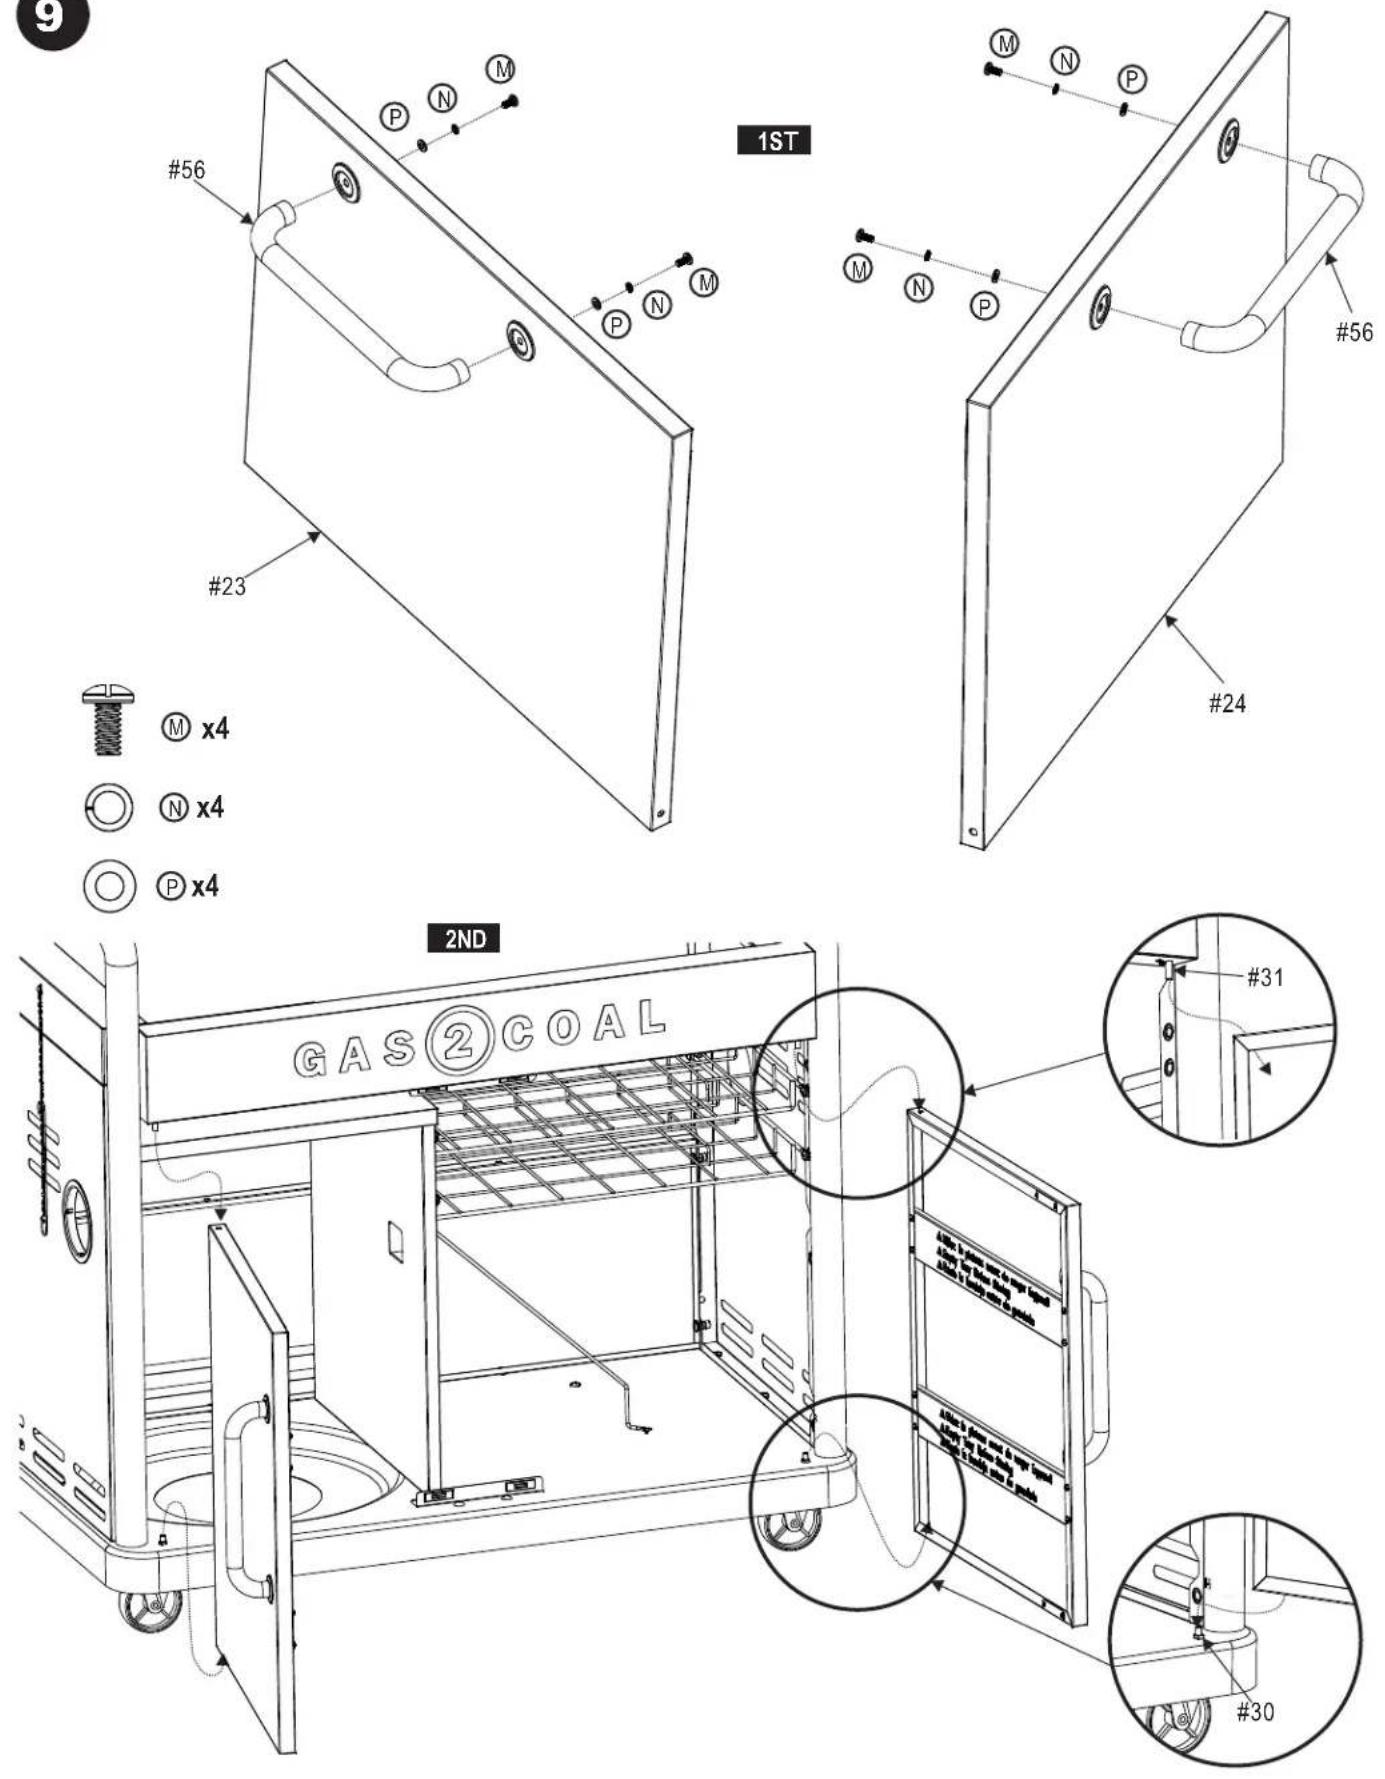
| M | #10-24x3/8" Machine Screw | 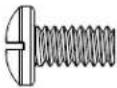 | 4 |
| N | 5mm Lock Washer |  | 4 |
| P | 5mm Flat Washer |  | 4 |
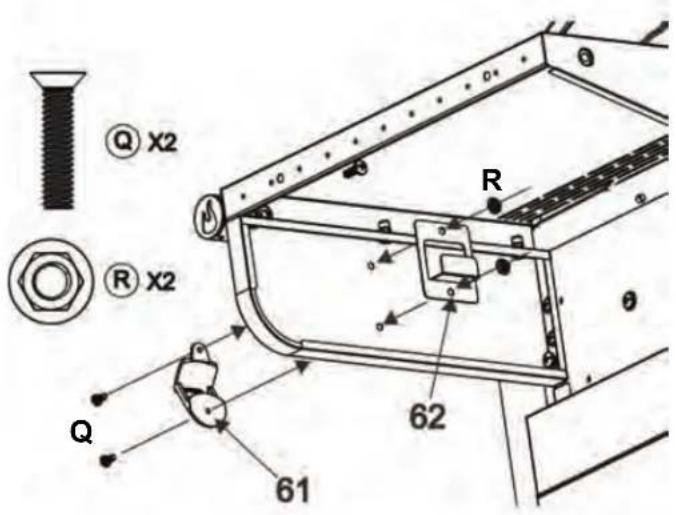
| Q | NO.10-24 UNC x10 Screw, Flat Head |  | 2 |
| R | NO.10-24 UNC Nut |  | 2 |
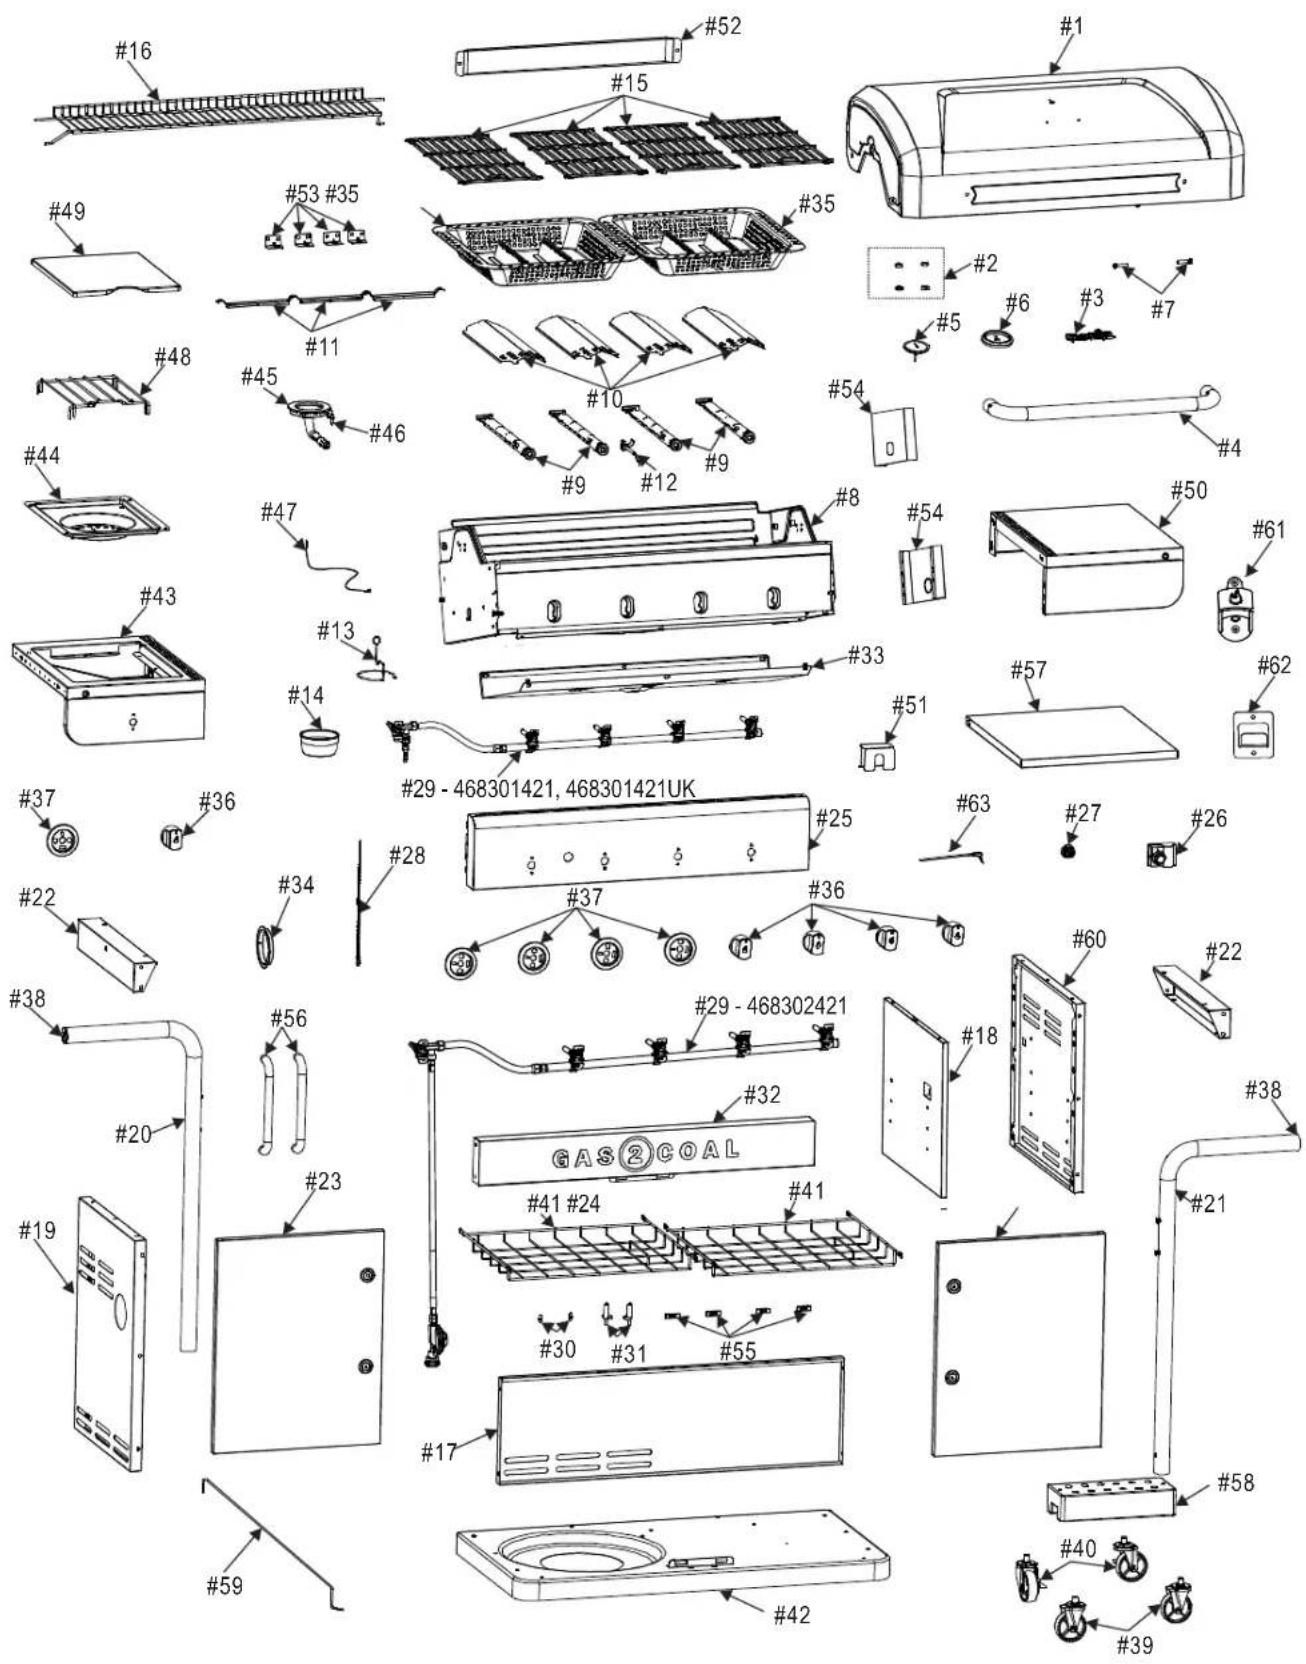
PARTS LIST
| Key Qty Description | |
| 1 1 | TOP LID |
| 2 4 | LID BUMPER |
| 3 1 | LOGO PLATE |
| 4 1 | HANDLE, F/ LID |
| 5 1 | TEMPERATURE GAUGE |
| 6 1 | BEZEL, TEMPERATURE GAUGE |
| 7 1 | HARDWARE F/ TOP LID |
| 8 1 | FIREBOX |
| 9 4 | BURNER |
| 10 4 | HEAT TENT |
| 11 3 | FLAME CARRYOVER TUBE |
| 12 1 | ELECTRODE |
| 13 1 | GREASE CUP CLIP |
| 14 1 | GREASE CUP |
| 15 4 | COOKING GRATE |
| 16 1 | SWINGAWAY RACK |
| 17 1 | BACK PANEL |
| 18 1 | MIDDLE PANEL, CABINET |
| 19 | 1 SIDE PANEL, F/ CART, LEFT |
| 20 1 | LEG, LEFT FRONT |
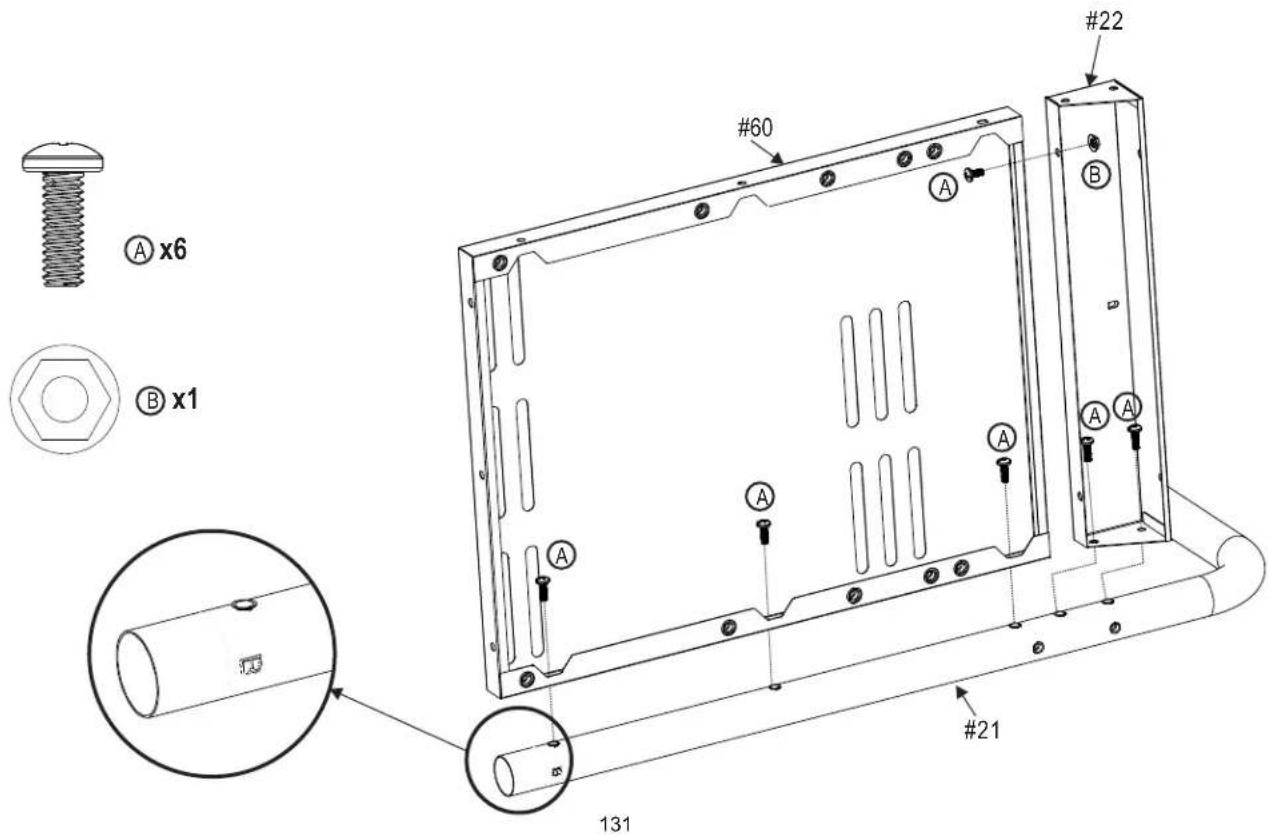
| 21 1 | LEG, RIGHT FRONT |
| 22 2 | UPPER CART BRACE |
| 23 1 | DOOR, LEFT |
| 24 1 | DOOR, RIGHT |
| 25 1 | CONTROL PANEL |
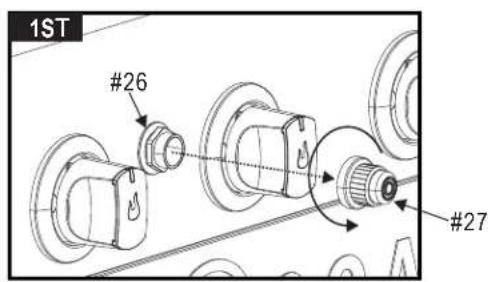
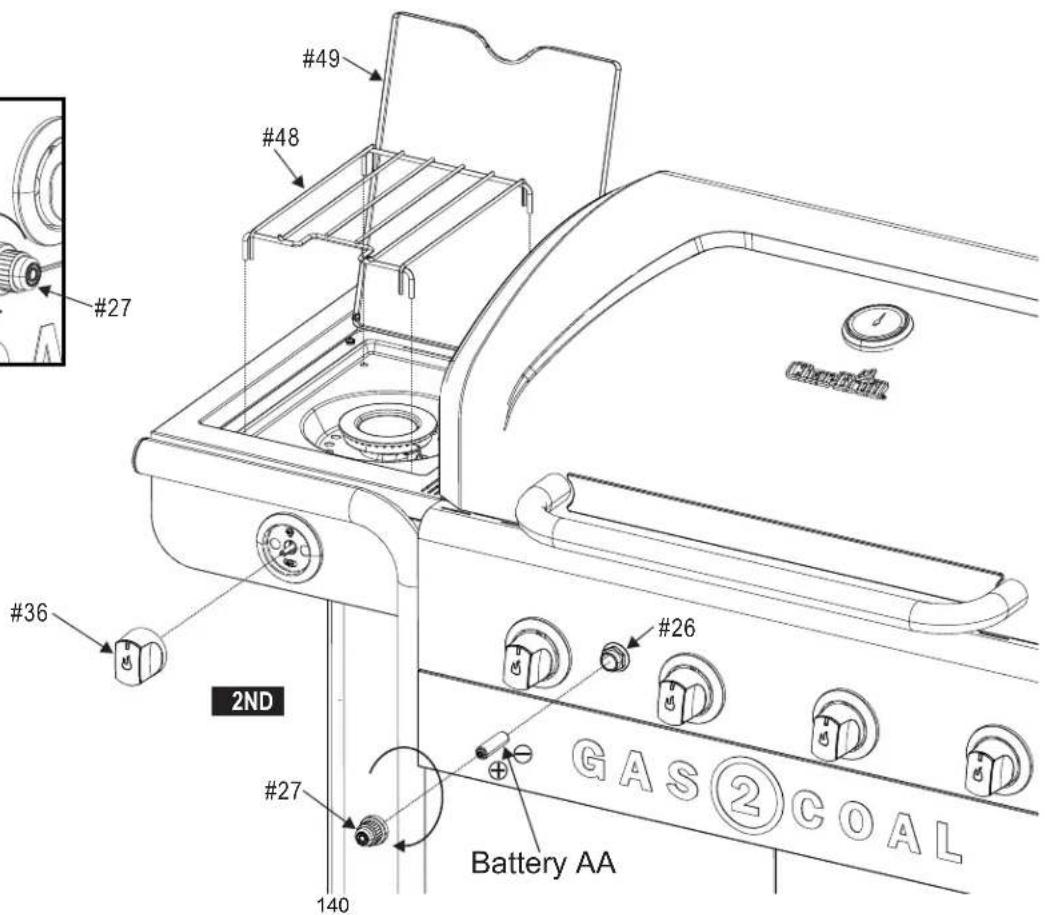
| 26 1 | ELECTRONIC IGNITION MODULE |
| 27 1 | BUTTON, F/ EI MODULE |
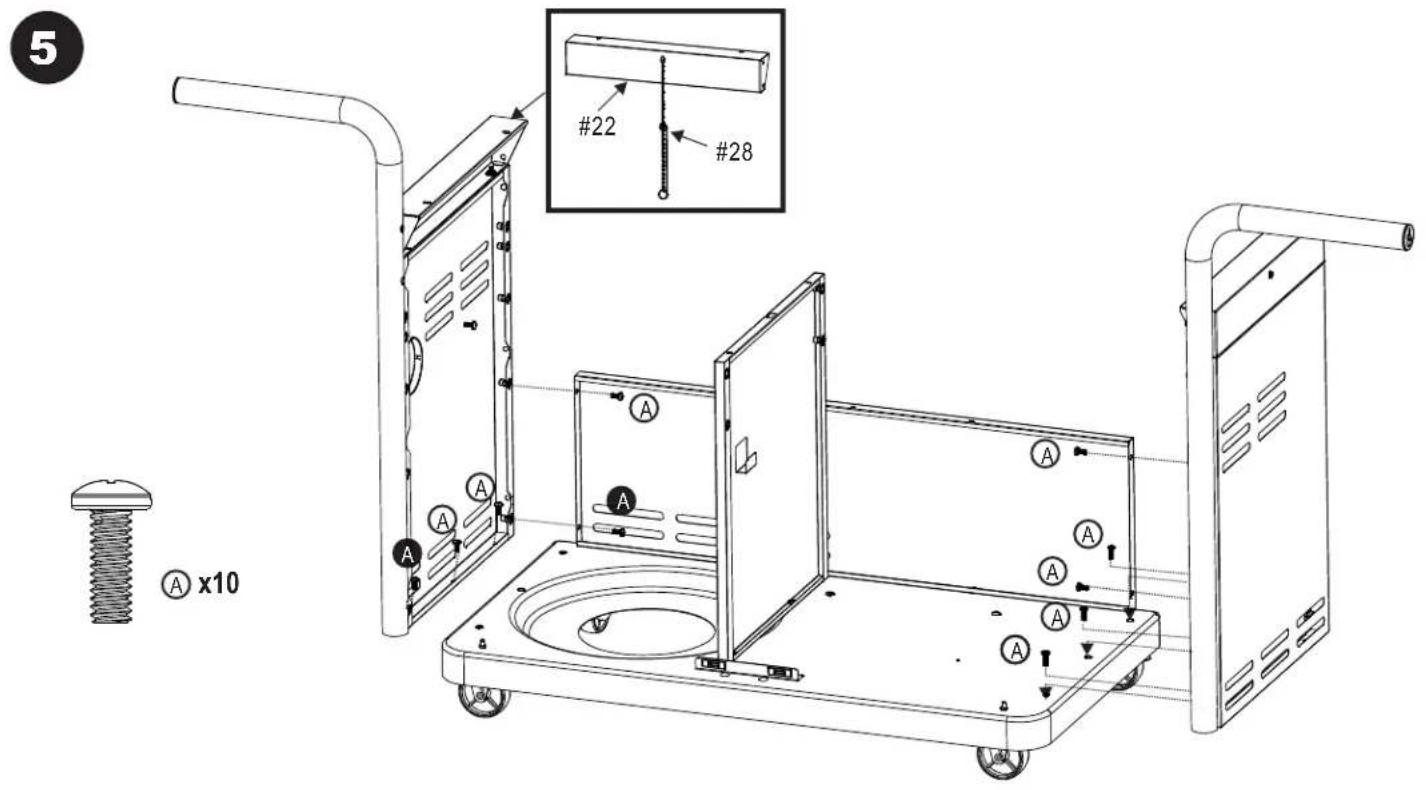
| 28 1 | MATCH HOLDER |
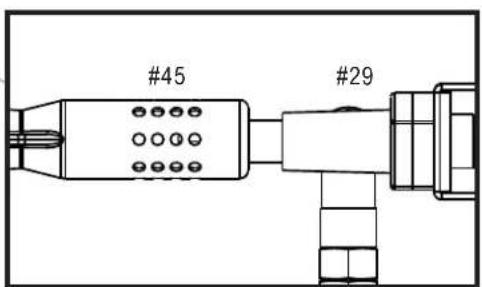
| 29 1 | VALVE ASSEMBLY |
| 30 2 | FIXED PIN, F/ DOOR |
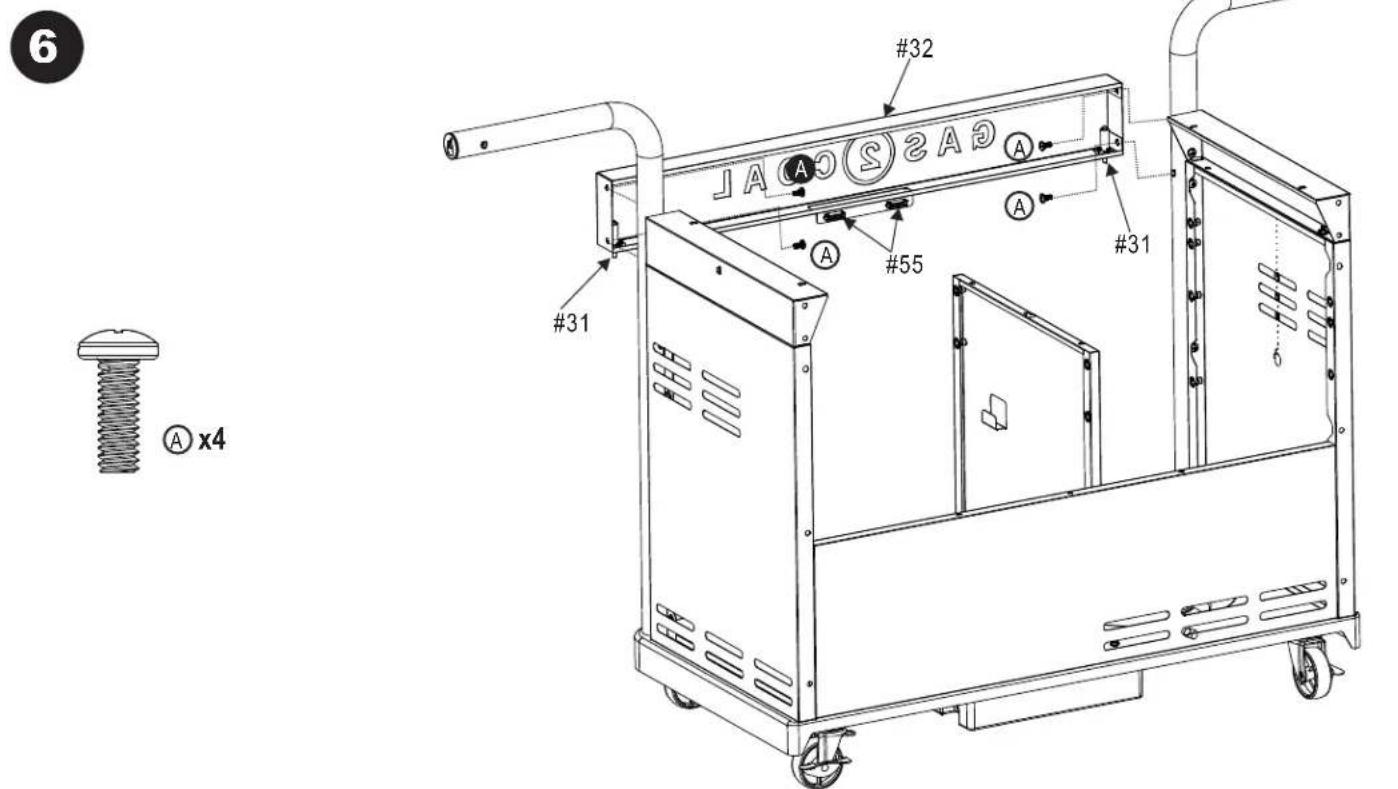
| 31 2 | SPRING PIN, F/ DOOR |
| 32 1 | DOOR BRACE, UPPER |
| 33 1 | HEAT SHIELD, TANK |
| 34 1 | GROMMET, F/ REGULATOR HOLE |
| 35 2 | CHARCOAL TRAY |
| 36 5 | CONTROL KNOB |
| 37 5 | BEZEL, F/ CONTROL KNOB |
| 38 2 | END CAP, F/ LEG |
| 39 2 | CASTER, FIXED |
| Key Qty Description | |
| 40 2 | CASTER, LOCKING |
| 41 2 | BASKET, F/ CHARCOAL TRAY |
| 42 1 | BOTTOM SHELF |
| 43 1 | HOT PLATE SHELF |
| 44 1 | DRIP PAN F/ HOT PLATE |
| 45 1 | HOT PLATE BURNER |
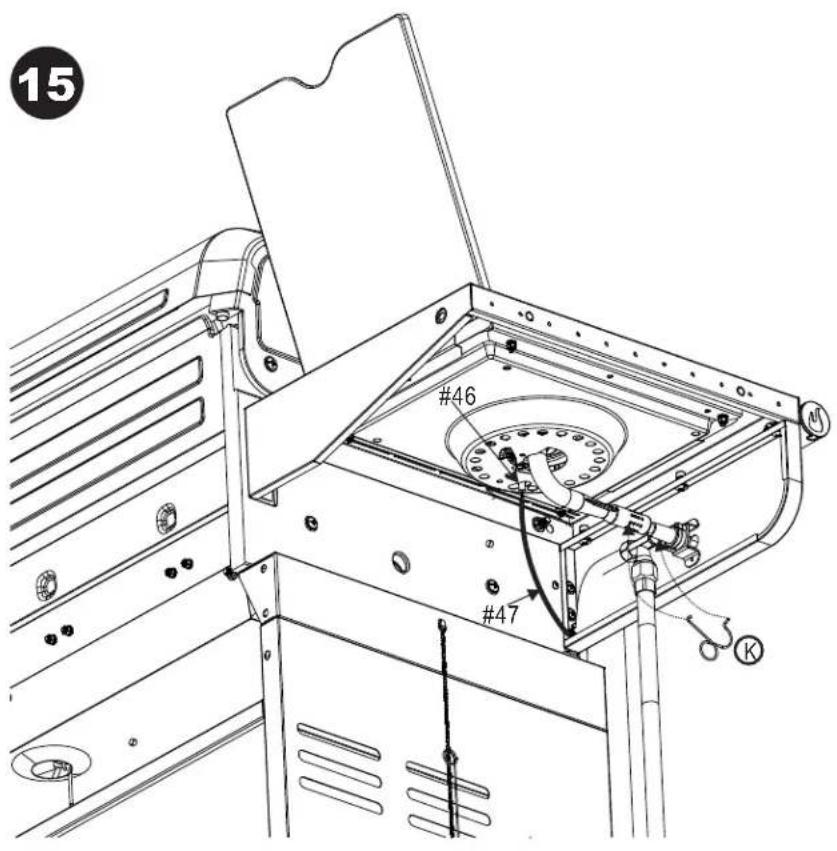
| 46 1 | ELECTRODE, F/ HOT PLATE |
| 47 1 | IGNITOR WIRE, F/ HOT PLATE |
| 48 1 | HOT PLATE GRATE |
| 49 1 | HOT PLATE LID |
| 50 1 | RIGHT SHELF ASSEMBLY |
| 51 1 | HEAT SHIELD, F/ EI MODULE |
| 52 1 | HEAT SHIELD, F/ HANDLE |
| 53 4 | BURNER BRACE |
| 54 2 | HEAT SHIELD, F/ FIREBOX |
| 55 4 | MAGNET ASSEMBLY |
| 56 2 | HANDLE, F/ DOOR |
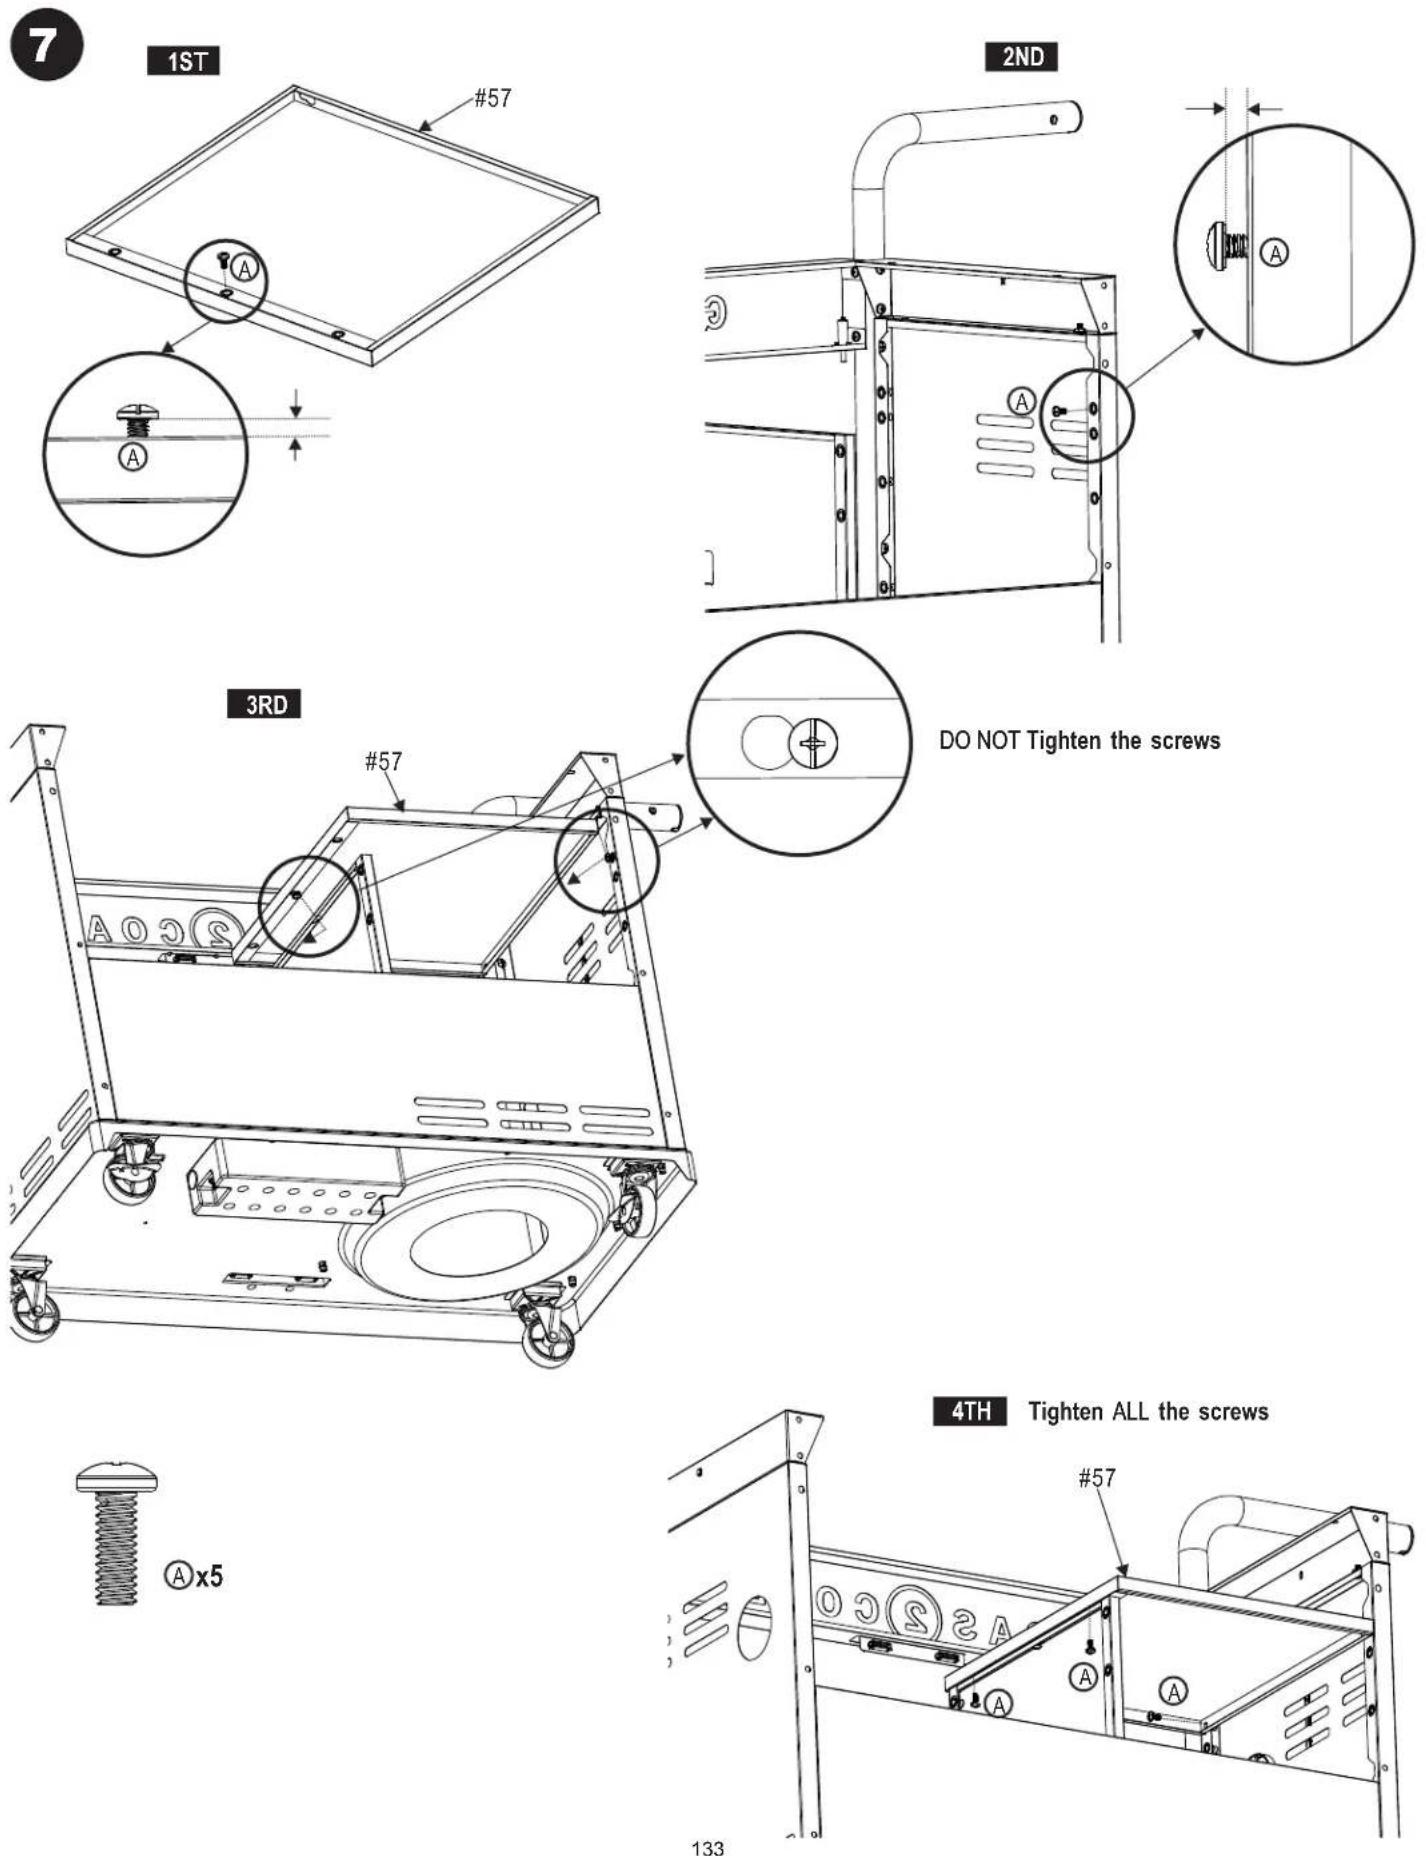
| 57 1 | SHELF, CABINET |
| 58 1 | WEIGHT BLOCK |
| 59 1 | TANK EXCLUSION WIRE |
| 60 1 | RIGHT SIDE PANEL, F/ CART |
| 61 1 | BOTTLE OPENER |
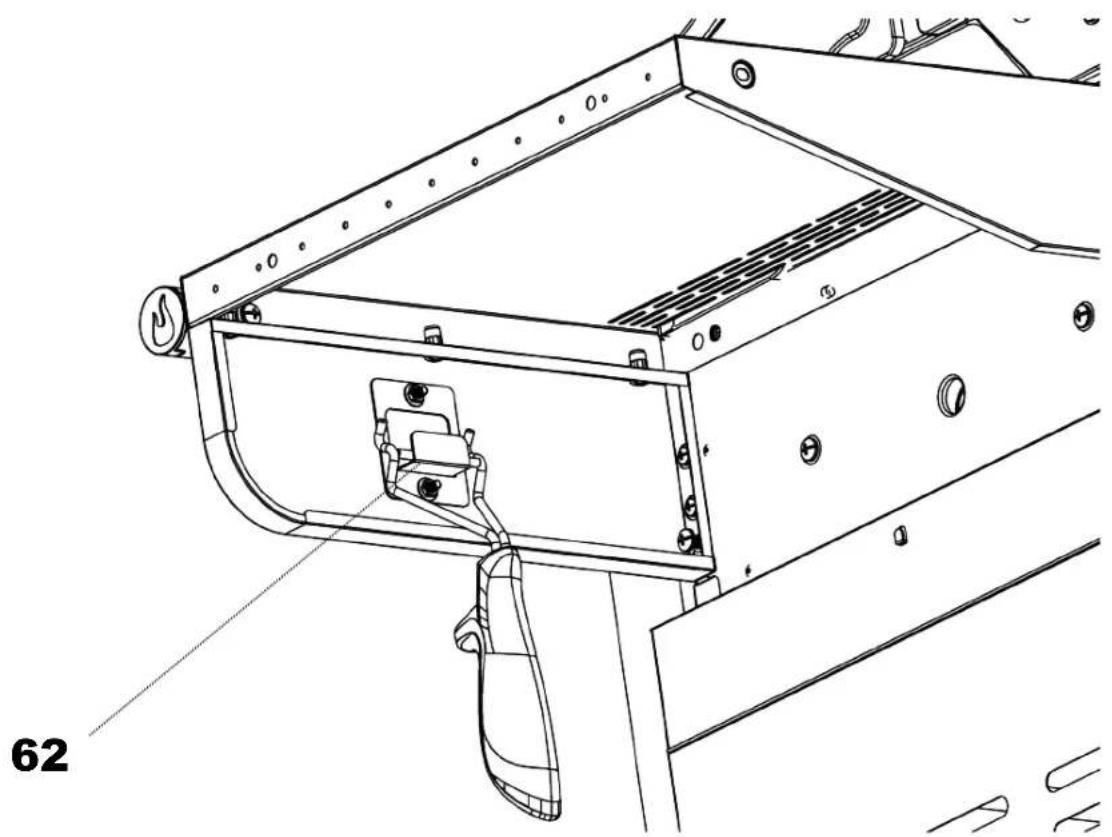
| 62 1 | GRATE TOOL HOLDER |
| 63 1 | TANK STRAP |
NOT Pictured
| ... 1 | PRODUCT GUIDE, EUROPE |
| ... 1 | HARDWARE PACK |
| ... 1 | RETAINER CLIP, F/ HOT PLATE |
| ... 1 | CASTER PIN |
| ... 1 | GRATE TOOL |
NOTE: Some grill parts shown in the assembly steps may differ slightly in appearance from those on your particular grill model. However, the method of assembly remains the same.
PARTS DIAGRAM
ASSEMBLY
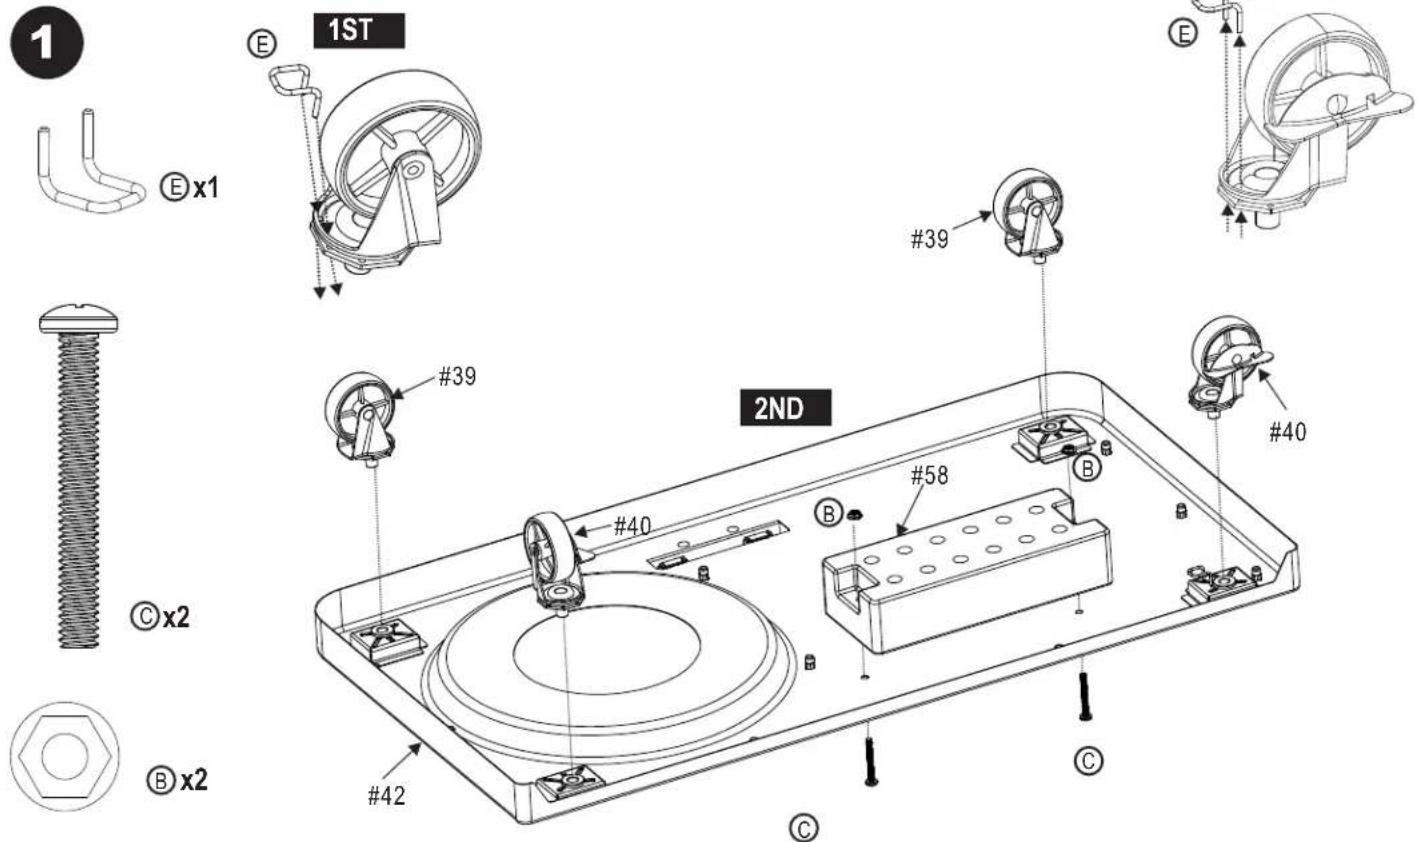
After all 4 casters are secure remove the Caster Pin (E) and save for future maintenance.
2

3
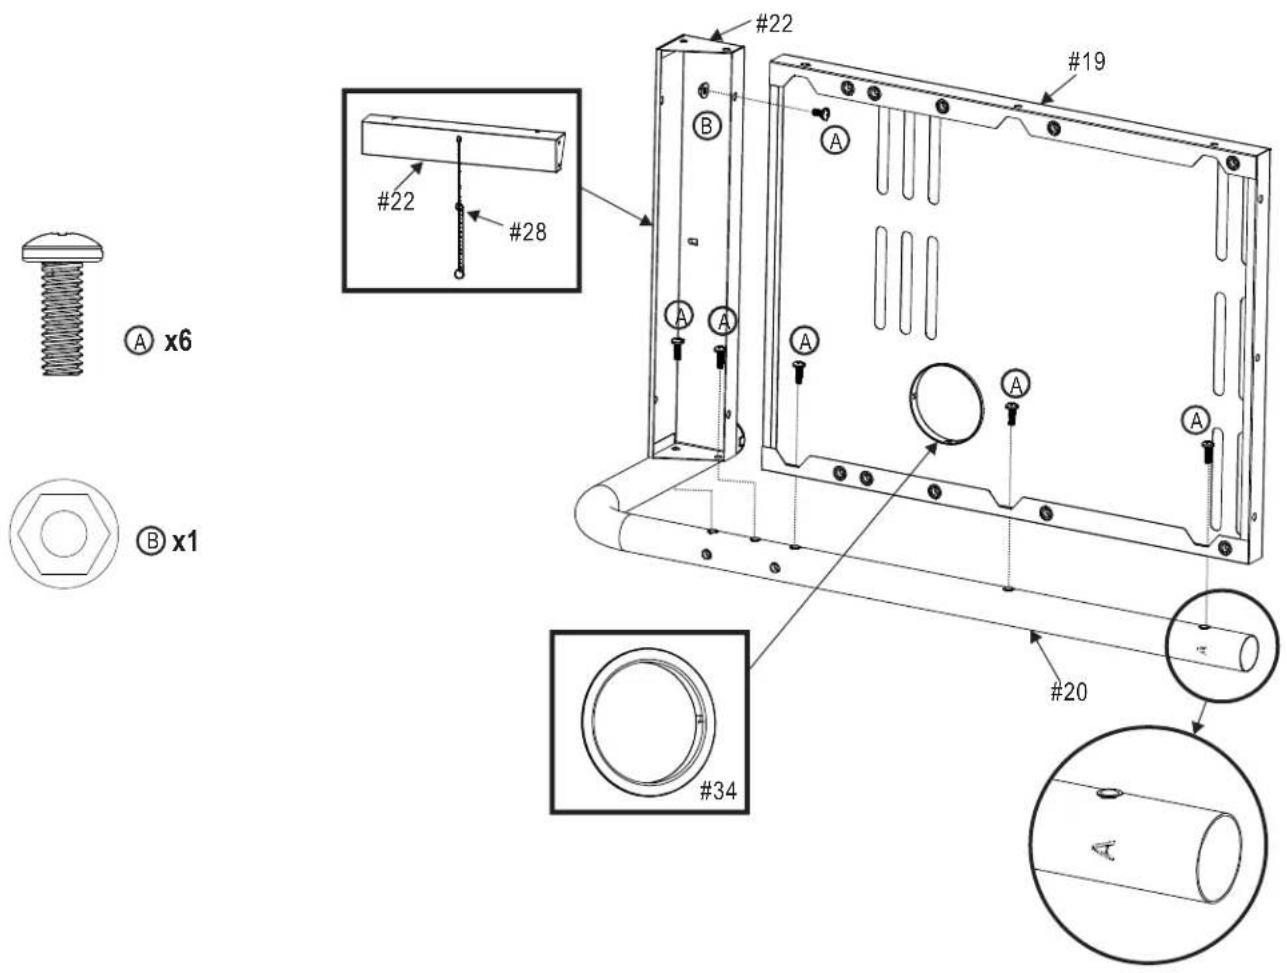
4
8
9


12
13

© x2
14
H x1

Jx1
natural_image
Simple line drawing of a curved pipe or tube with a circular end, no text or symbols present.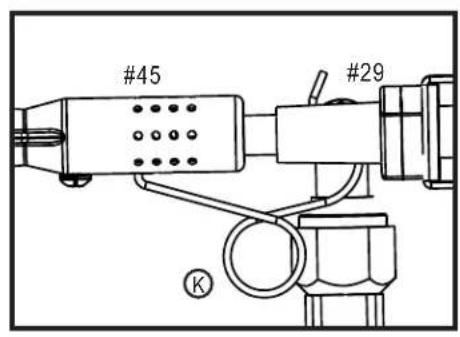
16
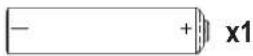
Battery AA
17
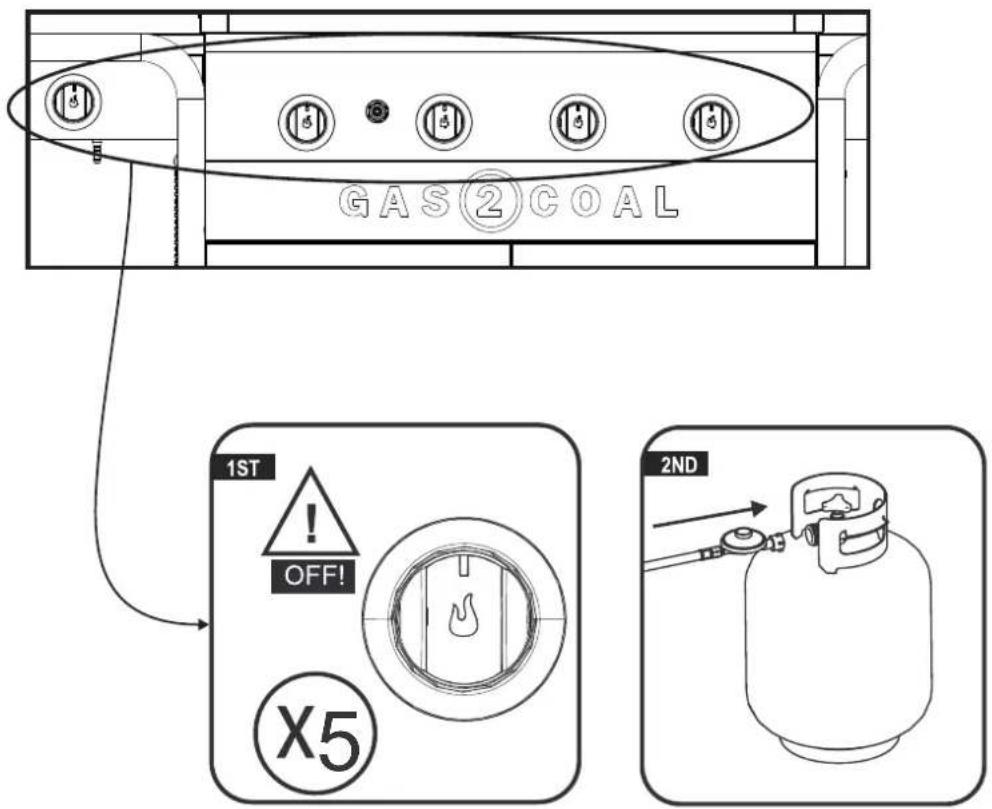
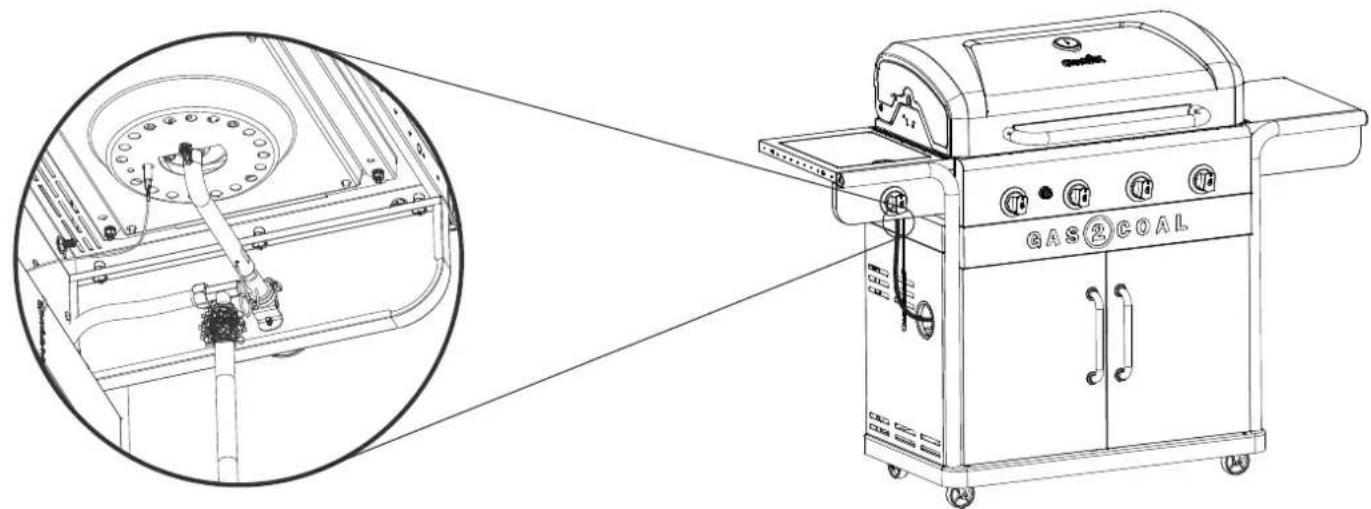
LEAK CHECK FOR MODELS: 468302421
1
2
natural_image
Technical line drawing of a gas-coal gas stove with internal components and a close-up inset showing the assembly (no text or symbols present)
Disconnect the tank after this check! Ontkoppel de gastank na deze controle! Koppla från tanken efter denna kontroll! Koble fra beholderen etter denne kontrollen! Po kontrole nádobu odpojte! Po të kontrole odpojte né Irrota säiliö tämän tarkistuksen jälkeen! Framontér tanken efter denne kontrol! Изключете резервоара след тази проверка!
POZOR!
Failure to install grease cup clip and cup will cause hot grease to drip from bottom of grill with risk of fire or property damage.
MISE EN GARDE
natural_image
Line drawing of a portable gas stove with open doors and control panel (no text or symbols)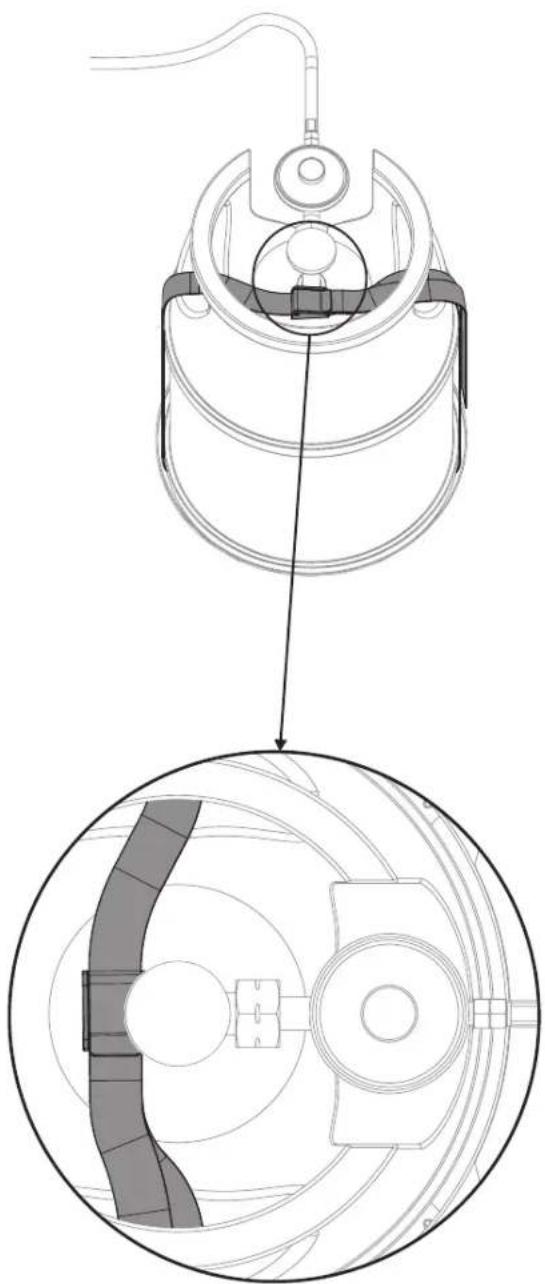
natural_image
Technical line drawing of a mechanical device with a circular cross-section view showing internal components (no text or symbols)24
natural_image
Technical line drawing of a mechanical assembly with no visible text or symbolsGB Leak test before first use, at least once per year, and every time the gas tank is reconnected
Char-Broil Europe GmbH, Paul-Dessau-StraBe 8, Quartier O - 4.OG, D-22761 Hamburg (Char-Broil) warrants to the PURCHASER of this Char-Broil product that it will be free of defects in material and workmanship from the date of purchase as follows:
| Gas2Coal | |
| Burners | 5 years |
| Cooking Grates/Emitters | 2 years |
| Charcoal Pan | 2 years |
| All Other Parts (EURO minimum) | 2 years |
Char-Broil or the seller of the product may require reasonable proof of your date of purchase. THEREFORE, YOU SHOULD RETAIN YOUR SALES RECEIPT OR INVOICE.
[France only: All products sold by the Seller are covered by the legal warranties provided in Articles 1641 and followings of the Civil Code (warranty against hidden defects) and Articles L. 217-1 to L. 217-14 and L. 411-1 to L. 411-2 of the Consumer Code (warranty of conformity.)]
This Warranty includes the right of repair or replacement of the product or parts of the product that prove defective under normal use and service. Before returning any parts, you should promptly contact Char-Broil using the contact information on our website. In case of a defect, Char-Broil will elect to replace or repair the product or such parts without charge. . Char-Broil will return the product or parts of the product to the purchaser, freight or postage prepaid. If Char-Broil elects to repair the product or such defective parts of the product and this repair fails, you are entitled, pursuant to your statutory legal rights, to reduce the purchase price or to withdraw from the contract and receive a refund.
This Warranty does not cover any failures or operating difficulties due to accident, abuse, misuse, alteration, misapplication, vandalism, improper installation or improper maintenance or service, or failure to perform normal and routine maintenance, including but not limited to damage caused by insects within the burner tubes, as set out in this owner's manual. Exceptions may apply, so please contact Char-Broil or your seller in case you have any questions on whether this Warranty applies to your specific case or not.
Deterioration or damage due to severe weather conditions such as hail, hurricanes, earthquakes or tornadoes, discoloration due to exposure to chemicals either directly or in the atmosphere, is not covered by this Warranty, and are not normally covered by your statutory legal rights.
Char-Broil is not liable for any unforeseeable losses (i.e. loss or damage that neither you nor Char-Broil or the seller contemplated at the time of purchase), or any damage caused by you, save for that Char-Broil's liability for fraud or death or personal injury caused by its negligence is not limited.
Char-Broil does not authorize any person or company to assume for it any other obligation or liability in connection with the sale, installation, use, removal, return, or replacement of its equipment; and no such representations are binding on Char-Broil.
This Warranty applies only to products sold at retail to individuals (as opposed to businesses) within the European Union.
This Warranty does not affect any of your statutory legal rights under the applicable consumer laws of your resident country.
For warranty service, contact Char-Broil at info-eu@charbroil.com.
[France only: All products sold by the Seller are covered by the legal warranties provided in Articles 1641 and followings of the Civil Code (warranty against hidden defects) and Articles L. 217-1 to L. 217-14 and L. 411-1 to L. 411-2 of the Consumer Code (warranty of conformity.)]
[France only: All products sold by the Seller are covered by the legal warranties provided in Articles 1641 and followings of the Civil Code (warranty against hidden defects) and Articles L. 217-1 to L. 217-14 and L. 411-1 to L. 411-2 of the Consumer Code (warranty of conformity.)]
[France only: All products sold by the Seller are covered by the legal warranties provided in Articles 1641 and followings of the Civil Code (warranty against hidden defects) and Articles L. 217-1 to L. 217-14 and L. 411-1 to L. 411-2 of the Consumer Code (warranty of conformity.)]
[France only: All products sold by the Seller are covered by the legal warranties provided in Articles 1641 and followings of the Civil Code (warranty against hidden defects) and Articles L. 217-1 to L. 217-14 and L. 411-1 to L. 411-2 of the Consumer Code (warranty of conformity.)]
[France only: All products sold by the Seller are covered by the legal warranties provided in Articles 1641 and followings of the Civil Code (warranty against hidden defects) and Articles L. 217-1 to L. 217-14 and L. 411-1 to L. 411-2 of the Consumer Code (warranty of conformity.)]
[France only: All products sold by the Seller are covered by the legal warranties provided in Articles 1641 and followings of the Civil Code (warranty against hidden defects) and Articles L. 217-1 to L. 217-14 and L. 411-1 to L. 411-2 of the Consumer Code (warranty of conformity.)]
[France only: All products sold by the Seller are covered by the legal warranties provided in Articles 1641 and followings of the Civil Code (warranty against hidden defects) and Articles L. 217-1 to L. 217-14 and L. 411-1 to L. 411-2 of the Consumer Code (warranty of conformity.)]
[France only: All products sold by the Seller are covered by the legal warranties provided in Articles 1641 and followings of the Civil Code (warranty against hidden defects) and Articles L. 217-1 to L. 217-14 and L. 411-1 to L. 411-2 of the Consumer Code (warranty of conformity.)]
(Char-Broil Europe GmbH, Paul-Dessau-Straße 8 Quartier O – 4.OG D-22761 Hamburg (Char-Broil:
[France only: All products sold by the Seller are covered by the legal warranties provided in Articles 1641 and followings of the Civil Code (warranty against hidden defects) and Articles L. 217-1 to L. 217-14 and L. 411-1 to L. 411-2 of the Consumer Code (warranty of conformity.)]
i -eu@chafbroid.com Char-Broil
Char-Broil does not authorize any person or company to assume for it any other obligation or liability in connection with the sale, installation, use, removal, return, or replacement of its equipment; and no such representations are binding on Char-Broil.
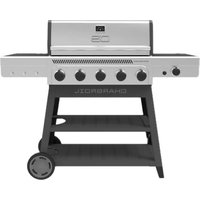
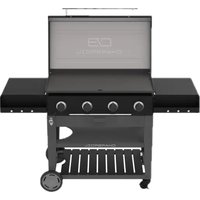

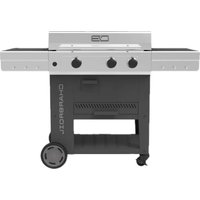
- INSTALLER/ASSEMBLER:
- CONSUMER:
- Questions:
- DANGER
- If you smell gas:
- WARNING
- CAUTION
- Grease Fires
- For Safe Use of Your Appliance and to Avoid Serious Injury:
- Always follow these instructions.
- Safety Tips
- Cylinder Placement
- Regulator Requirements
- Hose Requirements
- Gas Lighting Instructions- Ignitor Lighting
- Match-Lighting
- NOTE: Your barbecue may NOT be equipped with a Hot plate!
- Hot plate Ignitor Lighting
- Hot plate Match Lighting
- Leak Testing Valves, Hose and Regulator
- IF APPLIANCE FAILS TO LIGHT
- SPIDER ALERT!
- SPIDER AND WEBS
- INSIDE BURNER
- Charcoal Lighting Instructions
- Cleaning Recommendations
- Cleaning the Burner Assembly
- VERY IMPORTANT: Burner tubes must reengage valve openings. See illustrations at right.
- Correct burner-to-valve engagement
- Storing Your Appliance
- General Appliance Cleaning
- For Switzerland Only
- WARNING!
- CARBON MONOXIDE HAZARD
- INSTALLATEUR/ASSEMBLEUR :
- Lektest Kleppen, Slang en Regelaar
- Lækagetestning af ventiler, slange og regulator
- Krav for regulatorer
- Skúška tesnosti ventilov, hadice a ovládača
- Skladovanie zariadenia
- Lekapróf á lokum, slöngu og stilli
- Geymsla á grillinu
- Aprinderea grăsimilor
- PARTS LIST
- PARTS DIAGRAM
- 17
- 1
- 2
- POZOR!
- MISE EN GARDE
- 24
Brand : Char-Broil
Model : Gas2Coal 2.0 Line
Category : Grill plate