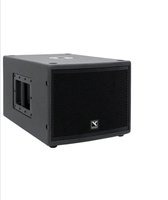
EXM Mobile Sub - Subwoofer YORKVILLE - Free user manual and instructions
Find the device manual for free EXM Mobile Sub YORKVILLE in PDF.


| Product type | Amplified subwoofer |
| Brand | Yorkville |
| Model | EXM Mobile Sub |
| Dimensions (W x D x H) | 55 x 37.5 x 32 cm |
| Weight | 13.6 kg |
| Power supply | AC mains 100-240 V, 50/60 Hz |
| Power consumption | 100 VA |
| Internal battery | Rechargeable lithium-ion, variable runtime |
| Amplifier | Class D |
| Speakers | 2 x 8" (20.3 cm) woofers with 2" voice coil |
| Impedance | 4 ohms |
| Frequency response | 47 Hz - 100 Hz (± 3 dB) |
| Crossover frequency | 100 Hz (low-pass) |
| Inputs | 2 x XLR / 6.35 mm jack combo, Bluetooth 5.0, 3.5 mm stereo input |
| Outputs | 2 x XLR high-pass, 1 x XLR full-range |
| Bluetooth | Audio streaming and wireless stereo pairing between two units |
| Protection | Excursion limiter, thermal, clipping |
| Cabinet material | 12 mm birch plywood |
| Finish | Paint |
| LED indicators | Activity, battery level (4 LEDs), charge status, Bluetooth |
| Max SPL | 116 dB continuous, 122 dB peak (C-weighted) |
| Stacking | Interlocking rubber feet (top/bottom) |
| Usage | Indoor only |
| Care and cleaning | Clean with a dry cloth |
| Safety | Do not expose to water or moisture, do not open |
Frequently Asked Questions - EXM Mobile Sub YORKVILLE
User questions about EXM Mobile Sub YORKVILLE
0 question about this device. Answer the ones you know or ask your own.
Ask a new question about this device
Download the instructions for your Subwoofer in PDF format for free! Find your manual EXM Mobile Sub - YORKVILLE and take your electronic device back in hand. On this page are published all the documents necessary for the use of your device. EXM Mobile Sub by YORKVILLE.
USER MANUAL EXM Mobile Sub YORKVILLE

WEB: www.yorkville.com
WORLD HEADQUARTERS
CANADA
Yorkville Sound Limited
550 Granite Court
Pickering, Ontario
L1W 3Y8 CANADA
Voice: 905-837-8481
Fax: 905-837-8746
U.S.A.
Yorkville Sound Inc.
4625 Witmer Industrial Estate
Niagara Falls, New York
14305, USA
Voice: 716-297-2920
Fax: 716-297-3689
Quality and Innovation Since 1963
Printed in Canada

SERVICE MANUAL
EXM-MOBILES
SMT Disclaimer
Due to the complex nature of the use of SMT installed components in Yorkville equipment, we highly caution all service technicians in attempting to repair or replace SMT factory installed components.
Many of these components may be glued prior to initial soldering
Replacing SMT components requires expensive
specialized de-soldering equipment and training.
Yorkville Sound will repair and replace defective SMT components to ensure proper quality assurance and installation is maintained.
IMPORTANT SAFETY INSTRUCTIONS

This lightning flash with arrowhead symbol, within an
equilateral triangle, is intended to alert the user to the presence of uninsulated "dangerous voltage" within the product's enclosure that may be of sufficient magnitude to constitute a risk of electric shock to persons.
The DO NOT STACK symbol is inlanded to alert the user that the product shall not be vertically slacked because of the nature of the product.
The excitation point within an equilateral triangle is intended to alert the user to the presence of important operating and maintenance (servicing) instructions in the literature accompanying the appliance.
Instructions pertaining to a risk of fire, electric shock, or injury to a person
CAUTION: TO REDUCE THE RISK OF ELECTRIC SHOCK, DO NOT REMOVE COVER (OR BACK). NO USER SERVICEABLE PARTS INSIDE. REFER SERVICING TO QUALIFIED SERVICE
PERSONNEL. THIS DEVICE IS FOR INDOOR USE ONLY!
INSTALLED BATTERY PACKS SHALL NOT BE EXPOSED TO EXCESSIVE HEAT SUCH AS SUNSHINE, FIRE OR THE LIKE.
Read Instructions: The Owner's Manual should be read and understood before operation of your unit. Please, save these instructions for future reference and heed all warnings.
Cleaning: Clean only with dry cloth.
Packaging: Keep the box and packaging materials, in case the unit needs to be returned for service.
Warning: To reduce the risk or fire or electric shock, do not expose this apparatus to rain or moisture. Do not use this apparatus near water!
Warning: When using electric products, basic precautions should always be followed, including the following:
Power Sources
Your unit should be connected to a power source only of the voltage specified in the owners manual or as marked on the unit. This unit has a polarized plug. Do not use with an extension cord or receptacle unless the plug can be fully inserted. Precautions should be taken so that the grounding scheme on the unit is not defeated. An apparatus with CLASS I construction shall be connected to a Mains socket outlet with a protective earthing connection. Where the MAINS plug or an appliance coupler is used as the disconnect device, the disconnect device shall remain readily operable.
Hazards
Do not place this product on an unstable cart, stand, tripod, bracket or table. The product may fail, causing serious personal injury and serious damage to the product. Use only with cart, stand, tripod, bracket, or table recommended by the manufacturer or sold with the product. Follow the manufacturer's instructions when installing the product and use mounting accessories recommended by the manufacturer. Only use attachments/assessories specified by the manufacturer.
Equipment that is suspended overhead must use a secondary safeguard to prevent personal injury in the event the primary mounting mechanism fails. Safety eyebolts attached to the equipment and galvanized steel wire can be used together to implement a fallsafe mounting thus ensuring the safety of the equipment and anyone positioned below the equipment.
Improper installation can result in bodily injury or death. If you are not qualified to attempt the installation get help from a professional structural rigger. Notes: Prolonged use of headphones at a high volume may cause health damage to your ears.
The apparatus should not be exposed to dripping or splashing water; no objects filled with liquids should be placed on the apparatus.
Terminals marked with the "lightning bolt" are hazardous live; the external wiring connected to these terminals require installation by an instructed person or the use of ready made leads or cords.
Ensure that proper ventilation is provided around the appliance. Do not install near any heat sources such as radiators, heat registers, sloves, or other apparatus (including amplifiers) that produce heat.
No naked flame sources, such as lighted candles, should be placed on the apparatus.
Power Cord
Do not defeat the safety purpose of the polarized or grounding-type plug. A polarized plug has two blades with one wider than the other. A grounding type plug has two blades and a third grounding prong. The wide blades or the third prong are provided for your safety. If the provided plug does not fill into your outlet, consult an electrician for replacement of the obsolete outlet. The AC supply cord should be routed so that it is unlikely that it will be damaged. Protect the power cord from being walked on or pinched particularly at plugs. If the AC supply cord is damaged DO NOT OPERATE THE UNIT. To completely disconnect this apparatus from the AC Mains, disconnect the power supply cord plug from the AC receptacle. The mains plug of the power supply cord shall remain readily operable.
Unplug this apparatus during lightning storms or when unused for long periods of time.
Service
The unit should be serviced only by qualified service personnel. Servicing is required when the apparatus has been damaged in any way, such as power-supply cord or plug is damaged, liquid has been spilled or objects have fallen into the apparatus, the apparatus has been exposed to rain or moisture, does not operate normally, requires battery pack replacement or has been dropped. Disconnect power before servicing!
IMPORTANT SAFETY INSTRUCTIONS

The Lightning Flash with arrowhead symbol within an equilateral triangle, is intended to alert the user to the presence of uninsulated "dangerous voltage" within the product enclosure that may be of sufficient magnitude to constitute a risk of shock to persons

The exclamation point within an equilateral triangle is intended to alert the user to the presence of important operating and maintenance (servicing) instructions in the literature accompanying the product
-
Read these instructions.
-
Keep these instructions.
-
Head all warnings.
-
Follow all instructions.
-
Do not use this apparatus near water.
-
Clean only with dry cloth.
-
Do not block any ventilation openings. Install in accordance with the manufacturer's instructions.
-
Do not install near any heat sources such as radiators, heat registers, stoves, or other apparatus (including amplifiers) that produce heat.
-
Do not defeat the safety purpose of the polarized or grounding-type plug. Apolarized plug has two blades with one wider than the other. A grounding type plug has two blades and a third grounding prong. The wide blade or the third prongs are provided for your safety. If the provided plug does not fit into your outlet, consult an electrician for replacement of the obsolete outlet.
-
Protect the power cord from being walked on or pinched particularly at plugs, convenience receptacles, and the point where they exit from the apparatus.
-
Only use attachments/accessories specified by the manufacturer.
-
Use only with the cart, stand, tripod, bracket, or table specified by the manufacturer, or sold with the apparatus. When a cart is used, use caution when moving the cart/apparatus combination to avoid injury from lip-over.
-
Unplug this apparatus during lightning storms or when unused for long periods of time.
-
Refer all servicing to qualified service personnel. Servicing is required when the apparatus has been damaged in any way, such as power-supply cord or plug is damaged, liquid has been spilled or objects have fallen into the apparatus, the apparatus has been exposed to rain or moisture, does not operate normally, or has been dropped.
WARNING:
• To reduce the risk of fire or electric shock, do not expose this apparatus to rain or moisture and objects filled with liquids, such as vases, should not be placed on this apparatus.
• To completely disconnect this apparatus from the ac mains, disconnect the power supply cord plug from the ac receptacle.
- The mains plug of the power supply cord or appliance coupler shall remain readily accessible.

POUR PRÉVENIR LES RISQUES D'ÉLECTROCUTION,
NE PAS RACCORDER A L'ALIMENTATION ÉLECTRIQUE ALORS QUE LA GRILLE EST RETIRÉE.

Specifications
Active or Passive Active
Program Power (watts) 100 watts, program (175 watts, peak)
Measured Max SPL (C-Weighted, Max Hold) 116dB Continuous, 122 dB Peak
Frequency Response (Hz +/- 3dB) 47Hz-100Hz
Crossover Frequency (Hz) 100 Hz Lowpass
Cabinet Configuration Bass Reflex
Driver Configuration 2x 8-inch LF woofer
LF Driver(s) 8-inch Neo with 2-inch Voice Coil
LF Impedance (ohms) 4 ohm Load (2x 8 ohm in Parallel)
LF Protection Excursion, Voice Coil Thermal (RMS)
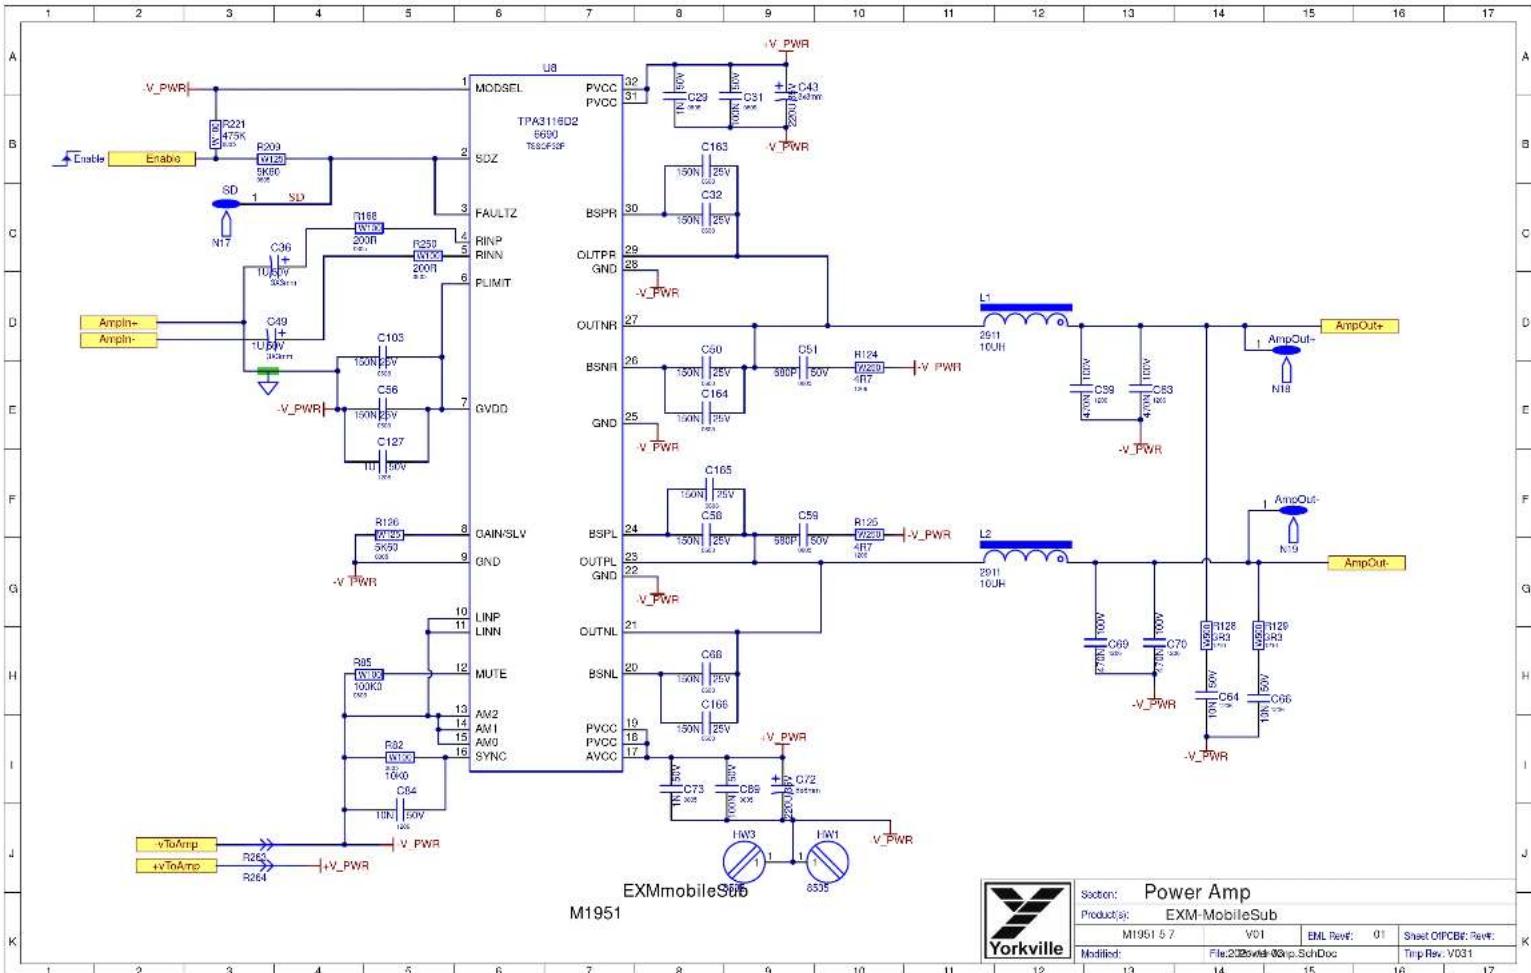
LF Amplifier Type Class D
Cooling Scheme Convection
Power Cable Yes
Power Switch Yes
Power Consumption 100VA
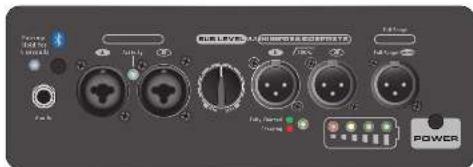
Inputs 2x (L&R) XLR / ¼-inch Combi-jack, Bluetooth™, 3.5mm Stereo,
Outputs 2x XLR (L&R)High Pass Out, XLR Full Range Mix Out
Level Controls Sub Level
Limiter Excursion, Thermal (RMS), Clipping
LED Indicators Activity, 4x Battery Level, Charging Status, Bluetooth™
Enclosure Materials 12 mm Birch Plywood
Stacking Feature Interlocking Rubber Feet (top/bottom)
Covering / Finish Paint
Dimensions (DWH xbackW, inches) 21.625 x 14.750 x 12.5
Dimensions (DWH xbackW, cm) 55 x 37.5 x 32
Weight (lbs/kg) 30/13.6
Specifications subject to change without notice
Spécifications
Active ou Passive Active
Puissance Nominale (watts) 100 watts, programme (175 watts, crête)
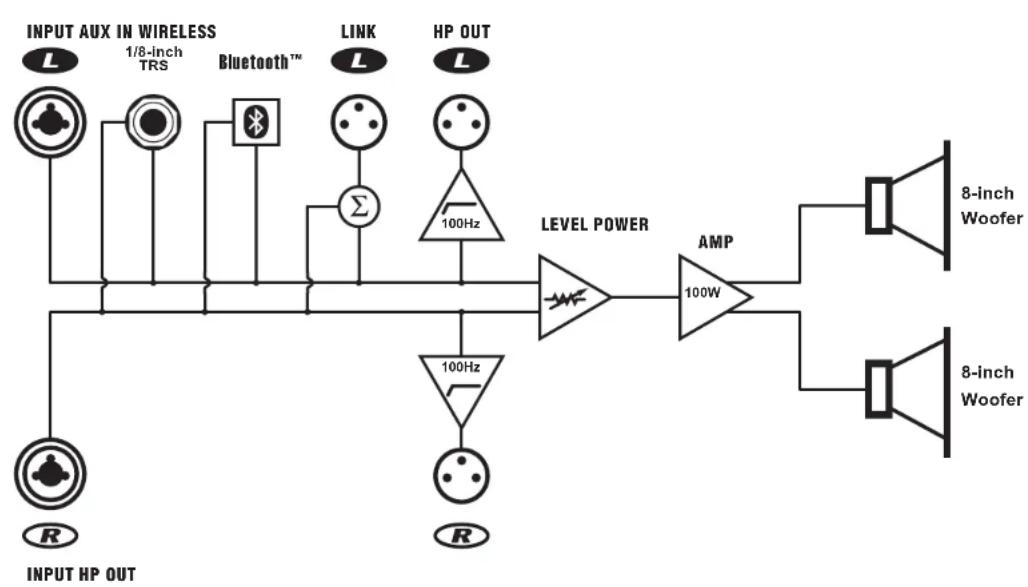
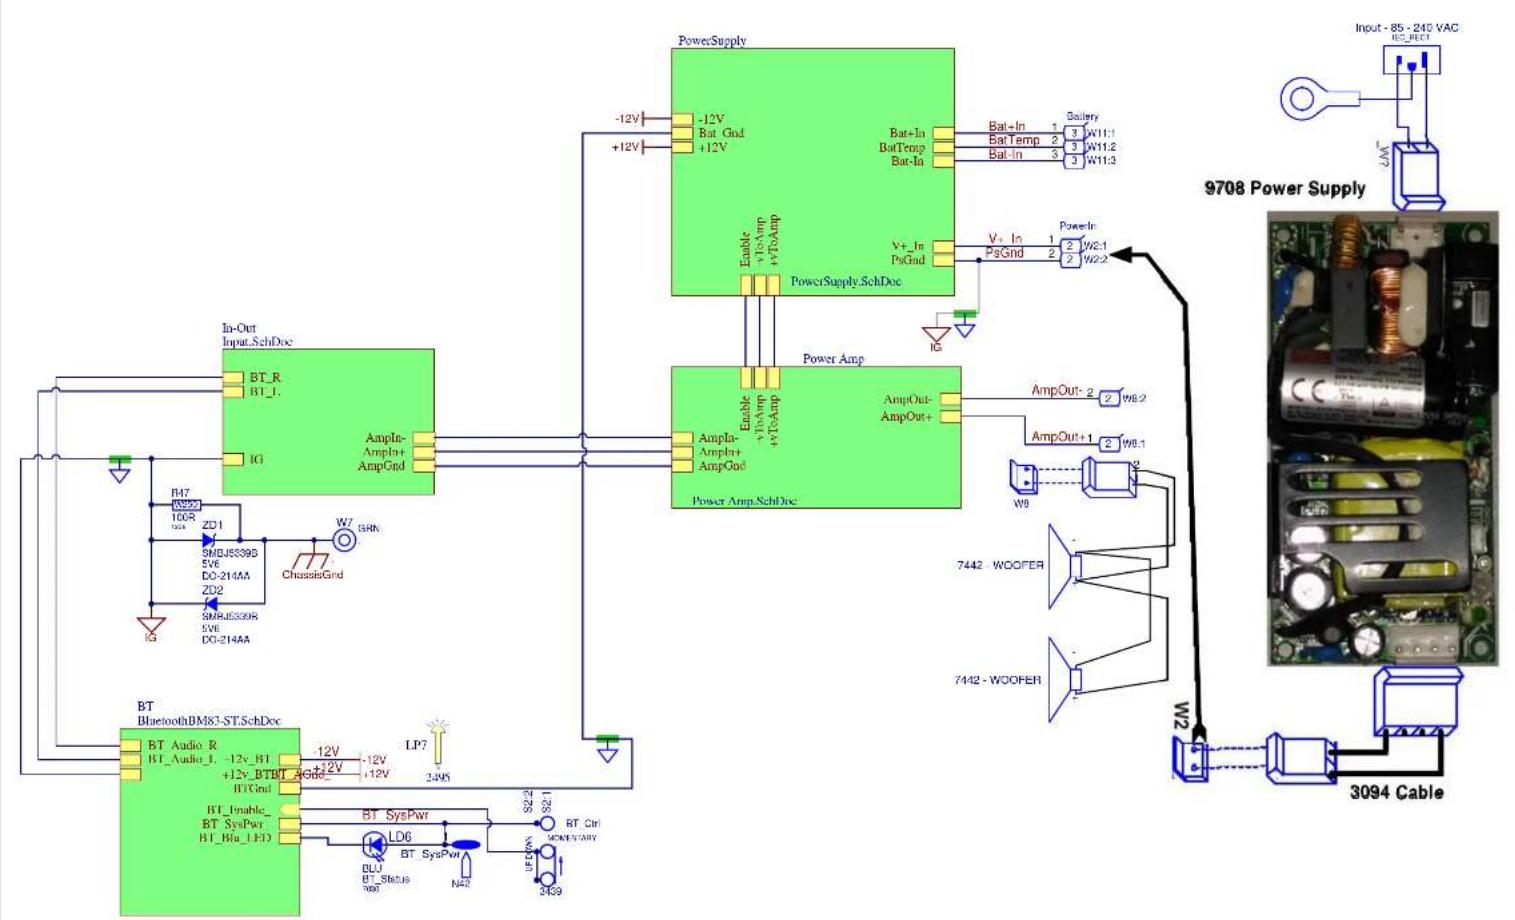
Block Diagram for EXM MobileSUB
DESIGNED & MANUFACTURED BY YORKVILLE SOUND
flowchart
graph LR
    A["INPUT AUX IN WIRELESS"] --> B["L"]
    B --> C["1/8-inch TRS"]
    C --> D["Bluetooth™"]
    D --> E["LINK"]
    E --> F["L"]
    F --> G["HP OUT"]
    G --> H["L"]
    H --> I["100Hz"]
    I --> J["LEVEL POWER"]
    J --> K["AMP"]
    K --> L["8-inch Woofer"]
    K --> M["8-inch Woofer"]
    J --> N["100W"]
    N --> O["R"]
    P["INPUT HP OUT"] --> Q["R"]
M1951 02 P1 Parts Reference List 8/5/2021
| REF | YS # | Description | REF | YS # | Description | REF | YS # | Description | REF | YS # | Description | ||||||||
| 100V | 25V 20V/CAP | 5X5.4 SMT ELE | 111 | 100V 55V 5NCAP | 906 SMT XTR | 111 | 4148 | MLR VALE PCB MT VERT 24VM A SERIES | 111 | W125 6B1R 1% | 806 SMT RES | 111 | W100 3R3 5% | 1210 SMT RES | |||||
| 22 | 52/2 | 100V | 100V 5X/CAP T&4 RAD | 21 L2 | 111 | 100V 55V 5NCAP | 906 SMT XTR | 211 | 5218 | 5NVA OK PC30 MT YST SPIN SUB 410K | 111 | W125 675 1% | 806 SMT HLS | 1129 | W100 3R3 5% | 1210 SMT HLS | |||
| 23 | 52/2 | 100V | 100V 5X/CAP T&4 RAD | 21 L2 | 111 | 100V 55V 5NCAP | 906 SMT XTR | 211 | 6008 | 5NVA OK PC30 MT YCT COMO NEUTRK | 111 | W100 2K6R 1% | 806 SMT HLS | 1123 | W100 6R1 5% | 2010 SMT HLS | |||
| 24 | 52/9 | 150V | 65V 10X/CAP T&4 RAD | 2F1L2 | 111 | 100V 55V 5NCAP | 906 SMT XTR | 211 | 4148 | MLD VALE PCB MT VERT 24VM A SERIES | 111 | W100 4K6R 1% | 806 SMT HRS | 1125 | W125 3K62 1% | 806 SMT RES | |||
| 25 | 52/2 | 100V | 100V 5X/CAP T&4 RAD | 2F1L2 | 111 | 100V 55V 5NCAP | 906 SMT XTR | 211 | 10, 200K | LED 1V7 ZONA 1206 SMT | 111 | W100 4K6R 1% | 806 SMT HLS | 1125 | W125 3K62 1% | 806 SMT RES | |||
| 26 | 52/2 | 100V | 100V 5X/CAP T&4 RAD | 2F1L2 | 111 | 100V 55V 5NCAP | 906 SMT XTR | 211 | 10, 200K | LED 1V7 ZONA 1206 SMT | 111 | W100 4K6R 2% | 806 SMT HLS | 1125 | W125 3K62 1% | 806 SMT RES | |||
| 27 | 52/2 | 100V | 100V 5X/CAP T&4 RAD | 2F1L2 | 111 | 100V 55V 5NCAP | 906 SMT XTR | 211 | 10, 200K | LED 1V7 ZONA 1206 SMT | 111 | W100 4K6R 3% | 806 SMT HLS | 1125 | W125 3K62 1% | 806 SMT RES | |||
| 28 | 52/2 | 100V | 100V 5X/CAP T&4 RAD | 2F1L2 | 111 | 100V 55V 5NCAP | 906 SMT XTR | 211 | 3306 | 5TUII CHINE 900 RD | 111 | W100 4K6R 1% | 806 SMT RES | 1127 | W100 1K6 1% | 806 SMT RES | |||
| 29 | 52/2 | 100V | 100V 5X/CAP T&4 RAD | 2F1L2 | 111 | 100V 55V 5NCAP | 5X5.4 SMT EL | 111 | 2YUUL CHINE 900 RD | 111 | W100 1K6R 1% | 806 SMT RES | 1128 | W125 10K6 1% | 806 SMT RES | ||||
| 30 | 52/2 | 100V | 100V 5X/CAP T&4 RAD | 2F1L2 | 111 | 100V 55V 5NCAP | 1206 SMT NPO | 111 | 2YUUL CHINE 900 RD | 111 | W100 2K6R 1% | 806 SMT RES | 1124 | W125 3K62 1% | 806 SMT RES | ||||
| 31 | 52/2 | 100V | 100V 5X/CAP T&4 RAD | 2F1L2 | 111 | 100V 55V 5NCAP | 906 SMT XTR | 111 | YES | LED 1V7 ZONA 1206 SMT | 111 | W100 1K6R 1% | 806 SMT RES | 1125 | W125 2K6 1% | 1206 SMT RES | |||
| 32 | 52/2 | 100V | 100V 5X/CAP T&4 RAD | 2F1L2 | 111 | 100V 55V 5NCAP | 906 SMT XTR | 111 | CRN | LED 1V7 ZONA 1206 SMT | 111 | W100 4K6R 1% | 806 SMT HRS | 1125 | W125 2K6 1% | 1206 SMT RES | |||
| 33 | 52/2 | 100V | 100V 5X/CAP T&4 RAD | 2F1L2 | 111 | 100V 55V 5NCAP | 8X6.4 SMT EL | 111 | ROGN | LED 1V7 ZONA 906 SMT | 111 | W250 100R 5% | 1206 SMT HRS | 1125 | W100 1K6 1% | 806 SMT RES | |||
| 34 | 52/2 | 100V | 100V 5X/CAP T&4 RAD | 2F1L2 | 111 | 100V 55V 5NCAP | 10KAD RAD 2FLW | 111 | YES | LED 1V7 ZONA 1206 SMT | 111 | W125 6K1R 1% | 806 SMT HRS | 1127 | W125 1K6 1% | 806 SMT RES | |||
| 35 | 52/2 | 100V | 100V 5X/CAP T&4 RAD | 2F1L2 | 111 | 100V 55V 5NCAP | 906 SMT XTR | 111 | BLU | LED 2V3 ZONA 1206 SMT | 111 | W100 1K6R 1% | 806 SMT RES | 1128 | W125 10K6 1% | 806 SMT RES | |||
| 36 | 52/9 | 180V | 50V 5X/CAP T&4 RAD | 2F1L2 | 111 | 180V 50V 5NCAP | 906 SMT NPO | 111 | CRN | LED 2V3 ZONA 1206 SMT | 111 | W125 6K1R 1% | 806 SMT HRS | 1129 | W100 4K6R 1% | 806 SMT RES | |||
| 37 | 52/9 | 180V | 50V 5X/CAP T&4 RAD | 2F1L2 | 111 | 180V 50V 5NCAP | 906 SMT NPO | 111 | CRN | LED 2V3 ZONA 1206 SMT | 111 | W125 6K1R 1% | 806 SRT HRS | 1129 | W100 4K6R 1% | 806 SMT RES | |||
| 38 | 52/9 | 180V | 50V 5X/CAP T&4 RAD | 2F1L2 | 111 | 180V 50V 5NCAP | 906 SMT NPO | 111 | CRN | LED 2V3 ZONA 1206 SMT | 111 | W125 6K1R 1% | 806 SPT HRS | 1129 | W100 4K6R 1% | 806 SMT RES | |||
| 39 | 52/9 | 180V | 50V 5X/CAP T&4 RAD | 2F1L2 | 111 | 180V 50V 5NCAP | 906 SMT NPO | 111 | CRN | LED 2V3 ZONA 1206 SMT | 111 | W125 6K1R 1% | 806 SHT HRS | 1129 | W100 4K6R 1% | 806 SMT RES | |||
| 40 | 52/9 | 180V | 50V 5X/CAP T&4 RAD | 2F1L2 | 111 | 180V 50V 5NCAP | 906 SMT NPO | 111 | CRN | LED 2V3 ZONA 1206 SMT | 111 | W125 6K1R 1% | 806 SFT HRS | 1129 | W100 4K6R 1% | 806 SMT RES | |||
| 41 | 52/9 | 180V | 50V 5X/CAP T&4 RAD | 2F1L2 | 111 | 180V 50V 5NCAP | 906 SMT NPO | 111 | CRN | LED 2V3 ZONA 1206 SMT | 111 | W125 6K1R 1% | 806 SBT HRS | 1129 | W100 4K6R 1% | 806 SMT RES | |||
| 42 | 52/9 | 180V | 50V 5X/CAP T&4 RAD | 2F1L2 | 111 | 180V 50V 5NCAP | 906 SMT NPO | 111 | CRN | LED 2V3 ZONA 1206 SMT | 111 | W125 6K1R 1% | 806 SXT HRS | 1129 | W100 4K6R 1% | 806 SMT RES | |||
| 43 | 52/9 | 180V | 50V 5X/CAP T&4 RAD | 2F1L2 | 111 | 180V 50V 5NCAP | 906 SMT NPO | 111 | CRN | LED 2V3 ZONA 1206 SMT | 111 | W125 6K1R 1% | 806 SST HRS | 1129 | W100 4K6R 1% | 806 SMT RES | |||
| 44 | 52/9 | 180V | 50V 5X/CAP T&4 RAD | 2F1L2 | 111 | 180V 50V 5NCAP | 906 SMT NPO | 111 | CRN | LED 2V3 ZONA 1206 SMT | 111 | W125 6K1R 1% | 806 SIT HRS | 1129 | W100 4K6R 1% | 806 SMT RES | |||
| 45 | 52/9 | 180V | 50V 5X/CAP T&4 RAD | 2F1L2 | 111 | 180V 50V 5NCAP | 906 SMT NPO | 111 | CRN | LED 2V3 ZONA 1206 SMT | 111 | W125 6K1R 1% | 806 SUT HRS | 1129 | W100 4K6R 1% | 806 SMT RES | |||
| 46 | 52/9 | 180V | 50V 5X/CAP T&4 RAD | 2F1L2 | 111 | 180V 50V 5NCAP | 906 SMT NPO | 111 | CRN | LED 2V3 ZONA 1206 SMT | 111 | W125 6K1R 1% | 806SUT HRS | 1129 | W100 4K6R 1% | 806 SMT RES | |||
| 47 | 52/9 | 180V | 50V 5X/CAP T&4 RAD | 2F1L2 | 111 | 180V 50V 5NCAP | 906 SMT NPO | 111 | CRN | LED 2V3 ZONA 1206 SMT | 111 | W125 6K1R 1% | 806SIT HRS | 1129 | W100 4K6R 1% | 806 SMT RES | |||
| 48 | 52/9 | 180V | 50V 5X/CAP T&4 RAD | 2F1L2 | 111 | 180V 50V 5NCAP | 906 SMT NPO | 111 | CRN | LED 2V3 ZONA 1206 SMT | 111 | W125 6K1R 1% | 806SST HRS | 1129 | W100 4K6R 1% | 806 SMT RES | |||
| 49 | 52/9 | 180V | 50V 5X/CAP T&4 RAD | 2F1L2 | 111 | 180V 50V 5NCAP | 906 SMT NPO | 111 | CRN | LED 2V3 ZONA 1206 SMT | 111 | W125 6K1R 1% | 806SPT HRS | 1129 | W100 4K6R 1% | 806 SMT RES | |||
| 50 | 52/9 | 180V | 50V 5X/CAP T&4 RAD | 2F1L2 | 111 | 180V 50V 5NCAP | 906 SMT NPO | 111 | CRN | LED 2V3 ZONA 1206 SMT | 111 | W125 6K1R 1% | 806SHT HRS | 1129 | W100 4K6R 1% | 806 SMT RES | |||
| 51 | 52/9 | 180V | 50V 5X/CAP T&4 RAD | 2F1L2 | 111 | 180V 50V 5NCAP | 906 SMT NPO | 111 | CRN | LED 2V3 ZONA 1206 SMT | 111 | W125 6K1R 1% | 806SHP HRS | 1129 | W100 4K6R 1% | 806 SMT RES | |||
| 52 | 52/9 | 180V | 50V 5X/CAP T&4 RAD | 2F1L2 | 111 | 180V 50V 5NCAP | 906 SMT NPO | 111 | CRN | LED 2V3 ZONA 1206 SMT | 111 | W125 6K1R 1% | 806SVT HRS | 1129 | W100 4K6R 1% | 806 SMT RES | |||
| 53 | 52/9 | 180V | 50V 5X/CAP T&4 RAD | 2F1L2 | 111 | 180V 50V 5NCAP | 906 SMT NPO | 111 | CRN | LED 2V3 ZONA 1206 SMT | 111 | W125 6K1R 1% | 806SRT HRS | 1129 | W100 4K6R 1% | 806 SMT RES | |||
| 54 | 52/9 | 180V | 50V 5X/CAP T&4 RAD | 2F1L2 | 111 | 180V 50V 5NCAP | 906 SMT NPO | 111 | CRN | LED 2V3 ZONA 1206 SMT | 111 | W125 6K1R 1% | 806SVP HRS | 1129 | W100 4K6R 1% | 806 SMT RES | |||
| 55 | 52/9 | 180V | 50V 5X/CAP T&4 RAD | 2F1L2 | 111 | 180V 50V 5NCAP | 906 SMT NPO | 111 | CRN | LED 2V3 ZONA 1206 SMT | 111 | W125 6K1R 1% | 806SVC HRS | 1129 | W100 4K6R 1% | 806 SMT RES | |||
| 56 | 52/9 | 180V | 50V 5X/CAP T&4 RAD | 2F1L2 | 111 | 180V 50V 5NCAP | 906 SMT NPO | 111 | CRN | LED 2V3 ZONA 1206 SMT | 111 | W125 6K1R 1% | 806SVH HRS | 1129 | W100 4K6R 1% | 806 SMT RES | |||
| 57 | 52/9 | 180V | 50V 5X/CAP T&4 RAD | 2F1L2 | 111 | 180V 50V 5NCAP | 906 SMT NPO | 111 | CRN | LED 2V3 ZONA 1206 SMT | 111 | W125 6K1R 1% | 806SVT HRS | 1129 | W100 4K6R 1% | 806 SMT RES | |||
| 58 | 52/9 | 180V | 50V 5X/CAP T&4 RAD | 2F1L2 | 111 | 180V 50V 5NCAP | 906 SMT NPO | 111 | CRN | LED 2V3 ZONA 1206 SMT | 111 | W125 6K1R 1% | 806SVSP HRS | 1129 | W100 4K6R 1% | 806 SMT RES | |||
| 59 | 52/9 | 180V | 50V 5X/CAP T&4 RAD | 2F1L2 | 111 | 180V 50V 5NCAP | 906 SMT NPO | 111 | CRN | LED 2V3 ZONA 1206 SMT | 111 | W125 6K1R 1% | 806SVTP HRS | 1129 | W100 4K6R 1% | 806 SMT RES | |||
| 60 | 52/9 | 180V | 50V 5X/CAP T&4 RAD | 2F1L2 | 111 | 180V 50V 5NCAP | 906 SMT NPO | 111 | CRN | LED 2V3 ZONA 1206 SMT | 111 | W125 6K1R 1% | 806SVIT HRS | 1129 | W100 4K6R 1% | 806 SMT RES | |||
M1951 02 P2 Parts Reference List 8/5/2021
| REF YS # Description REF YS # Description REF YS # Description REF YS # Description REF YS # Description | ||||||||||||||
| 1.1 | SWBS DUAL TOOTH DIGITAL SMT MCD | |||||||||||||
| 1.2 | TLB62 DUAL OPAMP LOPWIL SMT SOICU | |||||||||||||
| 1.3 | MM00HV PFET BUCK SMT IC VSSDP-KIP | |||||||||||||
| 1.4 | MS00D DUAL COMPARATOR SMT SOX | |||||||||||||
| 1.5 | MCS008SADR BUCKBOXIST INV IC 508 | |||||||||||||
| 1.6 | MCJ008SADR BUCKBOOST INV IC 509 | |||||||||||||
| 1.7 | 2501 | 75% POWER VH MALE 158 10A RA | ||||||||||||
| 1.8 | 3543 | PIN BREAKWAY RA 50 LOCK 1583 | ||||||||||||
| 1.1 | 4259 | PIN POWER VH MALE 158 10A RA | ||||||||||||
| 1.1 | 258J5338B 5/6 5W0 DO34AA 5MT ZEN | |||||||||||||
| 1.2 | 258J5338B 5/6 5W0 DO34AA 5MT ZEN | |||||||||||||
| 258J5338B 5/6 5W0 DO34AA 5MT ZEN | ||||||||||||||
| 258J5338B 5/6 5W0 DO34AA 5MT ZEN | ||||||||||||||
M2151 02 P1 Parts Reference List 5/16/2022
| REF. | YS # | Description | N.EF | YS # | Description | N.EF | YS # | Description |
| 21-006 | M215-169 | XM MOBILES AXPIN/PZ PGB | 100N 50V SNCAP 080S SMT XR | 100N 100UH KC COIL 12MM SMT | 100UH KC COIL 12MM SMT | 100UH KC COIL 12MM SMT | W120 200K % 080S SMT RES | W120 3432 1% 080S SMT RES |
| 22 | 100 | 25V ZVCAP 5X5.4 SMT ELE | 100N 50V SNCAP 080S SMT XR | 100N 300S 470L CH KLR080 RAO | 100S 470L CH KLR080 RAO | 100S 470L CH KLR080 RAO | W120 160K 1% 080S SMT RES | W120 160K 1% 080S SMT RES |
| 23 | 5212-100 | 100V SNCAP T6A RAO ZFM | 100N 50V SNCAP 080S SMT XR | 100N 2200UH COOL SMT | 100S 470L CH COOL SMT | 100S 470L CH COOL SMT | W120 160K 1% 080S SMT RES | W120 160K 1% 080S SMT RES |
| 24 | 5212-100 | 100V SNCAP T4T RAO ZFM | 100N 50V SNCAP 080S SMT XR | 100N 2200UH COOL SMT | 100S 470L CH COOL SMT | 100S 470L CH COOL SMT | W120 160K 1% 080S SMT RES | W120 1632 1% 080S SMT RES |
| 25 | 5212-100 | 100V SNCAP T2T RAO ZFM | 100N 50V SNCAP 080S SMT XR | 100N 2200UH COOL SMT | 100S 470L CH COOL SMT | 100S 470L CH COOL SMT | W120 160K 1% 080S SMT RES | W120 1200S SMT RES |
| 26 | 22 | 18V ZVCAP 5X5.5 SMT ELE | 100N 50V SNCAP 080S SMT XR | 100N 100UH ED V7 20MA 120S SMT | 100S 470L CH ED V7 20MA 120S SMT | 100S 470L CH ED V7 20MA 120S SMT | W120 284 2% 120S SMT RES | W120 284 2% 120S SMT RES |
| 27 | 100 | 18V ZVCAP 5X5.4 SMT NP | 100N 50V SNCAP 080S SMT XR | 100N 100UH ED V7 20MA 060S SMT | 100S 470L CH ED V7 20MA 060S SMT | 100S 470L CH ED V7 20MA 060S SMT | W120 160K 1% 120S SMT RES | W120 284 2% 120S SMT RES |
| 28 | 5212-100 | 100V SNCAP T4T RAO ZFM | 100N 50V SNCAP 5X5.4 SMT FL | 100N 100UH ED V7 20MA 120S SMT | 100S 470L CH ED V7 20MA 120S SMT | 100S 470L CH ED V7 20MA 120S SMT | W120 160K 1% 120S SMT RES | W120 160K 1% 120S SMT RES |
| 29 | 22 | 18V ZVCAP 5X5.5 SMT ELE | 100N 50V SNCAP 120S SMT SMT | 100N 100UH ED V7 20MA 120S SMT | 100S 470L CH ED V7 20MA 120S SMT | 100S 470L CH ED V7 20MA 120S SMT | W120 160K 1% 120S SMT RES | W119 1200S SMT RES |
| 30 | 22 | 18V ZVCAP 5X5.5 SMT ELE | 100N 50V SNCAP 080S SMT XR | 100N 100UH ED V7 20MA 120S SMT | 100S 470L CH ED V7 20MA 120S SMT | 100S 470 L CH ED V7 20MA 120S SMT | W120 160K 1% 120S SMT RES | W120 160K 1% 120S SMT RES |
| 31 | 22 | 18V ZVCAP 5X5.5 SMT ELE | 100N 50V SNCAP 080S SMT XR | 100N 100UH ED V7 20MA 120S SMT | 100S 470L CH ED V7 20MA 120S SMT | 100S 470R CH ED V7 20MA 120S SMT | W120 160K 1% 120S SMT RES | W120 160K 1% 120S SMT RES |
| 32 | 22 | 18V ZVCAP 5X5.5 SMT ELE | 100N 50V SNCAP 080S SMT XR | 100N 100UH ED V7 20MA 120S SMT | 100S 470L CH ED V7 20MA 120S SMT | 100S 470S CH ED V7 20MA 120S SMT | W120 160K 1% 120S SMT RES | W120 160K 1% 120S SMT RES |
| 33 | 22 | 18V ZVCAP 5X5.5 SMT ELE | 100N 50V SNCAP 080S SMT XR | 100N 100UH ED V7 20MA 120S SMT | 100S 470L CH ED V7 20MA 120S SMT | 100S 470P CH ED V7 20MA 120S SMT | W120 160K 1% 120S SMT RES | W120 160K 1% 120S SMT RES |
| 34 | 5212-100 | 100V SNCAP T6A RAO ZFM | 100N 50V SNCAP 080S SMT XR | 100N 100UH ED V7 20MA 120S SMT | 100S 470L CH ED V7 20MA 120S SMT | 100S 470L CH ED V7 20MA 120S SMT | W125 284 2% 120S SMT RES | W125 160K 1% 120S SMT RES |
| 35 | 22 | 18V ZVCAP 5X5.5 SMT ELE | 100N 50V SNCAP 120S SMT FL | 100N 100UH ED V7 20MA 120S SMT | 100S 470L CH ED V7 20MA 120S SMT | 100S 470L CH ED V7 20MA 120S SMT | W125 160K 1% 120S SMT RES | W125 160K 1% 120S SMT RES |
| 36 | 22 | 18V ZVCAP 5X5.5 SMT ELE | 100N 50V SNCAP 120S SMT RR | 100N 100UH ED V7 20MA 120S SMT | 100S 470L CH ED V7 20MA 120S SMT | 100S 470L CH ED V7 20MA 120S SMT | W125 160K 1% 120S SMT RES | W119 1200S SMT RES |
| 37 | 5212-100 | 100V SNCAP T6A RAO ZFM | 100N 50V SNCAP 080S SMT XR | 100N 100UH ED V7 20MA 120S SMT | 100S 470L CH ED V7 20MA 120S SMT | 100S V675 SMT SMT | W125 284 2% 120S SMT RES | W125 160K 1% 120S SMT RES |
| 38 | 22 | 18V ZVCAP 5X5.5 SMT ELE | 100N 50V SNCAP 5X5.5 SMT LLC | 100N 100UH ED V7 20MA 120S SMT | 100S 470L CH ED V7 20MA 120S SMT | 100S V675 SMT SMT | W125 160K 1% 120S SMT RES | W125 160K 1% 120S SMT RES |
| 39 | 22 | 18V ZVCAP 5X5.5 SMT ELE | 100N 50V SNCAP 5X5.5 SMT XR | 100N 100UH ED V7 20MA 120S SMT | 100S 470L CH ED V7 20MA 120S SMT | 100S V675 SMT SMT | W125 160K 1% 120S SMT RES | W125 160K 1% 160S SMT RES |
| 40 | 22 | 18V ZVCAP 5X5.5 SMT ELE | 100N 50V SNCAP 5X5.5 SMT XR | 100N 100UH ED V7 20MA 120S SMT | 100S 470L CH ED V7 20MA 120S SMT | 100S V674 SMT SMT | W125 160K 1% 160S SMT RES | W125 160K 1% 160S SMT RES |
| 41 | 22 | 18V ZVCAP 5X5.5 SMT ELE | 100N 50V SNCAP 5X5.5 SMT XR | 100N 100UH ED V7 20MA 120S SMT | 100S 470L CH ED V7 20MA 120S SMT | 100S V673 SMT SMT | W125 160K 1% 160S SMT RES | W125 160K 1% 160S SMT RES |
| 42 | 22 | 18V ZVCAP 5X5.5 SMT ELE | 100N 50V SNCAP 5X5.5 SMT XR | 100N 100UH ED V7 20MA 120S SMT | 100S 470L CH ED V7 20MA 120S SMT | 100S V676 SMT SMT | W125 160K 1% 160S SMT RES | W125 160K 1% 160S SMT RES |
| 43 | 5212-100 | 100V SNCAP T6A RAO ZFM | 100N 50V SNCAP 5X5.5 SMT NPO | 100N 100UH ED V7 20MA 120S SMT | 100S 470L CH ED V7 20MA 120S SMT | 100S V675 SMT SMT | W125 284 2% 120S SMT RES | W125 160K 1% 160S SMT RES |
| 44 | 22 | 18V ZVCAP 5X5.5 SMT ELE | 100N 50V SNCAP 5X5.5 SMT XR | 100N 100UH ED V7 20MA 120S SMT | 100S 470L CH ED V7 20MA 120S SMT | 100S V677 SMT SMT | W125 160K 1% 160S SMT RES | W125 160K 1% 160S SMT RES |
| 45 | 5212-100 | 100V SNCAP T4T RAO ZFM | 100N 50V SNCAP 5X5.5 SMT XR | 100N 100UH ED V7 20MA 120S SMT | 100S 470L CH ED V7 20MA 120S SMT | 100S V675 SMT SMT | W125 160K 1% 160S SMT RES | W125 160K 1% 160S SMT RES |
| 46 | 22 | 18V ZVCAP 5X5.5 SMT ELE | 100N 50V SNCAP 5X5.5 SMT XR | 100N 100UH ED V7 20MA 120S SMT | 100S 470L CH ED V7 20MA 120S SMT | 100S V678 SMT SMT | W125 160K 1% 160S SMT RES | W125 160K 1% 160S SMT RES |
| 47 | 5212-100 | 100V SNCAP T6A RAO ZFM | 100N 50V SNCAP 5X5.5 SMT XR | 100N 100UH ED V7 20MA 120S SMT | 100S 470L CH ED V7 20MA 120S SMT | 100S V675 SMT SMT | W125 160K 2% 120S SMT RES | W125 160K 2% 120S SMT RES |
| 48 | 22 | 18V ZVCAP 5X5.5 SMT ELE | 100N 50V SNCAP 5X5.5 SMT XR | 100N 100UH ED V7 20MA 120S SMT | 100S 470L CH ED V7 20MA 120S SMT | 100S V679 SMT SMT | W125 160K 2% 120S SMT RES | W125 160K 2% 120S SMT RES |
| 49 | 22 | 18V ZVCAP 5X5.5 SMT ELE | 100N 50V SNCAP 5X5.5 SMT XR | 100N 100UH ED V7 20MA 120S SMT | 100S 470L CH ED V7 20MA 120S SMT | 100S V683 SMT SMT | W125 160K 2% 120S SMT RES | W125 160K 2% 120S SMT RES |
| 50 | 22 | 18V ZVCAP 5X5.5 SMT ELE | 100N 50V SNCAP 5X5.5 SMT XR | 100N 100UH ED V7 20MA 120S SMT | 100S 470L CH ED V7 20MA 120S SMT | 100S V684 SMT SMT | W125 160K 2% 120S SMT RES | W125 160K 2% 120S SMT RES |
| 51 | 22 | 18V ZVCAP 5X5.5 SMT ELE | 100N 50V SNCAP 5X5.5 SMT XR | 100N 100UH ED V7 20MA 120S SMT | 100S 470L CH ED V7 20MA 120S SMT | 100S V685 SMT SMT | W125 160K 2% 120S SMT RES | W125 160K 2% 120S SMT RES |
| 52 | 22 | 18V ZVCAP 5X5.5 SMT ELE | 100N 50V SNCAP 5X5.5 SMT XR | 100N 100UH ED V7 20MA 120S SMT | 100S 470L CH ED V7 20MA 120S SMT | 100S V686 SMT SMT | W125 160K 2% 120S SMT RES | W125 160K 2% 120S SMT RES |
| 53 | 22 | 18V ZVCAP 5X5.5 SMT ELE | 100N 50V SNCAP 5X5.5 SMT XR | 100N 100UH ED V7 20MA 120S SMT | 100S 470L CH ED V7 20MA 120S SMT | 100S V687 SMT SMT | W125 160K 2% 120S SMT RES | W125 160K 2% 120S SMT RES |
| 54 | 5212-100 | 100V SNCAP T6A RAO ZFM | 100N 50V SNCAP 5X5.5 SMT XR | 100N 100UH ED V7 20MA 120S SMT | 100S 470L CH ED V7 20MA 120S SMT | 100s V688 SMT SMT | W125 160K 2% 120S SMT RES | W125 160K 2% 120S SMT RES |
| 55 | 22 | 18V ZVCAP 5X5.5 SMT ELE | 100N 50V SNCAP 5X5.5 SMT XR | 100N 100UH ED V7 20MA 120S SMT | 100s V689 SMT SMT | 100s V689 SMT SMT | W125 160K 2% 120S SMT RES | W125 160K 2% 120S SMT RES |
| 56 | 22 | 18V ZVCAP 5X5.5 SMT ELE | 100N 50V SNCAP 5X5.5 SMT XR | 100N 100UH ED V7 20MA 120S SMT | 100s V690 SMT SMT | 100s V690 SMT SMT | W125 160K 2% 120S SMT RES | W125 160K 2% 120S SMT RES |
| 57 | 5212-100 | 100V SNCAP T6A RAO ZFM | 100N 50V SNCAP 5X5.5 SMT XR | 100N 100UH ED V7 20MA 120S SMT | 100s V691 SMT SMT | 100s V691 SMT SMT | W125 160K 2% 120S SMT RES | W125 160K 2% 120S SMT RES |
| 58 | 22 | 18V ZVCAP 5X5.5 SMT ELE | 100N 50V SNCAP 5X5.5 SMT XR | 100N 100UH ED V7 20MA 120S SMT | 100s V692 SMT SMT | 100s V692 SMT SMT | W125 160K 2% 120S SMT RES | W125 160K 2% 120S SMT RES |
| 59 | 22 | 18V ZVCAP 5X5.5 SMT ELE | 100N 50V SNCAP 5X5.5 SMT XR | 100N 100UH ED V7 20MA 120S SMT | 100s V693 SMT SMT | 100s V693 SMT SMT | W125 160K 2% 120S SMT RES | W125 160K 2% 120S SMT RES |
| 60 | 22 | 18V ZVCAP 5X5.5 SMT ELE | 100N 50V SNCAP 5X5.5 SMT XR | 100N 100UH ED V7 20MA 120S SMT | 100s V694 SMT SMT | 100s V694 SMT SMT | W125 160K 2% 120S SMT RES | W125 160K 2% 120S SMT RES |
| 61 | 5212-100 | 100V SNCAP T6A RAO ZFM | 100N 50V SNCAP 5X5.5 SMT XR | 100N 100UH ED V7 20MA 120S SMT | 100s V695 SMT SMT | 100s V695 SMT SMT | W125 160K 2% 120S SMT RES | W125 160K 2% 120S SMT RES |
| 62 | 22 | 18V ZVCAP 5X5.5 SMT ELE | 100N 50V SNCAP 5X5.5 SMT XR | 100N 100UH ED V7 20MA 120S SMT | 100s V696 SMT SMT | 100s V696 SMT SMT | W125 160K 2% 120S SMT RES | W125 160K 2% 120S SMT RES |
| 63 | 22 | 18V ZVCAP 5X5.5 SMT ELE | 100N 50V SNCAP 5X5.5 SMT XR | 100N |
M2151 02 P2 Parts Reference List 5/16/2022
| REF YS # Description REF | YS # Description | REF | YS # | Description | REF | YS # | Description | REF | YS # | Description | ||||
| 1.6 | YC3 00XADR BUCK/BOOST INV IC 508 | |||||||||||||
| 1.7 | YC3 00XADR BUCK/BOOST INV IC 508 | |||||||||||||
| 2 | 2501 CCN4 HEADER RT ANGLE PIN 2PCS 0.156 | |||||||||||||
| 3 | 3543_2 20F4 PIN BREAKAWAY RA 80 LXX_156 | |||||||||||||
| 4.1 | 4259 CCN4 HEADER RT ANGLE PIN 3PCS 0.156 | |||||||||||||
| 5.1 | SMR 8330B SV6 SWC DOZHAA SMT ZEN | |||||||||||||
| 6.2 | SMR 8330B SV6 SWC DOZHAA SMT ZEN | |||||||||||||
flowchart
graph TD
    subgraph PowerSupply
        A["+V_In"] --> B["In-Out Input.SchDoc"]
        C["-12V"] --> D["BT_R BT_L"]
        E["+12V"] --> F["IG"]
        G["ChgF:ED"] --> H["WFR Grid"]
        I["+BatSw"] --> J["Enable"]
        K["+ToAmp"] --> L["PowerSupply.SchDoc"]
        M["V+_In"] --> N["Power Supply SchDoc"]
        O["PcGrid"] --> P["Power Amp SchDoc"]
        Q["V+ In"] --> R["Power Amp SchDoc"]
        S["PsGrid"] --> T["Power Amp SchDoc"]
        U["V2-1"] --> V["AMPOut-"]
        W["W2-2"] --> X["AMPOut+"]
        Y["WE2"] --> Z["AmpOut- 2"]
        AA["WE1"] --> AB["AmpOut+ 1"]
        AC["W8"] --> AD["W8-1"]
        AE["W8"] --> AF["W8-2"]
    end

    subgraph PowerAmp
        B --> G
        L --> H
        M --> N
        N --> O
        O --> P
        P --> Q
        Q --> R
        R --> S
        S --> T
        T --> U
        U --> V
        V --> W
        W --> X
        X --> Y
        Y --> Z
    end

    subgraph BatteryStatusLIDs
        N --> O
        P --> Q
        S --> R
        T --> S
        U --> T
        V --> T
        W --> T
    end

    subgraph 9708 PowerSupply
        A -->|Input - 65 - 240 VAC EC/RECT| C
        C -->|WMT| D
    end

    subgraph 3004 Cable
        D -->|W2| E
        E -->|W2| F
        F -->|W2| G
        G -->|W2| H
        H -->|W2| I
        I -->|W2| J
        J -->|W2| K
    end

    subgraph 9708 PowerSupply_SchDoc
        A -->|Input Section Product(s): EXM-MobileSub| L
    end

    style PowerSupply_SchDoc fill:#f9f,stroke:#333,stroke-width:2px
    style 9708 PowerSupply_SchDoc fill:#ccf,stroke:#333,stroke-width:2px
other
| Component | Value | | :--- | :--- | | Q4 7805 8CT23 | 3920 | | R11 W125 47K5 | 3920 | | D2 8CT-23 BAT750 | 7840 | | Q15 MMBT3906LT1 7805 | 11760 | | LD2 YEL 7C32 | 1210 | | R265 562R0 216 | 12970 | | R95 562R0 216 | 62000 | | Q15 MMBT3906LT1 7805 | 74970 | | LD9 RED Critical 7333 | 3920 | | R326 W100 1M0 11 + U13:3 | 3920 | | LM339D 7659 8O'4 OUT 13 | 7840 | | LM339D 7659 8O'4 OUT 14 | 6.82 | | LM339D 7659 8O'4 OUT 1 | 6.43 | | LM339D 7659 8O'4 OUT 1 | 6.82 | | LM339D 7659 8O'4 OUT 2 | 6.82 | | LM339D 7659 8O'4 OUT 2 | 6.82 | | LM339D 7659 8O'4 OUT 2 | 6.82 | | LM339D 7659 8O'4 OUT 2 | 6.82 | | LM339D 7659 8O'SO'4 | 6.82 | | LM339D 7659 8O'SO'4 | 6.82 | | LM339D 7659 8O'SO'4 | 6.82 | | LM339D 7659 8O'SO'4 | 6.82 | | LM339D 7659 8O'SO'5 | 7.21 | | LM339D 7659 8O'SO'5 | 7.21 | | LM339D 7659 8O'SO'5 | 7.21 | | LM339D 7659 8O'SO'5 | 7.21 | | LM339D 7659 8O'SO'5 | 7.22 | | LM339D 7659 8O'SO'5 | 7.22 | | LM339D 7659 8O'SO'5 | 7.22 | | LM339D 7659 8O'SO'5 | 7.22 | | LM339D 7659 8O'SO'5 | 7.21 | | LM339D 7659 8O'SO'5 | 7.21 | | LM339D 7659 8O'SO'5 | 7.21 | | LM339D 7659 8O'SO'5 | 7.11 | | LM339D 7659 8O'SO'5 | 7.11 | | LM339D 7659 8O'SO'5 | 7.11 | | LM339D 7659 8O'SO'5 | 7.11 | | LM339D 7659 8O'SO'5 | 7.01 | | LM339D 7659 8O'SO'5 | 7.01 | | LM339D 7659 8O'SO'5 | 7.01 | | LM339D 7659 8O'SO'5 | 7.01 | | LM339D 7659 8O'SO'5 | 7.11 | | LM339D 7659 8O'SO'5 | 7.11 | | LM339D 7659 8O'SO'5 | 7.11 | | LM339D 7659 8O'SO'5 | 7.21 | | LM339D 7659 8O'SO'5 | 7.21 | | LM339D 7659 8O'SO'5 | 7.21 | | LM339D 7659 8O'SO'5 | 7.10 | | LM339D 7659 8O'SO'5 | 7.10 | | LM339D 7659 8O'SO'5 | 7.10 | | LM339D 7659 8O'SO'5 | 7.01 | | LM339D 7659 8O'SO'5 | 7.01 | | LM339D 7659 8O'SO'5 | 7.01 | | LM339D 7659 8O'SO'5 | 7.00 | | LM339D 7659 8O'SO'5 | -100 | | LM339D 7659 - U13:4 V+ - U13:5 V- - U13:5 V- - U13:5 V- - U13:5 V- - U13:5 V- - U13:5 V- - U13:5 V- - U13:5 V- - U13:5 V- - U13:5 V- - U13:5 V- - U13:5 V- - U13:5 V- - U14:4 V+ - U14:4 V- - U14:4 V- - U14:4 V- - U14:4 V- - U14:4 V- - U14:4 V- - U14:4 V- - U14:4 V- - U14:4 V- - U14:4 V- - U14:4 V- - U14:4 V- - U14:4 V- - U10 +V_In +V_In +V_In +V_In +V_In +V_In +V_In +V_In +V_In +V_In +V_In +V_In +V_In +V_In +V_In +V_In +V_In +V_In +V_In +V_In +V_In +V_In +V_In +V_In +V_In +V_In +V_In +V_In +V_In +V_In +V_In +V_In +V_In +V_In +GND A B C D E F G H I J K L M N P Q R S T U S W L R S T U S W L R S T U S W L R S T U S W L R S T U S W L R S T U S W L R S T U S W L R S T U S W L M N P Q R S T U S W L R S T U S W L R S T U S W L R S T U S W L R S T U S W L R S T U S W L R S U S W L R S T U S W L R S T U S W L R S T U S W L R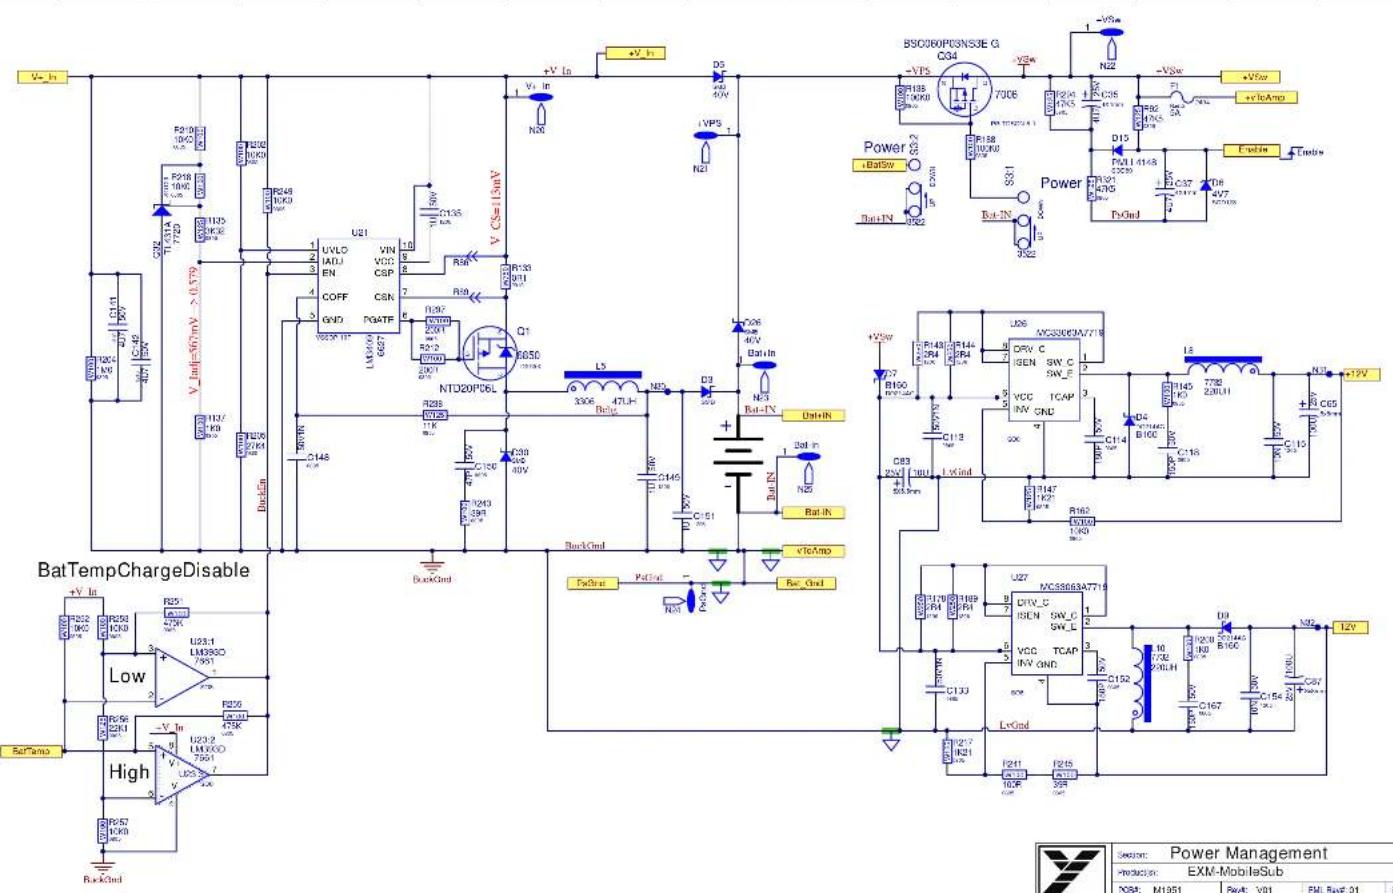
| Yorkville | Season: Power Management | |||
| Production: EXM-MobileSub | ||||
| NBR: M1951 | Rev: V01 | ENL Rev: 01 | Rev: 4 Of 7 | |
| Noted: 2021-11-03 | I to: PowerSupply.SchDoc | Imo IIrv: V01 | ||
PCB ASSEMBLY DOCUMENTATION
SPECIAL PRODUCTION NOTES
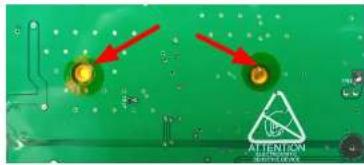
Add soldermask dots to the two threaded spacers.
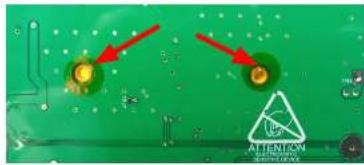
natural_image
Close-up of a green printed circuit board with two red circular highlights and a warning symbol (no readable text or symbols)Heatsink Assembly (PCB Finishing)
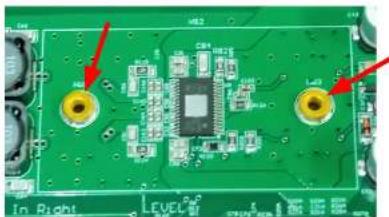
natural_image
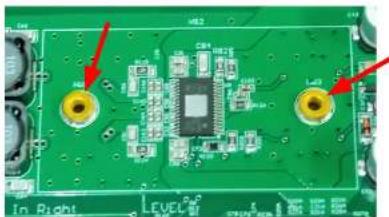
Close-up of a green printed circuit board with two yellow circular components and red arrows pointing to features (no readable text or symbols)1) Remove the kapton tape from the two spacers.
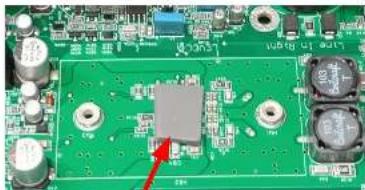
natural_image
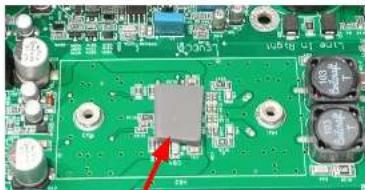
Close-up of a green printed circuit board with electronic components and a central chip (no visible text or symbols)2) Place the 4236 pad onto U8. Handle the 4236 pad by the edges only.
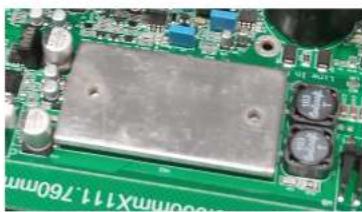
natural_image
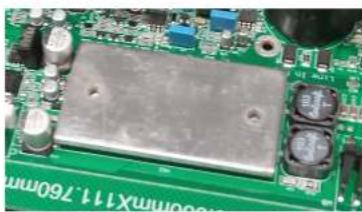
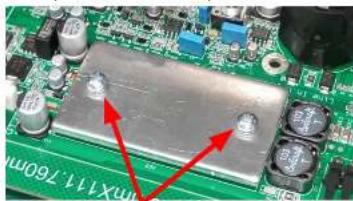
Close-up of a green printed circuit board with electronic components and no visible text or symbols3) Place Z1891 HS on top of U8.
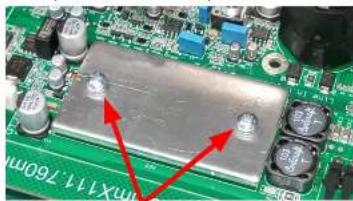
natural_image
Close-up of a green printed circuit board with electronic components and red arrows pointing to specific areas (no readable text or symbols)4) Secure with two 9441 screws. Tighten to 8 inch lbs.
The input section needs to be air tight. All vias and part holes must be filled with solder.
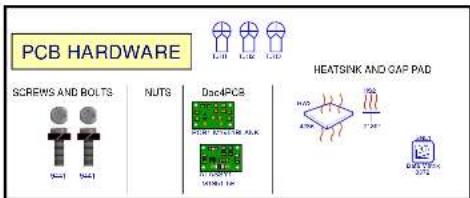
THIS SHEET CONTAINS SPECIAL PRODUCTION NOTES AND A LIST OF PCB HARDWARE PARTS REQUIRED FOR THE BUILD.

Section: Assembly Documentation
ExMmobileSub
FOM: M1951 Rev. 201 DIL Rev. 01 2007 T 01?
Mening: For the following: 2017/06: TPO-WE-STCH
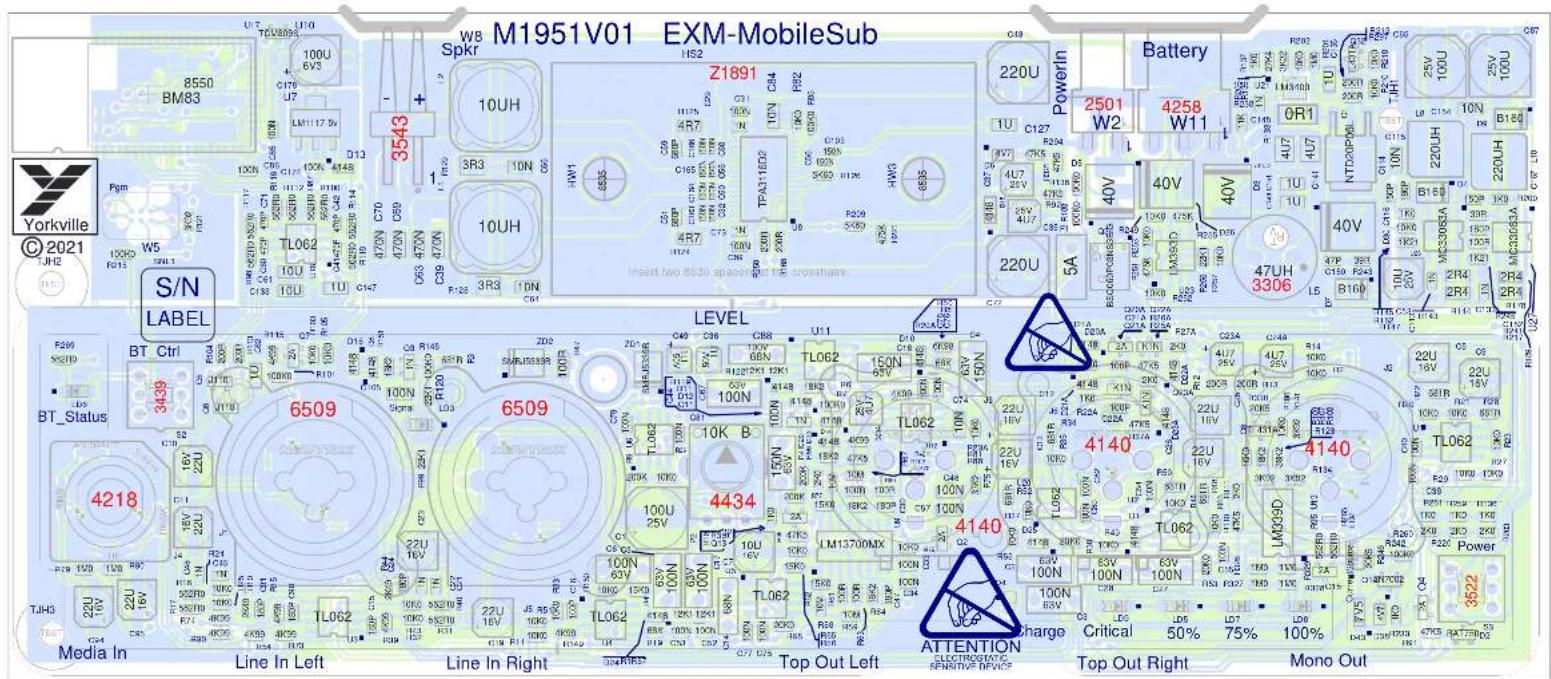
M1951V0EXM-MobileSub
PCB ASSEMBLY DOCUMENTATION
SPECIAL PRODUCTION NOTES
Add soldermask dots to the two threaded spacers.
natural_image
Close-up of a green printed circuit board with two red circular highlights and a warning symbol (no readable text or symbols)Heatsink Assembly (PCB Finishing)
natural_image
Close-up of a green printed circuit board with two yellow circular components and red arrows pointing to features (no readable text or symbols)1) Remove the kapton tape from the two spacers.
natural_image
Close-up of a green printed circuit board with electronic components and a central chip (no visible text or symbols)2) Place the 4236 pad onto U8. Handle the 4236 pad by the edges only.
natural_image
Close-up of a green printed circuit board with electronic components and no visible text or symbols3) Place Z1891 HS on top of U8.
natural_image
Close-up of a green printed circuit board with electronic components and red arrows pointing to specific areas (no readable text or symbols)4) Secure with two 9441 screws. Tighten to 8 inch lbs.
The input section needs to be air tight. All vias and part holes must be filled with solder.
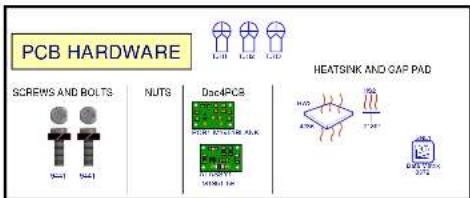
THIS SHEET CONTAINS SPECIAL PRODUCTION NOTES AND A LIST OF PCB HARDWARE PARTS REQUIRED FOR THE BUILD.

Section: Assembly Documentation
POMS: ations] b FOM: [No V] Rent: 101 D& Dem. 04 Dev. T C' S MOMS For Performance Section 103
DESIGN HISTORY AND INFORMATION
CHANGE HISTORY
| # | DATE | VER# | PC# | DESCRIPTION OF CHANGE |
| 1 | 25-Mar-2021 | V01 | Released For Production | |
| 2 | 03-NOV-2021 | V01 | 9712 | R105 IK0 YS#7621 replaced with 10K0 YS#7625. |
| 3 | ||||
| 4 | ||||
| 5 | ||||
| 6 | ||||
| 7 | ||||
| 8 | ||||
| 9 | ||||
| 10 | ||||
| 11 | ||||
| 12 | ||||
| 13 | ||||
| # | DATE | VER# | PC# | DESCRIPTION OF CHANGE |
| 1 | ||||
| 2 | ||||
| 3 | ||||
| 4 | ||||
| 5 | ||||
| 6 | ||||
| 7 | ||||
| 8 | ||||
| 9 | ||||
| 10 | ||||
| 11 | ||||
| 12 | ||||
| 13 | ||||
| # | DATE | VER# | PC# | DESCRIPTION OF CHANGE |
| 1 | ||||
| 2 | ||||
| 3 | ||||
| 4 | ||||
| 5 | ||||
| 6 | ||||
| 7 | ||||
| 8 | ||||
| 9 | ||||
| 10 | ||||
| 11 |
POTENTIOMETERS AND KNOBS
| POTENTIOMETERS/SWITCHES AND KNOBS | ||||
| REF | FUNCTION | POT/SW YSN | STYLE | KNOBF |
| P2 | Sub LEVEL | 4344 | P32 | 10043 |
| S2 | BT | 3439 | 8637 | |
| S3 | Power | 3522 | 8637 | |
THIS SHEET CONTAINS A CHANGE HISTORY LOG, A LIST OF THE POTS & KNOBS AND A LEADS & PINS REFERENCE SECTION.

| Design Information And History | |||||
| PAGES:ations | b | ||||
| PCDH[No V] | Rev. YCI | Del. Dev. 01 | Dim. S C' 5 | ||
| PCVHSC | For Chemistry Service | Test for Test | |||
flowchart
graph TD
    subgraph PowerSupply
        A["In-Out Input.SchDoc"] --> B["BT_R BT_I"]
        B --> C["Ampl-In-Ampl+ AmpGnd"]
        C --> D["Power Supply.SchDoc"]
        E["BP7 RS20 10CR Tack"] --> F["ZD1 SMDJES39S 5V6 DO-214M ZD2"]
        F --> G["ChassisGrid"]
        H["BT BluetoothBM87-ST.SchDoc"] --> I["BT Audio R BT_Audio_L -12v_BT +12v_BTBT_BTCGnd"]
        I --> J["BT_SysPwr BT_Bia_LFD"]
        K["Power Amp"] --> L["Enable AmpIn-Ampl+ AmpGnd"]
        L --> M["Power Supply.SchDoc"]
        N["AmpOut-AmpOut+"] --> O["AmpOut-2 AmpOut+"]
        P["AmpOut+1 AmpOut+"] --> Q["AmpOut-2 AmpOut+"]
        R["W0"] --> S["7442 WOOFER"]
        T["W2"] --> U["7442-WOOFER"]
    end

    subgraph 9708 Power Supply
        V["V+ In PsGnd"] --> W["V+ In PsGnd"]
        X["V+ In PsGnd"] --> Y["V+ In PsGnd"]
        Z["V+ In PsGnd"] --> AA["V+ In PsGnd"]
        AB["V+ In PsGnd"] --> AC["V+ In PsGnd"]
        AD["V+ In PsGnd"] --> AE["V+ In PsGnd"]
    end

    subgraph 9708 Power Supply
        AF["Input - 85 - 24D VAC RESPECT"] --> AG["9708 Power Supply"]
        AH["3094 Cable"] --> AI["3094 Cable"]
    end
| Yorkville | Section: Input Section | |||
| Product(s): EXM-MobileS | ||||
| PCBr: M2151 | Rout: V02 | Eng'R. Himbrault | Sheet 1 Of 6 | |
| Mod'ded: | File 20InputSection.Sch.Doc | |||
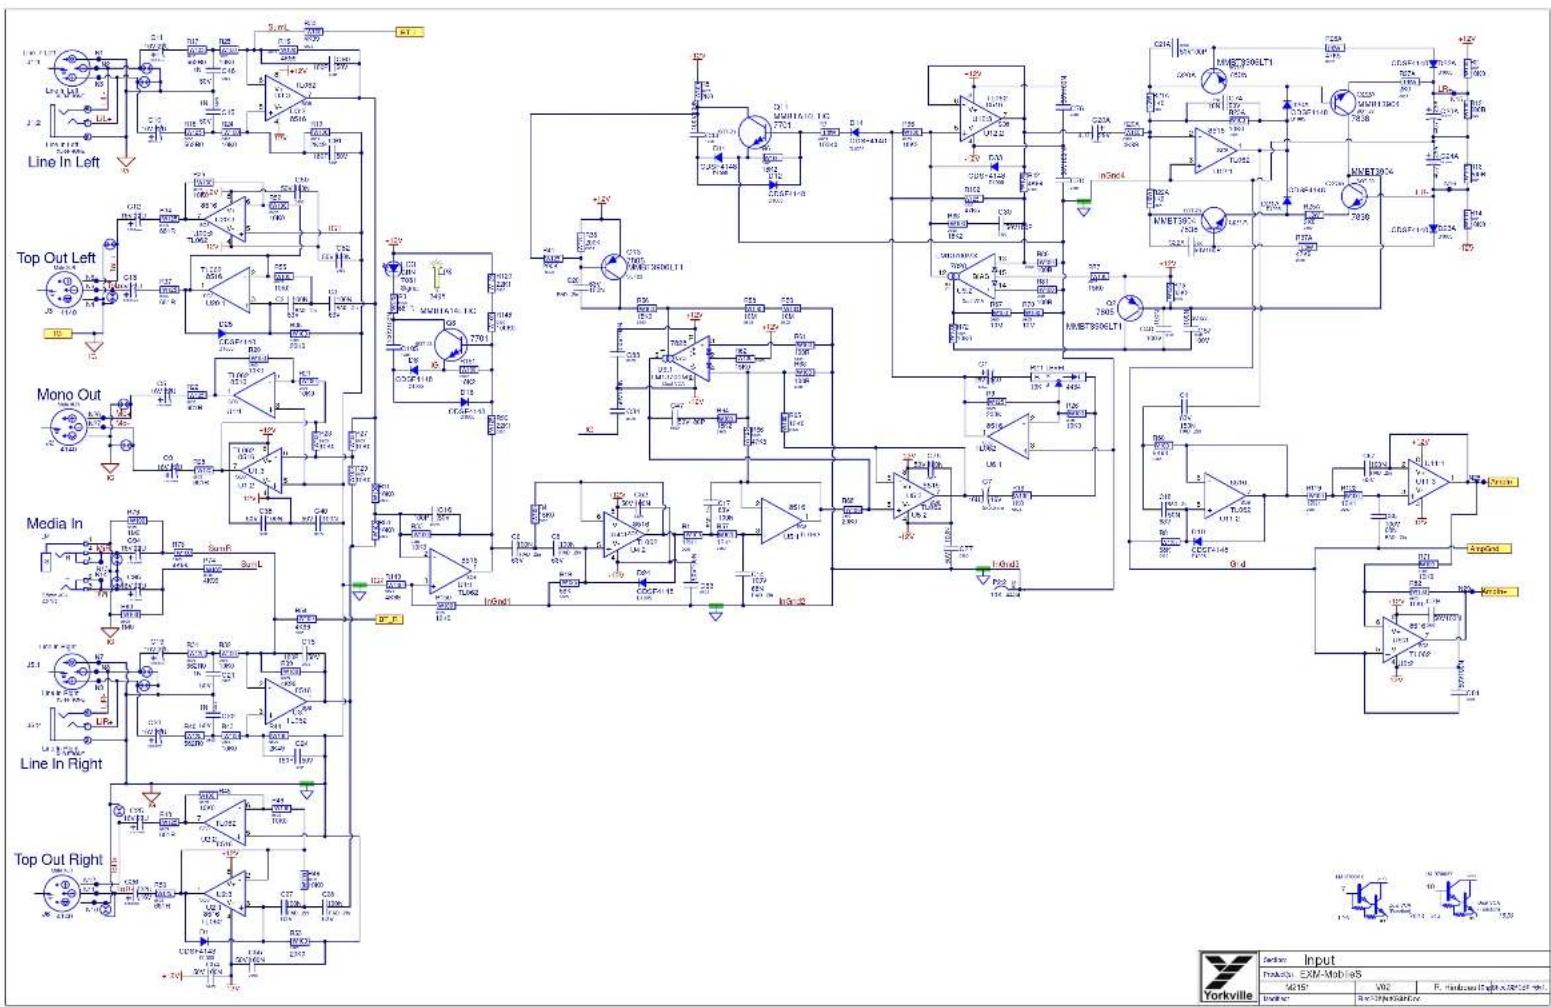


Power Amp


| Section: Power Amp | |||
| Product(s): EXM-MobileS | |||
| PCB#: M2151 | Rev#: V02 | Eng'R. Himbeault | Sheet 4 Of 6 |
| ModiIed: | File 2089wter.Afmp.SchDoc: | ||
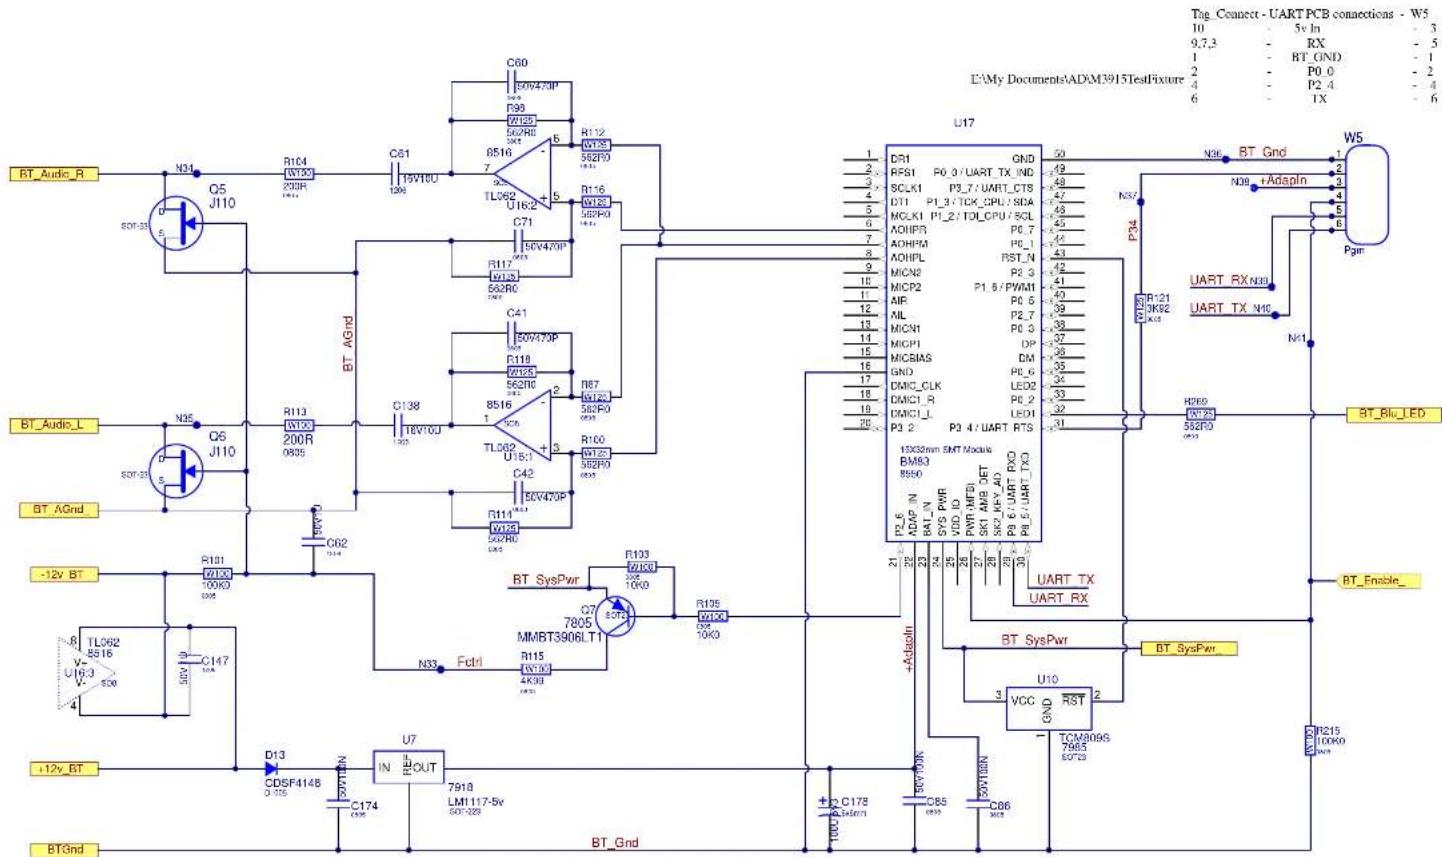

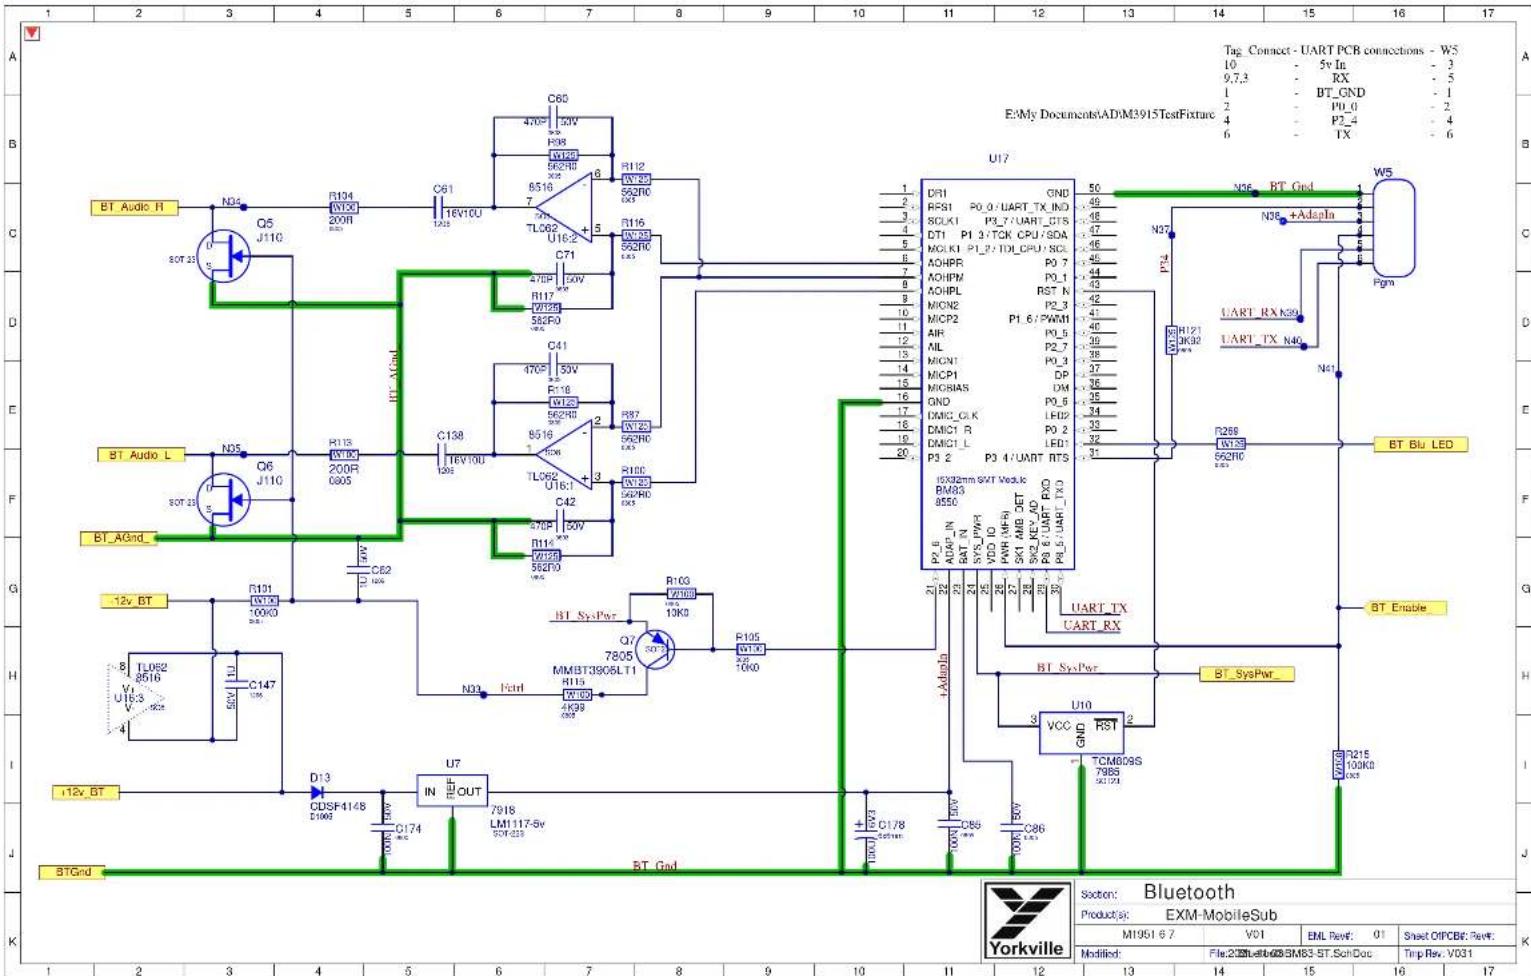
| Section: Bluetooth | |||
| Product(s): EXM-MobileS | |||
| PCB#: M2151 | Rev#: V02 | Eng:R. Himbeault | Sheet 5 Of 6 |
| Modified: | File: 2488e86dHBM03-ST.SchDoc | ||
DESIGN HISTORY AND INFORMATION
CHANGE HISTORY POTENTIOMETERS AND KNOBS
| # | DATE | VER# | PC# | DESCRIPTION OF CHANGE |
| 1 | 02-MAY-2022 | V01 | RELEASED FOR PRODUCTION | |
| 2 | 31-OCT-2022 | V02 | 9851 | CHANGED R188 AND R250 PADS TO ACCOMMODATE 0803 SIZE |
| 3 | ||||
| 4 | ||||
| 5 | ||||
| 6 | ||||
| 7 | ||||
| 8 | ||||
| 9 | ||||
| 10 | ||||
| 11 | ||||
| 12 | ||||
| 13 | ||||
| # | DATE | VER# | PC# | DESCRIPTION OF CHANGE |
| 1 | ||||
| 2 | ||||
| 3 | ||||
| 4 | ||||
| 5 | ||||
| 6 | ||||
| 7 | ||||
| 8 | ||||
| 9 | ||||
| 10 | ||||
| 11 | ||||
| 12 | ||||
| 13 | ||||
| # | DATE | VERN | PCN | DESCRIPTION OF CHANGE |
| 1 | ||||
| 2 | ||||
| 3 | ||||
| 4 | ||||
| 5 | ||||
| 6 | ||||
| 7 | ||||
| 8 | ||||
| 9 | ||||
| 10 | ||||
| 11 | ||||
| 12. | ||||
| 13 |
| POTENTIOMETERS/SWITCHES AND KNOBS | ||||
| REF | FUNCTION | POT/SW YS# | STYLE | KNOB# |
| P2 | Sub LEVEL | P32 | 10043443 | |
| S2 | BT | 3439 | 8637 | |
| S3 | Power | 3522 | 8637 | |
THIS SHEET CONTAINS A CHANGE HISTORY LOG, A LIST OF THE POTS & KNOBS AND A LEADS & PINS REFERENCE SECTION.

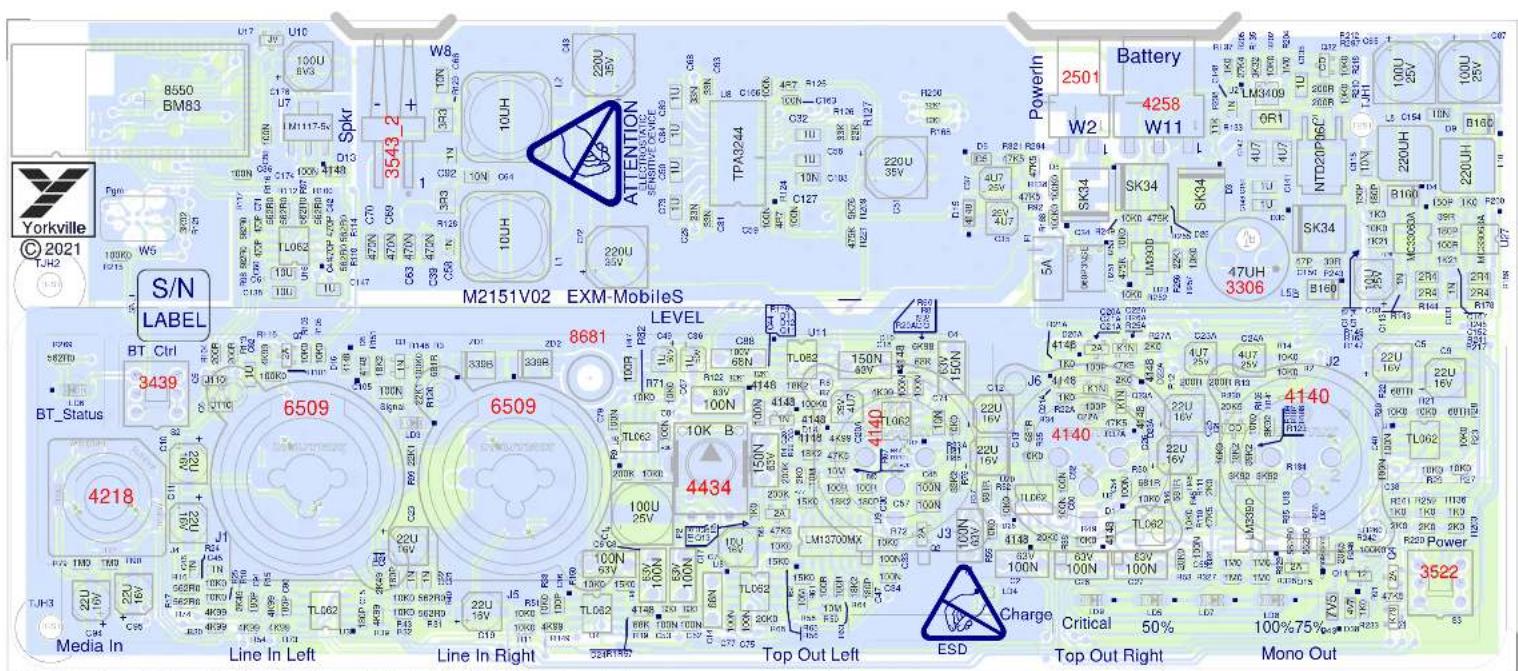
M2151V02 EXM-MobileS
PCB ASSEMBLY DOCUMENTATION
SPECIAL PRODUCTION NOTES
- Place alignment jig on connectors and parts prior to wave soldering. Also ensure the components are properly aligned in the jig and flush to the pcb.
- All vias and part holes must be filled with solder in input connector area or board.
- After wave soldering and pcb finishing, use pizza cutter to separate boards from the panel.
The Input section needs to be air tight. All vias and part holes must be filled with solder.
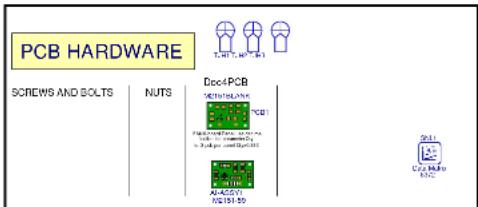
THIS SHEET CONTAINS SPECIAL PRODUCTION NOTES AND A LIST OF PCB HARDWARE PARTS REQUIRED FOR THE BUILD.

DESIGN HISTORY AND INFORMATION
CHANGE HISTORY POTENTIOMETERS AND KNOBS
| # | DATE | VER# | PC# | DESCRIPTION OF CHANGE |
| 1 | 02-MAY-2022 | V01 | RELEASED FOR PRODUCTION | |
| 2 | 31-OCT-2022 | V02 | 9851 | CHANGED R188 AND R250 PADS TO ACCOMMODATE 0803 SIZE |
| 3 | ||||
| 4 | ||||
| 5 | ||||
| 6 | ||||
| 7 | ||||
| 8 | ||||
| 9 | ||||
| 10 | ||||
| 11 | ||||
| 12 | ||||
| 13 | ||||
| # | DATE | VER# | PC# | DESCRIPTION OF CHANGE |
| 1 | ||||
| 2 | ||||
| 3 | ||||
| 4 | ||||
| 5 | ||||
| 6 | ||||
| 7 | ||||
| 8 | ||||
| 9 | ||||
| 10 | ||||
| 11 | ||||
| 12 | ||||
| 13 | ||||
| # | DATE | VERN | PCN | DESCRIPTION OF CHANGE |
| 1 | ||||
| 2 | ||||
| 3 | ||||
| 4 | ||||
| 5 | ||||
| 6 | ||||
| 7 | ||||
| 8 | ||||
| 9 | ||||
| 10 | ||||
| 11 | ||||
| 12. | ||||
| 13 |
| POTENTIOMETERS/SWITCHES AND KNOBS | ||||
| REF | FUNCTION | POT/SW YS# | STYLE | KNOB# |
| P2 | Sub LEVEL | P32 | 10043443 | |
| S2 | BT | 3439 | 8637 | |
| S3 | Power | 3522 | 8637 | |
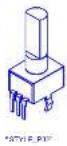
THIS SHEET CONTAINS A CHANGE HISTORY LOG, A LIST OF THE POTS & KNOBS AND A LEADS & PINS REFERENCE SECTION.


EXM MobileSUB
Bluetooth™
The EXM MobileSUB is capable of streaming audio from Bluetooth™ enabled devices and supports wireless 'stereo' pairing between two EXM MobileSUBs. In Bluetooth™ stereo mode, the first unit acts as the "Primary," playing the left audio channel and additional units are "Secondary" (playing the right channel). The audio source needs to be connected to the Primary EXM MobileSUB unit.
Operation: When the EXM MobileSUB is powered on, Bluetooth™ is disabled by default. To connect a device, tap the Bluetooth™ button. If a device has been previously connected, it will attempt to reconnect. If a wireless stereo connection was used, both EXM MobileSUB units will try to re-establish the wireless stereo connection (the same Primary/Secondary roles re-established).
Pairing: Press the Bluetooth™ button down and hold for 4 seconds, then release.
Status: The blue LED indicates the status of the Bluetooth™ connection, please refer to the chart in the Owner's Manual for more detail.
Level: Streamed music's volume can be changed via the connected Bluetooth™ device.
Stereo Mode: Wireless stereo playback is supported between two EXM MobileSUBs. One acts as the Primary unit while another acts as a Secondary unit. The Primary unit plays the left audio channel while the Secondary unit plays the right. The source device only connects to the Primary unit, not the Secondary.
To enable Stereo Mode, double tap the Bluetooth™ button on the EXM MobileSUB used as the Primary unit (left), then double tap the Bluetooth™ button on the secondary EXM MobileSUB (right). The first unit double tapped becomes the Primary unit (left).
New devices can still be paired to a Primary unit if it's in Stereo Mode. Pairing a device to an EXM MobileSUB that is in Secondary mode will end the stereo wireless connection.
Button Operation:
Single Tap: Enables Bluetooth™
Double Tap: Enter Stereo Mode
Press and Hold (4 seconds): Enter Pairing Mode
Press and Hold (8 seconds): Disables Bluetooth™
Range: The EXM's Bluetooth™ operating range is rated for 10 meters (33 feet) line of sight. The link's quality can be affected by excess wireless traffic in the 2.4 GHz bandwidth or structures between the Bluetooth™ unit and the streaming device.
Note: When connected with Bluetooth™, ALL audio is streamed from your device. If you don't want the streaming music to be interrupted, turn off 'notifications' on your device.
Controls & Input/Output
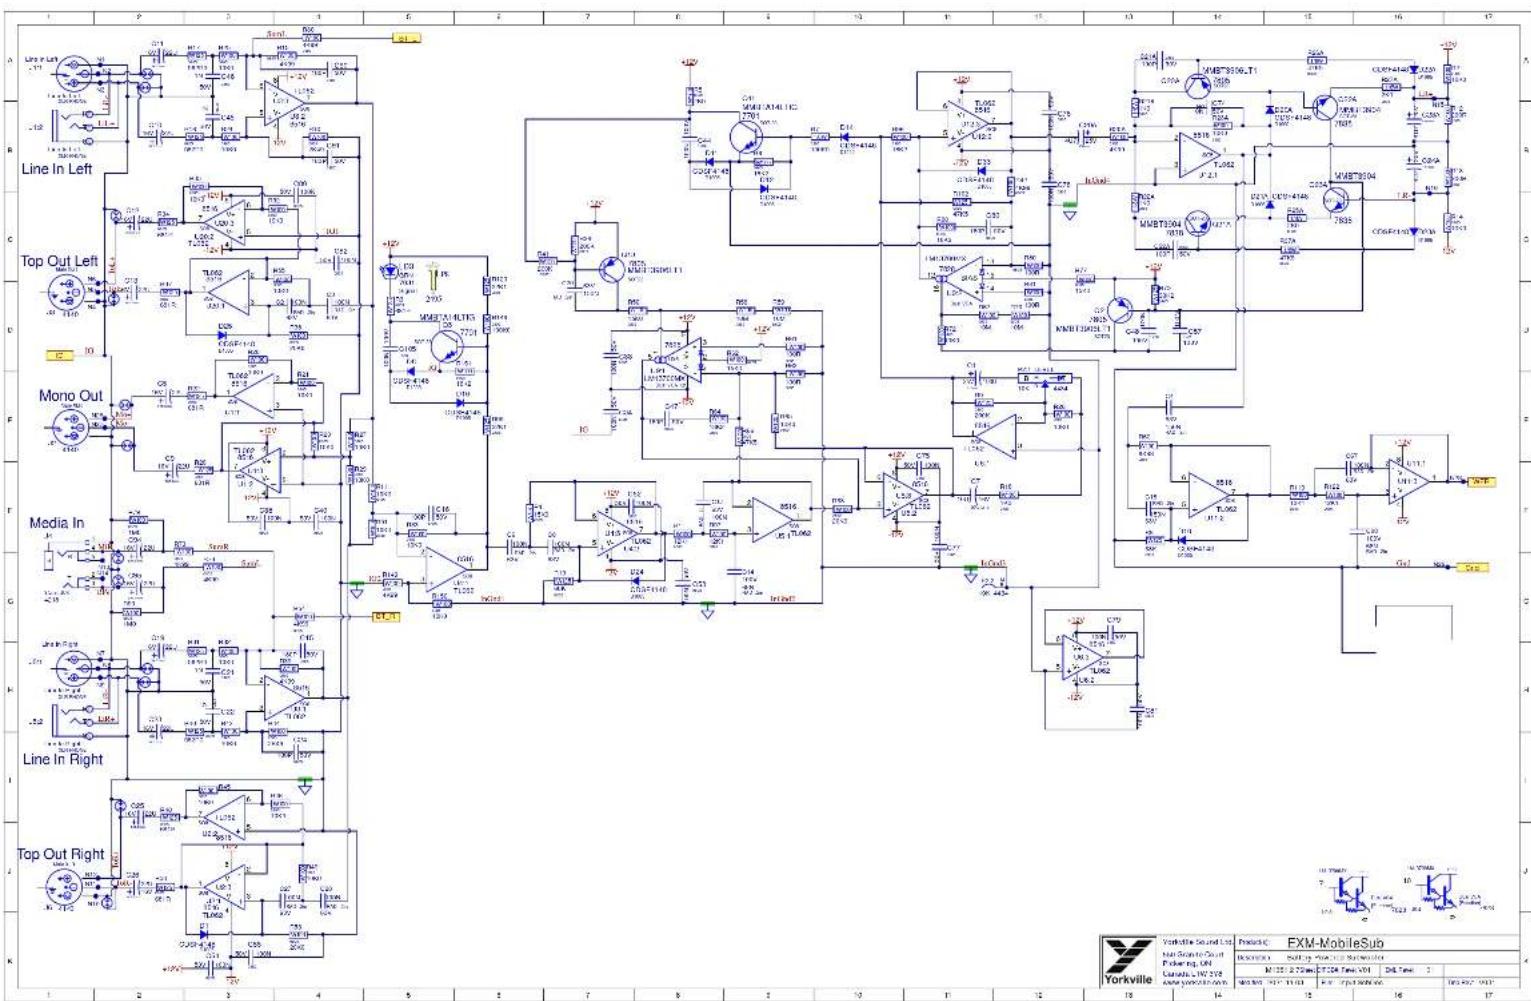
Input Jacks: The source should go directly to the EXM MobileSUB and then looped to the full-range loudspeakers using the High Pass Output jacks, this ensures an ideal crossover to the full-range loudspeakers. These jacks can be fed with mono or stereo. For mono, either the Left or Right jack can be used and if using stereo signals, the mono output sums the Left and Right signals.
Note: stereo separation is maintained for signals leaving the High Pass Output jacks.
Sub Level Control: This sets the amount of bass added to the system and adjusts for the relative sensitivity of the companion full-range speakers.
High Pass Output Jacks: These jacks eliminate the need for an external crossover, use these to feed the input of your powered full-range loudspeakers. The output signal of these XLR jacks has the audio below 100 Hz removed.
Full Range Output Jack: This jack can be used to send full-range signal (mono/summed) to additional EXM MobileSUBs or other powered enclosures that don't require a stereo source.
Protection and Indicators: This circuitry helps prevent amplifier clipping, over excursion and protects the amplifier and/or voice coil from overheating.
Battery & Charging
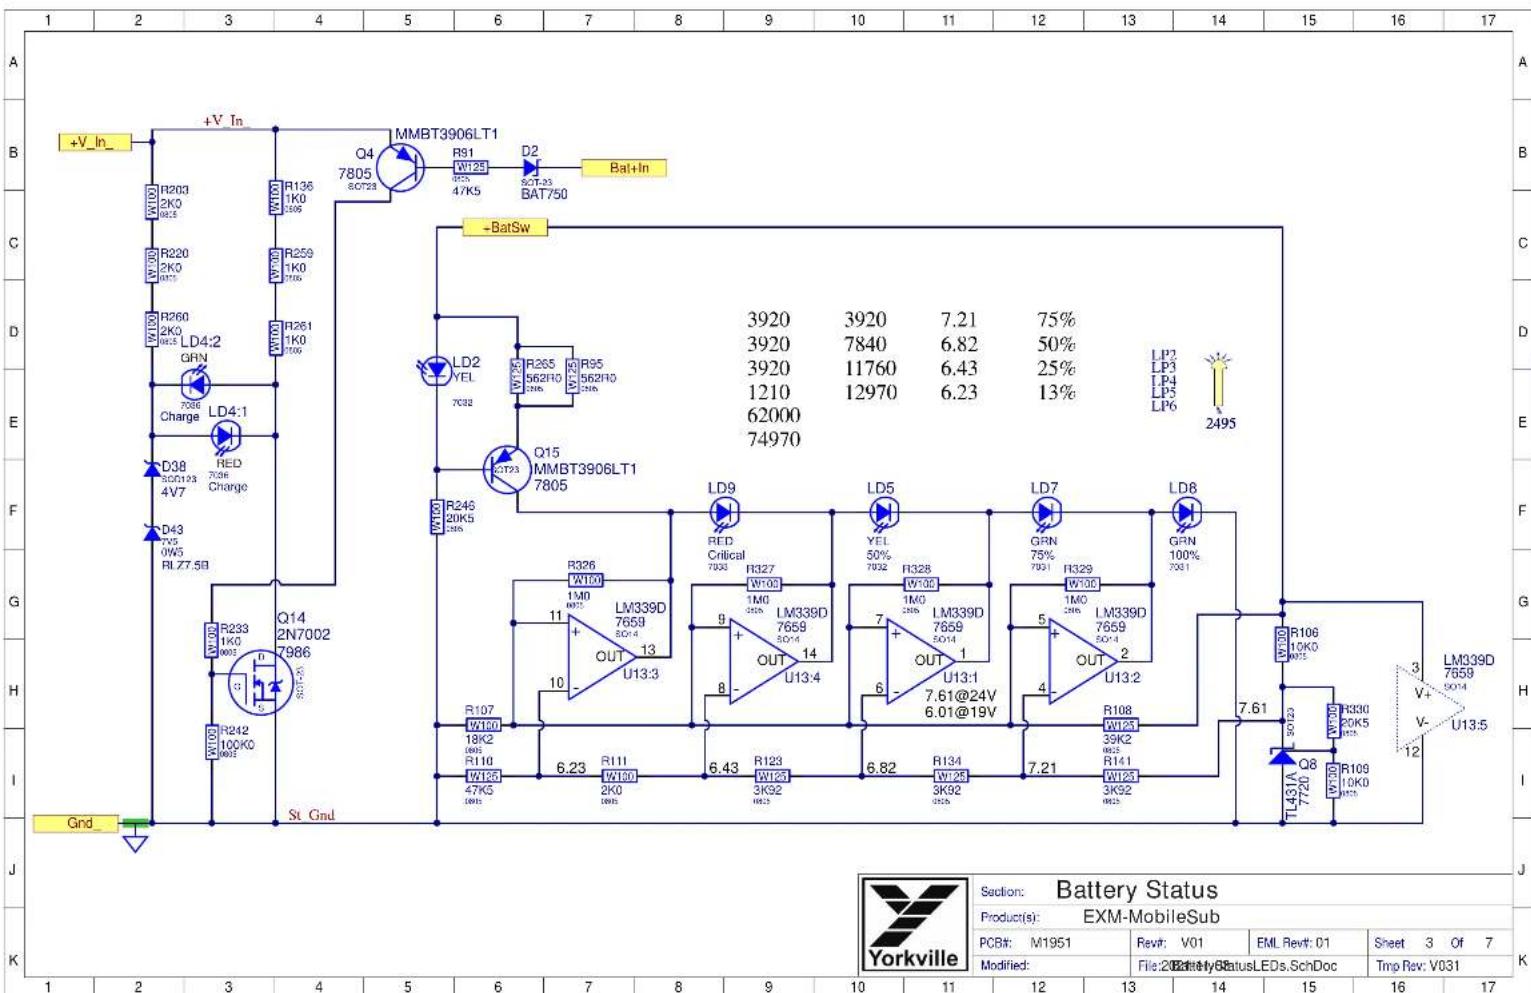
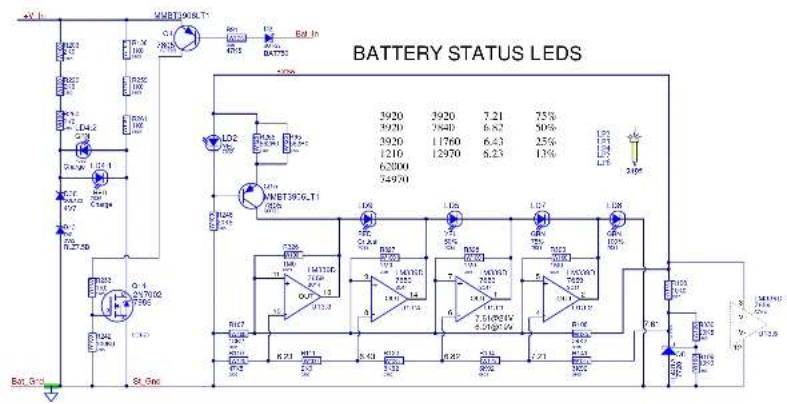
Battery Status Indicators: A series of four LEDs indicate the approximate charge level. The upper green LED is illuminated if there's greater than 75% charge. The red LED indicates if the battery is critically low (approx 10% remaining) and needs immediate charging.
Note: The indicators will be engaged only when the power switch is turned on.
Charging Indicator: When AC is connected, the charging indicator will be turned on. Green indicates fully charged, red indicates the unit is charging.
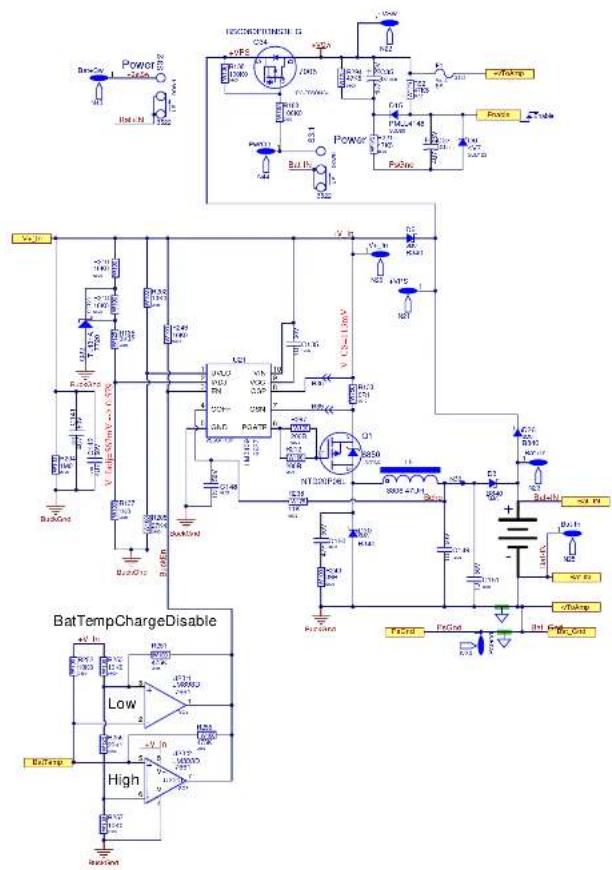
Charging: To charge, plug into an AC power source using the included power cord. The charging LED indicates the charging status; if all of the status LEDs are lit, there is still possibly additional charging time required. The EXM MobileSUB can be safely left connected to AC power for charging indefinitely.
The EXM MobileSUB will not charge when the temperature is below 0irc C or above 45irc C. If it's going to be stored unused for a long period of time (+6 months) it is advisable to plug it in to charge up the battery periodically. If stored for a long period of time unused and not been maintained, it is suggested to connect the charger and leave it plugged in for approximately 24 hours.

THIS UNIT CAN BE OPERATED WHILE CHARGING!
To get the full Owner's Manual please visit our website at
http://www.yorkville.com/manuals/ or, if you need a printed version call 905-837-8777
REAL Gear.
REAL People.
Canada
Voice: (905) 837-8481
Fax: (905) 837-8746
U.S.A.
Voice: (716) 297-2920
Fax: (716) 297-3689

Yorkville
www.yorkville.com
Yorkville Sound
550 Granite Court
Pickering, Ontario
L1W-3Y8 CANADA
Yorkville Sound Inc.
4625 Witmer Industrial Estate
Niagara Falls, New York
14305 USA

Bluetooth™
Niagara Falls, New York
14305 USA
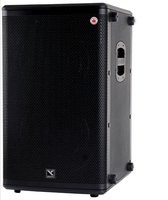
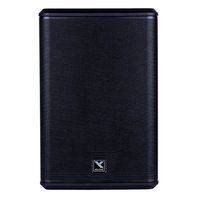



- WORLD HEADQUARTERS
- CANADA
- U.S.A.
- SERVICE MANUAL
- EXM-MOBILES
- SMT Disclaimer
- IMPORTANT SAFETY INSTRUCTIONS
- Power Sources
- Hazards
- Power Cord
- Service
- WARNING:
- Specifications
- Spécifications
- Block Diagram for EXM MobileSUB
- PCB ASSEMBLY DOCUMENTATION
- SPECIAL PRODUCTION NOTES
- DESIGN HISTORY AND INFORMATION
- EXM MobileSUB
- Bluetooth™
- Button Operation:
- Controls & Input/Output
- Battery & Charging
Brand : YORKVILLE
Model : EXM Mobile Sub
Category : Subwoofer