DWH050 - Drill DEWALT - Free user manual and instructions
Find the device manual for free DWH050 DEWALT in PDF.


User questions about DWH050 DEWALT
0 question about this device. Answer the ones you know or ask your own.
Ask a new question about this device
Download the instructions for your Drill in PDF format for free! Find your manual DWH050 - DEWALT and take your electronic device back in hand. On this page are published all the documents necessary for the use of your device. DWH050 by DEWALT.
USER MANUAL DWH050 DEWALT
English (original instructions)
text_image
Technical diagram of a mechanical device with labeled parts and exploded views of internal componentsFigure 2
text_image
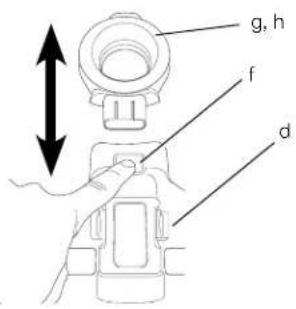
g, h f dFigure 3

text_image
d c kFigure 4
text_image
Technical diagram illustrating cable installation steps with labeled components and directional arrows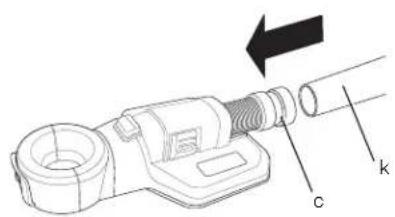
text_image
Technical diagram of a mechanical component with labeled parts c and k, showing a directional arrow indicating movement or force.Figure 5
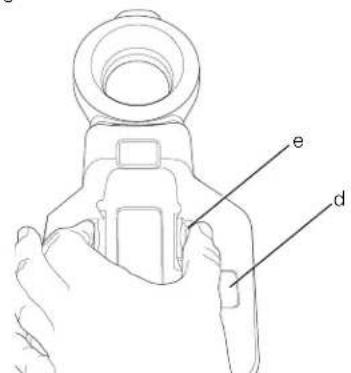
text_image
e dFigure 6

text_image
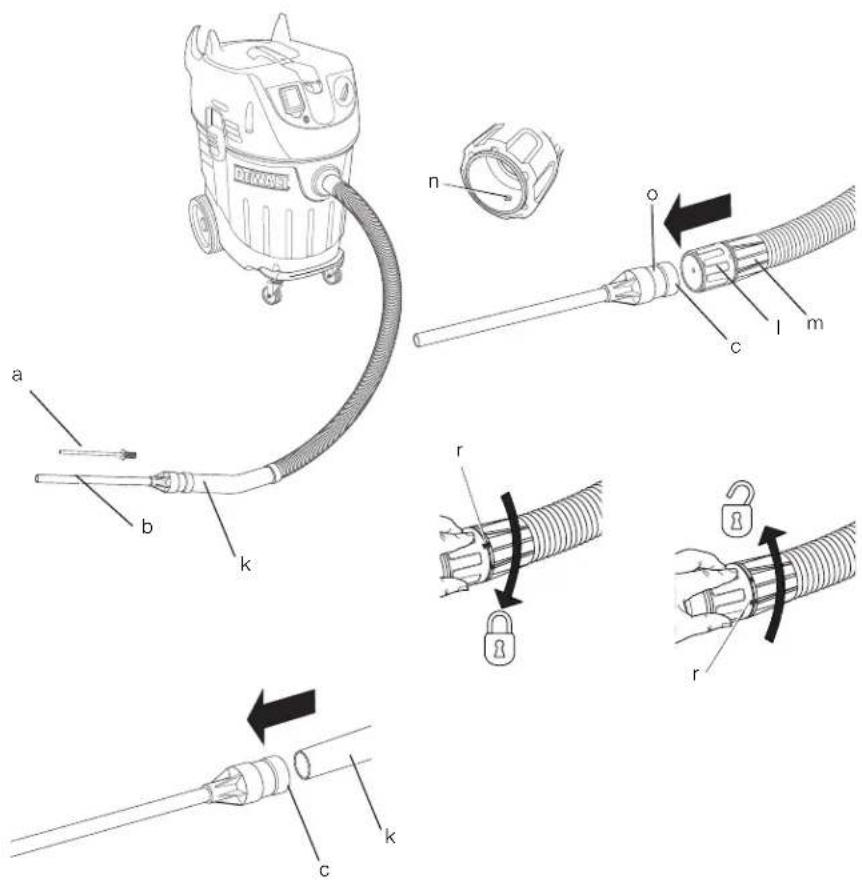
Diagram illustrating a three-step tool manipulation process with labeled parts a, b, and jFigure 7
text_image
Technical diagram showing exploded view of a vacuum cleaner with labeled parts and directional arrows indicating assembly steps.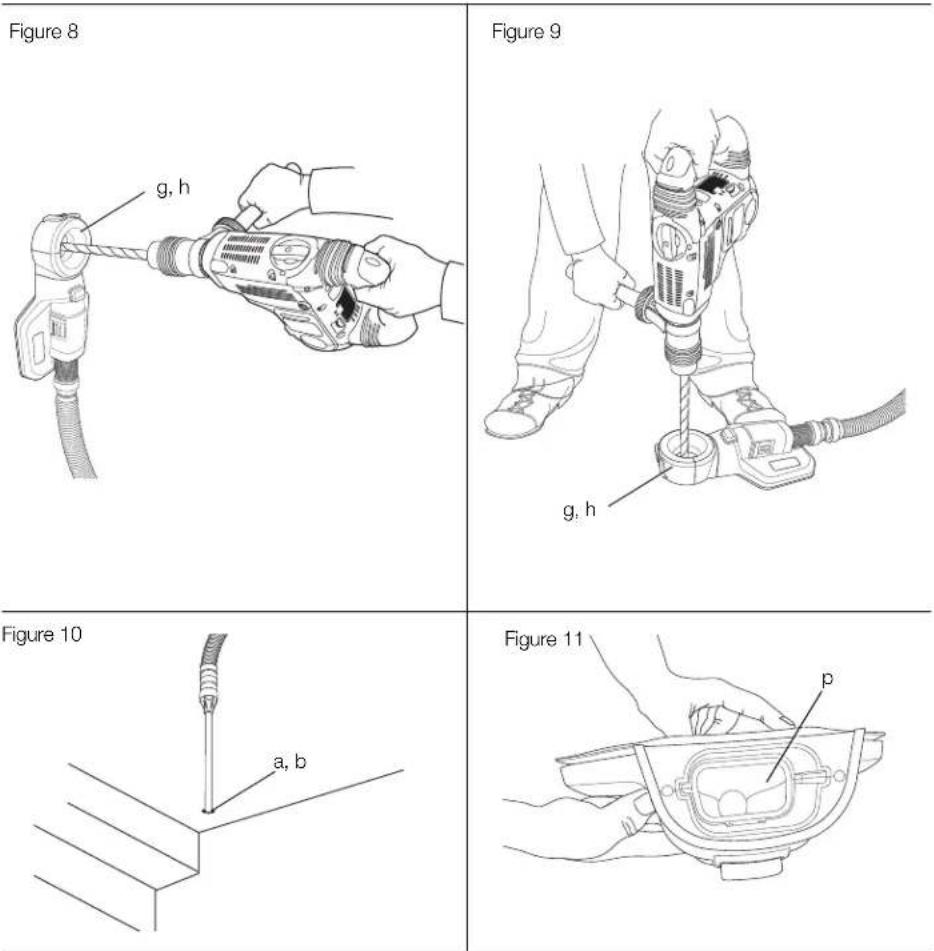
Figure 12

text_image
q g, h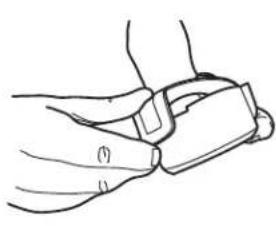
natural_image
Line drawing of a hand holding a belt buckle (no text or symbols)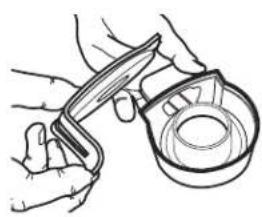
natural_image
Illustration of hands using a tool to cut a circular object (no text or symbols present)ST∅VOPSAMLINGSSYSTEM TIL BORING DWH050
Tillykke!
FOR AT UDSKIFTE SUGEPLADEN (FIG. 1)
You have chosen a DEWALT tool. Years of experience, thorough product development and innovation make DEWALT one of the most reliable partners for professional power tool users.
Technical Data
| DWH050 | |||
| Drill head | |||
| size | mm | 0–38 | 38–52 |
| Size | |||
| (l x b x h) | mm | 361 x 173 x 57 | 375 x 173 x 57 |
| Weight | kg | 0.6 | 0.62 |
Definitions: Safety Guidelines
The definitions below describe the level of severity for each signal word. Please read the manual and pay attention to these symbols.

DANGER: Indicates an imminently hazardous situation which, if not avoided, will result in death or serious injury.

WARNING: Indicates a potentially hazardous situation which, if not avoided, could result in death or serious injury.

CAUTION: Indicates a potentially hazardous situation which, if not avoided, may result in minor or moderate injury.
NOTICE: Indicates a practice not related to personal injury which, if not avoided, may result in property damage.

risk of electric shock.

risk of fire.
Safety Instructions

WARNING! Always observe safety regulations applicable in your country to reduce the risk of fire, electric shock and personal injury.
Read all of this manual carefully before operating the attachment. Also refer to the manual of any power tool that will be used with this attachment.
SAVE ALL WARNINGS AND INSTRUCTIONS FOR FUTURE REFERENCE
1) GENERAL
a) Keep work area clean. Cluttered areas and benches can cause accidents.
b) Keep children away. Do not let children come into contact with the tool or extension cord. Supervision is required for inexperienced users.
c) Use appropriate tool. The intended use is described in this instruction manual. Do not force small tools or attachments to do the job of a heavy-duty tool. The tool will do the job better and safer at the rate for which it was intended.

WARNING: The use of any accessory or attachment or performance of any operation with this tool, other than those recommended in this instruction manual may present a risk of personal injury.
2) ELECTRICAL SAFETY
a) Avoid body contact with earthed or grounded surfaces such as pipes, radiators, ranges and refrigerators. There is an increased risk of electric shock if your body is earthed or grounded.
b) Hold power tool by insulated gripping surfaces, when performing an operation where the cutting accessory may contact hidden wiring. Cutting accessory contacting a "live" wire may make exposed metal parts of the power tool "live" and could give the operator an electric shock.
c) Check beforehand (e.g. using a metal detector) to ensure there are no concealed electric cables or gas and water pipes present in the area which you are working. External metal parts of the appliance may become live, for example, when an electric cable is damaged accidentally. This presents a serious risk of electric shock.
3) PERSONAL SAFETY
a) Stay alert, watch what you are doing and use common sense when operating a power tool. Do not use a power tool while you are tired or under the influence of drugs, alcohol or medication. A moment of inattention while operating power tools may result in serious personal injury.
b) Use personal protective equipment. Always wear eye protection. Protective equipment such as dust mask, non-skid safety shoes, hard hat, or hearing protection used for appropriate conditions will reduce personal injuries.
c) Keep children and bystanders away while operating a power tool. Distractions can cause you to lose control.
4) POWER TOOL USE AND CARE
a) Use the power tool, accessories and tool bits etc., in accordance with these instructions taking into account the working conditions and the work to be performed. Use of the power tool for operations different from those intended could result in a hazardous situation.
b) Store idle power tools out of the reach of children and do not allow persons unfamiliar with the power tool or these instructions to operate the power tool. Power tools are dangerous in the hands of untrained users.
5) WORK AREA SAFETY
a) Ensure the workplace is well ventilated. Exposure to dust at a poorly ventilated workplace may result in damage to the health.
Additional Specific Safety Rules for Dust Extraction Systems
- Do not use the attachment for drilling applications in wood, steel or plastic.
- Do not use the attachment in core drilling applications.
- Do not use the attachment for chiselling applications.
- Use only power tools recommended by DEWALT with this attachment. For more information about DEWALT power tools compatible with this attachment, please contact your local dealer, refer to the addresses at the back of the manual or visit www.dewalt.eu.
- Do not use the tool in damp or wet conditions.
- Do not allow to be used as a toy. Close attention is necessary when used by or near children.
- Use only as described in this manual. Use only manufacturer's recommended attachments.
-
Do not put any object into openings. Do not use with any opening blocked; keep free of lint, hair and anything that may reduce air flow.
-
Keep hair, loose clothing, fingers and all parts of body away from openings and moving parts.
- Do not use to pick up flammable or combustible liquids, such as gasoline, or use in areas where they may be present.
- This appliance collects a significant percentage of, but not all, the dust generated.
WARNING: Some types of dust
created by working on materials contain chemicals known to cause cancer, birth defects or other reproductive harm, or serious and permanent respiratory or other injury. Some examples of these chemicals are: lead from lead-based paints, crystalline silica from bricks, concrete and other masonry products and natural stone, arsenic and chromium from chemically-treated lumber. Your risk from these exposures varies, depending on how often you do this type of work. To reduce exposure to these chemicals, the operator and bystanders should work in a well-ventilated area using approved safety equipment such as respirator protection appropriate for the type of dust generated and designed to filter out microscopic particles. Direct dust away from face and body. Avoid prolonged contact with dust. Wear protective clothing and wash exposed areas with soap and water. Allowing dust to get into your mouth, nose eyes, or to remain on your skin may promote absorption of harmful chemicals.
WARNING: Before beginning the work, check to determine the hazard classification of the dust produced. Use an industrial dust extractor of the appropriate official approved safety class and in compliance with your local dust hazard control regulations.
Residual Risks
The following risks are inherent to the use of the dust extraction system:
- Injuries caused by touching the rotating parts or hot parts of the tool.
ENGLISH
In spite of the application of the relevant safety regulations and the implementation of safety devices, certain residual risks cannot be avoided.
These are:
- Impairment of hearing.
– Risk of squeezing fingers when changing the accessory. - Health hazards caused by breathing dust developed when working in concrete and/or masonry.
Markings on Dust Extraction System
The following pictograms are shown on the tool:

Read instruction manual before use.

Wear eye protection.
DATE CODE POSITION
The date code, which also includes the year of manufacture, is printed on the main information label.
Example:
2011 XX XX
Year of Manufacture
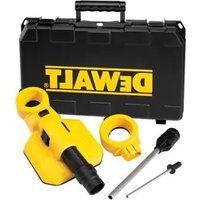
Package Contents
The package contains:
1 Drilling dust extraction system
1 Drilling head (fits drill bit diameters 0–38 mm)
1 Drilling head (fits drill bit diameters 38–52 mm)
2 Hole cleaning nozzles
1 Kitbox
1 Instruction manual
- Check for damage to the tool, parts or accessories which may have occurred during transport.
• Take the time to thoroughly read and understand this manual prior to operation.
Description (fi g. 1)
WARNING: Never modify the power tool or any part of it. Damage or personal injury could result.
a. Hole cleaning nozzle (8–14 mm)
b. Hole cleaning nozzle (14 mm and above)
c. Connection point
d. Dust extraction system
e. Quick release buttons
f. Drilling head release button
g. Drilling head (fits drill bit diameters 0–38 mm)
h. Drilling head (fits drill bit diameters 38–52 mm)
i. Suction pad
INTENDED USE
Your drilling dust extraction system has been designed for professional drilling applications in concrete and masonry. Using the appropriate hammer drill, drill bit and dust extractor it can be used to remove the vast majority of static and airborne dust which without the use of the dust extraction system could otherwise contaminate the working environment or pose an increased health risk to the operator and those in close proximity.
DO NOT use under wet conditions or in the presence of flammable liquids or gases.
The drilling dust extraction system is a professional power tool.
DO NOT let children come into contact with the tool. Supervision is required when inexperienced operators use this tool.
ASSEMBLY AND ADJUSTMENTS
WARNING: To reduce the risk of injury, turn unit off and disconnect machine from power source before installing and removing accessories, before adjusting or changing setups or when making repairs. Be sure the trigger switch is in the OFF position. An accidental start-up can cause injury.
Attach Drilling Head to Dust Extraction System (fi g. 1, 2)
- Select drilling head (g, h) to be used.
- Slide drilling head (g, h) into dust extraction system (d) until it locks into place.
Remove Drilling Head from Dust Extraction System (fi g. 1, 2)
Depress drilling head release button (f) to remove drilling head (g, h) from dust extraction system (d).
Attach Dust Extraction System to Dust Extractor (fi g. 1, 3, 4)

WARNING: Use only power tools recommended by DEWALT with this attachment. For more information about DEWALT power tools compatible with this attachment, please contact your local dealer, refer to the addresses at the back of the manual or visit www.dewalt.eu.
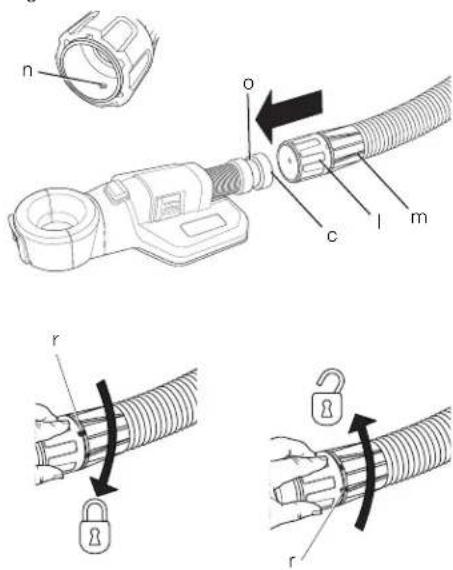
Push recommended dust extractor hose nozzle (k) into connection point (c) until tight. For a more secure connection use the AirLock connection system.
NOTE: Ensure hose connection is secure.
AIRLOCK CONNECTOR SYSTEM - DWV9000 (SOLD SEPARATELY)
AirLock allows for a fast and secure connection between the drilling dust extraction system and the dust extractor.
- Ensure the collar (l) on the AirLock connector (m) is in the unlock position. Align notches (r) on collar and AirLock connector as shown for unlock and lock positions.
- Push the AirLock connector (m) onto the connection point (c).
- Rotate the collar (l) to the locked position. NOTE: The ball bearings (n) inside collar will lock into slot (o) and secure the connection.
The drilling dust extraction system is now securely connected to the dust extractor.
Attach Drilling Dust Extraction System to Vertical or Horizontal Surface (fi g. 1, 5, 8, 9)
The dust extraction system (d) has a suction system that allows the unit to be fixed into place on a vertical or horizontal surface.
- With the correct drilling head (g, h) attached and the drilling dust extraction system securely connected to the dust extractor, turn the dust extractor on as instructed in the dust extractor instruction manual.
- Depress and hold the quick release buttons (e) and place the dust extraction system (d) on surface to be drilled.
NOTE: The suction system will not hold the unit in place on very rough or uneven surfaces. Secure the dust extraction system in place as shown in figure 9 if drilling on an uneven horizontal surface.
- Release the quick release buttons (e) and the dust extraction system will be secured in place.
- To make fine location adjustments, depress the quick release buttons (e) and the seal will release so the unit can be moved or removed from the surface completely.
Remove Drilling Dust Extraction System from Surface (fi g. 1, 5)

WARNING: DO NOT turn off the dust extractor before removing the drilling dust extraction system from the surface as instructed. Turning off the dust extractor before removing the drilling dust extraction system will result in the drilling dust extraction system falling from the surface which could cause injury
Depress the quick release buttons (e) on the dust extraction system to remove it from the surface.
Attach Hole Cleaning Nozzles (fi g. 1, 6, 7)
Hole cleaning is required to expose the full drilled depth and when using certain types of chemical fixing anchors to ensure maximum adhesion.
- Select the correct hole cleaning nozzle to be used:
-
Hole cleaning nozzle (a): used for small holes 8 mm to 14 mm in diameter.
• Hole cleaning nozzle (b): used for holes 14 mm in diameter and above. -
Remove/replace hole cleaning nozzle:
Grip the nozzle (a, b) firmly and pull it from the connection point (j).
Push the nozzle into the connection point (j) until it stops.
- Push the dust extractor hose nozzle into the connection point (c) until tight. For a more secure connection the AirLock connection system may be used.
NOTE: Ensure hose connection is secure.
AIRLOCK CONNECTOR SYSTEM - DWV9000 (SOLD SEPARATELY)
AirLock allows for a fast and secure connection between the hole cleaning nozzle and the dust extractor.
- Ensure the collar (l) on the AirLock connector (m) is in the unlock position. Align notches (r) on collar and AirLock connector as shown for unlock and lock positions.
ENGLISH
- Push the AirLock connector (m) onto the adaptor connector point (c).
- Rotate the collar (l) to the locked position. NOTE: The ball bearings (n) inside collar lock into slot (o) and secure the connection.
The hole cleaning nozzle is now securely connected to the dust extractor.
OPERATION
Instructions for Use
WARNING: Always observe the safety instructions and applicable regulations.
WARNING: To reduce the risk of serious personal injury, turn tool off and disconnect tool from power source before making any adjustments or removing/installing attachments or accessories.
WARNING: Always read and operate the tool as instructed in the tool instruction manual.
Drilling (fi g. 1, 8, 9)
- Complete the Attach Drilling Dust Extraction System to Vertical or Horizontal Surface procedure. The unit is now ready to use.
- Place the drill bit into the centre of the drilling head (g, h) and proceed to drill as shown.
Hole Cleaning (fi g. 10)
- Complete the Attach Hole Cleaning Nozzles procedure.
- Turn the dust extractor on as instructed in the dust extractor instruction manual.
NOTE: Ensure hose connection is secure. - Place the hole cleaning nozzle (a, b) into hole to be cleaned.
MAINTENANCE
Your DEWALT power tool has been designed to operate over a long period of time with a minimum of maintenance. Continuous satisfactory operation depends upon proper tool care and regular cleaning.
WARNING: To reduce the risk of injury, turn unit off and disconnect machine from power source before installing and removing accessories, before adjusting or changing
set-ups or when making repairs. Be sure the trigger switch is in the OFF position. An accidental start-up can cause injury.

Cleaning
WARNING: Remove dirt and dust from of the main housing with dry air as often as dirt is seen collecting in and around the air vents. Wear approved eye protection and approved dust mask when performing this procedure.
WARNING: Never use solvents or other harsh chemicals for cleaning the non-metallic parts of the tool. These chemicals may weaken the materials used in these parts. Use a cloth dampened only with water and mild soap. Never let any liquid get inside the tool; never immerse any part of the tool into a liquid.
CLEAN DUST EXTRACTION ADAPTOR SUCTION CHANNEL (FIG. 1, 11)
- Depress drilling head release button (f) and remove drilling head (g, h) from dust extraction system (d).
- Use the hole cleaning nozzle (a) to remove dirt and dust from the suction channel (p).
- Reassemble drilling head to dust extraction system.
CLEAN DRILLING HEAD (FIG. 1, 12)
- Depress drilling head release button (f) and remove drilling head from dust extraction system.
- Remove cover (q) from drilling head (g, h) and use the hole cleaning nozzle (a) to remove dirt and dust.
- Replace cover (q) on drilling head and reassemble to dust extraction system (d).
TROUBLESHOOTING
| FAULT POSSIBLE CAUSE REMEDY | ||
| Excessive dust emission | dust extractor is full | empty the dust extractor |
| filter of dust extractor is blocked | clean or replace the filter | |
| suction channel is blocked | clean the suction channel, refer toClean Dust ExtractionAdaptor Suction Channel under Cleaning | |
| the wrong drill head is selected | select the correct drill head | |
| Dust extraction system does not attach to surface | dust extractor is full | empty the dust extractor |
| filter of dust extractor is blocked | clean or replace the filter | |
| suction channel is blocked | clean the suction channel, refer toClean Dust ExtractionAdaptor Suction Channel under Cleaning | |
| suction pad is damaged | replace the suction pad, refer toReplace the Suction Pad under Optional Accessories | |
Optional Accessories

WARNING: Since accessories, other than those offered by DEWALT, have not been tested with this product, use of such accessories with this tool could be hazardous. To reduce the risk of injury, only DEWALT recommended accessories should be used with this product.
Consult your dealer for further information on the appropriate accessories.
TO REPLACE THE SUCTION PAD (FIG. 1)
- Disconnect dust extraction system from dust extractor.
- From the underside of unit remove the four screws (I) to release the suction pad (i).
- Replacement is a reversal of the above.
New suction pads are available from any DEWALT authorised repair agent.
Protecting the Environment

Separate collection. This product must not be disposed of with normal household waste.

Should you find one day that your DEWALT product needs replacement, or if it is of no further use to you, do not dispose of it with household waste. Make this product available for separate collection.

Separate collection of used products and packaging allows materials to be recycled and used again. Re-use of recycled materials helps prevent environmental pollution and reduces the demand for raw materials.
Local regulations may provide for separate collection of electrical products from the household, at municipal waste sites or by the retailer when you purchase a new product.
DEWALT provides a facility for the collection and recycling of DEWALT products once they have reached the end of their working life. To take advantage of this service please return your product to any authorised repair agent who will collect them on our behalf.
You can check the location of your nearest authorised repair agent by contacting your local DEWALT office at the address indicated in this manual. Alternatively, a list of authorised DEWALT repair agents and full details of our after-sales service and contacts are available on the Internet at:
www.2helpU.com.
GUARANTEE
DEWALT is confident of the quality of its products and offers an outstanding guarantee for professional users of the product. This guarantee statement is in addition to and in no way prejudices your contractual rights as a professional user or your statutory rights as a private non-professional user. The guarantee is valid within the territories of the Member States of the European Union and the European Free Trade Area.
• 30 DAY NO RISK SATISFACTION GUARANTEE •
If you are not completely satisfied with the performance of your DEWALT tool, simply return it within 30 days, complete with all original components, as purchased, to the point of purchase, for a full refund or exchange. The product must have been subject to fair wear and tear and proof of purchase must be produced.
• ONE YEAR FREE SERVICE CONTRACT •
If you need maintenance or service for your DEWALT tool, in the 12 months following purchase, you are entitled to one service free of charge. It will be undertaken free of charge at an authorised DEWALT repair agent. Proof of purchase must be produced. Includes labour. Excludes accessories and spare parts unless failed under warranty.
• ONE YEAR FULL WARRANTY •
If your DEWALT product becomes defective due to faulty materials or workmanship within 12 months from the date of purchase, DEWALT guarantees to replace all defective parts free of charge or – at our discretion – replace the unit free of charge provided that:
• The product has not been misused;
- The product has been subject to fair wear and tear;
• Repairs have not been attempted by unauthorised persons;
• Proof of purchase is produced;
- The product is returned complete with all original components.
If you wish to make a claim, contact your seller or check the location of your nearest authorised DEWALT repair agent in the DEWALT catalogue or contact your DEWALT office at the address indicated in this manual.
A list of authorised DEWALT repair agents and full details of our after-sales service is available on the Internet at: www.2helpU.com.
WAARSCHUWING: Zet de

AIRLOCK KOPPLINGSSYSTEM - DWV9000 (SÄLJS SEPARAT)
natural_image
Pure horizontal line with endpoints and no text or symbols| Belgique et Luxembourg | Black & Decker - DEWALTNieuwlandlaan 7, IZ Aarschot B156 | Dutch Tel: 32 70 220 063French Tel:32 70 220 062 | Fax: 32 70 225 585Fax: 32 70 222 441 |
| België en Luxembourg | B-3200 Aarschot www.dewalt.be | ||
| Danmark | DEWALTSluseholmen 2-42450 Kobenhavn SV | www.dewalt.dk | Tlf: 70201511Fax: 70224910 |
| Deutschland | DEWALTRichard Klingor Str. 1165510 Idstein | Fax: 06126-21-2770 | Tel: 06126-21-1www.dewalt.de |
| Ελλάς | Black & Decker (Ελλάς) A.E.Στράβωνος 7 & Βουλιαγμένης 159Γλυφάδα 16674, Αθήνα | Τηλ: 30 210 8981-616Service: 30 210 8981-616Φαξ: 30 210 8983-570 | www.dewalt.gr |
| España | DEWALTParque de Negocios "Mas Blau"Edificio Muntadas, c/Bergadá, 1, Of. A608820 El Prat de Llobregat (Barcelona) | Tel: 934 797 400Fax: 934 797 419www.dewalt.es | |
| France | DEWALT5, allée des hôtresBP 30084, 69579 Limonest Cedex | Tel: 04 72 20 39 20Fax: 04 72 20 39 00www.dewalt.fr | |
| SchweizSuisseSvizzera | DEWALTIn der Luberzen 428902 Urdorf | Tel: 044 - 755 60 70Fax: 044 - 730 70 67www.dewalt.ch | |
| Ireland | DEWALTCalpe House Rock HillBlack Rock, Co. Dublin | Fax: 00353-2781811www.dewalt.ie | Tel: 00353-2781800 |
| Italia | DEWALTc/o Energypark Building 03 sud, Via Monza 7/A,20871 Vimercate (MB), IT | www.dewalt.it | Tel: 800-014353Fax: 39 039 9590 317 |
| Nederlands | Black & Decker - DEWALT Tel: 31 164 283 063Joulehof 124600 AB Bergen Op Zoom | Fax: 31 164 283 200www.dewalt.nl | |
| Norge | DEWALTPostboks 4613, Nydalen0405 Oslo | Tel: 45 25 13 00Fax: 45 25 08 00 | www.dewalt.no |
| Österreich | DEWALTWerkzeug Vertriebsges m.b.HOberlaaerstrasse 248A-1230 Wien | Tel: 01 - 66116 - 0Fax: 01 - 66116 - 14www.dewalt.at | |
| Portugal | DEWALTCentro de Escritórios de Sintra Avenida AlmiranteGago Coutinho, 132/134, Edificio 142710-418 Sintra2710-418 Lisboa | Tel: 214 66 75 00 | Fax: 214 66 75 75www.dewalt.pt |
| Suomi | DEWALTTeknikantie 1202150 Espoo, Finland | Puh: 010 400 430Faksi: 0800 411 340www.dewalt.fi | |
| Sverige | DEWALTBox 94431 22 Mölndal | Tel: 031 68 61 00Fax: 031 68 60 08www.dewalt.se | |
| Türkiye | KALE Hirdavat ve Makina A.Ş.Defterdar Mah. Savaklar Cad. No:15Edirnekapı / Eyüp / İSTANBUL 34050 TÜRKİYE | Tel: 0212 533 52 55Faks: 0212 533 10 05www.dewalt.com.tr | |
| UnitedKingdom | DEWALT210 Bath Road; Slough, Børks SL1 3YD | Tel: 01753-56 70 55Fax: 01753-57 21 12 | www.dewalt.co.uk |
| Middle EastAfrica | DEWALTP.O. Box - 17164,Jebel Ali (South Zone), Dubai, UAE | Tel: 971 4 8863030www.dewalt.ae | Fax: 971 4 8863333 |
N361446
10/13