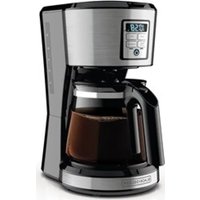
BEHB101 - Coffee machine BLACK & DECKER - Free user manual and instructions
Find the device manual for free BEHB101 BLACK & DECKER in PDF.

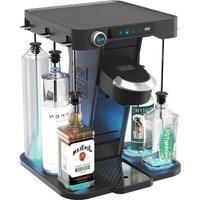
| Product Type | Cocktail Machine |
| Brand | Black & Decker |
| Model | BEHB101 |
| Power Supply | 12 V DC, 1000 mA (AC adapter included) |
| Bottle Capacity | 6 bottles (750 ml max each) |
| Main Functions | Cocktail dispensing with capsule, alcohol content selector (4 levels), party mode, cleaning mode, auto pause |
| Capsule Type | Bayesian capsule with barcode |
| LED Indicators | 6 bottle LEDs, 4 alcohol content LEDs, 1 mixer LED |
| Switch | On/Off (I/O) |
| Safety | Turn off and unplug before maintenance; do not immerse; use by adults only |
| Cleaning | Automatic cleaning mode for lines; straws, caps, capsule cup, and water bottle dishwasher safe (top rack) |
| Included Accessories | 6 straws, 6 straw caps, 6 straw locks, 6 bottle caps, 1 water bottle, 1 straw cleaner, 1 glass tray, 1 drip tray, 1 turn table, 1 capsule holder, 1 capsule cup |
| Warranty | 2-year limited (household use) |
| Intended Use | Residential, for adults of legal drinking age |
| Materials | Plastic, glass (tablet) |
| Country of Manufacture | Not specified |
| Weight | Not specified |
| Dimensions (approx.) | Not specified |
Frequently Asked Questions - BEHB101 BLACK & DECKER
User questions about BEHB101 BLACK & DECKER
0 question about this device. Answer the ones you know or ask your own.
Ask a new question about this device
Download the instructions for your Coffee machine in PDF format for free! Find your manual BEHB101 - BLACK & DECKER and take your electronic device back in hand. On this page are published all the documents necessary for the use of your device. BEHB101 by BLACK & DECKER.
USER MANUAL BEHB101 BLACK & DECKER
5 Drip tray cover finger hole
6 Bottle platform
7 Straws (6)
8 Straw locks (6)
9 Straw tips (6)
10 Straw slots (6)
11 Straw plug (6)
12 Straw plug notch (6)
13 Bottle stoppers (6)
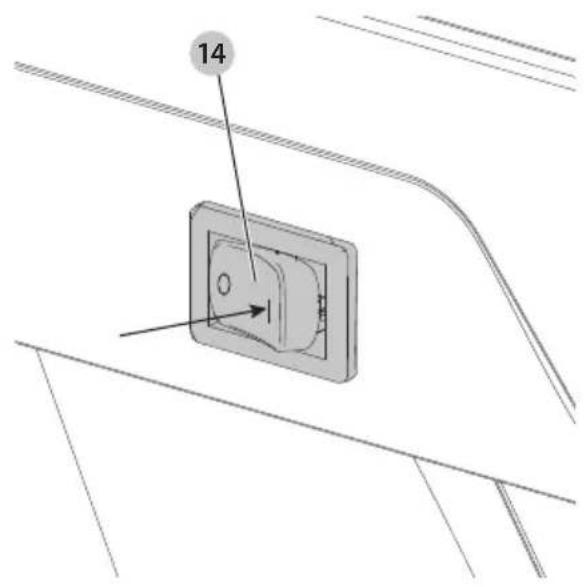
14 Power switch
15 Strength LEDs (4)
16 Bottle LEDs (6)
17 Glass shelf
18 Tower
19 Shaker LED
20 Capsule (not included)
21 Capsule holder
22 Capsule holder lid
23 Capsule cup
24 Capsule tab
25 Strength selector dial
26 Mix button
27 Party mode button
28 Cleaning mode button
29 Water bottle
30 Straw cleaner
Composants
1 Connecteur mâle
2 Port de la prise
3 Ramasse-gouttes
20 Capsule (non incluse)
21 Porte-capsule
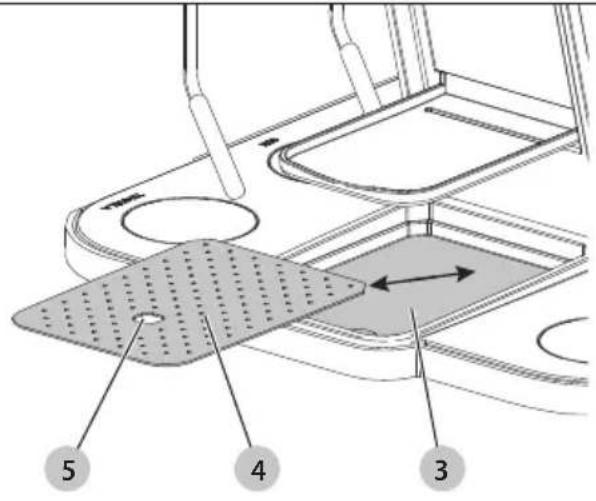
Fig. D
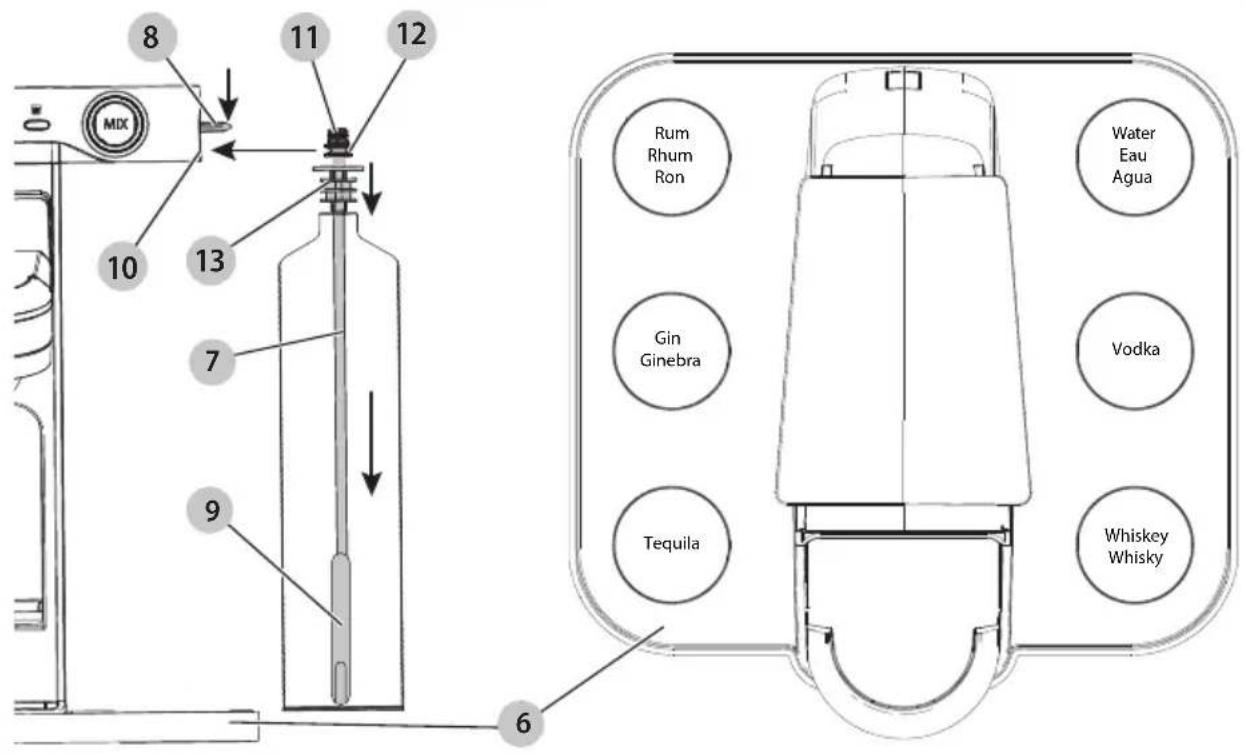
Fig. E
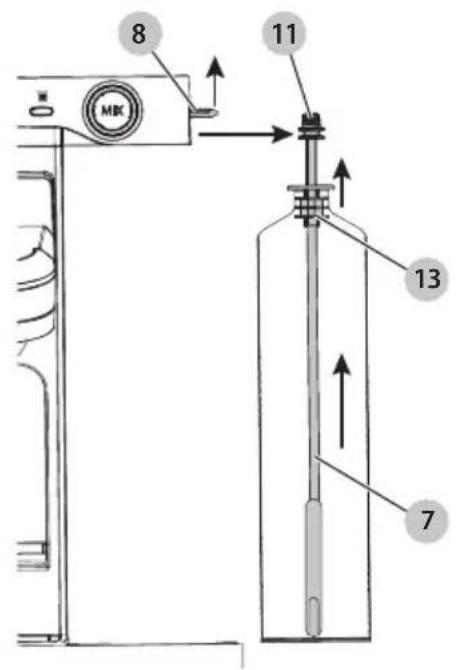
Fig. F
WARNING: Read all safety warnings and all instructions. Failure to follow the warnings and instructions may result in electric shock, fire and/or serious injury.

WARNING: To reduce the risk of injury, read the instruction manual.
Intended Use
This appliance is intended for residential use only for mixing cocktails by adults of legal drinking age.
DO NOT let children come into contact with the appliance.
Definitions: Safety Alert Symbols and Words
This instruction manual uses the following safety alert symbols and words to alert you to hazardous situations and your risk of personal injury or property damage.
DAJINGER: Indicates an imminently hazardous selection which, if not avoided, will result in death or serious injury.
WARNING: Indicates a potentially hazardous situation, if not avoided, could result in death or serious injury.
CANTION: Indicates a potentially hazardous situation which, if not avoided, may result in minor or moderate injury.
(### without word) Indicates a safety related message.
NOTICE: Indicates a practice not related to personal injury which, if not avoided, may result in property damage.
IMPORTANT SAFEGUARDS
WARNING: When using electrical appliances, basic safety precautions should always be followed to reduce the risk of fire, electric shock, and/or injury, including the following:
- Read and save all safety warnings, instructions, and cautionary markings for appliance, alcohol, and capsules.
- This appliance is intended for adults of legal drinking age. This appliance should not be used by children or by persons with reduced physical, sensory, or mental capabilities, or lack of experience and knowledge. Close supervision is necessary when any appliance is used near children. Children should be supervised to ensure that they do not play with the appliance.
• Always drink responsibly.
• To protect against risk of electrical shock, do not immerse appliance, motor, cord, or plug in water or other liquid. Do not use the appliance in the bathroom, near water, or in adverse weather conditions.
- Only use the power adaptor supplied by the manufacturer.
- Unplug when not in use, during external cleaning, or when making adjustments.
- Do not abuse the cord. Use the plug, never the cord, for unplugging the appliance. Replace damaged cord or plug immediately.
- Do not operate any appliance after the appliance malfunctions, or is dropped or damaged in any manner. Call the appropriate toll-free number in this manual.
- Do not use broken, chipped, or cracked bottles of alcohol.
- The use of attachments not recommended or sold by the appliance manufacturer may cause fire, electric shock, or injury; do not use attachments or appliances for anything other than intended use.
- This appliance is not intended for commercial, professional, or industrial use. It is designed and built exclusively for household use.
- Do not place appliance on, near, or in a hot item such as a stove, oven, pot, or container.
- Do not touch puncturing needles inside the pod holder. The needles are sharp. Handle carefully with your hands away from cutting edge. Always store out of reach of children with the pod holder closed.
- Do not use the appliance with wet hands.
- Never modify the appliance, attachments, or any parts thereof.
SAVE THESE INSTRUCTIONS.
This product is for household use only.
- Do not use an extension cord unless it is absolutely necessary. Use of improper extension cord could result in risk of fire, electric shock, or electrocution
- An extension cord must have adequate wire size (AWG or American Wire Gauge) for safety. The smaller the gauge number of the wire, the greater the capacity of the cable, that is, 16 gauge has more capacity than 18 gauge. An undersized cord will cause a drop in line voltage resulting in loss of power and overheating. When using more than one extension to make up the total length, be sure each individual extension contains at least the minimum wire size. The following table shows the correct size to use depending on cord length and nameplate ampere rating. If in doubt, use the next heavier gauge. The lower the gauge number, the heavier the cord.
Minimum Gauge for Cord Sets
| Volts | Total Length of Cord in Feet (meters) | ||||
| 120 V 25 (7.6) | 50 (15.2) 100 (30.5) 150 (45.7) | ||||
| 240 V 50 (15.2) | 100 (30.5) 200 (61.0) 300 (91.4) | ||||
| Ampere Rating | American Wire Gauge | ||||
| More Than | Not More Than | ||||
| 0 6 18 | 16 16 14 | ||||
| 6 10 18 | 16 14 12 | ||||
| 10 12 | 16 16 14 12 | ||||
| 12 16 14 12 Not Recommended | |||||
The label on your tool may include the following symbols. The symbols and their definitions are as follows:
V....volts ⑪....Class I Construction
Hz....hertz (grounded)
min....minutes .../min....per minute
or DC.....direct current BPM.....beats per minute
Class II Construction (double insulated)
n_0 .....no load speed n .....rated speed
PSI..... pounds per square inch
earthing terminal
⚠️ ......safety alert symbol
▲......visible radiation do not stare into the light
......wearrespiratory protection
...... wear eye protection
wearhearing protection
readall documentation
do not expose to rain
ASSEMBLY AND ADJUSTMENTS
WARNING: To reduce the risk of serious personal injury, turn appliance off and disconnect appliance from power source before making any adjustments or removing/installing attachments or accessories. An accidental start-up can cause injury.
Installing Cord (Fig. B)
- Place the cocktail maker upright on a flat, level, stable surface.
- Insert the jack plug 1 of the cord into the plug port 2.
- Plug the other end of the cord into an outlet.
Installing Coaster (Fig. C)
- Place the drip tray cover into the drip tray 3 so the rounded and slanted corners of the cover line up with the rounded and slanted corners of the drip tray.
- Ensure the cover sits fully inside the drip tray.
- To remove the cover, lift from the drip tray cover finger hole 5.
Installing Bottles (Fig. D)
WARNING: Only use water in the supplied water bottle. Use of other liquids or substances in the water bottle may result in damage to the appliance.
CAUTION: Avoid spills while installing bottles.
NOTE: It is recommended to use 750 ml bottles or smaller to ensure all bottles sit on the bottle platform 6 without hanging off the platform.
NOTE: Bottles must fit between the bottle platform and the top of the cocktail maker while standing.
- Slide a straw 7 into a bottle so the straw tip 9 sits on the bottom of the bottle.
- Slide the bottle stopper 13 down the straw until it sits fully in the top of the bottle.
- Ensure the straw lock 8 is up.
-
Align the straw plug notch 12 with the straw slot 10.
-
Slide the straw plug 11 all the way into the straw slot, allowing the bottle to sit freely in its designated space. Ensure the straw plug is fully seated in the slot
- To lock it into place, push the straw lock down until it clicks. Ensure the lever is fully down.
- Repeat for all bottles.
IMPORTANT: Bottles must be placed in their designated space to ensure the correct drink is dispensed. Names of the liquids are located in each spot, indicating the appropriate liquid.
IMPORTANT: The following are the only liquids that should be used with the appliance.
• Water
• Gin
- Rum
• Vodka
- Tequila
- Whiskey
Removing Bottles (Fig. E)
CAUTION: Avoid spills while removing bottles.
- Lift the straw lock 8.
- Slide the straw plug 11 and bottle off the cocktail maker.
- Pull the bottle stopper 13 out of the bottle and remove the straw 7.
NOTE: If the cocktail maker pauses for an empty bottle and you press mix without replacing the bottle, it will skip to the next bottle in the recipe. If that bottle is empty, it will pause again. Refer to the PAUSE MODE section for more information.
OPERATION
WARNING: To reduce the risk of serious personal injury, turn unit off and disconnect it from power source before making any adjustments or removing/installing attachments or accessories.
An accidental start-up can cause injury.
On/Off (Fig. F)
WARNING: Do not interact with the cocktail maker what it is operating.
- To turn the cocktail maker on, push the "I" side of the power switch 14. The 4 strength LEDs 15 and 6 bottle LEDs 16 will blink. When they become solid, the cocktail maker is ready to use.
- To turn the cocktail maker off, push the "O" side the side of the power switch. All LEDs will turn off.
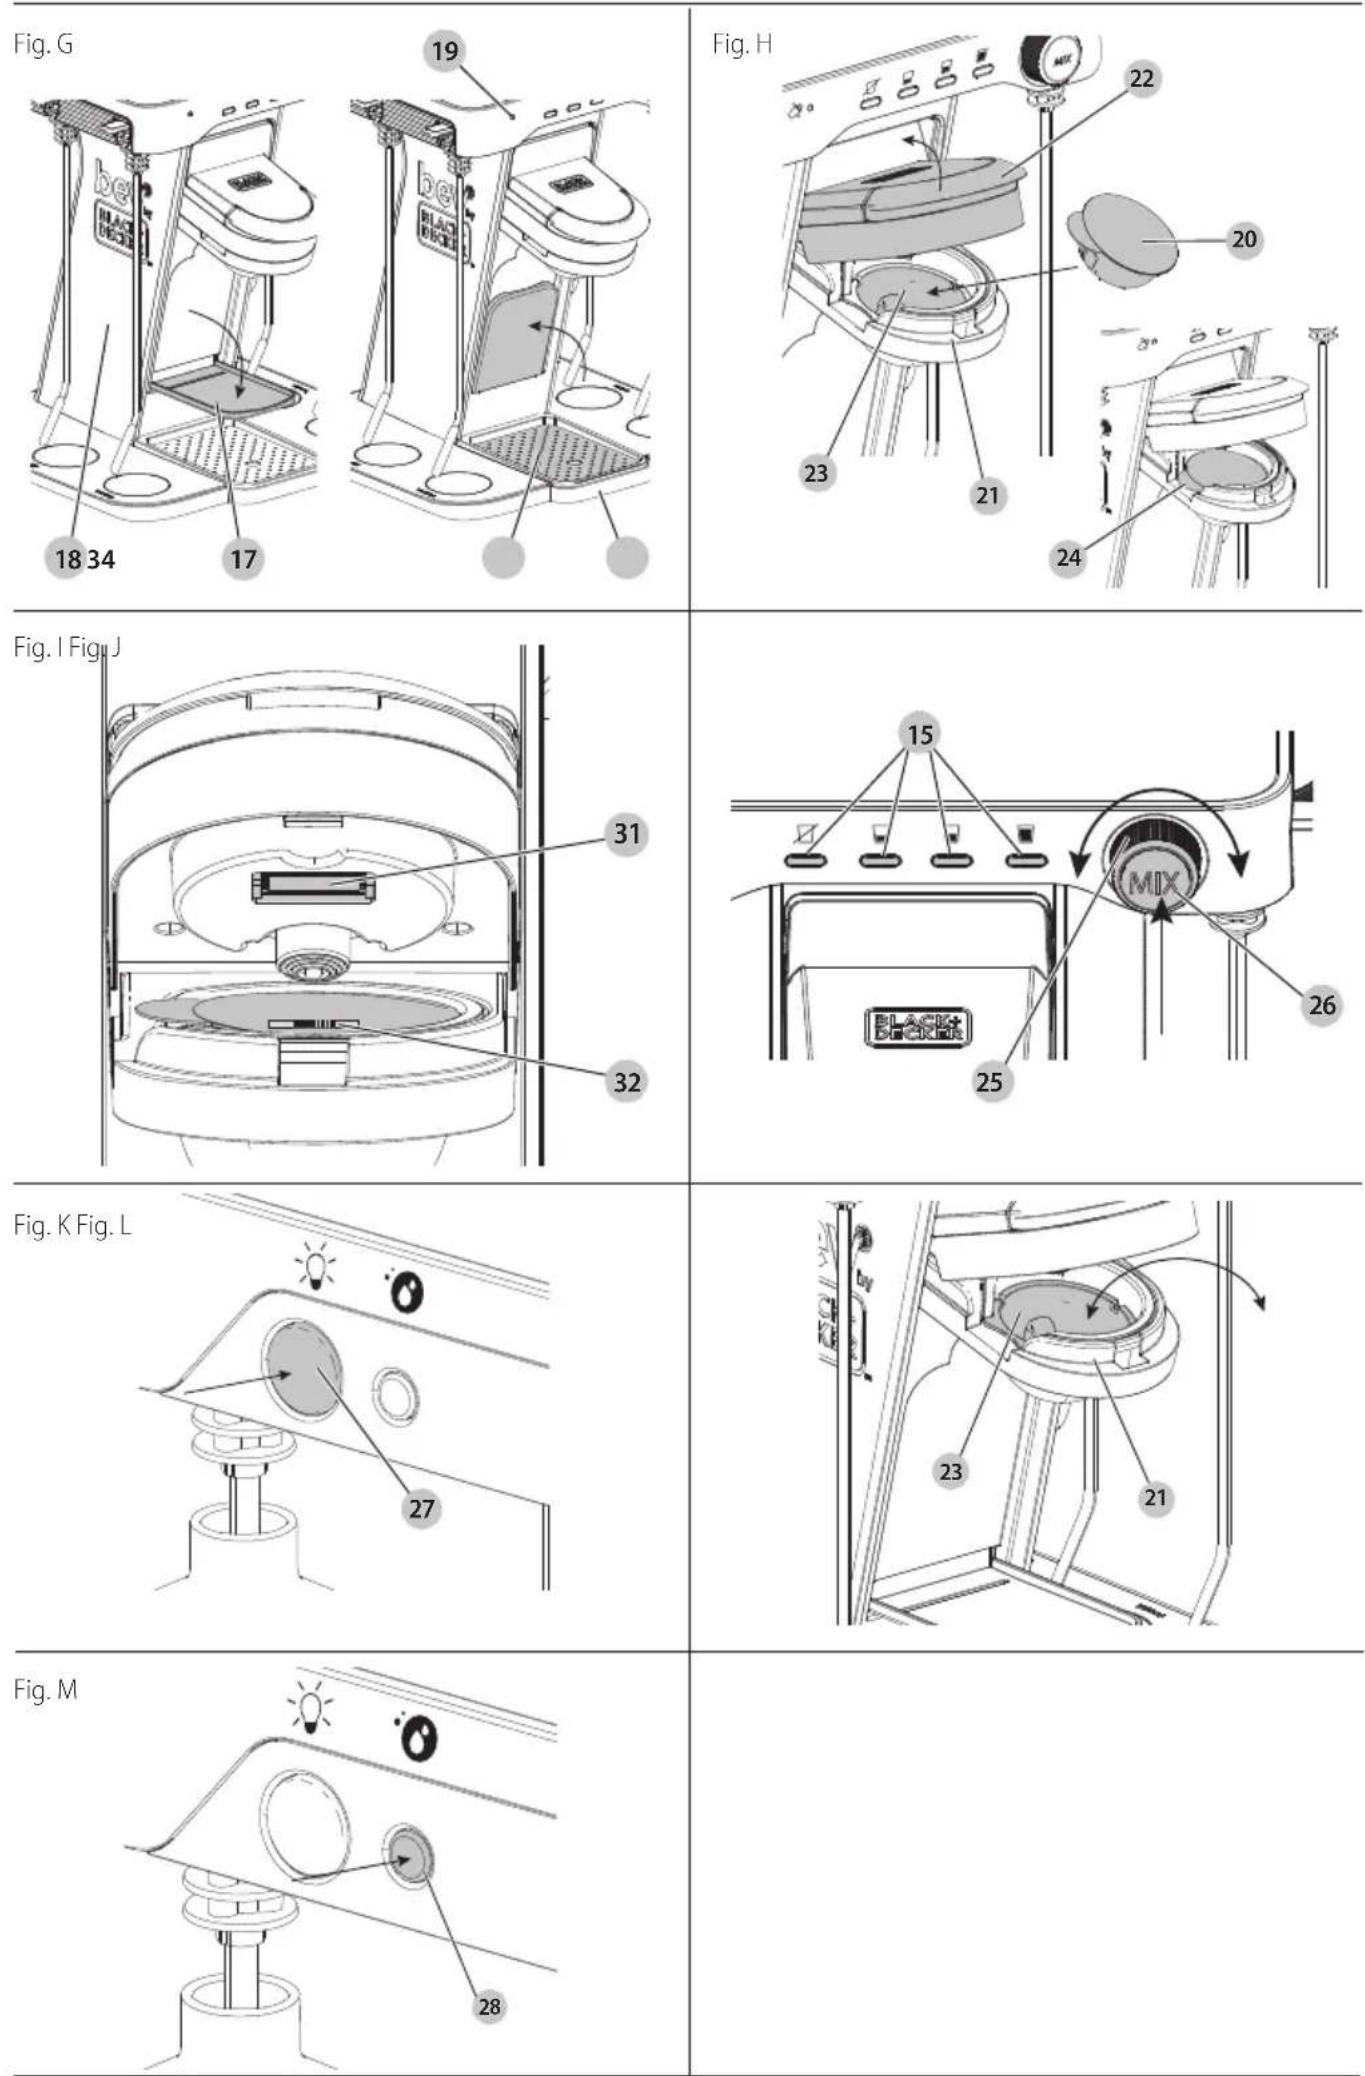
Choose a Glass Tray (Fig. G)
Place a glass or shaker on either the glass shelf 17 or drip tray 3, depending on the height of the glass being used. Refer to the cocktail image on the capsule 20 for glass style.
NOTE: A glass or shaker must be in place before making a drink to avoid spillage.
Short glass:
- Pull the glass shelf down so it stands straight out from the tower 18.
- Place a small glass on the glass shelf.
ENGLISH
Tall glass:
- Push the glass shelf up so it hides away in the tower.
- Ensure the drip tray cover 4 is in place.
- Place a tall glass on the drip tray cover.
Shaker:
The shaker LED 19 will light when a drink needs to be shaken. In this case, use a shaker instead of a tall glass.
- Push the glass shelf up so it hides away in the tower.
- Ensure the drip tray cover is in place.
- Place a shaker on the drip tray cover.
Inserting a Capsule (Fig. H, I)
WARNING: Cut Hazard. Do not probe capsule holder with fingers.
WARNING: Pinch point. Keep away from capsule holder when closing capsule holder lid.
WARNING: Use only Bartesian capsule. Use with any other capsule may result in damage to the appliance.
IMPORTANT: Do not open capsule 20.
IMPORTANT: Once the capsule is punctured, it may drip liquid. To avoid this, place a capsule in the capsule holder 21 just before mixing a drink.
- Before inserting a capsule, place a glass or shaker on the glass shelf 17 or drip tray 3 as described in the CHOOSE A GLASS TRAY section
- Select the capsule you wish to use.
- To open the capsule holder, lift the capsule holder lid 22 until it clicks into place.
- Ensure the bar code 32 is clean from liquid and debris. Wipe your thumb across the bar code before inserting capsule into capsule holder.
- Place the capsule in the capsule cup 23 located in the holder. Ensure the capsule tab 24 faces to the left. The cocktail maker will not operate if the capsule is inserted any other way.
- Ensure the capsule sits fully in the capsule cup.
NOTE: The scanner inside the capsule holder scans the code on top of the capsule. This allows the cocktail maker to pull from the correct bottles so it dispenses the correct drink.
- Push the capsule holder lid down to close the capsule holder until it clicks. Ensure the lid is fully closed before operating.
NOTE: If the capsule code is successfully read, the bottle LEDs 16 will light under the bottles that are being used. Ensure each bottle is in its correct place.
NOTE: If lights do not turn on, lift the capsule holder lid and use a clean, dry towel to wipe the barcode scanner 31 and the capsule barcode 32 as shown in Fig. I. Then, repeat step 6.
Select Alcohol Strength (Fig. J)
To select the amount of alcohol to be dispensed into the drink, turn the strength selector dial 25.
- Left: less alcohol
• Right: more alcohol
The strength LEDs 15 will turn on and off as you turn the selector, indicating the strength of the drink.
- - mocktail (no alcohol)
- light alcohol content
- regular alcohol content
- strong alcohol content
Making a Drink (Fig. F–J)
WARNING: To ensure liquor is not dispensed while making a mocktail, lift straw locks 8 for the alcohol bottles and keep the water bottle straw lock down.
- Turn the cocktail maker on as described in the ON/OFF section.
- Place a glass or shaker on the glass shelf 17 or drip tray 3 depending on its height as described in the CHOOSE A GLASS TRAY section.
- Insert the desired capsule 20 into the capsule holder 21 as described in the INSERTING CAPSULE section.
- Turn the strength selector dial 25 to set the alcohol content as described in the SELECT ALCOHOL STRENGTH section.
- Bottles used for the drink recipe will light up. Ensure bottles are installed in all locations illuminated.
- Push the mix button 26 to begin making a drink.
- The bottle LED will light under the bottle whose liquid is being dispensed.
- It is complete when all the LEDs become solid.
- Remove the capsule before removing the glass. The capsule may drip when it is being removed and if left in the holder.
NOTE: While making a drink, if the power button is turned off, the appliance is unplugged, or after one minute in pause mode, the mixing process will be reset, ending the mixing of the current drink. If this happens, a small amount of alcohol may remain in the internal lines. To ensure the next drink is not mixed with this remaining alcohol, clean the lines as described in the CLEANING MODE section before mixing another drink. To resume making the drink while in pause mode, refer to the PAUSE MODE section.
NOTE: If the cocktail maker continues to dispense to the point of overflow, turn the appliance off, lift the straw lock, or lift the capsule holder lid 22.
Bottle Runs Out During Mixing (Fig. F, J)
If a bottle runs out of liquid while the cocktail maker is mixing a drink:
- The cocktail mixer will enter pause mode for 2 minutes to allow you to replace the empty bottle. Refer to the PAUSE MODE section for more information.
- Do not turn the power switch 14 off. Turning it off will reset the mixing process and the cartridge will no longer be able to be used.
NOTE: The unit will not flush the lines while the capsule holder lid 22 is lifted.
To replace the empty bottle:
- Remove the bottle as described in the REMOVING BOTTLES section.
- Install the a new bottle as described in the INSTALLING BOTTLES section.
- Press the mix button 26 to resume mixing the drink from where it left off.
Pause Mode
Pause mode lasts for 2 minutes. The strength LEDs 15 will light to indicate the time remaining.
| 3 solid, 1 flashing 1:30 - 2 min. remaining |
| 2 solid, 1 flashing 1 - 1:30 min. remaining |
| 1 solid, 1 flashing 30 sec. - 1 minute remaining |
| 1 flashing less than 30 sec. |
- Press and hold the mix button for 3 seconds to cancel pause mode.
- If the LED countdown finishes before the drink mixing resumes or pause mode is cancelled, the unit will pump a small amount of water to flush the lines. The cocktail maker will reset to its original mode and the drink will no longer be mixed. If there is no water loaded into the cocktail maker, the unit will flush the lines with air.
NOTE: The unit will not flush the lines while the capsule holder lid 22 is lifted.
Pause mode is triggered three ways.
- The mix button is pressed.
- Press the mix button once more to resume.
• The capsule holder lid is open. - Close the lid and press the mix button.
• A bottle runs out of liquid - Replace the empty bottle as described in the BOTTLE RUNS OUT DURING MIXING section.
Turn on Party Mode LEDs (Fig. K)
The bottle LEDs 16 can be set to flash in a preset pattern.
- Turn the cocktail maker on by pushing the "I" side of the power switch 14. All 6 bottle LEDs will light.
- Press the party mode button 27 once to set party mode. The LEDs will begin flashing.
- Press the party mode button a second time to turn all bottle LEDs off..
- Press the party mode button a third time to turn all bottle LEDs back on.
MAINTENANCE
WARNING: To reduce the risk of serious personal injury, turn unit off and keep away from power switch before making any adjustments or removing/installing attachments or accessories.
An accidental start-up can cause injury.
Your BLACK+DECKER appliance has been designed to operate over a long period of time with a minimum of maintenance. Continuous satisfactory operation depends upon proper appliance care and regular cleaning.
Cleaning (Fig. C)
WARNING: Never use solvents or other harsh chemicals for cleaning the non-metallic parts of the appliance. These chemicals may weaken the plastic materials used in these parts. Use a cloth dampened only with water and mild soap. Never let any liquid get
inside the appliance; never immerse any part of the appliance into a liquid.
CAUTION: Straws, bottle stoppers, capsule cup, drip tray cover, and water bottle are top-rack dishwasher safe. It is recommended that you manually rinse the attachments before placing them in the dishwasher.
- Clean the inside of the straws with warm water, mild soap, and the provided straw cleaner 30.
- Clean all external parts with a cloth dampened with warm water and mild soap.
- Remove the capsule cup 23 by pulling it up and out of the capsule holder 21. To reinstall the cup, slide it into the capsule holder and press down. Ensure the cup sits fully and securely inside the capsule holder.
Cleaning Mode (Fig. E, I, L, M
It is recommended to clean the liquid lines of the cocktail maker at least once a month.
- Remove the capsule 20 from the capsule holder 21. Ensure the capsule cup 23 remains in place.
- Place a large glass that holds at least 10 oz (300 ml) on the drip tray 3.
- Remove the bottles as described in the REMOVING BOTTLES section.
- Fill a glass with at least 2 oz (60 ml) of water.
- Place a straw 7 in the glass and install the straw as described in the INSTALLING BOTTLES section.
- Repeat steps 1 - 5 for all bottles.
- Press the cleaning mode button 28 for 6 seconds.
- Once the unit starts pumping water, let go of the cleaning mode button.
- The bottle LEDs 16 will light one at a time to indicate which line is being cleaned. Once all LEDs turn on, the process is complete.
- Water may splash on the barcode scanner 31. Use a clean, dry towel to wipe the barcode scanner and surrounding area.
- Install the bottles as described in the INSTALLING BOTTLES section.
Accessories
WARNING: Since accessories, other than those offered by BLACK+DECKER, have not been tested with this product, use of such accessories with this product could be hazardous. To reduce the risk of injury, only BLACK+DECKER recommended accessories should be used with this product.
Recommended accessories for use with your product are available at extra cost from your local dealer or authorized service center. If you need assistance in locating any accessory, please contact BLACK+DECKER call
1-800-544-6986.
Storage
- Clean out the liquid lines as described in the CLEANING MODE section.
- Switch off the appliance.
ENGLISH
• Always store disconnected from power supply!
- Store in a place that is as cool and dry as possible.
- Store in a place where it cannot be accessed by children or unauthorized persons.
- Remove all bottles, capsules, straws, and stoppers from the appliance when storing for long periods of time.
- Check the appliance for damage before use after long periods of storage.
Transport
• Always transport your products disconnected from power supply.
- Turn power switch to the off position.
- Check the appliance for damage before use after transport
- Remove all bottles, capsule, straws, and stoppers from the appliance for transport.
- Do not transport with bottles installed.
Technical Data
12VDC 1000mA
Register Online
Thank you for your purchase. Register your product now for:
- WARRANTY SERVICE: Registering your product will help you obtain more efficient warranty service in case there is a problem with your product.
- CONFIRMATION OF OWNERSHIP: In case of an insurance loss, such as fire, flood or theft, your registration of ownership will serve as your proof of purchase.
• FOR YOUR SAFETY: Registering your product will allow us to contact you in the unlikely event a safety notification is required under the Federal Consumer Safety Act. - Register online at www.BlackandDecker.com / NewOwner
TWO-YEAR LIMITED WARRANTY
Black & Decker (U.S.) Inc. warranties this product to be free from defects in material or workmanship for a period of two (2) years following the date of purchase, provided that the product is used in a home environment. This limited warranty does not cover failures due to abuse, accidental damage or when repairs have been made or attempted by anyone other than BLACK+DECKER and its Authorized Service Centers. A defective product meeting the warranty conditions set forth herein will be replaced or repaired at no charge in either of two ways:
The first, which will result in exchanges only, is to return the product to the retailer from whom it was purchased (provided that the store is a participating retailer). Returns should be made within the time period of the retailer's policy for exchanges. Proof of purchase may be required. Please check with the retailer for its specific return policy regarding time limits for returns or exchanges. The second option is to take or send the product (prepaid) to a BLACK+DECKER owned or authorized Service Center for repair or replacement at BLACK+DECKER's option. Proof of purchase may be required. BLACK+DECKER owned and authorized service centers are listed online at www.blackanddecker.com. This warranty does not apply to accessories. This warranty gives you specific legal rights and you may have other rights which vary from state to state or province to province. Should you have any questions, contact the manager of your nearest BLACK+DECKER Service Center. This product is not intended for commercial use, and accordingly, such commercial use of this product will void this warranty. All other guarantees, express or implied, are hereby disclaimed.
LATIN AMERICA: This warranty does not apply to products sold in Latin America. For products sold in Latin America, check country specific warranty information contained in the packaging, call the local company or see the website for such information.
Imported by. Black & Decker (U.S.) Inc.,
701 E. Joppa Rd.
Towson, MD 21286

BlackandDecker.com
(1-800-544-6986)
Importé par.Black & Decker (U.S.) Inc., 701 E. Joppa Rd.
Towson, MD 21286

BlackandDecker.com (1-800-544-6986)
--- o DC.....corriente directa
Imported by. Black & Decker (U.S.) Inc.,
701 E. Joppa Rd.
Towson, MD 21286

BlackandDecker.com
(1-800-544-6986)