306609 - Doorbells Bearware - Free user manual and instructions
Find the device manual for free 306609 Bearware in PDF.


| Product Type | Wireless Doorbell |
| Brand | Bearware |
| Model | 306609 |
| Frequency Range | 433.05 - 434.79 MHz |
| Max Transmission Power | 4.36 dBm |
| Range | Up to 30 m (without obstacles) |
| Transmitter Power Supply | 2 CR2016 batteries (included) |
| Receiver Power Supply | 230 V, 50 Hz |
| Number of Tunes | Multiple (selectable) |
| Sound Volume | Variable (high/low) |
| Transmitter Protection Rating | IP44 |
| Mounting | Double-sided adhesive or screws (wall plugs included) |
| Pairing | Manual (volume button 5s then doorbell button) |
| Reset | Press 'Next' button for 5s |
| Package Contents | Transmitter, receiver, CR2016 batteries, instruction manual |
| Safety Instructions | Do not open, avoid water and moisture, keep out of reach of children |
| Recycling | WEEE compliant, eco-participation included |
Frequently Asked Questions - 306609 Bearware
User questions about 306609 Bearware
0 question about this device. Answer the ones you know or ask your own.
Ask a new question about this device
Download the instructions for your Doorbells in PDF format for free! Find your manual 306609 - Bearware and take your electronic device back in hand. On this page are published all the documents necessary for the use of your device. 306609 by Bearware.
USER MANUAL 306609 Bearware
Index of contents
- Deutsch .... 3
- English....10
- Français .... 16
- Italiano 23
- Español....29

ENG: Current drivers, user manuals and other relevant documents for this product can be found on our homepage.
Thank you for purchasing a BEARWARE product. Please read the following quick guide carefully so that you can enjoy your purchased device for a long time.
1. Scope of delivery
• Bell transmitter (incl. CR2016 batteries)
- Bell receiver
- Operating instructions
2. Technical data
| Frequency range 433.05 MHz - 434.79 MHz | |
| max. transmission power (e.i.r.p) | 4.36dBm |
| Transmission range up to 30m (without obstacles) | |
| Power supply | • Transmitter: 2x CR2016• Receiver: 230V 50Hz |
| Features | • Numerous ringtones• variable volume |
3. Additional information about this product
- The supplied transmitter is paired with the receiver and set to the standard ringtone. If the devices are not paired, please read the „Pairing“ chapter to pair the transmitter with the receiver and set your desired ringtone.
- It is not recommended to mount the transmitter on metal surfaces as the material can block the radio signals between the transmitter and receiver. However, if this is the only option, we recommend that you use the supplied adhesive pad instead of the supplied screws.
- The operating range will be reduced if the battery in the transmitter has a low charge level.
- It is not advisable to mount the transmitter directly outdoors without protection, as this could accelerate the ageing of the plastic.
4. Product details
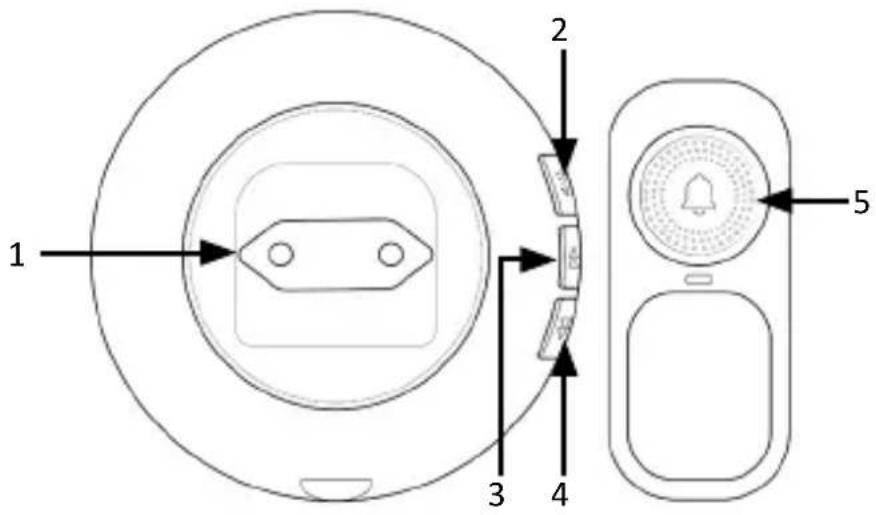
| Number Description | |
| 1 Mains connection | |
| 2 Volume button | |
| 3 "Forward" button | |
| 4 "Back" button | |
| 5 Bell button |
5. Start-up
Remove the bell transmitter and receiver from the packaging and remove all packaging material.
Plug the bell receiver into a desired and properly connected 230V socket.
The device is then ready for operation.
6. Battery change
Open the battery compartment on the back of the bell transmitter by loosening the two screws and removing the cover.
Remove the circuit board and turn it over. Then remove the batteries from the battery compartment and replace them with 2 new CR2016 batteries. Ensure that the polarity of the contacts is correct. The polarity is indicated on the battery compartment.
Reinsert the circuit board and screw the cover of the transmitter back on.
7. Setting the ringtone and volume
Volume control: Press the volume button on the receiver to switch between high and low volume.
Set the ringtone:
- Press the forward or backward button to select your favourite ringtone, the receiver will play the selected ringtone.
- Please follow the settings described in chapter 8 „Pairing“ to synchronise the new ringtone. The new ringtone is set for the last synchronised transmitter.
8. Pairing
- Please select your favourite ringtone before pairing.
- Press and hold the volume button for 5 seconds until you hear a „ding-dong“ and the LED indicator starts flashing.
- Press the „Ring“ button on the transmitter to send a signal to the receiver
- The device is then paired with the new ringtone.
Note:
- Pairing mode is cancelled automatically after pairing is complete.
- Pairing mode only takes 5 seconds.
12 English
9. Installation
Important: Test the range of the doorbell before installation.
Simply connect the receiver to a 230V socket in the desired room.
Transmitter installation method 1: Double-sided adhesive tape (preferred installation method)
-
Once you have found a suitable location, please clean the flat area where you want to attach the transmitter.
-
Tear off one side of the double-sided adhesive tape and stick it to the underside of the mounting aid. Tear off the other side and press the transmitter against the wall for approx. 10 seconds.
Transmitter installation method 2: Screws/anchors (optional installation method)
Prepare a drill, a Phillips screwdriver and a slotted screwdriver before installation.
-
Make two marks where the two fixing holes are located.
-
Drill two holes at the marked points and then insert the 2 dowels supplied.
-
Screw on the base of the transmitter.
-
Attach the transmitter to the base.
10. Reset device
Press the „Forward“ button for 5 seconds to reset the receiver to the default settings. If the receiver emits a beep and the LED flashes, this means that the reset was successful and the default settings have been restored.
11. Troubleshooting
The receiver does not emit any sound
- Check the transmitter battery and replace it if necessary.
- The receiver may be out of range of the transmitter.
- The receiver may not be paired correctly.
- Make sure that the volume control is not set to the minimum level.
The range is reduced
- Metal structures, including PVC door frames, can reduce the range of the product. Avoid mounting the transmitter or receiver on or near metal structures.
- Other devices may cause radio interference that will affect your doorbell.
- Walls and ceilings between the transmitter and receiver reduce the range.
- Weak batteries reduce the range. Replace the batteries approx. every 12-18 months.
12. Safety instructions and disclaimer
Never attempt to open the appliance to carry out repairs or modifications. Avoid contact with the mains voltage. Do not short-circuit the product. The device is not waterproof, please only use it in dry conditions. Protect it from high humidity, water and snow. Keep the device away from high temperatures.
Note: This does not apply to the push-button, which has protection class IP44!
Do not expose the appliance to sudden changes in temperature or strong vibrations, as this could damage the electronic components. Check the device for damage before use. The appliance should not be used if it has been knocked or damaged in any other way. Please observe the national regulations and restrictions. Do not use the device for purposes other than those described in the instructions. This product is not a toy. Keep it out of the reach of children or mentally impaired persons.
Any repair or modification to the appliance that is not carried out by the original supplier will invalidate the warranty or guarantee. The appliance may only be used by persons who have read and understood these instructions. The device specifications may change without prior notice.
13. Disposal instructions
According to the European WEEE Directive, electrical and electronic devices may not be disposed of with household waste. Their components must be recycled or disposed of separately, as toxic and hazardous components can cause lasting damage to the environment if disposed of incorrectly.
As a consumer, you are obliged under the Electrical and Electronic Equipment Act (ElektroG) to return electrical and electronic equipment free of charge at the end of its life to the manufacturer, the point of sale or to public collection centres set up for this purpose. Details are regulated by the respective state law. The symbol on the product, the operating instructions and/or the packaging refers to these regulations. By separating, recycling and disposing of old appliances in this way, you are making an important contribution to protecting our environment.
14. Notes on battery disposal
In connection with the sale of batteries or the delivery of devices containing batteries, the supplier is obliged to inform the customer of the following: The customer is legally obliged to return used batteries as the end user. The customer can return used batteries that the supplier carries or has carried as new batteries free of charge to the supplier's dispatch warehouse (dispatch address). The symbols shown on the batteries have the following meaning: Pb = battery contains more than 0.004 per cent lead by mass, Cd = battery contains more than 0.002 per cent cadmium by mass, Hg = battery contains more than 0.0005 per cent mercury by mass.

The crossed-out dustbin symbol means that the battery must not be disposed of with household waste.


WEEE Directive 2012/19/EU WEEE Register No.: DE 94495668
Hereby, WD Plus GmbH declares that the device 306609 is in compliance with the essential requirements and other relevant provisions of Directive 2014/53/EU. You can obtain a complete declaration of conformity from WD Plus GmbH, Wohlenbergstraße 16, 30179 Hanover, Germany
MO-FR 9:30am - 18pm CET

downloads.ganzeinfach.de
WD Plus GmbH

- Index of contents
- Scope of delivery
- Technical data
- Additional information about this product
- Product details
- Start-up
- Battery change
- Setting the ringtone and volume
- Set the ringtone:
- Pairing
- Note:
- English
- Installation
- Transmitter installation method 1: Double-sided adhesive tape (preferred installation method)
- Transmitter installation method 2: Screws/anchors (optional installation method)
- Reset device
- Troubleshooting
- The receiver does not emit any sound
- The range is reduced
- Safety instructions and disclaimer
- Disposal instructions
- Notes on battery disposal
Brand : Bearware
Model : 306609
Category : Doorbells